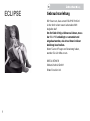
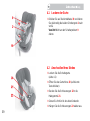
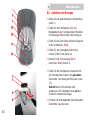
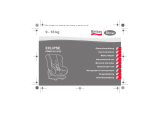
Britax Eclipse Le manuel du propriétaire
- Catégorie
- Siège de voiture
- Taper
- Le manuel du propriétaire
Ce manuel convient également à
La page est en cours de chargement...

2
Mode d'emploi
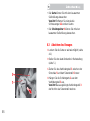
Nous sommes heureux que notre siège auto
ECLIPSE puisse accompagner votre enfant en
toute sécurité pendant un nouveau chapitre de sa
vie.
Pour protéger efficacement votre enfant, le
siège auto ECLIPSE doit impérativement être
utilisé et installé de la manière décrite dans le
présent mode d’emploi.
Pour toute question complémentaire, n'hésitez pas
à nous contacter.
BRITAX RÖMER
Kindersicherheit GmbH
Britax Excelsior Ltd.
User instructions
We are pleased that our ECLIPSE may accompany
your child safely through a new stage of his or her
life.
In order to protect your child correctly, the
ECLIPSE must always be used and installed as
described in these instructions.
If you have any further questions regarding its use,
please feel free to contact us.
BRITAX RÖMER
Kindersicherheit GmbH
Britax Excelsior Ltd.
La page est en cours de chargement...

4
Contents
1. Suitability .............................................................8
2. Use in the vehicle ..............................................10
3. Installation in the vehicle .................................12
3.1 Adjusting the shoulder straps ......................14
3.2 Installing the child safety seat with
3-point belt ..................................................20
3.3 Removing the child safety seat with 3-point
belt ..............................................................26
3.4 To correctly install your child safety seat
using the 3-point belt ..................................26
3.5 Installing the child safety seat with
2-point belt ..................................................30
3.6 Removing the child safety seat with 2-point
belt ..............................................................34
3.7 To correctly install your child safety seat
using the 2-point belt ...................................36
4. Securing your child ..........................................38
4.1 Loosening the harness................................ 40
4.2 Securing your child .....................................40
4.3 Tightening the harness ................................44
4.4 Checklist to ensure that your child is
buckled up correctly ....................................44
5. Reclining position of the child safety seat .....46
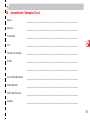
Table des matières
1. Habilitation ..........................................................8
2. Utilisation dans le véhicule .............................10
3. Montage dans le véhicule ................................ 12
3.1 Adaptation des bretelles .............................14
3.2 Montage du siège auto
avec une ceinture à 3 points .......................20
3.3 Démontage du siège auto
avec une ceinture à 3 points .......................26
3.4 Comment savoir si votre siège auto est
correctement monté avec la ceinture à 3
points ..........................................................26
3.5 Montage du siège auto
avec une ceinture à 2 points .......................30
3.6 Démontage du siège auto
avec une ceinture à 2 points .......................34
3.7 Comment savoir si votre siège auto est
correctement monté avec la ceinture à 2
points ..........................................................36
4. Protection de votre enfant ............................... 38
4.1 Desserrage des sangles .............................40
4.2 Attacher votre enfant ..................................40
4.3 Serrage des sangles ...................................44
4.4 Comment savoir si votre enfant est bien
protégé .......................................................44
5. Position de couchage du siège auto ..............46
La page est en cours de chargement...

6
6. Care instructions ..............................................46
6.1 Care for the harness buckle ........................48
6.2 Cleaning ......................................................54
6.3 Removing the cover ....................................56
6.4 Removing the harness ................................60
6.5 Installing the harness ..................................62
6.6 Re-fitting the cover ......................................64
7. Notes regarding disposal .................................68
8. Next child safety seat .......................................70
9. 2-year warranty .................................................70
10. Warranty Card / Transfer Check ......................78
6. Consignes d'entretien...................................... 46
6.1 Entretien du fermoir de ceinture .................48
6.2 Nettoyage ................................................... 54
6.3 Retrait de la housse ....................................56
6.4 Démontage des sangles .............................60
6.5 Montage des sangles .................................62
6.6 Remise en place de la housse ...................64
7. Remarques relatives à l'élimination ................68
8. Sièges ultérieurs ............................................... 70
9. 2 ans de garantie .............................................. 70
10. Carte de garantie / Procès-verbal de remise ..80
La page est en cours de chargement...

8
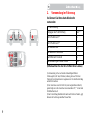
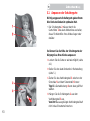
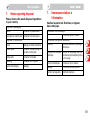
1. Habilitation
Homologation
*ECE = norme européenne pour les équipements de sécurité
• Ce siège auto est conçu, contrôlé et homologué
conformément aux exigences de la norme
européenne pour les équipements de sécurité
pour enfants (ECE R 44/04). Le signe de
contrôle E (dans un cercle) et le numéro
d'homologation se trouvent sur l'étiquette
d'homologation (autocollant sur le siège auto).
Le siège auto perd son homologation dès
que vous réalisez des modifications. Toute
modification doit exclusivement être réalisée
par le fabricant.
• Le siège auto ECLIPSE est exclusivement
réservé à l'installation sécuritaire de votre enfant
dans votre véhicule. Il ne convient en aucun cas
à un usage domestique en tant que siège ou
jouet.
Siège auto Britax/
RÖMER
Examen et homologation selon
ECE* R 44/04
Groupe Poids
ECLIPSE
I 9 à 18 kg
1. Suitability
Approval
*ECE = European Standard for Child Safety Equipment
• The child safety seat has been designed, tested
and certified to the requirements of the European
Standard for Child Safety Equipment (ECE R 44/
04). The seal of approval E (in a circle) and the
approval number are located on the approval
label (sticker on the child safety seat).
This approval will be invalidated if you make
any modifications to the child safety seat.
Only the manufacturer is permitted to make
modifications to the child safety seat.
•Use the ECLIPSE exclusively for securing your
child in your vehicle. It is in no way suitable as a
seat or toy in the home.
Britax / RÖMER
child safety seat
Tested and certified according to
ECE* R 44/04
Group Body weight
ECLIPSE
I 9 to 18 kg
La page est en cours de chargement...

10
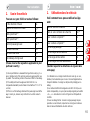
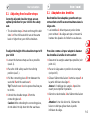
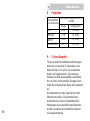
2. Use in the vehicle
You can use your child car seat as follows:
(Please observe the regulations applicable to your
particular country)
1) Use is permitted on a rearward-facing vehicle seat (e.g. in a
van or minibus) only if the vehicle seat is also approved for use
by adults. The seat may not be in the area of effect of an airbag.
2) The safety belt must be approved to ECE R 16 or a
comparable standard (see test label on belt with an "E" or "e" in
a circle).
3) If there is a front airbag: slide back the passenger seat all the
way or nearly so, observe any instructions in vehicle owner's
manual.
in the direction of travel yes
against the direction of travel
no
1)
with 2-point belt
2)
yes
with 3-point belt
2)
yes
on front passenger seat
yes
3)
on outer rear seat yes
on centre rear seat yes
on sideways-facing seats no
2. Utilisation dans le véhicule
Voici comment vous pouvez utiliser le siège
auto:
(Veuillez respecter les directives en vigueur dans
votre pays)
1) L'utilisation sur un siège orienté dos à la route (p. ex. van,
minibus) n'est autorisée que si celui-ci convient également au
transport d'adultes. Ce siège ne doit pas être protégé par un
airbag.
2) La ceinture doit être homologuée selon ECE R 16 (ou une
norme comparable), ce qui est par exemple signalé par la lettre
« E », « e » entourée d'un cercle et figurant sur l'étiquette de
contrôle.
3) Avec un airbag frontal : reculez le siège passager le plus
possible. Le cas échéant, respectez les consignes contenues
dans le manuel d'utilisation de votre véhicule.
dans le sens de la marche oui
dans le sens contraire de la marche
non
1)
avec ceinture à 2 points
2)
oui
avec ceinture à 3 points
2)
oui
sur le siège passager
oui
3)
sur les sièges arrière latéraux oui
sur le siège arrière central oui
sur les sièges orientés latéralement non
La page est en cours de chargement...

12
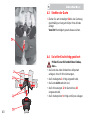
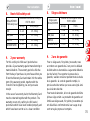
3. Montage dans le véhicule
Pour protéger tous les passagers
En cas de freinage d'urgence ou d'accident, les
objets et personnes non attachés risquent de
blesser d'autres passagers. Veuillez donc toujours
veiller à ce que…
• les dossiers des sièges du véhicule soient
verrouillés (enclenchez par exemple la
banquette arrière rabattable),
• tous les objets lourds ou à bords tranchants (par
exemple sur la lunette arrière) soient bien fixés,
• toutes les personnes aient mis leur ceinture,
• le siège auto soit toujours fixé dans la voiture
même si aucun enfant ne l'occupe.
Pour protéger votre véhicule
• Sur certaines housses de siège de véhicule
recouvertes d'une matière délicate (p. ex. velours,
cuir, etc.), l'utilisation de sièges auto risque de
laisser des traces.
3. Installation in the vehicle
For the protection of all vehicle
occupants
In the case of an emergency stop or an accident
unsecured persons or objects may cause injury to
other vehicle occupants. Please always check
that...
• The backrests of the vehicle seats are locked
(i.e. that a foldable rear seat bench latch is
engaged).
• All heavy or sharp-edged objects in the vehicle
(e.g. on the parcel shelf) are secured.
• All persons in the vehicle have their seat belts
fastened.
• The child safety seat is always secured when it is
in the vehicle, even if no child is being
transported.
To protect your vehicle
• Some vehicle seat covers of sensitive materials
(e.g. velour, leather, etc.) may develop wear
marks when child seats are used.
La page est en cours de chargement...

14
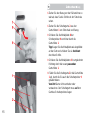
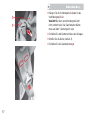
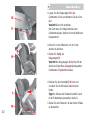
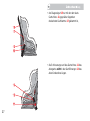
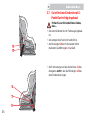
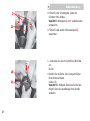
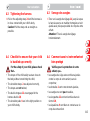
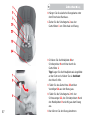
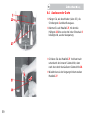
3.1 Adjusting the shoulder straps
Correctly adjusted shoulder straps ensure
optimal protection for your child in the safety
seat.
• The shoulder straps 2 must run through the belt
slots 1 of the child seat which are at the same
level or higher than your child's shoulders.
To adjust the height of the shoulder straps to fit
your child:
Þ Loosen the harness straps as far as possible
(see 4.1).
Þ Place the child safety seat in the reclining
position (see 5.).
Þ Pull the connecting piece 3 from between the
seat shell 5 and the seat base 6.
Tip! The belt cover 4 can be opened to allow you
to do this.
Þ Unhook the shoulder straps 2 from the
connecting piece 3.
Caution! After unhooking the connecting piece,
do not allow it to slip down into the seat base.
3.1 Adaptation des bretelles
Des bretelles bien adaptées garantissent que
votre enfant est efficacement maintenu dans le
siège auto.
• Les bretelles 2 doivent passer par les fentes
pour ceinture 1 du siège auto qui se trouvent à
hauteur des épaules de l'enfant ou au-dessus.
Procédez comme suit pour adapter la hauteur
des bretelles à la taille de votre enfant :
Þ Desserrez les sangles autant que possible (voir
point 4.1).
Þ Placez le siège auto en position de couchage
(voir point 5).
Þ Glissez l'élément de liaison 3 entre la coque 5 et
la partie inférieure du siège 6 .
Astuce ! L'habillage des sangles 4 peut être
ouvert pour simplifier l'opération.
Þ Décrochez les bretelles 2 de l'élément de liaison
3.
Attention ! Une fois décroché, l'élément de
liaison ne doit pas glisser dans la partie
inférieure du siège.
La page est en cours de chargement...

16
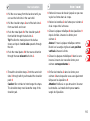
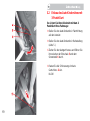
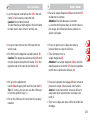
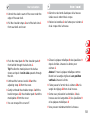
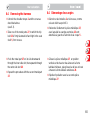
Þ Retirez la housse du dossier jusqu'à ce que vous
voyiez les fentes dans la coque.
Þ Retirez les bretelles 2 des fentes pour ceinture 1
de la coque et de la housse.
Þ Glissez la plaque métallique 8 des épaulières 9
depuis l'arrière à travers les fentes pour
ceinture 1.
Astuce ! Posez la plaque métallique comme
illustré sur la sangle et glissez-la en position
verticale à travers la fente.
Þ Glissez les plaques métalliques 8 dans le sens
inverse à travers les nouvelles fentes pour
ceinture correspondantes 1.
Þ Enfilez les bretelles 2 dans les fentes pour
ceinture 1 dans lesquelles vous avez également
fait passer les épaulières 9.
Attention ! Veillez à ne pas torsader ni inverser
les bretelles. La bretelle doit reposer sur la
sangle de l'épaulière.
Þ Pull the cover away from the backrest until you
can see the belt slots in the seat shell.
Þ Pull the shoulder straps 2 out of the belt slots 1
from seat shell and cover.
Þ Push the metal plate 8 of the shoulder pads 9
from behind through the belt slots 1.
Tip! Position the metal plate on the belt as
shown and push it on its side upwards through
the slot.
Þ Push the metal plates 8 in the reverse direction
through the new relevant belt slots 1.
Þ Thread the shoulder straps 2 into the same belt
slots 1 through which you threaded the shoulder
pads 9.
Caution! Do not twist or interchange the straps.
The shoulder strap must lie on the strap of the
shoulder pad.

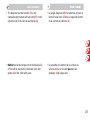
17
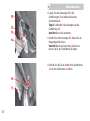
Þ Hängen Sie die Schultergurte 2 wieder in das
Verbindungsteil 3 ein.
Vorsicht! Der Gurt am Verbindungsteil darf
nicht verdreht sein. Die Garnfarbe der Nähte
muss auf allen 3 Gurten gleich sein.
Þ Schließen Sie die Klettverschlüsse des Bezuges.
Þ Straffen Sie die Gurte (siehe 4.3).
Þ Schließen Sie die Gurtabdeckung 4.
La page est en cours de chargement...

19
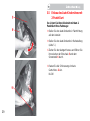
3.2 Einbau des Auto-Kindersitzes mit
3-Punkt-Gurt
So sichern Sie Ihren Kindersitz mit dem 3-
Punkt-Gurt Ihres Fahrzeugs:
Þ Stellen Sie den Auto-Kindersitz in Fahrtrichtung
auf den Autositz.
Þ Stellen Sie den Auto-Kindersitz in Ruhestellung
(siehe 5.).
Þ Ziehen Sie den Autogurt heraus und führen Sie
ihn zwischen der Sitzschale 5 und dem
Sitzunterteil 6 durch.
Þ Rasten Sie die Schlosszunge im Auto-
Gurtschloss 11 ein.
KLICK!

20
3.2 Montage du siège auto
avec une ceinture à 3 points
Pour fixer votre siège auto au moyen de la
ceinture à 3 points de votre véhicule, procédez
comme suit :
Þ Placez le siège auto sur le siège du véhicule en
l'orientant vers la route.
Þ Placez le siège auto en position de couchage
(voir point 5).
Þ Tirez sur la ceinture du véhicule et passez-la
entre la coque 5 et la partie inférieure du siège 6.
Þ Enclenchez la languette dans le fermoir de la
ceinture 11 du véhicule.
CLIC !
3.2 Installing the child safety seat with
3-point belt
To secure the child seat using the 3-point belt of
your vehicle proceed as follows:
Þ Place the child safety seat facing forward on the
vehicle seat (in the direction of travel).
Þ Place the child safety seat in the reclining
position (see 5.).
Þ Pull out the vehicle seat belt and place it
between the seat shell 5 and the seat base 6.
Þ Engage the buckle tongue in the vehicle seat
buckle 11.
CLICK!

21
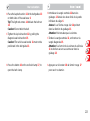
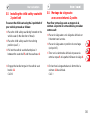
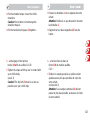
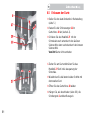
Þ Legen Sie den Beckengurt 12 in die
Gurtführungen 13 an beiden Seiten des
Sitzunterteiles 6.
Tipp! Die hellroten Pfeile 14 zeigen auf die
Gurtführung 13.
Vorsicht! Gurt nicht verdrehen.
Þ Straffen Sie den Beckengurt 12, indem Sie am
Diagonalgurt 15 ziehen.
Vorsicht! Das Auto-Gurtschloss 11 darf auf
keinen Fall in der Gurtführung 13 liegen.
Þ Drücken Sie die Taste 16 der roten Gurtklemme
17, um die Gurtklemme zu öffnen.

22
Þ Introduisez la sangle ventrale 12 dans les
guidages 13 situés des deux côtés de la partie
inférieure du siège 6.
Astuce ! Les flèches rouge clair 14 pointent
dans la direction du guidage 13.
Attention ! Ne torsadez pas la ceinture.
Þ Tendez la sangle ventrale 12, en tirant sur la
sangle diagonale 15.
Attention ! Le fermoir de la ceinture du véhicule
11 ne doit en aucun cas se trouver dans le
guidage 13.
Þ Appuyez sur le bouton 16 du fermoir rouge 17
pour ouvrir ce dernier.
Þ Place the lap belt section 12 in the belt guides 13
on both sides of the seat base 6.
Tip! The light red arrows 14 indicate the belt run
13.
Caution! Do not twist the belt.
Þ Tighten the lap belt section 12 by pulling the
diagonal seat belt section 15.
Caution! The vehicle seat buckle 11 must not be
positioned in the belt guide 13.
Þ Press the button 16 on the red belt clamp 17, to
open the belt clamp.
La page est en cours de chargement...

24
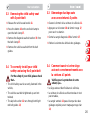
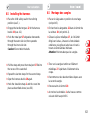
Þ Placez la sangle diagonale 15 dans le fermoir 17
et attachez la ceinture.
Attention ! Ne torsadez pas la ceinture.
La ceinture doit reposer dans le fermoir selon le
bon angle, afin d'éviter qu'elle ne gondole ou
qu'elle s'échappe.
Þ Posez un genou sur le siège auto pour le
pousser dans le siège du véhicule.
Þ Tirez fermement sur la
sangle diagonale 15.
Attention ! La sangle diagonale 15 ne doit être
attachée qu'avec le fermoir 17 situé en regard du
fermoir de la ceinture du véhicule 11.
Þ Poussez la poignée de réglage 18 vers le haut et
poussez la coque 5 de nouveau vers l'arrière.
Astuce ! Vous pouvez bien sûr aussi utiliser le
siège auto dans la position de couchage (voir
point 5).
Þ Tirez sur le siège auto pour vérifier la solidité du
montage.
Þ Lay the diagonal seat belt section 15 in the belt
clamp 17 and securely clamp the belt.
Caution! Do not twist the belt.
The belt must lay at right angles in the belt clamp
to make sure it does not arch and slip out.
Þ Use your knee to press the child seat into the
vehicle seat.
Þ Pull firmly on the diagonal seat belt section 15.
Caution! The diagonal seat belt section 15 must
only be clamped using the belt clamp 17 on the
opposite side to the vehicle seat buckle 11.
Þ Pull up on the adjustment
handle 18 and again push back the seat shell 5.
Tip! Of course, you can also use the child seat
in reclining position (see 5.).
Þ Pull on the child seat to check that it is securely
installed.

25
3.3 Ausbau des Auto- Kindersitzes mit
3-Punkt-Gurt
Þ
Öffnen Sie das Auto-Gurtschloss 11.
Þ Drücken Sie die Taste 16 der roten Gurtklemme,
um die Gurtklemme 17 zu öffnen.
Þ Nehmen Sie den Diagonalgurt 15 aus der
Gurtklemme 17.
Þ Nehmen Sie den Autogurt aus den
Gurtführungen.
3.4 So ist Ihr Auto-Kindersitz mit 3-
Punkt-Gurt richtig eingebaut
Prüfen Sie zur Sicherheit Ihres Kindes,
dass...
• der Auto-Kindersitz fest im Fahrzeug eingebaut
ist,
• der Autogurt straff und nicht verdreht ist,
• der Beckengurt 12 durch die beiden hellrot
markierten Gurtführungen 13 verläuft,

26
3.3 Démontage du siège auto
avec une ceinture à 3 points
Þ
Ouvrez le fermoir de la ceinture du véhicule 11.
Þ Appuyez sur le bouton 16 du fermoir rouge 17,
pour ouvrir ce dernier.
Þ Sortez la sangle diagonale 15 du fermoir 17.
Þ Retirez la ceinture du véhicule des guidages.
3.4 Comment savoir si votre siège
auto est correctement monté avec
la ceinture à 3 points
Vérifiez, pour la protection de votre
enfant, que...
• le siège auto est bien fixé dans le véhicule,
• la ceinture du véhicule est bien tendue et n'est
pas torsadée,
• la sangle ventrale 12 passe bien par les deux
guidages repérés par un marquage rouge clair
13,
3.3 Removing the child safety seat
with 3-point belt
Þ
Release the vehicle seat buckle 11.
Þ Press the button 16 on the red belt clamp to
open the belt clamp 17.
Þ Remove the diagonal seat belt section 15 from
the belt clamp 17.
Þ Remove the vehicle seat belt from the belt
guides.
3.4 To correctly install your child
safety seat using the 3-point belt
For the safety of your child, please check
that...
• The child safety seat is securely fastened in the
vehicle,
• The vehicle seat belt is tightened up and not
twisted,
• The lap belt section 12 runs through both light
red belt guides 13,

27
• der Diagonalgurt 15 nur mit der dem Auto-
Gurtschloss 11 gegenüber liegenden
dunkelroten Gurtklemme 17 geklemmt ist,
• die Schlosszunge und das Gurtschloss 11 des
Autogurtes nicht in den Gurtführungen 13 des
Auto-Kindersitzes liegen.
La page est en cours de chargement...

29
3.5 Einbau des Auto-Kindersitzes mit
2-Punkt-Gurt
So sichern Sie Ihren Kindersitz mit dem 2-
Punkt-Gurt Ihres Fahrzeugs:
Þ Stellen Sie den Auto-Kindersitz in Fahrtrichtung
auf den Autositz.
Þ Stellen Sie den Auto-Kindersitz in Ruhestellung
(siehe 5.).
Þ Ziehen Sie den Autogurt heraus und führen Sie
ihn zwischen der Sitzschale 5 und dem
Sitzunterteil 6 durch.
Þ Rasten Sie die Schlosszunge im Auto-
Gurtschloss 11 ein.
KLICK!

30
3.5 Installing the child safety seat with
2-point belt
To secure the child seat using the 2-point belt of
your vehicle proceed as follows:
Þ Place the child safety seat facing forward on the
vehicle seat (in the direction of travel).
Þ Place the child safety seat in the reclining
position (see 5.).
Þ Pull out the vehicle seat belt and place it
between the seat shell 5 and the seat base 6.
Þ Engage the buckle tongue in the vehicle seat
buckle 11.
CLICK!
3.5 Montage du siège auto
avec une ceinture à 2 points
Pour fixer votre siège auto au moyen de la
ceinture à 2 points de votre véhicule, procédez
comme suit :
Þ Placez le siège auto sur le siège du véhicule en
l'orientant vers la route.
Þ Placez le siège auto en position de couchage
(voir point 5).
Þ Tirez sur la ceinture du véhicule et passez-la
entre la coque 5 et la partie inférieure du siège 6.
Þ Enclenchez la languette dans le fermoir de la
ceinture 11 du véhicule.
CLIC !

31
Þ Legen Sie den Beckengurt 12 in die
Gurtführungen 13 an beiden Seiten des
Sitzunterteiles 6.
Tipp! Die hellroten Pfeile 14 zeigen auf die
Gurtführung.
Vorsicht! Gurt nicht verdrehen.
Þ Straffen Sie den Beckengurt 12 entsprechend
der Gebrauchs-anleitung Ihres Fahrzeugs.
Vorsicht! Das Auto-Gurtschloss 11 darf auf
keinen Fall in der Gurtführung 13 liegen.
La page est en cours de chargement...
La page est en cours de chargement...
La page est en cours de chargement...
La page est en cours de chargement...
La page est en cours de chargement...
La page est en cours de chargement...
La page est en cours de chargement...
La page est en cours de chargement...
La page est en cours de chargement...
La page est en cours de chargement...
La page est en cours de chargement...
La page est en cours de chargement...
La page est en cours de chargement...
La page est en cours de chargement...
La page est en cours de chargement...
La page est en cours de chargement...
La page est en cours de chargement...
La page est en cours de chargement...
La page est en cours de chargement...
La page est en cours de chargement...
La page est en cours de chargement...
La page est en cours de chargement...
La page est en cours de chargement...
La page est en cours de chargement...
La page est en cours de chargement...
La page est en cours de chargement...
La page est en cours de chargement...
La page est en cours de chargement...
La page est en cours de chargement...
La page est en cours de chargement...
La page est en cours de chargement...
La page est en cours de chargement...
La page est en cours de chargement...
La page est en cours de chargement...
La page est en cours de chargement...
La page est en cours de chargement...
La page est en cours de chargement...
La page est en cours de chargement...
La page est en cours de chargement...
La page est en cours de chargement...
La page est en cours de chargement...
La page est en cours de chargement...
La page est en cours de chargement...
La page est en cours de chargement...
La page est en cours de chargement...
La page est en cours de chargement...
La page est en cours de chargement...
La page est en cours de chargement...
La page est en cours de chargement...
La page est en cours de chargement...
-
 1
1
-
 2
2
-
 3
3
-
 4
4
-
 5
5
-
 6
6
-
 7
7
-
 8
8
-
 9
9
-
 10
10
-
 11
11
-
 12
12
-
 13
13
-
 14
14
-
 15
15
-
 16
16
-
 17
17
-
 18
18
-
 19
19
-
 20
20
-
 21
21
-
 22
22
-
 23
23
-
 24
24
-
 25
25
-
 26
26
-
 27
27
-
 28
28
-
 29
29
-
 30
30
-
 31
31
-
 32
32
-
 33
33
-
 34
34
-
 35
35
-
 36
36
-
 37
37
-
 38
38
-
 39
39
-
 40
40
-
 41
41
-
 42
42
-
 43
43
-
 44
44
-
 45
45
-
 46
46
-
 47
47
-
 48
48
-
 49
49
-
 50
50
-
 51
51
-
 52
52
-
 53
53
-
 54
54
-
 55
55
-
 56
56
-
 57
57
-
 58
58
-
 59
59
-
 60
60
-
 61
61
-
 62
62
-
 63
63
-
 64
64
-
 65
65
-
 66
66
-
 67
67
-
 68
68
-
 69
69
-
 70
70
-
 71
71
-
 72
72
-
 73
73
-
 74
74
-
 75
75
-
 76
76
-
 77
77
-
 78
78
-
 79
79
-
 80
80
-
 81
81


Britax Eclipse Le manuel du propriétaire
- Catégorie
- Siège de voiture
- Taper
- Le manuel du propriétaire
- Ce manuel convient également à
dans d''autres langues
- English: Britax Eclipse Owner's manual
- Deutsch: Britax Eclipse Bedienungsanleitung
Documents connexes
-
 Britax Romer Eclipse Group 1 Car Seat Manuel utilisateur
-
Britax-Römer First Class Si Le manuel du propriétaire
-
mothercare FIRST CLASS Manuel utilisateur
-
Britax-Römer Safefix Plus Le manuel du propriétaire
-
Britax BABY-SAFE PLUS SHR II Le manuel du propriétaire
-
-
Britax-Römer Max-Way Le manuel du propriétaire
-
-
Britax KIDFIX SL SICT Manuel utilisateur
-
Britax Kidfix Sict Le manuel du propriétaire

Autres documents
-
Römer King Plus Le manuel du propriétaire
-
-
Porsche Junior Seat ISOFIX Operating Instructions Manual
-
Kettler 8947-580 Le manuel du propriétaire
-
 Britax Romer BRITAX EVOLVA GROUP 123 CAR SEAT Manuel utilisateur
-
Hilti EXO-O1 Manuel utilisateur
-
