Nilfisk S2 Le manuel du propriétaire
- Catégorie
- Aspirateurs
- Taper
- Le manuel du propriétaire

S2
S3
C344-US-F-E
03/2010
US
F
E
INSTRUCTIONS MANUAL
MANUEL D’INSTRUCTIONS
MANUAL DE INSTRUCCIONES


S2 / S3
03/2010
1
C344
US
Table of contents
Instructions for use .........................................................................................................2
Operator safety ................................................................................................................................ 2
Operator Safety ............................................................................................................................... 2
General information for using the vacuum cleaner .......................................................................... 2
Proper uses ..................................................................................................................................... 2
Improper Use ................................................................................................................................... 3
CE Declaration of conformity ........................................................................................................... 3
General recommendations .............................................................................................................. 3
Vacuum cleaner description...........................................................................................4
Vacuum Cleaner Parts and Labels .................................................................................................. 4
Optional kits ..................................................................................................................................... 4
Accessories ..................................................................................................................................... 4
Packing and unpacking ................................................................................................................... 4
Unpacking, moving, use and storage .............................................................................................. 4
Connecting to the power supply ...................................................................................................... 5
Extensions ....................................................................................................................................... 5
Wet and dry applications ................................................................................................................. 5
Maintenance and repairs ................................................................................................................. 5
Technical Specications .................................................................................................................. 6
Controls and indicators .................................................................................................................... 7
Inspections prior to starting ............................................................................................................. 7
Starting and stopping ...................................................................................................................... 7
Vacuum cleaner operation ............................................................................................................... 7
Primary lter shaker ........................................................................................................................ 8
Emergency stopping ........................................................................................................................ 8
Emptying the dust container ............................................................................................................ 8
Plastic bag ....................................................................................................................................... 8
How to change the bag ................................................................................................................... 9
Liquids vacuuming ........................................................................................................................... 9
At the end of a cleaning session ..................................................................................................... 9
Maintenance, cleaning and decontamination ................................................................................ 10
Primary and HEPA lter disassembly and replacement ................................................................ 10
Primary lter replacement ..............................................................................................................11
HEPA lter replacement ................................................................................................................ 12
Seal inspection .............................................................................................................................. 12
Disposing of the vacuum cleaner .................................................................................................. 12
Recommended spare parts ........................................................................................................... 13
Troubleshooting ............................................................................................................14

C344
2
03/2010
S2 / S3
US
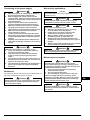
Instructions for use
GROUNDING INSTRUCTIONS
This appliance must be grounded. If it should malfunction or
breakdown, grounding provides a path of least resistance
for electric current to reduce the risk of electric shock. This
appliance is equipped with a cord that has an equipment-
grounding conductor and grounding plug. The plug must be
inserted into an appropriate outlet that is properly installed
and grounded in accordance with all local codes and
ordinances.
WARNING!
Improper connection of the equipment-grounding
conductor can result in a risk of electric shock. Check
with a qualied electrician or service person if you
are in the doubt as to whether the outlet is properly
grounded. Do not modify the plug provided with the
appliance-if it will not t the outlet, have a proper
outlet installed by a qualied electrician.
Make sure that the appliance is connected to an outlet
having the same conguration as the plug. No adapter
should be used with this appliance. If the appliance
must be reconnected for use on a different type of
electric circuit, the reconnection should be made by a
qualied service personnel.
General information for using the vacuum
cleaner
Use of the vacuum cleaner is governed by the laws in force in
the country where it is used.
Besides the operating instructions and the laws in force in
the country where the vacuum cleaner is used, the technical
regulations for ensuring safe and correct operation must also
be observed .
Do not carry out any operation that could jeopardize the safety
of people, property and the environment.
Comply with the safety indications and prescriptions in this
instruction manual.
Proper uses
This vacuum cleaner is suitable for commercial use, in hotels,
schools, hospitals, factories, shops, ofces and apartment
hotels.
This vacuum cleaner is suitable for cleaning and vacuuming
solid materials in indoor and outdoor environments.
■ Always leave enough room around the vacuum cleaner
to reach the controls easily.
The vacuum cleaner has been designed to be used by one
operator only.
This vacuum cleaner consists of an automated vacuum
unit, with a lter upstream and a container for collecting the
vacuumed material.
READ ALL THE OPERATING INSTRUCTIONS BEFORE USING
THIS APPLIANCE.
Comply with the important safety recommendations identied by the word WARNING!
Operator safety
Before starting the machine, it is absolutely essential to
read these operating instructions and to keep them on
le for consultation. The vacuum cleaner can only be
used by people who are familiar with the way it works
and who have been explicitly authorized and trained for
the purpose. Before using the vacuum cleaner, operators
must be informed, instructed and trained on how to
work it and for which substances its usage is permitted
including the safe method for removing and disposing of
the vacuumed material.
IMPORTANT SAFETY INSTRUCTIONS
Operator Safety
To reduce the risk of re, electric shock, or injury:
■ Do not leave appliance when plugged in. Unplug from
outlet when not in use and before servicing.
■ To reduce the risk of electrical shock, do not use
outdoors or on wet surfaces.
■ Do not allow this appliance to be used as a toy. This
machine is for adult-use only.
■ Use only as described in this manual. Use only the
manufacturer’s recommended attachments.
■ Do not use with damaged cord or plug. If appliance is
not working as it should, has been dropped, damaged,
left outdoors or dropped into water, return it to a service
center.
■ Do not pull or carry by the cord, use cord as a handle,
close a door on cord, or pull cord around sharp edges or
corners. Do not run the appliance over the cord. Keep
cord away from heated surfaces.
■ Do not unplug by pulling on cord. To unplug, grasp the
plug, not the cord.
■ Do not handle plug, cord or appliance with wet hands.
■ Do not put any object into the openings. Do not use with
any opening blocked; keep free from dust, lint, hair, and
anything that may reduce airow.
■ Keep hair, loose clothing, ngers, and all parts of the
body away from openings and moving parts.
■ Turn off all controls before unplugging.
■ Use extra care when cleaning stairs.
■ Do not use to pick up ammable or combustible liquids
such as gasoline or use in areas where they may be
present.
■ Do not pick up anything that is burning or smoking, such
as cigarettes, matches, or hot ashes, or any hazardous
dusts.
■ Do not use without dust bag/or lters in place.
■ Connect to a properly grounded outlet only. See
grounding instructions.
SAVE THESE INSTRUCTIONS

S2 / S3
03/2010
3
C344
US
Improper Use
WARNING!
The following use of the vacuum cleaner is strictly
forbidden:
■ Outdoors in case of atmospheric precipitation.
■ When placed on uneven surfaces.
■ When the ltering unit is not installed.
■ When the vacuum inlet and/or hose are placed on
parts of the human body.
■ Use without the cover on the vacuum unit.
■ When the dust bag is not installed.
■ Use without the guards, protective covers and
safety systems installed by the manufacturer.
■ When the cooling vents are partially or totally
clogged.
■ When the vacuum cleaner is covered with plastic
or fabric sheets.
■ Use with the air outlet partially or totally closed.
■ When used in narrow areas where there is no
fresh air.
■ Vacuuming liquids with vacuum cleaners without
liquid level monitoring function.
■ Vacuuming the following materials:
1. Burning materials (embers, hot ashes, lit
cigarettes, etc.).
2. Naked ames.
3. Combustible gas.
4. Flammable liquids, aggressive fuels (gasoline,
solvents, acids, alkaline solutions, etc.).
5. Explosive dust/substances and/or ones liable
to ignite in a spontaneous way (such as
magnesium or aluminium dusts, etc.).
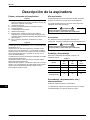
Versions
HEPA
This vacuum cleaner can be equipped with a HEPA
lter for vacuuming dust hazardous to one’s health.
The procedures for servicing and emptying the vacuum
cleaner including removing the dust container, must
only be performed by specialised personnel wearing
protective clothing. Do not use without the complete lter
system in place.
[ NOTE ]
■■ In■the■case■of■dust■harmful■to■health,■contact■the■local■
health■and■safety■authorities,■and■observe■national■
regulations■in■force■both■during■use■and■disposal.
■■ Radioactive■substances■are■not■included■in■the■
denition■of■the■type■of■dust■harmful■to■health■
described■above.
LIQUIDS COLLECTION
This vacuum cleaner can also be produced in a version for
vacuuming liquids, with level monitoring function.
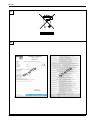
CE Declaration of conformity
Every vacuum cleaner comes with a CE Declaration of
conformity. See facsimile in g. 20.
[ NOTE ]
The■Declaration■of■conformity■is■an■important■document■
and■should■be■kept■in■a■safe■place■to■be■presented■to■the■
Authorities■on■request.
General recommendations
WARNING!
The vacuum cleaner can only be used when it is
certain that active sources of ignition are not going to
be vacuumed.
Do not vacuum the following materials: burning
materials (hot ashes, lighted cigarettes, etc.),
ammable liquids, aggressive fuels (e.g. gasoline,
solvents, acids, alkaline solutions, etc.).
Do not vacuum the following materials: explosive
dusts or ones liable to ignite spontaneously (such as
magnesium or aluminium dusts, etc.).
The vacuum cleaner is not suitable for vacuuming
explosive or similar substances, as established by the
laws governing explosive substances, particularly:
liquid fuels and mixtures of ammable dusts and
liquids.
WARNING!
If an emergency situation occurs:
■ Filter breakage
■ Fire outbreak
■ Short-circuit
■ Motor block
■ Electric shock
■ Etc.
Turn the vacuum cleaner off, unplug it and request
assistance from qualied personnel.
[ NOTE ]
Check■the■place■of■work■and■substances■tolerated■for■the■
vacuum■cleaner■suitable■for■liquids.
WARNING!
The vacuum cleaners must not be used or stored
outdoors, or in damp places.
Only versions with the level sensor can be used for
liquids, if not, they can only be used to vacuum dry
materials.
DANGER !
Version for liquids.
If foam or liquid leaks out of the vacuum cleaner, turn
it off immediately, unplug it and contact qualied
personnel for assistance.

C344
4
03/2010
S2 / S3
US
Vacuum cleaner description
Optional kits
Please contact the manufacturer’s sales network for
information on optionals.
Instructions for installing the optionals are included in the
conversion kit.
WARNING!
Use only supplied and authorized genuine spare parts.
Accessories
Various accessories are available; refer to the manufacturer’s
accessory catalogue.
WARNING!
Use only genuine accessories supplied and
authorized by the manufacturer.
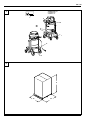
Packing and unpacking
Dispose of the packing materials in compliance with the laws
in force.
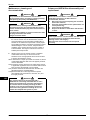
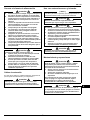
Figure 3
Model
S2
(50L)
S3
(50L)
S3
(100 L)
A (in) 27.6 27.6 27.6
B (in) 33.9 33.9 33.9
C (in) 68.9 68.9 68.9
Weight with
packaging (lbs.)
176 190 196
Unpacking, moving, use and storage
Operate on at, horizontal surfaces.
The load-bearing capacity of the surface the vacuum cleaner
is placed on must be suitable for bearing its weight).
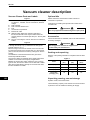
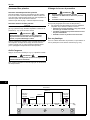
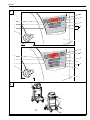
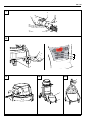
Vacuum Cleaner Parts and Labels
Figure 1
1. Model code, Technical Specications (see table on page
6), Serial N°., CE Mark, Year of manufacture, Nominal
voltage.
2. Dust container
3. Dust container release lever
4. Inlet
7. Accessories compartment
9. Exhaust air outlet
10. Attention plate: Draws the operator’s attention to
the fact that the lter must only be shaken when the
vacuum cleaner is turned off (see also par. “Primary lter
shaker”).
11. Plug for connecting the vacuum cleaner to an electrical
socket.
Figure 2
This vacuum cleaner creates a strong air ow which is drawn
in through the inlet (4 - Fig. 1) and blown out through the
exhaust outlet (9 - Fig. 1).
Before turning on the vacuum cleaner, t the vacuum hose
into the inlet and then t the required tool on to the end part
(refer to the manufacturer’s accessory catalogue or Service
Centre).
The diameters of the authorized hoses are given in the
technical specications table.
The vacuum cleaner is equipped with a primary lter which
enables it to be used for the majority of applications.
Besides the primary lter, which retains the most common
types of dust, the vacuum cleaner can be tted with a HEPA
lter with a higher ltering capacity for ne dusts and dusts
that are hazardous to health.

S2 / S3
03/2010
5
C344
US
Connecting to the power supply
WARNING!
■ Make sure there is no evident sign of damage to
the vacuum cleaner before starting work.
■ Before plugging the vacuum cleaner into the
electrical mains, make sure that the voltage rating
indicated on the data plate corresponds to that of
the electrical mains.
■ Plug the vacuum cleaner into a socket with a
correctly installed ground contact/connection.
■ Make sure that the vacuum cleaner is turned off.
■ The plugs and connectors of the connection
cables must be protected against splashed water.
■ Make sure that connections to the electrical
mains and plug are correct.
■ Use the vacuum cleaners only when the cables
that connect to the electrical mains are in perfect
condition (damaged cables could lead to electric
shocks!).
■ Regularly check that the electric cable does not
show signs of damage, excessive wear, cracks or
ageing.
WARNING!
When the vacuum cleaner is operating, do not:
■ Crush, pull, damage or tread on the cable that
connects to the electrical mains.
■ Only disconnect the cable from the electrical
mains by removing the plug (do not pull the
cable).
■ Only replace the electric power cable with one of
the same type as the original: SJT. The same rule
applies if an extension is used.
■ The cable must be replaced by the manufacturer’s
Service Centre staff or by equivalent qualied
personnel.
Extensions
If an extension cable is used, make sure it is sized properly for
the power requirements of the vacuum cleaner.
WARNING!
Never spray water on the vacuum cleaner: this could
be dangerous for persons exposed and could short
circuit the power supply.
Wet and dry applications
[ NOTE ]
The■supplied■lters■and■the■bag■(if■applicable)■must■be■
installed■correctly.
WARNING!
Comply with the safety regulations governing the
materials for which the vacuum cleaner is used.
WARNING!
If the version for liquids is used:
■ Make sure the liquid level sensor is working
correctly before vacuuming liquids.
■ If foam forms, turn off the vacuum cleaner
immediately and empty the container.
■ Warning: Switch off the vacuum cleaner
immediately if foam or liquid leaks out.
■ Regularly clean the liquid level limiting device
and check to make sure that there are no signs of
damage.
■ Warning: dirty liquid vacuumed up by the vacuum
cleaner must be considered conductive.
WARNING!
When vacuuming a mix of water and air, take care to
avoid overloading the motor of the vacuum unit.
Maintenance and repairs
WARNING!
Disconnect the vacuum cleaner from its power
source before cleaning, servicing, replacing parts or
converting it to another version/variant, the plug must
be disconnected from the socket.
■ Carry out only the maintenance operations
described in this manual.
■ Use only original spare parts.
■ Do not modify the vacuum cleaner in any way.
Failure to comply with these instructions could
jeopardize your safety. Moreover, such action would
immediately make the EC declaration of conformity
issued with the vacuum cleaner void.
WARNING!
Contact manufacturer’s technical service or sales
network for maintenance operations not described in
this manual.

C344
6
03/2010
S2 / S3
US
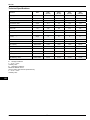
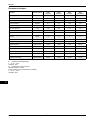
Technical Specications
Parameter Units
S2N1
(50 liter)
S2N6
(50 liter)
S3N1
(50 liter)
S3N1
(100 liter)
Voltage @ 60Hz Volts 120 120 120 120
Type of Power No. of phases 1 1 1 1
Power, max kW 2 1.6 2.4 2.4
Current Draw, rated Amps 14.5 11.5 15.8 15.8
Waterlift, max Inches H2O 83.1 71.5 71.5 71.5
Airow, max cfm 198 180 270 270
Filter Area, main Sq. ft 21 21 21 21
Filter Area, optional HEPA Sq. ft 37.7 37.7 37.7 37.7
Noise Level, @ 3’ 3”
(1 meter)
dB(A) 70 70 71 71
Protection Class IP 44 44 44 44
Insulation Class Class F F F F
Tank Capacity Gallons/liters 13/50 13/50 13/50 26/100
Machine Inlet Inches 3 3 3 3
Dimensions (l x w x h) Inches 31.5 x 23.6 x 51.2 31.5 x 23.6 x 51.2 31.5 x 23.6 x 51.2 31.5 x 23.6 x 62.2
Weight lbs. 139 139 150 157
Cord Length ft 30 30 30 30
Filter efciency, HEPA MPPS tested
99.995% @ 0.18
micron
99.995% @ 0.18
micron
99.995% @ 0.18
micron
99.995% @ 0.18
micron
■ Storage conditions:
T : -10°C ÷ +40°C
Humidity: 85%
■ Operating conditions:
Maximum altitude: 800 m
(Up to 2,000 m with reduced performances)
T : -10°C ÷ +40°C
Humidity: 85%

S2 / S3
03/2010
7
C344
US
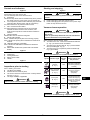
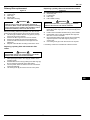
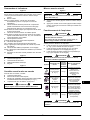
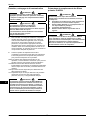
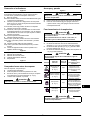
Controls and indicators
Figure 5
2. Start/Stop indicator and button
If the indicator is lit, the motor is ON.
You can start/stop each motor with this button.
5. Stop button
This button stops all the motors simultaneously when pressed
(but doesn’t turn the power of the vacuum cleaner off).
6. Low compressor pressure alarm indicator (only used with
automatic lter cleaning option with air compressor)
If lit, this indicates low air pressure inside air tank
7. Max. vacuumed level indicator
If lit, this indicates the maximum level of the vacuumed
material has been reached in the container, if the
level control for liquids or solids has been installed on
machine.
8. Voltage indicator
Indicates the vacuum cleaner is energized.
9. Primary lter indicator
Green - Indicates the primary lter is functioning properly.
Red - Indicates the primary lter is blocked and needs to be
cleaned.
10. HEPA lter indicator (if installed)
Red - Indicates the HEPA lter is blocked and should be
replaced.
11. Manual lter shaker knob (models with manual lter
shaker)
Figure 6
1. Dust Container release lever
2. Castor lever
3. Closing band lever
5. Electric power cable
6. Handle
Figure 7
1. Inlet
Inspections prior to starting
Prior to starting, check that:
■ The lters are installed;
■ All the levers are locked in place;
■ The vacuum hose and tools have been correctly tted to
the inlet (1 - Fig.7);
■ The bag is installed, if applicable.
WARNING!
Do not use the vacuum cleaner if the lter is faulty.
Starting and stopping
Figure 8
WARNING!
Lock the castor brakes (1) before starting the vacuum
cleaner.
■ Press button (2) to start each vacuum motor
■ Press button (2) again to stop each motor or press “stop”
button to stop all motors at once.
Vacuum cleaner operation
WARNING!
The air speed in the suction tube should not be less
than 20 m/s.
If the air speed drops below this rate, the red indicator
light will illuminate on the primary lter.
When using the vacuum cleaner, check:
■ The state of the max. vacuumed material level indicator
(7 - Fig. 5) if the level check is installed.
■ The state of the primary lter (9 - Fig. 5) and the HEPA
lter (if installed) (10 - Fig. 5).
■ The state of the low compressor pressure indicator (6 -
Fig. 5) (if installed).
WARNING!
If one of the indicators is lit, follow the instructions.
Symbol Indicator signal
Indicator
color
Vacuum cleaner state
and procedure
bar/psi
MAX
Low compressor
pressure
(6 - Fig. 5)
Red
Suction stopped.
Check the compressor
is functioning properly (if
installed).
bar/psi
MAX
Max. vacuumed
material level
(7 - Fig. 5)
Red
Suction stopped.
Empty the container
(See relevant
paragraph).
bar/psi
MAX
Primary lter
(9 - Fig. 5)
Red
Suction on.
Use the primary lter
shaker after stopping
the vacuum cleaner (on
models with a manual
lter shaker).
bar/psi
MAX
HEPA lter
(10 - Fig. 5)
Red
Suction on.
Change HEPA lter
(See relevant
paragraph).
WARNING!
Consult the “Troubleshooting” chapter if faults occur.

C344
8
03/2010
S2 / S3
US
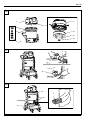
Emptying the dust container
WARNING!
■ Before proceeding with these operations, turn the
vacuum cleaner off and disconnect the plug from
the power socket.
■ Check the class of the vacuum cleaner.
Before emptying the container it is advisable to clean the lter
(see “Primary lter shaker”).
■ Machines without HEPA lters are not suitable for
vacuuming hazardous dust
▪ Release dust container (1, Fig. 10), with lever (2),
then remove and empty it.
▪ Make sure the seal is in good condition and
correctly positioned.
▪ Place the container back in position and secure it
again.
Plastic bag
You can use the plastic bags supplied by our sales network
(Fig. 10A) as an alternate collection means.
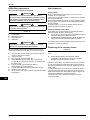
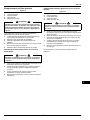
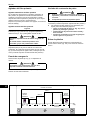
Primary lter shaker
Automatic primary lter shaker
On models with an automatic primary lter shaker, the lter
shaker will be automatically activated at the start and end of
the operating cycle, respectively after starting the vacuum
cleaner and after all the motors have stopped.
Diagram A (see bottom of page - work phase sequence).
Manual primary lter shaker
Figure 9
In relation to the quantity of material vacuumed and if indicator
(9 - Fig. 5) is red, turn the vacuum cleaner off and use knob
(1 - Fig. 9) of the manual lter shaker.
WARNING!
Stop the vacuum cleaner before using the lter shaker.
Do not shake the lter while the vacuum cleaner is on,
as this could damage the lter.
Wait before restarting the vacuum cleaner, to allow the dust to
settle. Replace the lter element if the indicator remains red
(9 - Fig. 5) even after the lter has been shaken (consult the
“Primary lter replacement” paragraph).
Emergency stopping
Press Stop button (5 - Fig. 5). The vacuum cleaner stops.
WARNING!
The motors and internal components of the vacuum
cleaner will still be electrically powered.
To start the vacuum cleaner again, press the buttons of each
single motor.
10
10 T (s)
2 2 2
STOP
0
I
0
I
0
I
A diagram
Power input
Motor 3
Motor 2
Motor 1
Automatic
lter shaker
Automatic
lter shaker
Stop motors
Operating
time

S2 / S3
03/2010
9
C344
US
How to change the bag
WARNING!
■ These operations can only be carried out by
trained and qualied personnel who must wear
adequate clothing, in compliance with the laws in
force.
■ Take care not to raise dust during these
operations. Wear a protective mask.
■ In case of dangerous and/or toxic dust, you must
use the supplied safety bag for these certied
vacuum cleaners.
■ The bag must only be disposed of by qualied
personnel and in compliance with the laws in
force.
Liquids vacuuming
WARNING!
Make sure that the vacuum cleaner is equipped with a
liquid level sensor and is suitable for vacuum liquids.
■ The lter element will be wet after liquids have been
vacuumed.
A wet lter element can quickly become clogged if the vacuum
cleaner is then used to vacuum dry substances.
For this reason, make sure that the lter element is dry or
replace it with another one before using the vacuum
cleaner for dry materials.
At the end of a cleaning session
■ Turn the vacuum cleaner off and disconnect the plug
from the socket.
■ Wind the connection cable up and hang it in the relevant
compartment (Fig. 13).
■ Empty the container as described in the “Emptying the
container” paragraph.
■ Clean the vacuum cleaner as described in the paragraph
“Maintenance, cleaning and decontamination”.
■ Wash the container with clean water if aggressive
substances have been vacuumed.
■ Store the vacuum cleaner in a dry place, out of reach of
unauthorized persons.

C344
10
03/2010
S2 / S3
US
Maintenance, cleaning and
decontamination
WARNING!
The precautions described below must be taken
during all maintenance operations, including cleaning
and replacing the primary and HEPA lters.
WARNING!
The maintenance, cleaning and decontamination
operations must only be performed with the vacuum
cleaner turned off and the plug disconnected from the
power socket.
It is absolutely forbidden to perform maintenance with
the plug connected to the socket.
Danger of electric shock!
■ If the user is performing the maintenance operations,
the vacuum cleaner must be disassembled, cleaned
and overhauled as far as reasonably possible without
hazards for the maintenance personnel or other people.
The suitable precautions include decontamination before
disassembling the vacuum cleaner, adequate ltered
ventilation of the exhaust air from the room in which it
is disassembled, cleaning the maintenance area and
suitable personal protection.
■ All parts of the vacuum cleaner must be considered
contaminated when they are removed from the
hazardous zone and appropriate actions must be taken
to prevent the dispersion of dust.
When maintenance or repair procedure are carried out, all the
contaminated elements that cannot be properly cleaned,
must be eliminated.
These elements must be disposed of in sealed bags conform
to applicable regulations and in accordance with the local
laws governing the disposal of such material.
This procedure must also be followed when the lters are
eliminated (primary and HEPA lters).
Compartments that are not dust-tight must be opened
with suitable tools (screwdrivers, wrenches, etc.) and
thoroughly cleaned.
WARNING!
This vacuum cleaner can be equipped with a
HEPA lter for vacuuming dust hazardous to one’s
health. The procedures for servicing and emptying
the vacuum cleaner including removing the dust
container, must only be performed by specialised
personnel wearing protective clothing. Do not use
without the complete lter system in place.
Primary and HEPA lter disassembly and
replacement
WARNING!
When the vacuum cleaner is used to vacuum
hazardous substances, the lters become
contaminated, therefore:
■ Work with care and avoid spilling the vacuumed
dust and/or material;
■ Place the disassembled and/or replaced lter in a
sealed plastic bag;
■ Close the bag hermetically;
■ Dispose of the lter in accordance with the laws
in force.
WARNING!
Filter replacement is a serious matter. The lter must
be replaced with one of identical characteristics,
ltering surface and category.
Otherwise the vacuum cleaner will not operate
correctly.

S2 / S3
03/2010
11
C344
US
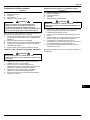
Primary lter replacement
Figure 14
1. Vacuuming unit
2. Locking lever
3. Filter cage
4. Primary lter
5. Filter shaker housing
WARNING!
Take care not to raise dust when this operation is
carried out. Wear a mask and other protective clothing
plus protective gloves suited to the hazardous nature
of the dust collected, refer to the laws in force.
Before proceeding with these operations, turn the vacuum
cleaner off and disconnect the plug from the power socket.
■ Use lever (2) to release vacuum unit (1) then pull it up
and out of the vacuum cleaner.
■ Remove the lter cage from the vacuum cleaner.
■ Remove the old lter by removing the plastic ties..
■ Fit the new lter and secure it in the cage with new
plastic ties.
■ Dispose of the old lter according to the laws in force.
Replacing a primary lter with automatic lter
shaker
WARNING!
Reassemble with care to avoid trapping your hands
between the vacuum unit and the container.
■ After replacing the lter in the cage (3), install it in the
container again.
■ Reassemble vacuum unit (1) making sure lter cage (3)
ts into shaped housing (5) of the lter shaker.
■ Turn the power switch on and the vacuum unit will self-
centre automatically.
■ Use locking lever (2) to lock the vacuum unit in place.
Replacing a primary lter with manual lter shaker
Figure 15
1. Manual lter shaker knob
2. Vacuuming unit
3. Locking lever
4. Filter cage
5. Filter shaker housing
WARNING!
Reassemble with care to avoid trapping your hands
between the vacuum unit and the container.
■ After having replaced and tted the lter in the cage,
insert lter shaker cage (4) in the shaped seat (5) of the
lter shaker.
■ Position the manual lter shaker knob (1) in the middle.
■ Reassemble vacuum unit (2) complete with cage and
lter, in the vacuum container.
■ Check the lter shaker works properly and if necessary
adjust the position of the lter cage by turning the
vacuum unit.
■ Use locking lever (3) to lock the vacuum unit in place.
If necessary contact the manufacturer’s Service Centre.

C344
12
03/2010
S2 / S3
US
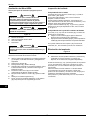
HEPA lter replacement
Version for dust harmful for the health.
WARNING!
Take care not to raise dust when this operation is
carried out. Wear a mask and other protective clothing
plus protective gloves suited to the hazardous nature
of the dust collected, refer to the laws in force.
WARNING!
Do not use the HEPA lter again after having removed
it from the vacuum cleaner.
Figure 16
1. Vacuuming unit
2. Locking lever
4. HEPA lter lock ring
5. HEPA lter disc
6. HEPA lter
WARNING!
Reassemble with care to avoid trapping your hands
between the vacuum unit and the container.
Before proceeding with these operations, turn the vacuum
cleaner off and disconnect the plug from the power socket.
■ Use lever (2) to release vacuum unit (1) then pull it up
and out of the vacuum cleaner.
■ Unscrew ring (4).
■ Pull out disc (5) and HEPA lter (6).
■ Place HEPA lter (6) in a plastic bag, close the bag
hermetically and dispose of the lter in accordance with
the laws in force.
■ Insert a new lter (6) with the same ltering
characteristics as the removed one.
■ Lock the HEPA lter with disc (5) and tighten ring (4).
■ Replace vacuum unit (1).
■ Fix the vacuum unit in place with lever (2) and lock safety
bolt (3) again.
Seal inspection
Hoses check
Make sure the connecting hoses (Fig. 17) are in a good
condition and correctly xed.
If the hoses are damaged, broken or have loose connections,
they must be replaced.
When sticky materials are treated, check for possible clogging
along the hose, in the inlet and on the bafe plate inside the
ltering chamber.
Scrape inlet (2, Fig. 17) from the outside and remove the
deposited waste as indicated in gure 17.
Filtering chamber seal check
If the gasket (1, Fig. 18) between the container (4) and the
ltering chamber (3) fails to seal properly:
■ Loosen the four screws (2) that lock the ltering chamber
(3) against the vacuum cleaner structure.
■ Allow the ltering chamber (3) to lower down and tighten the
screws (2) once it has reached the tightness position.
If an optimal seal cannot be obtained and the gasket is torn or
cracked, etc. it must be replaced.
Disposing of the vacuum cleaner
Figure 19
Dispose of the vacuum cleaner in compliance with the laws in
force.
■ Proper disposal (electric and electronic waste).
(Applicable in the European Union and in countries
providing a separate collection system)
The above symbol (Fig. 19), which is present on the product
or in its documentation, indicates that the product cannot be
disposed of together with other domestic waste at the end of
its life cycle.
To prevent damage to the environment or health caused by
improper waste disposal, please separate this product from
other waste and recycle it responsibly in order to support the
sustainable reutilization of material resources.
This product can not be disposed of together with other
commercial waste.

S2 / S3
03/2010
13
C344
US
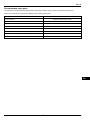
Recommended spare parts
The following is a list of spare parts that should be kept ready at hand in order to speed up maintenance operations.
Refer to the manufacturer’s spare parts catalogue when ordering spare parts.
Description P/N
Primary Filter Kit 40000338 (includes lter 8 17080)
Primary Filter Seal 8-17026
Filter Chamber Gasket 40000762
Filter Clamp 8-18079
HEPA Filter 4081700936
120V, 800W motor (models S2N6 and S3N1) 40000928
120V, 1000W motor (model S2N1 only) 40000904
Replacement carbon brush for 800W and 1000W motor 40000886

C344
14
03/2010
S2 / S3
US
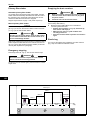
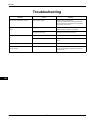
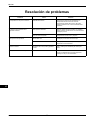
Troubleshooting
Problem Cause Remedy
The vacuum cleaner does not start Lack of power supply Check for power at the socket.
Check the condition of the socket and the cable.
Ask for assistance to be performed by a qualied
manufacturer’s technician.
The vacuum cleaner motors increase
in rpm
Clogged primary lter Use the lter shaker (models with manual lter
shaker). Replace it if this is not sufcient.
Clogged vacuum hose Check the vacuum hose and clean it.
Dust leaks from the vacuum cleaner The lter is torn Replace it with another of identical type.
Inadequate lter Replace it with another of a suitable category and
check.
Noisy motors Motor brushes (carbon) worn or broken Remove and replace the (carbon) motor brushes.
Electrostatic shock coming from the
vacuum cleaner
Non existent or insufcient grounding Check all ground connections. In particular on
the vacuum inlet tting; replace the hose with an
antistatic hose.

S2 / S3
03/2010
1
C344
F
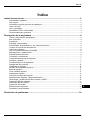
Index
Mode d’emploi .................................................................................................................2
Sécurité de l’opérateur .................................................................................................................... 2
Sécurité de l’opérateur .................................................................................................................... 2
Informations générales sur l’utilisation de l’aspirateur ..................................................................... 2
Utilisations prévues ......................................................................................................................... 2
Utilisations inappropriées ................................................................................................................ 3
Déclaration CE de conformité ......................................................................................................... 3
Recommandations générales .......................................................................................................... 3
Description de l’aspirateur .............................................................................................4
Composants et étiquettes de l’aspirateur ........................................................................................ 4
Options de transformation ............................................................................................................... 4
Accessoires ..................................................................................................................................... 4
Emballage et déballage ................................................................................................................... 4
Déballage, manutention, emploi et stockage .................................................................................. 4
Branchement au réseau d’alimentation ........................................................................................... 5
Rallonges ........................................................................................................................................ 5
Aspiration de substances sèches et de liquides .............................................................................. 5
Entretien et réparation ..................................................................................................................... 5
Données techniques ........................................................................................................................ 6
Commandes et indicateurs .............................................................................................................. 7
Contrôles avant la mise en marche ................................................................................................. 7
Mise en marche et arrêt .................................................................................................................. 7
Fonctionnement de l’aspirateur ....................................................................................................... 7
Secoueur ltre primaire ................................................................................................................... 8
Arrêt d’urgence ................................................................................................................................ 8
Vidange de la cuve à poussière ...................................................................................................... 8
Sac en plastique .............................................................................................................................. 8
Mode de remplacement des sacs ................................................................................................... 9
Aspiration de liquides ...................................................................................................................... 9
En n de poste ................................................................................................................................ 9
Entretien, nettoyage et décontamination ....................................................................................... 10
Démontage et remplacement des ltres primaire et HEPA ........................................................... 10
Remplacement du ltre primaire ....................................................................................................11
Remplacement du ltre HEPA ....................................................................................................... 12
Contrôle de l’étanchéité ................................................................................................................. 12
Mise à la ferraille de l’aspirateur .................................................................................................... 12
Pièces détachées conseillées ....................................................................................................... 13
Recherche des pannes .................................................................................................14

C344
2
03/2010
S2 / S3
F
Mode d’emploi
INSTRUCTIONS DE MISE A LA TERRE
Cet appareil doit être branché à la terre. En cas de panne,
la mise à la terre fournit au courant un chemin de moindre
résistance qui réduit le risque de choc électrique. Cet appareil
est pourvu d’un cordon muni d’un conducteur de terre et
d’une che avec broche de mise à la terre. La che doit
être branchée à une prise électrique de terre correctement
installée, appropriée et conforme aux normes et aux lois en
vigueur.
ATTENTION !
Le branchement non correct comporte le risque
de choc électrique. Demander l’intervention d’un
électricien ou d’un technicien qualié en cas de
doutes concernant le branchement de la prise
électrique de terre. Ne pas modier la che livrée
avec la machine. Si la che ne peut pas être branchée
à la prise électrique, demander l’intervention d’un
électricien qualié pour installer une prise électrique
de terre appropriée.
Vérier que la machine soit branchée à une prise
électrique ayant la même conguration de la che.
Aucun adaptateur ne doit être utilisé avec cette
machine. S’il est nécessaire de brancher à nouveau la
machine à un circuit électrique différent, l’opération
doit être effectuée par du personnel formé.
Informations générales sur l’utilisation de
l’aspirateur
L’utilisation de l’aspirateur est soumise aux normes
internationales en vigueur.
En plus des instructions du mode d’emploi et des règlements
en vigueur dans le Pays où l’aspirateur est utilisé, pour la
prévention des accidents il est nécessaire d’observer les
règles techniques pour un travail sûr et correct.
Éviter tout travail pouvant porter atteinte à la sécurité des
gens, des choses et de l’environnement.
Observer les informations et les prescriptions de sécurité
contenues dans ce manuel d’instructions.
Utilisations prévues
Cet aspirateur convient pour l’emploi commercial, par
exemple dans des hôtels, des écoles, des hôpitaux, des
usines, des magasins, des bureaux et des résidences.
Cet aspirateur convient pour les travaux de nettoyage et de
collecte de matières solides en lieux couverts et à ciel ouvert.
■ Prévoir toujours un espace libre autour de l’aspirateur
pour permettre un accès aisé aux commandes.
La machine a été conçue pour être utilisée par un seul
opérateur.
Cet aspirateur est formé d’une unité d’aspiration motorisée,
précédée d’une unité ltrante et munie d’une cuve pour la
collecte de la matière aspirée.
LIRE TOUTES LES INSTRUCTIONS D’UTILISATION AVANT
D’UTILISER LA MACHINE.
Observer les avertissements importants de sécurité repérés par ATTENTION !
Sécurité de l’opérateur
Avant de mettre la machine en service, lire absolument
les instructions d’utilisation et les garder à portée de main
pour pouvoir les consulter en cas de besoin. L’utilisation
de l’aspirateur est réservée exclusivement au personnel
expérimenté, formé et expressément chargé du fonctionnement.
Avant l’utilisation, les opérateurs doivent être instruits et formés
à l’utilisation de l’aspirateur et des substances pour lesquelles
il doit être utilisé, y compris la méthode sûre d’évacuation et
d’élimination de la matière recueillie.
INSTRUCTIONS IMPORTANTS DE
SÉCURITÉ
Sécurité de l’opérateur
Pour réduire le risque d’incendie, chocs électriques ou blessures :
■ Ne pas laisser la machine sans surveillance lorsqu’elle
est branchée. La débrancher lorsqu’elle n’est pas utilisée
et avant toute opération d’entretien.
■ Pour réduire le risque de chocs électriques, ne pas
l’utiliser à l’extérieur ou sur des surfaces mouillées.
■ Ne pas permettre que la machine soit utilisée comme jouet.
La machine doit être utilisée exclusivement par les adultes.
■ Utiliser la machine selon les indications décrites dans le
présent manuel. Utiliser exclusivement les accessoires
recommandés par le fabricant.
■ Ne pas utiliser avec des câbles ou des ches
endommagés. Si la machine ne fonctionne pas
correctement, si elle est endommagée, laissée à
l’extérieur ou tombée dans l’eau, la porter auprès d’un
Service après-vente agréé.
■ Ne pas la tirer par le câble, ne pas utiliser le câble
comme poignée, ne pas fermer de porte sur le câble
et ne pas tirer le câble sur des surfaces ou coins
tranchants. Ne pas démarrer la machine sur le câble.
Tenir le câble loin des surfaces chaudes.
■ Ne pas tirer le câble pour débrancher la machine. Pour
débrancher la machine, saisir la che et non le câble.
■ Ne pas toucher la che, le câble ou la machine avec les
mains mouillées.
■ Ne pas insérer d’objets dans les ouvertures. Ne pas
utiliser si les ouvertures sont colmatées ; les garder
libres de poussière, lasse, poils et tout autre corps
étranger à même de réduire le ux d’air.
■ Éviter que les poils, les vêtements amples, les doigts
et les parties du corps soient entraînés dans les parties
mobiles de la machine.
■ Désactiver toutes les commandes avant de débrancher
la machine de la prise de courant.
■ Prêter particulièrement attention pendant le nettoyage
des escaliers.
■ Ne pas utiliser pour aspirer de liquides inammables ou
combustibles (par exemple, l’essence) et ne pas utiliser
dans des endroits où ils pourraient être présents.
■ Ne pas aspirer de matières ardentes (cigarettes, braises,
cendres chaudes ou poussières dangereuses).
■ Ne pas utiliser sans le sac à collecte de poussière ou le ltre.
■ Brancher exclusivement à une prise électrique de terre
adaptée. Lire les instructions de mise à la terre.
CONSERVER CES INSTRUCTIONS

S2 / S3
03/2010
3
C344
F
Utilisations inappropriées
ATTENTION !
Sont formellement interdites :
■ L’utilisation en plein air en cas de précipitations
atmosphériques.
■ L’utilisation sur des surfaces dénivelées.
■ L’utilisation sans l’unité ltrante prévue par le
fabricant.
■ L’utilisation avec l’embout et / ou le tuyau
d’aspiration tournés vers le corps humain.
■ L’utilisation sans couverture de l’unité
d’aspiration.
■ L’utilisation sans avoir installé la cuve de
récupération.
■ L’utilisation sans les abris, les protections et les
dispositifs de sécurité installés par le fabricant.
■ L’utilisation de l’aspirateur en occluant
partiellement ou totalement les prises d’air de
refroidissement des composants à l’intérieur.
■ L’utilisation de l’aspirateur couvert par des toiles
en plastique ou en tissu.
■ L’utilisation avec les bouches d’échappement
d’air complètement ou partiellement fermées.
■ L’utilisation dans des endroits exigus, qui ne
permettent pas l’échange d’air.
■ L’aspiration de liquides sans le contrôle de
niveau.
■ Aspirer les matières suivantes :
1. Matières ardentes (braises, cendres chaudes,
cigarettes allumées, etc.).
2. Flammes libres.
3. Gaz combustibles.
4. Liquides inammables, combustibles
agressifs (essence, solvants, acides, solutions
alcalines, etc.).
5. Poussières / substances et / ou mélanges
explosifs et à allumage spontané (poussières
de magnésium ou d’aluminium, etc.).
Versions
FILTRE HEPA
Cet aspirateur peut être équipé du ltre HEPA pour
l’aspiration de poussières nuisibles à la santé. Les
procédures d’entretien et de vidange, y compris le
retrait de la cuve à poussière, doivent être conées
exclusivement à du personnel spécialisé, qui doit porter
un habillement protecteur. Ne pas mettre en marche sans
le système de ltration au complet.
[ REMARQUE ]
■■ En■cas■de■poussières■nuisibles■à■la■santé,■s’adresser■
aux■autorités■nationales■préposées■à■la■santé■et■la■
sécurité,■et■respecter■les■normatives■nationales■en■
vigueur■pendant■l’emploi■et■l’élimination.
■■ Les■substances■radio-actives■ne■font■par■partie■par■
dénition■du■type■de■poussières■nocives■pour■la■
santé,■décrites■plus■haut.
ASPIRATION DES LIQUIDES
Cet aspirateur peut aussi être produit en exécution pour
aspiration de liquides avec contrôle de niveau.
Déclaration CE de conformité
Tout aspirateur est accompagné de sa Déclaration CE de
conformité. Voir fac-similé g. 20.
[ REMARQUE ]
La■Déclaration■de■Conformité■est■un■document■de■la■plus■
haute■importance■qui■doit■être■conservé■avec■le■plus■
grand■soin■pour■être■disponible■en■cas■de■demande■des■
Organismes■de■contrôle.
Recommandations générales
ATTENTION !
L’aspirateur peut être utilisé seulement lorsqu’on a
vérié que de sources actives d’allumage ne seront
pas aspirées.
Ne pas aspirer les matières suivantes : matières
ardentes (cendres chaudes, cigarettes allumées,
etc.), liquides inammables, combustibles agressifs
(essence, solvants, acides, solutions alcalines, etc.).
Ne pas aspirer les matières suivantes : poussières
explosives et à allumage spontané (poussières de
magnésium ou d’aluminium, etc.).
L’aspirateur n’est pas adaptée à l’aspiration de
poussières explosives ou similaires, conformément
aux lois se référant aux substances explosives, en
particulier : combustibles liquides et mélanges de
poussières et de liquides inammables.
ATTENTION !
En cas d’émergence :
■ Rupture du ltre
■ Incendie
■ Court-circuit
■ Blocage du moteur
■ Choc électrique
■ Etc.
Éteindre l’aspirateur, débrancher la che et demander
l’intervention du personnel spécialisé.
[ REMARQUE ]
Vérier■les■substances■éventuellement■admises■et■la■zone■
de■travail■en■cas■d’aspirateur■dans■la■version■(exécution)■
pour■liquides.
ATTENTION !
Les aspirateurs ne doivent pas être utilisés ou
emmagasinés en plein air ou en présence d’humidité.
Seulement les versions à contrôle de niveau peuvent
être utilisées pour aspirer des liquides, dans le
cas contraire les aspirateurs peuvent être utilisés
uniquement pour aspirer à sec.
DANGER !
Version (exécution) pour liquides.
En cas de sortie de mousse ou de liquide, éteindre
immédiatement l’aspirateur, débrancher la che et
demander l’intervention de personnel spécialisé.

C344
4
03/2010
S2 / S3
F
Description de l’aspirateur
Options de transformation
Pour les options de transformation, veuillez contacter le
réseau commercial du fabricant.
Les instructions pour l’installation des parties en option sont
contenues dans le kit de transformation.
ATTENTION !
Utiliser uniquement des options d’origine fournies et
autorisées.
Accessoires
Plusieurs accessoires sont disponibles ; veuillez consulter le
catalogue des accessoires du constructeur.
ATTENTION !
Utiliser uniquement des accessoires d’origine fournis
et autorisés par le constructeur.
Emballage et déballage
Éliminer les matériaux de l’emballage conformément à la
législation en vigueur.
Figure 3
Modèle
S2
(50 litres)
S3
(50 litres)
S3
(100 litres)
A (pouces) 27,6 27,6 27,6
B (pouces) 33,9 33,9 33,9
C (pouces) 68,9 68,9 68,9
Poids avant
déballage (livres)
176 190 196
Déballage, manutention, emploi et
stockage
Travailler sur des surfaces plates et horizontales.
La portée du plan d’appui doit être adaptée au poids de
l’aspirateur.
Composants et étiquettes de l’aspirateur
Figure 1
1. Code modèle, données techniques (voir tableau page 6),
N° de série, marquage CE, année de fabrication, valeur
de la tension de secteur.
2. Cuve à poussière
3. Levier de décrochage cuve à poussière
4. Embout d’aspiration
7. Compartiment porte accessoires
8. Échappement air déchargé
9. Plaque d’attention : Attire l’attention de l’opérateur
en l’avertissant de la nécessité de secouer le ltre
seulement avec la machine éteinte (voir aussi le
paragraphe “Secouage du ltre primaire”).
10. Fiche pour le raccordement de l’aspirateur à la prise
électrique.
Figure 2
Cet aspirateur produit un fort ux d’air qui est aspiré par la
bouche d’aspiration (4 - Fig. 1) et est émis par le système
d’échappement (9 - Fig. 1).
Avant de mettre l’aspirateur en marche, brancher le tuyau
d’aspiration dans l’embout spécial et monter l’accessoire
adapté au travail à faire sur l’extrémité du tuyau ; veuillez
consulter le catalogue des accessoires du fabricant ou le
service après-vente.
Le diamètre des tuyaux autorisés est indiqué dans le tableau
des caractéristiques techniques.
L’aspirateur est équipé d’un ltre primaire qui permet le
fonctionnement de la plupart des applications.
En plus du ltre primaire qui retient les poussières ordinaires,
un ltre HEPA à haut pouvoir ltrant peut être monté pour les
poussières nes et nuisibles à la santé.
La page est en cours de chargement...
La page est en cours de chargement...
La page est en cours de chargement...
La page est en cours de chargement...
La page est en cours de chargement...
La page est en cours de chargement...
La page est en cours de chargement...
La page est en cours de chargement...
La page est en cours de chargement...
La page est en cours de chargement...
La page est en cours de chargement...
La page est en cours de chargement...
La page est en cours de chargement...
La page est en cours de chargement...
La page est en cours de chargement...
La page est en cours de chargement...
La page est en cours de chargement...
La page est en cours de chargement...
La page est en cours de chargement...
La page est en cours de chargement...
La page est en cours de chargement...
La page est en cours de chargement...
La page est en cours de chargement...
La page est en cours de chargement...
La page est en cours de chargement...
La page est en cours de chargement...
La page est en cours de chargement...
La page est en cours de chargement...
La page est en cours de chargement...
La page est en cours de chargement...
-
 1
1
-
 2
2
-
 3
3
-
 4
4
-
 5
5
-
 6
6
-
 7
7
-
 8
8
-
 9
9
-
 10
10
-
 11
11
-
 12
12
-
 13
13
-
 14
14
-
 15
15
-
 16
16
-
 17
17
-
 18
18
-
 19
19
-
 20
20
-
 21
21
-
 22
22
-
 23
23
-
 24
24
-
 25
25
-
 26
26
-
 27
27
-
 28
28
-
 29
29
-
 30
30
-
 31
31
-
 32
32
-
 33
33
-
 34
34
-
 35
35
-
 36
36
-
 37
37
-
 38
38
-
 39
39
-
 40
40
-
 41
41
-
 42
42
-
 43
43
-
 44
44
-
 45
45
-
 46
46
-
 47
47
-
 48
48
-
 49
49
-
 50
50


Nilfisk S2 Le manuel du propriétaire
- Catégorie
- Aspirateurs
- Taper
- Le manuel du propriétaire
dans d''autres langues
- English: Nilfisk S2 Owner's manual
- español: Nilfisk S2 El manual del propietario
Documents connexes
-
Nilfisk BDC40 H Le manuel du propriétaire
-
Nilfisk Alto ATTIX 200 TYPE 22 Le manuel du propriétaire
-
-
Nilfisk-ALTO ATTIX 125-01 Le manuel du propriétaire
-
Nilfisk 118 H Le manuel du propriétaire
-
Nilfisk-Advance ATTIX 145 Manuel utilisateur
-
-
Nilfisk-ALTO UZ 878 Manuel utilisateur
Autres documents
-
Blastrac BDC-23 Le manuel du propriétaire
-
Blastrac BDC-22-110V Le manuel du propriétaire
-
-
 Virutex AS800 Le manuel du propriétaire
-
Nilfisk-Advance S2 Manuel utilisateur
-
-
-
VWR 1000 Manuel utilisateur
