Part No 1141447 1 InTouch™ Flovair Seat
For more information regarding Invacare products, parts, and services,
please visit www.invacare.com
InTouch™ Flovair Seat
Model Nos. ITFG, ITFM
NOTE:Checkallpartsforshippingdamage.Incaseofshippingdamage,DONOTuse.
Contactcarrier/dealerforfurtherinstruction.
Toensurethesafeinstallation,operationanduseoftheFlovairseat,these
instructionsMUSTbefollowed:
WARNING
DO NOT use this equipment without first reading and understanding these
instructions. If you are unable to understand the Warnings, Cautions, and
Instructions, contact distributor before attempting to use this equipment,
otherwise, injury or damage may result.
Check all parts for shipping damage and test before use. In case of damage,
DO NOT use. Contact the distributor for further instructions.
The Flovair cushion IS NOT designed for use in the treatment of pressure
sores.
Skin condition should be checked very frequently after the installation of any
new seat.
Your therapist and physician should be consulted if you have any questions
regarding weight relief, self-examination of the skin, or individual limitations
and needs.
Make sure the hook and loop fastening straps are securely attached between
the seating surface and cushion before using.
The Flovair cushion has a weight limitation of 250 lbs for cushion widths up to
and including 20” and 350 lbs for cushion widths over 20”.
Invacare products are specifically designed and manufactured for use in
conjunction with Invacare accessories. Accessories designed by other
manufacturers have not been tested by Invacare and are not recommended
for use with Invacare products.
INSTALLATION WARNING
After ANY adjustments, repair or service and before use, make sure that all
attaching component parts are secure.
NOTE:Fluidinthepelvicpressure‐relievinginsertmayhaveatendencytomigrate
downwardifthecushionisrestingorstoredintheverticalposition.Ifthisisthecase,please
removetheouter/innercovertoinspecttheinsert.Ifmigrationhasoccured,gentlyknead
theinserttoensure
auniformvolumeoffluidexistsacrossthesurface.
Assembly, Installation and Operating Instructions
SAVE THESE INSTRUCTIONS

InTouch™ Flovair Seat 2 Part No 1141447
Important Information
Thebestwaytoavoidproblemsrelatedtopressuresoresistounderstandtheir
causesandyourroleinaskinmanagementprogram.
Yourtherapistandphysicianshouldbeconsultedifyouhavequestionsregarding
individuallimitationsandneeds.
Allseatsshouldbeselectedcarefully.Workingwithyourtherapist,andphysician
isthebestwaytoassurethataseatchoicematchesyourindividualneeds.
Astheneedsoftheindividualbecomemorecomplex,theseatevaluationbecomes
moreimportant.
Introduction
TheFlovairseatisdesignedtoprovidepelvicstability,legpositioningand
pressuremanagementforpatientswithposturalasymmetryandskinintegrity
concerns.TheFlovairseatisavailableintwodifferentcontourstosuittheamount
ofpositioningrequiredbytheuser.
Outer/Inner Covers
Theoutercoverismadefromawaterrepellentfabrictoprotectthefoam.Thetop
isfabricatedwithapatentedwaterproofstretchfabric.Thebottomisfabricated
fromaheavyweight,waterproof,non‐skidfabric.
Avaporpermeableinnercoverallowsaircirculationwhileprovidingadditional
protectionforthefoam.Regularcleaningandinspectionoftheinnerandouter
coversisrecommended.RefertoSeatInspectionandCleaningonpage 6.
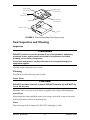
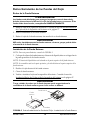
Attaching/Removing Seat To/From Seating Surface
NOTE:Forthisprocedure,refertoFIGURE 1onpage3.
NOTE:Toremovetheseatfromaseatingsurface,reversethefollowingprocedures.
NOTE:Theseatattachestotheseatingsurfaceusingthehookandloopfastenersonthe
bottomoftheseatcover.
NOTE:Theseatingsurfacecanbeoneof
thefollowing:seatupholstery,dropbaseorseat
pan.
NOTE:ThezipperontheseatshouldALWAYSfacerearward.
WARNING
Make sure the hook and loop fasteners are securely attached to the seating
surface and to the seat BEFORE using. If the seat is not secured to the seating
surface, use caution when transferring in and out of the wheelchair.

Part No 1141447 3 InTouch™ Flovair Seat
Determinewhetherseatingsurfacehasoneofthefollowingandrefer tooneofthe
followingprocedures:
• Hookattachmentstrips
• Loopattachmentstrips
•Noattachmentstrips
Hook Attachment Strips/No Attachment Strips
1. Removedoublesidedhookfrombottomofseat.
2. Alignfrontedgeofseatwithfrontedgeofseatingsurface.
3. Performoneofthefollowing:
• HookAttachmentStrips‐Securetheseattotheseatingsurface,makingsure
thatthestripsofloopontheseatcoveraresecurelyattachedtothestripsof
hookontheseatingsurface.
•NoAttachmentStrips‐Placetheseatontheseatingsurface.
Loop Attachment Strips
1. Verifythedoublesidedhookstripsaresecurelyattachedtotheloop
attachmentstripsonthebottomoftheseat.
2. Alignfrontedgeofseatwithfrontedgeofseatingsurface.
3. Securetheseattotheseatingsurface,makingsurethatthedoublesidedhook
issecurelyattachedtothestripsofloopontheseatcoverandtheseating
surface.
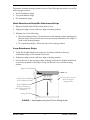
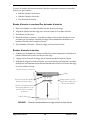
FIGURE 1 Attaching/Removing Seat To/From Seating Surface
Zipper Faces Rearward
Loop Portion of Fastening
Strap (Attached to Seat)
Double Sided Hook
Portion of Fastening
Strap (Remove backing if
necessary)
Seating Surface
Front of cushion lines up
with front edge of
seating surface
Seat

InTouch™ Flovair Seat 4 Part No 1141447
Removing/Installing Seat Covers
Removing the Outer Cover
WARNING
The covers are designed to protect the foam from moisture and to provide
fire retardency. DO NOT use the seat without either the inner or outer
cover. If the covers are torn, they must be replaced IMMEDIATELY.
1. Removetheseatfromtheseatingsurface.RefertoAttaching/RemovingSeat
To/FromSeatingSurfaceonpage 2.
2. Unziptheoutercover.
3. Removeseat,stillinsidetheinnercover,fromtheoutercover.
CAUTION
DO NOT remove both the outer cover and inner cover at the same time,
otherwise damage to the inner cover material may occur.
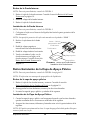
Installing Outer Cover
NOTE:Forthisprocedure,refertoFIGURE 2.
1. Positiontheseatwithinnercoverandthefluid/airinsertinplacetowardthe
rearoftheoutercover.
NOTE:Thefluid/airinsertisatthetopoftheinnercover.
NOTE:Thezipperisattherearandthestretchfabricisatthetopoftheoutercover.
2. Slidetheseatintotheoutercover.
3. Ziptheoutercoverclosed.
4. Reattachseatontoseatingsurface.RefertoAttaching/RemovingSeatTo/From
SeatingSurfaceonpage 2.
CAUTION
Use care not to snag the innercover in the outer cover zipper, or damage to
the inner cover will occur.
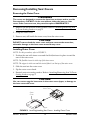
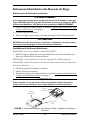
FIGURE 2 Removing/Installing Seat Covers - Installing Outer Cover
Outer
Cover
Inner Cover
Zipper
Seat

Part No 1141447 5 InTouch™ Flovair Seat
Removing Inner Cover
NOTE:Forthisprocedure,refertoFIGURE 3.
1. Removetheseatfromtheoutercover.Re fertoRemovingtheOuterCoveron
page 4.
2. Unflaptheinnercover.
3. Removetheseatfromtheinnercover.
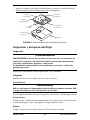
Installing Inner Cover
NOTE:Forthisprocedure,refertoFIGURE 3.
1. Positiontheseatwiththefluid/airinserttowardtherearoftheinnercover.
NOTE:Thebacksurfaceoftheseatis
marked“REAR”.
2. Slidetheseatintotheinnercover.
3. Foldthetopflapov erandtuckit
intothebottomcover.
4. Foldthebottomflapback.
5. Reinstalltheseat,withinnercover
inplace,intotheoutercover.Refer
toInstallingOuterCoveronpage 4.
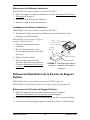
FIGURE 3 Removing Inner Cover -
Installing Inner Cover
Removing/Installing Pelvic Support Layer
NOTE:Forthisprocedure,refertoFIGURE 4onpage6.
NOTE:Theseatcomeswithafluid/airpelvicsupportlayer.
Removing Pelvic Support Layer
1. Removeseatfrominnerandoutercovers.RefertoRemoving/InstallingSeat
Coversonpage 4.
2. Unfastenthefrontstrap,therearstrap,andthetwosidestraps.
3. Lifttheexistingpelvicsupportlayerandremovefromthefoam.
Installing Pelvic Support Layer
1. Centerthepelvicsupportlayeronthefoamsothatthesidestrapsarecentered
inthecontoursoneachsideofthefoam.
2. Fastentherear,front,andsidestrapstogetheratthebottomofthefoam.
NOTE:DONOTover‐tightenthestraps.Thepelvicsupportlayermustbefreetomove
withtheseat.
3. Reinstallseatintoinnerandoutercovers.RefertoRemoving/InstallingSeat
Coversonpage 4.
Seat
Inner Cover
Insert - Toward
Rear of Inner
Cover
Top Flap
Bottom Flap

InTouch™ Flovair Seat 6 Part No 1141447
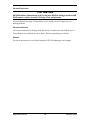
FIGURE 4 Removing/Installing Pelvic Support Layer
Seat Inspection and Cleaning
Inspection
WARNING
DO NOT continue to use this product if any of the hardware, upholstery
matierals, foams, and/or plastics are found to be deformed, corroded,
breaking, worn, and/or compressed.
Corrective maintenance can be performed at or arranged through your
equipment supplier.
Visuallyinspectallpartsonceaweek.
Cleaning
Performoneofthefollowingonceaweek:
Outer Cover
CAUTION
DO NOT use fabric softeners or bleach. DO NOT machine dry. DO NOT dry
in sun. Air dry only.
Machinewashseatcoverincoldwaterongentlecycleusingamilddetergent.
Inner Cover
Handcleanthewaterrepellentinnercoverusingasoftcloth,warmwateranda
mildsoapsolution.Rinseoffandhangdry.
Foam
Wipethefoamwithadampcloth.DONOTsubmergeorsoak.
Pelvic
Support Layer
Foam
Side Strap
Front Strap
(not shown)
Side Strap
(not shown)
Rear Strap
(not shown)
Foam Contour

Part No 1141447 7 InTouch™ Flovair Seat
LIMITED WARRANTY
PLEASE NOTE: THE WARRANTY BELOW HAS BEEN DRAFTED TO COMPLY WITH
FEDERAL LAW APPLICABLE TO PRODUCTS MANUFACTURED AFTER JULY 4, 1975.
This warranty is extended only to the original purchaser/user of our products.
This warranty gives you specific legal rights and you may also have other legal rights which
vary from state to state.
Invacare warrants its product to be free from defects in materials and workmanship for
the period of two years of use by original purchaser. All covers are warranted for 90 days
only. If within such warranty period any such product shall be proven to be defective, such
product shall be repaired or replaced, at Invacare's option. This warranty does not include
any labor or shipping charges incurred in replacement part installation or repair of any
such product. Invacare's sole obligation and your exclusive remedy under this warranty
shall be limited to such repair and/or replacement.
For warranty service, please contact the dealer from whom you purchased your Invacare
product. In the event you do not receive satisfactory warranty service, please write
directly to Invacare at the address on the back cover. Provide dealer's name, address,
model number, and the date of purchase, indicate nature of the defect and, if the product
is serialized, indicate the serial number.
Invacare Corporation will issue a return authorization. The defective unit or parts must be
returned for warranty inspection using the serial number, when applicable, as
identification within thirty days of return authorization date. DO NOT return products to
our factory without our prior consent. C.O.D. shipments will be refused; please prepay
shipping charges.
LIMITATIONS AND EXCLUSIONS: THE FOREGOING WARRANTY SHALL NOT
APPLY TO SERIAL NUMBERED PRODUCTS IF THE SERIAL NUMBER HAS BEEN
REMOVED OR DEFACED, PRODUCTS SUBJECT TO NEGLIGENCE, ACCIDENT,
IMPROPER OPERATION, MAINTENANCE OR STORAGE, COMMERCIAL OR
INSTITUTIONAL USE, PRODUCTS MODIFIED WITHOUT INVACARE'S EXPRESS
WRITTEN CONSENT INCLUDING, BUT NOT LIMITED TO, MODIFICATION
THROUGH THE USE OF UNAUTHORIZED PARTS OR ATTACHMENTS; PRODUCTS
DAMAGED BY REASON OF REPAIRS MADE TO ANY COMPONENT WITHOUT THE
SPECIFIC CONSENT OF INVACARE, OR TO A PRODUCT DAMAGED BY
CIRCUMSTANCES BEYOND INVACARE'S CONTROL, AND SUCH EVALUATION
WILL BE SOLELY DETERMINED BY INVACARE. THE WARRANTY SHALL NOT
APPLY TO PROBLEMS ARISING FROM NORMAL WEAR OR FAILURE TO ADHERE
TO THESE INSTRUCTIONS.
THE FOREGOING EXPRESS WARRANTY IS EXCLUSIVE AND IN LIEU OF ANY
OTHER WARRANTIES WHATSOEVER, WHETHER EXPRESS OR IMPLIED,
INCLUDING THE IMPLIED WARRANTIES OF MERCHANTABILITY AND FITNESS
FOR A PARTICULAR PURPOSE, AND THE SOLE REMEDY FOR VIOLATIONS OF
ANY WARRANTY WHATSOEVER, SHALL BE LIMITED TO REPAIR OR
REPLACEMENT OF THE DEFECTIVE PRODUCT PURSUANT TO THE TERMS
CONTAINED HEREIN, THE APPLICATION OF ANY IMPLIED WARRANTY
WHATSOEVER SHALL NOT EXTEND BEYOND THE DURATION OF THE EXPRESS
WARRANTY PROVIDED HEREIN. INVACARE SHALL NOT BE LIABLE FOR ANY
CONSEQUENTIAL OR INCIDENTAL DAMAGES WHATSOEVER.
THIS WARRANTY SHALL BE EXTENDED TO COMPLY WITH STATE/PROVINCIAL
LAWS AND REQUIREMENTS.

Siège Flovair InTouch™ 8 Part No 1141447
Pour plus de renseignements sur les produits, les pièces et les services de
Invacare, visiter le site web www.invacare.com
Siège Flovair InTouch™
Modèles No. ITFG, ITFM
REMARQUE:Vérifieztouteslespiècesqu’ellesn’aientpassubitdedégâtsdurantle
transport.Lecaséchéant,NEPA Sutiliser.ContactezleTransporteur/Invacarepour
obtenirdesinstructions.
PourassureruneinstallationetunusagecorrectetsansdangerdusiègeFlovair,il
estINDISPENSABLEderespectercesinstructions:
AVERTISSEMENT
NE PAS utiliser cet équipement sans avoir d’abord bien lu et compris ces
instructions. Si vous n’êtes pas capable de comprendre les Avertissements,
Dangers et Instructions, contactez le distributeur avant d’essayer d’installer
cet équipement sous risque de blessure ou dégâts.
Vérifiez toutes les pièces qu’elles n’aient pas subit de dégâts durant le
transport et essayez avant utilisation. En cas de dégâts, NE PAS utiliser.
Contactez le distributeur pour obtenir des instructions.
Le coussin Flovair N’EST PAS conçu pour être utilisé dans le cadre d’un
traitement des escarres.
L’état de l’épiderme doit être contrôlé fréquemment après l’installation d’un
nouveau siège.
Consultez votre médecin ou votre thérapeute si vous avez des questions
concernant le soulagement de votre poids, l’auto examen de la peau ou si
vous avez des limitations ou besoins spécifiques personnels.
Avant utilisation, assurez-vous que le bandes d’attache à boucles et crochets
soient fermement attachés entre la surface d’assise et le coussin.
Le coussin Flovair a une limite de poids de 113,4 kg (250 lb) pour les coussins
jusque 50,8 cm de large (20 po) et de 158,7 kg (350 lb) pour les coussins
au-dessus de 50,8 cm (20 po).
Les produits Invacare ont été conçus et fabriqués spécialement pour être
utilisés avec les accessoires Invacare. Les accessoires conçus par d’autres
fabricants n’ont pas été testés par Invacare et nous n’en recommandons pas
l’utilisation avec les produits Invacare.
AVERTISSEMENT POUR L’INSTALLATION
Après TOUT réglage, réparation ou entretien, avant de réutiliser, assurez-vous
que tous les éléments de fixation soient fermes.
REMARQUE:Lefluidedansl’insertdesoulagementdepressionpelviennepeutavoir
tendanceàsedéplacerverslabassilecoussinresteouestrangéenpositionverticale.Si
c’estlecas,enlevezlahousseextérieure/intérieurepourinspecterl’insert.S’ilyaeuun
déplacement,massezl’insertdélicatementpourassurerunerépartitionuniformedufluide
surl’intégralitédelasurface.
Instructions pour l’assemblage, l’installation et le fontionnement
CONSERVER CES INSTRUCTIONS

Part No 1141447 9 Siège Flovair InTouch™
Avis Important
Lemeilleurmoyend’éviterlesproblèmesliésauxescarresestdebienencomprendre
lacauseetdecomprendrevotrerôledansunprogrammede soinsde lapeau.
Consultezvotremédecinouvotrethérapeutesivousavezdeslimitationsou
besoinsspécifiquespersonnels.
Touslessiègesdoiventêtresélectionnésméticuleusement.Lemeilleurmoyen
pourvousassurerquelesiègechoisisrépondàvosbesoinsindividuelsestde
travaillerencoopérationavecvotrethérapeuteetvotremédecin.
Pluslesbesoinsd’unpatien tdeviennentcomplexes,pluslechoixdevientimportant.
Introduction
LesiègeFlovairest conçupourassurerlastabilitépelvienne,lepositionnementdes
jambesetlecontrôledelapressionauxpatientsaffectésd’uneasymétriedelaposture
etd’un problèmedel’épiderme.LesiègeFlovairest disponibleendeux profils
différentspours’adapteràl’importancedupositionnementrequisparle
patient.
Housses Intérieure/Extérieure
Lahousseextérieureestconstituéed’untissushydrofugepourprotégerlamousse.
Ledessusestcoupéenuntissusstretchhydrofugebreveté.Ledessousestcoupé
enuntissusépais,hydrofugenonglissant.
Unehousseintérieureperméableàlavapeurpermetlacirculationdel’airtouten
assurantuneprotectionsupplémentaireàlamousse.Nousconseillonsune
inspectionetunnettoyagerégulierdeshoussesextérieuresetintérieures.
ConsultezInspectionetNettoyageduSiègedelapage 13.
Comment attacher/détacher le siège sur/de la surface d’assise
REMARQUE:Pourcetteprocédure,consultezlaFIGURE1page10.
REMARQUE:Pourenleverlesiègedelasurfaced’assise,procédezensensinverse.
REMARQUE:Lesièges’attacheàlasurfaced’assiseparattachesàbouclesetcrochetsau
dessousdusiège.
REMARQUE:Lasurfaced’assisepeutêtresoitunsiègerembourré,une
basecreuseouune
panne.
REMARQUE:LafermetureéclairdusiègedoitTOUJOURSêtreversl’arrière.
AVERTISSEMENT
Assurez-vous que les attaches à boucles et crochets soient attachés ferme-
ment à la surface d’assise et au siège AVANT utilisation. Si le siège n’est pas
bien attaché à la surface d’assise, soyez prudent lors du transfert de et vers le
fauteuil roulant.

Siège Flovair InTouch™ 10 Part No 1141447
Voyezsilasurfaced’assiseestmunied’undesaccessoiressuivantsetconsultez
unedecesprocédures:
• Bandesd’attacheàcrochets
• Bandesd’attacheàboucles
•Pasdebanded’attache
Bande d’attache à crochets/Pas de bande d’attache
1. Enlevezlabandeàcrochetsdoublefacedudessousdusiège
2. Alignezlebordavantdusiègeaveclebordavantdelasurfaced’assise
3. Procédezàundesdeux:
4. Banded’attacheàcrochets–Attachezlesiègesurlasurfaced’assiseenvous
assurantquelesbandesàboucledusiègesoientfermementattachéesaux
bandesàcrochetsdelasurfaced’assise.
5. Pasdebandesd’attache–Placezlesiègesurlasurfaced’assise.
Bandes d’attache à boucles
1. Vérifiezquelesbandesàcrochetsdoublefacesoientfermementattachéesaux
bandesd’attacheàbouclesaudessousdusiège.
2. Alignezlebordavantdusiègeaveclebordavantdelasurfaced’assise
3. Attachezlesiègeàlasurfaced’assise,envousassurantquelabandeàcrochets
doublefaceestfermementattachéeauxbandesàbouclessurlahoussedusiège
etsurlasurfaced’assise
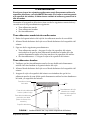
FIGURE 1 Comment attacher/détacher le siège sur/de la surface d’assise
Fermeture éclair vers l’arrière
Partie à boucles de la bande
d’attache (fixée au siège)
Partie à crochets double face
de la bande d’attache (le cas
échéant, enlevez le papier
protecteur)
Surface d’assis
Face avant du coussin
alignée avec l’arête avant
de la surface d’assise
Siège

Part No 1141447 11 Siège Flovair InTouch™
Enlèvement/Installation des Housses de Siège
Enlèvement de la housse extérieure
AVERTISSEMENT
Les housses sont conçues pour protéger la mousse de l’humidité et être igni-
fuges. NE PAS utiliser le siège sans les housses extérieure et intérieure. Si les
housses sont déchirées, elles doivent être remplacées IMMEDIATEMENT.
1.
Enlevezlesiègedelasurfaced’assise.ConsultezCommentattacher/détacherlesiège
sur/delasurfaced’assisedelapage 9.
2. Ouvrezlahousseextérieure.
3. Enlevezlesiège,toujoursdanssahousseintérieure,delahousseextérieure.
ATTENTION
NE PAS enlevez les deux housses, extérieure et intérieure, en même temps
sous risque d’endommager le tissus de la housse intérieure.
Installation de la Housse Extérieure
REMARQUE:Pourcetteprocédure,consultezlaFIGURE2.
1. Mettrelesiègeenplaceavecsahousseintérieureetsoninsertfluide/airàsa
placeversl’arrièredelahousseextérieure.
REMARQUE:L’insertfluide/airestàlapartiesupérieuredelahousseintérieure.
REMARQUE:Lafermetureéclairestàl’arrièreetletissusstretchestàlapartiesupérieure
delahousseextérieure.
2. Glissezlesiègedanslahousseextérieure.
3. Fermezlahousseextérieure.
4. Réattachezlesiègesurlasurfaced’assise.ConsultezCommentattacher/détacher
lesiègesur/de lasurfaced’assisede lapage 9.
ATTENTION
Faites attention de ne pas coincer la housse intérieure dans le fermeture
éclair de la housse extérieure sous risque d’abîmer la housse intérieure.
FIGURE 2 Enlèvement/Installation des Housses de Siège - Installation de la Housse
Extérieure
Housse
extérieure
Housse
intérieure
Fermeture
éclair
Siège

Siège Flovair InTouch™ 12 Part No 1141447
Enlèvement de la Housse Intérieure
REMARQUE:Pourcetteprocédure,consultezlaFIGURE3.
1. Enlevezlesiègedesahousseextérieure.ConsultezInstallationdelaHousse
Extérieuredelapage 11.
2. Enlevezlerabatdelahousseintérieure.
3. Enlevezlesiègedelahousseintérieure
Installation de la Housse Intérieure
REMARQUE:Pourcetteprocédure,consultezlaFIGURE3.
1. Positionnezlesiègeavecsoninsertfluide/airversl’arrièredelahousse
intérieurenouvelle/existante.
REMARQUE:Lafacearrièredusiègeest
marquée«REAR»(arrière).
2. Glissezlesiègedanslahousse
intérieure
3. Pliezlerabatsupérieurversle
dessusetpoussez‐ledanslefondde
lahousse.
4. Repliezlerabatinférieur
5. Placezlesiège,avecsahousse
intérieure,danslahousseextérieure.
ConsultezInstallationdelaHousse
Extérieuredelapage 11.
FIGURE 3 Enlèvement de la Housse
Intérieure - Installation de la Housse
Intérieure
Enlèvement/Installation de la Couche de Support
Pelvien
REMARQUE:Pourcetteprocédure,consultezlaFIGURE4,page13.
REMARQUE:Lesiègeestfournisavecunecouchedesupportpelvienfluide/air.
Enlèvement de la Couche de Support Pelvien
1. Enlevezlesiègedeshoussesintérieureetextérieure.Consultez
Enlèvement/InstallationdesHoussesdeSiège
delapage 11.
2. Défaiteslacourroieavant,lacourroiearrièreetlesdeuxcourroieslatérales.
3. Soulevezlacouchedesupportpelvienexistanteetenlevez‐ladelamousse.
Siège
Housse
Intérieure
Insert – vers
l’arrière de la
housse intérieure
Rabat supérieur
Rabat inférieur

Part No 1141447 13 Siège Flovair InTouch™
Installation de la Couche de Support Pelvien
1. Centrezlacouchedesupportpelviensurlamoussedemanièrequeles
courroieslatéralessoientcentréesdanslesprofilsdechaquecôtédelamousse.
2. Attachezensemblelescourroiesarrière,avantetlatéralesau‐dessousdela
mousse.
REMARQUE:Nepasserrerexcessivementlescourroies.Lacouchedesupportpelviendoit
pouvoirbougeraveclesiège.
3. Réinstallezlesiègedansleshoussesintérieureetextérieure.Consultez
Enlèvement/InstallationdesHoussesdeSiège
delapage 11.
FIGURE 4 Enlèvement/Installation de la Couche de Support Pelvien
Inspection et Nettoyage du Siège
Inspection
AVERTISSEMENT
NE PAS continuer à utiliser ce produit si un quelconque des éléments,
matériau de recouvrement, mousse et/ou plastic est déformé, oxydé, cassé,
usé et/ou comprimé.
Une réparation peut être effectuée ou organisée par votre fournisseur.
Procédezàuneinspectionvisuellehebdomadaire.
Nettoyage
Procédezàunedesopérationssuivanteschaquesemaine:
Couche de
support pelvien
Mousse
Courroie latérale
Courroie avant
(non représentée)
Courroie latérale
(non représentée)
Courroie arrière
(non représentée)
Profil de la
mousse

Siège Flovair InTouch™ 14 Part No 1141447
Housse Extérieure
ATTENTION
NE PAS utiliser d’adoucisseur ni d’eau de javel. PAS de séchage machine. NE
PAS mettre à sécher au soleil. Séchage à l’air uniquement.
Lavezlahoussedusiègeàlamachine,àl’eaufroide,encyclelégeravecun
détergentdoux.
Housse Intérieure
Lahousseintérieurehydrofugedoitêtrelavéeàlamainavecunchiffondoux,à
l’eautièdeetunesolutiondesavondoux.Rincezetpendrepoursécher.
Mousse
Frottezlamousseavecunchiffonhumide.NEPASsubmergeroutremper.

Part No 1141447 15 Siège Flovair InTouch™
GARANTIE LIMITÉE
REMARQUE : LA GARANTIE PRÉSENTÉE CI-DESSOUS A ÉTÉ MISE AU POINT EN
CONFORMITÉ AVEC LA LOI FÉDÉRALE AMÉRICAINE SUR LES PRODUITS
FABRIQUÉS APRÈS LE 4 JUILLET 1975.
Cette garantie ne s'applique qu'à l'acheteur/utilisateur initial de notre produit.
Cette garantie vous donne des droits juridiques spécifiques mais vous pouvez également
jouir de droits juridiques qui varient d’état à état.
Invacare garantit à l’acheteur/utilisateur original que ce produit est exempt de vices de
matière et de fabrication pour deux ans d’utilisation par l’acheteur original. Toutes les
housses ne sont garanties que durant 90 jours. Si durant cette période couverte par la
garantie un produit s'avère avoir des défauts, il sera réparé ou remplacé à la discrétion
d'Invacare. Cette garantie ne comprend pas la main-d'œuvre ni les frais d'expédition qui
seraient dus à l'installation de la pièce de rechange ou à la réparation de cette pièce sur un
tel produit. L'obligation d'Invacare et votre recours exclusif sous cette garantie sont
limités à une telle réparation ou à un tel remplacement.
Pour tout service couvert par la garantie, veuillez contacter le distributeur auprès duquel
vous avez acheté votre produit Invacare. Dans le cas où vous n'obtenez pas satisfaction
avec votre service de garantie, écrivez directement à Invacare à l'adresse qui se trouve sur
la couverture au dos de cette brochure. Fournissez-nous le nom et l'adresse de votre
distributeur, la date d'achat et indiquez la nature du défaut. Si le produit possède un
numéro de série, indiquez-le également.
Invacare Corporation va émettre une autorisation de retour. Les unités ou pièces défectueuses
doivent être renvoyées pour inspection de garantie en utilisant le numéro de série, le cas
échéant, comme identification dans les trente jours qui suivent la date d’autorisation.
Ne renvoyez PAS les produits à l’usine sans notre accord préalable.
Les expéditions en port du seront refusées ; veuillez, s.v.p. payer le fret d’avance.
LIMITATIONS ET EXCLUSIONS : LA PRÉSENTE GARANTIE NE S'APPLIQUE PAS
AUX PRODUITS PORTANT DES NUMÉROS DE SÉRIE SI CES NUMÉROS ONT ÉTÉ
SUPPRIMÉS OU EFFACÉS ; ELLE NE S'APPLIQUE PAS NON PLUS AUX PRODUITS
QUI ONT ÉTÉ SUJETS À NÉGLIGEANCE, ACCIDENTS, QUI ONT ÉTÉ UTILISÉS,
ENTRETENUS OU STOCKÉS DE MANIÈRE INCORRECTE, QUI ONT ÉTÉ SUJET À
UTILISATION COMMERCIALE OU INSTITUTIONNELLE, AUX PRODUITS QUI ONT
ÉTÉ MODIFIÉS SANS AUTORISATION SPÉCIFIQUE ÉCRITE D'INVACARE, ENTRE
AUTRES, MODIFICATION DE L'APPAREIL AVEC DES PIÈCES OU DES AJOUTS NON
AUTORISÉS, DOMMAGES OCCASIONNÉS DURANT DES RÉPARATIONS
EFFECTUÉES SUR L'UNE DES PIÉCES DE L'APPAREIL SANS L'ACCORD SPÉCIFIQUE
PRÉALABLE D'INVACARE, DOMMAGES CAUSÉS PAR DES CONDITONS QUI
ÉCHAPPENT AU CONTRÔLE D'INVACARE ; INVACARE DÉTERMINERA SI L'UNE
DES CONDITIONS CI-DESSUS S'APPLIQUE. LA GARANTIE NE S’APPLIQUE PAS
AUX PROBLÈMES CAUSÉS PAR L'USURE NORMALE DE PRODUIT ET À
L'UTILISATION NON CONFORME AUX INSTRUCTIONS FOURNIES.
LA PRÉSENTE GARANTIE EST EXCLUSIVE ET TIENT LIEU POUR TOUTES LES
AUTRES GARANTIES EXPRESSES. LES GARANTIES IMPLICITES, SI ELLES EXISTENT,
ENTRE AUTRES LES GARANTIES DE QUALITÉ MARCHANDE ET D'APTITUDE À UN
EMPLOI DONNÉ NE SE PROLONGENT PAS AU-DELÀ DE LA PRÉSENTE GARANTIE
EXPLICITE ; LES RECOURS AUX VIOLATIONS DE TOUTE GARANTIE IMPLICITE SONT
LIMITÉS À LA RÉPARATION ET AU REMPLACEMENT DU PRODUIT DÉFECTUEUX
DANS LES LIMITES DES DISPOSITIONS DE CE PRÉSENT DOCUMENT. L’APPLICATION
D’UNE GARANTIE IMPLICITE QUELCONQUE NE POURRA PAS S’ÉTENDRE AU-DELÀ
DE LA DURÉE DE LA GARANTIE EXPLICITE CI-DESSUS. INVACARE NE PEUT EN
AUCUN CAS ÊTRE TENU POUR RESPONSABLE DE QUELCONQUE MANIÈRE QUE CE
SOIT EN CAS DE DOMMAGES INDIRECTS OU ACCESSOIRES.
CETTE GARANTIE SERA ÉTENDUE POUR ÊTRE CONFORME AUX LOIS ET
RÉGLEMENTATIONS DE VOTRE ÉTAT/PROVINCE.

Cojín Flovair de InTouch™ 16 Part No 1141447
Para obtener más información sobre los productos, partes y servicios de Invacare,
visite el sitio www.invacare.com
Cojín Flovair de InTouch™
Modelos Nos. ITFG y ITFM
NOTE:Revisetodaslaspartesporsisufrierondañosduranteelenvío.Siasífuera,NOuse
launidad.Comuníqueseconsudistribuidor/empresadetransportesparaobtenermayores
instrucciones.
Afindeinstalar ,operaryusarenformaseguraelcojínFlovair,esFUNDAMENTAL
acatarlassiguientesinstrucciones:
ADVERTENCIA
ANTES de usar este equipo, lea y comprenda cabalmente estas instrucciones.
Si no entiende las advertencias, precauciones e instrucciones, comuníquese
con su distribuidor antes de usar el equipo, de lo contrario podría sufrir
lesiones o causar daños materiales.
Revise todas las partes por si sufrieron daños durante el envío y pruébelas
antes de usarlas. Si presentan daños, NO use la unidad. Comuníquese con su
distribuidor para obtener mayores instrucciones.
El cojín Flovair NO está diseñado para usarse en el tratamiento de úlceras
causadas por presión.
El estado de la piel debe revisarse con mucha frecuencia tras la instalación de
cualquier cojín nuevo.
Consulte a su terapeuta o médico si tiene dudas sobre la forma de aligerar
peso y autoexaminarse la piel, o acerca de sus limitaciones y necesidades
individuales.
Cerciórese de que las tiras adherentes estén firmemente unidas entre la
superficie del asiento y el cojín antes de usarlo.
El cojín Flovair tiene un límite de peso de 113,4 kg (250 lbs) para anchos de
cojín hasta 50,8 cm (20 pul.) inclusive, y 158,7 kg (350 lbs) para anchos de
cojín de más de 50,8 cm (20 pul.)
Los productos Invacare están específicamente diseñados y fabricados para
usarse con accesorios Invacare. Invacare no ha sometido a prueba los
accesorios diseñados por otros fabricantes, por lo que no recomienda usar
estos accesorios con productos Invacare.
ADVERTENCIA DE INSTALACIÓN
Después de realizar CUALQUIER ajuste, reparación o servicio y antes de
usar la unidad, cerciórese de que todos los componentes de conexión estén
seguros.
Instrucciones de armado, instalación y operación
CONSERVE ESTAS INSTRUCCIONES

Part No 1141447 17 Cojín Flovair de InTouch™
NOTE:Sielcojínsecolocaoguardaenposiciónvertical,esposiblequeellíquidoenel
insertoparaelaliviodelapresiónpélvicatiendaairsehaciaabajo.Siesasí,retirelafunda
externa/internapararevisarelinserto.Siellíquidohabajado,amasesuavementeelinserto
paracerciorarsedequetodalasuperficietengaunvolumendelíquidouniforme.
Información Importante
Lamejormaneradeevitarproblemasrelacionadosconúlcerasporpresiónes
conocersuscausasyseguirunprogramadetratamientodérmico.
Consulteasuterapeutaomédicositienedudassobresuslimitacionesy
necesidadesindividuales.
Sedebenseleccionarcuidadosamentetodosloscojines.Trabajejuntoconsu
terapeutaymédicoparacerciorarsedeescogerelcojínquemejorsatisfagasus
necesidades.
Mientrasmáscomplejasseanlasnecesidadesdelpaciente,mayorimportancia
tienelaevaluacióndelcojín.
Introducción
ElcojínFlovairestádiseñadoparabrindaralusuarioestabilidadpélvica,buena
posturadelaspiernasycontrolarlapresiónenpacientesconproblemasdeasimetría
posturaleintegridaddelapiel.ElcojínFlovairseofrececondoscontornosdistintos
paraadaptarsealasdiversasposturasrequeridasporelusuario.
Fundas externa/interna
Lafundaexternaestáhechadeunatelaimpermeablequeprotegelaespuma.La
partesuperiorestádiseñadaconunapatentadatelaelásticaimpermeable.Laparte
inferiorestáhechadeunatelagruesaantideslizanteeimpermeable.
Lafundainternapermeablealvaporpermitelacirculacióndelaireyasuvez
brindaprotecciónadicionalalaespuma.Serecomiendalimpiaryrevisar
regularmentelasfundasinternayexterna.ConsultelasecciónInspeccióny
LimpiezadelCojínenlapágina 21.
Instalación/Retiro del Cojín en/de la Superficie del
Asiento
NOTA:Paraesteprocedimiento,consultelaFIGURA 1onpágina18.
NOTA:Pararetirarelcojíndelasuperficiedelasiento,inviertalossiguientes
procedimientos.
NOTA:Elcojínvaunidoalasuperficiedelasientomediantelossujetadoresadherentes
situadosenlaparteinferiordelafundadelcojín.
NOTA:Lasuperficiedel
asientopuedeserunadelassiguientes:tapicería,basedebajadao
sillín.
NOTA:LacremalleradelcojínSIEMPREdebequedarorientadahaciaatrás.

Cojín Flovair de InTouch™ 18 Part No 1141447
ADVERTENCIA
Cerciórese de que los sujetadores adherentes estén firmemente unidos a la
superficie del asiento y al cojín ANTES de usarlo. Si el cojín no está asegurado
a la superficie del asiento, se deberá tener cuidado al sentarse y pararse de la
silla de ruedas.
Determinesilasuperficiedelasientotieneunadelassiguientescaracterísticasy
consulteunodelosprocedimientossiguientes:
•Tirasadherentesmacho
•Tirasadherenteshembra
•Sintirasadherentes
Tiras adherentes macho/sin tiras adherentes
1. Retiredelaparteinferiordelcojínlatiraadherentemachodecaradoble.
2. Alineeelbordedelanterodelcojínconelbordedelanterodelasuperficiedel
asiento.
3. Sigaunodelossiguientesprocedimientos:
•Tirasadherentesmacho‐Asegureelcojínalasuperficiedelasiento
cerciorándosedequelastirasadherentes
hembraenlafundadelcojín
quedenfirmementeunidasalastirasmachoenlasuperficiedelasiento.
•Sintirasadherentes–Coloqueelcojínenlasuperficiedelasiento.
Tiras adherentes hembra
1. Verifiquequelastirasadherentesmachodecaradobleesténfirmemente
unidasalastirashembraenlaparteinferiordelcojín.
2. Alineeelbordedelanterodelcojínconelbordedelanterodelasuperficiedel
asiento.
3. Asegureelcojínalasuperficiedelasientocerciorándosedequelatira
adherentemachodecaradoblequedefirmementeunidaalastirashembraen
lafundaylasuperficiedelasiento.
FIGURA 1 Instalación/Retiro del Cojín en/de la Superficie del Asiento
Cremallera orientada
hacia atrás
Parte de la tira adherente
hembra (unida al cojín)
Parte de la tira adherente
macho de cara doble
(Retire el refuerzo si es
necesario)
Superficie del asiento
Parte delantera del cojín
alineada con el borde
delantero de la superficie
del asiento
Cojín

Part No 1141447 19 Cojín Flovair de InTouch™
Retiro/Instalación de las Fundas del Cojín
Retiro de la Funda Externa
ADVERTENCIA
Las fundas están diseñadas para proteger la espuma contra la humedad y
brindar pirorresistencia. NO use el cojín sin la funda interna o externa. Si las
fundas están deterioradas, reemplácelas INMEDIATAMENTE.
1. Retireelcojíndelasuperficiedelasiento.ConsultelasecciónInstalación/Retiro
delCojínen/delaSuperficiedelAsientoenlapágina 17.
2. Abralacremalleradelafundaexterna.
3. Retireelcojíndelafundaexterna,sinsacarlodesufundainterna.
PRECAUCIÓN
NO retire simultáneamente las fundas externa e interna, ya que podría dañar
el material de la funda interna.
Instalación de la Funda Externa
NOTA:Paraesteprocedimiento,consultelaFIGURA 2.
1. Coloqueelcojínenlafundainternayelinsertodelíquido/aireensulugarhacia
laparteposteriordelafundaexterna.
NOTE:Elinsertodelíquido/aireestásituadoenlapartesuperiordelafundainterna.
NOTE:Lacremalleraestáenlaparteposteriorylatelaelásticaenlapartesuperiordela
fundaexterna.
2. Desliceelcojíndentrodelafundaexterna.
3. Cierrelafundaexterna.
4. Vuelvaainstalarelcojínenlasuperficiedelasiento.Consultelasección
Instalación/RetirodelCojínen/delaSuperficiedelAsiento
enlapágina 17.
PRECAUCIÓN
Tenga cuidado de evitar que la funda interna quede enganchada en la
cremallera de la funda externa, pues si ello ocurre se dañará.
FIGURA 2 Retiro/Instalación de las Fundas del Cojín - Instalación de la Funda Externa
Funda
externa
Funda interna
Cremallera
Cojín

Cojín Flovair de InTouch™ 20 Part No 1141447
Retiro de la Funda Interna
NOTA:Paraesteprocedimiento,consultelaFIGURA 3.
1. Retireelcojíndelafundaexterna.ConsultelasecciónRetirodelaFunda
Externaenlapágina 19.
2. Retirelasolapadelafundainterna.
3. Retireelcojíndelafundainterna.
Instalación de la Funda Interna
NOTA:Paraesteprocedimiento,consultelaFIGURA 3.
1. Coloqstueelcojínconelinsertodelíquido/airehacialaparteposteriordela
fundainterna.
NOTA:La superficie posterior del cojín está marcada con la palabra “REAR”.
2. Deslice el cojín dentro de la funda
interna.
3. Doblelasolapasuperiore
introdúzcalaenlafundainferior.
4. Doblelasolapainferiorhaciaatrás.
5. Vuelvaainstalarelcojín,conla
fundainternaensulugar,enla
fundaexterna.Consultelasección
RetirodelaFundaExternaenla
página 19.
FIGURA 3 Retiro de la Funda Interna -
Instalación de la Funda Interna
Retiro/Instalación de la Capa de Apoyo Pélvico
NOTA:Paraesteprocedimiento,consultelaFIGURA 4onpágina21.
NOTA:Elcojínvieneconunacapadeapoyopélvicodelíquido/aire.
Retiro de la capa de apoyo pélvico
1. Retireelcojíndelasfundasinternayexterna.Consultelasección
Retiro/InstalacióndelasFundasdelCojín
enlapágina 19.
2. Desenganchelastirasdelantera,traseraylasdostiraslaterales.
3. Levantelacapadeapoyopélvicoyretíreladelaespuma.
Instalación de la Capa de Apoyo Pélvico
1. Centrelacapadeapoyopélvicoenlaespumademodoquelastiraslaterales
quedencentradasenloscontornosacadaladodelaespuma.
2. Asegurelastirastrasera,delanteraylateralesentresíenlaparteinferiordela
espuma.
NOTA:NOaprieteexcesivamentelastiras.Lacapadeapoyo
pélvicodebequedarlibrepara
moversejuntoconelcojín.
Cojín
Funda interna
Inserto – Hacia la
parte posterior de la
funda interna
Solapa superior
Solapa inferior
La page est en cours de chargement...
La page est en cours de chargement...
La page est en cours de chargement...
La page est en cours de chargement...
-
 1
1
-
 2
2
-
 3
3
-
 4
4
-
 5
5
-
 6
6
-
 7
7
-
 8
8
-
 9
9
-
 10
10
-
 11
11
-
 12
12
-
 13
13
-
 14
14
-
 15
15
-
 16
16
-
 17
17
-
 18
18
-
 19
19
-
 20
20
-
 21
21
-
 22
22
-
 23
23
-
 24
24


Invacare InTouc Flovair Seat ITFG Manuel utilisateur
- Taper
- Manuel utilisateur
- Ce manuel convient également à
dans d''autres langues
Documents connexes
-
Invacare 1141448 Manuel utilisateur
-
-
-
-
-
-
Invacare Single Density Cushion Installation And Operating Instructions Manual
-
-
-