
For more information regarding Invacare products, parts, and services, please visit www.invacare.com
Part No 1141448 1 InTouch™ Stabilite/Stabilite OM Cushion
InTouch™ Stabilite/Stabilite OM Cushion
NOTE:Checkallpartsforshippingdamage.Incaseofshippingdamage,DONOTuse.Contactcarrier/dealerfor
furtherins truction.
Toensurethe safeinstallation,operationandus eoftheInTouchStabilite/StabiliteOMcushion,these
instructionsMUSTbefollowe d:
WARNING
DO NOT use this equipment without first reading and understanding these instructions. If you are
unable to understand the Warnings, Cautions, and Instructions, contact distributor before
attempting to use this equipment, otherwise, injury or damage may result.
Check all parts for shipping damage and test before use. In case of damage, DO NOT use. Contact
the distributor for further instructions.
The InTouch Stabilite/Stabilite OM cushion is NOT designed for use in the treatment of pressure
sores.
Skin condition should be checked very frequently after the installation of any new cushion.
Your therapist and physician should be consulted if you have any questions regarding weight relief,
self-examination of the skin, or individual limitations and needs.
Make sure the hook and loop fastening straps are securely attached between the seating surface and
cushion before using.
The InTouch Stabilite cushion has a weight limitation of 250 lbs for cushion widths up to and including
20 inches and 350 lbs for cushion widths over 20 inches.
The InTouch Stabilite OM cushion has a weight limitation of 300 lbs for cushion widths up to and
including 20 inches and 500 lbs for cushion widths over 20 inches.
ACCESSORIES WARNING
Invacare products are specifically designed and manufactured for use in conjunction with Invacare
accessories. Accessories designed by other manufacturers have not been tested by Invacare and are
not recommended for use with Invacare products.
INSTALLATION WARNING
After ANY adjustments, repair or service and before use, make sure that all attaching component
parts are secure.
Important Information
Thebe stwaytoav oidproblemsrelatedtopressuresoresistounderstandtheircausesandyourroleina
skinmanagementprogram.
Yourtherapistandphysicianshouldbeconsultedifyouhave questionsregardingindividuallimitations
andneeds.
Allse atsshouldbeselectedcarefully.Workingwithyourtherapist,andphysicianis
thebestwaytoassure
thatasea tchoicematchesyourindividualneeds.Astheneedsoftheindividualbecomemorecomplex,the
seatev aluationbecomesmoreimportant.
Assembly, Installation and Operating Instructions
SAVE THESE INSTRUCTIONS

InTouch™ Stabilite/Stabilite OM Cushion 2 Part No 1141448
Introduction
InTouch Stabilite Cushion
TheInTouchStabilitecushionisdesignedtoprovidepelvicstabilityandlegpositioningforpatients
withposturalasymmetry.TheInTouchStabilitecushionisavailableintwodifferentcontourstosuit
theamountofpositioningrequiredbytheuser.TheInTouchStabilitecomesstandardwithaThinAir
bladderformanagingshearunderthepelvis.
InTouch Stabilite OM (Obliquity Management) Cushion
TheInTouchStabiliteOMcushionisdesignedtoprovidepositioning,stabilityandlegpositioningfor
userswitheitheralev elpelvis,orwithamildtomoderatepelvicobliquity.
TheInTouchStabiliteOMcushionhastheaddedbenefitofallowingtheclinicianorRehabTechnology
Suppliertheabilitytoaccommodateorcorrectamildtomoderateobliquitybyrelocatingobliquity
inserts.RefertoModifyingtheCushiontoAccommodateObliquity
onpage 6.
TheThinAirbladderisavailableasanoptionfortheInTouchStabiliteOMcushion.Toorderthe
ThinAirbladder,contactcustomerserviceat1‐800‐333‐6900.
Outer/Inner Covers
Theoutercoverismadefromawaterresistantfabrictoprotectthefoam.Thetopisfabricatedfroma
stretchfabric.Thebottomisfabricatedfromaheavyweight,non‐skidfabric.
Awaterresistantinnercoverallowsaircirculationwhileprovidingadditionalprotectionforthefoam.
Cushion Inspection and Cleaning
Regularcleaningandinspectionoftheouterandinnercoversisrecommended.
WARNING
DO NOT continue to use this product if any of the upholstery materials, foams, and/or plastics
are found to be deformed, breaking, worn, and/or compressed. Corrective maintenance can be
performed at or arranged through your equipment supplier.
Outer Cover
CAUTION
DO NOT use fabric softeners or bleach. DO NOT machine dry. Air dry only. DO NOT dry in sun.
Machinewashtheoutercoverincoldwaterongentlecycleusingamilddetergent.
Inner Cover
Handcleantheinnercoverusingasoftcloth,warmwaterandamildsoapsolution.Rinseoffandhang
dry.
Foam
Wipethefoamwithadampcloth.DONOTsubmergeorsoak.

Part No 1141448 3 InTouch™ Stabilite/Stabilite OM Cushion
Attaching/Removing the Cushion To/From Seating Surface
NOTE:Forthisprocedure,refertoFIGURE 1.
NOTE:Toremovethecushionfromaseatingsurface,reversethefollowingprocedures.
NOTE:Thecushionattachestotheseatingsurfaceusingthehookandloopfastenersonthebottomofthecushion
cover.Theseatingsurfacecanbeseatupholstery,dropbaseorseatpan.
NOTE:Thezipperonthecushionmustalwaysfacerearward.
WARNING
Make sure the hook and loop fasteners are securely attached to the seating surface and to the
seat BEFORE using. If the cushion is not secured to the seating surface, use caution when trans-
ferring in and out of the wheelchair.
Hook Attachment Strips/No Attachment Strips
1. Removedoublesidedhookfrombottomofcushion.
2. Alignfrontedgeofcushionwithfrontedgeofseatingsurface.
3. Performoneofthefollowing:
• HookAttachmentStrips‐Securethecushiontotheseatingsurface,makingsurethatthestrips
oflooponthecushioncoveraresecurelyattachedtothestripsofhookontheseatingsurface.
•NoAttachmentStrips‐Placethecushionontheseatingsurface.
Loop Attachment Strips
1. Verifythedoublesidedhookstripsaresecurelyattachedtotheloopattachmentstripsonthebottom
ofthecushion.
2. Alignfrontedgeofcushionwithfrontedgeofseatingsurface.
3. Securethecushiontotheseatingsurface,makingsurethatthedoublesidedhookissecurely
attachedtothestripsoflooponthecushioncoverandtheseatingsurface.
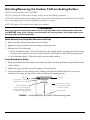
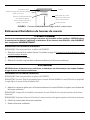
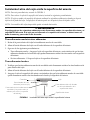
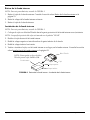
FIGURE 1 Attaching/Removing the Cushion To/From Seating Surface
Zipper
Loop portion of fastening
strap (attached to cushion)
Double-sided hook
portion of fastening strap
(remove backing if necessary
to attach to seating surface)
Seating surface
The front of the cushion
lines up with front edge
of seating surface
Cushion

InTouch™ Stabilite/Stabilite OM Cushion 4 Part No 1141448
Removing/Installing the Cushion Covers
WARNING
The covers are designed to protect the foam from moisture and to provide fire retardency. DO NOT
use the cushion without either the inner or outer cover. If the covers are torn, they MUST be
replaced IMMEDIATELY.
Removing Outer Cover
NOTE:Forthispr ocedur e,refertoFIGURE 2.
1. Removethecushionfromthe seatingsurface. Referto Attaching/RemovingtheCushionTo/From
SeatingSurfaceonpage 3.
2. Unziptheoutercov er.
3. Removecushion,stillinsideth einnercove r ,fromtheoutercov er.
CAUTION
DO NOT remove both the outer cover and inner cover at the same time, otherwise damage to the
inner cover material may occur.
Installing Outer Cover
NOTE:Forthispr ocedur e,refertoFIGURE 2.
NOTE:TheThinAirbladderisstandardontheInTouchStabilitecushion.TheThinAirbladderisavailableasanoption
fortheInTouchStab iliteOMcushion.Toorder theThinAirbladder,contactcustomerserviceat1‐800‐333‐6900.
1. P ositionthecushionwithinnercoverandtheThinAirbladderinplacetowardtherearoftheoutercover.
NOTE:Wheninst alledproperly,theThinAirbladderisattheto poftheinner cover.
NOTE:Thezipperisattherearandthestretchfabricisatthetopoftheoutercover.
2. Slidecushionintotheoutercove r.
3. Ziptheoutercoverclosed.
CAUTION
Use care not to snag the inner cover in the outer cover zipper, or damage to the inner cover will
occur.
4. Reattachcushionontoseatingsurface.RefertoAttaching/RemovingtheCushionTo/FromSeating
Surfaceonpage 3.
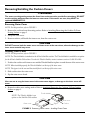
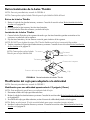
FIGURE 2 Removing Outer Cover - Installing Outer Cover
Outer cover
Inner cover
Zipper
Cushion
ThinAir bladder
NOTE:TheThinAirbladderisan
optionontheStabiliteOMcushion.

Part No 1141448 5 InTouch™ Stabilite/Stabilite OM Cushion
Removing Inner Cover
NOTE:Forthisprocedure,refertoFIGURE 3onpage5.
1. Removethecushionfromtheoutercover.RefertoRemovingOuterCoveronpage 4.
2. Unflaptheexistinginnercover.
3. Removethecushionfromtheinnercover.
Installing Inner Cover
NOTE:Forthisprocedure,refertoFIGURE 3.
1. PositionthecushionwiththeThinAirbladdertowardtherearofthenew/existinginnercover.
NOTE:Thebacksurfaceofthecushionismarked“REAR”.
2. Slidethecushionintotheinnercover.
3. Foldthetopflapoverandtuckintothebottomofthecover.
4. Foldthebottomflapback.
5. Reinstallthecushion,withinnercoverinplace,intotheoutercover.RefertoInstallingOuterCover
onpage 4.
FIGURE 3 Removing Inner Cover - Installing Inner Cover
Removing/Installing the ThinAir Bladder
NOTE:Forthisprocedure,refertoFIGURE 4onpage6.
Removing ThinAir Bladder
1. Removecushionfrominnerandoutercovers.RefertoRemoving/InstallingtheCushionCoverson
page 4.
2. Unfastentherearstrapandthetwosidestraps.
3. LifttheexistingThinAirbladderandremoveitfromthecushion.
Cushion
Inner cover
Top fla p
Bottom flap
ThinAir bladder
NOTE:TheThinAirbladderisan
optionontheStabiliteOMcushion.
NOTE:TheThinAirbladderisanoptionfortheInTouchStabiliteOMcushion.

InTouch™ Stabilite/Stabilite OM Cushion 6 Part No 1141448
Installing ThinAir Bladder
1. CentertheThinAirbladderonthefoamsothatthesidestrapsarecenteredinthecontoursoneach
sideofthefoam.
2. Fastenthesidestrapsandrearstraptothebottomofthefoam.
NOTE:DONOTover‐tightenthestraps.TheThinAirbladdermustbefreetomovewiththecushion.
3. Reinstallcushionintoinnerandoutercovers.RefertoRemoving/InstallingtheCushionCoverson
page 4.
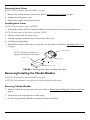
FIGURE 4 Removing/Installing the ThinAir Bladder
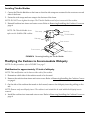
Modifying the Cushion to Accommodate Obliquity
NOTE:Forthisprocedure,refertoFIGURE 5onpage7.
Modification for approximately 1/2-inch of obliquity
NOTE:Thismodificationcanbedoneoneithersideofthecushion.
1. Determinewhichsideofthecushionneedstobelowered.
2. Removethecushionfrominnerandoutercovers.RefertoRemoving/InstallingtheCushionCovers
onpage 4.
3. Onthesideofthecushionthatneedstobelowered,removetheobliquityinsertbypullingonthe
tab.
NOTE:Removeonlyoneobliquityinsert.Thecushionisnotintendedtobeusedwithbothobliquityinserts
removed.
4. Installthecushionintoinnerandoutercovers.RefertoRemoving/InstallingtheCushionCoverson
page 4.
ThinAir bladder
Cushion
Foam contour
Side strap
Side strap
Rear strap
Foam contour
NOTE:TheThinAirbladderisan
optionontheStabiliteOMcushion.

Part No 1141448 7 InTouch™ Stabilite/Stabilite OM Cushion
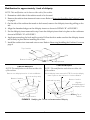
Modification for approximately 1-inch of obliquity
NOTE:Thismodificationcanbedoneoneithersideofthecushion.
1. Determinewhichsideofthecushionneedstobelowered.
2. Removethecushionfrominnerandoutercovers.RefertoRemoving/InstallingtheCushionCovers
onpage 4.
3. Onthesideofthecushionthatneedstobelowered,removetheobliquityinsertbypullingonthe
tab.
4. AlignthechamferededgesontheobliquityinsertsasshowninDETAIL“B”ofFIGURE 5.
5. Puttheobliquityinsertremovedinstep3ontotheobliquityinsertthatis
inplaceonthecushionas
showninDETAIL“B”ofFIGURE 5.
6. Applypressurealongthehookandloopstrip.Pullonthetabtomakesurethattheobliquityinserts
aresecurelyinplacebeforeinstallingthecovers.
7. Installthecushionintoinnerandoutercovers.RefertoRemoving/InstallingtheCushionCoverson
page 4.
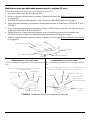
FIGURE 5 Modifying the Cushion to Accommodate Obliquity
DETAIL “A” - MODIFICATION FOR APPROXIMATELY
½-INCH OF OBLIQUITY
Obliquity Inserts
Ta b
Ta b
Top of c us hi on
Bottom of cushion
Bottom of cushion
Top o f
cushion
DETAIL “B” - MODIFICATION FOR APPROXIMATELY
1-INCH OF OBLIQUITY
Bottom of cushion
Top of c us hi on
Remove one obliquity insert for ½-inch modification
Align the
chamfered edges of
the obliquity inserts
Put the obliquity insert removed in STEP 3 onto the obliquity
insert in place on the cushion for 1-inch modification
NOTE:Thismodificationcanbedoneoneitherside
ofthecushion.
NOTE:Thismodificationcanbedoneoneitherside
ofthecushion.
Hook and loop strip
Ta b
Hook and loop strip
Ta b

InTouch™ Stabilite/Stabilite OM Cushion 8 Part No 1141448
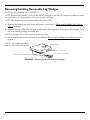
Removing/Installing Removable Leg Wedges
NOTE:Forthisprocedure,refertoFIGURE 6.
NOTE:Thisprocedureprovides1‐inchoflowerseattofloorheightononeside.Thismodificationallowsforeasier
footpropellingortheaccommodationofsomehipflexionlimitations.
NOTE:Thismodificationcanbedoneoneithersideofthecushion.
1. Removethecushionfromtheinnerandoutercovers.RefertoRemoving/InstallingtheCushion
Coversonpage 4.
2. Removethelegwedgefromthesideofthecushionthatrequiresalowerseattofloorheight.Save
theremovablelegwedgeforfutureuse.
NOTE:Legwedgessecureinplacewithhookandloopstrips.
3. Installcushionintoinnerandoutercovers.RefertoRemoving/InstallingtheCushionCovers
on
page 4.
FIGURE 6 Removing/Installing Removable Leg Wedges
Removable Leg Wedges
Top of c us hi on
Hook and Loop Strips
Bottom of cushion
NOTE:Thismodificationcanbe
doneoneithersideofthecushion.

LIMITED WARRANTY
Part No 1141448 9 InTouch™ Stabilite/Stabilite OM Cushion
LIMITED WARRANTY
PLEASE NOTE: THE WARRANTY BELOW HAS BEEN DRAFTED TO COMPLY WITH FEDERAL LAW
APPLICABLE TO PRODUCTS MANUFACTURED AFTER JULY 4, 1975.
This warranty is extended only to the original purchaser/user of our products.
This warranty gives you specific legal rights and you may also have other legal rights which vary from state to
state.
Invacare warrants its product to be free from defects in materials and workmanship for the period of two years of
use by original purchaser except for the cover, which is warranted for a period of 90 days of use by the original
purchaser. If within such warranty period any such product shall be proven to be defective, such product shall be
repaired or replaced, at Invacare's option. This warranty does not include any labor or shipping charges incurred
in replacement part installation or repair of any such product. Invacare's sole obligation and your exclusive
remedy under this warranty shall be limited to such repair and/or replacement.
For warranty service, please contact the dealer from whom you purchased your Invacare product. In the event
you do not receive satisfactory warranty service, please write directly to Invacare at the address on the back
cover. Provide dealer's name, address, model number, and the date of purchase, indicate nature of the defect
and, if the product is serialized, indicate the serial number.
Invacare Corporation will issue a return authorization. The defective unit or parts must be returned for warranty
inspection using the serial number, when applicable, as identification within thirty days of return authorization
date. DO NOT return products to our factory without our prior consent. C.O.D. shipments will be refused; please
prepay shipping charges.
LIMITATIONS AND EXCLUSIONS: THE FOREGOING WARRANTY SHALL NOT APPLY TO SERIAL
NUMBERED PRODUCTS IF THE SERIAL NUMBER HAS BEEN REMOVED OR DEFACED, PRODUCTS
SUBJECT TO NEGLIGENCE, ACCIDENT, IMPROPER OPERATION, MAINTENANCE OR STORAGE,
COMMERCIAL OR INSTITUTIONAL USE, PRODUCTS MODIFIED WITHOUT INVACARE'S EXPRESS
WRITTEN CONSENT INCLUDING, BUT NOT LIMITED TO, MODIFICATION THROUGH THE USE OF
UNAUTHORIZED PARTS OR ATTACHMENTS; PRODUCTS DAMAGED BY REASON OF REPAIRS MADE
TO ANY COMPONENT WITHOUT THE SPECIFIC CONSENT OF INVACARE, OR TO A PRODUCT
DAMAGED BY CIRCUMSTANCES BEYOND INVACARE'S CONTROL, AND SUCH EVALUATION WILL BE
SOLELY DETERMINED BY INVACARE. THE WARRANTY SHALL NOT APPLY TO PROBLEMS ARISING
FROM NORMAL WEAR OR FAILURE TO ADHERE TO THESE INSTRUCTIONS.
THE FOREGOING EXPRESS WARRANTY IS EXCLUSIVE AND IN LIEU OF ANY OTHER WARRANTIES
WHATSOEVER, WHETHER EXPRESS OR IMPLIED, INCLUDING THE IMPLIED WARRANTIES OF
MERCHANTABILITY AND FITNESS FOR A PARTICULAR PURPOSE, AND THE SOLE REMEDY FOR
VIOLATIONS OF ANY WARRANTY WHATSOEVER, SHALL BE LIMITED TO REPAIR OR REPLACEMENT
OF THE DEFECTIVE PRODUCT PURSUANT TO THE TERMS CONTAINED HEREIN, THE APPLICATION
OF ANY IMPLIED WARRANTY WHATSOEVER SHALL NOT EXTEND BEYOND THE DURATION OF THE
EXPRESS WARRANTY PROVIDED HEREIN. INVACARE SHALL NOT BE LIABLE FOR ANY
CONSEQUENTIAL OR INCIDENTAL DAMAGES WHATSOEVER.
THIS WARRANTY SHALL BE EXTENDED TO COMPLY WITH STATE/PROVINCIAL LAWS AND
REQUIREMENTS.

Stabilite InTouch™ /Coussin Stabilite OM 10 Part No 1141448
Pour plus rensiegnements sur les produits Invacare, sur les pièces ou le service après-vente, visitez www.invacare.com
Stabilite InTouch™ /Coussin Stabilite OM
REMARQUE:Vérifieztouteslespiècesqu’ellesn’aientpassubitdedégâtsdurantletrasnport.Lecaséchéant,
NEPA Sutiliser.ContactezleTransporteur/Distrbuteurpourobtenirdesinstructions.
PourassureruneinstallationetunusagecorrectetsansdangerduSTabiliteInTouch/CoussinStabilite
OM,ilestINDISPENSABLEderespectercesinstructions:
AVERTISSEMENT
NE PAS utiliser cet équipement sans avoir d’abord bien lu et compris ces instructions. Si vois
n’êtes pas capable de comprendre les Avertissements, Dangers et Instructions, contactez le
distrbuteur avant d’essayer d’installer cet èequipment sous risque de blessure ou dégâts.
Vérifiez toutes les pièces qu’elles n’aient pas subit de dégâts durant le transport et essayez avant
utilisation. En cas de dégâts, NE PAS utiliser. Contactez le distrbuteur pour obtenir des
instructions.
Le Stabilite InTouch/Coussin Stabilite OM N’EST PAS conçu pour être utilisé dans le cadre d’un
traitement des escarres.
L’état de l’épiderme doit être contrôlé fréquemment après l’installation d’un nouveau coussin.
Consultez votre médecin ou votre thérapeute si vous avez des questions concernant le
soulagement de votre poids, l’auto examen de la peau oui si vous avez des limitations ou besoins
spécifiques personnels.
Avant utilisation, assurez-vous que les bandes d’attache à boucles et crochets soient fermement
attachées entre la surface d’assise et le coussin.
Le coussin Stabilite InTouch a une limite de poids de 250 lb (114 kg) pour les coussins jusque et y
compris 20 po de large (508 mm) et de 350 lb (159 kg) pour les coussins audessus de 20 po (508
mm).
Le coussin Stabilite InTouch OM a une limite de poids de 300 lb (136 kg) pour les coussins jusque
et y compris 20 po de large (508 mm) et de 500 lb (227 kg) pour les coussins audessus de 20 po
(508 mm).
AVERTISSMENT POUR LES ACCESSOIRES
Les produits Invacare ont été conçus et fabriqués spécialement pour être utilisés avec les
accessoires Invacare. Les accessoires conçus par d’autres fabricants n’ont pas été testés par
Invacare et nous n’en recommandons pas l’utilisation avec les produits Invacare.
AVERTISSEMENT POUR L’INSTALLATION
Après TOUT réglage, réparation ou entretien, avant de réutiliser, assurez-vous que tous les élé-
ments de fixation soient fermes.
Information Importante
Lemeilleurmoyend’éviterles problèmesliésauxescarresestdebienencomprendrelacauseetde
comprendrevotrerôledansunprogrammedesoinsdelapeau.
Instructions pour l’assemblage, l’installation et le fontionnement
SAVE THESE INSTRUCTIONS

Pièce No 1141448 11 InTouch™ Stabilite/Coussin Stabilite OM
Consultezvotremédecinouvotrethérapeutesivousavezdeslimitationsoubesoinsspécifiques
personnels.
Touslessiègesdoiventêtresélectionnésméticuleusement.Lemeilleurmoyenpourvousassurerquele
siègechoisisrépondàvosbesoinsindividuelsestdetravaillerencooperérationavecvotrethérapeute
etvotremédecin.Pluslesbesoins
d’unpatientdeviennentcomplexes,pluslechoixdevientimportant.
Introduction
Coussin InTouch Stabilite
LecoussinInTouchStabiliteestconçupourassurerlastabilitépelvienneetlepositionnementdes
jambesauxpatientsaffectésd’uneasymétriedelaposture.LecoussiniStabiliteInTouchestdisponible
endeuxprofilsdifférentspours’adapteràl’importancedupositionnementrequisparlepatient.Le
StabiliteInTouchestfournienversionstandardavecunevessieThinAirpourlecontrôledes
déchiruressouslepelvis.
Coussin InTouch Stabilite OM (Obliquity Management, contrôle de déviation)
LecoussinInTouchStabiliteOMestconçupourassurerlepositionnement,lastabilitéetle
positionnementdesjambesdesutilisateurssoitaveclepelvisdeniveauouquisoffrenetd’une
déviationpelviennelégèreoumodérée.
LecoussinInTouchStabiliteOMprésentel’avantagesupplémentairedepermettreauthérapeuteouau
fornisseurdematérielderéhabilitationdetenircompteoudecorrigerunedéviationlégèreoumodérée
parlerepositionnementdesinsertsdedéviation.Consultezenpage 16Modificationducoussinpour
l’adapteràladéviation.
Housses intérieure/extérieure
Lahousseextérieureestconstituéed’untissushydrofugepourprotégerlamousse.Ledessusestcoupé
enuntissusstretch.Ledessousestcoupéenuntissusépais,nonglissant.
Unehousseintérieurehydrofugepermetlacirculationdel’airtoutenassurantuneprotection
supplémentaireàlamousse.
Inspection et nettoyage du coussin
Nousconseillonsuneinspectionetunnettoyagerégulierdeshoussesextérieureetintérieure.
AVERTISSEMENT
CESSEZ d’utiliser ce produit si n’importe quelle pièce du recouvrement, de la mousse et/ou de
plastic est déformée, cassée, usée et/ou déformée. Une réparation peut être effectuée ou organ-
isée par votre fournisseur.
Housse extérieure
ATTENTION
N’UTILISEZ PAS d’adoucisseur ou d’eau de javel. PAS de séchage machine. Séchage à l’air
uniquement. NE PAS sécher en plein soleil.
Lavezlahousseextérieureàlamachineeneaufroideetsurcyclelégeravecundétergentdoux.
LavessieThinAirestdisponibleenoptionpourlecoussinInTouchStabiliteOM.

InTouch™ Stabilite/Coussin Stabilite OM 12 Pièce No 1141448
Housse interne
Nettoyezlahousseinterneàlamainavecunchiffondoux,del’eautièdeetunesolutiond’unsavon
doux.Rincezetpendezpoursécher.
Mousse
Frottezlamousseavecunchiffonhumide.NEPASsubmergeroutremper.
Comment attacher/détacher le siège sur/de la surface d’assise
REMARQUE:Pourcetteprocédure,seréféreràlaFIGURE 1.
REMARQUE:Pourenleverlecoussindelasurfaced’assise,procédezensensinverse.
REMARQUE:Lecoussins’attacheàlasurfaced’assiseparattachesàbouclesetcrochetsaudessousdelahousse
ducoussin.Lasurfaced’assisepeutêtresoitunsiègerembourré,unebasecreuseouunepanne.
REMARQUE:Lafermetureéclairdusiègedoittoujoursêtreversl’arrière.
AVERTISSEMENT
Assurez-vous que les attaches à boucles et crochets soient attachés fermement à la surface
d’assise et au siège AVANT utilisation. Si le coussin n’est pas bien attaché à la surface d’assise,
soyez prudent lors du transfert de et vers le fauteuil roulant.
Bande d’attache à crochets/Pas de bande d’attache
1. Enlevezlabandeàcrochetsdoublefacedudessousdusiège.
2. Alignezlebordavantducoussinaveclebordavantdelasurface d’assise
3. Procédezàundesdeux:
•Banded’attacheàcrochets‐Attachezlecoussinsurlasurfaced’assiseenvousassurantqueles
bandesàboucledusiègesoientfermementattachéesauxbandesàcrochetsdelasurface
d’assise..
•Pasdebandesd’attache‐Placezlecoussinsurlasurfaced’assise.
Bandes d’attache à boucles
1. Vérifiezquelesbandesàcrochetsdoublefacesoientfermementattachéesauxbandesd’attacheà
bouclesaudessousducoussin.
2. Alignezlebordavantducoussinaveclebordavantdelasurface d’assise.
3. Attachezlecoussinàlasurfaced’assise,envousassurantquelabandeàcrochetsdoublefaceest
ferementattachéeauxbandesàbouclessurlahousseducoussinetsurlasurfaced’assise.

Pièce No 1141448 13 InTouch™ Stabilite/Coussin Stabilite OM
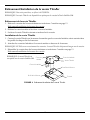
FIGURE 1 Comment attacher/détacher le siège sur/de la surface d’assise
Enlèvement/Installation de housses du coussin
AVERTISSEMENT
Les housses sont conçues pour prtéger la mousse de l’humidité et être ignifuges. NE PAS utiliser
le coussin sans les housses extérieure et intérieure. Si les housses sont déchirées, elles DOIVENT
être remplacées IMMEDIATEMENT.
Enlèvement de la housse extérieure
REMARQUE:Pourcetteprocédure,seréféreràlaFIGURE 2.
1. Enlevezlecoussindelasurfaced’assise.Consultezenpage 12Commentattacher/détacherlesiège
sur/delasurfaced’assise.
2. Ouvrezlahousseextérieure.
3. Enlevezlecoussin,toujoursdanssahousseintérieure,delahousseextérieure.
ATTENTION
NE PAS enlevez le deux housses, extérieure et intérieure, en même temps sous risque d’endom-
mager le tissus de la housse intérieure.
Installation de la housse extérieure
REMARQUE:Pourcetteprocédure,seréféreràlaFIGURE 2.
REMARQUE:Lorsqu’elleestinstalleéecorrectement,lavessieThinkAirestàlapartiesuérieuredelahousse
intérieure..
REMARQUE:Laferetureéclairestàl’arrièreetletissusstretchestàlapartiesupérieurede
lahousseextérieure.
2. Glissezlecoussindanslahousseextérieure.
3. Femrezlahousseextérieure.
Fermeture éclair
Partie à boucles de la bande d’attache
(fixée au coussin)
Partie à crochets double face
de la bande d’attache
(le cas échéant, enlevez le
papier protecteur)
Surface d’assise
Face avant du coussin
alignée avec l’arête avant
de la surface d’assise
Coussin
1. MettezlecoussinenplaceavecsahousseintérieureetlavessieThinAiràsaplaceversl’arrièrede
lahousseextérieure.
REMARQUE:LavessieThinAireststandardaveclecoussinInTouchStabilite.LavessieThinAirestdisponible
enoptionpourlecoussinInTouchStabiliteOM.

InTouch™ Stabilite/Coussin Stabilite OM 14 Pièce No 1141448
ATTENTION
Faites attention de ne pas coincer la housse intérieure dans le fereture éclair de la housse exté-
rieure sous risque d’abîmer la housse intérieure.
4. Rattachezlecoussinsurlasurfaced’assise.Consultezenpage 12Commentattacher/détacherle
siègesur/delasurfaced’assise.
FIGURE 2 Enlèvement de la housse extérieure - Installation de la housse extérieure
Enlèvement de la housse intérieure
REMARQUE:Pourcetteprocédure,seréféreràlaFIGURE 3.
1. Enlevezlecoussindesahousseextérieure.Consultezenpage 13Enlèvementdelahousse
extérieure.
2. Enlevezlerabatdelahousseintérieure.
3. Enlevezlecoussindelahousseintérieure.
Installation de la housse intérieure
REMARQUE:Pourcetteprocédure,seréféreràlaFIGURE 3.
1. PositionnezlecoussinavecsavessieThinAirversl’arrièredelahousseintérieurenouvelle/
existante.
REMARQUE:Lafacearrièreducoussinestmarquée<<REAR>>(arrière).
2. Glissezlecoussindanslahousseintérieure.
3. Pliezlerabatsupérieurversledessusetpoussez‐ledansle
fonddelahousse.
4. Repliezlerabatinférieurversl’arrière.
5. Placezlecoussin,avecsahousseintérieure,danslahousseextérieure.Consultezenpage 13
Installationdelahousseextérieure.
FIGURE 3 Enlèvement de la housse intérieure - Installation de la housse intérieure
Housse Extérieure
Housse Intérieure
Fermeture
éclair
Coussin
Vessie ThinAir
REMARQUE:LavessieThinAirest
uneoptionaveclecoussinStabilite OM
Coussin
Housse Intérieure
Rabat Supérieur
Rabat Inférieur
Vessie ThinAir
REMARQUE:LavessieThinAirestune
optionaveclecoussinStabiliteOM

Pièce No 1141448 15 InTouch™ Stabilite/Coussin Stabilite OM
Enlèvement/Installation de la vessie ThinAir
REMARQUE:Pourcetteprocédure,seréféreràlaFIGURE 4.
Enlèvement de la vessie ThinAir
1. Enlevezlecoussindeshoussesintérieureetextérieure.Consultezenpage 13
Enlèvement/Installationdehoussesducoussin.
2. Défaiteslacourroiearrièreetlesdeuxcourroieslatérales.
3. SoulevezlavessieThinAirexistanteetenlevez‐laducoussin.
Installation de la vessie ThinAir
1. CentrezlavessieThinAirsurlamoussedemanièrequelescourroieslatéralessoientcentréesdans
lesprofilsdechaquecôtédelamousse.
2. Attachezlescourroieslatéralesetlacourroiearrièreendessousdelamousse.
REMARQUE:NEPA S serrerexcessivementlescourroies.LavessieThinAirdoitpouvoirbougeraveclecoussin.
3. Réinstallezlecoussindansleshoussesintérieureetextérieure.Consultezenpage 13
Enlèvement/Installationdehoussesducoussin.
FIGURE 4 Enlèvement/Installation de la vessie ThinAir
Vessie ThinAir
Coussin
Profil de la Mousse
Courroie Latérale
Courroie Latérale
Courroie
Arrière
Profil de la Mousse
REMARQUE:LavessieThinAirest
uneoptionaveclecoussinStabilite OM
REMARQUE:LavessieThinAirestdisponibleenoptionpourlecoussinInTouchStabiliteOM.

InTouch™ Stabilite/Coussin Stabilite OM 16 Pièce No 1141448
Modification du coussin pour l’adapter à la déviation
REMARQUE:Pourcetteprocédure,seréféreràlaFIGURE 5.
Modification pour une déviation d’environ 12 mm
REMARQUE:Cettemodificationpeutsefairesurl’unoul’aturecôtédecoussin.
1. Définissezd’abordquelcôtéducoussindoitêtreabaissé.
2. Enlevezlecoussindeshoussesextérieureetintérieure.Consultezenpage 13
Enlèvement/Installationdehoussesducoussin.
3. Ducôtéducoussinquidoitêtreabaissé,enlevezl’insertdedéviationentirantsurl’onglet.
REMARQUE:N’enlevezqu’unseulinsertdedéviation.Lecoussinn’estpasconçupourêtreutiliséaveclesdeux
insertsdedéviationenlevés.
4. Réinstallezlecoussindansleshoussesintérieureetextérieure.Consultezenpage 13
Enlèvement/Installation
dehoussesducoussin.
Modification pour une déviation d’environ 25 mm
REMARQUE:Cettemodificationpeutsefairesurl’unoul’aturecôtédecoussin..
1. Définissezd’abordquelcôtéducoussindoitêtreabaissé.
2. Enlevezlecoussindeshoussesextérieureetintérieure.Consultezenpage 13
Enlèvement/Installationdehoussesducoussin.
3. Ducôtéducoussinquidoitêtreabaissé,enlevezl’insertdedéviationentirantsurl’onglet.
4. Alignezl’arêtechanfreinéedesinsertsdedéviationtelquerepresésentéauDETAIL<<B>>dela
FIGURE 5.
5. Placezl’insertdedéviationenlevéàl’étape3dansl’insertdedéviationquisetrouveàsaplacesur
lecoussintelquereprésentéauDETAIL<<B>>delaFIGURE 5.
6. Pressezlelongdesbandesdebouclesetcrochets.Tirezsurl’ongletpourvousassurerquelesinserts
dedéviationsontmaintenusferementàleurplaceavantd’installerleshousses.
7. Réinstallezlecoussindansleshoussesintérieureetextérieure.Consultez
enpage 13
Enlèvement/Installationdehoussesducoussin
.

Pièce No 1141448 17 InTouch™ Stabilite/Coussin Stabilite OM
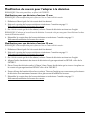
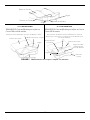
FIGURE 5 Modification du coussin pour l’adapter à la déviation
DETAIL <<A>> - MODIFICATION POUR ENVIRON
12 mm DE DEVIATION
Inserts de déviation
Onglet
Onglet
Dessus du Coussin
Dessous du Coussin
Dessous du Coussin
Dessus du
Coussin
DETAIL <<B>> - MODIFICATION POUR ENVIRON
25 mm DE DEVIATION
Dessous du Coussin
Dessus du Coussin
Enlevez un insert de déviation pour une modification 12 mm
Alignez les arêtes
chanfreinées des
inserts de déviation
Placez l’inserrt de déviation enlevé à l’ÉTAPE 3 sur l’insert de
déviation qui se trouve sur le coussin pour une modification pour
25 mm de déviation.
REMARQUE:Cettemodificationpeutsefair esurl’un ou
l’aturecôtédecoussin.
REMARQUE:Cettemodification peutsefairesur
l’unou l’atur ecôtédecoussin.
Bandes à boucles et crochets
Onglet
Bandes à boucles
et crochets
Onglet

InTouch™ Stabilite/Coussin Stabilite OM 18 Pièce No 1141448
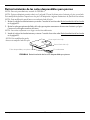
Enlèvement/Installation des coins amovibles pour les jambes
REMARQUE:Pourcetteprocédur e,seréféreràlaFIGURE 6.
REMARQUE:Cettepr océdur eajoute25mmde hauteurdebasdusiègeausol,d’uncôté.Ce ttemodificationpermet
unappuime illeuraupiedoudetenircompted’unmanquedeflexibilitédelahanche.
REMARQUE:Cettemodifica tionpeutsefairesurl’un
ou l’atur ecôtédecoussin.
1. Enlevezlecoussindeshoussesextérieureetintérieure.Consultezenpage 13Enlèvement/Insta llationde
houssesducoussin.
2. Enlevezlescoinsdeja mbeducôtéducoussinquidemandeunehauteurausolréduite.Gardezlecoin
dejambeamoviblepour usagefutur.
REMARQUE:Lescoinsdejambesontmaintenusen placepardesba ndesàbouclesetcrochets.
3. Réinstallezlecoussindansleshousses intérieureetextérieure.Consultezen page 13
Enlèveme nt/Installationdehoussesducoussin.
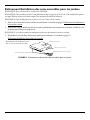
FIGURE 6 Enlèvement/Installation des coins amovibles pour les jambes
Coins de Jambes Amovibles
Dessus du Coussin
Bandes à boucles et crochets
Dessous du Coussin
REMARQUE:Cettemodificationpeutse
fairesurl’unoul’aturecôtédecoussin.

GARANTIE LIMITÉE
Pièce No 1141448 19 InTouch™ Stabilite/Coussin Stabilite OM
GARANTIE LIMITÉE
REMARQUE : LA GARANTIE PRÉSENTÉE CI-DESSOUS A ÉTÉ MISE AU POINT EN CONFORMITÉ AVEC LA
LOI FÉDÉRALE AMÉRICAINE SUR LES PRODUITS FABRIQUÉS APRÈS LE 4 JUILLET 1975.
Cette garantie ne s'applique qu'à l'acheteur/utilisateur initial de notre produit.
Cette garantie vous donne des droits juridiques spécifiques mais vous pouvez également jouir de droits juridiques
qui varient d'état à état.
Invacare garantit à l'acheteur/utilisateur original que ce produit est exempt de vices de matière et de fabrication
pour deux an d'utilisation par l'acheteur original, sauf pour la housse qui est garantie pour une durée de 90 jours
d'utilisation par l'acheteur original. Si durant cette période couverte par la garantie un produit s'avère avoir des
défauts, il sera réparé ou remplacé à la discrétion d'Invacare. Cette garantie ne comprend pas la main-d'œuvre ni
les frais d'expédition qui seraient dus à l'installation de la pièce de rechange ou à la réparation de cette pièce sur
un tel produit. L'obligation d'Invacare et votre recours exclusif sous cette garantie sont limités à une telle
réparation ou à un tel remplacement.
Pour tout service couvert par la garantie, veuillez contacter le distributeur auprès duquel vous avez acheté votre
produit Invacare. Dans le cas où vous n'obtenez pas satisfaction avec votre service de garantie, écrivez
directement à Invacare à l'adresse qui se trouve sur la couverture au dos de cette brochure. Fournissez-nous le
nom et l'adresse de votre distributeur, la date d'achat et indiquez la nature du défaut. Si le produit possède un
numéro de série, indiquez-le également.
Invacare Corporation va émettre une autorisation de retour. Les unités ou pièces défectueuses doivent être
renvoyées pour inspection de garantie en utilisant le numéro de série, le cas échéant, comme identification dans
les trente jours qui suivent la date d'autorisation.
Ne renvoyez PAS les produits à l'usine sans notre accord préalable.
Les expéditions en port du seront refusées ; veuillez, s.v.p. payer le fret d'avance.
LIMITATIONS ET EXCLUSIONS : LA PRÉSENTE GARANTIE NE S'APPLIQUE PAS AUX PRODUITS
PORTANT DES NUMÉROS DE SÉRIE SI CES NUMÉROS ONT ÉTÉ SUPPRIMÉS OU EFFACÉS ; ELLE NE
S'APPLIQUE PAS NON PLUS AUX PRODUITS QUI ONT ÉTÉ SUJETS À NÉGLIGEANCE, ACCIDENTS, QUI
ONT ÉTÉ UTILISÉS, ENTRETENUS OU STOCKÉS DE MANIÈRE INCORRECTE, QUI ONT ÉTÉ SUJET À
UTILISATION COMMERCIALE OU INSTITUTIONNELLE, AUX PRODUITS QUI ONT ÉTÉ MODIFIÉS SANS
AUTORISATION SPÉCIFIQUE ÉCRITE D'INVACARE, ENTRE AUTRES, MODIFICATION DE L'APPAREIL
AVEC DES PIÈCES OU DES AJOUTS NON AUTORISÉS, DOMMAGES OCCASIONNÉS DURANT DES
RÉPARATIONS EFFECTUÉES SUR L'UNE DES PIÉCES DE L'APPAREIL SANS L'ACCORD SPÉCIFIQUE
PRÉALABLE D'INVACARE, DOMMAGES CAUSÉS PAR DES CONDITONS QUI ÉCHAPPENT AU
CONTRÔLE D'INVACARE ; INVACARE DÉTERMINERA SI L'UNE DES CONDITIONS CI-DESSUS
S'APPLIQUE. LA GARANTIE NE S'APPLIQUE PAS AUX PROBLÈMES CAUSÉS PAR L'USURE NORMALE DE
PRODUIT ET À L'UTILISATION NON CONFORME AUX INSTRUCTIONS FOURNIES.
LA PRÉSENTE GARANTIE EST EXCLUSIVE ET TIENT LIEU POUR TOUTES LES AUTRES GARANTIES
EXPRESSES. LES GARANTIES IMPLICITES, SI ELLES EXISTENT, ENTRE AUTRES LES GARANTIES DE
QUALITÉ MARCHANDE ET D'APTITUDE À UN EMPLOI DONNÉ NE SE PROLONGENT PAS AU-DELÀ DE
LA PRÉSENTE GARANTIE EXPLICITE ; LES RECOURS AUX VIOLATIONS DE TOUTE GARANTIE
IMPLICITE SONT LIMITÉS À LA RÉPARATION ET AU REMPLACEMENT DU PRODUIT DÉFECTUEUX
DANS LES LIMITES DES DISPOSITIONS DE CE PRÉSENT DOCUMENT. L'APPLICATION D'UNE
GARANTIE IMPLICITE QUELCONQUE NE POURRA PAS S'ÉTENDRE AU-DELÀ DE LA DURÉE DE LA
GARANTIE EXPLICITE CI-DESSUS. INVACARE NE PEUT EN AUCUN CAS ÊTRE TENU POUR
RESPONSABLE DE QUELCONQUE MANIÈRE QUE CE SOIT EN CAS DE DOMMAGES INDIRECTS OU
ACCESSOIRES.
CETTE GARANTIE SERA ÉTENDUE POUR ÊTRE CONFORME AUX LOIS ET RÉGLEMENTATIONS DE
VOTRE ÉTAT/PROVINCE.

Cojín Stabilite/Stabilite OM de InTouch™ 20 Part No 1141448
Para obtener más información sobre los productos, partes y servicios de Invacare, visite el sitio www.invacare.com
Cojín Stabilite/Stabilite OM de InTouch™
NOTA:Revisetodaslaspartesporsisufrier ondañosduranteelenvío.Siasí fuera,NOuselaunidad.Comuníquese
consudistribuidor/empr esa detransportesparaobtenermayoresinstrucciones.
Afindeinstalar,operaryusarenformaseguraelcojínStabilite/StabiliteOMdeIn Touch,es
FUNDAMENTALacatarlassiguientes instrucciones:
ADVERTENCIA
ANTES de usar este equipo, lea y comprenda cabalmente estas instrucciones. Si no entiende las
advertencias, precauciones e instrucciones, comuníquese con su distribuidor antes de usar el equipo,
de lo contrario podría sufrir lesiones o causar daños materiales.
Revise todas las partes por si sufrieron daños durante el envío y pruébelas antes de usarlas. Si
presentan daños, NO use la unidad. Comuníquese con su distribuidor para obtener mayores
instrucciones.
El cojín Stabilite/Stabilite OM de InTouch NO está diseñado para usarse en el tratamiento de úlceras
causadas por presión.
El estado de la piel debe revisarse con mucha frecuencia tras la instalación de cualquier cojín nuevo.
Consulte a su terapeuta o médico si tiene dudas sobre la forma de aligerar peso y autoexaminarse la
piel, o acerca de sus limitaciones y necesidades individuales.
Cerciórese de que las tiras adherentes estén firmemente unidas entre la superficie del asiento y el
cojín antes de usarlo.
El cojín Stabilite de InTouch tiene un límite de peso de 250 lbs (114 Kg) para anchos de cojín hasta 20
pulgadas (508 mm) inclusive, y 350 lbs (159 KG) para anchos mayores.
El cojín Stabilite OM de InTouch tiene un límite de peso de 300 lbs (136 Kg) para anchos de cojín
hasta 20 pulgadas (508 mm) inclusive, y 500 lbs (227 Kg) para anchos mayores.
ADVERTENCIA SOBRE ACCESORIOS
Los productos Invacare están específicamente diseñados y fabricados para usarse con accesorios
Invacare. Invacare no ha sometido a prueba los accesorios diseñados por otros fabricantes, por lo que
no recomienda usar estos accesorios con productos Invacare.
ADVERTENCIA DE INSTALACIÓN
Después de realizar CUALQUIER ajuste, reparación o servicio y antes de usar la unidad, cerciórese
de que todos los componentes de conexión estén seguros.
Información importante
Lamejormaneradeevitarproblemasrelacionadosconúlcerasporpresiónesconocersuscausasyseguir
unprogramadetratamientodérmico.
Consulteasuterapeutaomédico sitienedudassobresuslimitacionesynecesidadesindividuales.
Sedebenseleccionarcuidadosamentetodosloscojines.Trabajejuntoconsuterapeutaymédicopara
cerciorarsedeescogerelcojínquemejorsatisfagasusnecesidades.Mientrasmáscomplejasseanlas
necesidadesdel paciente,may orimportanciatienelaev aluacióndelcojín.
Instrucciones de armado, instalación y operación
CONSERVE ESTAS INSTRUCCIONES
La page charge ...
La page charge ...
La page charge ...
La page charge ...
La page charge ...
La page charge ...
La page charge ...
La page charge ...
-
 1
1
-
 2
2
-
 3
3
-
 4
4
-
 5
5
-
 6
6
-
 7
7
-
 8
8
-
 9
9
-
 10
10
-
 11
11
-
 12
12
-
 13
13
-
 14
14
-
 15
15
-
 16
16
-
 17
17
-
 18
18
-
 19
19
-
 20
20
-
 21
21
-
 22
22
-
 23
23
-
 24
24
-
 25
25
-
 26
26
-
 27
27
-
 28
28


Invacare 1141448 Manuel utilisateur
- Taper
- Manuel utilisateur
- Ce manuel convient également à
dans d''autres langues
- English: Invacare 1141448 User manual
- español: Invacare 1141448 Manual de usuario
Documents connexes
-
Invacare 1141448 Manuel utilisateur
-
-
-
-
-
-
-
Invacare Single Density Cushion Installation And Operating Instructions Manual
-
-
Autres documents
-
Unbranded OP-PESOF-CNS-MOR-K Guide d'installation
-
RST Brands OP-PEEC20-BLS-K Mode d'emploi
-
 Arden Selections AH0WF04B-DKZ1 Mode d'emploi
-
Classic Accessoires 60-374-011101-RT Mode d'emploi
-
Hampton Bay H168-01524900 Mode d'emploi
-
Classic Accessories 60-231-010801-RT Mode d'emploi
-
Orliman 1202 Mode d'emploi
