Virutex SRI174T Operating Instructions Manual
- Taper
- Operating Instructions Manual

Sierra de incisión
Plunge-cut saw
Scie circulaire plongeante
Tauchsäge
Sega circulare a tuffo
Serra de incisão
Пила циркулярная погружная
Pilarko-zagłębiarka
SRI174T
MANUAL DE INSTRUCCIONES
OPERATING INSTRUCTIONS
MODE D’ EMPLOI
GEBRAUCHSANWEISUNG
MANUALE D’ISTRUZIONI
MANUAL DE INSTRUÇÕES
ИНСТРУКЦИЯ ПО ЭКСПЛУАТАЦИИ
INSTRUKCJA OBSŁUGI

2
Fig. 1 Fig. 2
Fig. 4
Fig. 3
MANUAL DE INSTRUCCIONES
OPERATING INSTRUCTIONS
MODE D'EMPLOI
GEBRAUCHSANWEISUNG
MANUALE D'ISTRUZIONI
MANUAL DE INSTRUÇÕES
ИНСТРУКЦИЯ
ПО
ЭКСПЛУАТАЦИИ
INSTRUKCJA OBSŁUGI
página/page
seite/pagina
страница/strona
ESPAÑOL Sierra de incisión SRI174T
4
ENGLISH SRI174T Plunge-cut saw
8
FRANÇAIS Scie circulaire plongeante SRI174T
12
DEUTSCH Tauchsäge SRI174T
16
ITALIANO Sega circulare a tuffo SRI174T
21
PORTUGUÉS Serra de incisão SRI174T
25
РУССКИЙ Пила циркулярная погружная SR174T
29
POLSKI
Pilarko-zagłębiarka SRI174T
34
D
B
A
90°
M
C
G
H
45°

3
Fig. 9
Fig. 10
Fig. 11
Fig. 12
Fig. 5
Fig. 6
Fig. 8
Fig. 7
2 - 4 mm
2 - 4 mm
F
G
G
E
L
K
J
7445818
N
P

8
muy diferente al valor declarado en otras condiciones
de aplicación, con otros útiles de trabajo o con un
mantenimiento insuficiente de la herramienta eléctrica
y sus útiles, pudiendo llegar a resultar un valor mucho
más elevado debido a su ciclo de trabajo y modo de uso
de la herramienta eléctrica.
Por tanto, es necesario fijar medidas de seguridad de
protección al usuario contra el efecto de las vibraciones,
como pueden ser mantener la herramienta y útiles de
trabajo en perfecto estado y la organización de los
tiempos de los ciclos de trabajo (tales como tiempos
de marcha con la herramienta bajo carga, y tiempos de
marcha de la herramienta en vacío y sin ser utilizada
realmente ya que la reducción de estos últimos puede
disminuir de forma sustancial el valor total de exposición).
17. GARANTÍA
Todas las máquinas electroportátiles VIRUTEX, tienen una
garantía válida de 12 meses a partir del día de suministro,
quedando excluidas todas las manipulaciones o daños
ocasionados por manejos inadecuados o por desgaste
natural de la máquina. Para cualquier reparación, dirigirse
al servicio oficial de asistencia VIRUTEX, S.A.
VIRUTEX se reserva el derecho de modificar sus productos
sin previo aviso.
ENGLISH
SRI174T PLUNGE-CUT SAW
Important
Read these OPERATING INSTRUCTIONS
and the attached GENERAL SAFETY
INSTRUCTIONS LEAFLET carefully before
using the machine. Make sure you have
understood them before operating the
machine for the first time.
Keep both sets of instructions for any
future queries.
1. SAFETY INSTRUCTIONS FOR USING THE
PLUNGE-CUT CIRCULAR SAW
1.1 GENERAL INSTRUCTIONS
• We recommend that, while using the machine, you
keep the documents relating to it within reach, so that
you can consult them if necessary while working. We
also recommend that if possible, you keep a copy in a
safe place.
• Check the condition of the plug and cable every time
you use the machine.
• Unplug the power supply before handling the machine.
• Always keep the cable away from the moving parts
of your machine.
• Only plug into the power socket with the machine
switched off.
• If you need to use an electric extension lead, the wires
must be at least 1 mm
2
in diameter and the cable must
be completely unwound.
• Use a blocking device for the piece you are going
to work on whenever possible, so that it does not slip.
• In the event of jamming, turn the machine off imme-
diately and unplug the power supply. Do not resume work
without having removed the cause of the jamming. If this
is inside the machine, give it to an authorised technician.
• Before using an accessory, make sure that its maxi-
mum rotation speed is compatible with the machine’s
performance.
• As far as possible, always use protective equipment
such as gloves, goggles, safety shoes, etc. Off-cuts can
lead to injuries.
• Before cutting on a wall, floor or ceiling, make sure
there is no pipework behind it.
• Power tools must not be used by people under 16
years old.
• Only bring the machine in operation near to the piece
being worked on.
• Both above and below the cut path must be free of
obstacles.
• Do not put your fingers in the shavings ejection
nozzle.
• Keep your hands away from the moving saw. Avoid
contact with the saw blade that protrudes from the
lower part of the unit.
• Do not use the machine above your head.
• Do not work with materials containing asbestos.
• Do not use blades with a base disk that is thicker or
with a kerf that is smaller than the thickness of the
dividing knife.
• The cutting guide must be readjusted when changing
circular saws with different diameters.
• When the machine is turned off, wait for the blade
to stop by itself. Never stop the blade by pressing on it
from the side or in the centre.
• Always use the dividing knife.
• Never force a machine that appears to have operating
difficulties or shows some sort of weakness. There may
be a technical problem, in which case continuing to work
could damage the machine irreparably. In all cases where
the machine does not work properly, have it checked by
an authorised agent without delay.
• Use only original accessories.
1. 2 SPECIFIC INSTRUCTIONS
FOR THE MACHINE
CAUTION

9
• Do not place your hands in the sawing area or near
the saw blade. Hold the machine with both hands, using
the two handles of the circular saw. This will prevent
them from being injured by the saw blade.
• Do not hold the piece to be sawn from below. The
saw protection does not cover the saw blade below the
piece to be sawn.
• Adapt the cutting depth to suit the thickness of the
material. No more than one complete tooth’s height
should be visible under the material.
• Never hold the piece you are going to saw with one
hand or on your leg. Place the piece somewhere it is
well supported. It is very important to fix the material
correctly in order to minimise risks of contact with the
body, jamming of the sawing blade or loss of control.
• Wear the appropriate personal protection equip-
ment:
ear protection, protective goggles and a mask for dusty
work, and protective gloves when working with rough
materials and when changing tools.
1. 3 CAUSES OF BACKLASH
AND WAYS TO AVOID IT
• A backlash is the unexpected reaction of a saw blade
which becomes jammed, blocked or is incorrectly alig-
ned, which may lead to the saw exiting the material in
an uncontrolled fashion and being deflected towards
the user.
• The saw blade becomes blocked when it becomes
hooked or jammed in the slot being sawn which beco-
mes narrower, and the strength of the motor jerks it
backwards towards the user.
• If the saw blade becomes twisted or incorrectly aligned,
the teeth on the lower part of the saw can become stuck
in the surface of the material, making the blade jump
out towards the user. Backlash occurs as a consequence
of incorrect or inappropriate usage of the saw. It can
be avoided if the appropriate precautionary measures
described below are taken.
• Hold the saw with both hands and position your arms
in such a way as to be able to deal with the strength
of a backlash. Always hold the saw blade to one side.
Never place it in line with your body. In the event of a
backlash the circular saw may jerk backwards. However,
the force of the backlash can be controlled by the user
by applying the appropriate measures.
• In the event of the saw blade becoming blocked or the
sawing work stopping for any other reason, release the
on/off switch and hold the saw firmly in the material
until the saw blade has stopped completely. Do not under
any circumstances attempt to take the saw out of the
material or pull the saw backwards while the blade is
moving, as this may cause a backlash. Determine the
cause of the saw blade blockage and rectify the problem
by taking the appropriate measures.
• If you want to carry on working with a saw blade that
is in material, centre the blade on the sawing groove
and make sure that the teeth of the saw are not stuck
in the material. If the saw blade is stuck, it may come
out of the material or cause a backlash when it is
turned on again.
• Prop up large panels to prevent the risk of a backlash
when a saw blade becomes stuck. Large panels may
bend due to their own weight. The panels must be
supported on both sides, next to the sawing groove
and also on the edge.
• Do not use blunt or damaged saw blades. Saw blades
with blunt or incorrectly aligned teeth result in increased
friction, blocked saw blades and backlash, as the saw
groove is too narrow.
• Before starting to saw, set the cutting depths and angles.
If the settings change while sawing, the saw blade may
become stuck and could cause a backlash.
• Be especially careful when making plunge cuts in a
hidden area, such as a wall. The saw blade making the
plunge cut may become blocked when it comes across
hidden objects and cause a backlash.
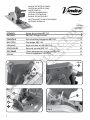
2. SPECIFICATIONS
Motor.................................................50/60Hz
Imput power..........................................1150 W
No-load speed...................................5500/min
Saw diameter......................................160 mm
Depth of cut at 90°................................55 mm
Depth of cut at 45°...............................35 mm
Dividing knife............................................Yes
Weight....................................................4,7 Kg
Weighted equivalent continuous
acoustic pressure level A..................................................89 dBA
Acoustic power level A...................................................100 dBA
Uncertainty...................................................................K = 3 dbA
Wear ear protection!
Vibration total values.................................................a
h
: 3.5 m/s
2
Uncertainty....................................................................K: 1.5 m/s
2
3. STANDARD EQUIPMENT
• SRI174T plunge-cut circular saw in transport case
• One M5 Allen Key
• One dust collector connection N (Fig. 12),
ref.8204262
• Operating instructions and miscellaneous documen-
tation.
• 800 mm guide rail (only with the SRI174T-UCP 800
mm model)
4. STARTING THE MACHINE
• Switching On - Press the safety button B then press

10
button A and hold depressed. (Fig. 2)
• Switching Off - Release switch button A.
5. ADJUSTING THE CUT DEPTH
The cut depth must be approximately 5 mm greater
than the thickness of the material to be cut. Loosen
screw C (Fig. 3), set the limit of the desired cut depth
and tighten screw C again.
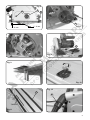
6. ADJUSTING THE DIVIDING KNIFE
The dividing knife helps to prevent a backlash.
For safety reasons, the dividing knife must be installed
and correctly adjusted before any sawing operation
takes place.
The dividing knife must be set so that the distance
between the saw blade circle and the dividing knife is
2 to 4 mm, and the saw blade is 2 to 4 mm lower than
the dividing knife.
Disconnect the machine from the mains
before performing any operation.
To adjust the dividing knife, the machine must be locked
in the “Saw Change” position.
To do this, pull rod D outwards (Fig. 1) and turn it 90°
clockwise until it meets the support cradle and then free
the machine using safety catch B (Fig. 2) and press this
in the cutting direction until the trigger is automatically
set in the “Saw Change” position on the machine. Use the
Allen key to loosen screw E (Fig. 5), adjust the dividing
knife as needed and retighten it.
Loosen rod D (Fig. 1) and turn it anticlockwise until its
original position and the machine will return automa-
tically to its rest position.
7. CHANGING THE SAW BLADE
Disconnect the machine from the mains
before performing any operation.
Follow the instructions in section 6, to set the machine
in the “Saw Change” position.
Once the machine is set, press lever M (Fig. 4) until the
axis is wedged in place.
Using the Allen key, loosen screw F (Fig. 5) which holds
the outer fixing plate.
Remove the outer fixing plate and the saw blade and
clean the inner saw fixing plate.
Fit the new saw blade and check that the rotation direc-
tions of the saw blade and the machine are the same.
Fit the outer fixing plate of the saw and manually attach
fastening screw F (Fig. 5) to the axis.
Press lever M (Fig. 4) until the axis is wedged in place
and tighten screw F with the Allen key.
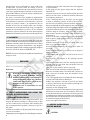
8. ATTACHING THE DUST COLLECTOR
The dust collector connection N (Fig. 12) included in the
standard machine, can be connected to the machine by
means of the STANDARD DUST CONNECTOR FITTING, 3.5
m ref. 6446073 or 1746245 of 5 m (optional) to our dust
collectors AS182K, AS282K, or any other industrial dust
collector may be fitted (Fig. 12).
9. ADJUSTING THE CUTTING ANGLE
The machine can be adjusted to make bevelled cuts of
between 0° and 45°. To do this, loosen the front and
back knobs G (Fig. 3 and 5), adjust to the desired cutting
angle and fix them once again.
Warning: The two final positions (0° and 45°) are ad-
justed in the factory but can be readjusted by technical
service. (Fig. 3).
10. SAWING WITH THE MACHINE
Always fix the material in place so that it cannot move
when you work with it.
The machine must always be held with both hands on
the handles provided for that purpose.
Always hold the side handle with the left hand and
the front handle with the right hand to give you good
control of the saw.
Check that you have set the right cutting depth.
Place the front of the saw base on the material.
Turn the machine on and press slowly downwards until
you reach the desired cutting depth.
Always move the machine forwards,
never towards you, as this could cause a
serious accident.
Move forward gently and evenly, never sharply.
Make sure that the base of the machine is well supported
on the material.
When you saw along a previously marked line, you can
use the guide groove H (Fig. 3), located at the front of
the base, to follow the line. Groove H shows the cutting
line of the saw at any blade angle.
When you finish cutting, turn off the machine and take
it to its upper safety position.
11. SAWING BLIND SEGMENTS
BY PLUNGE CUT
When you want to cut blind segments in a panel,
proceed as follows:

11
Always place the machine with the edge
of the base against a fixed edge, in order
to prevent backlashes.
• Turn on the machine, press slowly downwards until
you reach the adjusted cutting depth and move forward
smoothly, never sharply, in the cutting direction.
Marks I (Fig. 5) located on the protection cover show
the edges and the centre of the saw blade at its maxi-
mum cut depth.
12. GUIDE RAIL FOR PARALLEL CUTS
Guide rails, available in lengths of 800 mm and of 1400
mm, enable you to make precise and clean cuts, as
well as protecting the surface of the material against
possible damage.
The guide rails are fitted with a splinter protector P
(Fig. 11) which must be cut to size before being used
for the first time:
• Place the machine at the rear end of the guide rail.
• Turn the saw on and press downwards to the set cut
depth and cut the whole length of the splinter protector
without deviation.
• The edge of the splinter protector coincides exactly
with the edge of the cut.
ADJUSTING THE MACHINE ON THE RAIL:
The machine is equipped with adjustment knobs J (Fig.
8) which enable you to eliminate gaps between the
machine channel and the guide rail.
FASTENING THE RAIL TO THE MATERIAL:
With G-clamps, (optional accessory. 2-item set, ref.
6045710):
We recommend using G-clamps to fasten the rail to
the material.
Insert a G-clamp in the slot of the rail at each end,
move them closer to the material and fasten it at the
edges (Fig. 9).
With suction pads, (optional accessory. 2-item set, ref.
7445819):
The rail can also be fixed to the material with which
you wish to work by using the suction pads, although
only when the surface of the material is flat, smooth
and non-porous, such as melamine-coated or smooth
layered surfaces.
We recommend fitting the two suction pads on the rail,
near each edge of the material.
The suction pad works by pressing it down onto the sur-
face to which it is to be attached and moving the central
lever to the horizontal position, as shown (Fig. 10).
The suction pads are specially designed for fixing
templates during routing or sawing jobs. If the work
is carried out non-continuously, with long breaks in
between, it will be necessary to check the suction of
the pads before resuming work.
SAWING WITH A GUIDE RAIL:
Place the machine at the beginning of the guide rail,
switch on the machine, press downwards slowly until
you reach the adjusted cutting depth and move forward
smoothly, never suddenly, in the cutting direction.
13. CHANGING BRUSHES
Disconnect the machine from the mains
before performing any operation.
Brushes should be changed when they have a minimum
length of 6 mm.
To replace them:
Remove the 4 screws holding motor cover L (Fig. 6) and
remove the cover.
Take out the brushes from each brush-holder with
tweezers or pliers.
Remove the screw K (Fig. 7) fastening them, and replace
them with new ones.
Replace the motor cover L (Fig. 6) with the 4 screws.
14. OPTIONAL ACCESSORIES
7406518 UCP174T Guide rail for parallel cuts, 800 mm
(Included as standard in SRI174T-UCP model)
7406519 UCP174T Guide rail for parallel cuts, 1,400
mm
6045710 Set of 2 holding G-clamps.
7445819 Set of 2 UCP174T suction pads.
7445818 UCP rail jointing kit. Enables two rails to be
joined (see Fig. 11).
6446073 Dust collection connector 2.25 m
1746245 Dust collection connector 5 m
15. MAINTENANCE
Make sure that blade guard moves freely and that it
automatically slides over the saw blade. Check blade
guard travel before use when plug is withdrawn.
Motor housing vent slots must be kept clean. Blow out
slots from time to time.
Change carbon brushes when required. Brush length
must be at least 6 mm. Have saw serviced only at
authorized VIRUTEX service centers. Use only original
VIRUTEX spare parts.
16. NOISE AND VIBRATION LEVEL
The noise and vibration levels of this device have been
measured in accordance with European standard EN
60745-2-5 and EN 60745-1 and serve as a basis for com-

12
parison with other machines with similar applications.
The indicated vibration level has been determined for
the device’s main applications and may be used as an
initial value for evaluating the risk presented by expo-
sure to vibrations. However, vibrations may reach levels
that are quite different from the declared value under
other application conditions, with other tools or with
insufficient maintenance of the electrical device or its
accessories, reaching a much higher value as a result
of the work cycle or the manner in which the electrical
device is used.
Therefore, it is necessary to establish safety measures
to protect the user from the effects of vibrations, such
as maintaining both the device and its tools in perfect
condition and organising the duration of work cycles
(such as operating times when the machine is subjected
to loads, and operating times when working with no-load,
in effect, not in use, as reducing the latter may have a
considerable effect upon the overall exposure value).
17. WARRANTY
All VIRUTEX power tools are guaranteed for 12 months
from the date of purchase, excluding any damage which
is a result of incorrect use or of natural wear and tear
on the machine. All repairs should be carried out by the
official VIRUTEX technical assistance service.
VIRUTEX reserves the right to modify its products wi-
thout prior notice.
FRANÇAIS
SCIE CIRCULAIRE PLONGEANTE
SRI174T
Important
Avant d'utiliser la machine, lisez attenti-
vement ce MANUEL D'INSTRUCTIONS et la
BROCHURE D'INSTRUCTIONS GÉNÉRALES
DE SÉCURITÉ qui vous sont fournis avec
cette machine. Assurez-vous de bien
avoir tout compris avant de commencer
à travailler avec la machine.
Gardez toujours ces deux manuels
d'instructions à portée de la main pour
pouvoir les consulter, en cas de besoin
1. INSTRUCTIONS DE SÉCURITÉ POUR LE MANIE-
MENT DE LA SCIE CIRCULAIRE PLONGEANTE
1.1 INSTRUCTIONS GÉNÉRALES
• Il est recommandé de toujours avoir sous la main tous
les documents relatifs à la machine lors de son utilisation,
pour pouvoir les consulter en cas de besoin quand on
travaille; de même, il est conseillé d’en conserver, si
possible, une copie dans un endroit sûr.
• À chaque nouvelle utilisation de la machine, il faut
contrôler l’état de la prise et du câble.
• Avant toute manipulation de la machine, débrancher
la prise de courant.
• Toujours maintenir le câble éloigné des parties mobiles
de la machine.
• Vérifier que l’interrupteur de la machine est sur arrêt
avant de brancher la prise sur le secteur.
• En cas d’utilisation d’une rallonge électrique, les fils
doivent avoir une section minimum de 1 mm
2
et le câble
doit être complètement déroulé.
• Prévoir aussi fréquemment que possible un dispositif
de blocage de la pièce à travailler, pour éviter que
celle-ci ne glisse.
• En cas de blocage, arrêter immédiatement la machine
et débrancher la prise de courant. Ne pas reprendre le
travail sans avoir éliminé la cause du blocage ; si celle-ci
provient de la machine, il faut la faire réparer par un
service technique agréé.
• Avant l’utilisation d’un accessoire, il faut vérifier si
sa vitesse de rotation maximale est compatible avec les
rendements de la machine.
• Dans la mesure du possible, toujours utiliser des
équipements de protection tels que gants, lunettes,
chaussures de sécurité, etc. Les déchets de coupe peuvent
causer des blessures.
• Avant de couper une cloison, un plafond ou un
plancher, il faut vérifier qu’il n’y a pas de canalisation
à l’intérieur.
• Les outils électriques ne doivent pas être utilisés par
des personnes de moins de 16 ans.
• Quand l’appareil est en marche, il ne faut le diriger
que vers la pièce à travailler.
• La trajectoire de coupe ne doit pas comporter
d’obstacles sur sa partie supérieure et inférieure.
• Ne pas mettre les doigts dans la buse d’expulsion
des copeaux.
• Toujours maintenir les mains à distance de la lame de
scie en mouvement. Éviter le contact avec la lame de scie
qui dépasse de la partie inférieure de la pièce.
• Ne pas guider l’appareil en le tenant au-dessus de
la tête.
• Il est interdit de travailler avec des matériaux conte-
nant de l’amiante.
• Ne pas employer de lames de scie ayant un disque base
plus épais ou un avoyage plus petit que l’épaisseur du
couteau diviseur.
• Le guide de coupe doit être de nouveau réglé quand
on remplace des lames de scies circulaires ayant des
diamètres différents.
• Au moment de l’arrêt de la machine, attendre que la
lame s’arrête de tourner toute seule. Ne jamais freiner

Virutex, S.A.
Antoni Capmany, 1
08028 Barcelona (Spain)
www.virutex.es
7496587 122015
http://www.virutex.es/registre
Acceda a toda la información técnica.
Access to all technical information.
Accès à toute l’information technique.
Zugang zu allen technischen Daten.
Accedere a tutte le informazioni tecniche.
Aceso a todas as informações técnicas.
Dostęp do wszystkich informacji technicznych.
Доступ ко всей технической информации.
-
 1
1
-
 2
2
-
 3
3
-
 4
4
-
 5
5
-
 6
6
-
 7
7
-
 8
8
-
 9
9


Virutex SRI174T Operating Instructions Manual
- Taper
- Operating Instructions Manual
dans d''autres langues
- English: Virutex SRI174T
Documents connexes

Autres documents
-
Ferm CSM1035 Manuel utilisateur
-
Scheppach PL55 Translation Of Original Operating Manual
-
-
Festool 575389 Manuel utilisateur
-
Batavia MAXXWORK BT–PS007 Operating Instructions Manual
-
Scheppach PL75 Original Instruction Manual
-
-
EINHELL Expert Tauchsäge TE-PS 165 Manuel utilisateur
-
DeWalt DWS520 Manuel utilisateur
-