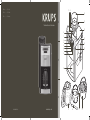
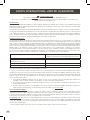
Krups KM785D50 Manuel utilisateur
- Catégorie
- Cafetières
- Taper
- Manuel utilisateur

Grind and brew coffee maker
www.krups.com
ENFRES
NC00148197-02
EN ................. P. 1 – 10
FR ................. P. 11 – 22
ES ................. P. 23 – 33
3
4
9
5
6
8
7
19
2
17 20
1011
18
1
13
12
14
14
15
16

3
1 8
8C
2
E B
4
5 6 7
D
A
Fig.1
Fig.
2b
Fig.
4
10 cups
Fig.
5
Fig.
3
OR
Fig.
7a
Fig.
7b
Fig.
6
Fig.
10
9
13
Fig.
8
Fig.
9
Fig.
2a

Fig.
11
Fig.16Fig.15
Fig.13Fig.12
Fig.14

1
ENGLISH
TABLE OF CONTENTS
PAGE
1. Safety instructions ................................................................. 2
2. Description ............................................................................. 4
3. Before rst use....................................................................... 4
4. Setting the clock .................................................................... 4
5. Use .......................................................................................... 5
6. Making coffee ........................................................................ 5
7. Cleaning and maintenance ................................................... 7
8. Descaling ................................................................................ 8
9. Troubleshooting .................................................................... 9
10. KRUPS International Limited Guarantee ........................... 10

2
IMPORTANT SAFEGUARDS
When using electrical appliances, basic safety precautions should always be
followed to reduce the risk of re, electric shock, and/or injury to persons
including the following:
1. Read all instructions before using.
2. Do not touch hot surfaces. Use handles or knobs.
3. To protect against electric shock do not immerse cord, plugs or coffee maker
in water or other liquid. Close supervision is necessary when the any appliance
is used by or near children.
4. Unplug from outlet when either the appliance or display clock is not in use, and
before cleaning. Allow to cool before putting on or taking off parts, and before
cleaning the appliance.
5. Do not operate any appliance with a damaged cord or plug or after the appliance
malfunctions, or has been damaged in any manner. Return the appliance to
the nearest authorized service facility for examination, repair or adjustment.
6. The use of attachments not recommended or sold by the manufacturer may
cause re, electric shock or injury.
7. Do not use outdoors.
8. Do not let cord hang over edge of table or counter, or touch hot surfaces.
9. Do not place on or near a hot gas or electric burner, or in a heated oven.
10. Always attach plug to the appliance rst, then plug cord in the wall outlet. To
disconnect, turn any control to “off”, then remove plug from wall outlet.
11. Do not use the appliance for other than intended use.
12. The coffee carafe is designed for use with this appliance. It must never be used
on a range top.
13. Do not place a hot carafe on a wet or cold surface.
14. Do not use a cracked carafe or a carafe having a loose or weakened handle.
15. Do not clean carafe with cleansers, steel wool pads, or other abrasive material.
16. Scalding may occur if the lid is removed during the brewing cycles.
17. Avoid contacting moving parts.
18. Check hopper for presence of foreign objects before using.
19. This appliance has a polarized plug (one blade is wider than the other). To
reduce the risk of electric shock, this plug is intended to t into a polarized
outlet only one way. If the plug does not t fully into the outlet, reverse the plug.
If it still does not t, contact a qualied electrician. Do not attempt to modify
the plug in any way.
SAVE THESE INSTRUCTIONS
CAUTION
This machine is intended for household use only. Any servicing other than cleaning
and user maintenance should be performed by the nearest authorized KRUPS
SAFETY INSTRUCTIONS

3
ENGLISH
Service Center. Visit our website at www.krupsusa.com in the USA or www.krups.
ca in Canada or contact your respective country’s Consumer Service department
for the service center nearest you, or contact your respective country’s Consumer
Service department. To reduce the risk of re or electric shock, do not attempt
to disassemble the machine. Repair should be done by an authorized KRUPS
Service Center only.
SHORT CORD INSTRUCTIONS
A. A short power cord or a detachable power cord is provided to reduce the risks
of becoming entangled in or tripping over a longer cord accidentally.
B. Longer detachable power cords or extension cords are available and may be
used if care is exercised in their use.
C. If a long detachable power cord or an extension cord is used:
1) the marked electrical rating of the detachable power cord or extension cord
should be at least as great as the electrical rating of the appliance.
2) If the appliance is of the grounded type, the extension cord should be a
grounding type 3-wire cord.
3) the longer cord should be arranged so that it will not drape over the counter
where it can be pulled on by children or tripped over accidentally. The
appliance may have a polarized plug (one blade is wider than the other). To
reduce the risk of electric shock, this plug is intended to t into a polarized
outlet only one way. If the plug does not t fully into the outlet, reverse the
plug. If it still does not t, contact a qualied electrician. Do not attempt to
modify the plug in anyway.
ADDITIONAL SAFETY INSTRUCTIONS
Your appliance is designed for domestic use only.
It is not intended to be used in the following applications, and the guarantee
will not apply for: staff kitchen areas in shops, ofces and other working
environments; farm houses; by clients in hotels, motels and other residential
type environments; bed and breakfast type environments.
This appliance is not designed to be used by children or people without
knowledge or experience with the product, unless they are supervised or given
prior instructions concerning the use of the appliance by someone responsible
for their safety.
Burns can occur from touching hot plate, hot water or steam. Exercise caution.
All machines are subject to stringent quality control. Practical tests using
machines taken at random are conducted and this may explain any slight marks
or coffee residue showing prior to use.
Do not pour liquids other than water and descaling solutions specied in this
manual into the water tank.
Protect the machine against humidity and freezing.
Do not pour water into the appliance if it is still hot.
Always place your coffee maker on a at, stable, heat resistant work surface
away from water splashes and any external sources of heat.

4
Never place your carafe or your insulated pot in a microwave oven, in a
dishwasher or on a stove top.
Never put your hand inside the insulated pot.
Do not use the carafe or the insulated pot without the lid.
Do not use the thermal carafe if the glass inner part inside is broken. If the glass
inner part of the carafe is broken, pieces of glass can transfer to your cup.
In the interest of improving products, KRUPS reserves the right to change
specications without prior notice.
A short power supply cord is provided to reduce the hazards resulting from
becoming entangled in or tripping over a long cord.
This appliance is not intended for use by persons (including children) with
reduced physical, sensory or mental capabilities, or lack of experience and
knowledge, unless they have been given supervision or instruction concerning
use of the appliance by a person responsible for their safety.
Children should be supervised to ensure that they do not play with the appliance.
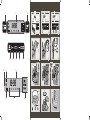
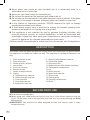
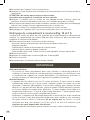
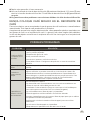
DESCRIPTION
Your coffee maker has been designed for making coffee with coffee beans or ground coffee.
The appliance is suitable for indoor use only. The appliance is suitable for domestic use
only.
1. Grind and brew button
2. Grind off button
3. Coffee quantity selector
4. Hour button
5. Auto start function
6. Minutes button
7. Coffee strength selector
8. Display
A. Coffee quantity indicator
B. Coffee strength indicator
C. Timer indicator
D. Descaling indicator
E. Keep-warm indicator
9. Ground coffee neness selector
10. Coffee lter holder
11. Permanent lter
12. Release button (lter holder assembly)
13. Coffee bean compartment
14. Lid
15. Water reservoir
16. Water level indicator
17. Glass carafe
18. Heating plate
19. Cleaning compartment
20. Brush
BEFORE FIRST USE
Rinse all the removable parts.
Before using your coffee maker for the rst time, run a cycle without coffee to rinse the
circuit. Fill the water tank to the maximum level and start a cycle by pressing the Grind
off button (1).
IMPORTANT: Your machine has been designed to work with cold or water at room
temperature only.

5
ENGLISH
SETTING THE CLOCK
Plug your appliance. The display (8) will light up to indicate that the clock can be set. The
clock can be adjusted at any time later on. Fig. 1 and 2.
Repeatedly press the hour button (4) to set the hours. Fig. 2a.
Repeatedly press the minute button (6) to set the minutes. The display will light up within
a few seconds and the time will appear on the screen. Fig. 2b.
NOTE: You can adjust or change the time. You can adjust the time setting by using the
Hour and Minutes buttons.
USE
The appliance can be used for making coffee with coffee beans or ground coffee. Before rst
use, the appliance is set to make coffee with coffee beans. After each use, the appliance will
memorize the last setting used for the next use: making coffee with coffee beans or making
coffee with ground coffee.
The appliance can only be used when the display is activated. If the display is not activated,
press any button to activate the display. The appliance is ready for use.
Before you proceed, we need you to pay attention to the following notes:
Keep your hands, face and other body parts away from the steam hole. The steam from
the appliance becomes very hot during use.
Do not cover the steam hole.
MAKING COFFEE
Making coffee with coffee beans
Before you proceed, we would like you to focus your attention on the following notes:
Only use coffee beans.
Only use paper coffee lters or permanent lter.
Open the lid (14) and ll the water reservoir (15) with the required amount of water.
Fig. 3 and 4.
Do not ll the water reservoir with more water than required for making the coffee.
Fill the coffee bean compartment (13) completely with coffee beans Fig. 9.
Close the lid (14).
Set the ground coffee neness. Refer to the section “Setting the ground coffee neness”
Fig. 8.
Press the Release button (12) to open the lter holder compartment Fig. 6.
Place a suitable paper lter holder or permanent lter in the coffee lter holder (10) Fig.
7a or 7b.
Close the lter holder compartment until the Release button (12) clicks into place.
Note: The appliance can only be used when the display is activated. If the display is not
activated, press any button to activate the display. The appliance is ready for use.
Set the coffee quantity. The coffee quantity selector (3) is used for setting the required
coffee quantity. The coffee quantity selector (3) can be set to 2, 4, 6, 8 or 10 cups Fig. 13.

6
Set the coffee strength. The coffee strength selector (7) is used for setting the required
coffee strength. The coffee strength selector (7) can be set to mild coffee (MILD), medium
coffee (MEDIUM) and strong coffee (STRONG) Fig. 14.
Place the glass carafe (17) on the heating plate (18) Fig. 16.
Press Grind and Brew button (1). The cup-of-coffee symbol (E) appears (Keep warm
function) Fig. 15.
After a few seconds, the appliance starts grinding the coffee beans and making the coffee.
To interrupt the process, press the Grind and Brew button (1).
If the process is completed, the appliance will beep and switch to keep-warm mode.
The cup-of-coffee symbol (E) starts ashing. The appliance can be switched off by
pressing the Grind and Brew button (1) or the appliance switches off automatically after
2 hours.
Making coffee with ground coffee
Before you proceed, we would like you to focus your attention on the following notes:
Only use ground coffee.
Only use paper coffee lters or the permanent lter.
Fill the water reservoir (15) with the required amount of water.
Do not ll the water reservoir with more water than required for making the coffee.
Press the Release button (12) to open the lter holder Fig. 6.
Place a suitable paper lter or permanent lter in the coffee lter holder (10) Fig.7a or 7b.
Note: The appliance can only be used when the display is activated. If the display is not
activated, press any button to activate the display. The appliance is ready for use.
Put the required amount of coffee in the coffee lter Fig. 12.
Close the lter holder compartment until the Release button (12) clicks into place.
Place the glass carafe (17) on the heating plate (18) Fig. 16.
Press the Grind Off button to turn off the grinder. Then, press the Grind and Brew button
for the coffee symbol to appear (E).
After a few seconds, the appliance starts making the coffee.
To interrupt the process, press the Grind and brew button (1).
If the process is completed, the appliance will beep and switch to keep-warm mode.
The cup-of-coffee symbol (E) starts ashing. The appliance can be switched off by
pressing the Grind off button (2) or the appliance switches off automatically after 2 hours.
Setting the coffee quantity
ONLY for «Grind / Brew», NOT applicable for «Grind Off».
The coffee strength selector (7) is used for setting the required coffee strength. The coffee
strength selector (7) can be set to mild coffee (MILD), medium coffee (MEDIUM) and strong
coffee (STRONG).
Setting the coffee strength (B)
ONLY for «Grind / Brew», NOT applicable for «Grind Off».
The coffee strength selector (7) is used for setting the required coffee strength. The coffee
strength selector (7) can be set to mild coffee (MILD), medium coffee (MEDIUM) and strong
coffee (STRONG) Fig. 14.
Note: The appliance can only be used when the display is activated. If the display is not
activated, press any button to activate the display. The appliance is ready for use.
Repeatedly press the coffee strength selector (7) to set the coffee strength. The coffee
strength (B) is shown on the display (8).

7
ENGLISH
Setting the ground coffee neness (Fig. 8)
The ground coffee neness selector (9) is used for setting the required neness of the
ground coffee when using coffee beans. The ground coffee neness selector (9) can be set
to different positions from ne ground coffee to coarse ground coffee.
Turn the ground coffee neness selector (9) to the required position to set the neness of
the ground coffee.
Auto start function
The appliance has an auto start function which makes it possible to program the time for
starting the coffee-making process.
Note: The appliance can only be used when the display is activated. If the display is not
activated, press any button to activate the display. The appliance is ready for use.
Set the clock. Check whether the clock has already been set. If the clock has not been
set, refer to the section “Setting the clock”.
Keep the Auto start button (5) pressed until the clock on the display ashes.
Repeatedly press the Hour button (6) to set the hours.
Repeatedly press the Minutes button (7) to set the minutes.
Set the coffee quantity. Refer to the section “Setting the coffee quantity”.
Set the coffee strength. Refer to the section “Setting the coffee strength”.
If you want to make coffee with ground coffee, switch off the grinding function before
using the auto start function.
Press the Auto start button (5) to save the settings. The timer indicator (C) light will
continuously appear.
To interrupt the process, press the Auto start button (5) again. The timer indicator (C) will turn off.
CLEANING AND MAINTENANCE
To dispose of used ground coffee, remove the lter and the lter holder (10) of the coffee maker.
Throw the coffee grounds and lter paper in the garbage.
Do not clean the appliance if it is still hot.
Wash the carafe (17), the removable lter holder (10) and the permanent lter (11) with
warm, soapy water.
CAUTION: Do not place the carafe (17) in the microwave.
Do not put any parts of the coffee maker into the dishwasher.
Clean the coffee maker with a damp cloth or sponge. Never use abrasive or strong
products on any part of the coffee maker.
To clean the stainless steel parts of your coffee maker, dampen a soft cloth or sponge
with warm water. Wipe carefully with a dry cloth.
For difcult stains, use a cloth with white vinegar.
Do not immerse the appliance in water or under the faucet.
Cleaning the grinding compartment (Fig. 10 and 11)
When grinding coffee beans, coffee powder can clog the grinding mechanism. The grinding
compartment (19) should be cleaned at least every 2 weeks to prevent the grinding
mechanism from being clogged.
Before you proceed, we would like you to focus your attention on the following notes:
–Before cleaning the grinding compartment, take the following actions:
–Switch off the appliance.
–Remove the plug from the wall socket.

8
–Remove the coffee carafe (17) from the heating plate (18).
–Empty the coffee lter holder (10). Place a suitable coffee lter. Close the lter holder
compartment.
Remove the cover by pressing with a tooth pick or similar non metallic object and pulling
the cover simultaneously Fig. 10.
Clean the grinding compartment (19) using the brush (21).
Replace the cover.
Do not clean the machine if it is still hot.
DESCALING
Why descale
–Limestone forms naturally in your coffee maker. Descaling preserves the coffee maker
and ensures it will last longer and provide quality coffee over time. Limestone can
permanently affect the machine’s performance. Malfunctions associated with scaling
will not be covered by the warranty if the product is returned.
When to descale
–The appliance must be descaled after 70 brewing cycles. If you leave the appliance
plugged into the wall, the appliance will keep track of the number of brewing cycles.
Theindicator (D) will ash on the display to indicate that the appliance must be descaled.
If the appliance must be descaled, use the KRUPS descaling solution
®
or 5.oz of white
vinegar diluted in 17.oz of cold or water at room temperature or 1.5oz of citric acid
diluted in 17.oz until the crystals have completely dissolved.
–However, the descaling frequency depends on the hardness of the water and the number
of BREW cycles. It may be necessary to descale your coffee machine more frequently
if you notice the following signs, even if the indicator (D) does not ash on the display:
longer cycle time or excessive steaming, more noise at the end of the cycle or stopping
mid-cycle this means that your machine needs to be descaled.
–Descaling should be done every other month, depending on the hardness of the water.
How to descale your KRUPS coffee maker
Use the KRUPS descaling solution
®
or 5 . oz of white vinegar diluted in 17 .oz of cold
or water at room temperature or 1.5 oz of citric acid diluted in 17 . oz until the crystals
have completely dissolved.
Pour the solution into the water reservoir (15) (without coffee).
Press Grind off button (3).
Please wait until the end of the cycle.
To rinse the machine, run 2 full 10 cups cycles with water but without coffee.
Repeat the operation if needed.
When the descaling cycle is nished, press 2-10 cups button (3) as well as the coffee
strength selector (7) to reset the descaling function. The descaling indicator (D) will not
light up anymore.
The warranty does not cover coffee makers that do not work, or do so poorly, due
to lack of descaling.
NEVER PUT GROUND COFFEE IN THE WHOLE BEAN
COFFEE CONTAINER
Use of coffee beans that are oily, caramelized or avored is not recommended for this
machine. This type of bean may damage the machine.
Make sure that no foreign objects such as small stones among the coffee beans enter the
coffee container. Any damage due to foreign objects having entered the coffee container is
not covered by the warranty. Do not put water in the coffee bean container.

9
ENGLISH
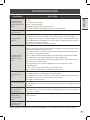
TROUBLESHOOTING
PROBLEM SOLUTION
The coffee does
not BREW or the
appliance does not
turn on.
Make sure the appliance is plugged into a working outlet and the screen
ashes.
The water tank is empty.
There is a power outage.
Unplug the machine, then plug it back in.
The clock should be reprogrammed after a power outage.
The appliance
seems to leak.
Make sure the water reservoir has not been lled beyond the maximum limit.
Brewing takes a
long time.
It may be time to descale the appliance.
Several minerals can accumulate in the coffee maker’s circuitry. Regular
descaling of the machine is recommended. This may need to be done more
often depending on the hardness of your water. Formore information, please
consult the “Descaling” section.
CAUTION: do not take the appliance apart.
The lter basket
overows or the
coffee ows too
slowly.
The coffee maker needs cleaning.
There is too much coffee. We recommend using one measuring spoon or one
tablespoon of ground coffee per cup.
The ground coffee is too ne (Please note that: ground coffee for espresso
won’t work in a drip coffee maker).
There is ground coffee lodged between the paper lter and the lter holder.
The paper lter is not opened properly or is not well placed.
Rinse the lter holder before inserting the paper lter so it will adhere to the
damp walls of the lter basket.
Be sure you have not inserted a paper lter at the same time as the
permanent lter.
There is more than one paper lter in the lter holder.
Make sure the lter basket is pushed down all the way.
The coffee tastes
bad.
Clean the coffee maker.
The ground coffee is not right for your coffee maker.
The proportion of coffee and water is not sufcient. Adjust to suit your taste.
The quality and freshness of the coffee is not the best.
The water is of poor quality.
The coffee does not
ow.
See if there is water in the water tank.
The coffee ow system may be obstructed. You may clean it simply by rinsing
with water.
The time is not
correct (there is a
time difference).
The timer is synchronized and depends on your electrical network. If there is
a time difference, we recommend that you program the time once a week to
be sure it is correct.
You have used
ground coffee
instead of coffee
beans.
Use your vacuum cleaner to remove the pre-ground coffee from the coffee
bean container.
You put water in
the coffee bean
compartment.
Bring your coffee machine to the customer service.
If your appliance does not always work properly, call customer service in your country.

10
KRUPS INTERNATIONAL LIMITED GUARANTEE
: www.krups.com
This product is repairable by KRUPS during and after the guarantee period.
Accessories, consumables and end-user replaceable parts can be purchased, if locally available, as described on the
KRUPS internet site www.krups.com
The Guarantee:
This product is guaranteed by KRUPS (company address and details included in the country list of the KRUPS International
Guarantee) against any manufacturing defect in materials or workmanship for a period of 2 years starting from the initial date
of purchase or delivery date.
The international manufacturer’s guarantee by KRUPS is an extra benet which does not affect consumer’s Statutory Rights.
The international manufacturer’s guarantee covers all costs related to restoring the proven defective product so that it conforms
to its original specications, through the repair or replacement of any defective part and the necessary labour. At KRUPS’s
choice, a replacement product may be provided instead of repairing a defective product. KRUPS’s sole obligation and your
exclusive resolution under this guarantee are limited to such repair or replacement.
Conditions & Exclusions:
The international KRUPS guarantee only applies within the guarantee period and for those countries listed in the country list
attached and is valid only on presentation of a proof of purchase. The product can be taken directly in person to an authorised
service centre or must be adequately packaged and returned, by recorded delivery (or equivalent method of postage), to a KRUPS
authorised service centre. Full address details for each country’s authorised service centres are listed on KRUPS website (www.
krups.com) or by calling the appropriate telephone number as set out in the country list to request the appropriate postal address.
KRUPS shall not be obliged to repair or replace any product which is not accompanied by a valid proof of purchase.
This guarantee will not cover any damage which occurs as a result of misuse, negligence, failure to follow KRUPS instructions,
use on current or voltage other than as stamped on the product, or a modication or unauthorised repair of the product. It also
does not cover normal wear and tear, maintenance or replacement of consumable parts, or the following:
– using the wrong type of water or consumable – ingress of water, dust or insects into the product (excluding
appliances with features specically designed for insects)
– damage as a result of lightning or power surges – mechanical damages, overloading
– scaling (any de-scaling must be carried out according to
the instructions for use)
– accidents including re, ood, thunderbolt, etc
– damages or poor results due to wrong voltage or frequency – damage to any glass or porcelain ware in the product
– professional or commercial use
This guarantee does not apply to any product that has been tampered with, or to damages incurred through improper use and
care, faulty packaging by the owner or mishandling by any carrier.
In order to offer the best possible after-sales service and constantly improve customer satisfaction, KRUPS may send a
satisfaction survey to all customers who have had their product repaired or exchanged in a KRUPS authorised service centre.
The international KRUPS guarantee applies only for products purchased in one of the countries listed, and used for domestic
purposes only in one of the countries listed on the Country List. Where a product purchased in one listed country and then
used in another listed country:
a. The international KRUPS guarantee does not apply in case of non conformity of the purchased product with the local
standards, such as voltage, frequency, power plugs, or other local technical specications
b. The repair process for products purchased outside the country of use may require a longer time if the product is not
locally sold by KRUPS
c. In cases where the product is not repairable in the new country, the international KRUPS guarantee is limited to a
replacement by a similar product or an alternative product at similar cost, where possible.
Consumer Statutory Rights :
This international KRUPS guarantee does not affect the statutory rights a consumer may have or those rights that cannot be
excluded or limited, nor rights against the retailer from which the consumer purchased the product. This guarantee gives a
consumer specic legal rights, and the consumer may also have other legal rights which vary from State to State or Country to
Country. The consumer may assert any such rights at his sole discretion.
For Australia only: Our goods come with guarantees that cannot be excluded under the Australian Consumer Law. You are
entitled to a replacement or refund for a major failure and compensation for any other reasonably foreseeable loss or damage.
You are also entitled to have the goods repaired or replaced if the goods fail to be of acceptable quality and the failure does
not amount to a major failure.
*** Please keep this document for your reference should you wish to make a claim under the guarantee

11
FRANÇAIS
TABLE DES MATIÈRES
PAGE
1. Consignes de sécurité ......................................................... 12
2. Description ........................................................................... 14
3. Avant la première utilisation ............................................... 15
4. Réglage de l'horloge ........................................................... 15
5. Utilisation .............................................................................. 15
6. Préparation du café ............................................................. 15
7. Nettoyage et entretien ......................................................... 17
8. Détartrage ............................................................................ 18
9. Dépannage .......................................................................... 19
10. KRUPS garantie internationale ......................................... 21

12
CONSIGNES IMPORTANTES
DESÉCURITÉ
Lorsque vous utilisez un appareil électrique, des consignes de sécurité
élémentaires doivent toujours être observées pour réduire les risques de feu,
de décharge électrique et de blessures, y compris les suivantes :
1. Lire le mode d’emploi entier.
2. Ne pas toucher les surfaces chaudes; utiliser les poignées ou les boutons.
3. Pour se protéger des incendies, des décharges électriques et des blessures,
ne pas immerger la machine dans l’eau ni dans tout autre liquide.
4. Avant de procéder au nettoyage, débranchez l’appareil ou l’horloge d’afchage
s’ils ne sont pas utilisés. Laissez refroidir l’appareil avant d’ajouter ou de retirer
des pièces, et avant de le nettoyer.
5. Débrancher l’appareil de la prise murale lorsqu’il n’est pas utilisé ou pour le
nettoyer. Laisser l’appareil refroidir avant d’ajouter ou d’enlever des pièces.
6. L’utilisation d’accessoires qui ne sont par recommandés ou vendus par
le fabricant peut provoquer un incendie, une décharge électrique ou des
blessures.
7. L’utilisation d’accessoires non recommandés ni vendus par le fabricant peut
causer des feux, des décharges électriques ou des blessures.
8. Ne pas utiliser à l’extérieur.
9. Le cordon ne doit pas pendre de la table ou du comptoir, ni toucher à des
surfaces chaudes.
10. Ne pas placer l’appareil sur ou près d’un brûleur au gaz ou électrique, ni dans
un four chaud.
11. Toujours brancher le cordon à l’appareil en premier, puis sur la prise murale.
Pour débrancher, tourner le bouton de commande à la position «OFF» puis
retirer la che de la prise murale.
12. Ne pas utiliser l’appareil pour une autre fonction que celle pour laquelle il a été
conçu.
13. La verseuse est conçue pour être utilisée avec cet appareil; ne jamais l’utiliser
sur une cuisinière.
14. Ne pas déposer une verseuse chaude sur une surface froide ou humide.
15. Ne pas utiliser un récipient fêlé ou qui présente une faiblesse à la poignée.
16. Ne pas nettoyer la verseuse avec des nettoyants, des éponges métalliques ni
avec tout autre produit abrasif.
17. Le retrait du couvercle pendant les cycles d’infusion peut causer des blessures.
18. Evitez tout contact avec les parties mobiles.
19. Avant utilisation, assurez-vous que la trémie ne contient pas de corps étrangers.
20. Cet appareil dispose d’une che polarisée (une broche plus large que l’autre).
Pour réduire le risque d’une décharge électrique, cette che est prévue pour
rentrer dans une prise polarisée d’une seule façon. Si la che ne rentre pas
complètement dans la prise, inversez le sens. Si le problème persiste, contactez
un technicien qualié. N’essayez pas de modier la che de quelque manière
que ce soit.
CONSIGNES DE SÉCURITÉ

13
FRANÇAIS
CONSERVEZ CES INSTRUCTIONS
ATTENTION
Cet appareil est conçu pour une utilisation domestique seulement. Tout entretien
autre que le nettoyage et l’entretien normal de l’appareil par son propriétaire doit
être effectué par un centre de service agréé de Krups uniquement. Visitez notre site
Web www.krups.ca au Canada ou communiquez avec le service à la clientèle pour
connaître le centre de service le plus près de chez vous. An de réduire les risques
de feu et de décharge électrique, ne pas démonter la base de l’appareil. Toute
réparation doit être effectuée par un centre de service agréé de Krups uniquement.
INSTRUCTIONS POUR LE CORDON COURT
A. Un cordon d’alimentation court ou amovible est fourni avec l’appareil pour
éviter qu’il ne s’emmêle ou ne fasse trébucher quelqu’un.
B. Des rallonges et des cordons plus longs peuvent être utilisés, mais l’utilisateur
doit prendre les précautions nécessaires.
C. Si vous utilisez une rallonge ou un cordon d’alimentation plus long :
1) Le calibre spécié sur le cordon ou la rallonge doit être égal ou supérieur à
celui indiqué sur l’appareil.
2) Si l’appareil est mis à la terre, le cordon ou la rallonge doit être du type mis à
la terre (à 3 ls).
3) Le cordon d’alimentation doit être placé de façon qu’il ne pende pas du
plan de travail ou du haut de la table, car un enfant pourrait tirer dessus ou
trébucher accidentellement. L’appareil peut être équipé d’une prise polarisée
(une lame est plus large que l’autre). Pour réduire les risques de décharges
électriques, cette che ne peut se brancher que dans un sens. Si la che ne
rentre pas correctement dans la prise murale, mettez-la dans l’autre sens.
Si elle ne rentre toujours pas, contactez un électricien. N’essayez en aucune
façon de modier la prise.
CONSIGNES DE SÉCURITÉ SUPPLÉMENTAIRES
Votre machine a été conçue pour un usage domestique seulement.
Il n’a pas été conçu pour être utilisé dans les cas suivants qui ne sont pas
couverts par la garantie: dans des coins de cuisines réservés au personnel dans
des magasins, bureaux et autres environnements professionnels; dans des
fermes; Par les clients des hôtels, motels et autres environnements à caractère
résidentiel; dans des environnements de type chambres d’hôtes.
Cet appareil n’est pas conçu pour être utilisé par des enfants et des personnes
ne possédant pas de connaissances ou d’expérience quant au produit, à moins
qu’une personne responsable de leur sécurité ne les supervise ou ne leur donne
des instructions préalables.
Tout contact avec la base, de l’eau chaude ou de la vapeur peut provoquer des
brûlures. Faites preuve de prudence.
Tout appareil est soumis à un contrôle de qualité très strict qui comprend
des tests d’utilisation réelle sur des appareils sélectionnés au hasard, ce qui
expliquerait toute trace légère d’usage ou résidus de café avant l’utilisation.

14
Ne pas verser de liquides dans le réservoir d’eau autres que de l’eau ou les
solutions de détartrage spéciées dans ce guide.
Protéger l’appareil contre l’humidité et la congélation.
Ne pas verser de l’eau dans l’appareil s’il est encore chaud.
Toujours installer votre cafetière sur un plan de travail plat, stable et résistant à la
chaleur, loin des éclaboussements d’eau et de toute source externe de chaleur.
Ne jamais mettre votre verseuse ou votre cafetière isolée dans un four à
microondes, au lave-vaisselle ou sur une cuisinière.
Ne jamais mettre votre main à l’intérieur de la cafetière isolée.
Ne pas utiliser la verseuse ou la cafetière isolée sans le couvercle.
Ne pas utiliser la verseuse isotherme si la partie intérieure en verre est cassée,
car des morceaux de verre pourraient être transférés dans votre tasse.
Dans l’intérêt d’améliorer ses produits, Krups se réserve le droit de modier les
caractéristiques sans avis préalable.
Un cordon électrique court est fourni an de réduire les risques d’emmêlement
et de trébuchement accidentel liés à l’utilisation d’un plus long cordon.
Cet appareil n’est pas prévu pour être utilisé par des personnes (y compris les
enfants) dont les capacités physiques, sensorielles ou mentales sont réduites
ou des personnes dénuées d’expérience ou de connaissance, sauf si elles ont
pu bénécier, par l’intermédiaire d’une personne responsable de leur sécurité,
d’une surveillance ou d’instructions préalables concernant l’utilisation de
l’appareil.
Il convient de surveiller les enfants pour s’assurer qu’ils ne jouent pas avec
l’appareil.
DESCRIPTION
Votre cafetière a été conçue pour préparer du café avec du café en grains ou du café moulu.
L'appareil est conçu exclusivement pour une utilisation à l’intérieur. L'appareil est conçu
exclusivement pour une utilisation domestique.
1. Touche Grind brew
2. Touche Grind off
3. Sélecteur de quantité de café
4. Touche Hr pour les heures
5. Fonction de démarrage automatique
6. Touche Minutes
7. Sélecteur d'intensité de café
8. Écran
A. Indicateur de quantité de café
B. Indicateur d'intensité du café
C. Indicateur de minuterie
D. Indicateur de détartrage
E. Indicateur de réchaud
9. Sélecteur de nesse du café moulu
10. Porte-ltre à café
11. Filtre permanent
12. Bouton d'ouverture (porte-ltre).
13. Récipient à café en grains
14. Couvercle
15. Réservoir d'eau
16. Indicateur de niveau d'eau
17. Carafe en verre
18. Plaque chauffante
19. Compartiment de nettoyage
20. Brosse

15
FRANÇAIS
AVANT LA PREMIÈRE UTILISATION
Rincez tous les accessoires.
Avant d'utiliser votre cafetière pour la première fois, effectuez un cycle sans café pour
rincer le circuit. Remplissez le réservoir d'eau au niveau maximum et commencez un
cycle en appuyant sur la touche Grind off (1).
IMPORTANT : Votre machine est conçue pour fonctionner avec de l'eau froide ou à
température ambiante seulement.
RÉGLAGE DE L'HORLOGE
Branchez votre appareil. L'écran (8) s'allumera pour indiquer que l'horloge peut être réglée.
L'horloge peut être réglée à tout moment par la suite. Fig. 1 et 2.
Appuyez à répétition sur la touche Hr (4) pour régler les heures. Fig. 2.
Appuyez à répétition sur la touche Minutes (6) pour régler les minutes. L'écran s'allume
quelques secondes et l'heure paraît. Fig. 2.
REMARQUE: Vous pouvez régler ou changer l'heure. Vous pouvez régler l'heure avec
les touches Hr et Minutes.
UTILISATION
L'appareil peut être utilisé pour préparer du café avec du café en grains ou du café moulu.
Avant la première utilisation, l'appareil est réglé pour préparer du café avec du café en
grains. Après chaque utilisation, l'appareil mémorisera le dernier réglage utilisé pour la
prochaine utilisation: café en grains ou café moulu.
L'appareil peut uniquement être utilisé lorsque l'écran est activé. Si l'écran n'est pas activé,
appuyez sur n'importe quelle touche pour l'activer. L'appareil est prêt à être utilisé.
Prenez connaissance de ce qui suit avant de continuer:
Gardez vos mains, votre visage et les autres parties de votre corps à l'écart de la sortie
de vapeur. La vapeur provenant de l'appareil devient très chaude pendant l'utilisation.
Ne couvrez pas la sortie de vapeur.
PRÉPARATION DU CAFÉ
Préparation du café avec des grains de café
Prenez connaissance de ce qui suit avant de continuer:
Utilisez uniquement des grains de café.
Utilisez uniquement des ltres à café ou un ltre permanent.
Soulevez le couvercle et remplissez le réservoir d'eau (15) avec la quantité d'eau requise.
Fig. 3 et 4.
Ne remplissez pas le réservoir d'eau avec plus d'eau que nécessaire pour faire le café.
Utilisez uniquement la quantité d'eau requise pour faire le café.
Remplissez complètement le compartiment à grains de café (13) avec des grains de café
Fig. 9.
Refermez le couvercle (14).

16
Choisissez la nesse du café moulu. Consultez la section «Choix de la nesse du café
moulu» Fig. 8.
Appuyez sur le bouton Ouverture (12) pour ouvrir le porte-ltre Fig. 6.
Placez un ltre en papier approprié ou un ltre permanent dans le porte-ltre (10)
Fig. 7a ou 7b.
Fermez le porte-ltre jusqu'à ce que le bouton Ouverture (12) fasse un clic.
Remarque: L'appareil peut uniquement être utilisé lorsque l'écran est activé. Si l'écran
n'est pas activé, appuyez sur n'importe quelle touche pour l'activer. L'appareil est prêt à
être utilisé.
Choisissez la quantité de café. Le sélecteur de quantité de café (3) est utilisé pour choisir
la quantité de café requise. Le sélecteur de quantité de café (3) peut être réglé à 2, 4, 6,
8 ou 10 tasses Fig. 13.
Choisissez l'intensité du café. Le sélecteur d'intensité du café (7) est utilisé pour choisir
l'intensité de café requise. Le sélecteur d'intensité du café (7) peut être réglé à café doux
(MILD), café moyen (MEDIUM) et café fort (STRONG) Fig. 14.
Placez la carafe en verre (17) sur la plaque chauffante (18) Fig. 16.
Appuyez sur la touche Grind brew (1). Le symbole tasse de café (E) paraît (fonction de
réchaud) Fig. 15.
Après quelques secondes, l'appareil commence à moudre les grains de café et à préparer
du café.
Pour interrompre le processus, appuyez sur la touche Grind brew (1).
Si le processus est terminé, l'appareil sonnera et passera en mode réchaud. Le symbole
de tasse de café (E) commencera à clignoter. L'appareil peut être éteint en appuyant sur
la touche Grind brew (1), sinon l'appareil s'éteindra automatiquement après deux heures.
Préparation du café avec du café moulu
Prenez connaissance de ce qui suit avant de continuer:
Utilisez uniquement du café moulu.
Utilisez uniquement des ltres à café en papier ou le ltre permanent qui conviennent à
l'appareil.
Remplissez le réservoir d'eau (15) avec la quantité d'eau requise.
Ne remplissez pas le réservoir d'eau avec plus d'eau que nécessaire pour faire le café.
Utilisez uniquement la quantité d'eau requise pour faire le café.
Appuyez sur le bouton Ouverture (12) pour ouvrir le porte-ltre Fig. 6.
Placez un ltre en papier approprié ou un ltre permanent dans le porte-ltre (10)
Fig. 7a ou 7b.
Remarque : L’appareil peut uniquement être utilisé lorsque l’écran est activé. Si l’écran
n’est pas activé, appuyez sur n’importe quelle touche pour l’activer. L’appareil est prêt à
être utilisé.
Mettez la quantité de café requise dans le ltre à café Fig. 12.
Fermez le porte-ltre (10) jusqu'à ce que le bouton Ouverture (12) fasse un clic.
Placez la carafe en verre (17) sur la plaque chauffante (18) Fig. 16.
Appuyez sur la touche « Grind Off » (« Arrêt de la mouture ») pour éteindre le moulin.
Ensuite, appuyez sur la touche « Grind and Brew » (« Mouture et infusion ») an que le
symbole du café s’afche (E).
Après quelques secondes, l’appareil commence à préparer du café.
Pour interrompre le processus, appuyez sur la touche Grind off (2).
Si le processus est terminé, l'appareil sonnera et passera en mode réchaud. Le symbole
de tasse de café (E) commencera à clignoter. L'appareil peut être éteint en appuyant sur
la touche Grind off (2), sinon l'appareil s'éteindra automatiquement après deux heures.

17
FRANÇAIS
Choix de la quantité de café
SEULEMENT en mode «Grind / Brew», NON applicable en mode «Grind Off.
Le sélecteur de quantité de café (3) est utilisé pour choisir la quantité de café requise.
Lesélecteur de quantité de café (3) peut être réglé à 2, 4, 6, 8 ou 10 tasses Fig. 13.
Choix de l'intensité du café (B)
SEULEMENT en mode «Grind / Brew», NON applicable en mode «Grind Off.
Le sélecteur d'intensité du café (7) est utilisé pour choisir l'intensité de café requise.
Lesélecteur d'intensité du café (7) peut être réglé à café doux (MILD), café moyen (MEDIUM)
et café fort (STRONG) Fig. 14.
Remarque: L'appareil peut uniquement être utilisé lorsque l'écran est activé. Si l'écran
n'est pas activé, appuyez sur n'importe quelle touche pour l'activer. L'appareil est prêt à
être utilisé.
Appuyez plusieurs fois sur le sélecteur d'intensité du café (7) pour sélectionner l'intensité
du café. L'intensité du café (B) paraît à l'écran (8).
Réglage de la nesse du café moulu (Fig. 8)
Le sélecteur de nesse de café moulu (9) est utilisé pour choisir la nesse du café moulu
lorsque vous utilisez des grains de café. Le sélecteur de nesse de café moulu (9) peut être
réglé à diverses positions, de n à grossier.
Tournez le sélecteur de nesse de café moulu (9) à la nesse désirée.
Fonction de démarrage automatique
L'appareil est muni d'une fonction de démarrage automatique qui permet de programmer
l'heure de mise en marche du processus de préparation du café.
Remarque: L'appareil peut uniquement être utilisé lorsque l'écran est activé. Si l'écran
n'est pas activé, appuyez sur n'importe quelle touche pour l'activer. L'appareil est prêt à
être utilisé.
Réglez l'horloge. Vériez si l'horloge a déjà été réglée. Si l'horloge n'a pas été réglée,
consultez la section «Réglage de l'horloge».
Appuyez sur la touche Auto on (5) et tenez-la enfoncée jusqu'à ce que l'horloge clignote
à l'écran.
Appuyez à répétition sur la touche Hr (6) pour régler les heures.
Appuyez à répétition sur la touche Minutes (7) pour régler les minutes.
Choisissez la quantité de café. Consultez la section «Choix de la quantité de café».
Choisissez l'intensité du café. Consultez la section «Choix de l'intensité du café».
Si vous voulez préparer du café avec du café moulu, éteignez la fonction de mouture
avant d'utiliser la fonction de démarrage différé.
Appuyez sur la touche Auto start (5) pour enregistrer les paramètres. L'indicateur de
minuterie (C) demeure allumé.
Pour interrompre le processus, appuyez sur la touche Auto start (5) à nouveau. L'indicateur
de minuterie (C) s'éteint.
NETTOYAGE ET ENTRETIEN
Pour jeter le café moulu utilisé, retirez le ltre et le porte-ltre de la cafetière.
Jetez le marc de café et le papier-ltre à la poubelle.
La page est en cours de chargement...
La page est en cours de chargement...
La page est en cours de chargement...
La page est en cours de chargement...
La page est en cours de chargement...
La page est en cours de chargement...
La page est en cours de chargement...
La page est en cours de chargement...
La page est en cours de chargement...
La page est en cours de chargement...
La page est en cours de chargement...
La page est en cours de chargement...
La page est en cours de chargement...
La page est en cours de chargement...
La page est en cours de chargement...
La page est en cours de chargement...
-
 1
1
-
 2
2
-
 3
3
-
 4
4
-
 5
5
-
 6
6
-
 7
7
-
 8
8
-
 9
9
-
 10
10
-
 11
11
-
 12
12
-
 13
13
-
 14
14
-
 15
15
-
 16
16
-
 17
17
-
 18
18
-
 19
19
-
 20
20
-
 21
21
-
 22
22
-
 23
23
-
 24
24
-
 25
25
-
 26
26
-
 27
27
-
 28
28
-
 29
29
-
 30
30
-
 31
31
-
 32
32
-
 33
33
-
 34
34
-
 35
35
-
 36
36


Krups KM785D50 Manuel utilisateur
- Catégorie
- Cafetières
- Taper
- Manuel utilisateur
dans d''autres langues
- English: Krups KM785D50 User manual
- español: Krups KM785D50 Manual de usuario
Documents connexes
-
Krups KM785D50 Manuel utilisateur
-
-
Krups 760D Manuel utilisateur
-
-
Krups KM7005 Manuel utilisateur
-
-
-
-
-
Krups KM8105 Le manuel du propriétaire