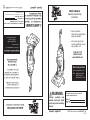
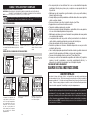
Dirtdevil UD70010 Le manuel du propriétaire
- Catégorie
- Aspirateurs
- Taper
- Le manuel du propriétaire

For quick reference, please record your
vacuum information below.
Model #:
Mfg. Code:
(Mfg. code located on the lower backside of cleaner)
Español - página E1
©2010 All rights reserved #960009616 R0
6/10
• Pleasereadthese
instructions carefully before
using your Upright.
• Letushelpyouputyour
vacuum together or answer
any questions, call:
1-800-321-1134
(USA & Canada)
www.dirtdevil.com
WARNING:
Cleaner assembly may
include small parts. Small
parts can present a choking
hazard.
OWNER’S MANUAL
Operating and Servicing
Instructions
Warranty Registration
• Onlineat:www.dirtdevil.com
• Mail: RoyalApplianceMfg
7005 Cochran Rd.
Glenwillow, Ohio 44139
Español - página E1
• Veuillezlireattentivement
ces instructions avant
d’utiliser votre aspirateur.
• Nous pouvons vous aider à
assembler votre aspirateur et
à répondre à vos questions.
Pourcelacomposezle:
1-800-321-1134
(É.U. et Canada)
www.dirtdevil.com
MANUEL DU PROPRIÉTAIRE
Notice d’utilisation et d’entretien
AVERTISSEMENT :
L’assemblage de l’appareil
comprend des petites pièces.
Ces dernières présentent un
danger d’étouffement.
Consignez les renseignements ci-dessous pour
pouvoir les consulter rapidement.
Nº de modèle :
Code de fabrication :
(Lecodedefabricationsetrouvesurlapartieinférieure
arrière de l’aspirateur)
Enregistrement en Garantie
• SurInternet:www.dirtdevil.com
• Adressepostale:
Royal Appliance Mfg
7005 Cochran Rd.
Glenwillow, Ohio 44139
©2010 Tous droits réservés #960009616 R0
6/10

THIS VACUUM CLEANER IS INTENDED FOR HOUSEHOLD USE ONLY.
IMPORTANT SAFETY INSTRUCTIONS
When you use an appliance, basic precautions should always be followed,
including the following:
• READALLINSTRUCTIONSBEFOREUSINGTHEAPPLIANCE.
• ALWAYSFOLLOWTHESESAFETYINSTRUCTIONS.
• BRINGVACUUMCLEANERTOUPRIGHTPOSITIONWHENUSINGTHEHOSE
AND ATTACHMENTS.
• DONOTLEAVEVACUUMCLEANERUNATTENDEDWHENPLUGGEDIN.
• REGULARLYCHECKTHEFILTERTOCLEANORREPLACE.
• WARNING:DONOTUSESHARPOBJECTSTOCLEANOUTTHEHOSE
SINCE THEY COULD CAUSE DAMAGE.
• OCCASIONALLYREMOVEBRUSHANDCLEANDEBRISFROMENDCAPS
TOKEEPBRUSHROTATINGSMOOTHLY.
• WARNING:THECORDS,WIRES,AND/ORCABLESSUPPLIEDWITH
THIS PRODUCT CONTAINS CHEMICALS, INCLUDING LEAD OR LEAD
COMPOUNDS,KNOWNTOTHESTATEOFCALIFORNIATOCAUSECANCER
ANDBIRTHDEFECTSOROTHERREPRODUCTIVEHARM.WASHHANDS
AFTER USING.
WARNING:TOREDUCETHERISKOFFIRE,
ELECTRICSHOCKORINJURY:
• Donotleaveappliancewhenpluggedin.Unplugfromoutletwhennotinuse
and before servicing.
• Donotuseoutdoorsoronwetsurfaces.Electricalshockcouldoccur.
• Donotallowtobeusedasatoy.Closeattentionisnecessarywhenusedbyor
near children.
• Useonly asdescribed inthis manual.Use onlymanufacturer’s recommended
attachments.
• Donotusewithdamagedcordorplug.Ifapplianceisnotworkingasitshould,has
been dropped, damaged, left outdoors, or dropped into water, return it to a service
center for inspection. Call 1-800-321-1134 for the nearest service center.
• Donotpullorcarrybycord,usecordashandle,closeadooroncord,orpullcord
aroundsharpedgesorcorners.Donotrunapplianceovercord.Keepcordaway
from heated surfaces.
• Donotunplugbypullingoncord.Tounplug,grasptheplug,notthecord.
• Donothandleplugorappliancewithwethands.
• Donotputanyobjectsintoopenings.Donotusewithanyopeningblocked;keep
free of dust, lint, hair, and anything that may reduce air flow.
• Keephair,looseclothing,fingers,andallpartsofbodyawayfromopeningsand
moving parts.
• Donotpickupanythingthatisburningorsmoking,suchascigarettes,matches,
or hot ashes.
2
CET APPAREIL A ÉTÉ CONÇU EXCLUSIVEMENT POUR UN USAGE DOMESTIQUE.
CONSIGNES DE SÉCURITÉ IMPORTANTES
Lorsquevousutilisezunappareilménager,vousdevezprendrecertainesprécautions
de sécurité, telles que :
• LISEZTOUTESLESINSTRUCTIONSAVANTD’UTILISERL’APPAREIL.
• RESPECTEZTOUJOURSÀLALETTRECESCONSIGNESDESÉCURITÉ.
• METTREL’ASPIRATEURENPOSITIONVERTICALEQUANDVOUSUTILISEZ
LE TUYAU ET LES ACCESSOIRES.
• NELAISSEZPASL’APPAREILSANSSURVEILLANCEQUANDILEST
BRANCHÉ.
• VÉRIFIEZRÉGULIÈREMENTLESFILTRESÀNETTOYEROUÀREMPLACER.
• AVERTISSEMENT:N’UTILISEZPASD’OBJETSTRANCHANTSPOURNETTOYER
LE TUYAU : ILS POURRAIENT L’ENDOMMAGER.
• ENLEVEZLEROULEAUDETEMPSENTEMPSETNETTOYEZLESSALETÉS
QUIENCOMBRENTSESEXTRÉMITÉSAFINQU’ILCONTINUEÀTOURNER
SANSPROBLÈME.
• AVERTISSEMENT:LESCORDONS,FILSÉLECTRIQUESET/OUCÂBLEFOURNIS
AVEC CE PRODUIT CONTIENNENT DES PRODUITS CHIMIQUES Y COMPRIS DU
PLOMBOUDESCOMPOSÉSDUPLOMBCONNUPARL’ÉTATDECALIFORNIE
POURSONEFFETCANCÉRIGÈNE,POUVANTENTRAÎNERDESMALFORMATIONS
CONGÉNITALESOUENDOMMAGERLESORGANESDEREPRODUCTION.LAVEZ-
VOUSLESMAINSAPRÈSTOUTEUTILISATION.
AVERTISSEMENT : POUR RÉDUIRE LES
RISQUES D’INCENDIE, DE DÉCHARGE
ÉLECTRIQUEETDEBLESSURE:
• Nelaissezjamaisl’appareilsanssurveillancequandilestbranché.Débranchez-
le quand il n’est pas utilisé ainsi qu’avant de procéder à son entretien.
• N’utilisezpasl’appareilàl’extérieurousurdessurfacesmouillées.Vouspourriez
vous électrocuter.
• Nelaissezpaslesenfantsjoueravecl’appareil.Exercezunesurveillanceétroite
quandl’appareilestutilisépardesenfantsouàproximitédeceux-ci.
• Utilisezl’appareilenrespectantàlalettrelesconsignesdecemanuel.Utilisez
seulement les accessoires recommandés par le fabricant.
• N’utilisezpasl’appareilsilaficheoulecordonestendommagé.Sil’aspirateurne
fonctionnepascommeprévu,s’ilesttombé,s’ilaétéendommagé,laisséàl’extérieur
ous’ilesttombédansl’eau,expédiez-leàuncentrederéparationpourqu’ilsoitvérifié.
Appelezle1-800-321-1134poursavoirquelestlecentrederéparationleplusproche.
• Netirezpasl’appareilparsoncordon,nevousservezpasducordoncommepoi-
gnée,nefermezpasdeportessurlecordonetnetirezpaslecordonsurdescoins
oudesbordstranchants.Évitezdepasserl’appareilsurlecordond’alimentation.
Tenezlecordonhorsdeportéedessurfaceschauffées.
• Nedébranchezpasl’appareilentirantsurlecordon.Pourledébrancher,tirezsur
la fiche et non sur le cordon.
2

WARNING:
Toreducetheriskofelectricshock,thisappliancehasapolarizedplug(onebladeiswider
thantheother).Thisplugwillfitinapolarizedoutletonlyoneway.Iftheplugdoesnotfit
fully in the outlet, reverse the plug. If it still does not fit, contact a qualified electrician to
installtheproperoutlet.Donotchangethepluginanyway.
Your cleaner contains a thermal protective device to shut off the motor to avoid overheating.
Ifthishappens,turnswitchoffandunplugthecleaner.Inspecttheexhaust,inlet,andfilters
foranyblockage.Emptythedirtcontainerandcleanfilters.Afterapproximately30minutes
the motor will have cooled and the vacuum will be ready to use. NOTE: the cleaner must
remain unplugged during the 30 minute cooling period.
3
• Donotusewithoutdirtcontainerandfiltersinplace.
• Turnoffallcontrolsbeforeunplugging.
• Useextracarewhencleaningonstairs.
• Donotusetopickupflammableorcombustibleliquids,suchasgasoline,oruse
in areas where they may be present.
• Keepthevacuumcleaneronthefloor.Onlythehand-heldvacuumcleanersmay
be set on furniture.
• Vacuumcleanermustbeintheuprightpositiontolifttherotatingbrushoffthe
carpet when doing above floor cleaning.
• Donotuseanextensioncordwiththisvacuumcleaner.
• Storethevacuumcleanerindoors.Putthevacuumcleanerawayafterusetoprevent
tripping accidents.
• Usingimpropervoltagemayresultindamagetothemotorandpossibleinjuryto
theuser.Propervoltageislistedonthecleanerplate.
•Unplugbeforeconnecting*PowerBrushTool.
• Ifunintendedoperationofthe*propulsionshouldoccur-Returnthecleanerhandle
to the full upright position and/or turn off power to the cleaner at the foot pedal
switch.
*NOT AVAILABLE ON ALL MODELS
SAVE THESE INSTRUCTIONS
Votreaspirateurestmunid’unprotecteurthermiqueafindecouperlemoteurencasde
surchauffe.Sicelaseproduit,arrêtezl’aspirateuretdébranchez-le.Examinezlesystème
d’évacuation,d’aspiration,letuyau,legodetàpoussièreetledeuxièmefiltrepourdétecter
touteobstruction.Videzlegodetàpoussièreetnettoyezlesfiltres.Auboutde30minutes,
le moteur aura refroidi et l’aspirateur sera de nouveau prêt à être utilisé. REMARQUE :
L’aspirateur doit demeurer à l’arrêt pendant la période de refroidissement de 30 minutes.
• Nemanipulezpaslaficheoul’aspirateuravecdesmainsmouillées.
• N’insérezpasd’objetsdanslesouvertures.Évitezd’utiliserl’appareilsilesouvertures
sontobstruées;gardezlesouverturesexemptesdepoussière,depeluches,dechev-
euxetdetoutcequipourraitréduireledébitd’air.
• Gardezlescheveux,lesvêtementsamples,lesdoigtsettoutepartieducorpsà
l’écart des ouvertures et des pièces en mouvement.
• Évitezd’aspirertoutobjetquibrûleoufume,commelescigarettes,lesallumettes
et les cendres incandescentes.
• Nepasutiliserl’aspirateursanssacpoussièreet/oufiltresenplace.
• Éteigneztouteslescommandesavantdedébrancherl’appareil.
• Faitesbienattentionquandvousnettoyezlesmarchesd’escalier.
• N’aspirez pas les liquides inflammables oucombustibles comme l’essence;
n’utilisezpasl’appareilenprésencedecesmatériaux.
• Gardezl’aspirateurausol.Seulslesaspirateursàmainpeuventêtreposéssur
les meubles.
• L’aspirateurdoitêtreenpositionverticalepourpouvoirleverlabrosserotativeet
nettoyer le plancher.
• N’utilisezjamaisderallongeélectriqueaveccetaspirateur.
• Rangezl’aspirateuràl’intérieur.Rangezl’aspirateuraprèssonutilisationpourne
pas trébucher dessus.
• L’utilisationd’unetensioninadéquatepeutendommagerlemoteuretblesser
l’utilisateur.Latensionadéquateestindiquéesurlaplaquedel’appareil.
• Débranchezavantdeconnecterle*BrossePower.
• Silesystème*autotracténefonctionnepasdemanièreappropriée,remettrela
poignéedel’aspirateuràlapositionverticaleet/ouarrêtezl’aspirateuraumoyen
de l’interrupteur situé sur la pédale.
*NON DISPONIBLE SUR TOUS LES MODÉLES
VEUILLEZCONSERVERCESINSTRUCTIONS
AVERTISSEMENT :
Afin de réduire les risques de choc électrique, cet appareil est muni d’une fiche polarisée
une tige est plus large que l’autre). Cette fiche ne peut être insérée dans une prise de cou-
rant polarisée que dans un sens. Si la fiche ne s’insère pas complètement dans la prise,
inversez-la.Siellenes’insèretoujourspas,demandezàunélectricienqualifiéd’installer
lapriseappropriée.Nemodifiezjamaislafiche.
3

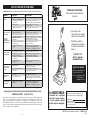
CONGRATULATIONS
You are now the proud owner of the Dirt Devil
®
. We trust your new purchase
will bring you many years of satisfaction.
Our company has designed and developed this product with you in mind.
We are very proud of our products and hope that you are equally satisfied
with their quality and performance.
Thank you for your support of Dirt Devil
®
products.
Visit our website at www.dirtdevil.com
TABLEOFCONTENTS
Safety Instructions . . . . . . . . . . . . . . . . . . . . . . . . . . . . . . Page2,3
Features . . . . . . . . . . . . . . . . . . . . . . . . . . . . . . . . . . . . . . Page5
How to Assemble . . . . . . . . . . . . . . . . . . . . . . . . . . . . . . . Page6
How To Operate . . . . . . . . . . . . . . . . . . . . . . . . . . . . . . . . Page6,7
Floor/CarpetCleaning . . . . . . . . . . . . . . . . . . . . . . . . . Page7
AboveFloorCleaning . . . . . . . . . . . . . . . . . . . . . . . . . Page7
DirtContainer&Filter:Removal&Replacement . . . . . . . . Page8,9
BeltorBrushroll:Removal&Replacement . . . . . . . . . . . . Page10
Lightbulb:Removal&Replacement .................. Page11
General Maintenance . . . . . . . . . . . . . . . . . . . . . . . . . . . . Page11
Troubleshooting Guide. . . . . . . . . . . . . . . . . . . . . . . . . . . . Page12
LIMITED WARRANTY
To the consumer, Royal Appliance Mfg. Co. warrants this vacuum cleaner to be free of defects in material or
workmanship commencing upon the date of the original purchase. Refer to your vacuum cleaner carton for
the length of warranty and save your original sales receipt to validate start of warranty period.
If the vacuum cleaner should become defective within the warranty period, we will repair or replace any defective
parts free of charge. The complete machine must be delivered prepaidtoanyROYAL
®
AuthorizedSales&
WarrantyServiceStation.Pleaseincludecompletedescriptionoftheproblem,dayofpurchase,copyoforigi-
nal sales receipt and your name, address and telephone number. If you are not near a Warranty Station, call
thefactoryforassistanceatUSA&Canada:1-800-321-1134.UseonlygenuineRoyal
®
replacement parts.
The warranty does not include unusual wear, damage resulting from accident or unreasonable use of the vacuum
cleaner. This warranty does not cover brushes, bags, flat belts, filters and bulbs. This warranty does not cover
unauthorizedrepairs.Thiswarrantygivesyouspecificlegalrightsandyoumayalsohaveotherrights(Otherrights
may vary from state to state in the USA).
4
IMPORTANT: USE ONLY GENUINE ROYAL
®
REPLACEMENT PARTS.
NOTE: RETURN WARRANTY CARD TO REGISTER YOUR CLEANER
FÉLICITATIONS !
Vous êtes désormais l’heureux propriétaire d’un Dirt Devil
®
. Nous sommes
persuadés que cet appareil vous satisfera pendant plusieurs années.
Nous avons conçu ce produit pour vous faciliter la vie.
Nous sommes très fiers de nos produits et nous espérons que vous
serez aussi satisfait que nous de leur qualité et de leur perfor-
mance.
Merci d’utiliser les produits Dirt Devil
®
.
Visitez notre site Web : www.dirtdevil.com
TABLEDESMATIÈRES
Consignes de sécurité ...............................Page2,3
Descriptionsdel’appareil.............................Page5
Assemblage ......................................Page6
Utilisation de l’appareil...............................Page6,7
Nettoyage du sol/tapis............................Page7
Nettoyage au-dessus du sol .......................Page7
Godet à poussière et filtre : Retrait et réinstallation .........Page8,9
Courroie et rouleau-brosse : Retrait et réinstallation ........Page10
Ampoule:Déposeetremplacement ....................Page11
EntretienGénéral...................................Page11
Guide de dépannage ................................Page12
GARANTIE LIMITÉE
RoyalApplianceMfg.Co.garantitauconsommateurquecetaspirateurestexemptdevicesdematériauoude
fabricationàcompterdesadated’achatd’origine.Consultezlecartond’emballagedel’appareilpourdéterminerla
duréedelagarantieetconservezvotrereçud’achatd’originepourjustifierladated’entréeenvigueurdelapériode
de garantie.
Si l’appareil tombe en panne pendant la période couverte par la garantie, nous réparerons ou remplacerons
gratuitementtoutepiècedéfectueuse.L’appareilentierdoitêtrerenvoyéportpayéàn’importequelpoint
deventeouderéparationsousgarantiedeROYAL
®
.Veuillezinclureunedescriptiondétailléeduproblème,
ladated’achat,unecopiedureçud’achatd’origineainsiquevosnom,adresseetnumérodetéléphone.Si
aucuncentrederéparationnesetrouvedansvotrerégion,appelezl’usineau1-800-321-1134,auCANADA
etauxÉTATS-UNIS.N’utilisezquelespiècesderechangeRoyal
®
.
Cette garantie ne couvre pas l’usure inhabituelle, les dommages causés par les accidents ou un usage abusif de
l’appareil.Ellenecouvrepasnonpluslesbrosses,lescourroiesplates,lesfiltresetlesampoules.Cettegarantiene
couvre pas les réparations non autorisées. Cette garantie vous offre des droits spécifiques mais il se peut que vous
ayezd’autresdroits(Cesderniersvarientd’étatàétatauseindesÉtats-Unis).
IMPORTANT:N’UTILISEZQUELESPIÈCESDERECHANGEROYAL
®
AUTHENTIQUES.
REMARQUE:RENVOYEZLAFICHEDEGARANTIEPOURENREGISTRER
VOTRE ASPIRATEUR
4

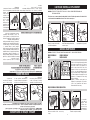
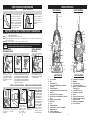
BACKVIEWFRONT VIEW
FRONT VIEW
1. Handle Grip
2. Handle
3. PowerBrushTool
4. Crevice Tool (inside
extension wand)
5. Extension Wand
6. DirtContainerReleaseButton
7. Baffle
8. See Through Dirt Container
9. Quick Release Dirt Container
Button
10. Height Adjust Lever
11. Headlight
12. Bumper
13. BrushViewWindow
14. Clear Dirt Path Window
15. Lower Hose
16. Hose Wand
17. Hose Wand Handle
BACKVIEW
18. Hose Caddy
19. Hose
20. DustBrush
21. Cord Guide
22. Cord Wrap with Quick
Cord Release
23. Long Power Cord
24. Lower Cord Wrap
25. Wheels
26. Handle Release Pedal
27. On/Off Pedal
28. BackPanel
29. Hose Clip
30. Carrying Handle
5
FEATURES
1
4
6
7
8
9
10
19
20
30
23
26
27
29
28
22
5
12
14
13
15
17
3
16
18
25
25
2
24
21
11
ARRIÈREAVANT
AVANT
1. Poignée confortable
2. Poignée
3. BrossePower
4. Suceur plat (dans la rallonge)
5. Rallonge
6. Loquet du collecteur de poussière
7. Chicane
8. Godet à poussière transparent
9. Boutondedégagementrapidedu
godet à poussière
10. Levier de réglage de la hauteur
11. Phare avant
12. Pare-choc
13. Fenêtre de rouleau-brosse
14. Fenêtre de passage de la poussière
15. Tuyau inférieur
16. Tuyau de rallonge
17. Poignée de rallonge
ARRIÈRE
18. Support du tuyau
19. Tuyau
20. Brosseàépousseter
21. Guide du cordon
22. Dispositif d’enroulement du cordon à
déclenchement rapide
23. Cordon d’alimentation long
24. Dispositif d’enroulement du cordon
25. Pousser
26. Pédale de dégagement de la poignée
27. Pédale marche/arrêt
28. Panneau arrière
29. Attaches pour tuyau
30. Poignée de transport
5
CARACTÉRISTIQUES
1
4
6
7
8
9
10
19
20
30
23
26
27
29
28
22
5
12
14
13
15
17
3
16
18
25
25
2
24
21
11

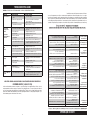
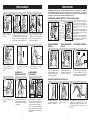
Insert the one (1) screw into
the front and tighten until
secure.
6
HOWTOASSEMBLE
TOOL REQUIRED: PHILLIPS OR FLAT HEAD SCREWDRIVER
7.
Wrap hose around back of
hosecaddy.Pushhosewand
down into the right side of
cleaner.
1.
Attach tools: (a) Slide the dust
brush onto post on the upper tool
caddy with bristles facing out. (b)
Clip PowerBrushTool onto the front
of the PowerBrushTool caddy. (c)
Slide the extension wand/crevice
tool into round slot on the front
right side of tool caddy.
1.
a
FRONT
BACK
Attach back panel of cleaner by pushing
downintoplace(Diagram2).Insert the two
(2) screws into the front of the back panel
andtightenuntilsecure(Diagram2a).
SlideupperhandleintoPower
BrushToolcaddy.
Replace dirt container by tilting
back until it snaps into place.
c
b
TOOL STORAGE
SECUREBACKHOSE
Insert handle fastener into the
back of the PowerBrushTool
caddy.
6.
Remove dirt container
from back panel.
1. 2.
Attach lower hose to right side of
back panel (Diagram 3). Insert one
(1) screw through the back of the
hosetosecure(Diagram3a).
3.
2a. 3a.
4.
6
ASSEMBLAGE
OUTILNÉCESSAIRE:TOURNEVISÀPOINTECRUCIFORMEOUÀTÊTEPLATE
Insérezlavis(1)àl’avantet
serrezjusqu’aubloquage.
7.
Enroulezletuyauàl’arrièredu
support de tuyau. Insérez la
rallonge de tuyau sur le côté
droit de l’aspirateur.
1.
Comment fixer les accessoires :
(a)Glissezlabrosseàépousseter
dans le taquet situé sur le support
à accessoires supérieurs avec les
poils de la brosse tournés vers
l’extérieur. (b) Attachez le Brosse
Power à l’avant de son support.
(c)Glissezlarallonge/suceurdans
l’encoche ronde du côté droit du
support à accessoires.
1.
a
AVANT
ARRIÈRE
Fixezlepanneauarrièredel’aspirateuren
appuyant vers le bas pour l’enclencher.
(Illustration2).Insérezlesdeux(2)vissur
lepanneauarrièreetserrez-lespourbien
fixerlepanneau.(illustration2a).
Faites glisser la poignée
supérieure dans le support
d’accessoiresBrossePower.
Remettezlegodetàpoussière
en l’inclinant vers l’arrière
pour l’enclencher.
c
b
RANGEMENT DES
ACCESSOIRES
POUR FIXER
LE TUYAU
Insérez l’attache de poignée à
l’arrière du support d’accessoires
BrossePower.
6.
Enlevez le godet à
poussière du panneau
arrière.
1. 2.
Connectezletuyauinférieuraucôté
droit du panneau arrière (illustration
3).Insérezune(1)visparl’arrièredu
tuyaupourlefixer(illustration3a).
3.
2a. 3a.
4.

Settings: For maximum cleaning
performance, the following carpet
height settings are recommended:
•Lowestsetting:foralltypesofcarpet.
Note: If the cleaner is difficult to push,
turnknobtothenexthighersetting.
• Higher settings: for very deep pile
carpet, where easier pushing effort
is desired, while maintaining good
cleaning performance.
HOW TO OPERATE
7
a
b
c
Movethehandleandadjust
it to the desired position
for (a) storing the upright,
(b) operating the cleaner,
and (c) de-press the handle
release pedal again to clean
under furniture.
To release handle, push the
handle release pedal located
on the lower left side of the
cleaner.
ON/OFF PEDAL
3.
Plugcordintoelectricaloutlet.
Turn cleaner on by depressing
foot pedal located on the back
left side of the cleaner.
4.
5.
FLOOR / CARPET
CLEANING
HANDLE RELEASE
PEDAL
CAUTION: Brushagitatorcontinuestorotatewhilehoseisremovedorinuseandatalltimeswhilecleaneris
on. Keep hair, loose clothing, fingers, and all parts of body away from brush area while cleaner is on.
Cleaner must be in the upright position to lift the rotation brush off the carpet when cleaning above the floor.
Turn Quick Cord
Release for easy
cord removal.
Store cord in
cord guide (see
Features - pg.
5) to keep out of
the way while
vacuuming.
CORD RELEASE HEIGHTADJUSTKNOB
2.
Remove the hose from the
tool caddy.
Cleaner must be in its upright
position to raise brushroll.
1.
2.
ABOVEFLOORCLEANING
Choose any of the handy accessories
or use the hose alone. Simply push
the attachment firmly onto the end of
the wand or hose handle. To remove
tool, twist and pull apart gently.
3.
Réglages : Pour une performance
maximale, les réglages de hauteur
ci-dessous sont recommandés :
•Réglageinférieur:pourtouslestypes
de moquettes. Nota : S’il est difficile
de déplacer l’appareil, le placer à un
réglage de hauteur supérieur.
•Réglages supérieurs : pour les
moquettestrès épaisses;cesréglages
exigent moins d’efforts tout en
maintenant une bonne performance.
7
FONCTIONNEMENT DE L’ASPIRATEUR
a
b
c
Déplacezlapoignéeetréglez-laà
la position souhaitée lorsque vous
(a)rangezl’aspirateur,(b)faites-
lefonctionner,et(c)appuyezsur
la pédale de déclenchement de
la poignée pour nettoyer sous
les meubles.
Pour dégager la poignée,
appuyez sur la pédale de
dégagement de la poignée
située sur la partie inférieure
de l’aspirateur.
PÉDALE
MARCHE/ARRÊT
3.
Branchez le cordon dans
uneprise de courant. Mettez
l’aspirateur en marche en
appuyant sur la pédale de
marche située à l’arrière de
l’aspirateur du côté gauche.
4.
5.
NETTOYAGE DU SOL /
DES TAPIS
PÉDALE DE
DÉGAGEMENT DE
LA POIGNÉE
ATTENTION : L’agitateur de la brosse continues à pivoter lorsque le tuyau est enlevé ou en marche tout le
temps lorsque l’aspirateur fonctionne. Gardez les cheveux, les vêtements amples, et toute partie
du corps à l’écart de la zone de la brosse lorsque l’aspirateur est en marche.
L’aspirateur doit être en position verticale pour pouvoir lever la brosse rotative et nettoyer au-dessus du sol.
Tournezledéclench-
eur instantané du
cordon pour faciliter
l’enlèvement du cor-
don.Rangezlecordon
dans le guide du
cordon (voir carac-
téristiques à la page
5) pour ne pas nuire
pendant l’utilisation.
DÉCLENCHEUR DU CORDON LEVIER DE RÉGLAGEDE LA HAUTEUR
2.
Choisissezlesaccessoiresselonvosbesoinsou
utilisezuniquementletuyau.Insérezsimplement
lesaccessoiressurl’extrémitédelarallongeou
delapoignéedutuyauetappuyezfermement.
Pourretirerunaccessoire,tournez-leetretirez-le
avec précaution.
1.
2.
3.
Retirezletuyaudusupport
à accessoires.
Mettezl’aspirateurenposition
vertical pour lever la brosse.
NETTOYAGE AU-DESSUS DU SOL

8
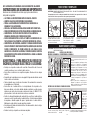
DIRT CONTAINER & FILTER: REMOVAL & REPLACEMENT
HOW TO OPERATE: CONTINUED
Hold dirt container over garbage can and
press clean release dirt container button
to empty. Make sure container bottom
center opening is clear of debris. Snap
dirt container bottom back into place
after emptying.
WARNING:TOREDUCETHERISKOFINJURYFROMMOVINGPARTS-UNPLUGBEFORESERVICING.
NOTE: Unplug cleaner before changing filter.
NOTE: Rinse foam filter once every month. If vacuum is used frequently, the filter may require more frequent cleaning.
NOTE: For best performance, replace pleated filter yearly.
For F51 filter replacement, please call 1-800-321-1134 or visit our website at www.
dirtdevil.com to locate a dealer nearest you.
Press dirt container
release button on back
of cleaner to remove
the dirt container.
1.
2.
EMPTY DIRT CONTAINER
2a.
Use the carry handle on
the back of the cleaner
to move the cleaner from
room to room.
If additional length is
needed,usetheextension
wand and crevice tool.
NOTE: The crevice tool is
stored inside the extension
wand.
4.
5.
EXTENSION WAND CARRY HANDLE
Click button on the base of
the cleaner toward the out-
side edges to unlock filter
cartridge.
1.
REMOVE FILTER
Remove foam filter from
filter cartridge.
3.
Lift filter cartridge
out of base of
cleaner.
2.
Tap the pleated fil-
ter on the inside of
a garbage to remove
excess dust and dirt
from filter. Replace
filter every 6 months.
4.
CLEAN PLEATED FILTERREMOVE FOAM FILTER
CLEAN AND RINSE
PLEATED FILTER
Hold filter under
running water to
rinse. DO NOT use
soap/detergent. Tap
excess water out of
filter. Allow filter to
COMPLETELY DRY
for at least 24 hours
before replacing in
filter cartridge.
5.
FILTER TYPE
F51
8
GODETÀPOUSSIÈREETFILTRE:RETRAITETRÉINSTALLATION
1.
2.
2a.
AVERTISSEMENT : POURÉVITERDEVOUSBLESSERAVECLESPIÈCESMOBILES,DÉBRANCHEZL’APPAREILAVANT
DEPROCÉDERÀSONENTRETIEN.
REMARQUE : Débranchez l’aspirateur avant de changer le filtre.
REMARQUE : Rincez le filtre mousse une fois par mois. En cas d’utilisation fréquente de l’aspirateur, le filtre doit être
nettoyé plus souvent.
REMARQUE : Pour garantir un meilleur fonctionnement, remplacez le filtre plissé chaque année.
Pour obtenir un F51 filtre de rechange, veuillez appeler le 1-800-321-1134 ou visitez le site www.
dirtdevil.com pour connaître le centre de service le plus proche.
Appuyez sur le bouton
de dégagement du
godet à poussière situé
à l’avant de l’aspirateur
pour enlever le godet à
poussière.
POUR VIDER ET NETTOYER
LECOLLECTEURDEPOUSSIÈRE
Tenez le godet à poussière au-dessus de la poubelle
et appuyez sur le bouton de dégagement du godet
à poussière pour le vider. Assurez-vous que l’orifice
central au fond du godet ne contient aucun débris.
Enclenchezdenouveaulefonddugodetàpoussière
après avoir vidé ce dernier.
FONCTIONNEMENT DE L’ASPIRATEUR : SUITE
Utilisez la poignée de transport
située à l’arrière de l’aspirateur
pour transporter l’aspirateur
d’une pièce à l’autre.
Sivousavez besoin d’une
longueur supplémentaire,
utilisez la rallonge et le
suceur. Retirez le suceur
platdelarallonge.Utilisez
la rallonge et le suceur plat
ensemble ou séparément.
4.
5.
RALLONGE POIGNÉE DE TRANSPORT
Enclenchez les boutons situés
sur la base de l’aspirateur vers
l’extérieur pour déverrouiller la
cartouche du filtre.
1.
DÉGAGEZLA
CARTOUCHE DE FILTRE
Enlevezlefiltremousse
de la cartouche.
Dégagez la cartou-
che du filtre de la
base de l’aspirateur.
Cognezlefiltrecontre
l’intérieur d’une pou-
belle pour dégager
la poussière et la
saleté accumulée.
Remplacez le filtre
semestriellement.
NETTOYAGE DU FILTRE PLISSÉ
NETTOYAGE DU FILTRE PLISSÉ
3.
2.
4.
NETTOYAGE ET
RINÇAGE DU FILTRE
PLISSÉ
Maintenir le filtre sous
l’eau courante pour le
rincer.NE PAS utiliser
de savon/détergent.
Tapoter le filtre pour
enlever l’excès d’eau.
LaisserlefiltreSÉCHER
COMPLÈTEMENT
pendant au moins 24
heures avant de le
replacer dans la car-
touche de filtre.
5.
TYPE DE FILTRE
F51

9
*REGULAR MAINTENANCE: Each time the dirt container is emptied, the filter should be cleaned. Tap the filter firmly against
the inside of a trash can until the dirt stops falling from the filter. (Filter will be discolored after use, this will not affect the
filter’s performance.) Do not brush the filter. The cleaning instructions may vary depending on the dirt conditions. In some
cases, more or less cleaning of the filter may be required.
DIRT CONTAINER & FILTER REMOVAL & REPLACEMENT: CONTINUED
Return foam filter to filter
cartridge.
7.
Return filter cartridge to base of
cleaner.
6.
8.
ToremoveAirDirector,rotate1/4
turn counterclockwise.
ToremoveAirDirector,rotate1/4
turn counterclockwise.
Click button back into place to
lock filter cartridge in base of
cleaner.
8.
9.
TO CLEAN THE AIR DIRECTOR
Return dirt container to cleaner.
(See Page 7, Install Dirt
Container).
The Performance Indicator will
notify you to possible system
performance issues. Please go
to Troubleshooting section for
possible causes and solutions.
Dry and return the Air Director
to the dirt container. Rotate 1/4
turn clockwise to lock in place.
11.
12. 1.
REPLACE DIRT CONTAINER
PERFORMANCE INDICATOR*
CLEAN FOAM FILTER REPLACE FOAM FILTER REPLACE FILTER CARTRIDGE
REPLACE FILTER
CARTRIDGE
10.
CLEAN AND RINSE FOAM FILTER
Holdfilterunderrunningwatertorinse.DO
NOTusesoap/detergent.Tapexcesswater
out of filter. Allow filter to COMPLETELY
DRY for at least 24 hours before
replacing in filter cartridge.
9
L’indicateurdevérificationdusystème
vous informe des problèmes possibles
liés au rendement du système.
Consulter la section Dépannage pour
connaître les causes possibles et les
solutions.
1.
INDICATEUR DE VÉRIFICATION
DUSYSTÈME*
NETTOYER LE FILTRE
EN MOUSSE
GODETÀPOUSSIÈREETFILTRE:RETRAITETRÉINSTALLATION:SUITE
Remettez le filtre en
mousse dans la cartou-
che.
Remettez la cartouche
de filtre sur la base de
l’aspirateur.
Pour retirer les tube directionnel,
tournezunquartdetourdansle
sens antihoraire.
Réenclenchez les boutons pour
verrouiller la cartouche de filtre
sur la base de l’aspirateur.
8.
9.
COMMENTNETTOYERLETUBEDIRECTIONNEL
Remettez le godet à poussière
dans l’aspirateur (voir page 7,
Installation du godet à poussière).
Laissezsécherletubedirectionnel
et remettez-le dans le godet à
poussière. Tournez un quartde
tour pour les enclencher.
11.
12.
REMETTEZLEGODETÀPOUSSIÈRE
Dégagez-les tubes directionnels
et nettoyez-les avec un chiffon
humide.
REMETTRE LE FILTRE
MOUSSE
REMETTEZLACARTOUCHE
DE FILTRE
10.
*ENTRETIEN REGULIER : À chaque fois que vous videz le godet à poussière, nettoyez le filtre. Cognez le filtre fermement
contre l’intérieur d’une poubelle jusqu’à ce que la poussière cesse de s’en échapper. (Le filtre se décolorera après son
utilisation, ceci n’altérera pas son rendement.) Ne brossez pas le filtre. Les instructions de nettoyage peuvent varier selon
les conditions de saleté. Dans certains cas, il sera nécessaire de nettoyer plus ou moins le filtre.
NETTOYAGE ET
RINÇAGE DU FILTRE
EN MOUSSE
Maintenir le filtre
sous l’eau courante
pour le rincer. NE
PAS utiliser de savon/
détergent. Tapoter
le filtre pour enlever
l’excès d’eau. Laisser
6.
5.
7.
lefiltre SÉCHER COMPLÈTEMENT
pendant au moins 24 heures
avant de le replacer dans la
cartouche de filtre.

10
Reattachnozzleguard. Replace all six (6) screws to secure
nozzleguard.
7.
8.
With new belt in place, pull and
slide brushroll into nozzle mak-
ing sure that the brushroll end
caps are in the correct orientation
(6a inset). Rotate brushroll manu-
ally to make sure belt is properly
aligned.
6.
6a.
END
CAP
Slide belt onto motorshaft. Placenewbeltinarea
of brushroll without
bristles.
MOTOR SHAFT
4.
5.
TOREPLACEBELTORBRUSHROLL
BELTORBRUSHROLL:REMOVAL&REPLACEMENT
12
BELT STYLE
ForBeltStyle12replacements,pleasecall1-800-321-1134orvisitourwebsiteat
www.dirtdevil.com to locate a dealer nearest you.
TOOLREQUIRED:PHILLIPSORFLATHEADSCREWDRIVER
WARNING:TOREDUCETHERISKOFINJURYFROMMOVINGPARTS-UNPLUGBEFORESERVICING.
Lay cleaner flat and flip cleaner to
exposenozzlebase.Baseshouldlay
flat and face up. To remove nozzle
guard, use Phillips screwdriver to
remove the six (6) screws. Arrows
show location of screws.
Lift and remove brushroll.
Disposeofoldbelt.
Liftnozzleguardoff.
3.
2.
1.
TOREMOVEBELT
Posez l’aspirateur
à plat retournez-
le pour exposer la
basedusuceur.La
base doit être à plat
et tournée vers le
haut. Pour enlever
le dispositif de pro-
tection du suceur,
utilisez un tournevis à pointe cruciforme pour
dévisserlessix(6)vis.
10
Remettezenplaceledispositif
de protection du suceur.
Remettez les six (6) vis pour
fixerledispositifdeprotection
du suceur.
7.
8.
Une fois la nouvelle courroie installée,
tirezetglissezlerouleau-brossedans
le suceur en veillant à ce que les
extrémités du rouleau-brosse soient
orientées correctement (Schéma 6a).
Faites pivoter le rouleau-brosse à la
main pour vous assurer que la courroie
est alignée correctement.
6.
6a.
COURONNE
D’EXTRÉMITÉ
COURROIEETROULEAU-BROSSE:RETRAITETRÉINSTALLATION
12
MODÈLE DE COURROIE
Pour le remplacement la courroie modèle 12, veuillez appeler le 1-800-321-1134 ou visiter
notre site à www.dirtdevil.com pour trouver le revendeur le plus proche.
OUTILNÉCESSAIRE:TOURNEVISÀPOINTECRUCIFORME
AVERTISSEMENT :POURÉVITERDEVOUSBLESSERAVECLESPIÈCESENMOUVEMENT,DÉBRANCHEZ
L’APPAREILAVANTDEREMPLACERLACOURROIEOULEROULEAU-BROSSE.
POUR ENLEVER LA COURROIE
Soulevez et enlevez le roule-
au-brosse. Jetez la courroie
usagée.
3.
Soulevez le dispositif de
protection du suceur.
2.
Glissez la courroie sur
l’arbre de moteur.
Placezlanouvellecourroie
dans la partie du rouleau-
brosse n’ayant pas de
crins.
4.
L’ARBREDE
MOTEUR
5.
POURREMPLACERLACOURROIEOULEROULEAU-BROSSE
1.

1. Checktoseeifdirtcupisfull;emptyifneeded.
2. Plug cleaner in and check to see if there is
any suction at end of hose (Diagram 1). If
there is suction at end of hose, move on to
Diagram3.Ifthereis no suction at the end
of hose, clear dirt path window and lower
hose.Followthesesteps:1.Unplugcleaner.
2. Twist and pull hose from upper hose inlet
(Diagram 2). 3. Unwrap hose from caddy.
Remove obstruction.
3. Diagram 3: Remove nozzle guard (see
Diagram 1) by removing the six (6) screws.
Look for any obstructions and remove.
Remove brushroll if necessary.
GENERAL MAINTENANCE
WARNING:TOREDUCETHERISKOFINJURYFROMMOVINGPARTS-UNPLUGBEFORESERVICING.
3.
1.
2.
DEBRISREMOVAL/
HOSE
DEBRISREMOVAL/
NOZZLEGUARD
11
Leancleanerhandleback.Remove
the two (2) screws located on either
side of the headlight lens.
1.
Pullbulb outofsocketto remove.
DoNOTtwist.Gentlypushbulbinto
socket to replace.
2.
Secure the headlight lens by
replacing the two (2) screws.
3.
LIGHTBULB:REMOVAL&REPLACEMENT
TOOLREQUIRED:SMALLPHILLIPSHEADSCREWDRIVER
WARNING: TOREDUCETHERISKOFELECTRICSHOCK-UNPLUGCLEANERBEFOREREMOVINGOR
REPLACINGLIGHTBULB.
This cleaner uses a common automotive lamp #906, 13.0 volts. For bulb replacement call 1-800-321-1134
or visit our website at www.dirtdevil.com to locate a dealer nearest you.
Turn the Turbo Tool/Power
Brush over and slide off the
O-ring.
4.
Pivot lower housing and
remove clog.
5.
O Ring
To reassemble,
be sure tabs are
engaged. Pivot
the lower hous-
ing closed. Slip
the O-ring into the
groove at the neck of the Turbo Tool/Power
Brushtocompletereassembly.
6.
DEBRISREMOVAL/POWERBRUSHTOOL
1.Vérifiez si le godet à poussière est plein,
videz-lesinécessaire.
2.Branchezl’aspirateuretvérifiezs’ilseproduit
uneaspirationàl’extrémitédutuyau.(Schéma
1). Si l’aspiration se produit à l’extrémité du
tuyau,passezàSchéma3.Siaucuneaspiration
neseproduit;dégagezl’obstructiondel’orifice
depassagedelapoussièreetabaissezletuyau
inférieur. Suivre les étapes suivantes : 1.
Débranchez l’aspirateur. 2. Faites tourner et
retirez-letuyausupérieurdel’orificed’aspiration
(Schéma2).3.Déroulezsoigneusementletuyau
dusupport.Dégagezl’obstruction.
3.Schéma 3:Enlevezledispositifdeprotection
dusuceur(Schéma 1) en enlevantles six 6)
vis. Veillez à dégager toute obstruction.
Enlevezlerouleau-brossesinécessaire.
ENTRETIEN GÉNÉRAL
3.
1.
2.
AVERTISSEMENT :POURRÉDUIRELERISQUEDELÉSIONÀCAUSEDEPIÈCESENMOUVEMENT,
DÉBRANCHEZL’PPAREILAVANTDEFAIRESONENTRETIEN.
POUR ENLEVER LES
SALETÉS /TUYAU
POUR ENLEVER LA SALETÉ/DISPOSITIF DE
PROTECTION DU SUCEUR
OUTILNÉCESSAIRE:PETITTOURNEVISÀPOINTECRUCIFORME
AVERTISSEMENT : POURREDUIRELERISQUEDECHOCELECTRIQUE:DEBRANCHEZL’ASPIRATEURAVANT
D’ENLEVERETDEREMPLACERL’AMPOULE.
Cet aspirateur utilise une ampoule automobile courante : nº 906, 13.0 volts. Pour acheter une ampoule
composez le 1-800-321-1134 ou contactez votre magasin de pièces automobiles.
AMPOULE : DÉPOSE ET REMPLACEMENT
Basculezlapoignéedel’aspirateur.
Enlevez les deux (2) vis qui se
trouvent de chaque côté des verres
de la lampe.
1.
Tirez sur l’ampoule pour la sortir de
ladouille.Nela tournez pas. Insérez
soigneusement l’ampoule dans la
douille.
2.
Fixez-la lampe à l’aide
desdeux(2)visquevous
aviezenlevées.
3.
11
4.
Faitespivoterleboîtierinférieur
et dégager l’obstruction.
5.
POURENLEVERLESSALETÉS/BROSSEPOWER
Retourner l’accessoire élec-
trique/la brosse à moteur
et glisser le joint en forme
d’anneau.
JOINTENFORMED’ANNEAU
Assembler de nou-
veau en s’assurant
que les languettes
sont correctement
insérées. Faire
pivoter le com-
partiment inférieur
pour le refermer.
Insérer le joint en
forme d’anneau
danslarainuresituéeàl’extrémitédel’accessoire
électrique/la brosse à moteur pour terminer le
réassemblage.
6.

WARNING:TOREDUCERISKOFPERSONALINJURY-UNPLUGCLEANERBEFORESERVICING
TROUBLESHOOTINGGUIDE
12
ANYOTHERSERVICINGSHOULDBEDONEBYANAUTHORIZEDSERVICEREPRESENTATIVE
CUSTOMER SERVICE (1-800-321-1134)
Intheeventthatfurtherassistanceisrequired,seeyourYellowPagesforanauthorizedRoyal
®
Dealer.Costsof
any transportation to and from any place of repair are to be paid by the owner. The service parts used in this unit
areeasilyreplacedandreadilyavailablefromanauthorizedRoyal
®
Dealerorretailer.Alwaysidentifyyourcleaner
by the model number and manufacturing code when requesting information or ordering replacement parts. (The
model number appears on the bottom of the cleaner.)
PROBLEM POSSIBLEREASON POSSIBLESOLUTION
Cleaner won’t run
Cleaner won’t
pick-up or low
suction
Performance
Indicator light has
turned red
Dust escaping
from
cleaner
Cleaner tools won’t
pick-up
Headlight not
working
Cleaner is difficult
to push
1. Powercordnotfirmlypluggedinto
outlet.
2. Blownfuseortrippedbreaker.
3. Needs service.
4. ThermalProtectoractivated.
1. Dirtcontainernotinstalledcorrectly.
2. Dirtcontainerfull.
3. Brushrollworn.
4. Brokenorwornbelt.
5. Clogged filter.
6. Nozzle/dirtpassagehoseclogged.
7. Carpet height setting is incorrect.
1. Dirtcontainer full.
2. Dirtcontainer not installed correctly.
3. Hose not connected correctly.
4. Filternotinstalledcompletely.
1. Hose clogged.
2. Dirtcontainer full.
3. Filterclogged.
1. Bulbburntout.
2. Looseelectricalwires.
1. Carpet height setting is incorrect.
1. Plugunitinfirmly.
2. Check fuse or breaker in home. Replace
fuse/reset breaker.
3. Take to service center or call 1-800-321-1134.
4. Allowcleanertocool-Pg.3.
1. Review dirt containerremoval&replacement-
Pg.8&9.
2. Emptydirtcontainer-Pg.8.
3. Replacebrushroll-Pg.9&10.
4. Replacebelt-Pg.10.
5. Removefilterandclean-Pg.8&9.
6. Removelowerhose;removeobstruction-Pg.11.
7. Setcarpetheightadjustlevertoappropriate
settingforcarpetbeingcleaned-Pg.7.
1. Emptydirtcontainer-Pg.8.
2. Review dirt containerremoval&replacement-
Pg.8&9.
3. Reviewhoseinstallation-Pg.6.
4. Reviewfilterremoval&replacement-Pg.8&9.
1. Removehoseandtools;removeobstruction-
Pg.6,11.
2. Emptydirtcontainer-Pg.8.
3. Cleanfilter-Pg.8&9.
1. Replacebulb-Pg.11.
2. Call1-800-321-1134fornearestauthorized
Royal
®
Dealer.
1. Setcarpetheightadjustlevertoappropriate
settingforcarpetbeingcleaned-Pg.7.
AVERTISSEMENT : POURRÉDUIRELERISQUEDESEBLESSER,DÉBRANCHERL’ASPIRATEURAVANTLESERVICE
GUIDE DE DÉPANNAGE
TOUT AUTRE ENTRETIEN DOIT ÊTRE ÉFFECTUÉ PAR UN REPRÉSENTANT AUTORISÉ
SERVICEÀLACLIENTÈLE:(1-800-321-1134)
Pourobtenirdel’aidesupplémentaire,consultezlesPagesjaunesafindeconnaîtrelesdépositairesRoyal
®
autorisés.
Lescoûtsdetransportaller-retouràpartirdel’endroitoùsonteffectuéeslesréparationsdoiventêtredéfrayésparle
propriétairedel’appareil.Lespiècesréparablesutiliséesdanscetappareilpeuventfacilementêtreremplacéesetsont
disponibles auprès des dépositaires ou revendeurs Royal
®
autorisés.Identifieztoujoursl’aspirateurparlenumérodu
modèleetlecodedefabricationlorsquevousdemandezdesinformationsouquevouscommandezdespiècesde
rechange.(Lenumérodemodèlefigureaubasdel’appareil).
12
PROBLEME CAUSEPOSIBLE SOLUTIONPOSIBLE
L’appareil ne
fonctionne pas
L’appareil n’aspire
pas ou n’a qu’une
faible succion
La lumière de
l’indicateur de
vérification du sys-
tème est rouge
De la poussière
s’échappe de
l’aspirateur
Les accessoires
n’aspirent pas la
poussière
La lumière avant
ne fonctionne pas
L’aspirateur est
difficile à pousser
1. Branchezfermementlecordond’alimentation.
2. Vérifiezlefusibleouledisjoncteur.Remplacez
lefusibleouréenclenchezledisjoncteur.
3. Apportezl’appareilaucentrederéparation
outéléphonezau1-800-321-1134.
4. Leprotecteurthermiqueseréinitialisera-
Pg.3.
1. Revoir l’enlèvement et la réinstallation du
godetàpoussière-Pg8&9.
2. Viderlegodetàpoussière-Pg.8.
3. Changezlerouleaubrosse-Pg.9&10.
4. Changezlacourroie-Pg.10.
5. Retirezlefiltreetnettoyez-le-Pg.8&9.
6. Enlevezletuyauinférieur,dégagezl’obstruction-
Pg.11.
7. Régler la hauteur de l’appareil pour l’épaisseur
dutapisànettoyer-Pg.7.
1. Viderlegodetàpoussière-Pg.8.
2. Revoir l’enlèvement et la réinstallation du
godetàpoussière-Pg.8&9.
3. Consultezànouveaulasectionsur
l’installationdutuyau-Pg.6.
4. Consultezànouveaulasectionsurl’installation
dufiltre-Pg.8&9.
1. Enleverletuyauetlesaccessoires,dégager
lesobstructions-Pg.6,11.
2. Viderlegodetàpoussière-Pg.8.
3. Nettoyerlefiltre-Pg.8&9.
1. Changerl’ampoule-Pg.11.
2. Appeler le 1-800-321-1134 pour connaître
le dépositaire Royal
®
le plus proche.
1. Régler la hauteur de l’appareil pour
l’épaisseurdutapisànettoyer-Pg.7.
1. Laficheducordond’alimentation
n’est pas bien insérée dans la
prise de courant.
2. Unfusibleestgrilléouledisjoncteur
est déclenché.
3. L’appareildoitêtreentretenu.
4. Laisserrefroidirl’asprateur.
1. Legodetàpoussièren’estpas
installé correctement.
2. Godet à poussière plein.
3. Lerouleau-brosseestusé.
4. Lacourroieestcasséeouusée.
5. Lefiltreestobstrué.
6. Lesuceurouletuyaud’aspiration
est obstrué.
7. Mauvais réglage de la hauteur de
l’appareil.
1. Godet à poussière plein.
2. Legodetàpoussièren’estpas
installé correctement.
3. Letuyaun’estpasinstallé
correctement.
4. Lefiltren’estpasinstallé
complètement.
1. Letuyauestobstrué.
2. Godet à poussière plein.
3. Filtreobstrué.
1. L’ampouleestgrillée.
2. Lesfilsélectriquessontdesserrés.
1. Mauvais réglage de la hauteur de
l’appareil.

Paratenerunareferenciarápida,anotepor
favor la información de su aspiradora aquí.
No. de Modelo:
CódigodelFabricante:
(Elcódigodelfabricanteapareceenlaparteposterior
e inferior de la aspiradora).
©2010 Todos los derechos reservados #960009616 R0
6/10
• Porfavorleaestas
instrucciones con cuidado
antes de usar su aspiradora.
• Permítanosayudarlea
ensamblar su aspiradora o
a contestar sus preguntas,
llame al:
1-800-321-1134
(EE.UU. y Canadá)
www.dirtdevil.com
MANUAL DEL PROPIETARIO
InstruccionesdeFuncionamiento
y Servicio
Registro de Garantía
• Enlíneaen:www.dirtdevil.com
• Teléfono:1-800-321-1134
• Dirección:RoyalApplianceMfg.
7005 Cochran Rd.
Glenwillow, Ohio 44139
ADVERTENCIA:
El ensamble de la aspiradora
puede incluir partes pequeñas.
Las partes pequeñas pueden
presentar riesgo de ahogamien-
to.
E12
ADVERTENCIA:PARAREDUCIRELRIESGODELESIONESPERSONALES,DESCONECTEANTESDEDARSERVICIO
GUIADESOLUCIÓNDEPROBLEMAS
CUALQUIEROTROSERVICIODEBESERREALIZADOPORUNREPRESENTANTEAUTORIZADODESERVICIO
SERVICIO AL CLIENTE (1-800-321-1134)
Encasode necesitar másayuda,veaenlasPáginasAmarillas para encontrar aunDistribuidorAutorizado
Royal
®
.Loscostosdetransporte haciaydesdeelsitiodereparación seránpagados porelpropietario.Las
partes de repuesto utilizadas en esta unidad son de reemplazo fácil y están disponibles a través de un
DistribuidorAutorizadoRoyal
®
o en otras tiendas. Siempre identifique su aspiradora por medio del número de
modeloyelcódigodefabricacióncuandopidainformaciónuordenepartesderepuesto.(Elnúmerodemodelo
aparece en la parte posterior de la aspiradora).
PROBLEMA POSIBLECAUSA SOLUCIÓNPOSIBLE
La aspiradora no
funciona
La aspiradora no
aspira o la succión
es muy débil
La luz del
indicador de
rendimiento se ha
iluminado en rojo
Polvo escapando
de la aspiradora
Los accesorios de
la aspiradora no
recogen
La luz frontal no
funciona
Es difícil empujar
la aspiradora
1. Elcordóneléctriconoestábien
conectado en la toma de corriente.
2. Fusiblequemadoointerruptor
desconectado.
3. Necesita servicio.
4. Protectortérmicoactivado.
1. Elrecipientedepolvonoestá
instalado correctamente.
2. Elrecipientedepolvoestálleno.
3. Cepillo giratorio desgastado.
4. Bandarotaodesgastada.
5. Filtrotapado.
6. Estátapadalaboquilla/manguera
de paso de polvo.
7. Ajusteincorrectodelaalturade
alfombra.
1. Elrecipientedepolvoestálleno.
2. Elrecipientedepolvonoestá
instalado correctamente.
3. Lamangueranoestáinstalada
correctamente.
4. Elfiltronoestáinstalado
completamente.
1. Manguera tapada.
2. Elrecipientedepolvoestálleno.
3. Filtrotapado.
1. Focofundido.
2. Cables eléctricos sueltos.
1. Ajusteincorrectodelaalturade
alfombra.
1. Conectelaunidadconfirmeza.
2. Revise el fusible o el interruptor en casa.
Reemplaceelfusible/reajusteelinterruptor.
3. Llévelaalcentrodeservicioollameal
1-800-321-1134.
4. Estoreajustaráelprotector-Pág.E3.
1. Reviselaformaderetiroyreemplazodel
recipientedepolvo-Pág.E8&E9.
2. Vacíeelrecipientedepolvo-Pág.E8.
3. Reemplaceelcepillogiratorio-Pág.E9&E10.
4. Reemplacelabanda-Pág.E10.
5. Retireylimpieelfiltro-Pág.E8&E9.
6. Retirelamanguerainferior;retirela
obstrucción-Pág.E11.
7. Muevalapalancadeajustedealturade
alfombra a un nivel apropiado para la
alfombraqueseestélimpiando-Pág.E7.
1. Vacíeelrecipientedepolvo-Pág.E8.
2. Reviselaformaderetiroyreemplazodel
recipientedepolvo-Pág.E8&E9.
3. Revise la instalación de la manguera -
Pág.E6.
4. Reviselaformaderetiroyreemplazodel
filtro-Pág.E8&E9.
1. Retirelamangueraylosaccesorios;retire
laobstrucción-Pág.E6,E11.
2. Vacíeelrecipientedepolvo-Pág.E8.
3. Limpieelfiltro-Pág.E8&E9.
1. Reemplaceelfoco-Pág.E11.
2. Llameal1-800-321-1134paraencontraral
DistribuidorRoyal
®
máscercanoasudomicilio.
1. Muevalapalancadeajustedealturade
alfombra a un nivel apropiado para la
alfombraqueseestélimpiando-Pág.E7.

E2
ESTA ASPIRADORA ESTÁ DISEÑADA PARA USO DOMÉSTICO SOLAMENTE
INSTRUCCIONES DE SEGURIDAD IMPORTANTES
Cuandouseunelectrodomésticosedebenseguirprecaucionesbásicas,
incluyendo las siguientes:
• LEATODASLASINSTRUCCIONESANTESDEUSARELAPARATO.
• SIEMPRESIGAESTASINSTRUCCIONESDESEGURIDAD.
• PONGALAASPIRADORAENPOSICIÓNVERTICALCUANDOUSELA
MANGUERA Y LOS ACCESORIOS.
• NODEJELAASPIRADORASINVIGILANCIACUANDOESTÉCONECTADA.
• REVISECONFRECUENCIALOSFILTROSPARALIMPIARLOSOREEMPLAZARLOS.
• ADVERTENCIA:NOUTILICEOBJETOSCONFILOPARALIMPIARLA
MANGUERA,DEBIDOAQUEPUEDENCAUSARDAÑO.
• DEVEZENCUANDORETIREELCEPILLOYLIMPIELOSRESIDUOSDELAS
TAPAS FINALES PARA PERMITIR LA ROTACIÓN UNIFORME DEL CEPILLO.
• ADVERTENCIA:LOSCORDONES,ALAMBRESY/OCABLESSUMINISTRADOS
CON ESTE PRODUCTO CONTIENEN PRODUCTOS QUÍMICOS QUE INCLUYEN
PLOMO O COMPUESTOS DE PLOMO ACERCA DE LOS CUALES SE HA
SABIDOENELESTADODECALIFORNIA,PRODUCENCÁNCER,DEFECTOS
DE NACIMIENTO U OTROS DAÑOS REPRODUCTIVOS. LÁVESE LAS MANOS
DESPUÉS DE SU USO.
ADVERTENCIA: PARA REDUCIR EL RIESGO DE
INCENDIO,CHOQUE ELÉCTRICO O LESIONES:
• Nodejesoloelaparatocuandoestéconectado.Desconéctelodelatomade
corriente cuando no lo use y antes de darle servicio.
• Noloutilice enexterioreso ensuperficiesmojadas. Puedeocurrirun choque
eléctrico.
• Nopermitaquelaaspiradoraseusecomojuguete.Pongamuchaatencióncuando
la use un niño o cerca de niños.
• Úselasolamentecomoseindicaenestemanual.Usesolamentelosaccesorios
recomendados por el fabricante.
• Nolautiliceconelcordóneléctricoolaclavijadañados.Sielaparatonotra-
bajacomodebiera,sehacaído,dañado,dejadoenexterioresocaídoenagua,
regréseloauncentrodeservicioparasuinspección.Llameal1-800-321-1134
paraencontrarelcentrodeserviciomáscercanoasudomicilio.
• Notirenilotransportetomándoledelcordóneléctrico,noutiliceelcordóneléctrico
como asa, no cierre la puerta sobre el cordón eléctrico, ni tire del mismo alrededor
de esquinas o rebordes agudos. No pase el aparato sobre el cordón eléctrico.
Mantengaelcordóneléctricolejosdesuperficiescalientes.
• Nolodesconectetirandodelcordóneléctrico.Paradesconectarlo,tomelaclavija,
no el cordón eléctrico.
• Notomelaclavijaoelaparatoconlasmanosmojadas.
E11
MANTENIMIENTO GENERAL
3.
1.
2.
ADVERTENCIA:PARAREDUCIRELRIESGODELESIONESPERSONALES-DESCONECTELAASPIRADORA
ANTESDEDARLESERVICO.
RETIRO DE LOS DESECHOS /
PROTECCIÓNDELABOQUILLA
RETIRO DE LOS
DESECHOS / MANGUERA
1.Vea si el recipiente está lleno; vacíelo si es
necesario.
2. Conecte la aspiradora y verifique que haya
succión en el extremo de la manguera
(Diagrama1.)Sihaysucciónenelextremode
la manguera, vaya al Diagrama 3. Si no hay
succiónenelextremodelamanguera,limpie
la ventana del paso del polvo y baje la
manguera.Sigaestospasos:1.Desconectela
aspiradora. 2. Gire y tire la manguera de la
entradasuperiordelamanguera(Diagrama2).
3. Saque la manguera de la caja. Retire la
obstrucción.
3. Retire la protección de la boquilla (vea el
Diagrama 3) al quitar los seis (6) tornillos.
Busque las obstrucciones y retírelas. Enlevez
le rouleau-brosse si nécessaire.
Dé la vuelta al turbocepillo/
accesorio con motor y haga
deslizarelanillodecierre.
4.
Haga girar el compartimiento
inferior y quite el tapón de
suciedad.
5.
ANILLO DE CIERRE
RETIRODELOSDESECHOS/POWERBRUSHTOOL
Incline hacia atrás el asa de la
aspiradora. Retire los dos (2) tornillos
ubicados en cualquiera de los lados
delalentedelaluzfrontal.
1.
Para retirar el foco, sáquelo
del receptáculo. NO lo gire.
Para reemplazarlo, empújelo
suavementeenelreceptáculo.
2.
Fijela lente de la luz frontal
volviendo a colocar los dos
(2) tornillos
3.
FOCO:RETIROYREEMPLAZO
HERRAMIENTAREQUERIDA:DESTORNILLADORPHILLIPSPEQUEÑO
ADVERTENCIA:PARAREDUCIRELRIESGODEDESCARGASELECTRICAS-DESCONECTELAASPIRADORAANTESDE
QUITAROCAMBIARELFOCO.
Esta aspiradora usa un foco común para automóvil # 906, 13.0 voltios. Para repuestos del foco llame al
1-800-321-1134 o llame a su proveedor local de repuestos para automóvil.
Vuelvaaensam-
blar el accesorio
asegurándose
de que las
lengüetas están
insertadas adec-
u a d a m e n t e .
Haga girar el
compartimiento
inferior para
cerrarlo. Inserte el anillo de cierre en la ranura que
seencuentraalextremodelturbocepillo/accesorio
conmotorparaterminarelensamblaje.
6.

Acueste la aspi-
radora y voltéela
para ver la base
de la boquilla.
La base debe
quedar plana y
mirando hacia
arriba. Utilice un
destornill a dor
Phillipsparareti-
rar los seis (6) tornillos y así quitar la protección
delaboquilla.Lasflechasindicanlaposiciónde
los tornillos.
E3
Su aspiradora contiene un dispositivo de protección termal para apagar el motor y así evitar el
recalentamiento. Si esto sucede apague el interruptor y desconecte la aspiradora. Inspeccione
ladescarga,laentradaylosfiltrosporsihubieraatascos.Vacíeelrecipientedepolvo y limpie
losfiltros.Despuésdeaproximadamente30minutoselmotorsehabráenfriadoylaaspiradora
estarálistaparausar.NOTA: La aspiradora deberá permanecer desconectada durante el período
de enfriamiento de 30 minutos.
ADVERTENCIA:
Parareducirelriesgodechoqueeléctrico,esteaparatotieneunaclavijapolarizada(una
hojamásanchaquelaotra.)Estaclavijaencajaráenunatomadecorrientepolarizadade
unamanerasolamente.Silaclavijanoencajatotalmenteenlatomadecorriente,invierta
laclavija.Siaúnnoencaja,póngaseencontactoconunelectricistacalificadoparainstalar
latomadecorrienteapropiada.Nomodifiquelaclavijadeningunamanera.
• Nocoloqueobjetosenlasaberturas.Nolouseconunaaberturabloqueada;
manténgalo libre de polvo, pelusa, pelo y cualquier cosa que pueda reducir el
flujodeaire.
• Mantengalejosdelasaperturasypartesmóviles,elpelo,ropasuelta,dedosy
todas las partes del cuerpo.
• Noaspireobjetosqueesténquemándoseoemitiendohumo,talescomocigarrillos,
cerillosocenizascalientes.
• Nolousesintenerensusitioelrecipientedepolvoylosfiltros.
• Apaguetodosloscontrolesantesdedesconectar.
• Tengamáscuidadocuandoaspireescaleras.
• Nolouseparaaspirarlíquidosinflamablesocombustibles,talescomogasolina,
nilouseenáreasdondepudieranestarpresentes.
• Mantengalaaspiradoraenelsuelo.Solamentelasaspiradorasdemanopueden
ser colocadas sobre muebles.
• La aspiradora debe estar en posición vertical para levantar de la alfombra al
cepillogiratoriocuandohagalimpiezaporencimadelniveldelpiso.
• Nouseunaextensióneléctricaalusarestaaspiradora.
• Guardelaaspiradoraeninteriores.Guárdeladespuésdesuusoparaevitar
accidentesdetropiezos.
• Usarelvoltajeinapropiadopuederesultarendañoalmotoryposibleslesionesal
usuario.Elvoltajeapropiadoestálistadoenlaplacadelaaspiradora.
• Desconectelaaspiradoraantesdeconectarel*PowerBrushTool.
• Encasoqueocurraunfuncionamientoespontáneodelsistemade*propulsión,
regrese el asa de la aspiradora a su posición completamente vertical y / o
desconecte la corriente de la aspiradora con el interruptor de pedal.
*NO VIENE EN TODOS LOS MODELOS
GUARDE ESTAS INSTRUCCIONES
E10
Vuelvaacolocarlaprotección
de la boquilla.
Reemplace los seis (6) tor-
nillos para asegurar la pro-
tección de la boquilla.
7.
8.
Una vez que la banda nueva
está puesta en su lugar, tire del
cepillo giratorio y deslícelo den-
tro de la boquilla asegurándose
que las tapas finales estén en la
orientación correcta (inserción
6a). Gire el cepillo giratorio de
forma manual para asegurarse
que la banda esté alineada
apropiadamente.
6.
6a.
TAPA
FINAL
BANDAYCEPILLORETIROYREEMPLAZO
ParaelreemplazodelabandaEstilo12porfavorllameal1-800-321-1134ovisitenuestrositio
webwww.dirtdevil.comparalocalizaraldistribuidormáscercanoausted.
HERRAMIENTAREQUERIDA:DESTORNILLADORPHILLIOPS
ADVERTENCIA: PARA REDUCIR EL RIESGO DE LESIONES CAUSADAS POR LAS PARTES MÓVILES,
DESCONECTE LA ASPIRADORA ANTES DE CAMBIAR LA BANDA O EL CEPILLO GIRATORIO.
NOTA: Desconecte la aspiradora antes de cambiar la correa o el rodillo del cepillo.
PARARETIRARLABANDA
Levante y retire el cepillo
giratorio. Deseche la banda
usada.
Levante la protección de la
boquilla.
1.
3.
2.
Deslice la banda en el
ejedelmotor.
Coloque la banda nueva
enelárea sin cerdas del
cepillo giratorio.
4.
5.
EJEDELMOTOR
REEMPLAZODELABANDAODELCEPILLOGIRATORIO

E4
FELICITACIONES
Usted es ahora el orgulloso propietario de una Dirt Devil
®
. Confiamos
en que su nueva adquisición le ofrecerá muchos años de satisfac-
ción.
Nuestra compañía diseñó y desarrolló este producto teniéndolo a
usted en mente.
Estamos muy orgullosos de nuestros productos y esperamos que
usted esté igualmente satisfecho con su calidad y rendimiento.
Gracias por su apoyo a los productos Dirt Devil
®
.
Visite nuestro sitio Web en www.dirtdevil.com
GARANTÍA
RoyalApplianceMfg.Co.garantizaalconsumidorqueestaaspiradoranotienedefectosnidematerialnidemanodeobra.
Lagarantíacomienzaenlafechadecompraoriginal.Vealacajaparainformacióndeladuracióndelagarantíayguardeel
recibodecompraoriginalparahacerválidoeliniciodelperíododegarantía.
Encasoquelaaspiradoramuestrealgúndefectodentrodelperíododegarantía,repararemosoreemplazaremosdemanera
gratuitacualquierpartedefectuosa.LamáquinacompletadebeserenviadaconportepagadoacualquierEstaciónAutorizada
ROYAL
®
deVentasyServiciodeGarantía.Porfavorincluyaunadescripcióncompletadelproblema,fechadecompra,copia
delrecibodecompraoriginalysunombre,domicilioynúmerodeteléfono.SinoseencuentracercadeunaEstaciónde
Garantía, llame a la fábrica para pedir asistencia en los EE.UU. y CANADÁ: 1-800-321-1134. Use solamente partes de
repuesto genuinas Royal
®
.
Lagarantíanoincluyeeldesgasteanormal,dañocomoresultadodeunaccidenteodelusonoadecuadodelaaspiradora.
Estagarantíanocubreloscepillos,bandasplanas,bolsas,filtrosodañoalventilador.Estagarantíanocubrereparacionesno
autorizadas.Estagarantíaleconfierederechoslegalesespecíficosypodríahaberotrosderechostambién.(Losotrosderechos
varíandeEstadoaEstadoenlosEE.UU.)
ÍNDICE
Instrucciones de Seguridad ........................ PáginaE2,E3
Características . . . . . . . . . . . . . . . . . . . . . . . . . . . . . . . . . PáginaE5
CómoEnsamblar ................................ PáginaE6
CómoFunciona ................................. PáginaE6,E7
Limpiezadealfombras/piso . . . . . . . . . . . . . . . . . . . PáginaE7
Limpiezaporencimadelniveldelpiso . . . . . . . . . . . . PáginaE7
RecipientedePolvoyFiltro:RetiroyReemplazo ........ PáginaE8,E9
BandayCepillo:RemociónyReemplazo .............. PáginaE10
Foco:RetiroyReemplazo . . . . . . . . . . . . . . . . . . . . . . . . . Página E11
Mantenimiento General ........................... PáginaE11
GuíadeSolucióndeProblemas ..................... PáginaE12
IMPORTANTE: USE SOLAMENTE PARTES DE REPUESTO GENUINAS ROYAL
®
.
NOTA:REGRESELATARJETADEGARANTÍAPARAREGISTRARSUASPIRADORA
E9
MANTENIMIENTO REGULAR: Cada vez que se vacía el recipiente de polvo, se debe limpiar el filtro. Golpee suave-
mente el filtro, pero con firmeza, contra el interior del basurero hasta que deje de caer polvo del filtro. (El filtro perderá
color con el uso, pero esto no afectará su rendimiento.) No cepille el filtro. Las instrucciones de limpieza pueden variar
dependiendo de las condiciones de suciedad. En algunos casos, se necesitará una limpieza mayor o menor del filtro.
Vuelvaacolocarelfiltrodeespuma
en el cartucho del filtro.
6.
Vuelvaacolocarelcartuchodelfiltro
en la base de la aspiradora.
5.
Sostengaelfiltrodeespumabajo
el chorro de agua para lavarlo.
Escurra el exceso de agua del
filtro.Dejesecarelfiltroalmenos
24horasantesdereemplazarel
cartucho del filtro.
7.
Paraquitarlaguíadeaire,gírela
1/4 de vuelta en sentido contrario
alasmanecillasdelreloj.
Inserte los botones nuevamente
en su sitio para asegurar el
cartucho del filtro en la base de
la aspiradora.
8.
9.
PARA LIMPIAR LA GUÍA DE AIRE
Coloque de nuevo el recipiente
de polvo en la aspiradora (vea
la Página E7, Instalación del
RecipientedePolvo.)
Seque y vuelva a colocar la guía de aire
en el recipiente de polvo. Gírelas 1/4 de
vuelta en sentido de las manecillas del
relojparatrabarlasensulugar.
11.
12.
REEMPLACE EL RECIPIENTE DE POLVO
Sáquelas y limpiélas con un paño
húmedo.
10.
LAVE EL FILTRO DE
ESPUMA
REPOSICIÓN DEL FILTRO
DE ESPUMA
REEMPLACE EL CARTUCHO
DEL FILTRO
RECIPIENTEDEPOLVOYFILTRORETIROYREEMPLAZO:
CONTINUACIÓN
El Indicador de rendimiento le
notifica sobre posibles problemas de
rendimientodelsistema.Diríjaseala
sección Solución de problemas para
obtener información sobre posibles
causas y soluciones.
1.
INDICADOR DE RENDIMIENTO

PARTE POSTERIORPARTE FRONTAL
PARTE FRONTAL
1. Asa de Confort
2. Asa
3. PowerBrushTool
4. Accesorio para Hendiduras (en la lanza de
extensión)
5. Lanza de Extensión
6. Seguro de Liberación del Recipiente de Polvo
7. Deflector
8. Recipiente de Polvo Transparente
9. BotóndeLiberaciónRápidadelRecipientede
Polvo
10. Palanca de Ajuste de Altura
11. Luz Frontal
12. Tope
13. Ventana del Cepillo
14. Ventana de Paso del Polvo Transparente
15. Manguera Inferior
16. Lanza de la Manguera
17. Asa de la Lanza de Manguera
PARTE POSTERIOR
18. Contenedor de la manguera
19. Manguera
20. Cepillo para Polvo
21. Guía del Cordón Eléctrico
22. Gancho con Liberación Rápida del
Cordón Eléctrico
23. Cordón Eléctrico Largo
24. Enrollamiento del cordón
25. Rudeas
26. Pedal de Liberación del Asa
27. Pedal de Encendido / Apagado
28. Cubierta Posterior
29. Abrazadera de la Manguera
30. Asa de Transporte
CARACTERÍSTICAS
E5
RECIPIENTEDEPOLVOYFILTRO:RETIROYREEMPLAZO
Para el filtro de reemplazo F51, por favor llame al 1-800-321-1134 o visite nuestro sitio Web
www.dirtdevil.com para localizar al distribuidor más cercano a usted.
ADVERTENCIA:PARA REDUCIR EL RIESGO DE LESIONES CAUSADAS POR LAS PARTES MÓVILES, DESCONECTE
ANTESDEDARSERVICIO.
NOTA: Desconecte la aspiradora antes de cambiar el filtro.
NOTA: Enjuague el filtro de espuma una vez por mes. Si la aspiradora se usa con frecuencia, es posible que necesite
limpiar el filtro más seguido.
NOTA: Para un mejor desempeño, reemplace el filtro con pliegues cada año.
Oprima el botón de
liberación del recipi-
ente de polvo en la parte
delantera de la aspiradora
para retirar el recipiente
de polvo.
Sostenga el recipiente de polvo sobre un
basurero y presione el botón de liberación del
recipiente de polvo para vaciarlo. Asegúrese
que la abertura central de la base del recipi-
entenotengaresiduos.Encajenuevamente
la parte inferior del recipiente de polvo en su
lugar después de vaciarlo.
CÓMO FUNCIONA: CONTINUACIÓN
1.
2.
2a.
Para llevar la aspira-
dora de una habitación
a otra, use el asa de
transporte ubicada en
la parte posterior de la
aspiradora.
Si se necesita mayor longitud,
use la lanza de extensión y el
accesorio para hendiduras.
Saque la herramienta para hen-
diduras de la lanza de exten-
sión.Uselalanzadeextensión
y la herramienta para hendidu-
rasjuntasoporseparado.
4.
5.
LANZADEEXTENSIÓNWAND ASA DE TRANSPORTE
VACÍE Y LIMPIE EL
RECIPIENTE DE POLVO
E8
1
4
6
7
8
9
10
19
20
30
23
26
27
29
28
22
5
12
14
13
15
17
3
16
18
25
25
2
24
21
11
Oprima los botones de la base
de la aspiradora hacia los
bordes externos para liberar
el cartucho del filtro.
1.
QUITE EL CARTUCHO
DEL FILTRO
Quite el filtro de
espuma del cartucho
del filtro.
Levanteelcartucho
del filtro fuera
de la base de la
aspiradora.
Golpee suavemente
el filtro plisado en
la parte interna
del basurero para
eliminar el exceso
de suciedad y
polvo del filtro.
LIMPIEZADELFILTROCONPLIEGUES
QUITE EL FILTRO DE ESPUMA
3.
2.
4.
LIMPIEYENJUAGUE
EL FILTRO PLEGADO
Sujeteelfiltrodebajo
del agua corriente
para enjuagarlo. NO
usejabón/detergente.
Golpee suavemente el
filtro para eliminar el
excesodeagua.Deje
queelfiltroseSEQUE
COMPLETAMENTE
durante, al menos,
24 horas antes de
volver a colocarlo en
el cartucho de filtros.
5.
Reemplace el filtro
cada 6 meses.
TIPO DE FILTRE
F51

E6 E7
CÓMOENSAMBLAR CÓMO FUNCIONA
a
b
c
Muevaelasayajústelaenlaposición
deseada para (a) guardar la aspiradora,
(b) operar la aspiradora y (c) pisar el
pedal de liberación del asa nuevamente
paralimpiardebajodelosmuebles.
Para liberar el asa, pise el
pedal de liberación del asa
localizadoenlaparteinferior
izquierdadelaaspiradora.
PEDAL DE ENCENDIDO/
APAGADO
3.
Conecte el cordón eléctrico en
latomadecorriente.Encienda
la aspiradora pisando el pedal
localizadoenlaparteposterior
izquierdadelaaspiradora.
4.
5.
PISO/ALFOMBRASLIMPIEZAPEDALDELIBERACIÓN
DEL ASA
PRECAUCIÓN: El agitador del cepillo continúa girando cuando usted usa o retira la manguera o si la aspirdora
está funcionando. Mantenga lejos del área del cepillo el pelo, la ropa suelta, los dedos y otras partes del
cuerpo cuando la aspiradora esté funcionando. La aspiradora debe estar en posición vertical para levantar de
la alfombra el cepillo giratorio cuando limpie por encima del nivel del piso.
Gire el gan-
cho de liber-
ación rápida
del cordón
eléctrico para
retirarlo más
f á c i l m e n t e .
Guárdelo en la
guía del cordón
eléctrico
LIBERACIÓNDELCORDÓNELÉCTRICO AJUSTEDEALTURAPALANCA
2.
Inserte el tornillo (1) en la
parte frontal y apriételo hasta
asegurarlo.
7.
Enrollelamangueraalrededorde
la parte posterior del contenedor.
Empujelalanzadelamanguera
haciaabajoenelladoderechode
la aspiradora.
1.
Para fijar los accesorios: (a) Deslice el
cepillo para polvo en el contenedor de
accesorios superior con las cerdas hacia
afuera. (b) Sujete la Power Brush Tool
en la parte frontal de su contenedor. (c)
Desliceelaccesorioparahendiduras/la
lanzadeextensiónenlaranuraredonda
del lado derecho frontal del contenedor
de accesorios.
1.
a
ANTERIOR
POSTERIOR
Coloque la cubierta posterior de la aspiradora
empujándola hacia abajo para que quede
en su lugar (Diagrama 2). Inserte dos (2)
tornillos en el frente de la cubierta posterior y
apriételoshastaasegurarlos(Diagrama2a).
Deslice el asa superior en
el contenedor de la Power
BrushTool.
Vuelvaacolocarelrecipiente
de polvo inclinándolo hacia
atrás hasta que quede tra-
bado.
c
b
ALMACENAMIENTO
DE ACCESORIOS
FIJACIÓNDELA
MANGUERA POSTERIOR
Inserteelsujetadordelasaenla
parte posterior del contenedor
delaPowerBrushTool.
6.
Retire el recipiente de
polvo de la cubierta
posterior.
1. 2.
Fijelamanguera inferior en el lado
derecho de la cubierta posterior
(Diagrama 3). Asegúrela insertando
un (1) tornillo en la parte posterior de
lamanguera(Diagrama3a).
3.
2a. 3a.
4.
HERRAMIENTANECESARIA:DESTORNILLADORPHILLIPSOPLANO
Retire la manguera del
contenedor de acceso-
rios.
La aspiradora debe estar
en su posición vertical para
levantar el cepillo giratorio.
1.
2.
LIMPIEZAPORENCIMADELNIVELDELPISO
Elija cualquiera de los útiles accesorios o use la
manguerasola.Sim-plementeempujeelaccesorio
confirmezaenelextremodelalanzaodelasade
lamanguera. Paraquitarelaccesorio, gire y tire
suavemente.
3.
Posiciones: Para obtener el máximo ren-
dimiento de limpieza, se recomiendan las
siguientes posiciones, según la altura de
la moqueta:
• Posición más baja: para todo tipo de
moquetas. Nota: Si le cuesta mucho empu-
jarlaaspiradora,girelaperillaalasiguiente
posiciónmásalta.
•Posicionesmásaltas:paramoquetasde
gran espesor, donde se desea reducir el
esfuerzoalempujary,alavez,mantener
unbuenrendimientodelimpieza.
-
 1
1
-
 2
2
-
 3
3
-
 4
4
-
 5
5
-
 6
6
-
 7
7
-
 8
8
-
 9
9
-
 10
10
-
 11
11
-
 12
12
-
 13
13
-
 14
14
-
 15
15
-
 16
16
-
 17
17
-
 18
18


Dirtdevil UD70010 Le manuel du propriétaire
- Catégorie
- Aspirateurs
- Taper
- Le manuel du propriétaire
dans d''autres langues
- English: Dirtdevil UD70010 Owner's manual
- español: Dirtdevil UD70010 El manual del propietario
Documents connexes
-
Dirtdevil M086710 Le manuel du propriétaire
-
Dirtdevil M088920 Le manuel du propriétaire
-
Dirtdevil M085845RDI Le manuel du propriétaire
-
-
-
Dirt Devil UD20005EBN Manuel utilisateur
-
-
-
-
Autres documents
-
-
-
-
-
-
-
-
-
-