Siemens HSL6EI23/01 Manuel utilisateur
- Catégorie
- Cuisinières
- Taper
- Manuel utilisateur
Ce manuel convient également à

Installation instructions
Instructions for use
Notice de montage et d'installation
Notice d'utilisation
HSL6EI23
HSL6EW22
EN
FR
Umschlag_SE_EN+FR_280509.fm Page 1 Thursday, May 28, 2009 5:54 PM

...........
Umschlag_SE_EN+FR_280509.fm Page 2 Thursday, May 28, 2009 5:54 PM

1
Installation instructions 2 - 15
Instructions for use 16 - 43
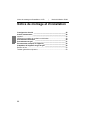
Notice de montage et d'installation 44 - 58
Notice d'utilisation 59 - 88
EN
FR

2
Installation instructions 2-15 | Instructions for use 16-43
Installation instructions
Safety information____________________________________________ 3
Before installation ____________________________________________ 4
Appliance........................................................................................................ 4
Ventilation area guidelines ............................................................................. 6
Electric connection ___________________________________________ 7
Gas connection ______________________________________________ 9
Installing and dismantling the appliance ________________________ 13
Converting the gas type ______________________________________ 14
Oven burner ................................................................................................. 14
General nozzle table .................................................................................... 15

3
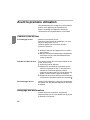
Safety information
The safe operation of this appliance can only be
guaranteed if it has been assembled and installed by
a professional in accordance with these instructions.
The fitter and/or installer is liable for any damage or
faults resulting from incorrect assembly or
installation.
All installation work and adjustments, and any
conversion to a different type of gas, must be carried
out by an authorised expert in accordance with the
applicable rules and regulations enforced by the local
gas suppliers.
Always disconnect the gas supply before carrying out
any work on the appliance.
Prior to installation of the appliance, verify that the
local prerequisites (gas type and gas pressure) and
the appliance settings are compatible with one
another. The rating plate indicates the appliance
adjustment conditions.

4
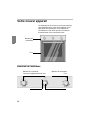
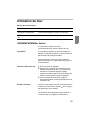
Before installation
Note the following appliance specifications and the
guidelines relating to the ventilation area.
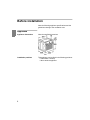
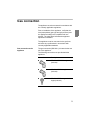
Appliance
Appliance dimensions Note the specified dimensions.
Installation positions This appliance can be fitted in the following positions:
• Underneath a worktop
• Above another appliance

5
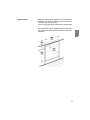
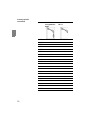
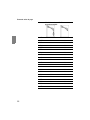
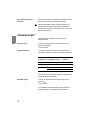
Adjacent units Adjacent units must be made from non-combustible
materials. The fronts of adjacent units must be heat-
resistant up to at least 120°C.
Coat cut surfaces with specialist water-resistant glue.
If the appliance is to be installed close to other units,
you must observe the specified minimum clearance
distances:

6
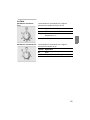
Rating plate The technical data for the appliance can be found on
the rating plate on the back of the appliance and on
the left-hand side of the cooking compartment when
the appliance door is open. Never remove the rating
plate from the appliance.
The setting values are specified on the rating plate on
the rear right of the appliance.
In the table below, enter the
product number (E no.),
production number (FD no.),
factory settings for gas type and gas pressure and,
if applicable, the converted gas type and gas
pressure.
Ventilation area guidelines
This appliance may only be installed in a room with
adequate ventilation, and in accordance with the
applicable regulations and ventilation requirements.
This appliance is not connected to a smoke extraction
system. Install the appliance in a position where
natural or routed ventilation can be ensured by
means of openings to the outside or suitable air
pipes. The ventilation must ensure a continuous air
supply which is sufficient to provide the air required
for combustion and also expel expended air.
E no. FD no.
After-sales service
Gas type
Gas pressure
(factory setting)
Gas type
Gas pressure
(conversion)

7
Electric connection
Only a licensed expert may connect the appliance.
The appliance must be installed in accordance with
the latest IEE guidelines (Institution of Electrical
Engineers). The appliance could be damaged if
incorrectly connected.
Make sure that the voltage value of the power supply
corresponds with the value specified on the rating
plate. The rating plate is located on the back of the
appliance. Ensure that the power supply is properly
earthed and that the wiring system in the building can
withstand the load from the appliance.
If the appliance is connected directly to the power
supply, an all-pin isolating switch must be present
with a contact gap of 3 mm.
The method of connection must allow complete
isolation in accordance with the conditions for
overvoltage category III. The earth cable is excluded
from this.
Install the mains cable in such a way that it is not
trapped or squashed. The cable must not come into
contact with cut or sharp edges.

8
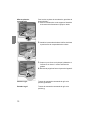
Connecting the mains
cable
The mains cable is connected via the strip terminal.
The mains cable must be of the following type:
• H05RRF or H05RNF
• 3 x 1.5 mm²
• 220-240 V~
Proceed as follows:
• Open the terminal box on the back of the
appliance.
• On the strip terminal, loosen the screw which is
holding the cable in place.
• Loosen the screw contacts. The cable must
comply with the stipulated specifications and it
must be long enough.
• Connect the yellow/green wire to terminal $.
This wire must be at least 30 mm longer than the
other wires.
• Connect the blue neutral conductor to terminal N.
• Connect the brown cable to terminal L.

9
Gas connection
The appliance must be connected in accordance with
the currently applicable regulations.
Prior to installation of the appliance, verify that the
local prerequisites (gas type and gas pressure) and
the appliance settings are compatible with one
another. The rating plate indicates the appliance
adjustment conditions.
The appliance must be connected to the gas lines
and seals by a professional in accordance with
currently applicable standards.
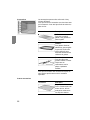
Gas connection to the
appliance
The gas connection (ISO 228-1) is located at the rear
left of the appliance.
The following connections are provided with the
appliance:
Connection Description
ISO 228-1/ISO 228-1 angle
(and seal)
ISO 228-1/ISO 7-1 angle
(and seal)
ISO 228-1/LPG corrugated tube
nipple (and seal)

10
Country-specific
connection
ISO 228-1 +
corrugated tube
nipple
ISO 7-1
AE X X
AF X X
BD X X
BH X X
DZ X X
EG X X
GH X X
IR X X
JO X X
KW X X
LB X X
LY X X
MA X X
OM X X
PK X X
QA X X
SA X X
SD X X
SY X X
TN X X
YE X X

11
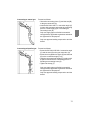
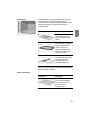
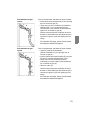
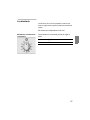
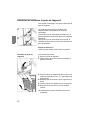
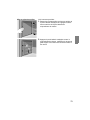
Connecting to natural gas Proceed as follows:
• Screw the connecting piece (C) and the seal (B)
to the gas connection (A).
• Hold the ISO 228-1/
ISO 7-1
connection angle (C)
in place with a spanner and screw the connecting
piece to a fixed supply pipe or a flexible gas
connecting hose (D).
Only use supply pipes or flexible hoses which
comply with the applicable regulations and which
are approved for this purpose.
Only use approved sealing compound to seal the
thread.
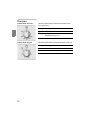
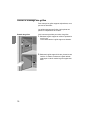
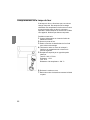
Connecting to liquefied gas Proceed as follows:
• Screw the ISO 228-1/
ISO 228-1
connection angle
(C) and the seal (B) to the gas connection (A).
• Screw the corrugated tube nipple (E) and the seal
(D) to the connection angle (C+A).
• Hold the corrugated tube nipple (E) in place with
a spanner and screw the connecting piece to a
flexible gas connecting hose (G).
• Tighten the clamp (F).
Only use supply pipes or flexible hoses which
comply with the applicable regulations and which
are approved for this purpose.
Only use approved sealing compound to seal the
thread.
A
B
C
D
A
B
C
D
E
F
G

12
Flexible hoses If you use flexible hoses, make sure that:
• the hoses are not trapped or squashed.
• no tractive or torsional forces are exerted on the
hoses.
• the hoses are not touching any cutting or sharp
edges, for example.
• the hoses are not touching any heated parts such
as the bottom, back or ceiling of the oven.
Make sure that the full length of the hoses is
accessible for inspection.
Safety valve It is mandatory to install a safety valve to allow the
gas supply to be opened and closed.
Install the safety valve between the gas supply line to
the relevant room and the appliance. Ensure that
there is unhindered access to this valve.
Testing for leaks Once the gas line is connected, check for leaks in the
connections using soapy water.
Initial use Switch the appliance on as described in the
instruction manual.
Light all the burners and check that the flames remain
stable at both the high and low settings.

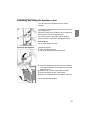
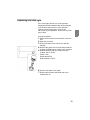
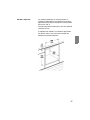
13
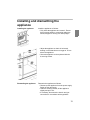
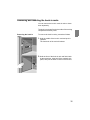
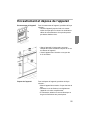
Installing and dismantling the
appliance
Installing the appliance Install the appliance as follows:
• Fully insert the appliance and centre it. Ensure
that no power cables or connecting cables are
kinked, trapped or running over sharp edges.
• Adjust the appliance so that it is horizontal,
bearing in mind that there must a gap of 15 mm
above the appliance.
• Screw the appliance to the cupboard with the
4 securing screws.
Dismantling the appliance Dismantle the appliance as follows:
• Disconnect the appliance from the power supply.
Switch off the gas supply.
• Undo the securing screws, lift the appliance
slightly and pull it out.
• If necessary, disconnect the electric and gas
connections in accordance with regulations.

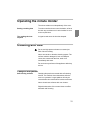
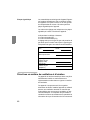
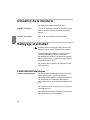
14
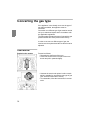
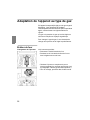
Converting the gas type
If the appliance is not already set to use the type of
gas that is available, the appliance must be
converted.
Conversion to a different type of gas must be carried
out by an authorised expert and in accordance with
the applicable regulations.
The rating plate indicates the type of gas and the gas
pressure which have been pre-set in the factory.
In order to convert to a different type of gas, the
nozzles must be replaced and the low flame must be
adjusted.
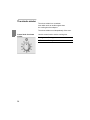
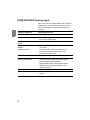
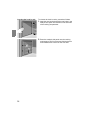
Oven burner
Replacing the nozzles Proceed as follows:
• Dismantle the shelf part of the oven.
• Loosen the screw on the front part of the oven
burner and pull it upwards slightly.
• Unscrew the nozzle and replace it with a nozzle
which is suitable for use with the new type of gas
(see "General nozzle table" section).
• To reassemble, follow the instructions in reverse
order.

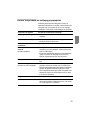
15
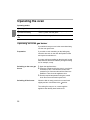
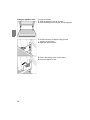
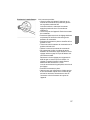
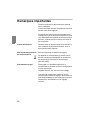
Adjusting the low flame Proceed as follows:
• Open the appliance door. Press the control knob
for the oven in and turn it anti-clockwise to the
maximum setting
265
.
The gas burner will light. Hold the control knob
pressed in for around 15 seconds and then let go.
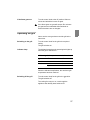
• Close the appliance door. Remove the control
knob.
• Through the gas tap opening in the control panel,
loosen the internal setting screw slightly.
• Replace the control knob and heat the oven for
15 minutes.
• Then turn the control knob to the minimum setting
160
.
• Remove the control knob again.
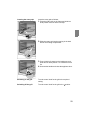
• Now, through the gas tap opening in the control
panel, adjust the internal setting screw until a
correct, stable flame is burning.
Loosen the setting screw to increase the gas flow
or tighten it to reduce the gas flow. The setting is
correct when the low flame is around 3 to 4 mm
high.
In the case of a connection to liquefied gas,
tighten the setting screw.
• Replace the control knob again.
• Make sure that the flame does not go out when
the gas flow is changed quickly from maximum to
minimum and vice versa, and when the appliance
door is opened and closed.
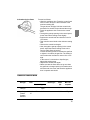
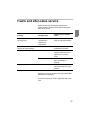
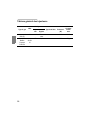
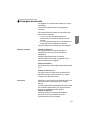
General nozzle table
Gas type mbar
Nozzle no.
Burner type Power
(W)
Max. con-
sumptionNozzle Bypass
Natural gas
G20 (E)
20 115 Partially
open
Oven burner
2,400 229 l/h
Liquefied gas
Butane
Propane
G30/G31
28-30/
37
75 0.48
Oven burner
2,400 175 g/h

16
Instructions for use
Important information________________________________________17
Safety information........................................................................................18
Material damage...........................................................................................20
Your new appliance__________________________________________21
The control panel..........................................................................................21
The oven......................................................................................................22
The minute minder.......................................................................................24
Before us ing fo r the fir st tim e __ ______ _____ ______ _____ _____ ____ 25
Baking out the oven......................................................................................25
Cleaning accessories ...................................................................................25
Operating the oven__________________________________________26
Operating the oven gas burner.....................................................................26
Operating the grill.........................................................................................27
Using the rotary spit.....................................................................................28
Operating the minute minder__________________________________31
Cleaning and care___________________________________________31
Catalytic side panels....................................................................................31
Using the correct cleaning agent..................................................................32
Removing and fitting the appliance door......................................................33
Removing and inserting the hook-in racks...................................................35
Faults and after-sales service _________________________________37
After-sales service........................................................................................38
Replacing the oven light...............................................................................39
Tips and tricks______________________________________________40
Tips for saving energy..................................................................................40
Tips for using your appliance.......................................................................40
Baking................................................................................................41
Roasting.............................................................................................42
Grilling................................................................................................43

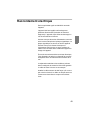
17
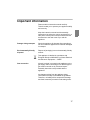
Important information
Please read this instruction manual carefully.
This will enable you to operate your appliance safely
and correctly.
Keep the instruction manual and the assembly
instructions, as well as the various accessories, in a
safe place. Please pass on these manuals and the
accessories to the new owner if you sell the
appliance.
Damage during transport Check the appliance for damage after unpacking it.
Do not connect the appliance if it has been damaged
in transport.
Environmentally-friendly
disposal
Dispose of packaging in an environmentally-friendly
manner.
This appliance is labelled in accordance with
European Directive 2002/96/EC on Waste Electrical
and Electronic Equipment — WEEE.
Gas connection All work involved in connecting the appliance to the
gas supply and/or converting it to a different type of
gas must be carried out by a licensed expert.
Assembly instructions are provided with the
appliance.
Any damage arising from the appliance being
connected incorrectly will invalidate the guarantee.
Therefore, no liability will be accepted for damage
and faults caused by connection and setting errors.
¦

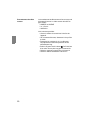
18
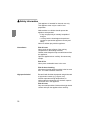
m Safety information
This appliance is intended for domestic use only.
This appliance must only be used for food
preparation.
Neither adults nor children should operate the
appliance unsupervised
• if they are physically or mentally incapable of
doing so
• or if they lack the knowledge and experience
required to operate the appliance correctly and
safely.
Never let children play with the appliance.
Hot surfaces Risk of burns.
Never touch the hot surfaces of the cooking
compartment or the heating elements.
Children must always be kept at a safe distance from
the appliance.
Open the appliance door carefully. Hot steam may
escape.
Risk of fire.
Never place combustible items in the oven.
Risk of short-circuiting.
Never trap electrical appliance cables in the hot oven
door. The cable insulation could melt.
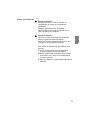
High-proof alcohol Be careful with food that is prepared using drinks with
a high alcohol content (e.g. cognac, rum).
Alcohol evaporates at high temperatures. In
unfavourable circumstances, the alcoholic vapours
could catch fire in the appliance.
Risk of burns.
Only use small quantities of drinks with a high alcohol
content and open the appliance door carefully.
La page est en cours de chargement...
La page est en cours de chargement...
La page est en cours de chargement...
La page est en cours de chargement...
La page est en cours de chargement...
La page est en cours de chargement...
La page est en cours de chargement...
La page est en cours de chargement...
La page est en cours de chargement...
La page est en cours de chargement...
La page est en cours de chargement...
La page est en cours de chargement...
La page est en cours de chargement...
La page est en cours de chargement...
La page est en cours de chargement...
La page est en cours de chargement...
La page est en cours de chargement...
La page est en cours de chargement...
La page est en cours de chargement...
La page est en cours de chargement...
La page est en cours de chargement...
La page est en cours de chargement...
La page est en cours de chargement...
La page est en cours de chargement...
La page est en cours de chargement...
La page est en cours de chargement...
La page est en cours de chargement...
La page est en cours de chargement...
La page est en cours de chargement...
La page est en cours de chargement...
La page est en cours de chargement...
La page est en cours de chargement...
La page est en cours de chargement...
La page est en cours de chargement...
La page est en cours de chargement...
La page est en cours de chargement...
La page est en cours de chargement...
La page est en cours de chargement...
La page est en cours de chargement...
La page est en cours de chargement...
La page est en cours de chargement...
La page est en cours de chargement...
La page est en cours de chargement...
La page est en cours de chargement...
La page est en cours de chargement...
La page est en cours de chargement...
La page est en cours de chargement...
La page est en cours de chargement...
La page est en cours de chargement...
La page est en cours de chargement...
La page est en cours de chargement...
La page est en cours de chargement...
La page est en cours de chargement...
La page est en cours de chargement...
La page est en cours de chargement...
La page est en cours de chargement...
La page est en cours de chargement...
La page est en cours de chargement...
La page est en cours de chargement...
La page est en cours de chargement...
La page est en cours de chargement...
La page est en cours de chargement...
La page est en cours de chargement...
La page est en cours de chargement...
La page est en cours de chargement...
La page est en cours de chargement...
La page est en cours de chargement...
La page est en cours de chargement...
La page est en cours de chargement...
La page est en cours de chargement...
La page est en cours de chargement...
La page est en cours de chargement...
-
 1
1
-
 2
2
-
 3
3
-
 4
4
-
 5
5
-
 6
6
-
 7
7
-
 8
8
-
 9
9
-
 10
10
-
 11
11
-
 12
12
-
 13
13
-
 14
14
-
 15
15
-
 16
16
-
 17
17
-
 18
18
-
 19
19
-
 20
20
-
 21
21
-
 22
22
-
 23
23
-
 24
24
-
 25
25
-
 26
26
-
 27
27
-
 28
28
-
 29
29
-
 30
30
-
 31
31
-
 32
32
-
 33
33
-
 34
34
-
 35
35
-
 36
36
-
 37
37
-
 38
38
-
 39
39
-
 40
40
-
 41
41
-
 42
42
-
 43
43
-
 44
44
-
 45
45
-
 46
46
-
 47
47
-
 48
48
-
 49
49
-
 50
50
-
 51
51
-
 52
52
-
 53
53
-
 54
54
-
 55
55
-
 56
56
-
 57
57
-
 58
58
-
 59
59
-
 60
60
-
 61
61
-
 62
62
-
 63
63
-
 64
64
-
 65
65
-
 66
66
-
 67
67
-
 68
68
-
 69
69
-
 70
70
-
 71
71
-
 72
72
-
 73
73
-
 74
74
-
 75
75
-
 76
76
-
 77
77
-
 78
78
-
 79
79
-
 80
80
-
 81
81
-
 82
82
-
 83
83
-
 84
84
-
 85
85
-
 86
86
-
 87
87
-
 88
88
-
 89
89
-
 90
90
-
 91
91
-
 92
92


Siemens HSL6EI23/01 Manuel utilisateur
- Catégorie
- Cuisinières
- Taper
- Manuel utilisateur
- Ce manuel convient également à
dans d''autres langues
- English: Siemens HSL6EI23/01 User manual