Chapin 63924 Manuel utilisateur

Taper
Manuel utilisateur
Chapin International, Inc
P.O. Box 549 700 Ellicott St.
Batavia, NY 14021-0549 U.S.A.
1-800-950-4458 www.chapinmfg.com
24V RECHARGEABLE
BACKPACK SPRAYER
See website for warranty detail
Model 63924 • 4G/ 15L
017684 R0421
Carefully Read These Instructions Before Use
WARNING
Use and Care Manual
DO NOT RETURN THIS
SPRAYER TO STORE
Call: 1-800-950-4458
www.chapinmfg.com
1E
Chapin Backpack Sprayer Operators Manual - English
WARNING: IMPROPER USE OR FAILURE TO FOLLOW INSTRUCTIONS CAN RESULT
IN EXPLOSIVE FAILURE CAUSING SERIOUS EYE OR OTHER INJURY.
For safe use of this product you must read and follow all instructions. Do not leave
a pressurized sprayer in the hot sun. Heat can cause pressure build-up resulting in
possible explosion. Do not store or leave solution in tank after use. Always wear goggles,
gloves, long sleeve shirt, long pants and full foot protection when spraying. Do not
attempt to modify this sprayer. Replace parts only with manufacturer’s original parts.
Never spray flammable, caustic, acidic, chlorine, bleach or other corrosive solutions
or heat, pressure, or gas producing chemicals. Always read and follow chemical
manufacturer’s instructions before use with this sprayer as some chemicals may be
hazardous when used with this sprayer.
PRE-USE CHECK: Before each use check tightness of hose nut to be sure hose is securely
attached to the shut-off assembly. Ensure that all nozzle and wand connections are tight.
Do Not exceed a tank solution temperature of 120º F/ 49º C.
NOTE: The tank and hose may have residual water in it due to quality testing performed on
the sprayer.
WARNING
CAUTION
This sprayer is designed to operate with a Chapin 24V Lithium Ion battery ONLY. Any
other batteries could cause serious harm or injury to the operator and serious damage
to the sprayer.
WARNING: For safe operation, read this manual before using the charger.
The battery pack is not fully charged out of the carton. Before using the battery pack
and charger, read the safety instructions below. Then follow charging procedures
outlined.
NOTE: Remove battery and place in charger when not in use.
WARNING
STORAGE RECOMMENDATIONS
1. The best storage place is one that is cool and dry away from direct sunlight and excess heat or cold.
2. Long storage will not harm the battery pack or charger.
CHARGING PROCEDURE
Chapin chargers are designed to charge Chapin battery packs in
3.5-4 hours depending on the pack being charged.
1. Plug the charger into an appropriate outlet before inserting the
battery pack.
2. Insert the battery pack into the charger as shown in figure A.
3. The red light on the charger is continuously on when the battery
is charging.
4. The green light on the charger is continuously on when the battery is charged. The pack is fully charged and
may be used at this time or left on the charger.
5. Blinking red and green lights on the charger indicates a defective battery and should properly be disposed of.
2E
IMPORTANT SAFETY INSTRUCTION FOR BATTERY PACKS
READ ALL INSTRUCTIONS
A
Chapin Backpack Sprayer Operators Manual - English
Do not incinerate the battery pack even if it is severely damaged or is completely worn out. The
battery pack can explode in a fire. Toxic fumes and materials are created when battery packs are burned.
Do Not charge or use battery in explosive atmospheres, such as in the presence of flammable
liquids, gases or dust. Inserting or removing the battery from the charger may ignite the dust or fumes.
If battery contents come into contact with the skin, immediately wash area with mild soap and
water. If battery liquid gets into the eye, rinse water over the open eye for 15 minutes or until irritation
ceases. If medical attention is needed, the battery electrolyte for Lithium-Ion batteries is composed of a
mixture of liquid organic carbonates and lithium salts.
Contents of opened battery cells may cause respiratory irritation. Provide fresh air. If symptoms
persist, seek medical attention.
WARNING: Burn hazard. Battery liquid may be flammable if exposed to spark or flame.
Charge the battery packs only in Chapin chargers.
DO NOT splash or immerse in water or other liquids. This may cause premature cell failure.
Do not store or use the tool and battery pack in locations where the temperature may reach or
exceed 105ºF (40ºC) (such as outside sheds or metal buildings in summer).
WARNING: Never attempt to open the battery pack for any reason. If battery pack case is cracked or damaged, do not
insert into charger. Do not crush, drop or damage battery pack. Do not use a battery pack or charger that has received
a sharp blow, been dropped, run over or damaged in any way (i.e., pierced with a nail, hit with a hammer, stepped on).
Damaged battery packs should be returned to service center for recycling.
WARNING: Fire hazard. Do not store or carry battery so that metal objects can contact exposed battery terminals.
For example, do not place battery in aprons, pockets, tool boxes, product kit boxes, drawers, etc., with loose nails,
screws, keys, etc.
Transporting batteries can possibly cause fires if the battery terminals inadvertently come in contact with
conductive materials such as keys, coins, hand tools and the like. The US Department of transportation Hazardous
Material Regulations (HMR) actually prohibit transporting batteries in commerce or on airplanes (i.e., packed in
suitcases and carry-on luggage) UNLESS they are properly protected from short circuits. So when transporting
individual batteries, make sure that the battery terminals are protected and well insulated from materials that could
contact them and cause a short circuit. NOTE: Lithium-Ion batteries should not be put in checked baggage.
INSTALLING AND REMOVING THE BATTERY PACK FROM THE SPRAYER
WARNING: Make sure switch is in the off position.
TO INSTALL BATTERY PACK: Insert battery pack into sprayer until an
audible click is heard (Figure B). Make sure battery pack is fully seated
and latched into position.
TO REMOVE THE BATTERY PACK: Depress the battery release button as
shown in Figure C and pull battery pack out of sprayer.
BB
CC
3E
Recharge discharged batteries as soon as possible after use or battery life may be greatly diminished. For longest
battery life, do not discharge batteries fully. It is recommended that the batteries be recharged after each use.
LEAVING THE BATTERY IN THE CHARGER
The charger and battery pack can be left connected with the green LED glowing indefinitely. The charger will keep the
battery pack fresh and fully charged.
IMPORTANT CHARGING NOTES
1. Longest life and best performance can be obtained if the battery pack is charged when the air temperature is
between 65°F and 75°F (18°- 24°C). DO NOT charge the battery pack in an air temperature below +40°F (+4.5°C), or
above +105°F (+40.5°C). This is important and will prevent serious damage to the battery pack.
2. The charger and battery pack may become warm to touch while charging. This is a normal condition, and does not
indicate a problem. To facilitate the cooling of the battery pack after use, avoid placing the charger or battery pack in a
warm environment such as
in a metal shed, or an uninsulated trailer.
3. If the battery pack does not charge properly:
a. Check current at receptacle by plugging in a lamp or other appliance.
b. Check to see if receptacle is connected to a light switch which turns power off when you turn out the lights.
c. Move charger and battery pack to a location where the surrounding air temperature is approximately 65°F and 75°F
(18°- 24°C).
4. The battery pack should be recharged when it fails to produce sufficient power on jobs which were easily done
previously. DO NOT CONTINUE to use under these conditions. Follow the charging procedure. You may also charge a
partially used pack whenever you desire with no adverse affect on the battery pack.
5. Foreign materials of a conductive nature such as, but not limited to, steel wool, aluminum foil, or any buildup of
metallic particles should be kept away from charger cavities. Always unplug the
charger from the power supply when there is no battery pack in the cavity. Unplug charger before attempting to clean.
6. Do not freeze or immerse charger in water or any other liquid.
WARNING: Shock hazard. Do not allow any liquid to get inside charger. Never attempt to open the battery pack for any
reason. If the plastic housing of the battery pack breaks or cracks, call 1-800-822-8837 for recycling information.
Chapin Backpack Sprayer Operators Manual - English
Green Check Button
3/4 Charge
1/2 Charge
1/4 Charge
Red Needs Charge
Battery Charge Indicator
When battery is disconnected from the
charger, depress green button to see the
charge level. To charge see “Charging
Pocedures” in this manual.
Symbols
The label on your sprayer may include the following symbols.
V
volts
Hz hertz
min minutes
direct current
Class I Construction
(grounded)
Class II Construction
( double insulated)
Read instruction
manual before use
Use proper eye protection
A
amperes
W
watts
alternating current
no load speed
earthing terminal
safety alert symbol
/min or rpm revolutions or
reciprocation per minute
Use proper
respiratory protection
Use proper hearing protection
SAVE THESE INSTRUCTIONS:
This manual contains important safety instructions for battery chargers.
• Before using charger, read all instructions and cautionary markings on charger, battery pack, and product using
battery pack.
WARNING: Shock hazard. Do not allow any liquid to get inside charger.
CAUTION: Burn hazard. To reduce the risk of injury, charge only designated Chapin batteries. Other types of batteries
my burst causing personal injury and damage.
CAUTION: Under certain conditions, with the charger plugged into the power supply, the charger can be shorted by
foreign material. Foreign materials of a conductive nature such as, but not limited to, steel wool, aluminum foil, or any
build up of metalic partices should be kept away from charger cavities. Always unplug the charger from the power
supply when there is no battery pack in the cavity. Unlplug charger before attempting to clean.
WARNING: DO NOT attempt to charge the battery pack with any chargers other than the ones in this manual.
The charger and battery pack are specifically designed to work together.
• These chargers are not intended for any uses other than charging designated Chapin rechargeable batteries.
Any other uses may result in risk of fire, electric shock or electrocution.
• Do not expose charger to rain or snow.
• Pull by plug rather than cord when disconnecting charger. This will reduce risk of damage to electric plug and cord.
• Make sure that cord is located so that it will not be stepped on, tripped over, or otherwise subjected to damage
or stress.
• Do not use an extension cord unless it is absolutely necessary. Use of improper extension cord could result in risk
of fire, electric shock, or electrocution.
• An extension cord must have adequate wire size (AWG or American Wire Gauge) for safety. The smaller the gauge
number of the wire, the greater the capacity of the cable, that is 16 gauge has more capacity than 18 gauge. When
using more than one extension to make up the total lenght, be sure each idividual extension contains at least the
minimum wire size.
• Do not operate charger with damaged cord or plug - have them replaced immediately.
• Do not operate charger if it has received a sharp blow, been dropped, or otherwise damaged in any way.
Take it to an authorized service center.
• Do not dissassemble charger; take it to an authorized service center when service or repair is required.
Incorrect reassembly may result in a risk of electric shock electrocution or fire.
• Disconnect the charger from the outlet before attempting any cleaning. This will reduce the risk of electric shock.
Removing the battery pack will not reduce the risk.
• NEVER attempt to connect 2 chargers together.
• The charger is designed to operate on standard household electrical power (120Volts). Do not attempt to use it
on any other voltage.
IMPORTANT SAFETY INSTRUCTIONS FOR BATTERY CHARGERS
4E
Chapin Backpack Sprayer Operators Manual - English
5E
1. Poly
Nozzle Cap
2. Retaining
Nut
3. Nozzle
Body
4. Nozzle
Gasket
5. Elbow
Figure 3Figure 2Figure 1
1. Brass
Nozzle Cap
2. Retaining
Nut
3. Nozzle
Body
4. Nozzle
Gasket
5. Elbow
Nozzle
Gasket
Retaining Nut
Elbow
Fan Nozzle Tip
SPRAYER COMPONENTS & USE INFORMATION
NOZZLE ASSEMBLY
Figure 1-2
Unscrew the nozzle cap (1) from the nozzle body (3) with retaining nut (2) fastened tightly to the elbow (5). Unscrew
the retaining nut (2). Push the nozzle body (3) with the nozzle gasket (4) out of the retaining nut (2). To reinstall the
nozzle, reverse the above instructions.
Figure 3
Unscrew the retaining nut from the elbow and push the fan nozzle tip and gasket out of the retaining nut. To reinstall
the nozzle, reverse the above instructions.
APPLICATIONS & USE FOR YOUR SPRAYER
Avoid using a sprayer for general cleaning purposes if plant protection or herbicide chemicals have already been used
in the sprayer. If a sprayer has been used for plant protection or as an herbicide, clean the sprayer completely (see
cleaning section) before using.
Plant Food: Use different spray patterns for optimum foliage feeding or for fungicide and pesticide application.
Herbicides: Reduce weeds and unwanted plants but avoid using the same sprayer for plant feeding or protection
without thoroughly cleaning (see cleaning section) the sprayer first.
General Household Use: Apply detergents, cleaning solutions, warm water (do not exceed 120°F/49°C) or nontoxic
household cleaning chemicals for carpets, floors, walls, glass, counter tops and ceilings. DO NOT use sprayer that has
been used with herbicides, pesticides or other toxic chemicals for household applications.
General Outdoor Use: Use the sprayer for cleaning windows or with a detergent for general purpose cleaning.
WAND ASSEMBLY
1. Make sure the o-ring is installed on the end of the wand. Insert the wand into shut-off valve.
2. Turn and tighten the retaining nut clock-wise onto the shut-off valve.
O-ringWand
Retaining
Nut
Shut-off
Valve
Chapin Backpack Sprayer Operators Manual - English
6E
INSTALLING THE SHOULDER STRAP
The top of the shoulder straps are attached to the tank.
Attach the lower end of the straps by clipping the strap hooks to the
metal frame between where the frame exits the tank and curves
around.
Figure 1
Stage 1
(Filter basket)
3 STAGE FILTERING SYSTEM
This backpack sprayer is equipped with a 3 stage filtering system (see
figure 1). Stage 1 is a filter basket incorporated into the tank opening
where fluid is added. Stage 2 filter is located at the inlet of the pump
housing. Stage 2 is a removable In-tank filter. Stage 3 is a removable filter
incorporated into the shut-off assembly. Periodic cleaning of these filters is
recommended to insure consistent fluid flow through the sprayer. This will
also reduce sprayer component wear.
The stage 3 filter is a removable filter incorporated into the inlet side of
the shut-off valve (see section “disassembling and repairing the shut-off
valve”). Make sure pump switch is off and pressure is released before
detaching the hose from the shut-off.
Stage 2
(Removable
In-Tank Filter
Pump
Housing
Stage 3
(removable
Shut-off filter)
Figure 2 Stage 2 (removable In-tank filter)
Guide edge facing away
from pressure cylinder Guide edge on
pressure cylinder
Chapin Backpack Sprayer Operators Manual - English
FILLING THE SPRAYER
Make sure the filter basket is in place to keep debris from entering the tank.
Determine the amount of mixture needed for your application. Add the proper amount of water to the tank. Add
the proper amount of chemical to the tank (check the chemical label for proper ratio of chemical). Stir mixture in
tank with a clean utensil (like a paint stirrer). The tank will hold the 4-gallon (15.1L) capacity plus the chemical.
It is not necessary to completely fill the sprayer tank with each use. You can fill the tank with only the amount
needed for each application.
Always follow the manufacturer’s instructions included on their product label.
7E
OPERATING THE SPRAYER
• Plug in charged battery
• Turn switch to on position
• Spray liquid back into tank to prime pump
• Close shut-off. Pump should stop running.
• Replace cap & begin spraying.
POWDER-BASED CHEMICALS - (Not reccomended for use with this model).
Powder-based chemicals (powder mixed with liquids to make the spraying agent) are usually abrasive
and can cause wear. When you use a powder-based chemical in your sprayer, make sure it is thoroughly
dissolved in the liquid solution. Thoroughly clean and flush the sprayer with water to extend the life of the
sprayer’s parts.
When finished spraying turn switch to off position.
Remove and re-charge battery.
Note: Unit is equipped with a battery protection circuit. If sprayer abruptly stops after spraying for an
extended period of time, the battery may require charging.
CLEANING TANK
Always empty the sprayer and clean the tank thoroughly after each use.
CLEANING FILTERS
There are two (2) filters in your sprayer that need to be cleaned regularly. The first filter is located
in the body of the shut off assembly. The shut off assembly is the handle with the red grip and
trigger that you squeeze to create the spray. The second filter is in the tank, next to the pump.
Shut Off Assembly Filter
Unthread the shut off assembly from the hose. In the body of the handle is a white filter.
Remove the filter and soak in warm soapy water to clean any debris or chemical residue that
may be present.
Once you have cleaned this filter you will reattach the handle to the hose.
In Tank Filter
Looking inside of your tank from above you will see a black stick with a finger hole.
You can pull this stick straight up.
Soak the filter in warm soapy water to clean up any debris or chemical residue that may be present.
Once you have cleaned this filter, slide the filter back into place alongside of the pump.
Other Cleaning Hints:
Improper spray distribution usually means the nozzle is clogged, remove the nozzle and clean it.
Soap can be added to the water to clean the tank.
Do not use strong cleaning agents or abrasives.
If you use a chemical agent to clean the tank, follow the manufacturer’s recommendations for the
disposal of the waste water.
Follow the chemical manufacturers instructions for clean up.
Chapin Backpack Sprayer Operators Manual - English
8E
Recycling Spent Battery
In some areas, it is illegal to place spent lithium-ion batteries in the trash or municipal solid waste
stream. You may also contact your local recycling center for information on where to drop off the
spent battery, or call 1-800-8-BATTERY.
1) Assembled shut-off valve (Figure 1).
2) Remove the retaining pin (A) (Figure 2) place the
notched end of the retaining pin on a hard surface and
push down. Remove the retaining pin and slide the handle
off the valve.
3) Remove the retaining nut (o-ring attached), spring, and
valve stem (B) (Figure 3). Replace worn parts. Lubricate
the O-rings and reassemble by reversing the steps above.
Place the handle groove in the slotted area of the valve
stem and make sure the locking clip is positioned in the
neutral position (see “Helpful Spraying Information”
section). Insert the retaining pin. Push down on the handle
a few times to distribute the lubricant evenly. Check filter
(C) in end of shut-off valve for debris. Remove filter and
flush with water to clean out.
Figure 1
DISASSEMBLING AND REPAIRING THE SHUT OFF VALVE
Figure 2
A
Chapin Backpack Sprayer Operators Manual - English
STORING AND MAINTAINING YOUR SPRAYER
The Battery Should be removed prior to storage.
• Store battery on charger. Best practice is to store your battery on a plugged in charger to maximize
the life of your battery.
• The sprayer should be stored out of direct sunlight in a cool dry space.
• Before freezing weather make sure to drain all liquid in the tank, pump, hose, shut-off valve, wand and
nozzle, to avoid liquid expansion and cracking in the sprayer components (See “Cleaning” section).
Lock the shut-off valve in the “open” position.
• When service is required call your nearest dealer and always insist on original manufactured r
eplacement parts.
• Inspect the hose, wand, tank and shut-off valve for wear, damage or leaks on a regular basis and
repair defects promptly.
Figure 3
B
Valve
Stem
C
9E
TROUBLE SHOOTING YOUR SPRAYER
Symptom Possible Reason Correction
Unit runs but does not spray Pump is not primed Activate shut-off handle until liquid
sprays out. Release handle and pump
will shut-off.
Unit will not start Battery pack not installed properly Check battery pack installation.
Battery pack not charged Check battery pack charging
requirements.
Battery pack will not charge Battery pack not inserted into charger Insert battery pack into charger until
green LED appears.
Charger not plugged in Plug charger into a working outlet.
Refer to “Important Charging Notes”
for more details.
Surrounding air temperature too hot or too cold Move charger and battery pack to
asurrounding air temperature of above
40 degrees F (4.5ºC) or below 105
degrees F (+40.5º).
Unit shuts off abruptly Battery pack has reached its maximum thermal
limit.
Allow battery pack to cool down.
Out of charge. (To maximize the life of the battery
pack it is designed to shut off abruptly when the
charge is depleted.)
Place on charger and allow to charge.
Shut-off leaks Connections loose Tighten connection.
Worn or damaged shut-off Rebuild or replace the shut-off valve.
Wand assembly leaks Connections loose Tighten connection.
Damaged or worn o-ring/gasket Replace o-ring/gasket.
Nozzle assembly leaks Connections loose Tighten connection.
Damaged or worn o-ring/gasket Replace o-ring/gasket.
Leak between pump
assembly and tank
Pump clamp loose Tighten clamp.
O-ring worn or damaged Replace pressure chamber o-ring.
Hose leaking at tank outlet Hose clamp loose Tighten clamp.
Hose leaking at shut-off Connection loose Tighten retaining nut.
Damaged or worn o-ring/gasket Replace o-ring/gasket.
Chapin Backpack Sprayer Operators Manual - English
TROUBLE SHOOTING NOTES
Chapin Backpack Sprayer Operators Manual - English
CHECKING THE WIRE CONNECTIONS:
Make sure that your tank is empty and not pressurized.
Loosen the bolt in the front of the sprayer.
Slowly pull down the switch housing.
You will see wires and you will want to make sure that the wires are connected near the pump and
at the switch.
Once you have verified that the wires are properly connected you will reattach the housing to the
tank in the same manner you removed the housing.
PRIMING THE PUMP ( First time use or after long storage)
Fill your tank at least ¾ of the way full with water. Make sure that the pump cylinder is completely
submerged in water.
Let the water sit in the tank for a few hours.
Once your unit has sat for a period of time you can turn the switch to the on position. The l indicates
the on position, the 0 indicates the off position.
With the switch turned on, place a rubber band around the trigger of the shut off assembly to hold
the trigger open, as if you were spraying.
Let your unit run for @12-15 minutes. You may not receive a spray right away as your pump may run
but may not build pressure. This is acceptable and part of the priming steps.
You should receive a strong stream at the 12-15 minute mark.
Your unit is now cleaned and primed and ready for use.
10E
6-8138
Shut-off
Assembly
11E
REPLACEMENT PARTS ORDER INFORMATION
6-8122
Brass
Adjustable Nozzle
6-8093
Poly
Adjustable
Nozzle
6-8096
Flat Fan
Nozzle
Retaining
Nut
Nozzle
gasket
Elbow with
o-ring
6-8148
Nozzle Kit
6-8120B
Shut-off Valve
Repair Kit
6-8131
Nozzle Kit
6-8169
Filter
Replacement
Kit
6-8219
Wand
Assembly
Wand
O-ring
Screw
Cap
Chapin Backpack Sprayer Operators Manual - English
Congratulations!
You have just purchased a quality Chapin product.
Register Your Sprayer Online@ www.chapinmfg.com/warranty.asp
Chapin International, Inc
P. O. Box 549 700 Ellicot St. • Batavia, NY 14021-0549 U.S.A. • 1-800-950-4458 • www.chapinmfg.com
Due to our ongoing product improvement process, product specifications may change without notice. U.S. and foreign patents pending.
REPLACEMENT PARTS ORDER INFORMATION
6-8153
O-ring Kit
Elbow O-ring Hose Gasket
Nozzle Gasket Wand O-ring
6-8146-1
Filter Basket
& Cap
6-8137
Straps
6-8105
Hose
Assembly
Hose Washer
Retaining Nut
Hose
6-8238
Battery and Charger
Chapin Backpack Sprayer Operators Manual - English
Visite el sitio web para conocer
los detalles de la garantía
Chapin International, Inc
P.O. Box 549 700 Ellicott St.
Batavia, NY 14021-0549 U.S.A.
1-800-950-4458 www.chapinmfg.com
24V ROCIADOR DE MOCHILA
RECARGABLE
Modelo 63924 • 4G/ 15L
017684 R0421
Lea estas instrucciones atentamente antes de utilizarlo
ADVERTENCIA
Manual de uso
y cuidado
NO DEVOLVER ESTE
PULVERIZADOR A LA TIENDA.
LLAMAR AL: 1-800-950-4458
www.chapinmfg.com
1S
ADVERTENCIA: EL USO INAPROPIADO O NO SEGUIR LAS INSTRUCCIONES PUEDE
DAR LUGAR A UNA FALLA EXPLOSIVA Y CAUSAR SERIAS LESIONES OCULARES O DE
OTRO TIPO.
Para el uso seguro de este producto, debe leer y seguir todas las instrucciones. No deje el pulverizador
presurizado expuesto al sol. El calor puede provocar una acumulación de presión que cause una posible
explosión. No almacene o deje la solución en el tanque después de usar. Cuando utilice el pulverizador use
siempre anteojos protectores, guantes, camisa de manga larga, pantalones largos y protección completa
en los pies. No intente modificar este pulverizador. Reemplace las piezas sólo con piezas originales del
fabricante.
Nunca pulverice soluciones inflamables, cáusticas, ácidas, de cloro, de lejía u otras soluciones
corrosivas ni químicos que produzcan calor, presión o gas. Siempre lea y siga las instrucciones del
fabricante del producto químico antes de usarlo con este pulverizador, ya que algunos productos
químicos pueden ser peligrosos cuando se usan con este pulverizador.
• REVISIÓN PREVIA AL USO: antes de cada uso, revise que la tuerca de la mangueraesté bien
apretada para asegurar que la misma se encuentre sujeta en forma segura al montaje de la unidad
de cierre. Asegúrese de que todas las conexiones de la boquilla y la varilla estén bien apretadas.
No exceda la temperatura de la solución del tanque de 120º F/ 49º C.
NOTA: El tanque y la manguera pueden tener agua residual en su interior, debido a las pruebas de
calidad realizadas en el pulverizador.
ADVERTENCIA
PRECAUCIÓN
Este pulverizador está diseñado para funcionar con una batería de iones de litio de 24 voltios Chapin
SOLAMENTE. Cualquier otra batería podría causar daños o lesiones al operador y daños graves al
pulverizador.
ADVERTENCIA: Para un funcionamiento seguro, lea este manual antes de utilizar el cargador.
La batería no está completamente cargada cuando la extrae de la caja de cartón. Antes de utilizar la batería
y el cargador, lea las instrucciones de seguridad a continuación. Luego, siga los procedimientos de carga
detallados.
NOTA: Retire la batería y conecte el cargador cuando no se esté usando.
ADVERTENCIA
Manual del operador del pulverizador de mochila Chapin - Español
2S
No incinere la batería, aunque esté gravemente dañada o completamente desgastada. La batería puede
explotar si se la expone al fuego. Se generan vapores y materiales tóxicos cuando se queman baterías.
No cargue ni use la batería en atmósferas explosivas, como por ejemplo en presencia de líquidos, gases o
polvo inflamables. La inserción o extracción de la batería del cargador puede encender polvo o vapores
combustibles.
Si el contenido de la batería entra en contacto con la piel, lave inmediatamente la zona con jabón suave y agua.
Si el líquido de la batería entra en los ojos, enjuague con agua manteniendo los ojos abiertos durante 15 minutos
o hasta que cese la irritación. Si es necesaria la atención médica, el electrolito de la batería de iones de litio se
compone de una mezcla de carbonatos orgánicos líquidos y sales de litio.
El contenido de las celdas de la batería abierta puede causar irritación respiratoria. Suministre aire fresco. Si
los síntomas persisten, busque asistencia médica.
ADVERTENCIA: Peligro de quemaduras. El líquido de la batería puede encenderse si se expone a chispas o
llamas.
Cargue las baterías solamente en cargadores Chapin.
NO salpique ni sumerja en agua o en otros líquidos. Esto puede causar un fallo prematuro de las celdas.
No almacene ni utilice la herramienta y la batería en lugares donde la temperatura pueda alcanzar o exceder
los 105 ºF (40 ºC) (tales como cobertizos o edificaciones de metal al aire libre en verano).
ADVERTENCIA: Nunca intente abrir la batería por ningún motivo. Si el estuche de la batería está agrietado o dañado,
no la utilice; tampoco use una batería o cargador que hayan recibido un golpe fuerte, se hayan caído, se les haya
pasado por encima con un equipo o vehículo o se hayan dañado de alguna manera (por ejemplo, perforado con
un clavo, golpeado con un martillo, pisado). Las baterías dañadas deben devolverse al centro de servicio para su
reciclaje.
ADVERTENCIA: Peligro de incendio. No almacene ni transporte la batería de una forma en la cual los objetos
metálicos puedan ponerse en contacto con los terminales expuestos de la batería. Por ejemplo, no coloque la batería
en delantales, bolsillos, cajas de herramientas, cajas de juegos de productos, cajones, etc., junto con clavos, tornillos,
llaves sueltos, etc.
Es posible que el transporte de las baterías pueda provocar incendios si los terminales de éstas entran en
contacto accidentalmente con materiales conductores tales como llaves, monedas, herramientas de mano
y similares. Las Normas de Materiales Peligrosos (HMR, Hazardous Material Regulations) del Departamento de
Transporte de los Estados Unidos, en realidad, prohíben el transporte de baterías comercialmente o en aviones (es
decir, empacadas en maletas y equipaje de mano) A MENOS que estén debidamente protegidas contra cortocircuitos.
Por eso, cuando transporte baterías individuales, asegúrese de que los terminales están protegidos y aislados de
manera adecuada de materiales que pudieran hacer contacto con ellos y causar un cortocircuito. NOTA: Las baterías
de iones de litio no se deben colocar en el equipaje que se envía a bodega.
RECOMENDACIONES DE ALMACENAMIENTO
1. El mejor lugar de almacenamiento es aquel que sea fresco y seco, lejos de la
luz solar directa y el exceso de calor o frío.
2. El almacenamiento prolongado no dañará la batería o el cargador.
PROCEDIMIENTO DE CARGA
Los cargadores Chapin están diseñados para cargar
baterías Chapin en 3,5 a 4 horas, en función de la batería que se está cargando.
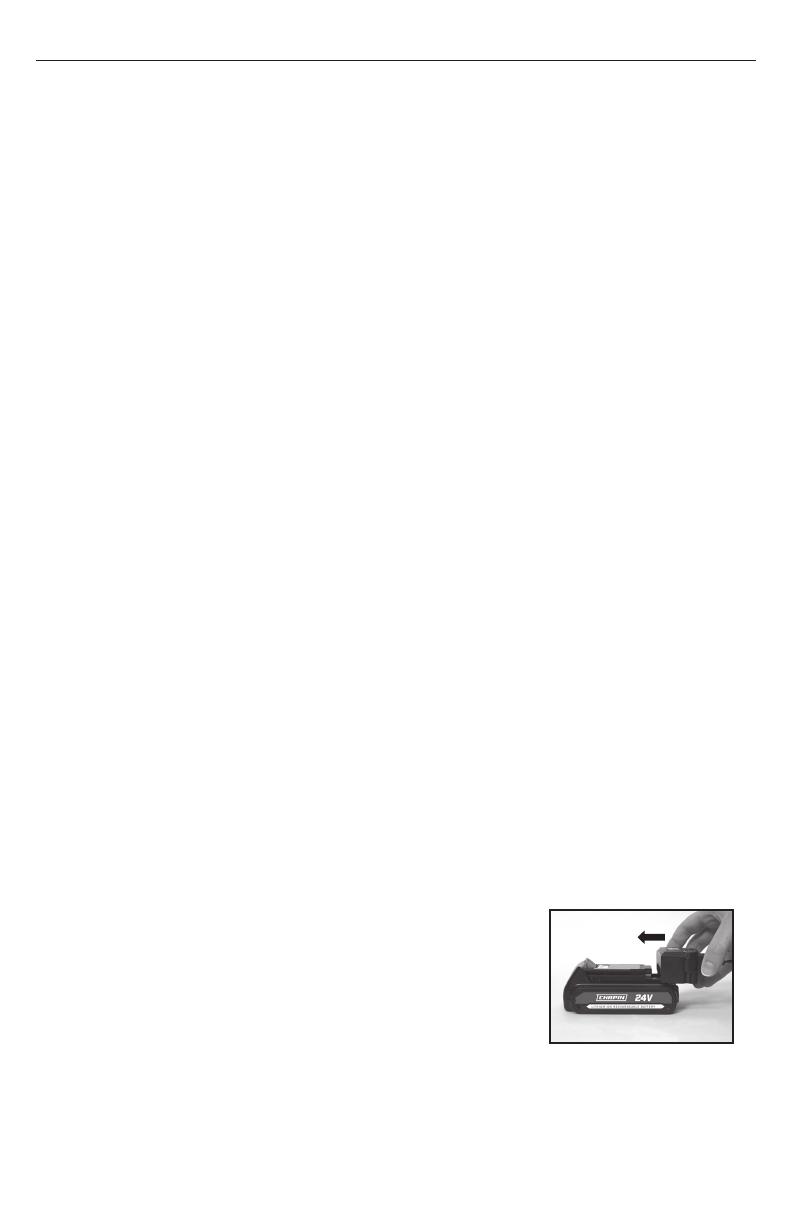
1. Conecte el cargador a un tomacorriente adecuado antes de insertar la batería.
2. Inserte la batería en el cargador como se muestra en la figura A.
3. La luz roja está encendida de forma continua cuando se está cargando la batería.
4. La luz verde está encendida de forma continua cuando la batería está cargada. La batería está completamente
cargada y puede utilizarse en este momento o dejarse en el cargador.
5. Cuando las luces roja o verde titilan indican que debe desecharse una batería defectuosa.
Manual del operador del pulverizador de mochila Chapin - Español
A
INSTRUCCIONES DE SEGURIDAD IMPORTANTES PARA LAS BATERÍAS
LEA TODAS LAS INSTRUCCIONES
3S
INSTALACIÓN Y EXTRACCIÓN DE LA BATERÍA DEL PULVERIZADOR
ADVERTENCIA: Asegúrese de que el interruptor esté en la posición de
apagado (off).
PARA INSTALAR LA BATERÍA: Inserte la batería en el pulverizador hasta
que se escuche un clic audible (Figura B). Asegúrese de que la batería
esté completamente ubicada y trabada en su posición.
PARA RETIRAR LA BATERÍA: Presione el botón de liberación de la
batería como se muestra en la Figura C y tire de la batería para extraerla
del pulverizador.
Recargue las baterías descargadas tan pronto como sea posible después de su uso o la vida útil de la batería
pueden verse muy disminuida. Para una mayor vida útil de la batería, no descargue las baterías por completo. Se
recomienda la recarga de las baterías después de cada uso.
SI DEJA LA BATERÍA EN EL CARGADOR
El cargador y la batería pueden dejarse conectados con el LED verde encendido indefinidamente. El cargador
mantendrá la batería fresca y completamente cargada.
NOTAS IMPORTANTES SOBRE LA CARGA
1. Se puede obtener una vida útil más prolongada y un mejor rendimiento si la batería se carga cuando la temperatura
del aire es de entre 65 °F y 75 °F (18 °C a 24 °C). NO cargue la batería a una temperatura del aire por debajo de +40 °F
(+4,5 °C) o superior a +105 °F (+40,5 °C). Esto es importante y evitará daños graves a la batería.
2. El cargador y la batería pueden estar calientes al tacto durante la carga. Esta es una condición normal y no indica
un problema. Para facilitar el enfriamiento de la batería después del uso, evite colocar el cargador o la batería en un
ambiente cálido, como en un cobertizo metálico o un remolque sin aislamiento térmico.
3. Si la batería no se carga correctamente:
a. Revise la corriente en el receptáculo enchufando una lámpara u otro aparato.
b. Compruebe si el receptáculo está conectado a un interruptor de luz que corta la alimentación cuando usted apaga
las luces.
c. Traslade el cargador y la batería a un lugar donde la temperatura ambiente circundante sea de aproximadamente
65 °F y 75 °F (18 °C a 24 °C).
4. La batería debe recargarse cuando no produce la alimentación suficiente para tareas que previamente realizaba con
facilidad. NO CONTINÚE utilizándola en estas condiciones. Siga el procedimiento de carga. También puede cargar una
batería usada parcialmente cuando lo desee, sin ningún efecto negativo sobre la misma.
5. Los materiales ajenos de naturaleza conductora, como, entre otros, la lana de acero, el papel de aluminio o cualquier
acumulación de partículas metálicas, deben conservarse alejados de las cavidades del cargador. Siempre desenchufe
el cargador de la fuente de alimentación cuando no haya batería en la cavidad. Desenchufe el cargador antes de
intentar limpiarlo.
6. No congele ni sumerja el cargador en agua ni en ningún otro líquido.
ADVERTENCIA: Riesgo de descarga eléctrica. No permita que ningún líquido ingrese en el cargador. Nunca intente
abrir la batería por ningún motivo. Si la carcasa de plástico de la batería se rompe o quiebra, llame al 1-800-822-8837
para recibir información sobre reciclaje.
Manual del operador del pulverizador de mochila Chapin - Español
BB
CC
Botón verde de verificación
3/4 carga
1/2 carga
1/4 carga
Rojo, necesita carga
Indicador de carga de la batería
Cuando la batería esté desconectada del
cargador, presione el botón verde para ver
el nivel de carga. Para cargar la batería,
consulte la sección «Procedimientos de
carga» en este manual.
4S
Símbolos
La etiqueta sobre su herramienta puede incluir los siguientes símbolos.
V voltios
Hz hercios
min minutos
corriente continua
Construcción de Clase I
(puesto a tierra)
Construcción de Clase II
(aislamiento doble)
Lea el manual de instruccio-
nes antes de su uso
Utilice la protección
ocular adecuada
A amperios
W vatios
corriente alterna
velocidad sin carga
terminal de puesta a tierra
símbolo de alerta de seguridad
Use la protección respiratoria
adecuada
Utilice la protección
auditiva adecuada
/min o rpm
reciprocidad por minuto
revoluciones o
GUARDE ESTAS INSTRUCCIONES:
Este manual contiene instrucciones importantes de seguridad para cargadores de baterías.
• Antes de usar el cargador, lea todas las instrucciones y advertencias sobre el cargador, la batería y el producto que
utiliza dicha batería.
ADVERTENCIA: Riesgo de descarga eléctrica. No permita que ningún líquido ingrese en el cargador.
PRECAUCIÓN: Peligro de quemaduras. Para reducir el riesgo de lesiones, cargue solamente
baterías Chapin específicas. Otros tipos de baterías pueden estallar y causar lesiones personales y daños.
PRECAUCIÓN: En determinadas condiciones, con el cargador enchufado al suministro de energía, este puede
experimentar un cortocircuito por material extraño. Los materiales ajenos de naturaleza conductora, como, entre otros,
la lana de acero, el papel de aluminio o cualquier acumulación de partículas metálicas, deben conservarse alejados de
las cavidades del cargador. Siempre desenchufe el cargador de la fuente de alimentación cuando no haya batería en la
cavidad. Desenchufe el cargador antes de intentar limpiarlo.
ADVERTENCIA: NO intente cargar la batería con otros cargadores que no sean los que se detallan en este manual.
El cargador y la batería están específicamente diseñados para trabajar juntos.
• Estos cargadores no están diseñados para usos distintos a la carga de baterías recargables Chapin específicas.
Cualquier otro uso puede generar riesgo de incendio, descarga eléctrica o electrocución.
No exponga el cargador a la lluvia o a la nieve.
Tire del enchufe y no del cable al desconectar el cargador. Esto reducirá el riesgo de dañar el enchufe y el cable.
Asegúrese de que el cable eléctrico esté ubicado de manera que no lo pise o tropiece con él, o lo someta de otra
manera a daños o tensión.
No utilice un cable de prolongación a menos que sea absolutamente necesario. El uso de un cable de prolongación
incorrecto puede provocar riesgo de incendio, descarga eléctrica o electrocución.
Un cable de prolongación debe tener un tamaño de alambre adecuado (AWG o American Wire Gauge) para su
seguridad. Cuanto menor sea el número de calibre del alambre, mayor será la capacidad del cable, es decir que un
calibre 16 tiene mayor capacidad que el calibre 18. Cuando se utiliza más de una prolongación para lograr la longitud
total, asegúrese de que cada prolongación individual contenga al menos el calibre mínimo de alambre.
No utilice el cargador con un cable o enchufe dañados. Hágalos reparar de inmediato.
No utilice el cargador si ha recibido un golpe fuerte, se ha caído o dañado de cualquier otra forma.
Llévelo a un centro de servicio técnico autorizado.
No desmonte el cargador, llévelo a un centro de servicio técnico autorizado cuando sea necesario su mantenimiento
o reparación. Un montaje incorrecto puede dar lugar a un riesgo de electrocución por descarga eléctrica o incendio.
Desconecte el cargador del tomacorriente antes intentar realizar cualquier tarea de limpieza. Esto reducirá el
riesgo de descarga eléctrica. La extracción de la batería no reducirá el riesgo.
NUNCA intente conectar 2 cargadores juntos.
El cargador está diseñado para funcionar con corriente eléctrica doméstica estándar (120 voltios). No intente
utilizarlo con otro voltaje.
INSTRUCCIONES IMPORTANTES DE SEGURIDAD PARA LOS
CARGADORES DE BATERÍAS
Manual del operador del pulverizador de mochila Chapin - Español
1. Tapa de boquilla
de polietileno
2. Tuerca de
retención
3. Cuerpo de
la boquilla
4. Junta de
la boquilla
5. Codo
Figura 3Figura 2Figura 1
1. Tapa de boquilla
de latón
2. Tuerca de
retención
3. Cuerpo de
la boquilla
4. Junta de
la boquilla
5. Codo
Junta de
la boquilla
Tuerca de retención
Codo
Punta de la boquilla
de pulverización
USO Y APLICACIÓN DE SU PULVERIZADOR
Evite el uso de un pulverizador con fines de limpieza si ya se utilizaron productos protectores para plantas o
químicos herbicidas en el mismo. Si se ha utilizado el pulverizador para proteger plantas o como herbicida, limpie
completamente el pulverizador (consulte la sección de limpieza) antes de utilizarlo.
Fertilizante: utilice diferentes tipos de patrones de pulverización para la óptima nutrición de follaje y aplicación de
fungicidas y pesticidas.
Herbicidas: reduzca la maleza y las plantas no deseadas, pero evite utilizar el mismo pulverizador para fertilizar o
proteger plantas sin primero limpiar el pulverizador por completo (consulte la sección de limpieza).
Uso general en el hogar: aplique detergentes, soluciones limpiadoras, agua tibia (que no exceda los 120°F/49°C) o
químicos limpiadores para el hogar no tóxicos en alfombras, pisos, paredes, vidrio, encimeras y techos. NO utilice el
pulverizador que se utilizó con herbicidas, pesticidas u otros químicos tóxicos para aplicaciones en el hogar.
Uso general en exteriores: utilice el pulverizador para limpiar ventanas o para aplicar algún detergente para
propósitos de limpieza general.
INFORMACIÓN DE LOS COMPONENTES Y USO DEL PULVERIZADOR
ENSAMBLE DE BOQUILLA
Figura 1-2
Desatornille la tapa de boquilla (1) del cuerpo de la boquilla (3) con la tuerca de retención (2) en el codo (5). Desatornille
la tuerca de retención (2). Empuje el cuerpo de la boquilla (3) con la boquilla junta (4) de manera de separarlos de la
tuerca de retención (2). Para volver a instalar la boquilla, haga lo mismo pero empezando por el último paso..
Figura 3
Desatornille la tuerca de retención del codo y empuje la punta de la boquilla de pulverización de modo que se separe de
la tuerca de retención. Para volver a instalar la boquilla, haga lo mismo pero empezando por el último paso.
5S
Manual del operador del pulverizador de mochila Chapin - Español
MONTAJE DE LA VARILLA
1. Asegúrese de que el anillo “O” esté instalado en el extremo de la varilla pulverizadora.
Inserte la varilla a la válvula de cierre.
2. Gire y apriete la tuerca de retención sobre la válvula de cierre en el sentido de las agujas del reloj.
Anillo “O”Varilla
Tuerca de
retención
Válvula de
apagado
6S
Manual del operador del pulverizador de mochila Chapin - Español
INSTALACIÓN DE LAS CORREAS PARA HOMBROS
La p rmazón de metal, en la parte donde el armazón sale del
tanque y se curva alrededor del mismo.
Figure 1
Etapa 1
(canastilla de filtro)
SISTEMA DE FILTRACIÓN EN 3 ETAPAS
Este pulverizador de mochila está equipado con un sistema de filtración en
3 etapas (ver Figura 1). La etapa 1 es una canastilla de filtro incorporada en
la abertura del tanque donde se coloca el fluido. El filtro de la etapa 2 está
ubicado en la entrada de la carcasa de la bomba. La etapa 2 es una varilla
de filtro desmontable. La etapa 3 es un filtro desmontable integrado en el
montaje de cierre. Se recomienda limpieza periódica de estos filtros para
garantizar un flujo uniforme del fluido a través del pulverizador. Esto también
reducirá el desgaste del componente pulverizador.
El filtro de la etapa 3 es un filtro desmontable incorporado en el lado de
la entrada de la válvula de cierre (vea la sección “desarmado y reparación
de la válvula de cierre”). Asegúrese de que el interruptor de la bomba esté
apagado y de liberar la presión antes de desconectar la manguera del
dispositivo de cierre.
Etapa 2
(varilla
desmontable)Carcasa de
la bomba
Etapa 3
(Filtro de cierre)
Figura 2 Etapa 2 (varilla de filtro desmontable)
El borde de la guía está
mirando hacia afuera del
cilindro de presión
El borde de la guía está en
el cilindro de presión
LLENADO DEL PULVERIZADOR
Asegúrese de que la canastilla de filtro esté en su lugar para evitar que entren residuos al tanque.
Determine la cantidad de mezcla que necesita para su aplicación.
Agregue la cantidad adecuada de agua en el tanque. Agregue la cantidad adecuada de agente químico
en el tanque (consulte la etiqueta del agente químico para conocer la proporción adecuada del mismo).
Agite la mezcla en el tanque con un utensilio limpio (como una espàtula para pintura). El tanque tiene
capacidad para 4 galones (15.1L) más el agente químico.
No es necesario llenar el tanque del pulverizador en cada uso. Puede llenar el tanque con tan sólo la
cantidad necesaria para cada aplicación.
Siempre siga las instrucciones del fabricante que se incluyen en la etiqueta del producto.
  • Page 1 1
  • Page 2 2
  • Page 3 3
  • Page 4 4
  • Page 5 5
  • Page 6 6
  • Page 7 7
  • Page 8 8
  • Page 9 9
  • Page 10 10
  • Page 11 11
  • Page 12 12
  • Page 13 13
  • Page 14 14
  • Page 15 15
  • Page 16 16
  • Page 17 17
  • Page 18 18
  • Page 19 19
  • Page 20 20
  • Page 21 21
  • Page 22 22
  • Page 23 23
  • Page 24 24
  • Page 25 25
  • Page 26 26
  • Page 27 27
  • Page 28 28
  • Page 29 29
  • Page 30 30
  • Page 31 31
  • Page 32 32
  • Page 33 33
  • Page 34 34
  • Page 35 35
  • Page 36 36
  • Page 37 37
  • Page 38 38
  • Page 39 39
  • Page 40 40

Chapin 63924 Manuel utilisateur

Taper
Manuel utilisateur

dans d''autres langues

Autres documents