Dyna-Glo DGA550SSP-D Manuel utilisateur
- Catégorie
- Barbecues
- Taper
- Manuel utilisateur

Serial Number
Purchase Date
ATTACH YOUR RECEIPT HERE
Español p. 63
Français p. 32
5-BURNER GAS
GRILL
MODEL #DGA550SSP/DGA550SSP-D
Questions, problems, missing parts? Before returning to your retailer, call our customer
service department at 1-877-447-4768, 8:30 a.m. – 4:30 p.m., CST, Monday – Friday,
or e-mail us at [email protected].
1
ANS Z21.58b-2012
CSA 1.6b-2012
Outdoor Cooking
Gas Appliance
70-10-054 Rev 02/2014

18
OPERATING INSTRUCTIONS
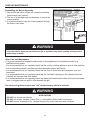
Checking for Leaks
Afterallconnectionsaremade,checkallconnectionsandttingsontheLPgastankvalve,gashose
and regulator for leaks with a water and soap solution.
Topreventreorexplosionwhiletestingforaleak:
• Always perform leak test prior to lighting the grill.
• Do not smoke while testing for a leak.
• Always perform leak tests outdoors in a well-ventilated area.
•Donotuseanysourceofamewhiletestingforleaks.
• Do not use the grill until any and all leaks are corrected.
• If you are unable to correct a leak, disconnect the propane supply and call a gas appliance service
dealer.
Perform Leak Test
• Prepare leak test solution by combining 1 part liquid dish soap with 3 parts water. Total solution
requiredisapproximately2-3ounces(70-90ml).Putleaktestsolutioninaspraybottle.
• Ensure all control knobs are in the O OFF position.
• Connect the gas hose to the gas supply.
• Open the LP gas tank valve.
•Sprayleaktestsolutiononallgascarryingconnectionsandttings.Presenceofbubblesatareasof
applied test solution indicates a gas leak. If leaks are detected or you smell or hear gas, shut off the
gas supply valve immediately and repair or replace the defective part. Do not use the grill until all
leaks are corrected.
Use only the regulator and hose assembly provided. If a replacement is necessary, please call our
customer service center. DO NOT use replacement parts that are not intended for this grill.
CAUTION
ALL INSTRUCTIONS AND SAFEGUARDS ON THIS PAGE MUST BE FOLLOWED TO
PREVENT FIRE, DAMAGE AND/OR INJURY.
WARNING

19
OPERATING INSTRUCTIONS
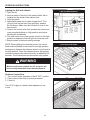
Connecting Gas Cylinder
The propane gas supply cylinder to be used must be constructed and marked in accordance with the
SpecicationsforLPGasCylindersoftheU.S.DepartmentofTransportation(D.O.T.)ortheNational
Standard of Canada, CAN/CSA-B339, Cylinders, Spheres and Tubes for Transportation of Dangerous
Goods;andCommission,asapplicable;andprovidedwithalistedoverllingpreventiondevice.
Use only 20-lb. cylinders (height: 18.11 in. (46 cm), tank diameter: 9.84 in. (25 cm), foot diameter:
8.03 in. (20.4 cm) equipped with a cylinder connection device compatible with the connection for
outdoor cooking appliances.
The cylinder must include a collar to protect the cylinder valve. The gas cylinder should not be
dropped or handled roughly!
If the appliance is not in use, the gas cylinder must be disconnected. Storage of an appliance indoors
is permissible ONLY if the cylinder is disconnected and removed from the appliance. Cylinders must be
stored outdoors out of the reach of children and must not be stored in a building, garage or any other
enclosedarea.Yourcylindermustneverbestoredwheretemperaturescanreachover125°F(51.67˚C).
Place dust cap on cylinder valve outlet whenever the cylinder is not in use. Only install the type of
dust cap on the cylinder valve outlet that is provided with the cylinder valve. Other types of caps or
plugs may result in leakage of propane.
Before connection, be sure that there is no debris caught in the outlet of the gas cylinder, outlet of
the regulator valve or in the outlet of the burner and burner ports. Connect regulator valve and hand-
tightenrmly.Keepthepropanecylindervalveclosedanddisconnectthepropanecylinderfromthe
regulator valve when the grill is not in use.
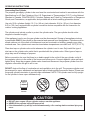
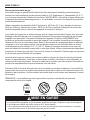
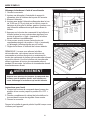
DO NOTobstructtheowofcombustionairandventilationairtothegrill.Thepropanecylindermust
bearrangedforvaporwithdrawalandequippedwithalistedoverllingpreventiondevice.Pleaseuse
the proper cylinder orientation to provide vapor withdrawal. NOTE: The cylinder must be fully upright
for the cylinder to have vapor withdrawal only.
Correct Wrong Wrong
Vapor
Liquid
Vapor
Liquid
Vapor
Liquid
a. DO NOT store a spare LP-gas cylinder under or near this appliance.
b.NEVERllthecylinderbeyond80percentfull.
c.Iftheinformationin(a)and(b)isnotfollowedexactly,arecausingdeathorseriousinjurymay
occur.
CAUTION

20
OPERATING INSTRUCTIONS
NOTE: Other cylinders may be acceptable for use with this appliance provided they are compatible
with the appliance nesting hole and retention means. Refer to Step 29 of the Assembly Instructions
for correct cylinder to cylinder holder connection.
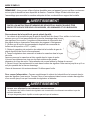
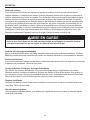
Connecting the LP Tank
1. The knob on the LP tank must be closed. Make sure that the knob is turned clockwise to a full stop.
The cylinder supply system must be arranged for vapor withdrawal.
2. Check that the control knob on the control unit is turned off.
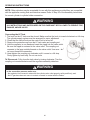
3. Remove the protective cap from the LP tank valve and coupling nut.
4. Hold the regulator in one hand and insert the nipple into the valve outlet.
Be sure the nipple is centered in the valve outlet. The coupling nut
connects to the large outside threads on the valve outlet. Use care – do
not cross thread the connection.
5. Hand-tighten the coupling nut clockwise until it comes to a full stop.
Firmly tighten by hand only. Do not use tools.
To Disconnect: Fully close the tank valve by turning clockwise. Turn the
coupling nut counterclockwise until the regulator assembly detaches.
ALL INSTRUCTIONS AND SAFEGUARDS ON THIS PAGE MUST BE FOLLOWED TO PREVENT FIRE,
DAMAGE, AND/OR INJURY.
WARNING
In the connection process, make sure:
•theregulatorinletconnectormateswiththecylindervalveoutletproperly,safelyandrmly,and;
•theLPgashosedoesnotcomeincontactorremainincontactwiththerebox.
WARNING

21
OPERATING INSTRUCTIONS
Lighting Instructions (For all burners, including side burner and rotisserie burner)
Beforerstuse:
Remove all hangings or plastic straps, if present. Before you cook on your new gas grill, it is important
tocleanyourgrillwithheat.Todothis,operatethegrillforapproximately15minuteswiththelid
closed and the control knob in the highest position. This will clean the internal parts by burning off any
residue and odor from the manufacturing process.
Important: If your grill is equipped with a rotisserie burner, only that burner should be used for
cooking when the rotisserie is mounted and in operation. The main burners on the grill must be turned
OFF when the rotisserie burner is in use.
Important: DO NOT use the rotisserie burner and the main burner at the same time while using the
rotisserie. DO NOT use side burners and the rotisserie simultaneously.
Read instructions before lighting.
1. Check that the control knobs are in the O OFF position.
2. Open lid during lighting.
3. Open valve at tank fully by turning counterclockwise.
4. Push igniter down 3 to 4 seconds while turning the desired control knob to the high position. The
burner should ignite.
NOTE: When lighting the rotisserie burner, the control knob must be pushed in and turned to the
high position. Push igniter down 3 to 4 seconds while continuing to depress the rotisserie burner
control knob in the high position. Once the rotisserie burner has ignited, continue to depress the
control knob for an additional 30 seconds. The rotisserie burner should then stay ignited.
If ignition of any burner does not take place within 5 seconds, immediately turn the control knob to
the O OFF position. Wait 5 minutes and repeat step 4 above or refer to match lighting instructions in
manual.
5. Repeat Step 4 above to ignite all other burners.
DO NOT lean over grill when lighting. Read instructions before lighting.
WARNING
Iftheameextinguishesaccidentallyduringignitionoroperation,immediatelyTURNOFFthe
cylinder valve and then TURN OFF the control knobs.
CAUTION

22
OPERATING INSTRUCTIONS
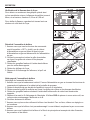
Lighting the Grill with a Match
1. Open the lid.
2. Insert a match in the end of the match holder that is
installed on the inside of the cabinet door.
3. Light the match.
4. Immediately place the lit match through the 0.75 in.
(20 mm) hole on the side of the grill body, nearest
the left burner. Make sure the lit match is close to the
burner ports.
5. Press in the control knob that operates the burner and
rotate counterclockwise to High position and burner
should light immediately.
6. The other main control can now be turned on the High
position by sequence and will light via crossover port.
7. Adjust burners to desired cooking settings.
NOTE: When lighting the rotisserie burner, the control
knob must be pushed in and turned to the high position.
continuing to depress the rotisserie burner control knob in
the high position. Once the rotisserie burner has ignited,
continue to depress the control knob for an additional 30
seconds. The rotisserie burner should then stay ignited.
Shutdown Instructions
1. Turn control knobs clockwise to the O "OFF" position.
2. Close valve at tank fully by turning clockwise.
3. Close lid.
Turn off LP supply at cylinder when appliance is not
in use.
LIGHTING SIDE BURNER
LIGHTING ROTISSERIE BURNER
LIGHTING MAIN BURNER
Make sure all burner controls are off, except for the
burner being lit and the burners that have been lit.
WARNING

23
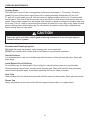
Cooking Grates
Thebesttimeto‘burn-off’thecookinggratesisaftereveryuse(approx.15minutes).Thegrillis
already hot from cooking thus requiring less fuel to obtain necessary temperature for ‘burn-off’.
To ‘burn off’ or heat clean your grill, turn the burners to highest position and run for 15 minutes with
thelidclosed.Thenturnofftheburnersanduseawirebrushtocleanexcessfoodresiduefromthe
grates.Theporcelaingrateshaveanenamelnish(similartoglass)andshouldbehandledwithcare
not to chip. Turn off, unplug, and remove the rotisserie kit when not in use. After using, clean all metal
parts by wiping clean using a damp rag. Do not immerse any parts in water. Wipe completely dry
before storing. Store in a dry place.
Recommended Cleaning Supplies
Mild liquid dish soap, warm water, nylon cleaning pad, and a wire brush.
DO NOT use cleaners that contain acid, mineral spirits or any abrasive substance.
Outside Surfaces
It is recommended to use only mild dish soap and hot water to clean grill and grill parts. Rinse with
warm water.
Inside Bottom Pan of Grill Body
Toavoidare-ups,thebottompanofthecookingboxshouldbekeptcleanonaregularbasis.
Remove residue using a brush, scraper and/or cleaning pad. Wash with mild dish soap and warm
water. Rinse with warm water. Avoid water splashing into venturi tubes of burners.
Heat Tents
Clean residue with wire brush and wash with mild dish soap and warm water. Rinse with warm water.
Grease Cup
Empty the grease cup and clean with mild dish soap and warm water on a regular basis.
CARE AND MAINTENANCE
Ensure the grill is cool before cleaning and conducting maintenance. Ensure the gas supply is
turned off at the LP cylinder.
CAUTION

24
CARE AND MAINTENANCE
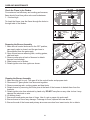
Check the Flame in the Firebox
Formaximumfuelefciencyandcookingperformance,
ameshouldbeablue-yellowcolorandbebetween
1 - 2 inches high.
Tochecktheame,viewtheamethroughtheholesin
therightsideoftherebox.
Removing the Burner Assembly
1. Make sure all control knobs are in the OFF position,
gas supply valve is closed, and the gas hose is
disconnected from the gas supply.
2. Open lid and remove warming rack, cooking grates,
and heat tents.
3. Remove cotter pins at back of burners to detach
burners from brackets.
4.Slideburnersoutofrebox.
5. Detach ignition wire from ignitor as shown.
Cleaning the Burner Assembly
1. Make sure the grill is cool. Turn gas off at the control knobs and propane tank.
2. Disconnect LP gas cylinder from hose and regulator.
3. Remove warming rack, cooking grates and heat tents.
4. Detach burner by removing the cotter pins at the back of the burners to detach them from the
brackets.
5. Detach ignition wire from electrode by hand only. DO NOT use pliers or any other tool as it may
damage the electrode or wire.
6. Lift burner slowly.
7. Ensure all burner ports are clear of clogs. Use of a pin or paper clip works well.
8. Ensure burner is free of any damage. If damage is found, replace with new burner.
9. Ensure the end of the burner and primary air screen are clear from insect nests, dirt or debris.
Good Flame
Yellow
Light Blue
2 in.
Blue
Yellow
Light Blue
Blue
Bad Flame

25
CARE AND MAINTENANCE
Reinstalling the Burner Assembly
1.Ensurethatgasvalveoricesarecorrectlypositioned
inside burner inlet (venturi).
2.Theuseofaashlightmaybenecessarytoensurethe
correct position.
3. It is recommended to view the correct position through
thereboxventholes.
Other Care and Maintenance
• It is recommended that inspection and service on this appliance be conducted annually by a
qualiedserviceperson.
• It is recommended that you regularly check that the outdoor cooking appliance area is clear and free
fromcombustiblematerial,gasolineandotherammablevaporsandliquids.
•Itisrecommendedthatyouregularlycheckthattheowofcombustionandventilationairisnot
obstructed.
• It is recommended that you regularly check that the ventilation openings of the cylinder enclosure
(cabinet) are free and clear from debris.
• It is recommended that you regularly check and clean the burner/venturi tubes for insects and insect
nests.Acloggedtubecanleadtoarebeneaththegrill.
The electronic ignition requires one "AA" alkaline battery, which is included.
Iftheinstructionsabovearenotfollowed,areorexplosionmayresult,possiblycausingserious
bodilyinjuryordeath.
WARNING
BURN HAZARD
DO NOTmixoldandnewbatteries.
DO NOTmixalkaline,standard(Carbon-Zinc),orrechargeable(Nickle-Cadmium)batteries.
DO NOTdisposeofbatteriesinre.Improperdisposalmaycausebatteriestoleakorexplode.
WARNING

26
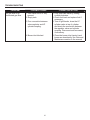
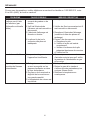
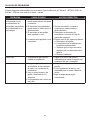
TROUBLESHOOTING
PROBLEM POSSIBLE CAUSE CORRECTIVE ACTION
The burner will not
light using the ignitor
procedure (weak or no
spark being generated).
1. The igniter electrode may
be covered with grease or
residue.
2. The igniter electrode may
have a loose or disconnected
wire.
3. Cracked or broken ignition
electrode.
4. Dead battery or faulty battery
connection.
1. Clean the ignitor electrode.
2. Check the connection and reconnect
any loose or disconnected wires.
3. Replace ignition electrode (see
Replacement Parts List).
4. Perform any of the following:
a. Replace battery.
b. Check to see if battery is inserted
correctly.
c. Check for any corrosion around
battery terminals.
d. Check wire.
Low heat. 1.Insufcientgaspressureto
the unit.
1.Callaqualiedserviceagencyto
check the gas supply pressure and
correct the pressure.
Excessive
areups.
1. Grease and/or residue build-
uponheattentsorinrebox.
2.Excessivedrippingoffator
marinade from food.
3. Cooking temperature too high.
1. Clean the grill components.
2. Trim the fat from meat and use non-
oil based marinades.
3. Lower temperature accordingly.
The burner will not
light with a match.
1. Match not reaching burners
(when holding match
with hand).
2. Empty tank.
3. Poor connection between
valve regulator and LP
cylinder coupling.
4. Burner inlet blocked.
1. Use match holder found in cabinet
door.
2.Checkfuellevelandrelltankif
necessary.
3. Turn off grill knobs, close the LP
cylinder valve at top of cylinder
and check the connection between
the regulator valve and cylinder
coupling. Disconnect and reconnect,
if necessary.
4. Clean the burner inlet (venturi) and
burner as described by the Care and
Maintenance section in the manual.
If you have any questions regarding the product, please call customer service at 1-877-447-4768,
8:30 a.m. – 4:30 p.m., CST, Monday – Friday.

27
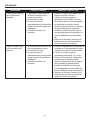
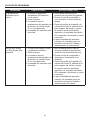
TROUBLESHOOTING
PROBLEM POSSIBLE CAUSE CORRECTIVE ACTION
Nogasoworan
obstructedgasow.
1. Tank valve not on or fully
opened.
2. Empty tank.
3. Poor connection between
valve regulator and LP
cylinder coupling.
4. Burner inlet blocked.
1. Fully open tank valve by turning
counterclockwise.
2. Check fuel level and replace fuel if
necessary.
3. Turn off grill knobs, close the LP
cylinder valve at top of cylinder
and check the connection between
the regulator valve and cylinder
coupling. Disconnect and reconnect,
if necessary.
4. Clean the burner inlet (venturi) and
burner as described by the Care and
Maintenance section in the manual.

29
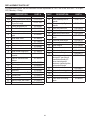
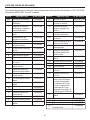
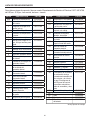
For replacement parts, call our customer service department at 1-877-447-4768, 8:30 a.m. – 4:30 p.m.,
CST, Monday – Friday.
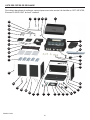
PART DESCRIPTION PART #
N/A
Hardware pack
154-05001
N/A
Owner’s/instruction manual
70-01-054
1
Grill lid assembly – includes
Dyna-Glo badge
70-01-100
2
Temp gauge and nut
102-02005
3
Bezelforlidhandle*
153-12004
4
Lidhandle*
153-12003
5
Lid pivot pins-with cotter
pins
101-02007
6
Side table cover
113-04004
7
Side table pan
113-14004
8
Side table - Left
113-14003
9
Side burner grate
103-04006
10
Sideburnerventuritube*
103-04005
11
Side burner hinge pins
113-24004
12
Side burner valve retaining
bracket
113-14005
13
Ignition electrode-side
burner
113-03022
14
Ignition wire-side burner
113-03019
15
Warming rack
153-03016
16
Cooking grate
153-03015
17
Heat tent
153-03005
18
Side table assembly-Right
103-04001
19
Grease pan
153-04013
20
Grease cup
102-04014
21
Matchholder-withchain*
153-04019
22
Doorhandle*
101-01017-00
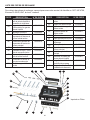
PART DESCRIPTION PART #
23
Cart door handle sleeve
102-04021
24
Door assembly-Left-no
handle
70-01-101
25
Door assembly-Right-no
handle
70-01-102
26
Cart side panel-Left
102-04009
27
Cart front upper door brace
153-04009
28
Main burner control knob
102-03009
29
Side /rear burner control
knob
103-03011
30
Cart side panel-Right
153-04010
31
Cart rear panel
153-04008
32
Door magnet
113-14020
33
Tank screw
102-04012
34
3”caster-regular*
103-04018
35
3”caster-Locking*
103-04017
36
Fireboxassembly-includes
burners/LP gas valve&
manifold assembly/LP
hose /control panel/
electronic ignition/ignition
wire and electrode
70-01-103
37
Cart bottom shelf
153-04007
38
Tank shelf retaining plate 153-80001
39
Rail 153-80002
40
Tank shelf 153-80003
41
Tank shelf rail locking
plate
153-80004
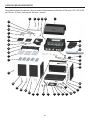
REPLACEMENT PARTS LIST
*Includes Hardware

30
For replacement parts, call our customer service department at 1-877-447-4768, 8:30 a.m. – 4:30 p.m.,
CST, Monday – Friday.
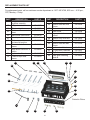
REPLACEMENT PARTS LIST
1
18
19
20
30
32
31
37
35
34
38
41 33
403938 6426 27
25
63
22
23
24
21
17
16
15
11
6
9
10
14
13
8
7
28
29
5
2 4
12 36
3

31
53
52
54
51
50
49
48
47
46454443
42
62
61
60
59
58 57 56 55
For replacement parts, call our customer service department at 1-877-447-4768, 8:30 a.m. – 4:30 p.m.,
CST, Monday – Friday.
REPLACEMENT PARTS LIST
Printed in China
PART DESCRIPTION PART #
42
LP gas hose and
regulator assembly
153-03009
43
LP gas hose holder 153-13007
44
Electronic ignition 153-03023
45
Side/rear burner control
bezel
103-03014
46
Mainburnercontrolbezel 103-03010
47
Control panel 70-01-104
48
Fireboxassembly-
includes lid bumpers
153-03002
49
Gas metal tube for rear
burner
153-06001
50
Rear burner connector &
orice
153-06002
51
Ignition wire-Rear burner 153-06003
52
Thermocouple-Rear
burner
153-06004
PART DESCRIPTION PART #
53
Thermocouple bracket 153-06005
54
Ignition electrode-Rear
burner
153-06006
55
Back cover of rear burner 153-06007
56
Rear burner 153-06008
57
Upper plate in the rear
burner
153-06009
58
Ignition Carry-over tube 153-13023
59
Main burner 113-03003
60
Ignition electrode-Main
burner
113-03020
61
Ignition wire-Main burner 113-03017
62
LP gas valve & manifold 153-03007
63 Cylinderexclusion
153-80005
64 Tank shelf retaining
plate B
153-88001

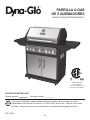
#70-10-054
GRILL AU GAZ
À CINQ BRÛLEURS
32
ANS Z21.58b-2012
CSA 1.6b-2012
Appareil de cuisson
au gaz extérieur
JOIGNEZ VOTRE REÇU ICI
Numéro de série
Des questions, des problèmes, des pièces manquantes? Avant de retourner l’article au
détaillant,appeleznotreserviceàlaclientèleau1-877-447-4768, 08:30-16 heures 30,
HNC, du lundi - vendredi ou par e-mail à [email protected].
Date d’achat
MODÈLE #DGA550SSP/DGA550SSP-D

49
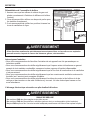
Utilisez uniquement le tuyau fourni. Sivousavezbesoind’unepiècederechange,communiquezavec
leserviceàlaclientèle.N’utilisez PAS de pièces de rechange qui ne sont pas conçues pour ce barbecue.
MISE EN GARDE
TOUTES LES INSTRUCTIONS ET MESURES DE SÉCURITÉ QUI SUIVENT DOIVENT ÊTRE
RESPECTÉES AFIN DE PRÉVENIR LES INCENDIES, LES DOMMAGES ET LES BLESSURES.
AVERTISSEMENT
MODE D’EMPLOI
Détection des fuites
Aprèsavoireffectuétouslesbranchements,vériezs’ilyadesfuitesenvaporisantdel’eau
savonneusesurlerobinetdelabouteilledegazdepétroleliquéé,letuyaudegazetlerégulateur.
Pourprévenirlesincendiesoulesexplosionslorsquevoustentezdedétecterlesfuites:
•Procédeztoujoursàladétectiondesfuitesavantd’allumerlebarbecue.
•Nefumezpaslorsquevousvériezlaprésencedefuites.
•Procédeztoujoursàladétectiondesfuitesàl’extérieur,dansunendroitbienaéré.
•N’utilisezaucunesourcedeammelorsquevousvériezlaprésencedefuites.
•N’utilisezpaslebarbecuetantquelesfuitesn’ontpastoutesétécolmatées.
•Sivousnepouvezcolmaterunefuite,débranchezimmédiatementl’alimentationetappelezun
service de réparation d’appareils.
Véricationdesfuites
•Préparezunesolutionandeprocéderàlavéricationdesfuites;mélangezunepartdesavonà
vaisselleliquideettroispartsd’eau.Vousaurezbesoind’environ70à90ml(2à3oz)deliquide.
Versezlasolutionenquestiondansunvaporisateur.
•Assurez-vousquetouslesboutonsdecommandessontàlapositionO«OFF»(arrêt).
•Branchezletuyaudegazàl’alimentationengaz.
•Ouvrezlerobinetdelabouteilledegazdepétroleliquéé.
•Vaporisezlasolutionsurtouslesbranchementsetlesraccordsdanslesquelscirculedugaz.La
présencedebullesàunendroitoùvousavezappliquélasolutiond’eausavonneuseindiqueune
fuitedegaz.Sivousdétectezouentendezunefuite,ousivoussentezuneodeurdegaz,fermez
immédiatementlerobinetd’alimentationengazetréparezouremplacezlapiècedéfectueuse.
N’utilisezpaslebarbecuetantquelesfuitesn’ontpastoutesétécolmatées.

50
MODE D’EMPLOI
Raccord de la bouteille de gaz
Labouteilledegazdepétroleliquééutiliséedoitêtrefabriquéeetidentiéeconformémentaux
normespourlesbouteillesdegazdepétroleliquééduU.S.DepartmentofTransportation(D.O.T.)
ouàlanormenationaleduCanadaetinstructionsCAN/CAS-B339,«Bouteillesettubesutiliséspour
le transport des marchandises dangereuses », le cas échéant, et munie d’un dispositif de protection
contre les débordements.
Utilisezuniquementdesbouteillesde9,07kg(hauteur:45,99cm(18,11po),diamètreduréservoir:
24,99 cm (9,84 po), diamètre de la base : 20,40 cm (8,03 po) dotées d’un dispositif de raccord de
bouteillecompatibleavecleraccorddesappareilsdecuissonàl’extérieur.
Labouteilledoitcomporteruncolletprotecteurpourlerobinetdelabouteille.Prenezsoindenepas
échapperlabouteilledegaznidelamanipulerrudement.Déconnectezlabouteilledegazlorsque
l’appareiln’estpasutilisé.Ilestpermisd’entreposerl’appareilàl’intérieurUNIQUEMENTsila
bouteilledegazestdéconnectéeetretiréedel’appareil.Lesbouteillesdoiventêtreentreposéesà
l’extérieurethorsdelaportéedesenfants.Ellesnedoiventpasêtreentreposéesdansunbâtiment,
un garage ou tout autre espace fermé. Il ne faut jamais entreposer votre bouteille dans un endroit
oùlatempératurepeutexcéder51,67°C(125°F).Mettezlecapuchonprotecteursurletuyaude
sortiedurobinetdelabouteillelorsquecelle-cin’estpasutilisée.Utilisezuniquementdescapuchons
protecteurs du même type que celui fourni avec le robinet de la bouteille. D’autres types de capuchon
ou de bouchon peuvent laisser fuir le propane.
Avantdefaireleraccord,assurez-vousqu’aucundébrisn’obstrueletuyaudesortiedelabouteille
degaz,dumanodétendeur,dubrûleuroudesoricesdubrûleur.Raccordezlemanodétendeuret
resserrez-leàlamainfermement.Fermezlerobinetdelabouteille,puisdéconnectezlabouteillede
propane du manodétendeur lorsque le barbecue n’est pas utilisé.
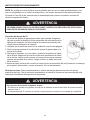
N’entravezPASleuxd’airdecombustionetdeventilationserendantaubarbecue.Labouteillede
propane doit être munie d’un système permettant le retrait de la vapeur et d’un dispositif reconnu de
préventiondestrop-pleins.Veuillezorienterlabouteilledanslesensindiquépourpermettreleretrait
de la vapeur.
REMARQUE:Labouteilledegazdoittoujoursêtreenpositionverticaleandepermettre
uniquement le retrait de la vapeur.
Adéquat Inadéquat Inadéquat
Vapeur
Liquide
Vapeur
Liquide
Vapeur
Liquide
a.NeplacezPASdebouteilledegazdepétroleliquééderechangeàl’intérieurouprèsdecetappareil.
b.NeremplissezJAMAISlabouteilleàplusde80%desacapacité.
c.Silesdirectivesmentionnéesaupoint(a)etaupoint(b)nesontpassuiviesexactement,unincendie
pouvant causer la mort ou des blessures graves pourrait survenir.
MISE EN GARDE

51
MODE D’EMPLOI
REMARQUE : Vouspouvezutiliserd’autresbouteillesaveccetappareil,pourvuqu’ellesconviennent
autroupourlabouteilleetauxdispositifsdexation.Consultezl’étape29desinstructionspour
l’assemblagepourconnaîtrelamanièreadéquatedexerunebouteilleausupportdebouteille.
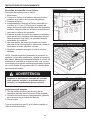
Raccordementdelabouteilledegazdepétroleliquéé.
1.Lerobinetdelabouteilledegazdepétroleliquéédoitêtrefermé.Pourvériersic’estlecas,
assurez-vousqu’iln’estpaspossibledeletournerdavantagedanslesens
des aiguilles d’une montre. Le système d’alimentation de la bouteille doit
êtreplacédefaçonàpermettrel’évacuationdupropaneàl’étatgazeux.
2.Vériezqueleboutondecommandedudispositifdecommandedu
brûleurestàlaposition«OFF»(arrêt).
3.Retirezlecapuchondeprotectiondurobinetdelabouteilledegazde
pétroleliquééetdel’écroud’accouplement.
4.Tenezlerégulateurdansunemainetinsérezlemamelondansletuyau
de sortie.
Assurez-vousquelemamelonestbiencentrédansletuyaudesortie.
L’écroud’accouplementsevissesurlesletsextérieursdegrande
dimensiondutuyaudesortie.Faitesattentiondenepasfausserleletageduraccord.
5.Serrezl’écroud’accouplementàlamaindanslesensdesaiguillesd’unemontrejusqu’àcequ’ilne
soit plus possible de le tourner davantage.
Vissez-lefermementàlamainseulement.N’utilisezpasd’outils.
Pour couper l’alimentation :Fermezcomplètementlerobinetdelabouteilleenletournantdansle
sensdesaiguillesd’unemontre.Tournezl’écroud’accouplementdanslesenscontrairedesaiguilles
d’unemontrejusqu’àcequel’ensemblederégulateursedétache.
TOUTES LES INSTRUCTIONS ET MESURES DE SÉCURITÉ QUI SUIVENT DOIVENT ÊTRE
RESPECTÉES AFIN DE PRÉVENIR LES INCENDIES, LES DOMMAGES ET LES BLESSURES.
AVERTISSEMENT
Lorsque vous effectuez les raccordements, assurez-vous que :
•leconnecteurdel’oriced’entréedurégulateurestcorrectementetsolidementraccordéautuyaude
sortie de la bouteille;
•letuyaudegazdepétroleliquéénetouchepasaufoyerdubarbecue.
AVERTISSEMENT
Ligne
droite

52
MODE D’EMPLOI
Instructions d’allumage (pour tous les brûleurs, y compris le brûleur latéral et le brûleur de
tournebroche)
Avant la première utilisation :
Retireztoutl’emballageetlescourroiesdeplastique,lecaséchéant.Avantd’utiliservotrenouveau
barbecueaugaz,ilestnécessairedelenettoyeràlachaleur.Pourcefaire,faitesfonctionnerle
barbecuependantunequinzainedeminutes;lecouvercledoitêtreferméetleboutondecommande,
àlapositionmaximale.Decettefaçon,lachaleurbrûleratouslesrésidusetdissiperal’odeur
provenant du processus de fabrication, nettoyant ainsi les pièces internes.
Important :Sivotrebarbecueestmunid’unbrûleurdetournebroche,utilisezseulementcebrûleur
pourlacuissonlorsqueletournebrocheestenmarche.Éteignezlesbrûleursprincipauxdubarbecue
lorsque le brûleur du tournebroche est en marche.
Important :Lorsqueletournebrocheestenmarche,n’utilisezpas simultanément le brûleur
detournebrocheetlebrûleurprincipal.N’utilisezpassimultanémentlesbrûleurslatérauxetle
tournebroche.
Lisezlesdirectivesavantd’allumerlebrûleur.
1.VériezquelesboutonsdecommandesontàlapositionO « OFF » (arrêt).
2.Ouvrezlecouverclelorsquevousprocédezàl’allumage.
3.Ouvrezcomplètementlerobinetdelabouteilleenletournantdanslesenscontrairedesaiguilles
d’une montre .
4.Enfoncezl’allumeurpendant3ou4secondestoutentournantleboutondecommandesouhaitéà
la position «High»(maximale).Lebrûleurdevraits’allumer.
REMARQUE:Lorsquevousallumezlebrûleurdetournebroche,vousdeveztournerleboutonde
commande en position élevée.Enfoncezl’allumeurpendant3à4secondestoutenmaintenantle
bouton de commande du brûleur de tournebroche enfoncé en position élevée. Une fois le brûleur
detournebrocheallumé,maintenezleboutondecommandeenfoncépendant30secondes.Le
brûleur de tournebroche devrait ensuite demeurer allumé.
Siunbrûleurnes’allumepasdansundélaide5secondes,tournezimmédiatementleboutonde
commande en position O«OFF»(arrêt).Attendez5minutes,puisrépétezl’étape4ci-dessusou
consultezlesinstructionsdumanuelpourl’allumageavecuneallumette.
5.Répétezl’étape4ci-dessuspourallumertouslesautresbrûleurs.
Ne vous penchez pas au-dessus du barbecue lorsque vous l’allumez. Lisez les directives avant
d’allumer le brûleur.
AVERTISSEMENT
Silaammes’éteintaccidentellementpendantl’allumageoul’utilisationdubarbecue,FERMEZ
immédiatement le robinet de la bouteille de propane, puis FERMEZ les boutons de commande du brûleur.
MISE EN GARDE

53
MODE D’EMPLOI
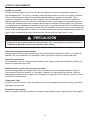
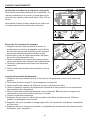
Allumage du barbecue à l’aide d’une allumette
1.Ouvrezlecouvercle.
2.Insérezuneallumetteàl’extrémitédusupportà
allumettessituéàl’intérieurdelaportedel’armoire.
3.Allumezl’allumette.
4.Insérezsanstarderl’allumetteenamméedansletrou
de 19,05 mm (0,75 po) situé sur le côté du corps du
barbecueleplusprèsdubrûleurgauche.Assurez-vous
quel’allumetteenamméeestprèsdesoricesdu
brûleur.
5.Appuyezsurleboutondecommandeliéaubrûleuret
tournez-ledanslesenscontrairedesaiguillesd’une
montreàlaposition«High»(maximale);lebrûleur
devrait s’allumer immédiatement.
6.Vouspouvezensuitetournerl’autreboutonde
commandeprincipalàlaposition«High»(maximale)
etl’allumages’effectueragrâceauportcroisé.
7.Réglezlesbrûleursàl’intensitédecuissondésirée.
REMARQUE:Lorsquevousallumezlebrûleur
detournebroche,vousdeveztournerleboutonde
commande en position élevée tout en maintenant le
bouton de commande du brûleur de tournebroche enfoncé
en position élevée. Une fois le brûleur de tournebroche
allumé,maintenezleboutondecommandeenfoncé
pendant 30 secondes. Le brûleur de tournebroche devrait
ensuite demeurer allumé.
Instructions pour l’arrêt
1.Tournezlesboutonsdecommandedanslesensdes
aiguillesd’unemontrejusqu’àlapositionO « OFF »
(arrêt).
2.Fermezcomplètementlerobinetdelabouteilleenle
tournant dans le sens des aiguilles d’une montre.
3.Fermezlecouvercle.
Fermezlabouteilledegazdepétroleliquéélorsquevous
n’utilisezpasl’appareil.
ALLUMAGE DU BRÛLEUR LATÉRAL
ALLUMAGE DU BRÛLEUR DE TOURNEBROCHE
ALLUMAGE DU BRÛLEUR PRINCIPAL
Assurez-vous que tous les boutons de commande des
brûleurs sont en position d’arrêt, sauf le brûleur en
cours d’allumage et les brûleurs qui ont été allumés.
AVERTISSEMENT
La page charge ...
La page charge ...
La page charge ...
La page charge ...
La page charge ...
La page charge ...
La page charge ...
La page charge ...
La page charge ...
La page charge ...
La page charge ...
La page charge ...
La page charge ...
La page charge ...
La page charge ...
La page charge ...
La page charge ...
La page charge ...
La page charge ...
La page charge ...
La page charge ...
La page charge ...
-
 1
1
-
 2
2
-
 3
3
-
 4
4
-
 5
5
-
 6
6
-
 7
7
-
 8
8
-
 9
9
-
 10
10
-
 11
11
-
 12
12
-
 13
13
-
 14
14
-
 15
15
-
 16
16
-
 17
17
-
 18
18
-
 19
19
-
 20
20
-
 21
21
-
 22
22
-
 23
23
-
 24
24
-
 25
25
-
 26
26
-
 27
27
-
 28
28
-
 29
29
-
 30
30
-
 31
31
-
 32
32
-
 33
33
-
 34
34
-
 35
35
-
 36
36
-
 37
37
-
 38
38
-
 39
39
-
 40
40
-
 41
41
-
 42
42


Dyna-Glo DGA550SSP-D Manuel utilisateur
- Catégorie
- Barbecues
- Taper
- Manuel utilisateur
dans d''autres langues
Documents connexes
-
Dyna-Glo DGA550SSP-D Manuel utilisateur
-
-
-
-
-
-
-
-
Dyna-Glo DGF493BNP Manuel utilisateur
