3
Setting up the Monitor/Configuration du moniteur
/Instalación del monitor/Einrichten des Monitors
/Configurazione del monitor
2
Example
If you have two wireless cameras and their channels are set on CHANNEL 1 and
CHANNEL 3, and you wish to monitor the two channels in sequence, you must
slide up the first and third dipswitches to the ON position (see the diagram below).
If you wish these two channels to be alternated at four-second intervals, slide the
fifth dipswitch to the ON position. Leave it in the lower position for eight-
second channel change intervals.
Stopping the auto-sequence function:
To stop the auto-sequence function and lock on to one channel, leave the
dipswitch for the channel you want to receive in the ON position. Slide the
others to the lower position.
PIR motion detector which can automatically trigger the
monitor when it senses motion
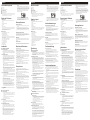
Other Applications
Recording on a VCR
1. The monitor comes with AV (audio/video) output jacks for connecting to a
VCR for recording.
2. Connect the AV cable's (option) white and yellow plugs to the white and
yellow AV jacks of the monitor and to the white and yellow input jacks of the
VCR, matching the plug colors with the jacks on both the monitor and VCR.
See Fig. 12.
PIR Motion Detection
The camera features a
. Set the beeper volume level by sliding the
BEEPER HI/LO switch. See Fig. 11.
Audio Only
Screen can be turned off for audio monitoring only. To turn off screen, push the
button on the front panel as shown in the illustration on the right.
Night Vision
The camera has eight high-intensity LEDs for picking up clear images in unlit
locations. The LEDs are always lit.
Troubleshooting
If you are not getting any signal at all
Check the power on the camera and monitor.
Make sure power plugs are pushed all the way in.
Check the channel switches on both camera and monitor are set to the same
number.
If the camera/monitor is powered by batteries, replace all batteries with new
ones.
If you can receive sound, but don't have images, or the images are poor, check
the SCREEN ON/OFF button on the front panel, or adjust the V-HOLD/
CONTRAST/BRIGHTNESS knob on the back of the monitor.
If the signal is poor, or there is interference
Change the channel settings on both camera and monitor and make them the
same.
If there is a microwave oven in use in the path between the camera and
monitor, remove the microwave oven or turn it off.
Make sure the camera and monitor are within range of each other (range of
approximately 300 feet; 100 meters in a clear line of sight).
Precautions
Keep all its parts and accessories out of young children's reach.
The camera's performance can be adversely affected by fingerprints or dirt
on the lens surface. Avoid touching the lens surface with your fingers.
Should the lens become dirty, use a blower to blow off dirt and dust, or a soft,
dry cloth to wipe off the lens.
Keep dry. Precipitation, humidity, and liquids, contain minerals that will
corrode electronic circuits.
Do not use or store in dusty, dirty areas.
Do not store in hot areas. High temperatures can shorten the life of
electronic devices and warp or melt certain plastics.
Do not store in very cold areas. When the system warms up (to its normal
temperature), moisture can form inside the case, which may damage
electronic circuit boards.
Do not attempt to open the case. Non-expert handling of the device may
damage the system.
Avoid dropping and strong impact.
Operate this product using only the power supply included with it or
provided as an accessory.
Do not overload electrical outlets or extension cords as this can result in fire
or electric shock.
Do remember that you are using public airwaves when you use the system
and that sound and video may be broadcast to other 2.4 GHz receiving
devices. Conversations, even from rooms near the camera, may be broadcast.
To protect the privacy of your home, always turn the camera off when not in
use.
Specifications
English
What You Get
One Camera
One Monitor
Two Power Adapters
Mounting Bracket
Waterproof Tape
Fixing Screws and Masonry Plugs
This User's Manual
Note: The AC adapters CANNOT be interchanged. Use only the adapter
labeled OUTPUT: 7.5V DC with the camera. Use only the adapter labeled
OUTPUT: 13.5V DC with the monitor.
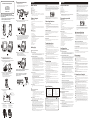
Product Layout
Camera (Fig. 1)
1. Infrared LEDs (Eight LEDs provide infrared light for night vision)
2. Lens
3. PIR Motion Detector
4. Microphone
5. Pivot
6. Mounting Bracket
7. Channel Selection Switch (Select the channel by sliding the slide switch to
the channel number you want. Note: Must select the same channel both on
the camera and monitor.)
8. Power cable
Monitor (Fig. 2)
1. Power/Volume Control
2. Screen ON/OFF
3. Power indicator LED
4. 13.5V Power Adapter Plug
5. Channel Selection Switch (Select the channel by sliding the slide switch to
the channel number you want. Note: Must select the same channel both on
monitor and receiver.)
6. Auto-sequence time intervals setting switch
7. Beeper volume level setting switch
8. Audio Output Jack (White)
9. Video Output Jack (Yellow)
10. V-HOLD
11. BRIGHT (Brightness)
12. CONT (Contrast)
Setting Up
Setting up the Camera
Select channels
Select the channel on the camera by sliding the slide switches on the back
of the camera, see Fig. 3. (Remove the rubber plug at the bottom of the
back of camera. Slide the switches by using a screwdriver.)
The camera can be mounted either to a wall or ceiling. The monitor
reception should be tested before fixing the camera in place. Have one
person hold the camera in the proposed mounting position while another
checks the reception on the monitor. If interference or other problems are
present, refer to the "Troubleshooting" section of this manual. You may need
to select a different location to mount the camera.
1. Drill two holes 63mm apart, at the camera mounting position.
2. Fix the camera to the wall or ceiling using the masonry plugs and fixing
screws supplied. See Fig. 4.
Note: It is suggested to install the camera under eaves for better
outdoor image capturing performance.
3. Select a suitable location to drill a cable entry hole. Depending on the
location, this can be through the house wall or through a door or
window frame.
4. Push the cable through the cable entry hole. We recommend using a
plastic bag to protect the plug on the end of the cable from dust and
damage. Pull the rest of the cable inside.
Power supply
1. Connect the plug of the power adapter with the Power In socket of the
cable from the camera. Make sure power plugs are pushed all the way in.
2. Plug the AC adapter into a wall outlet. See Fig. 5.
How to use the waterproof tape
After connecting the plug of the power adapter to the Power In socket of
the camera, use the provided waterproof tape to prevent moisture and dirt
getting inside.
1. Remove the release liner and wrap the waterproof tape in a spiral
around the plug and socket. Wrap the tape with enough tension to
obtain conformability on the surface.
2. Overlap by at least half the width of the tape so it bonds to itself, while
removing the release liner. See Fig. 5.
Fine tuning
Adjust the camera's viewing angle according to the illustrations of Fig. 6 &
Fig. 7.
Setting up the Monitor
Power Supply
1. Plug one end of the provided power adapter into a wall outlet and the
other end into the back of the monitor. See Fig 11. Note: Use the
adapter labeled OUTPUT: 13.5V DC with the monitor.
2. Turn the monitor on. The LED on the front of the monitor should light
up. See Fig 11.
3. Adjust the volume to a comfortable level.
Fine Tuning
Adjust the video image using the V-HOLD, CONTRAST and
BRIGHTNESS adjustment knobs on the back of the monitor, as needed.
th
Positioning the camera
Multi-location Monitoring
The monitor's built in auto-sequence function is ideal for security use.
The monitor can be used with up to four cameras on four different
channels and display them in sequence on a single monitor.
Note 1: The monitor will auto detect the receiving channels, and
display them in sequence. When only one channel dipswitch is in the
ON position, the monitor will display that channel continuously,
without regard to the position of the 5 dipswitch. If more than one
dipswitch remains on, the auto-sequence function will alternately
display those channels.
Note 2: When none of the dipswitches are in the ON position, the monitor
will automatically set the receiving channel to Channel 1.
Product Layout/Figures des produits/Contenido del paquete
/Produkt-Layout/Descrizione del Prodotto
Français
October, 2005
P/N: 408-000350-01
Figures and Quick Guide/
/
Figures et guide rapide
Figuras y Guía Rápido/Abbildungen und Schnellanleitung
/Figure e guida rapida
User's Manual
Manuel d'utilisation
Manual del Usuario
Benutzerhandbuch
Manuale utente
1
2
1
2
1
1
.
.
.
.
1
1
3
2
Fig. 1
Fig. 2
Fig. 8
Specifications subject to change without notice
0678
FCC Statement
This equipment has been tested and found to comply with the limits for a Class B digital device, pursuant to Part 15 of
the FCC Rules. These limits are designed to provide reasonable protection against harmful interference in a residential
installation. This equipment generates, uses and can radiate radio frequency energy and, if not installed and used in
accordance with the instructions, may cause harmful interference to radio communications. However, there is no
guarantee that interference will not occur in a particular installation. If this equipment does cause harmful interference to
radio or television reception, which can be determined by turning the equipment off and on, the user is encouraged to try
to correct the interference by one or more of the following measures:
Reorient or relocate the receiving antenna
Increase the separation between the equipment and receiver
Connect the equipment into an outlet on a circuit different from that to which the receiver is connected
Consult the dealer or an experienced radio/TV technician for help
FCC Label Compliance Statement:
This device complies with Part 15 of the FCC Rules. Operation is subject to the following two conditions: (1) this device
may not cause harmful interference, and (2) this device must accept any interference received, including interference that
may cause undesired operation.
Note: The manufacturer is not responsible for any radio or TV interference caused by unauthorized modifications to this
equipment. Such modifications could void the user's authority to operate the equipment.
Monitor
Frequency 2.4 GHz
Channel 4 selectable channels
A/V mod/demod. method FM
Display 5.5 inch B/W monior
Resolution at Center V: 350 lines
H: 300 lines
Sound max. output 800mW
Dimensions 15.5(W) x17(H) x 20(D) cm
Weight 1310g
Power DC 13.5V, 1000mA
Operating temperature 0 ~ 40 (32 ~ 104 )
Camera
Frequency 2.4 GHz
Channel 4 selectable channels
A/V mod/demod. method FM
Image Sensor 1/4” CMOS image sensor
Effective pixels EIA: 320 (H) x 240 (V)
CCIR: 352 (H) x 288 (V)
Lens f 3.6mm, F 2.0
Infrared LEDs 8 pieces
Dimensions 9.3(W) x 14(H) x 6.7(D) cm
Weight 300g
Power DC 6V, 400mA
Operating temperature -10 ~ 40 (14 ~ 104 )
Remarque 1: Le moniteur détectera automatiquement les canaux de
réception et les affichera en séquence. Si le commutateur DIP d'un
seul canal est en position ON, le moniteur affichera ce canal en continu,
quelque soit la position du 5e commutateur DIP. Si plus d'un
commutateur DIP est en position ON, la fonction de séquence
automatiquement affichera ces canaux alternativement.
Remarque 2: Quand aucun des commutateurs DIP n'est en position
ON, le moniteur règle automatiquement le canal de moniteur sur le
canal 1.
Exemple
Si vous avez deux caméras sans fil et que leurs canaux sont réglés sur
le canal 1 et le canal 3, et si vous désirez superviser ces deux canaux en
séquence, vous devez placer les deux commutateurs DIP (1 et 3) sur la
position ON (voir le diagramme ci-dessous). Si vous souhaitez que
ces deux canaux alternent à un intervalle de 4 secondes, placez le
commutateur DIP 5 sur la position ON. Laissez-le en position basse
pour un intervalle de changement de canal de 8 secondes.
Arrêt de la fonction de séquence automatique:
Pour arrêter la fonction de séquence automatique et la verrouiller sur
un seul canal, laissez le commutateur DIP pour le canal que vous
désirez recevoir en position ON. Placez les autres dans la position
inférieure.
Détecteur de mouvement PIR
La caméra comporte un détecteur de mouvement PIR intégré déclenche
automatiquement le moniteur lorsqu'il détecte du mouvement
éé é
é
Autres applications
Enregistrer sur un magnétoscope
1. Le moniteur est équipé de prises de sortie Audio/Vidéo pour une connexion
avec un magnétoscope qui enregistre.
2. Connectez les fiches blanche et jaune du câble audio/vidéo aux prises
audio/vidéo blanche et jaune du moniteur, ainsi qu'aux prises d'entrée
blanche et jaune du magnétoscope, en faisant correspondre les couleurs des
fiches avec les couleurs des prises sur le moniteur et sur le magnétoscope.
Voir Fig 12.
. Pour ajuster le
volume du signaleur, appuyez sur le bouton de BEEPER HI/LO. Voir Fig 11.
Audio Seulement
L' cran peut être eint pour une surveillance audio seulement. Afin d' teindre
L' cran, poussez le bouton sur le panneau de face comme le montre l'illustration
de droite.
Vision de Nuit
La caméra est équipée de huit LED de haute intensité pour pouvoir recueillir des
images des endroits sombres. Les LED sont toujours allumees.
Dépannage
Si vous n'avez aucun signal
Vérifiez que la caméra et le moniteur sont sous tension.
Assurez-vous que les prises de courant sont enfoncées jusqu'au bout.
Vérifiez que les sélecteurs de canaux de la caméra et du moniteur sont
configurés sur le même chiffre.
Si la caméra /le moniteur sont sur piles, remplacez toutes les piles avec des
piles neuves.
Si vous pouvez recevoir du son, mais aucune image, ou bien que les images
sont de mauvaise qualité, vérifiez le bouton Allumé/Eteint du panneau de
face, ou ajustez le bouton STABILITÉ/CONTRASTE/LUMINOSITE à
l'arrière du moniteur.
Si le signal est de mauvaise qualité, ou qu'il y a des interférences
Changez le canal de la caméra et du récepteur et assurez-vous que ce soit le
même sur les deux.
Si il y a un four à micro-ondes entre la caméra et le récepteur, éloignez-le ou
éteignez-le.
Assurez-vous que la caméra et le moniteur sans à distance acceptable
(environ 100 mètres en espace libre).
Précautions d'emploi
Conservez toutes les parties et accessoires de l'appareil hors de portée des
enfants.
Les performances de la caméra peuvent être affectées par des empreintes de
doigt ou de la poussière sur la surface de l'objectif. Évitez donc de toucher à
la surface de l'objectif.
Si l'objectif venait à se salir, utilisez un souffleur pour souffler les saletés et
la poussière, ou un chiffon doux et sec pour essuyer l'objectif.
Conserver les appareils au sec. La pluie, l'humidité, et les liquides,
contiennent des minéraux qui peuvent provoquer la corrosion des circuits
électroniques.
Ne placez pas les appareils dans des endroits poussiéreux et sales.
Ne stockez pas les appareils dans des endroits chauds. Les hautes
températures peuvent raccourcir la durée de vie des composants
électroniques ou faire fuir et mélanger certains plastiques.
Ne placez pas les appareils dans des endroits froids. Lorsque l'unité chauffe
(jusqu'à sa température normale), de la moisissure peut se former à l'intérieur
du boîtier, ce qui peut endommager les circuits électroniques.
N'essayez pas d'ouvrir le boîtier. Une manipulation effectuée par un non-
expert peut endommager l'appareil.
Evitez de laisser tomber les appareils ou de leur faire subire des chocs.
Ne faîtes fonctionner ce produit qu'avec la source d'alimentation qui est
inclue et qui est fournie avec ses accessoires.
Ne surchargez pas les prises électriques ou les rallonges car cela pourrait
causer un incendie ou des chocs électriques.
Veuillez vous rappeler que vous utilisez les ondes publiques lorsque vous
mettez le système en opération, et que le son et la vidéo peuvent donc être
transmis vers d'autres appareils de réception à 2.4 GHz. Les conversations,
même si elles ont lieu dans des pièces différentes de celle où se trouve la
caméra, peuvent donc être transmises. Afin de protéger votre vie privée,
veillez donc à toujours mettre la caméra hors tension lorsqu'elle n'est pas
utilisée.
Ce que vous avez
Une caméra
Un moniteur
Deux adaptateurs
Vis de fixation et chevilles de maçonnerie
Manuel de l'utilisateur
Remarque: Les adaptateurs secteur NE PEUVENT PAS être échangés.
Utilisez l'adaptateur marqué SORTIE : 7.5V DC avec la caméra. Utilisez
l'adaptateur marqué SORTIE : 13.5V avec l'écran.
Figures des produits
Caméra (Fig. 1)
1. LED Infrarouges (Huit LED qui fournissent une lumière infra-rouge pour
une vision de nuit.)
2. Lentille
3.
4. Microphone
5.
6.
7. Bouton de sélection des canaux (Sélectionnez le canal en tournant le bouton
vers le numéro du canal que vous désirez configurer. Remarque: Vous
devez choisir le même canal sur la caméra et sur le récepteur.)
8. Cable électrique
Monitor (Fig. 2)
1. Contrôle d'alimentation/volume
2. Ecran Allumé/Eteint (L'écran peut être éteint lors d'une surveillance
uniquement audio.)
3. LED Indicateur d'Alimentation
4. Prise de l'adaptateur de courant 13.5V
5. Bouton de sélection des canaux (Sélectionnez le canal en tournant le bouton
vers le numéro du canal que vous désirez configurer. Remarque: Vous
devez choisir le même canal sur la caméra et sur le récepteur.)
6. Commutateur: é
7. Commutateur: Commutateur du cadre du niveau de volume bip
8. Prise Audio (Blanche)
9. Prise Vidéo (Jaune)
10. Stabilité image (V-HOLD)
11. Luminosité (BRIGHT)
12. Contraste (CONT)
Configuration
Configuration du moniteur
Alimentation
1. Branchez l'une des extrémité de l'adaptateur de courant fourni dans
une prise murale, et l'autre extrémité à l'arrière du moniteur. Voir Fig
11. Remarque: Utilisez seulement l'adaptateur libellé SORTIE:
13.5V DC avec le moniteur.
2. Mettez le moniteur sous tension. Le LED qui se trouve à l'avant du
moniteur s'allume. Voir Fig 11.
3. Ajustez les contrôles du volume à un niveau confortable.
Optimisation
Ajustez l'image vidéo en utilisant les boutons d'ajustement STABILITÉ,
CONTRASTE et LUMINOSITE qui se trouvent à l'arrière du moniteur.
Supervision Multiple
Support de fixation
Ruban étanche
Détecteur de mouvement PIR
Pivot
Support de fixation
Configure l'intervalle de temps du changement de s uence
Configuration de la caméra
Sélection des canaux
Choisissez le canal sur la caméra en faisant glisser les commutateurs à l'arrière
de la caméra, voir Fig. 3. (Retirez le couvercle en caoutchouc en bas de l'arrière
de la caméra et faites basculer les commutateurs avec un tournevis.)
Positionnement de la caméra
La caméra peut être fixée soit sur un mur ou à un plafond. La réception du
moniteur doit être testée avant de fixer la caméra. Une personne peut
maintenir la caméra dans la position prévue pendant qu'une autre vérifie
la réception sur le moniteur. En cas d'interférence ou de problème,
reportez-vous à la section « Dépannage » de ce manuel. Il peut être
nécessaire de sélectionner un emplacement différent pour installer la
caméra.
1. Faites deux trous à 63 mm de distance et alignés, là où la caméra doit
être installée.
2. Fixez la caméra au mur ou au plafond en utilisant les chevilles de
maçonnerie et les vis de fixation fournies. Voir Fig. 4.
Remarque: Il est suggere pour installer l'appareil-photo sous les
avant-toit pour l'ameliorer l'image exterieure capture l'execution..
3. Sélectionnez un emplacement approprié pour faire un trou d'entrée
pour le câble. Selon l'emplacement, ceci peut être fait dans le mur de la
maison ou au travers du cadre d'une porte ou d'une fenêtre.
4. Faites passer le câble au travers de son trou d'entrée. Il est
recommandé d'utiliser un sac plastique pour protéger la fiche à
l'extrémité du câble de la poussière et des dégradations. Tirez le reste
du câble à l'intérieur.
Alimentation
1. Connectez la prise de transformateur dans la prise d'entrée
d'alimentation du câble de la caméra. Vérifiez que les prises sont
enfoncées à fond.
2. Assurez-vous que les prises d'alimentation sont enfoncées à fond. Voir
Fig. 5.
Comment utiliser le ruban étanche
Après avoir connecté la prise de l'adaptateur d'alimentation à la prise
d'alimentation du câble de l'appareil photo, vous pouvez utiliser le ruban
étanche fourni pour éviter à l'entrée de l'humidité et de la poussière.
1. Enlevez le support du ruban adhésif et enroulez le ruban autour de la
prise et du réceptacle. Enroulez le ruban avec une tension suffisante
pour obtenir une couverture moulante de la surface.
2. Faites chevaucher le ruban d'au moins la moitié de sa largeur pour qu'il
adhère à lui-même, tout en retirant la doublure. Voir Fig. 5.
Optimisation
Ajustez l'angle de vision de la caméra selon les illustrations de la Fig. 6, 7.
La fonction de séquence automatique intégrée du moniteur est idéale pour
les utilisations de sécurité. Le moniteur peut être utilisé avec quatre
caméras différentes au maximum sur quatre différents canaux et les
afficher en séquence sur un seul receveur.
1
1
1
.
.
1
4
Camera/Caméra/Cámara/Kamera/Telecamera
Monitor/Moniteur
Other Applications/Autres applications/Otras aplicaciones
/Andere Anwendungen/Altre applicazioni
IN
VIDEO
AUDIO
VCR
(White)/(blanche)/(blanca)
/(weiß)/(bianca)
Recording on a VCR/Enregistrement sur un magnétoscope
/Grabar con una VCR/Aufnahme auf einen Videorecorder
/Registrazione su un VCR
Fig. 12
(white)
/(blanche)
/(blanca)
/(weiß)
/(bianca)
(Yellow)
/(jaune)
/(amarilla)
/(gelb)
/(gialla)
(yellow)
/(jaune)
/(amarilla)
/(gelb)
/(gialla)
2
1
Using AC Power/Utilisation de l'alimentation AC/Usar Corriente AC
/Benutzen von Netzstrom/Uso della corrente AC
2.4 GHz Wireless B/W Security System
Positioning the camera/Positionnement de la caméra
/Montaje de la cámara/Befestigung der Kamera
/Posizionamento della telecamera
6
3
m
m
Fig. 4
Mounting on a wall/Fixation sur un mur/Montaje en la pared
/Befestigung an einer wand/Montaggio a parete
1.2
Power Supply/Alimentation/Alimentación/Stromversorgung
/Alimentazione elettrica
Fig. 5
Cable Entry Hole
/
/Agujero de Entrada del Cable
/Kabelloch
/Foro d'ingresso del cavo
Trou d'entrée du câble
Release Liner
/Doublure
/Revestimiento protector
/Klebebandstreifen
/Adesivo fissante
Waterproof Tape
/Ruban étanche
/Cinta impermeable
/Wasserdichtes Klebeband
/Nastro resistente all'acqua
1.3
3
5
1
8
7
1
Setting up the Camera/Installer la caméra
/Configuración de la cámara/Einrichten der Kamera
/Installazione della videocamera
Select Channels/Sélection des canaux/Selección de Canales
/Auswahl von Kanälen/Selezione dei canali
1.1
Channel 1
Channel 2
Channel 3
Fig. 3
Select Channels/Sélection des canaux/Selección de Canales
/Auswahl von Kanälen/Selezione dei canali
2.1
2
6
1.4
1.2
1
2
3
4
5
7
9
10
11
12
1 2
3
4
Channel 4
6
8
1.4
Fine Tuning/Ajustement/Ajuste Fino/Ausrichtung/Sintonia fine
Longitudinal turn (Tilt)
/Rotation longitudinale (inclinaison)
/Giro longitudinal (Inclinación)
/Vertikales Drehen (Kippen)
/Rotazione longitudinale (Inclinazione)
Horizontal turn (Pan)
/Rotation horizontale (panoramique)
/Giro Horizontal (Panorámica)
/Horizontales Drehen (Schwenken)
/Rotazione orizzontale (Panoramica)
Fig. 6 Fig. 7
Fig. 9
Set the sequence change interval time/
é
ür
Configure l'intervalle de
temps du changement de s uence/Define el tiempo de intervalo
en el cambio de secuencias/Einstellen des Intervalls f Das
Wechseln der Sequenz/Imposta il tempo dell'intervallo nei
cambiamenti della sequenza
2.2
Fig. 10
Beeper volume level setting/Pour ajuster le volume du signaleur
ara ajustar el volumen del beeper/P
/Das Volumen des Signalgebers justieren
/Per registrare il volume del sistema di teleguida
2.3
Fig. 11
4
2.2
2.3
1.3
1
2
3
4 5
CH
S E C
2
2.1
2.2
2.3
1
2
3
4 5
CH
S E C
La page est en cours de chargement...
-
 1
1
-
 2
2


SWITEL O6LTTA-36T Manuel utilisateur
- Taper
- Manuel utilisateur
- Ce manuel convient également à
dans d''autres langues
- italiano: SWITEL O6LTTA-36T Manuale utente
- English: SWITEL O6LTTA-36T User manual
- español: SWITEL O6LTTA-36T Manual de usuario
- Deutsch: SWITEL O6LTTA-36T Benutzerhandbuch