Toro Scarifier Manuel utilisateur
- Catégorie
- Outils de jardin
- Taper
- Manuel utilisateur

FormNo.3442-852RevC
Scarier
54610
Vertikutierer
54610
Escaricador
54610
Scaricateur
54610
Scaricatore
54610
Cultivator
54610
www.T oro.com.
*3442-852*


FormNo.3442-842RevC
Scarier
ModelNo.54610—SerialNo.321000001andUp
Operator'sManual
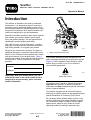
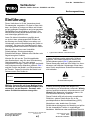
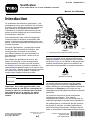
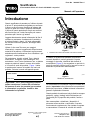
Introduction
Thisscarierisintendedtobeusedbyresidential
homeowners.Itisdesignedprimarilytoloosenthe
soilandtoremovemossandweedsfromthesoilon
well-maintainedlawnsonresidentialproperties.Using
thisproductforpurposesotherthanitsintendeduse
couldprovedangeroustoyouandbystanders.
Readthisinformationcarefullytolearnhowtooperate
andmaintainyourproductproperlyandtoavoid
injuryandproductdamage.Youareresponsiblefor
operatingtheproductproperlyandsafely.
Visitwww.Toro.comformoreinformation,including
safetytips,trainingmaterials,accessoryinformation,
helpndingadealer,ortoregisteryourproduct.
Wheneveryouneedservice,genuineToroparts,or
additionalinformation,contactanAuthorizedService
DealerorToroCustomerServiceandhavethemodel
andserialnumbersofyourproductready.Figure1
identiesthelocationofthemodelandserialnumbers
ontheproduct.Writethenumbersinthespace
provided.
ModelNo.
SerialNo.
Important:Withyourmobiledevice,youcan
scantheQRcodeontheserialnumberdecal(if
equipped)toaccesswarranty,parts,andother
productinformation.
g340199
Figure1
1.Modelandserialnumberlocation
Thismanualidentiespotentialhazardsandhas
safetymessagesidentiedbythesafety-alertsymbol
(Figure2),whichsignalsahazardthatmaycause
seriousinjuryordeathifyoudonotfollowthe
recommendedprecautions.
g000502
Figure2
Safety-alertsymbol
Thismanualuses2wordstohighlightinformation.
Importantcallsattentiontospecialmechanical
informationandNoteemphasizesgeneralinformation
worthyofspecialattention.
ThisproductcomplieswithallrelevantEuropean
directives;fordetails,pleaseseetheseparateproduct
specicDeclarationofConformity(DOC)sheet.
Donottamperwithordisablesafetydevicesonthe
machine,andchecktheirproperoperationregularly.
Donotattempttoadjustortamperwiththeengine
speedcontrol;doingsomaycreateanunsafe
operatingcondition,resultinginpersonalinjury.
©2021—TheToro®Company
8111LyndaleAvenueSouth
Bloomington,MN55420
Registeratwww.Toro.com.
OriginalInstructions(EN)
PrintedinChina
AllRightsReserved
*3442-842*

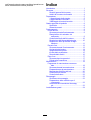
Contents
Introduction...............................................................1
Safety.......................................................................2
GeneralSafety...................................................2
SafetyandInstructionalDecals..........................3
Setup........................................................................4
1AssemblingtheHandle....................................4
2AddingOiltotheEngine...................................5
3AssemblingtheGrassBag...............................6
ProductOverview.....................................................7
Specications....................................................7
Attachments/Accessories...................................7
Operation..................................................................8
BeforeOperation...................................................8
BeforeOperationSafety.....................................8
FillingtheFuelTank............................................8
CheckingtheEngine-OilLevel............................9
AdjustingtheHandleHeight...............................9
AdjustingtheMaximumDepthofCut................10
DuringOperation.................................................12
DuringOperationSafety...................................12
StartingtheEngine...........................................13
ShuttingOfftheEngine.....................................13
EngagingtheScarier......................................14
BaggingtheClippings.......................................15
AfterOperation....................................................16
AfterOperationSafety......................................16
CleaningundertheMachine.............................16
Maintenance...........................................................17
RecommendedMaintenanceSchedule(s)...........17
MaintenanceSafety..........................................17
PreparingforMaintenance...............................18
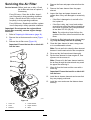
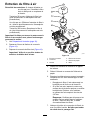
ServicingtheAirFilter.......................................19
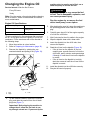
ChangingtheEngineOil...................................20
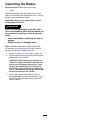
InspectingtheBlades.......................................21
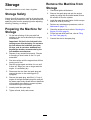
Storage...................................................................22
StorageSafety..................................................22
PreparingtheMachineforStorage...................22
RemovetheMachinefromStorage...................22
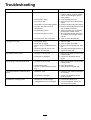
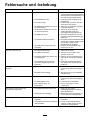
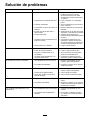
Troubleshooting......................................................23
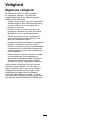
Safety
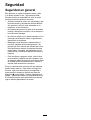
GeneralSafety
Thisproductiscapableofamputatinghandsand
feetandofthrowingobjects.Alwaysfollowallsafety
instructionstoavoidseriouspersonalinjuryordeath.
•Read,understand,andfollowtheinstructions
andwarningsinthisOperator’sManualandon
themachineandattachmentsbeforestartingthe
engine.
•Donotputyourhandsorfeetnearmovingpartsor
underthemachine.Keepclearofanydischarge
opening.
•Donotoperatethemachinewithoutallguards
andothersafetyprotectivedevicesinplaceand
functioningproperlyonthemachine.
•Keepbystandersandchildrenoutoftheoperating
area.Donotallowchildrentooperatethemachine.
Allowonlypeoplewhoareresponsible,trained,
familiarwiththeinstructions,andphysically
capabletooperatethemachine.
•Stopthemachine,shutofftheengine,remove
theignitionkey(ifequipped),andwaitforall
movingpartstostopbeforeservicing,fueling,or
uncloggingthemachine.
Improperlyusingormaintainingthismachinecan
resultininjury.Toreducethepotentialforinjury,
complywiththesesafetyinstructionsandalways
payattentiontothesafety-alertsymbol
,which
meansCaution,Warning,orDanger—personalsafety
instruction.Failuretocomplywiththeseinstructions
mayresultinpersonalinjuryordeath.
2

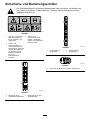
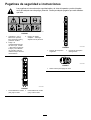
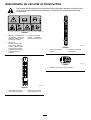
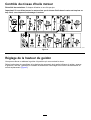
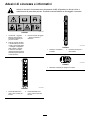
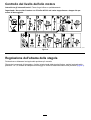
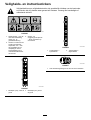
SafetyandInstructionalDecals
Safetydecalsandinstructionsareeasilyvisibletotheoperatorandarelocatednearanyarea
ofpotentialdanger.Replaceanydecalthatisdamagedormissing.
decal134-5696
134-5696
1.Warning—readthe
Operator’sManual;wear
eyeprotectionandhearing
protection.
3.Thrownobject
hazard—keepbystanders
away.
2.Cutting/dismemberment
hazardofhandorfoot,
blade—disconnectthe
spark-plugwireand
readtheOperator's
Manualbeforeperforming
maintenance.
decal134-5697
134-5697
1.Bladedepth(mm),below
ground
2.Bladedepth(mm),above
ground
decal134-5698
134-5698
1.Transport
position—engaged
2.Transport
position—disengaged
decal134-6097
134-6097
1.Releasethebailtoshutofftheengine.
3

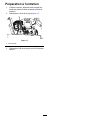
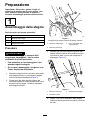
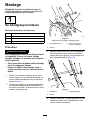
Setup
Important:Removeanddiscardtheprotective
plasticsheetthatcoverstheengineandanyother
plasticorwrappingonthemachine.
1
AssemblingtheHandle
Partsneededforthisprocedure:
2
Carriagebolt
4Lockknob
2
Curvedwasher
2
Curved-headbolt
Procedure
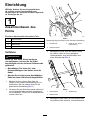
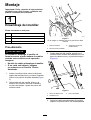
WARNING
Assemblingandunfoldingthehandle
improperlycandamagethecables,causing
anunsafeoperatingcondition.
•Donotdamagethecableswhenunfolding
thehandle.
•Ifacableisdamaged,contactan
AuthorizedServiceDealer.
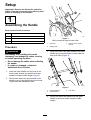
1.Installthelowerhandleoverthepostonthe
lowerhandlebracketandpositionthelower
handlefordesiredhandleheight(Figure3).
2.Secureeachsideofthelowerhandletothe
machineusingacarriageboltandalockknob.
Tightenthelowerhandlebarknobs.
g340201
Figure3
Showninstalledathighesthandleheight
1.Lockknob3.Postonlowerhandle
bracket
2.Carriagebolt
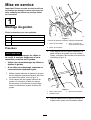
3.Installeachsideoftheupperhandletothelower
handleusingacurvedwasher,curvedheadbolt,
andalockknob(Figure4).
g340202
Figure4
1.Curved-headbolt
3.Lockknob
2.Curvedwasher
4.Securethecablesthatextendfromtheupper
handletothelowerhandleusingthecable
clamps.
4

2
AddingOiltotheEngine
NoPartsRequired
Procedure
Important:Iftheoillevelintheengineistoolowortoohighandyouruntheengine,youmaydamage
theengine.
g222533
Figure5
5

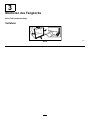
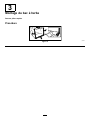
3
AssemblingtheGrassBag
NoPartsRequired
Procedure
g230447
Figure6
6

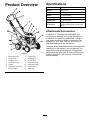
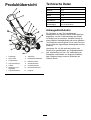
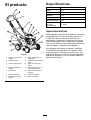
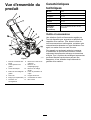
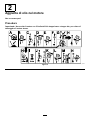
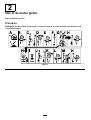
ProductOverview
g340200
Figure7
1.Blade-controlbar8.Fuel-tankcap
2.Upperhandle
9.Oilll/dipstick
3.Transportlever
10.Oildrainplug
4.Handle-lockknob
11.Depth-of-cutlever
5.Airlter
12.Recoil-starthandle
6.Sparkplug(notshown)
13.Enginecontrols
7.Exhaustguard
14.Grassbag
Specications
Model54610
Weight
38kg(77lb)
Length
122cm(48inches)
Width
61cm(24inches)
Height
107cm(42inches)
WidthofCut40cm(16inches)
DepthofCut
(6positions)
10mmabovegroundto15mmbelow
(2/5inchesabovegroundto3/5inches
below)
Attachments/Accessories
AselectionofToroapprovedattachmentsand
accessoriesisavailableforusewiththemachine
toenhanceandexpanditscapabilities.Contact
yourAuthorizedServiceDealerorauthorizedToro
distributororgotowww.T oro.comforalistofall
approvedattachmentsandaccessories.
Toensureoptimumperformanceandcontinuedsafety
certicationofthemachine,useonlygenuineToro
replacementpartsandaccessories.Replacement
partsandaccessoriesmadebyothermanufacturers
couldbedangerous,andsuchusecouldvoidthe
productwarranty.
7

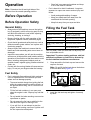
Operation
Note:Determinetheleftandrightsidesofthe
machinefromthenormaloperatingposition.
BeforeOperation
BeforeOperationSafety
GeneralSafety
•Alwaysshutoffthemachine,removetheignition
key(ifequipped),waitforallmovingpartstostop,
andallowthemachinetocoolbeforeadjusting,
servicing,cleaning,orstoringit.
•Becomefamiliarwiththesafeoperationofthe
equipment,operatorcontrols,andsafetysigns.
•Checkthatallguardsandsafetydevices,suchas
deectorsand/orgrasscatcher,areinplaceand
functioningproperly.
•Alwaysinspectthemachinetoensurethatthe
bladesandrollerassemblypartsarenotwornor
damaged.
•Inspecttheareawhereyouwillusethemachine,
andremoveallobjectsthatcouldinterferewiththe
operationofthemachineorthatthemachinecould
throw,includingundergroundobjectssuchas
sprinklerheads,irrigationpiping,shallowelectrical
cords,etc.
•Contactwiththemovingbladeswillcauseserious
injury.Donotputyourngersunderthehousing.
FuelSafety
•Fuelisextremelyammableandhighlyexplosive.
Areorexplosionfromfuelcanburnyouand
othersandcandamageproperty.
–Topreventastaticchargefromignitingthefuel,
placethecontainerand/ormachinedirectlyon
thegroundbeforelling,notinavehicleoron
anobject.
–Fillthefueltankoutdoors,inanopenarea,
whentheengineiscold.Wipeupanyfuelthat
spills.
–Donothandlefuelwhensmokingoraroundan
openameorsparks.
–Donotremovethefuelcaporaddfueltothe
tankwhiletheengineisrunningorhot.
–Ifyouspillfuel,donotattempttostartthe
engine.Avoidcreatingasourceofignitionuntil
thefuelvaporshavedissipated.
–Storefuelinanapprovedcontainerandkeep
itoutofthereachofchildren.
•Fuelisharmfulorfatalifswallowed.Long-term
exposuretovaporscancauseseriousinjuryand
illness.
–Avoidprolongedbreathingofvapors.
–Keepyourhandsandfaceawayfromthe
nozzleandthefuel-tankopening.
–Keepfuelawayfromyoureyesandskin.
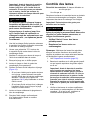
FillingtheFuelTank
TypeUnleadedgasoline
Minimumoctanerating
87(US)or91(research
octane;outsidetheUS)
Ethanol
Nomorethan10%byvolume
MethanolNone
MTBE(methyltertiarybutyl
ether)
Lessthan15%byvolume
OilDonotaddtothefuel
Useonlyclean,fresh(nomorethan30daysold),fuel
fromareputablesource.
Important:Toreducestartingproblems,addfuel
stabilizer/conditionertofreshfuelasdirectedby
thefuel-stabilizer/conditionermanufacturer.
1.Cleanaroundthefuel-tankcapandremovethe
capfromthetank.
Note:Donotllthefueltankabovethebottom
ofthefuel-tankneck(Figure4).
g230458
Figure8
2.Installthefuel-tankcapandtightenitsecurely
byhand.
8

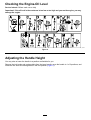
CheckingtheEngine-OilLevel
ServiceInterval:Beforeeachuseordaily
Important:Iftheoillevelinthecrankcaseistoolowortoohighandyouruntheengine,youmay
damagetheengine.
g222533
Figure9
AdjustingtheHandleHeight
Youmayraiseorlowerthehandletoapositioncomfortableforyou.
Removethelockknobsandcarriageboltsfromthelowerhandle,movethehandleto1of3positions,and
installthelockknobandcarriageboltsinthenewposition(Figure3).
9

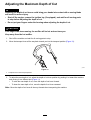
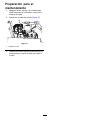
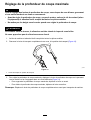
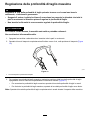
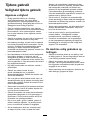
AdjustingtheMaximumDepthofCut
DANGER
Adjustingthedepth-of-cutleverscouldbringyourhandsintocontactwithamovingblade
andresultinseriousinjury.
•Shutofftheengine,removetheignitionkey(ifequipped),andwaitforallmovingparts
tostopbeforeadjustingthedepthofcut.
•Donotputyourngersunderthehousingwhenadjustingthedepthofcut.
CAUTION
Iftheenginehasbeenrunning,themuferwillbehotandcanburnyou.
Keepawayfromthehotmufer.
1.Shutoffthemachineandwaitforallmovingpartstostop.
2.Movethetransportleverallthewaybacktowardyouintothetransportposition(Figure10).
g340366
Figure10
1.Transportleverinthetransportposition
3.Toadjustthemaxdepthofcut,adjustthedepth-of-cutleverpositionbypushingitintowardthemachine
andmovingittoadifferentslot(Figure11).
•Toraisethemaxdepthofcut,movethedepth-of-cutleverforward
•Tolowerthemaxdepthofcut,movethedepth-of-cutleverrearward.
Note:Movethedepth-of-cutleverallthewayforwardwhentransportingthemachine.
10

g345149
Figure11
11

DuringOperation
DuringOperationSafety
GeneralSafety
•Wearappropriateclothing,includingeye
protection;longpants;substantial,slip-resistant
footwear;andhearingprotection.Tiebacklong
hairanddonotwearlooseclothingorloose
jewelry.
•Useyourfullattentionwhileoperatingthe
machine.Donotengageinanyactivitythat
causesdistractions;otherwise,injuryorproperty
damagemayoccur.
•Donotoperatethemachinewhileill,tired,or
undertheinuenceofalcoholordrugs.
•Thebladeissharp;contactingthebladecanresult
inseriouspersonalinjury.Shutofftheengine,
removetheignitionkey(ifequipped),andwait
forallmovingpartstostopbeforeleavingthe
operatingposition.
•Keepbystandersoutoftheoperatingarea.Keep
smallchildrenoutoftheoperatingareaandunder
thewatchfulcareofaresponsibleadultwhois
notoperatingthemachine.Stopthemachineif
anyoneentersthearea.
•Alwayslookdownandbehindyoubeforemoving
themachineinreverse.
•Operatethemachineonlyingoodvisibilityand
appropriateweatherconditions.Donotoperate
themachinewhenthereistheriskoflightning.
•Wetgrassorleavescancauseseriousinjuryifyou
slipandcontacttheblades.Avoidoperatingthe
machineinwetconditions.
•Useextremecarewhenapproachingblind
corners,shrubs,trees,orotherobjectsthatmay
blockyourview.
•Donotoperatethemachinewithouttherear
deectorloweredorthegrassbaginstalled.Stop
theblade(s)whencrossinggravelsurfaces.
•Watchforholes,ruts,bumps,rocks,orother
hiddenobjects.Uneventerraincouldcauseyou
toloseyourbalanceorfooting.
•Ifthemachinestrikesanobjectorstartstovibrate,
immediatelyshutofftheengine,removethe
ignitionkey(ifequipped),waitforallmovingparts
tostop,anddisconnectthewirefromthespark
plugbeforeexaminingthemachinefordamage.
Makeallnecessaryrepairsbeforeresuming
operation.
•Beforeleavingtheoperatingposition,shutoffthe
engine,removetheignitionkey(ifequipped),and
waitforallmovingpartstostop.
•Iftheenginehasbeenrunning,itwillbehotand
canseverelyburnyou.Keepawayfromthehot
engine.
•Operatetheengineonlyinwell-ventilatedareas.
Exhaustgasescontaincarbonmonoxide,whichis
anodorless,deadlypoison.
•Checkthegrasscatchercomponentsandthe
dischargechutefrequentlyforanywearor
deteriorationandreplacethemwithgenuineToro
partswhennecessary.
SlopeSafety
•Operatethemachineacrossthefaceofslopes;
neverupanddown.Useextremecautionwhen
changingdirectiononslopes.
•Donotoperatethemachineonexcessivelysteep
slopes.Poorfootingcouldcauseaslip-and-fall
accident.
•Operatethemachinewithcautionneardrop-offs,
ditches,orembankments.
12

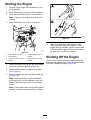
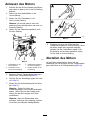
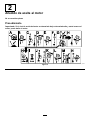
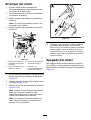
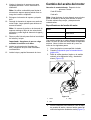
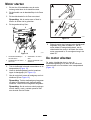
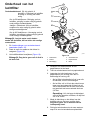
StartingtheEngine
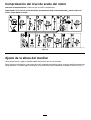
1.PushupontheengineOn/Offswitchsoitisin
theONposition.
2.Movethefuel-valvelevertotheOPENposition.
3.MovethechokelevertotheCLOSEDposition.
Note:Awarmorhotenginemaynotrequire
choking.
4.MovethethrottlelevertotheFASTposition.
g348519
Figure12
1.Fuel-valveleverinthe
OPENposition
3.ThrottleleverintheFAST
position
2.ChokeleverintheCLOSED
position
4.On/OffswitchintheON
position
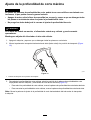
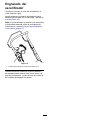
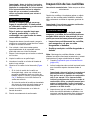
5.Movethetransportleverallthewaybacktoward
youintothetransportposition(Figure10).
6.Holdtheblade-controlbaragainstthehandle
(AofFigure13).
7.Fromtheengine,pulltherecoil-starthandle(B
ofFigure13).
Note:Whenyoupulltherecoil-starthandle,
pullitlightlyuntilyoufeelresistance,thenpullit
sharply.Allowtheropetoreturntothehandle
slowly.
Note:Ifthemachinedoesnotstartafterseveral
attempts,contactanAuthorizedServiceDealer.
g348516
Figure13
8.Aftertheenginestarts,graduallymovethe
chokeleverbacktotheOFFposition.Ifthe
enginestallsorhesitates,movethechokeback
totheONpositionagainuntiltheenginewarms
up,thenmoveittotheOFFposition.
ShuttingOfftheEngine
Toshutofftheengine,releasetheblade-controlbar
andmovethetransportleverallthewaybacktoward
youintothetransportposition(Figure10).
13

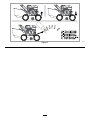
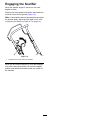
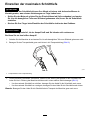
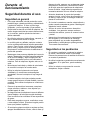
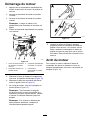
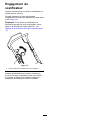
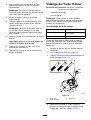
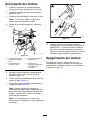
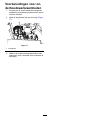
EngagingtheScarier
Whenthescarierengineisturnedon,theroller
beginstorotate.
Slowlymovethetransportleverallthewayforwardto
lowertherollerintotheground(Figure14).
Note:Ifthescarierdoesnotpenetratethegroundat
thedesireddepth,adjustthemaxdepthofcut;refer
toAdjustingtheMaximumDepthofCut(page10).
g340496
Figure14
1.TransportleverintheOPERATINGposition
Whenyouarenishedscarifying,movethetransport
leverallthewaybacktowardyouintothetransport
positionandreleasetheblade-controlbartoshutoff
themachine.
14

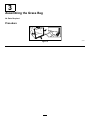
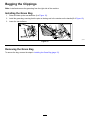
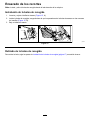
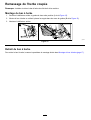
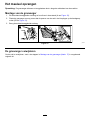
BaggingtheClippings
Note:Installandremovethegrassbagfromtherightsideofthemachine.
InstallingtheGrassBag
1.Raiseandholdupthereardeector(AofFigure15).
2.Installthegrassbag,ensuringthatthepinsonthebagrestinthenotchesonthehandle(BofFigure15).
3.Lowerthereardeector.
g233434
Figure15
RemovingtheGrassBag
Toremovethebag,reversethestepsinInstallingtheGrassBag(page15).
15

AfterOperation
AfterOperationSafety
GeneralSafety
•Alwaysshutoffthemachine,waitforallmoving
partstostop,allowthemachinetocool,and
disconnectthesparkplugwirefromthesparkplug
beforeadjusting,servicing,cleaning,orstoringit.
•Cleangrassanddebrisfromthemachinetohelp
preventres.Cleanupoilorfuelspills.
•Neverstorethemachineorfuelcontainerwhere
thereisanopename,spark,orpilotlight,such
asonawaterheateroronotherappliances.
HaulingSafety
•Priortohauling,movethetransportleverintothe
transportposition.
•Usecarewhenloadingorunloadingthemachine.
•Securethemachinefromrolling.
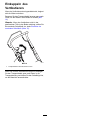
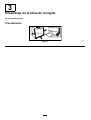
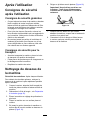
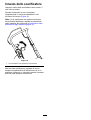
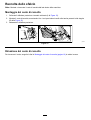
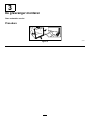
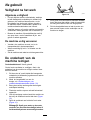
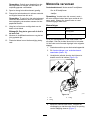
CleaningundertheMachine
ServiceInterval:Aftereachuse
Forbestresults,cleanunderthemachinesoonafter
youhavecompletedoperatingthemachine.
1.Shutofftheengine,waitforallmovingpartsto
stop,andallowthemachinetocool.
2.Disconnectthespark-plugwirefromthespark
plug;refertoPreparingforMaintenance(page
18).
3.Raisethemachinetoitshighestdepth-of-cut
setting.
4.Movethemachineontoapavedlevelsurface.
5.Holdingthehandle,tiltthemachineupsothe
bottomofthedeckisaccessible(Figure16).
6.Sprayastreamofwaterunderthedeck(Figure
16).
Important:Donotspraytheenginewith
water;watercandamagetheengineor
contaminatethefuelsystem.
g345240
Figure16
7.Whennomoredebriscomeout,lowerthe
machine,stopthewater,andmovethemachine
toadryarea.
8.Connectthesparkplugwireandruntheengine
forafewminutestodrytheundersideofthe
machine.
16

Maintenance
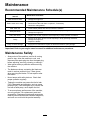
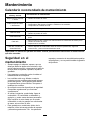
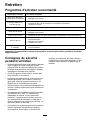
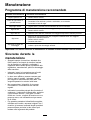
RecommendedMaintenanceSchedule(s)
MaintenanceService
Interval
MaintenanceProcedure
Aftertherst5hours
•Changetheengineoil.
Beforeeachuseordaily
•Checktheengine-oillevelandaddoilasneeded.
•Checktheairlterandcleanorreplaceit,ifnecessary.
•Checkthecuttingblades.
Aftereachuse
•Cleanscarierdebrisanddirtfromunderthemachine.
Every50hours
•Cleantheairlter;cleanitmorefrequentlyindustyoperatingconditions.
•Changetheengineoil.
Every200hours
•Replacetheairlter;replaceitmorefrequentlyindustyoperationconditions.
Yearly
•Servicetheairlter;serviceitmorefrequentlyindustyoperatingconditions.
•Changetheengineoil.
•Inspecttheblades.
Yearlyorbeforestorage
•Emptythefueltankbeforerepairsasdirectedandbeforeyearlystorage.
Important:Refertoyourengineowner’smanualforadditionalmaintenanceprocedures.
MaintenanceSafety
•Alwaysshutoffthemachine,waitforallmoving
partstostop,allowthemachinetocool,and
disconnectthespark-plugwirefromthesparkplug
beforeadjusting,servicing,cleaning,orstoringit.
•Wearglovesandeyeprotectionwhenservicing
themachine.
•Thebladesaresharp;contactingthebladecan
resultinseriouspersonalinjury.Weargloves
whenservicingtheblades.Donotrepairoralter
theblades.
•Nevertamperwithsafetydevices.Checktheir
properoperationregularly.
•Tippingthemachinemaycausethefueltoleak.
Fuelisammableandexplosive,andcancause
personalinjury.Runtheenginedryorremovethe
fuelwithahandpump;neversiphonthefuel.
•Toensureoptimumperformanceofthemachine,
useonlygenuineTororeplacementpartsand
accessories.Replacementpartsandaccessories
madebyothermanufacturerscouldbedangerous,
andsuchusecouldvoidtheproductwarranty.
17

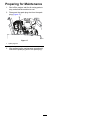
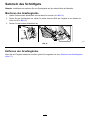
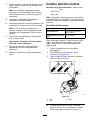
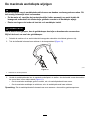
PreparingforMaintenance
1.Shutofftheengine,waitforallmovingpartsto
stop,andallowthemachinetocool.
2.Disconnectthespark-plugwirefromthespark
plug(Figure17).
g340368
Figure17
1.Spark-plugwire
3.Afterperformingthemaintenanceprocedure(s),
connectthespark-plugwiretothesparkplug.
18
La page charge ...
La page charge ...
La page charge ...
La page charge ...
La page charge ...
La page charge ...
La page charge ...
La page charge ...
La page charge ...
La page charge ...
La page charge ...
La page charge ...
La page charge ...
La page charge ...
La page charge ...
La page charge ...
La page charge ...
La page charge ...
La page charge ...
La page charge ...
La page charge ...
La page charge ...
La page charge ...
La page charge ...
La page charge ...
La page charge ...
La page charge ...
La page charge ...
La page charge ...
La page charge ...
La page charge ...
La page charge ...
La page charge ...
La page charge ...
La page charge ...
La page charge ...
La page charge ...
La page charge ...
La page charge ...
La page charge ...
La page charge ...
La page charge ...
La page charge ...
La page charge ...
La page charge ...
La page charge ...
La page charge ...
La page charge ...
La page charge ...
La page charge ...
La page charge ...
La page charge ...
La page charge ...
La page charge ...
La page charge ...
La page charge ...
La page charge ...
La page charge ...
La page charge ...
La page charge ...
La page charge ...
La page charge ...
La page charge ...
La page charge ...
La page charge ...
La page charge ...
La page charge ...
La page charge ...
La page charge ...
La page charge ...
La page charge ...
La page charge ...
La page charge ...
La page charge ...
La page charge ...
La page charge ...
La page charge ...
La page charge ...
La page charge ...
La page charge ...
La page charge ...
La page charge ...
La page charge ...
La page charge ...
La page charge ...
La page charge ...
La page charge ...
La page charge ...
La page charge ...
La page charge ...
La page charge ...
La page charge ...
La page charge ...
La page charge ...
La page charge ...
La page charge ...
La page charge ...
La page charge ...
La page charge ...
La page charge ...
La page charge ...
La page charge ...
La page charge ...
La page charge ...
La page charge ...
La page charge ...
La page charge ...
La page charge ...
La page charge ...
La page charge ...
La page charge ...
La page charge ...
La page charge ...
La page charge ...
La page charge ...
La page charge ...
La page charge ...
La page charge ...
La page charge ...
La page charge ...
La page charge ...
La page charge ...
La page charge ...
La page charge ...
La page charge ...
La page charge ...
La page charge ...
La page charge ...
La page charge ...
La page charge ...
La page charge ...
La page charge ...
La page charge ...
La page charge ...
La page charge ...
La page charge ...
-
 1
1
-
 2
2
-
 3
3
-
 4
4
-
 5
5
-
 6
6
-
 7
7
-
 8
8
-
 9
9
-
 10
10
-
 11
11
-
 12
12
-
 13
13
-
 14
14
-
 15
15
-
 16
16
-
 17
17
-
 18
18
-
 19
19
-
 20
20
-
 21
21
-
 22
22
-
 23
23
-
 24
24
-
 25
25
-
 26
26
-
 27
27
-
 28
28
-
 29
29
-
 30
30
-
 31
31
-
 32
32
-
 33
33
-
 34
34
-
 35
35
-
 36
36
-
 37
37
-
 38
38
-
 39
39
-
 40
40
-
 41
41
-
 42
42
-
 43
43
-
 44
44
-
 45
45
-
 46
46
-
 47
47
-
 48
48
-
 49
49
-
 50
50
-
 51
51
-
 52
52
-
 53
53
-
 54
54
-
 55
55
-
 56
56
-
 57
57
-
 58
58
-
 59
59
-
 60
60
-
 61
61
-
 62
62
-
 63
63
-
 64
64
-
 65
65
-
 66
66
-
 67
67
-
 68
68
-
 69
69
-
 70
70
-
 71
71
-
 72
72
-
 73
73
-
 74
74
-
 75
75
-
 76
76
-
 77
77
-
 78
78
-
 79
79
-
 80
80
-
 81
81
-
 82
82
-
 83
83
-
 84
84
-
 85
85
-
 86
86
-
 87
87
-
 88
88
-
 89
89
-
 90
90
-
 91
91
-
 92
92
-
 93
93
-
 94
94
-
 95
95
-
 96
96
-
 97
97
-
 98
98
-
 99
99
-
 100
100
-
 101
101
-
 102
102
-
 103
103
-
 104
104
-
 105
105
-
 106
106
-
 107
107
-
 108
108
-
 109
109
-
 110
110
-
 111
111
-
 112
112
-
 113
113
-
 114
114
-
 115
115
-
 116
116
-
 117
117
-
 118
118
-
 119
119
-
 120
120
-
 121
121
-
 122
122
-
 123
123
-
 124
124
-
 125
125
-
 126
126
-
 127
127
-
 128
128
-
 129
129
-
 130
130
-
 131
131
-
 132
132
-
 133
133
-
 134
134
-
 135
135
-
 136
136
-
 137
137
-
 138
138
-
 139
139
-
 140
140
-
 141
141
-
 142
142
-
 143
143
-
 144
144
-
 145
145
-
 146
146
-
 147
147
-
 148
148
-
 149
149
-
 150
150
-
 151
151
-
 152
152
-
 153
153
-
 154
154
-
 155
155
-
 156
156


Toro Scarifier Manuel utilisateur
- Catégorie
- Outils de jardin
- Taper
- Manuel utilisateur
dans d''autres langues
- italiano: Toro Scarifier Manuale utente
- English: Toro Scarifier User manual
- español: Toro Scarifier Manual de usuario
- Deutsch: Toro Scarifier Benutzerhandbuch
- Nederlands: Toro Scarifier Handleiding