Waring Commercial WCS220 Manuel utilisateur
- Catégorie
- Trancheuses
- Taper
- Manuel utilisateur

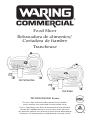
Food Slicer
Rebanadora de alimentos/
Cortadora de fiambre
Trancheuse
WCS220/250
WCS300
WCS220/250/300 Series
For your safety and continued enjoyment of this product,
always read the instruction book carefully before using.
Para su seguridad y para disfrutar plenamente de este producto,
siempre lea cuidadosamente las instrucciones antes de usarlo.
An que votre appareil vous procure en toute sécurité beaucoup de
satisfaction, lire attentivement le mode d’emploi avant de l’utiliser.

2
IMPORTANT UNPACKING INSTRUCTIONS
CAUTION: THE SLICING BLADE HAS A VERY SHARP EDGE.
To avoid injury when unpacking the unit, please follow these
instructions:
1. Put the box on a large, sturdy, at surface.
2. Remove the instruction book and other literature.
3. P osition the box on its side, and then ip the box so that the
open side is facing the oor.
4. Lift up the box and remove the foam inserts.
5. Remove the protective bag.
6. To lift and move the unit, bend your knees to avoid back injuries,
and place one hand on the bottom of the motor housing and the
other one under the carriage.
7. Please use extreme caution when handling the blade. We
suggest you save all the packing materials in the event that
future shipping of the machine is needed.
Keep all plastic bags away from children.
REPACKING INSTRUCTIONS
1. Put food slicer on a large, sturdy, at surface.
2. Put food slicer into plastic bag.
3. P osition foam inserts on each end of the food slicer.
4. Put the packaged unit into the upright box.
5. Replace top corrugated insert, instruction book and
other literature.
DELIVERY, PACKAGING AND STORAGE
TRANSPORT – HANDLING – STORAGE
The machine is packed in a cardboard box with
foam inserts.
The packaging is suitable for travel by all means
of transport.
It can be stacked one carton on another for a
maximum of three cartons.
– The packaging must be kept dry.
– To be handled by 2 persons.
– When on pallets, handle only with electric lifters.

3
IMPORTANT SAFEGUARDS
When using electrical appliances, especially when children are
present, basic safety precautions should always be taken,
including the following:
1. READ ALL INSTRUCTIONS.
2. U nplug power cord from outlet when not in use, before
putting on or taking off parts, before cleaning, and before
attaching, adjusting or removing the blade sharpener.
3. Blade is exceptionally sharp. Handle very carefully.
4. To protect against risk of electric shock, do not put appliance in
water or other liquids.
5. Do not use appliance near children and individuals with certain
disabilities.
6. Avoid contact with moving parts.
7. Never put the unit near a hot burner, in an oven, or in a
dishwasher.
8. Do not operate the Waring® Commercial Food Slicer or
any electrical equipment with a damaged cord or plug, or after
the unit malfunctions, is dropped or damaged in any manner.
If damaged, immediately stop use and call Waring customer
service at (800) 269-6640. Return unit to the nearest Authorized
Service Center for examination, repair, or adjustment.
9. Do not use outdoors.
10. Do not let cord hang over the edge of a table or counter, come
into contact with sharp edges, or touch hot surfaces.
11. Place the appliance on a rm and stable surface. Ensure that
the appliance is not placed near the edge of the worktop, where
it can be easily pushed off or fall.
12. Never plug in the appliance where water may ood the area.
13. N EVER PUT YOUR FINGERS NEAR THE BLADE WHILE IT IS
IN OPERATION.
14. The use of attachments not recommended or sold by the
manufacturer may cause re, electric shock or injury.
15. U se the slicer to cut ONLY designated food. Do not attempt
to slice frozen food or materials such as bones, cardboard,
plastic, etc.

4
16. T O PROTECT AGAINST ANY RISK OF ELECTRIC
SHOCK, DO NOT PUT THE APPLIANCE IN WATER
OR IN ANY OTHER LIQUIDS.
17. The Waring® Food Slicer has a sharp blade. To avoid injury,
never hand-feed food to be sliced. Always use the unit when
completely assembled with food carriage and food guide.
18. W ARNING: This appliance is not intended for use by persons
(including children) with reduced physical, sensory, or mental
capabilities, or lack of experience and knowledge, unless they
have been adequately trained to do so in a safe manner. It is
better to watch over children to be sure they do not play with
the device. Use of this appliance must be carried out with the
utmost care as it concerns a cutting device.
19. Always use completely assembled slicers with food tray
and food holder arm and with all the protective parts.
20. The use of spare parts not recommended or sold by
manufacturer may cause re, electric shock or injury.
21. Do not catch slices with your hand.
22. Children should be supervised to ensure that they do not play
with the appliance.
23. Do not use the machine with the protective parts removed.
24. Waring declines all responsibility in the case of improper use of
the machine. Do not use the food slicer for frozen food, bone-in
meat or anything other than foodstuffs. Periodically check the
state of the cable; should it be damaged, it must be replaced by
qualied staff.
25. Do not submerge the food slicer in water when cleaning.
26. The slicer is not to be washed by the use of a waterjet.
27. Do not use extension cords.
28. Do not unplug by pulling the cord.
29. Do not use the machine with wet hands or bare feet.
30. Do not place slicer near sources of heat.
31. Even though the machine is equipped with safety devices, keep
your hands away from the blade and moving parts.

5
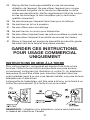
SAVE THESE INSTRUCTIONS.
FOR COMMERCIAL USE ONLY
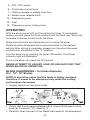
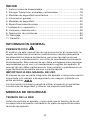
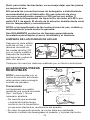
GROUNDING INSTRUCTIONS
This appliance must be grounded while in use to protect the operator
from electric shock. The appliance is equipped with a 3-conductor
cord and 3-prong grounding-type plug to t the proper grounding-
type receptacle. The appliance has a plug that looks like the plug
in drawing (1). An adapter, as in drawing (2), should be used for
connecting the appliance plug to two-prong receptacles.
The grounding lug, which extends from the adapter, must be
connected to a permanent ground such as a properly grounded
outlet box, as shown in drawing (3), using a metal screw.
NOTE: The use of an adapter is not authorized in Canada.

6
CONTENTS
1. Unpacking Instructions ..................................................................2
2. Delivery, Packaging and Storage ...................................................2
3. Important Safeguards ....................................................................3
4. General Information ....................................................................... 6
5. Safety .............................................................................................6
6. Technical Data ................................................................................ 7
7. Installation and Operation ...............................................................9
8. Cleaning and Sanitizing Instructions ............................................ 12
9. Troubleshooting ............................................................................16
10. Waste Disposal ........................................................................... 17
11. Warranty / Service ...................................................................... 17
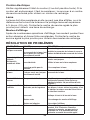
GENERAL INFORMATION
PRESENTATION
The aim of this handbook is to provide the customer with as much
information as possible about our food slicer, and instructions for
its use and maintenance in order to keep it working efciently. This
handbook should be given to those responsible for the use and
periodical maintenance of the slicer. The handbook should be kept
in good condition and stored in an easily accessible place for
quick reference.
IMPORTANCE OF THE HANDBOOK
The handbook is an integral part of the machine. It includes
important information regarding safety and danger, pointed out
by these symbols:
The information included will allow you to use the machine in
perfectly safe conditions and to obtain the best results.
SAFETY
MAIN VOLTAGE
Before plugging in, check that the main voltage corresponds to the
voltage indicated on the food slicer (see data plate).
WARNINGS AND SAFETY RULES
READ ALL INSTRUCTIONS

7
Read carefully all the instructions before using the machine, taking
particular care of the paragraphs with the safety and danger symbols.
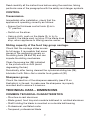
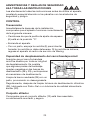
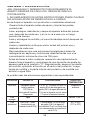
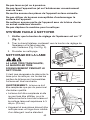
CONTROL
Transmission.
Immediately after installation, check that the
appliance is operating correctly as follows:
– Ensure the thickness control knob (6) is in
“0” position.
– Switch on the slicer.
– Using a cloth, push on the blade (3), to try to
brake it; the blade must not stop. If the blade does
stop, return appliance to Waring service center.
Check that the carriage slides across
its full range. It is possible that some
pieces of the packaging remain on
the sliding bars (28 and 29) and can
impede the sliding mechanism.
Clean the square bar (28) indicated
in the picture with a cloth (avoid
degreasing the bar).
Periodically, after having cleaned the cylindrical sliding bar (29),
lubricate it with Petro-Gel or similar food-grade oil (30).
Sliding capacity of the food tray group carriage.
Sharpener group.
Check the insertion of the sharpener assembly (see #10 on
illustration) in its seat, to make sure the sharpener is properly
mounted and to ensure it is secure.
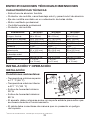
TECHNICAL DATA – DIMENSIONS
– Structure is cast aluminum
– Blade guard, food tray and movable bulkhead: in oxidized aluminum
– Shaft holding the blade is mounted on a double ball-bearing
– Professional, ventilated motor
– Tempered, professional blade
COMMON TECHNICAL CHARACTERISTICS

8*Peak input watts.
WCS250
WCS300
WCS220

9
Slicer Info WCS220 WCS250 WCS300
Dimensions in Inches L x W 18.8 x 20.8 18.9 x 20.8 18.9 x 21.6
Height Less Sharpener 13.9 14.7 16.9
Height w/Sharpener 15.2 15.2 19.4
Blade Diameter 8.5 in. 10 in. 12 in.
Power ¾ HP* ¾ HP* 1 HP*
Capacity of Cut
(approx)
8.2 x 5.7 8.6 x 6.2 7.8 x 8.0
Carriage Stroke 9.2 9.2 9.2
Weight 28.6 lb. 30.9 lb. 38.5 lb.
Slice Thickness 0-0.59"/15mm 0-0.59"/15mm 0-0.59"/15mm
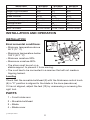
INSTALLATION AND OPERATION
INSTALLATION
Environmental conditions:
– Minimum temperature above
46°F (7.7 °C)
– Maximum temperature below
100°F (37.7 °C)
– Minimum moisture 30%
– Maximum moisture 80%
– The slicer must be put on a
stable support to prevent it from moving.
– The cord has to be connected in a manner that will not create a
tripping hazard.
Leveling
Check that the movable bulkhead (2) with the thickness control knob
(6) in “0” position is aligned to the blade in the zone (see above).
If it is not aligned, adjust the feet (12) by unscrewing or screwing the
right foot.
PARTS
1 – Food holder arm
2 – Movable bulkhead
3 – Blade
4 – Blade cover
*Peak input watts.

10
5 – ON / OFF switch
6 – Thickness control knob
7 – Sliding carriage or sliding food tray
9 – Blade cover release knob
10 – Sharpener group
12 – Feet
13 – Sharpener group locking knob
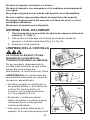
OPERATION
With the slicer turned off, pull the slicing food tray (7) completely
toward you and place the food product onto the food tray. Slice only
boneless, unfrozen product with the slicer.
Make sure all knobs are tightened prior to using the slicer.
Rotate the slice thickness dial counterclockwise to the desired
setting. After slicing is complete, always turn the slice thickness
control knob clockwise to the “0” position.
Turn the slicer on by pushing the green ON switch. The Power
indicator light will illuminate.
To turn the slicer off, press the OFF switch.
NEVER ATTEMPT TO ADJUST LOAD OR UNLOAD FOOD TRAY
WHEN SLICER IN OPERATION.
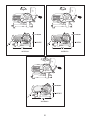
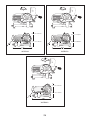
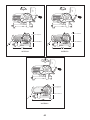
BLADE SHARPENING – for blade diameter:
8½", 10", 12" Blades
NOTE: It should be noted that the blade is highly resistant;
therefore, it needs to be sharpened only when the cutting
performance decreases.
• Unplug slicer from electrical outlet.
• Check that the movable bulkhead (2) is closed (thickness control
knob (6) in position “0”). See Fig. 2.
• Carefully clean the part of the blade that needs to be sharpened.

11
• Reinsert the plug.
• Loosen the locking knob (13) of the sharpener group (10).
See Fig. 1.
• Raise the sharpener group (10), turning it by 180° so that both
wheels are in working position. See Fig. 2.
• Lower the sharpener group (10) until it locks. See Fig. 2.
• Secure the group by turning the locking knob (13). See Fig. 3.
• Switch on (5). See Fig. 2.
• Press button (26) and let the blade turn for about 1 minute. Turn
slicer off (5). When the blade is still, check to see if any burrs have
formed on the edge. See Fig. 2.
• After having veried the presence of burr, switch on and gently
press button (27) for about 3 seconds to remove the burr
produced during sharpening. See Fig. 2.
• After sharpening, move the sharpener group (10) back to its
original position and clean the edge of the blade and the wheels.
• After several sharpening operations, remove any residue from the
sharpening wheel with alcohol and a brush.
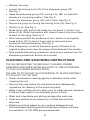
CLEANING AND SANITIZING INSTRUCTIONS
THE SLICER MUST BE THOROUGHLY CLEANED, RINSED,
SANITIZED AND DRIED AFTER EACH DAY OF USE ACCORDING
TO THE FOLLOWING INSTRUCTIONS.
FAILURE TO DO SO MAY ALLOW RESIDUE OF SLICED MATERIAL
TO COLLECT ON THE UNIT.
• Never use abrasive cleaning agents or abrasive cloths when
cleaning the unit.
• Remove the plug before the maintenance and disassembly
operations for cleaning of the protective parts.
• Wash, rinse, sanitize and dry slicer prior to initial use and whenever
it has not been used for an extended period of time.
• Wash and rinse blade and slicing carriage after each use.
• Clean and sanitize motor base prior to initial use and after
each use.
• Washing solutions based on non-sudsing detergents and
chlorine-based sanitizing solutions having a minimum chlorine
concentration of 100 PPM are recommended.

12
• Before carrying out any maintenance operation, unplug the
machine and make sure that the thickness control knob is in the
“0” position. Remove the blade guard periodically, by removing the
screw (in the center of the blade guard). Then clean both the blade
and the inside of the blade guard with alcohol or warm water.
The following washing, rinsing, and sanitizing solutions, or their
equivalents, may be used.
SOLUTION PRODUCT DILUTION IN WATER TEMPERATURE
Washing International Products 1%–2%: 1¼ – 2¾ Room
Corporation LF2100® Ounce/Gallon (lower dilution of 1% Temperature
Liquid Low-Foam for normal cleaning and up to 2%
Cleaner for more stubborn soils)
Rinsing Plain Water Warm 95˚F (35˚C)
Sanitizing Clorox® 2 Teaspoons/Gallon (Alternately, Between
Regular Bleach a bleach with 5.25% Hypochlorite 50˚F and 120˚F
(8.25% Hypochlorite Concentration can be used at (10˚C to 49˚C)
Concentration) dilution of 3 Teaspoons/Gallon)
Do not use jets of water.
Do not hose down slicer or splash excessively with water.
Do not wash any slicer components in a dishwasher.
Do not use brushes that can damage the surface of the
machine.
Do not clean any parts of the slicer with a steel or abrasive pad.
Do not move the machine to clean it.
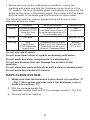
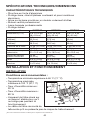
EASY-CLEAN SYSTEM
1. M ake sure that the thickness control knob is in position “0”
– Fig. 1 (the system operates only if the thickness control
knob is in position “0”).
2. Pull the carriage toward the
thickness control knob and tilt the carriage outward – Fig. 2/3.
3. Proceed with the cleaning.

13
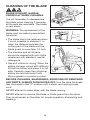
CLEANING OF THE BLADE
BLADE IS SHARP. HANDLE
CAREFULLY WHEN CLEANING.
It is not necessary to disassemble
the blade when cleaning it because
all its parts are reachable. The blade
is very sharp.
WARNING: The replacement of the
blade must be made by specialized
personnel.
• The blade has to be replaced when
it is not possible to sharpen it, or
when the distance between the
cutting part of the blade and the
blade guard is more than 1/4 inch.
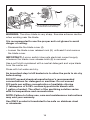
• The machine and all its parts
should be cleaned with soft cloths
moistened with standard, neutral
detergents.
• Use soft cloths for drying. When the
sliding carriage moves with difculty,
FIG. 3
lift the food slicer and place it on its
side. Carefully clean the cylindrical
sliding bar and lubricate it with
lithium grease or a similar product.
BEFORE CLEANING, SHARPENING, SERVICING OR REMOVING
ANY PARTS, ALWAYS TURN SLICER OFF. Turn the slice thickness
dial clockwise to the “0” position until it stops, and unplug power
cord.
NEVER attempt to clean slicer with the blade running.
NEVER attempt to remove the blade or blade guard from the slicer.
They must remain on the slicer for proper operation, sharpening and
cleaning.
FIG. 1
FIG. 2

14
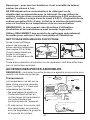
WARNING: The slicer blade is very sharp. Exercise extreme caution
when working near the blade.
It is recommended to use the proper anti-cut gloves to avoid
danger of cutting.
– Disassemble the blade cover (4).
– Loosen the blade cover release knob (9), unthread it and remove
the blade cover.
IMPORTANT! A micro switch interrupts electrical current supply
whenever the blade cover release knob (9) is removed.
Use a soft cloth moistened with a neutral detergent and wipe blade
from the center out.
Rinse with hot water and dry.
An important step to kill bacteria is to allow the parts to air-dry
before using.
DO NOT exceed chemical manufacturer’s recommended
concentrations for detergent or sanitizer. Do not exceed
200 parts per million concentration of available chlorine
(1 tablespoon of 5.25% sodium hypochlorite bleach with
1 gallon of water). The effect of the sanitizing solution varies
with its temperature and concentration.
NOTE: Failure to follow use, care and maintenance instructions
may void your warranty.
Use ONLY products formulated to be safe on stainless steel
or aluminum.
Clean the blade (3) on both faces
as indicated in the drawings.

15
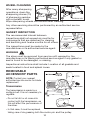
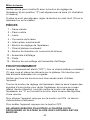
WHEEL CLEANING
After many sharpening
operations, clean the
sharpening stones (10)
of sharpening residue
with a metallic brush.
Wipe sharpening wheels with alcohol after cleaning.
Any other servicing should be performed by an authorized service
representative.
WCS300 WCS220/250
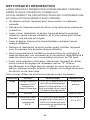
GASKET INSPECTION
The recommended interval between
inspections shall not exceed six months for
components that are detached for cleaning
and sanitizing and twelve months for all others.
The inspections must be made by the
manufacturer or its authorized service agent.
WARNING
The slicer must be removed from service until repaired by the
manufacturer or its Waring authorized service agent if any gasket or
seal is found to be damaged, or missing.
Inspections instructions shall include: Location of all gaskets and
seals located in food and splash zones.
REMOVABLE
ACCESSORY PARTS
NOTE: Contact your nearest
authorized service center for blade
replacement
Transmission
The transmission is made by a
multigrip belt. It is not necessary to
regulate.
– Do not let dirt or oil come into
contact with the transmission, as
this will affect the performance of
the slicer.
– In that case, it must be replaced,
taking care of de-greasing both
the motor pin and the pulley.
Gasket between
slice thickness
control
Protection on
the switch

16
Electric cord
Periodically check its condition (there must not be any kinks). If
the cord is damaged, it has to be replaced. Please return it to an
authorized service center for replacement.
Blade
The blade has to be replaced when it is not possible to sharpen
it or when the distance between the cutting part of the blade and
the blade guard is more than 1/4 inch. Please contact your nearest
authorized service center for replacement.
Sharpening stones of the sharpener
These stones, after a lot of sharpening operations, lose their abrasive
action and they must be replaced. Contact your nearest authorized
service center for replacement.
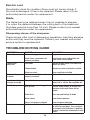
TROUBLESHOOTING GUIDE
SYMPTOM CAUSE SOLUTION
Slicer will not start Slicer not plugged in Plug in slicer
Blade cover removed or not Install blade cover and tighten the
properly installed blade cover release knob
Ragged cuts, Dull blade Sharpen blade; make sure blade and
poor yield stones are clean
Chipped blade Sharpen or have new blade installed
Blade too small Have new blade installed
Metal rubbing Blade cover not tightened/ Tighten blade cover release knob
on blade properly installed
Hard-to-push food No lubrication Lubricate sliding bars thoroughly with
carriage assembly Petrol-Gel or similar. No vegetable oil!
Hard to sharpen Stones dirty, wet or clogged Clean stones with warm water and
with grease a brush. Allow stones to air-dry and
lubricate shafts with Petro-Gel or
similar.
Blade dirty Clean top and bottom of blade
Worn stones Have stones replaced
Stones not properly aligned Have sharpener adjusted
Slicer stops running Motor overheated Unplug unit and wait 10–15 minutes
for slicer to cool down. Turn unit back
on and push the ON button. If problem
persists, contact an authorized service
center.

17
LIMITED ONE-YEAR WARRANTY
(U.S. AND CANADA ONLY)
Waring warrants every new WARING COMMERCIAL PRODUCT
to be free from defects in materials and workmanship for a period
of one year from the date of purchase when used with foodstuffs,
nonabrasive liquids (other than detergents) and nonabrasive semi-
liquids, providing it has not been subject to loads in excess of the
indicated rating.
Under this warranty, the Waring Commercial Division will repair
or replace any part which, upon our examination, is defective in
materials or workmanship, provided the product is delivered prepaid
to the Waring Service Center, 314 Ella T. Grasso Ave., Torrington, CT
06790 or any Factory Approved Service Center.
This warranty does not: a) apply to any product that has become
worn, defective, damaged or broken due to misuse or due to repairs
or servicing by other than the Waring Service Center or a Factory
Approved Service Center or due to abuse, misuse, overloading or
tampering; b) cover consequential damages of any kind.
The one-year warranty is applicable only to appliances used in the
United States and Canada; this supersedes all other express product
warranty or guarantee statements.
Warning: This warranty is VOID if appliance is used on Direct
Current (DC).

18
IMPORTANTES INSTRUCCIONES DE
DESEMBALAJE
PRECAUCIÓN: LA CUCHILLA REBANADORA ES MUY FILOSA.
Para evitar las heridas, desembale el aparato cuidadosamente,
siguiendo las instrucciones a continuación:
1. Ponga la caja sobre una superficie espaciosa, plana y segura.
2. Saque el libro de instrucciones y otros folletos.
3. Coloque la caja de lado, y luego voltéela de modo que el lado
abierto mire hacia el piso.
4. Levante la caja y quite los insertos de esp uma de polies tireno.
5. Quite la bolsa protectora.
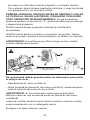
6. Para levantar y mover la unidad, doble las rodillas para evitar
lesiones en la espalda y coloque una mano debajo del bloque-
motor y la otra debajo del carro/bandeja móvil.
7. Tenga mucho cuidado al manipular la cuchilla. Le sugerimos
que conserve la caja y el material de embalaje en caso de que
sea necesario enviar el aparato en el futuro.
Mantenga las bolsas de plástico fuera del alcance de los niños.
INSTRUCCIONES DE EMPAQUE
1. Ponga el aparato sobre una superficie espaciosa, plana y
segura.
2. Coloque el aparato en la bolsa de plástico.
3. Coloque un inserto de espuma de poliestireno en cada lado del
aparato.
4. Coloque el aparato, junto con los insertos, en la caja.
5. Vuelva a colocar el inserto de cartón encima del aparato, ponga
el manual de instrucciones y otros folletos en la caja y cierre la
misma.
ENTREGA/TRANSPORTE, EMBALAJE Y
ALMACENAJE
TRANSPORTE – MANIPULACIÓN – ALMACENAJE
El aparato viene en una caja de cartón con insertos de
espuma de poliestireno.

19
El embalaje es adecuado para transportar el aparato por todos los
medios de transporte.
Puede apilar hasta tres cartones encima uno de otro.
– La caja y material embalaje deben mantenerse secos.
– La caja debe ser manejada por 2 personas.
– Cuando la caja se encuentre en una paleta, manipúlela solamente
con elevadores eléctricos.
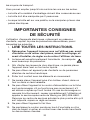
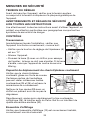
MEDIDAS DE SEGURIDAD
IMPORTANTES
Al usar aparatos eléctricos, especialmente en presencia de niños,
siempre debe tomar precauciones básicas de seguridad, entre ellas
las siguientes:
1. LEA TODAS LAS INSTRUCCIONES.
2. D esenchufe el aparato cuando no está en uso, antes de
instalar/sacar piezas, antes de limpiar el aparato, y antes
de instalar, ajustar o sacar el afilador de cuchilla.
3. La cuchilla es extremadamente filosa; manipúlela con sumo
cuidado.
4. Para reducir el riesgo de descarga eléctrica, no coloque la base
del aparato en agua ni en ningún otro líquido.
5. No utilice el aparato cerca de niños o personas con ciertas
discapacidades.
6. Evite el contacto con las piezas móviles.
7. No coloque el aparato sobre o cerca de una hornilla caliente,
ni adentro de un horno caliente; tampoco lo ponga en el
lavavajillas.
8. No utilice este aparato si el cable o el enchufe están dañados,
después de un mal funcionamiento, después de que se haya
caído o si está dañado;
En caso de daño o mal funcionamiento, interrumpa
inmediatamente el uso y llame al 1-800-269-6640. Regrese el
aparato al centro de servicio autorizado más cercano para su
revisión, reparación o ajuste.
9. No lo utilice en exteriores.
10. No permita que el cable cuelgue del borde de la encimera o
de la mesa, ni que tenga contacto con superficies calientes o
tajantes.
11. Ponga el aparato sobre una superficie llana y segura.

20
No coloque el aparato cerca del borde de una mesa o
encimera, de donde pueda ser empujado o caerse.
12. Nunca enchufe el aparato en un lugar donde pueda quedar
sumergido en agua.
13. M ANTENGA LOS DEDOS ALEJADOS DE LA CUCHILLA
DURANTE EL FUNCIONAMIENTO.
14. El uso de accesorios no recomendados o vendidos por el
fabricante presenta un riesgo de incendio, descarga eléctrica o
heridas.
15. U se el aparato para cortar SOLAMENTE los alimentos
mencionados. No intente rebanar alimentos congelados o
materiales como huesos, cartón, plástico, etc.
16. P ARA REDUCIR EL RIESGO DE DESCARGA ELÉCTRICA,
NO COLOQUE EL APARATO EN AGUA NI EN NINGÚN OTRO
LÍQUIDO.
17. La cuchilla de la rebanadora/cortadora de fiambres Waring®
es muy filosa. Para evitar las heridas, nunca empuje los
alimentos con la mano. No utilice el aparato a menos que esté
completamente y correctamente ensamblado; nunca lo use sin
el carro/bandeja móvil ni el empujador.
18. ADVERTENCIA: los niños o las personas que carezcan de la
experiencia o de los conocimientos necesarios para manipular
el aparato, o aquellas cuyas capacidades físicas, sensoriales
o mentales estén limitadas, no deben utilizar este aparato
a menos que hayan recibido la formación adecuada para
hacerlo de manera segura. Se aconseja vigilar a los niños para
asegurarse de que no jueguen con el aparato. El uso de este
aparato debe realizarse con el máximo cuidado, ya que se trata
de una máquina de corte.
19. Siempre use el aparato completamente ensamblado, con
el carro/bandeja móvil, el empujador y todas las piezas de
protección en su puesto.
20. El uso de repuestos no recomendados o vendidos por el
fabricante presenta un riesgo de incendio, descarga eléctrica o
heridas.
21. No agarre las rebanadas/lonchas con la mano.
22. No permita que los niños jueguen con este aparato.
23. No use el aparato si las piezas de protección no están en su
puesto.
24. Waring declina toda responsabilidad en caso de uso indebido
del aparato. No utilice el aparato para cortar alimentos
congelados, carne con hueso o cualquier cosa que no sean
La page est en cours de chargement...
La page est en cours de chargement...
La page est en cours de chargement...
La page est en cours de chargement...
La page est en cours de chargement...
La page est en cours de chargement...
La page est en cours de chargement...
La page est en cours de chargement...
La page est en cours de chargement...
La page est en cours de chargement...
La page est en cours de chargement...
La page est en cours de chargement...
La page est en cours de chargement...
La page est en cours de chargement...
La page est en cours de chargement...
La page est en cours de chargement...
La page est en cours de chargement...
La page est en cours de chargement...
La page est en cours de chargement...
La page est en cours de chargement...
La page est en cours de chargement...
La page est en cours de chargement...
La page est en cours de chargement...
La page est en cours de chargement...
La page est en cours de chargement...
La page est en cours de chargement...
La page est en cours de chargement...
La page est en cours de chargement...
La page est en cours de chargement...
La page est en cours de chargement...
La page est en cours de chargement...
La page est en cours de chargement...
-
 1
1
-
 2
2
-
 3
3
-
 4
4
-
 5
5
-
 6
6
-
 7
7
-
 8
8
-
 9
9
-
 10
10
-
 11
11
-
 12
12
-
 13
13
-
 14
14
-
 15
15
-
 16
16
-
 17
17
-
 18
18
-
 19
19
-
 20
20
-
 21
21
-
 22
22
-
 23
23
-
 24
24
-
 25
25
-
 26
26
-
 27
27
-
 28
28
-
 29
29
-
 30
30
-
 31
31
-
 32
32
-
 33
33
-
 34
34
-
 35
35
-
 36
36
-
 37
37
-
 38
38
-
 39
39
-
 40
40
-
 41
41
-
 42
42
-
 43
43
-
 44
44
-
 45
45
-
 46
46
-
 47
47
-
 48
48
-
 49
49
-
 50
50
-
 51
51
-
 52
52


Waring Commercial WCS220 Manuel utilisateur
- Catégorie
- Trancheuses
- Taper
- Manuel utilisateur
dans d''autres langues
Documents connexes
Autres documents
-
 Centerline EDGE Slicer Manuel utilisateur
-
Vollrath Slicer, Electric, Automatic Manuel utilisateur
-
-
-
Berkel B12A-SLC Le manuel du propriétaire
-
Berkel B9-SLC, B10-SLC, B12-SLC, B14-SLC Le manuel du propriétaire
-
Hobart EDGE13 Manuel utilisateur
-
Berkel RSEGL0U00000W Le manuel du propriétaire
-
H.Koenig MSX250 lame 25 cm Le manuel du propriétaire
-
