
IC Recorder
ICD-PX370
Operating Instructions
GB
FR
© 2016 Sony Corporation Printed in China
4-595-546-11(1)
ICD-PX370
4-595-546-11(1)
Owner’s Record
The model number is located at the rear panel and the serial number is
located at the rear panel. Record these numbers in the space provided
below. Refer to these numbers whenever you call upon your Sony dealer
regarding this product.
Model No. _________________________________
Serial No. __________________________________
You are cautioned that any changes or modifications not expressly approved
in this manual could void your authority to operate this equipment.
Refer to the Help Guide
This is the Operating Instructions, which provides you with instructions on
the basic operations of the IC recorder.
The Help Guide is an online manual.
Refer to the Help Guide when you would like to know further details,
operations and possible solutions when a problem occurs.
http://rd1.sony.net/help/icd/p37/h_uc/
Check the supplied items
•IC Recorder (1)
•LR03 (size AAA) alkaline batteries (2)
•Operating Instructions (this sheet)
•Warranty card
•Application Software, Sound Organizer 2 (Installer file stored in the built-in
memory so that you can install it to your computer.)
Optional accessories
Electret condenser microphone ECM-CS3, ECM-TL3
Note
Depending on the country or region, some of the models or optional accessories
are not available.
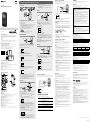
Parts and controls
Built-in microphone (monaural)
(headphones) jack
Operation indicator
Display window
REC/PAUSE (record/pause) button
STOP button
Control button ( DPC (Digital Pitch Control),
A-B (repeat A-B)/
(review/fast backward), (cue/fast forward))
(play/enter) button*
BACK/ HOME button ( : press, : press and hold)
T-MARK (track mark) button
OPTION button
Built-in speaker
Strap hole (No strap is supplied with your IC recorder.)
USB connector compartment
(microphone) (PLUG IN POWER) jack*
VOL –/+ (volume –/+) button*
Slot cover
microSD card slot (The card slot is located under the cover.)
USB slide lever
HOLD•POWERswitch
Battery compartment
* The (play/enter) button, VOL –/+ (volume –/+) button, and (microphone) (PLUG IN
POWER) jack have a tactile dot. Use the tactile dot as a reference when operating the IC
recorder.
Let’s try out your new IC recorder
Power on
Slide and lift the battery compartment lid, insert LR03 (size
AAA) alkaline batteries with the correct polarity, and close the
lid.
Turn the power on.
To turn the power on
SlideandholdtheHOLD•POWERswitchinthedirectionof“POWER”
until the window display appears.
Toturnthepoweroff,slidetheHOLD•POWERswitchto“POWER”
andholdituntil“PowerOff”appearsonthedisplaywindow.
To prevent unintentional operations (HOLD)
SlidetheHOLD•POWERswitchinthedirectionof“HOLD.”
¼ To release the IC recorder from the HOLD status, slide the
HOLD•POWERswitchtowardsthecenter.
Initial settings
Select
(/)
Enter
WhenyouturnonyourICrecorderforthefirsttime,the“Configure
InitialSettings”screenappearsonthedisplaywindow.Youcanthen
select the display language, set the clock, and turn on/off the beep
sound.
Select “Yes” to start the initial settings.
Select the display language.
You can select from the following languages:
English*, Español (Spanish), Français (French)
* Default setting
Set the current year, month, day, hour, and minute.
¼ To go back to the previous clock setting item, press BACK/HOME.
Select “Next.”
Select “ON” or “OFF” to turn on or off the beep sound.
When the initial settings finish, the completion message and then
the HOME menu screen appears.
¼
•You can change any of the initial settings at any time later. For detailed
instructions, refer to the Help Guide.
•When you re-insert batteries, or when you replace batteries with new ones,
the clock setting display appears, and the approximate date and time
when you last operated the IC recorder before removing the batteries is
displayed. Set the clock to the current time again.
•Tocheckthecurrenttimeaftertheinitialsettings,slidetheHOLD•POWER
switchinthedirectionof“HOLD.”
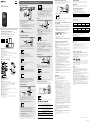
Record
Built-in microphone
STOP
REC/PAUSE
Select
(/)
Enter
¼
•BeforeyoustartusingtheICrecorder,makesurethattheHOLD•POWER
switch is at the center dot position.
•Youcanselectarecordingsceneforeachsituationbyselecting“Scene
Select”intheOPTIONmenu.
Recordedaudiofilesarestoredin“FOLDER01”under“ RecordedFiles”
by default.
Select “ Record” from the HOME menu.
The recording standby screen appears on the display window.
Select the folder you want to store the recorded files.
Tostoretheaudiofilesinafolderotherthan“FOLDER01,”create
a new folder and change the file storage destination folder to the
new folder. For detailed instructions, refer to the Help Guide.
Turn the IC recorder so that its built-in microphone points in
the direction of the recording source.
Press REC/PAUSE.
Recordingstarts,“REC”appearsonthedisplay,andtheoperation
indicator lights in red.
Pressing and holding the REC/PAUSE does not start recording.
Doing so makes your IC recorder pause for recording.
During recording, the recording level guide () is displayed.
Adjust the orientation of the built-in microphone, the distance from
the sound source, or the sensitivity setting of the microphone so
that the input level indicated by stays at 3/6 or 4/6, which fits
within the optimum range, as illustrated above.
Press STOP to stop recording.
“Saving...”appearsonthedisplay,andthenthedisplayreturnsto
the record standby screen.
After you stopped recording, you can press to play the file you
have just recorded.
Listen
Select
(
//
/
)
Enter
VOL –/+
(volume –/+)
Recordedaudiofilesarestoredin“FOLDER01”under“ RecordedFiles”
by default.
Select “ Recorded Files” from the HOME menu.
Select “Folders” - “Built-In Memory” - “FOLDER01,” and then
press .
To listen to recorded audio files stored on a microSD card, select
“Folders”-“SDCard.”
Select your desired file.
Playback starts.
Press STOP to stop playback.
¼
•Press VOL -/+ to adjust the volume.
•The built-in speaker is provided mainly for checking recorded audio files.
If you find the volume not loud enough or have difficulty in understanding
what you hear, use headphones (not supplied).
•Whenyouselect“
RecordedFiles,”thefilesearchcategoriesofthe
stored files appear on the display window. You can select one of the search
categoriesfrom“LatestRecording,”“SearchbyRECDate,”“SearchbyREC
Scene,”or“Folders.”
To add a track mark
You can add a track mark at a point at which you want to divide a file
later or locate during playback. You can add a maximum of 98 track
marks to each file.
You can also add track marks during a recording.
Delete
OPTION
Select
(/)
Enter
Note
Once a file is deleted, you cannot restore it.
Select the file you want to delete from the list of recorded files
or play back the file you want to delete.
Select “Delete a File” from the OPTION menu.
“Delete?”appearsandtheselectedfilestartsplayingforyour
confirmation.
Select “Yes.”
“PleaseWait”appearsandstaysuntiltheselectedfileisdeleted.
Using the OPTION menu
You can use the OPTION menu to perform a variety of functions, including
changing the settings of your IC recorder.
The available items differ depending on the situation.
OPTION
Select
(/)
Enter
Select your desired function from the HOME menu, and then press
OPTION.
Select the menu item for which you want to change the setting.
Select your desired setting option.
Copying files from your IC recorder to a
computer
You can copy the files and folders from your IC recorder to a computer to
store them.
Slide the USB slide lever in the direction of the arrow, and insert
the USB connector into the USB port of a running computer.
Drag and drop the files or folders you want to copy from “IC
RECORDER” or “MEMORY CARD” to the local disk on the computer.
To copy a file or folder (Drag and drop)
1 Click and hold,
2 drag,
3 and then drop.
IC RECORDER or
MEMORY CARD
Your computer
Make sure that “Accessing” is not displayed on the display
window of your IC recorder, and then disconnect the IC recorder
from the computer.
Installing Sound Organizer 2
Install Sound Organizer on your computer.
Sound Organizer allows you to exchange files between your IC recorder and
your computer.
Songs imported from music CDs and other media, MP3 and other audio
files imported to a computer can also be played and transferred to the IC
recorder.
Notes
•Sound Organizer is compatible with Windows computers only. Itis not
compatible with Mac.
•This IC recorder is compatible with Sound Organizer 2 only.
•If you format the built-in memory, all data stored there will be deleted. (The
Sound Organizer software will also be deleted.)
¼ When installing Sound Organizer, log in to an account with administrator
privileges.
Slide the USB slide lever in the direction of the arrow, and insert
the USB connector into the USB port of a running computer.
Make sure the IC recorder is successfully detected by the
computer.
“Connecting”appearsandstaysontheICrecorder'sdisplaywindow
while the IC recorder is connected to the computer.
Go to the [Start] menu, click [Computer], and then double-click [IC
RECORDER] - [FOR WINDOWS].
Double-click [SoundOrganizer_V2001] (or [SoundOrganizer_V2001.
exe]).
Followthecomputer'son-screeninstructions.
Make sure that you accept the terms of the license agreement,
select [I accept the terms in the license agreement], and then click
[Next].
When the [Setup Type] window appears, select [Standard] or
[Custom], and then click [Next].
Follow the instructions on the screen and set the installation settings
when you select [Custom].
When the [Ready to Install the Program] window appears, click
[Install].
The installation starts.
When the [Sound Organizer has been installed successfully.]
window appears, check [Launch Sound Organizer 2 Now], and
then click [Finish].
Note
You may need to restart your computer after installing Sound Organizer.
Precautions
On power
DC 3.0 V: Use two LR03 (size AAA) alkaline batteries
DC 2.4 V: Use two NH-AAA rechargeable batteries
DC 5.0 V: when using USB AC adaptor
Rated current consumption: 500 mA
On safety
Do not operate the unit while driving, cycling or operating any motorized
vehicle.
On handling
•Do not leave the unit in a location near heat sources, or in a place subject
to direct sunlight, excessive dust or mechanical shock.
•Should any solid object or liquid fall into the unit, remove the batteries
and have the unit checked by qualified personnel before operating it any
further.
•When using your IC recorder, remember to follow the precautions below
in order to avoid warping the cabinet or causing the IC recorder to
malfunction.
– Do not sit down with the IC recorder in your back pocket.
– Do not put your IC recorder into a bag with the headphones/earphones
cord wrapped around it and subject the bag to strong impact.
•Be careful not to allow water to splash on the unit. The unit is not
waterproof. In particular, be careful in the following situations.
– When you have the unit in your pocket and go to the bathroom, etc.
When you bend down, the unit may drop into the water and may get
wet.
– When you use the unit in an environment where the unit is exposed to
rain, snow, or humidity.
– In circumstances where you get sweaty. If you touch the unit with wet
hands or if you put the unit in the pocket of sweaty clothes, the unit may
get wet.
•Listening with this unit at high volume may affect your hearing. For traffic
safety, do not use this unit while driving or cycling.
•You may feel pain in your ears if you use the headphones when the
ambient air is very dry.
This is not because of a malfunction of the headphones, but because of
static electricity accumulated in your body. You can reduce static electricity
by wearing non-synthetic clothes that prevent the emergence of static
electricity.
On noise
•Noise may be heard when the unit is placed near an AC power source, a
fluorescent lamp or a mobile phone during recording or playback.
•Noise may be recorded when an object, such as your finger, etc., rubs or
scratches the unit during recording.
On maintenance
To clean the exterior, use a soft cloth slightly moistened in water. Then use a
soft dry cloth to wipe the exterior. Do not use alcohol, benzine or thinner.
If you have any questions or problems concerning your unit, please consult
your nearest Sony dealer.
WARNING
Do not expose the batteries (battery pack or batteries installed) to excessive
heat such as sunshine, fire or the like for a long time.
CAUTION
Risk of explosion if battery is replaced by an incorrect type. Dispose of used
batteries according to the instructions.
FOR UNITED STATES CUSTOMERS. NOT APPLICABLE IN CANADA,
INCLUDING IN THE PROVINCE OF QUEBEC.
POUR LES CONSOMMATEURS AUX ÉTATS-UNIS. NON APPLICABLE AU
CANADA, Y COMPRIS LA PROVINCE DE QUÉBEC.
INFORMATION
This equipment has been tested and found to comply with the limits
for a Class B digital device, pursuant to Part 15 of the FCC Rules. These
limits are designed to provide reasonable protection against harmful
interference in a residential installation.
This equipment generates, uses and can radiate radio frequency energy
and, if not installed and used in accordance with the instructions, may
cause harmful interference to radio communications.
However, there is no guarantee that interference will not occur in a
particular installation. If this equipment does cause harmful interference
to radio or television reception, which can be determined by turning
the equipment off and on, the user is encouraged to try to correct the
interference by one or more of the following measures:
– Reorient or relocate the receiving antenna.
– Increase the separation between the equipment and receiver.
– Connect the equipment into an outlet on a circuit different from that to
which the receiver is connected.
– Consult the dealer or an experienced radio/TV technician for help.
If you have any questions about this product, you may call: Sony
Customer Information Service Center 1-800-222-7669 or http://www.
sony.com/
Declaration of Conformity
Trade Name : SONY
Model : ICD-PX370
Responsible Party : Sony Electronics Inc.
Address : 16535 Via Esprillo, San Diego, CA 92127 USA
Telephone Number : 858-942-2230
This device complies with part 15 of the FCC Rules. Operation is subject
to the following two conditions: (1) This device may not cause harmful
interference, and (2) this device must accept any interference received,
including interference that may cause undesired operation.
Specifications
Capacity (User available capacity*
1
*
2
)
4 GB (approx. 3.20 GB = 3,435,973,837 Byte)
Maximum recording time (Built-in memory)
The maximum recording time of all the folders is as follows.
MP3 192 kbps*
3
39 hours 45 minutes
MP3 128 kbps 59 hours 35 minutes
MP3 48 kbps (MONO) 159 hours
Note
When you are going to record continuously for a long time, you may have to
replace the batteries with new ones in the middle of recording. For details on the
battery life, see Battery Life.
The maximum recording time in this topic is for your reference only.
Battery Life
When using Sony LR03 (SG) (size AAA) alkaline batteries (JEITA)*
4
*
5
REC Mode Recording
Playback with the
built-in speaker*
6
Playback with the
headphones
MP3 192 kbps Approx. 55 hours Approx. 18 hours Approx. 43 hours
MP3 128 kbps Approx. 57 hours Approx. 18 hours Approx. 45 hours
When using NH-AAA rechargeable batteries (JEITA)*
4
*
5
REC Mode Recording
Playback with the
built-in speaker*
6
Playback with the
headphones
MP3 192 kbps Approx. 40 hours Approx. 14 hours Approx. 34 hours
MP3 128 bps Approx. 41 hours Approx. 14 hours Approx. 34 hours
Dimensions (w/h/d) (not incl. projecting parts and controls) (JEITA)*
4
Approx. 1.51 inches (38.3 mm) x 4.50 inches (114.2 mm) x 0.76 inches (19.3 mm)
Mass (JEITA)*
4
Approx. 2.7 oz (74 g) (including two LR03 (size AAA) alkaline batteries)
Temperature/Humidity
Operating temperature 41 °F - 95 °F (5°C - 35°C)
Operating humidity 25% - 75%
Storage temperature 14 °F - 113 °F (-10°C - +45°C)
Storage humidity 25% - 75%
Compatible memory cards
microSDHC cards from 4 GB to 32 GB
Note
microSDXC cards are not compatible with your IC recorder.
*
1
A small amount of the internal memory is used for file management and therefore not
available for user storage.
*
2
When the built-in memory is formatted with the IC recorder.
*
3
Default settings for the recording scenes.
*
4
Measured value by the standard of JEITA (Japan Electronics and Information Technology
Industries Association)
*
5
The battery life may shorten depending on how you operate the IC recorder.
*
6
When playing back music with the built-in speaker with the volume level set to 27.
Trademarks
•Microsoft, Windows, Windows Vista and Windows Media are registered
trademarks or trademarks of Microsoft Corporation in the United States
and/or other countries.
•Mac OS is a trademark of Apple Inc., registered in the USA and other
countries.
•MPEG Layer-3 audio coding technology and patents licensed from
Fraunhofer IIS and Thomson.
•microSD, microSDHC and microSDXC logos are trademarks of SD-3C, LLC.
All other trademarks and registered trademarks are trademarks or registered
trademarksoftheirrespectiveholders.Furthermore,“™”and“®”arenot
mentioned in each in this manual.
The“SoundOrganizer2”usessoftwaremodulesasshownbelow:
Windows Media Format Runtime
License
Notes on the License
This IC recorder comes with software that are used based on licensing
agreements with the owners of that software.
Based on requests by the owners of copyright of these software
applications, we have an obligation to inform you of the following. Please
read the following sections.
Licenses (in English) are recorded in the internal memory of your IC recorder.
Establish a Mass Storage connection between the IC recorder and a
computertoreadlicensesinthe“LICENSE”folder.
On GNU GPL/LGPL applied software
The software that is eligible for the following GNU General Public License
(hereinafterreferredtoas“GPL”)orGNULesserGeneralPublicLicense
(hereinafterreferredtoas“LGPL”)areincludedintheICrecorder.
This informs you that you have a right to have access to, modify, and
redistribute source code for these software programs under the conditions
of the supplied GPL/LGPL.
Source code is provided on the web. Use the following URL to download it.
http://www.sony.net/Products/Linux/
We would prefer you do not contact us about the contents of source code.
Licenses (in English) are recorded in the internal memory of your IC recorder.
Establish a Mass Storage connection between the IC recorder and a
computertoreadlicensesinthe“LICENSE”folder.
Using the HOME menu
You can use the HOME menu for a variety of operations, including locating
and playing a recorded file and changing the settings of your IC recorder.
BACK/ HOME
Select
(
/
)
Enter
Press and hold BACK/HOME.
The HOME menu screen appears.
The HOME menu items are aligned in the following sequence.
Recorded
Files
Record Settings Back to
XX*
Music
*Thefunctionyouarecurrentlyusingisdisplayedin“XX.”
Select your desired function from the following:
Music
You can select and play one of the files you have
imported from a computer.
Tolocateamusicfile,select“AllSongs,”“Albums,”
“Artists,”or“Folders.”
Recorded Files
You can select and play one of the files you have
recorded with your IC recorder.
Tolocatearecordedfile,select“LatestRecording,”
“SearchbyRECDate,”“SearchbyRECScene,”or
“Folders.”
Record
You can display the record standby screen, and then
start recording.
Settings
You can display the Settings menu screen and
change various settings on the IC recorder.
Back to XX*
You can go back to the screen that was displayed
before the HOME menu screen.
* The function you are currently using is displayed
in“XX.”
¼ Press STOP to return to the screen displayed before you entered the HOME
menu.

ICD-PX370
GB
FR
© 2016 Sony Corporation Printed in China
Enregistreur IC
Mode d’emploi
ICD-PX370
4-595-546-11(1)
Consultation du Guide d’aide
CeModed'emploiprésentedesinstructionsrelativesaufonctionnement
généraldel’enregistreurIC.
LeGuided’aideestunmanuelenligne.
Reportez-vousauGuided’aidepourdeplusamplesinformations,le
fonctionnement et les solutions possibles en cas de problèmes.
http://rd1.sony.net/help/icd/p37/h_uc/
Vérification des éléments fournis
•Enregistreur IC (1)
•Piles alcalines LR03 (AAA) (2)
•Moded’emploi(cedocument)
•Carte de garantie
•Application,SoundOrganizer2(lefichierd’installationeststockédansla
mémoireinterneafinquevouspuissiezl’installersurvotreordinateur.)
Accessoires en option
Microphone à condensateur Electret ECM-CS3, ECM-TL3
Remarque
Selonlespaysoulesrégions,certainsmodèlesouaccessoiresenoptionnesont
pas disponibles.
Éléments et commandes
Microphoneintégré(monophonique)
Prise (casque)
Indicateur de fonctionnement
Écran
Touche REC/PAUSE (enregistrement/pause)
Touche STOP
Touche de commande ( DPC (Digital Pitch Control),
A-B(Répétition
A-B)/(révision/retourrapide), (calage/avance rapide))
Touche (lecture/entrée)*
Touche
BACK/ HOME ( : appuyez, : appuyez de manière
prolongée)
Touche T-MARK (repère de piste)
Touche OPTION
Haut-parleurintégré
Orificedeladragonne(dragonnenonfournieavecl'enregistreurIC)
Compartiment du connecteur USB
Prise (microphone) (PLUG IN POWER)*
Touche VOL –/+ (volume –/+)*
Protection du logement
Logement de carte microSD (le logement de carte se trouve derrière la
protection.)
Levier coulissant USB
CommutateurHOLD•POWER
Compartiment de la pile
* La touche (lecture/entrée),latoucheVOL–/+(volume–/+)etlaprise (microphone)
(PLUGINPOWER)possèdentunrepèretactile.Utilisez-lecommepointderéférencelorsdu
fonctionnementdel'enregistreurIC.
Essai de votre nouvel enregistreur IC
Mise sous tension
Faites glisser et soulevez le couvercle du compartiment des
piles, installez des piles alcalines LR03 (AAA) en respectant la
polarité, puis refermez le couvercle.
Mettez l'appareil sous tension.
Mise sous tension
FaitesglisserdemanièreprolongéelecommutateurHOLD•POWER
vers«POWER»jusqu’àcequel'écranapparaisse.
Pourmettrel'appareilhorstension,faitesglisserlecommutateur
HOLD•POWERvers«POWER»demanièreprolongéejusqu'àceque
«PowerOff»s'afficheàl'écran.
Prévention des opérations involontaires (HOLD)
FaitesglisserlecommutateurHOLD•POWERvers«HOLD».
¼ Pourlibérerl'enregistreurICdel'étatHOLD,faitesglisserle
commutateurHOLD•POWERverslemilieu.
Paramètres initiaux
Sélection
(/)
Entrée
Àlapremièremisesoustensiondel'enregistreurIC,lemessage
«ConfigureInitialSettings»s'afficheàl'écran.Vouspouvezalors
sélectionnerlalangueaffichée,réglerl'horloge,etactiveroudésactiver
le bip.
Sélectionnez «Yes» pour configurer les paramètres initiaux.
Sélectionnez la langue affichée.
Vous pouvez choisir entre les langues suivantes:
English* (anglais), Español (espagnol), Français
*Paramètrepardéfaut
Configurez l'année, le mois, le jour et l'heure (heures et
minutes) en cours.
¼ Pourrevenirauparamètredeconfigurationd'horlogeprécédent,
appuyez sur BACK/HOME.
Sélectionnez «Next».
Sélectionnez «ON» ou «OFF» pour activer ou désactiver le
bip.
Unefoislaconfigurationdesparamètresinitiauxterminée,un
messageindiquantlafindelaconfigurations'affichepuisl'écrande
menuHOMEs'affiche.
¼
•Vouspouvezmodifiern'importequelparamètreinitialultérieurement.Pour
deplusamplesinformations,reportez-vousauGuided’aide.
•Lorsdelaremiseenplaceouleremplacementdespiles,l'écrandu
réglaged'horloges'afficheetl'heureetladateapproximativesdudernier
fonctionnementdel'enregistreurICavantderetirerlespiless'affichent.
Réglezl'horlogeunenouvellefois.
•Pourvérifierl'heureactuelleaprèsleréglageinitial,faitesglisserle
commutateurHOLD•POWERvers«HOLD».
Enregistrement
Microphoneintégré
STOP
REC/PAUSE
Sélection
(/)
Entrée
¼
•Avantdedémarrerl'enregistreurIC,assurez-vousquelecommutateur
HOLD•POWERestalignésurlerepèredumilieu.
•Vouspouvezsélectionnerunescèned'enregistrementpourchaque
situationensélectionnant«SceneSelect»danslemenuOPTION.
Lesfichiersaudioenregistréspardéfautsontstockésdans«FOLDER01»
sous « Recorded Files».
Sélectionnez « Record» dans le menu HOME.
L'écrandemiseenveilledel'enregistrements'afficheàl'écran.
Sélectionnez le dossier dans lequel les fichiers enregistrés
seront stockés.
Pour stocker les fichiers audio dans un dossier autre que
«FOLDER01»,créezundossierpuismodifiezledossierde
destination de stockage de fichiers vers le dossier en question. Pour
plusd'informations,reportez-vousauGuided'aide.
Orientez l'enregistreur IC de manière à ce que son microphone
intégré soit dirigé vers la source d'enregistrement.
Appuyez sur REC/PAUSE.
L'enregistrementdémarre,«REC»s'afficheàl'écranetl'indicateur
defonctionnements'allumeenrouge.
L'appuidemanièreprolongéesurREC/PAUSEnedémarrepas
l'enregistrement.
Ilmetl'enregistrementdel'enregistreurICenpause.
Lorsdel’enregistrement,leguideduniveaud’enregistrement()
s’affiche.
Réglezl'orientationdumicrophoneintégré,ladistancedelasource
sonoreouleparamètredesensibilitédumicrophonepourquele
niveaud'enregistrementindiquépar se maintienne à 3/6 ou 4/6,
niveaucorrespondantàlaplageoptimale,commeillustréci-dessus.
Appuyez sur STOP pour arrêter l’enregistrement..
«Saving...»s'afficheàl'écran,puisl'écranrevientàl'écrandemise
enveilledel'enregistrement.
Aprèsl'arrêtdel'enregistrement,vouspouvezappuyersur pour
lirelefichierquevousvenezd'enregistrer.
Écoute
Sélection
(
//
/
)
Entrée
VOL –/+
(volume –/+)
Lesfichiersaudioenregistréspardéfautsontstockésdans«FOLDER01»
sous « Recorded Files».
Sélectionnez « Recorded Files» dans le menu HOME.
Sélectionnez «Folders» - «Built-In Memory» - «FOLDER01»,
puis appuyez sur .
Pourécouterdesfichiersaudioenregistrésquisontstockéssurune
cartemicroSD,sélectionnez«Folders» - «SD Card».
Sélectionnez le fichier de votre choix.
La lecture commence.
Appuyez sur STOP pour arrêter la lecture.
¼
•AppuyezsurVOL-/+pourréglerlevolume.
•Lehaut-parleurintégrésertprincipalementàvérifierlesfichierssonores
enregistrés.
Silevolumen'estpasassezélevéouquevousavezdesdifficultésà
comprendre, utilisez un casque (non fourni).
•Lorsquevoussélectionnez«
Recorded Files»,lescatégoriesderecherche
desfichiersstockéss'affichentàl'écran.Vouspouvezsélectionnerunedes
catégoriesderecherchedans«
Latest Recording», «Search by REC Date»,
«
Search by REC Scene» ou «Folders».
Ajout d'un repère de piste
Vouspouvezajouterunrepèredepisteàl'endroitoùvousvoulez
diviserunfichierultérieurementoupourlerechercherpendantla
lecture.Chaquefichierpeutcompterjusqu'à98repèresdepiste.
Vouspouvezégalementajouterdesrepèresdepistependant
l'enregistrement.
Suppression
OPTION
Sélection
(/)
Entrée
Remarque
Unefoisqu'unfichieraétésupprimé,ilestimpossibledelerécupérer.
Sélectionnez le fichier à supprimer sur la liste des fichiers
enregistrés ou lisez le fichier à supprimer.
Sélectionnez «Delete a File» dans le menu OPTION.
«Delete?»s'afficheetlefichierenquestionestlupour
confirmation.
Sélectionnez «Yes».
«PleaseWait»s'affichejusqu'àcequelefichiersélectionnéest
supprimé.
Utilisation du menu OPTION
VouspouvezutiliserlemenuOPTIONpourexécuterdenombreuses
fonctions,notammentlamodificationdesparamètresdel'enregistreurIC.
Les options disponibles varient selon la situation.
OPTION
Sélection
(/)
Entrée
Sélectionnez la fonction voulue dans le menu HOME, puis
appuyez sur OPTION.
Sélectionnez l'option de menu pour laquelle vous voulez modifier
le paramètre.
Sélectionnez l'option de paramètre voulue.
Copie de fichiers de l'enregistreur IC vers
un ordinateur
Vouspouvezcopierdesfichiersetdesdossiersdel'enregistreurICversun
ordinateur à des fins de stockage.
Faites glisser le levier coulissant USB vers le sens de la flèche,
et branchez le connecteur USB sur le port USB d’un ordinateur
allumé.
Faites glisser et déposez les fichiers ou dossiers à copier de
«IC RECORDER» ou «MEMORY CARD» vers le disque local de
l'ordinateur.
Copie d'un fichier ou dossier (glisser et déposer)
1 Cliquez de manière prolongée.
2 Faites glisser.
3 Déposez.
IC RECORDER ou
MEMORY CARD
Votre ordinateur
Assurez-vous que «Accessing» ne s'affiche pas à l'écran de
l'enregistreur IC, puis débranchez l'enregistreur IC de l'ordinateur.
Installation de Sound Organizer 2
InstallezSoundOrganizerdansl'ordinateur.
SoundOrganizerpermetl'échangedefichiersentrel'enregistreurICet
l'ordinateur.
Lesfichiersmusicauximportésd'unCDouautresupport,ainsiqueles
fichiersMP3etautresfichiersaudioimportésd'unordinateurpeuvent
égalementêtrelusettransférésdansl'enregistreurIC.
Remarques
•SoundOrganizern’estcompatiblequ’aveclesordinateursWindows.Iln’estpas
compatible avec les Mac.
•CetenregistreurICn'estcompatiblequ'avecSoundOrganizer2.
•Sivousformatezlamémoireinterne,touteslesdonnéesquiysontstockées
serontsupprimées.(LelogicielSoundOrganizerseraégalementsupprimé.)
¼ Lorsque vous installez Sound Organizer, connectez-vous avec un compte ayant
desdroitsd’administrateur.
Faites glisser le levier coulissant USB vers le sens de la flèche,
et branchez le connecteur USB sur le port USB d’un ordinateur
allumé.
Assurez-vous que l'enregistreur IC est correctement détecté par
l'ordinateur.
«Connecting»s'affichesurl'écrandel'enregistreurIClorsqu'ilest
connectéàl'ordinateur.
Choisissez le menu [Démarrer], cliquez sur [Ordinateur], puis
double-cliquez sur [IC RECORDER] - [FOR WINDOWS].
Double-cliquez sur [SoundOrganizer_V2001] (ou
[SoundOrganizer_V2001.exe]).
Suivezlesinstructionsaffichéesàl'écrandel'ordinateur.
Assurez-vous d'accepter les dispositions du contrat de licence,
sélectionnez [I accept the terms in the license agreement], puis
cliquez sur [Next].
Lorsque l'écran [Setup Type] s'affiche, sélectionnez [Standard] ou
[Custom], puis cliquez sur [Next].
Suivezlesinstructionsaffichéesetconfigurezlesparamètres
d'installationlorsquevoussélectionnez[Custom].
Lorsque l'écran [Ready to Install the Program] s'affiche, cliquez sur
[Install].
L'installationcommence.
Lorsque l'écran [Sound Organizer has been installed successfully.]
s'affiche, cochez la case [Launch Sound Organizer Now], puis
cliquez sur [Finish].
Remarque
Vousdevezredémarrerl'ordinateuraprèsl'installationdeSoundOrganizer.
Précautions
Alimentation
3,0 V CC : utilisez deux piles alcalines LR03 (AAA)
2,4 V CC : utilisez deux piles rechargeables NH-AAA
5,0VCC:avecl'adaptateursecteurUSB
Consommationélectriquenominale:500mA
Sécurité
Nefaitespasfonctionnerl’appareilenconduisantunevoiture,une
bicycletteoutoutautrevéhiculemotorisé.
Manipulation
•Nelaissezpasl’appareilàproximitéd’unesourcedechaleuroudansun
endroitexposéaurayonnementdirectdusoleil,àunepoussièreexcessive
ouàdeschocsmécaniques.
•Sidesélémentssolidesouliquidesvenaientàpénétreràl’intérieurde
l’appareil,retirezlespillesetfaites-levérifierparuntechnicienqualifié
avant de le remettre en service.
•LorsquevousutilisezvotreenregistreurIC,veillezàsuivrelesprécautions
décritesci-dessousafind’éviterdedéformerleboîtieroudeprovoquerun
dysfonctionnementdel’enregistreurIC.
– Nevousasseyezpasaprèsavoirplacél’enregistreurICdansvotrepoche
arrière.
– NeplacezpasvotreenregistreurICdansunsacaprèsavoirenrouléle
cordonducasque/desécouteursautouretnesoumettezpaslesacàdes
chocs violents.
•Veillezànepasrenverserd’eausurl’appareil.L’unitén’estpasétanche.
Soyez particulièrement prudent(e) dans les situations suivantes :
– Lorsquevousvousrendezdanslasalledebain,etc.,alorsquel’appareil
se trouve dans votre poche.
Sivousvousbaissez,l’appareilrisquedetomberdansl’eauetd’être
mouillé.
– Lorsquevousutilisezl’appareildansunenvironnementdanslequelilest
exposéàlapluie,àlaneigeouàl’humidité.
– Lorsquevoustranspirez.Sivoustouchezl’appareilalorsquevosmains
sontmouilléesousivousplacezcedernierdanslapoched’unvêtement
couvertdesueur,ilrisqued’êtremouillé.
•Vousrisquezdesubirdeslésionsauditivessivousutilisezcetappareilaun
volumeélevé.Pourdesraisonsdesécurité,n’utilisezpascetappareilen
voitureouàvélo.
•Vousrisquezd’avoirmalauxoreillessivousutilisezlecasquealorsque
l’airambiantesttrèssec.Celan’estpasliéàundysfonctionnementdes
écouteursmaisàl’accumulationd’électricitéstatiquedansvotrecorps.
Vouspouvezdiminuercetteélectricitéstatiqueenportantdesvêtements
nonsynthétiquesévitantsonapparition.
Bruits
•Desbruitsparasitespeuventsefaireentendresil’appareilestplacéà
proximitéd’unesourced’alimentationsecteur,d’unelampefluorescente
oud’untéléphonemobiledurantl’enregistrementoulalecture.
•Ilsepeutquedesbruitsparasitessoientenregistréssiquelquechose
comme votre doigt par exemple, touche ou frotte accidentellement
l’appareilpendantl’enregistrement.
Entretien
Pournettoyerl’extérieur,utilisezunchiffondouxlégèrementimprégné
d’eau.Utilisezensuiteunchiffondouxsecpouressuyerl’extérieur.N’utilisez
pasd’alcool,d’essenceoudediluant.
Si vous avez des questions ou des problèmes concernant cet appareil,
consultez votre revendeur Sony.
AVERTISSEMENT
Nepasexposerlespiles(packdepilesoupilesinstallées)àdefortes
chaleurs(rayonsdusoleil,feu,etc.)pendantunepériodeprolongée.
ATTENTION
Risqued’explosionencasderemplacementdelapileparuntypeincorrect.
Mettezlespilesusagéesaurebutconformémentauxinstructions.
Caractéristiques techniques
Capacité (capacité disponible à l'utilisateur*¹*²)
4 Go (environ 3,20 Go = 3 435 973 837 octets)
Durée maximale d'enregistrement (mémoire interne)
Laduréemaximaled'enregistrementdetouslesdossiersestlasuivante.
MP3 192 kbps*³ 39 heures et 45 minutes
MP3 128 kbps 59 heures et 35 minutes
MP3 48 kbps (MONO) 159 heures
Remarque
Encasd’enregistrementencontinupendantunelonguepériode,vousdevrez
peut-êtreremplacerlespilespardesneuvesaumilieudel'enregistrement.Pour
plusd'informationssurl'autonomiedespiles,reportez-vousàAutonomiedes
piles.
Letempsd’enregistrementmaximalindiquédanscetterubriqueestdonnéàtitre
d’indicationuniquement.
Autonomie de la batterie
Avec des piles alcalines Sony LR03 (SG) (AAA) (JEITA)*
4
*
5
REC Mode Enregistrement
Lecture avec
le haut-parleur
intégré*
6
Lecture avec le
casque
MP3 192 kbps Environ 55 heures Environ 18 heures Environ 43 heures
MP3 128 kbps Environ 57 heures Environ 18 heures Environ 45 heures
Avec des piles rechargeables NH-AAA (JEITA)*
4
*
5
REC Mode Enregistrement
Lecture avec
le haut-parleur
intégré*
6
Lecture avec le
casque
MP3 192 kbps Environ 40 heures Environ 14 heures Environ 34 heures
MP3 128 kbps Environ 41 heures Environ 14 heures Environ 34 heures
Dimensions (l/h/p) (parties saillantes et commandes non comprises)
(JEITA)*
4
Environ 1,51 po (38,3 mm) x 4,50 po (114,2 mm) x 0,76 po (19,3 mm)
Poids (JEITA)*
4
Environ 2,7 once (74 g) (avec deux piles alcalines LR03 (AAA))
Température/Taux d'humidité
Températuredefonctionnement 41 °F - 95 °F (5°C - 35°C)
Tauxd'humiditédefonctionnement 25% - 75%
Températuredestockage 14 °F - 113 °F (-10°C - +45°C)
Tauxd'humiditédestockage 25% - 75%
Cartes mémoire compatibles
Carte microSDHC de 4Go à 32Go
Remarque
LescartesmicroSDXCnesontpascompatiblesavecl'enregistreurIC.
*¹Unepetitequantitédelamémoireinterneestréservéeàlagestiondesfichiersetn’estdonc
pas disponible pour le stockage.
*²Lorsquelamémoireinterneestformatéeàl’aidel’enregistreurIC.
*³Paramètrespardéfautpourlesscènesd'enregistrement.
*⁴Valeurmesuréed’aprèslanormeJEITA(JapanElectronicsandInformationTechnology
Industries Association)
*⁵L'autonomiedelabatteriepeutêtreréduiteselonlamanièredontvousfaitesfonctionner
l'enregistreurIC.
*⁶Lecturedemusiquesaveclehaut-parleurintégréetunniveaudevolumeréglésur27.
Marques commerciales
•Microsoft, Windows, Windows Vista et Windows Media marques
commercialesoudesmarquesdéposéesdeMicrosoftCorporationaux
États-Uniset/oudansd’autrespaysourégions.
•MacOSestunemarquecommercialed’AppleInc.,déposéeauxÉtats-Unis
etdansd’autrespays.
•Technologied’encodageaudioMPEGLayer-3etbrevetssouslicencede
Fraunhofer IIS et Thomson.
•Les logos microSD, microSDHC et microSDXC sont des marques
commerciales de SD-3C, LLC.
Lesautresmarquescommercialesetmarquesdéposéesapparaissantdans
leprésentdocumentsontdesmarquescommercialesoudéposéesdeleurs
propriétairesrespectifs.Enoutre,«™»et«®»nesontpasmentionnés
systématiquementdansceguide.
Le«SoundOrganizer2»utilisedesmoduleslogicielsindiquésci-dessous:
Windows Media Format Runtime
Licence
Remarques sur la Licence
CetenregistreurICestdotédelogicielsquisontutiliséssurlabasede
contratsdelicenceaveclespropriétairesdeceslogiciels.
Àlademandedesdétenteursdesdroitsd’auteurdecesapplications
logicielles,noussommesdansl’obligationdevouscommuniquerles
informations suivantes.
Veuillez lire les sections suivantes.
Leslicences(enanglais)sontenregistréesdanslamémoireinternedevotre
enregistreur IC. Établissez une connexion.
Stockagedemasseentrel’enregistreurICetunordinateurpourlireles
licences dans le dossier «LICENSE».
À propos des logiciels sous licence GNU GPL/LGPL
Leslogicielssusceptiblesd’êtrecouvertsparlaGNUGeneralPublicLicense
(ci-aprèsdésignéepar«GPL»)oulaGNULesserGeneralPublicLicense(ci-
aprèsdésignéepar«LGPL»)sontinclusdansl’enregistreurIC.
Cettenoticevousinformequevousavezundroitd’accès,demodification
et de redistribution du code source pour ces programmes logiciels
conformémentauxconditionsdelalicenceGPL/LGPLfournie.
VoustrouverezlecodesourcesurInternet.Utilisezl’URLsuivantepourle
télécharger.http://www.sony.net/Products/Linux/
Nouspréférerionsquevousnenouscontactiezpasàproposducontenudu
code source.
Leslicences(enanglais)sontenregistréesdanslamémoireinternede
votre enregistreur IC. Établissez une connexion Stockage de masse entre
l’enregistreurICetunordinateurpourlireleslicencesdansledossier
«LICENSE».
Utilisation du menu HOME
Vous pouvez utiliser le menu HOME pour effectuer de nombreuses
opérations,notammentlarechercheetlalectured'unfichierenregistré,
ainsi que la modification des paramètres de votre enregistreur IC.
BACK/ HOME
Sélection
(
/
)
Entrée
Appuyez de manière prolongée sur BACK/HOME.
L'écrandumenuHOMEapparaît.
LesélémentsdumenuHOMEsontalignésselonl'ordresuivant.
Recorded
Files
Record Settings Back to
XX*
Music
*Lafonctionencoursd'utilisations'affichedans«XX».
Sélectionnez la fonction voulue parmi les suivantes:
Music
Permetdesélectionneretlireundesfichiers
importésd'unordinateur.
Pourrechercherunfichiermusical,sélectionnez«All
Songs», «Albums», «Artists» ou «Folders».
Recorded Files
Permetdesélectionneretlireundesfichiers
enregistrésavecvotreenregistreurIC.
Pourrechercherunfichierenregistré,sélectionnez
«Latest Recording», «Search by REC Date»,
«Search by REC Scene» ou «Folders».
Record
Permetd'afficherl'écrandemiseenveille
del'enregistrement,puisdecommencer
l'enregistrement.
Settings
Permetd'afficherl'écrandumenuSettingsetde
modifierplusieursréglagesdel'enregistreurIC.
Back to XX*
Permetdereveniràl'écranaffichéavantl'écrandu
menu HOME.
*Lafonctionencoursd'utilisations'affichedans
«XX».
¼ Appuyez sur STOPpourreveniràl'écranaffichéavantlemenuHOME.
-
 1
1
-
 2
2


dans d''autres langues
Documents connexes
-
Mode ICD-PX370 Manuel utilisateur
-
Sony ICD-PX470 Mode d'emploi
-
-
Sony ICD-UX560 Mode d'emploi
-
-
-
Sony ICD-PX440 Guide de démarrage rapide
-
Sony ICD-SX2000 Mode d'emploi
-
Sony ICD-AX412 Guide de démarrage rapide
-
Sony ICD-TX800 Mode d'emploi