U.S. Products King Cobra KC-500-S Mode d'emploi
- Catégorie
- Scrubber
- Taper
- Mode d'emploi

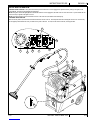
King Cobra® 500
INFORMATION AND
OPERATING
INSTRUCTIONS
INFORMACIÓN E
INSTRUCCIONES DE
USO
INFORMATION ET
DIRECTIVES
D’UTILISATION
MODELS: KC-500, KC-500-ADAF, KC-500-CSA, KC-500-B
KC-500-S
CAUTION: DO NOT OPERATE MACHINE UNTIL YOU HAVE READ
ALL SECTIONS OF THIS INSTRUCTION MANUAL
PRECAUCIÓN: NO UTILICE LA MÁQUINA HASTA HABER LEÍDO
TODAS LAS SECCIONES DE ESTE MANUAL DE INSTRUCCIONES
ATTENTION : N’UTILISEZ PAS LA MACHINE AVANT D’AVOIR LU
TOUTES LES SECTIONS DU PRÉSENT MANUEL
IMPROPER USE OF THE MACHINE WILL VOID THE WARRANTY
EL USO INCORRECTO DE LA MÁQUINA ANULARÁ LA GARANTÍA
UNE UTILISATION INCORRECTE DE LA MACHINE ANNULERA LA GARANTIE
5/10 revised 10/12 FORM NO. 56041964
A-English
B- Español
C-Français

A-2 KING COBRA® 500 - 56041964 5/10
INSTRUCTIONS FOR USEA - ENGLISH
TABLE OF CONTENTS
Page
Introduction ................................................................................... A-3
Parts and Service ........................................................................... A-3
Nameplate ...................................................................................... A-3
Uncrating the Machine .................................................................... A-3
Important Safety Instructions .......................................................... A-4
Grounding Instructions ................................................................... A-5
Know Your Machine.............................................................A-6 – A-7
Control Panel .................................................................................. A-7
Set-Up and Operation ...................................................... A-10 – A-11
Auto-Fill ........................................................................................ A-12
Auto-Dump ................................................................................... A-12
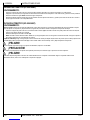
After Use
After Using the Machine ............................................................... A-13
Maintenance
Maintenance Schedule ................................................................. A-13
Power Cord Maintenance ............................................................. A-13
Troubleshooting ............................................................................ A-14
Technical Specifi cations ............................................................... A-14
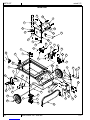
SECTION II – Parts List ..................................................... D-1 - D-10
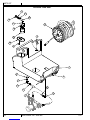
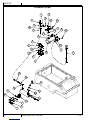
Base Assy .............................................................................. D-2 - D-3
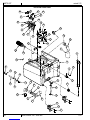
Holding Tank Assy ................................................................. D-4 - D-5
Vacuum Tank Assy ................................................................ D-6 - D-7
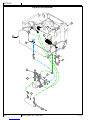
Plumbing System ................................................................... D-8 - D-9
Water Flow Diagram ...........................................................D-10 - D-11

5/10 A-3 56041964 - KING COBRA® 500
ENGLISH - AINSTRUCTIONS FOR USE
INTRODUCTION
This manual will help you get the most from your extractor. Read it thoroughly before operating the machine.
Note: Bold numbers in parentheses indicate an item illustrated on page A-6 unless otherwise noted.
This product is intended for commercial use only.
PARTS AND SERVICE
Repairs, when required, should be performed by your Authorized Service Center, who employs factory trained service personnel, and maintains
an inventory of original replacement parts and accessories.
Call for repair parts or service. Please specify the Model and Serial Number when discussing your machine.
MODIFICATIONS
Modifi cations and additions to the cleaning machine which affect capacity and safe operation shall not be performed by the customer or user
without prior written approval from the manufacturer. Unapproved modifi cations will void the machine warranty and make the customer liable for
any resulting accidents.
NAMEPLATE
The Model and Serial Number of your machine are shown on the Nameplate. This information is needed when ordering repair parts for the
machine. Use the space below to note the Model and Serial Number of your machine for future reference.
Model _________________________________________
Serial Number ___________________________________
UNPACKING THE MACHINE
When the machine is delivered, carefully inspect the shipping carton and the machine for damage. If damage is evident, save the shipping carton
so that it can be inspected.
WARNING!
The Products sold with this Manual contain or may contain chemicals that are known to certain governments (such as the State of California, as
identifi ed in its Proposition 65 Regulatory Warning Law) to cause cancer, birth defects or other reproductive harm. In certain locations (including
the State of California) purchasers of these Products that place them in service at an employment job site or a publicly accessible space are
required by regulation to make certain notices, warnings or disclosures regarding the chemicals that are or may be contained in the Products at or
about such work sites. It is the purchaser’s responsibility to know the content of, and to comply with, any laws and regulations relating to the use
of these Products in such environments. The Manufacturer disclaims any responsibility to advise purchasers of any specifi c requirements that
may be applicable to the use of the Products in such environments.

A-4 KING COBRA® 500 - 56041964 5/10
INSTRUCTIONS FOR USEA - ENGLISH
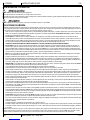
IMPORTANT SAFETY INSTRUCTIONS:
This machine is only suitable for commercial use, for example in hotels, schools, hospitals, factories, shops and offi ces other than normal
residential housekeeping purposes.
When using any electrical appliance, basic precautions should always be followed, including the following:
NOTE: Read all instructions before using this machine.
WARNING!
To reduce the risk of fi re, electric shock, or injury:
•
Before each use, remove the spray tool from the hose, and check to make sure the spray nozzles are securely tightened
to the spray tool. A loose nozzle could fl y off during use.
• Never use solvents.
• Do not leave the machine unattended when it is plugged in. Unplug the unit from the outlet when not in use, and before
servicing.
• To avoid electric shock, do not expose to rain or snow. Store, and use, indoors.
• Do not allow the machine to be used as a toy. Close attention is necessary when used near children.
• Use only as described in this manual. Use only the manufacturer’s recommended attachments.
• Never add water over 130 °F/54 °C to the Holding Tank.
• If the machine is not working as it should, has been dropped, damaged, left outdoors, or dropped into water, return it to a service
center.
• Do not pull by the cord, use the cord as a handle, close a door on the cord, or pull the cord around sharp edges or corners. Do
not run the machine over the cord. Keep the cord away from heated surfaces. To unplug, grasp the plug, not the cord.
• Do not handle the plug, the cord, or the machine with wet hands.
• Extension cords must be 12/3 and no longer than 50 feet.
• Do not use with a damaged cord or cord end. If the cord or unplug becomes damaged have it repaired immediately by an
authorized service center.
• Do not put any object into openings. Do not use with any opening blocked; keep free of dust, lint, hair, and anything that may
reduce air fl ow.
• Keep loose clothing, hair, fi ngers, and all parts of body away from openings and moving parts.
• Do not pick up anything that is burning or smoking, such as cigarettes, matches, or hot ashes, or any health endangering dusts.
Do not use the machine to pick up fl ammable or combustible liquids such as gasoline or use it in areas where they may be
present.
• Turn off all controls before unplugging.
• Use extra care when cleaning on stairs.
• Connect to a properly grounded outlet only.
• Liquid ejected at the spray nozzle could be dangerous as a result of its temperature, pressure, or chemical content. Use caution.
• Always read chemical MSDS sheets before use.
SAVE THESE INSTRUCTIONS

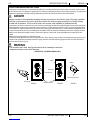
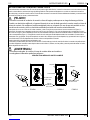
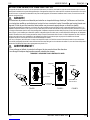
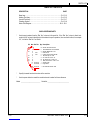
Grounding Pin
Tab for Grounding Screw
Adapter
Adapter
Metal Screw
FIGURE 1 FIGURE 2 FIGURE 3
Grounded Outlet Box
Grounded Outlet
5/10 A-5 56041964 - KING COBRA® 500
ENGLISH - AINSTRUCTIONS FOR USE
120VAC GROUNDING INSTRUCTIONS
This appliance must be grounded. If it should electrically malfunction, grounding provides a path of least resistance for electric current to reduce
the risk of electric shock. This appliance is equipped with a cord having an equipment-grounding conductor and grounding plug. The plug must be
plugged into an appropriate outlet that is properly installed and grounded in accordance with all local codes and ordinances.
DANGER!
Improper connection of the equipment-grounding conductor can result in a risk of electric shock. Check with a qualifi ed
electrician or service person if you are in doubt as to whether the outlet is properly grounded. Do not modify the plug
provided with the appliance. If it will not fi t the outlet, have a proper outlet installed by a qualifi ed electrician.
This appliance is for use on a nominal 120-volt circuit, and has a grounding plug that looks like the plug illustrated in Figure 1 below. A temporary
adapter illustrated in Figures 2 and 3 may be used to connect this plug to a 2-pole receptacle as shown in Figure 2 if a properly grounded outlet
is not available. The temporary adapter should be used only until a properly grounded outlet (Figure 1) can be installed by a qualifi ed electrician.
The green-colored rigid ear, tab, or the like extending from the adapter must be connected to a permanent ground such as a properly grounded
outlet box cover. Whenever the adapter is used, it must be held in place by a metal screw. Grounding adapters are not approved for use in
Canada.
Replace the plug if the grounding pin is damaged or broken.
The Green (or Green/Yellow) wire in the cord is the grounding wire. When replacing a plug, this wire must be attached to the grounding pin only.
Extension cords connected to this machine should be 12 gauge, three-wire cords with three-prong plugs and outlets. DO NOT use extension
cords more than 50 feet (15 m) long.
WARNING!
• If an extension cord is used, the plug and socket must be of watertight construction.
• Inadequate extension cords can be dangerous.
PLEASE NOTE: FOR NORTH AMERICA ONLY
5/12

A-6 KING COBRA® 500 - 56041964 5/10
INSTRUCTIONS FOR USEA - ENGLISH
12
3
4
5
6
7
8
9
10
11
12
13
14
15
15
16
17
19
20
21
22
23 24
18
25
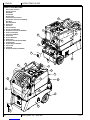
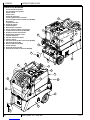
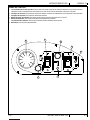
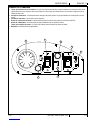
KNOW YOUR MACHINE
1 Vacuum Hose Connection
2 Recovery Tank Lid
3 Wand Holder
4 Control Panel
5 Recovery Tank
6 Solution Hose Quick Connect
7 Auto-Fill Hose Connector (KC-500-ADAF)
8 Rear Wheel
9 Base Compartment
10 Holding Tank
11 Tank Latch
12 Vacuum Hose Reel
13 Recovery Tank Drain Hose
14 Dump Hose Connection (KC-500-ADAF)
15 Power Cord Receptacle
16 Front Castor with Brake
17 Power Cords
18 Pressure Relief Valve
19 Solution Hose
20 Dump Pump Inlet Filter (KC-500-ADAF)
21 Pump Inlet Filter
22 Pre-Filter Bag (KC-500-ADAF)
23 Vacuum Hose
24 Cord Hooks
25 Dump Pump Switch (KC-500-ADAF)

5/10 A-7 56041964 - KING COBRA® 500
ENGLISH - AINSTRUCTIONS FOR USE
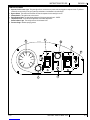
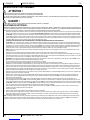
CONTROL PANEL
A Separate Circuit Locator Light: This green light will turn on when the two power cords are plugged into separate circuits. Try different
outlets with one cord until you can get a green light, otherwise a circuit breaker in the wall may trip.
B Bypass Switch: This switch turns the heater on when the separate circuit locator light is not on.
C Vacuum Switch: This switch turns on the vacuum.
D Pump Pressure Knob: This knob allows adjustment of the pump pressure from 0 - 500PSI.
E Temperature Knob: This knob allows adjustment of the heater temperature.
F Heater Indicator Light: This red light will turn ON the heater is ON.
G Pressure Gauge: Indicates spraying presure.
A
G
F
CE
B
D

A-8 KING COBRA® 500 - 56041964 5/10
INSTRUCTIONS FOR USEA - ENGLISH
SET-UP AND OPERATION
CAUTION!
Use care when handling hazardous chemicals.
Never leave the machine running when you are not actively using it.
To avoid vacuum motor damage, always make sure the fl oat fi lter is clean and that it can travel freely before you operate the machine. Always use a defoamer
any time foam is present.
DANGER!
Do NOT use solvents, or any chemicals that may be fl ammable, explosive or combustible.
CLEANING SOLUTIONS:
Select a proper pre-spray for the surface to be cleaned, and apply the pre-spray. Use a neutral pH rinse or detergent (6 to 10 pH) in the King Cobra to prevent
premature wear of the pumps, seals, and other components. Damage caused by the use of improper or strong chemicals is not covered by warranty. Powdered
chemicals are not recommended.
1 Before each use, inspect the machine, hoses, and cleaning tools for cleanliness and completeness. Make sure the hoses are in good condition and the
spray nozzle(s) is tight. Be sure the Pre-Filter Bag (22 / KC-500-ADAF only) and the Dump Pump Inlet Filter (21) are installed and are clean.
2 KC-500-ADAF: When not using the auto-dump feature, just make sure the brass cap is screwed tightly on the Dump Hose Connection (16) on the dump
pump on the rear of the machine. If you choose to use the auto-dump, connect the dump hose to the Dump Hose Connection (16) on the back of the dump
pump, and place the open end of the hose in a drain. Make sure the Recovery Tank Drain Hose (15) is closed, and the Recovery Tank Lid (2) is closed tight.
REFER TO THE AUTO-FILL AND AUTO-DUMP INSTRUCTIONS ON THE FOLLOWING PAGES.
3 KC-500-ADAF: If you choose to use the auto-fi ll feature, connect the fi ll hose to the Auto-Fill Hose Connector (7). Turn on the water source, and allow the
tank to fi ll with water. When using the auto-fi ll system, the auto-fi ll fl oat will automatically turn on and turn off as the tank empties and then fi lls. NOTE: If you
are not going to use the auto-fi ll system, just fi ll the tank with water and cleaning chemical. Follow chemical directions regarding dilution and mixing. Do not
use harsh chemicals; they may damage seals in pumps and valves, and cause the pump to wear prematurely.
NOTE: Using warm water in the tank may improve the effi ciency of the heat exchanger when cleaning with heat, but never use water with a temperature
exceeding 130 °F / 54 °C.
4 Pre-spray the area to be cleaned, with a pump-up sprayer, while the tank is fi lling. Follow chemical directions.
5 Plug in the power cords (17). Do not connect both cords to the same outlet. The green, ‘separate circuit’ locator light (A) on the switch plate should light
up. If the locator light does not come on, check the circuit breaker box in the wall, and/or try different outlets until it does turn on. If you are certain the
cords are on separate circuits, turn the Bypass switch (B) on.
CAUTION: using the Bypass switch (B) when the cords are on the same circuit may cause the breaker in the wall to trip. NOTE: the
receptacle (15) on the left (viewed from behind the machine) powers the heater.
The red light (F) will turn on only when the heat exchanger is actively heating.
6 Press the lever on the Pressure Relief Valve (18) to make sure there is no back pressure in the system.
7 Connect the priming/siphon hose to the Solution Hose Quick Connect (6), turn the pump ON by turning the Pump Pressure Knob (D) up to increase pump
speed and turn the Vacuum Switch (C) on. Place the open end of the priming hose into the Vacuum inlet hose barb (1). Use your hand to block the open
area in the hose barb. This will allow the pump and the vacuum to work together to get the water moving. The air should prime out of the pump within 20 -
60 seconds. Watch the water fl ow into the recovery tank. When the water is clear (no air in it) and is fl owing strongly, turn both the pump and the vacuum
off, and remove the priming hose. NEVER remove the priming hose while the pump is still running.
8 Connect the Solution Hose (19) from the reel to the Solution Hose Quick Connect (6) and connect the Vacuum Hose (23) from the reel to the Vacuum Hose
Connection (1). Connect both hoses to the cleaning tool.
9 Set the Temperature Knob (E) to the desired heat setting. Allow the heat exchanger two minutes to reach operating temperature. The red light (F) will go out
when the heater has reached operating temperature. NOTE: The red light will be on nearly all the time as you clean.
10 Turn the pump on by setting the Pump Pressure Knob (D) to the desired spraying pressure (0 - 500 PSI). Read the spraying pressure at the Pressure Gauge
(G) while spraying. NOTE: when you let off the trigger on the wand, the pressure gauge reading will drop to 0 psi; however, the spraying pressure will
remain at the level to which you have set it. Turn the Vacuum Switch (C) ON. NOTE: the vacuum motor will start up slowly to prevent a large current surge.
KC-500-ADAF: Turn on the dump pump (25). NOTE: The dump pump will automatically turn on and turn off as the tank fi lls and then empties. It may take
several cycles to heat the lines and the cleaning tool.
11 If you are not using the auto-fi ll and auto-dump features, turn off both the pump (D) and vacuum (C) when the Holding Tank gets low, fi ll the Holding Tank,
and empty and clean the recovery tank.
12 Begin cleaning.
13 Use defoamer in the recovery tank any time foaming occurs.
14 When fi nished with the job, remove any unused solution from the solution tank, and run a few gallons of clean water through the system. Drain the recovery
tank by placing the dump hose over a drain, or a bucket, and removing the cap. Disconnect the hoses from the cleaning tool, and reel them up onto the hose
spool.
NOTE: To remove the reel, with hoses, from the machine, pull the vacuum hose loose from the hose barb on the front of the tank. Disconnect the solution hose
quick coupling. Push Vacuum hose into the center of the hose spool. Grasp the spool from either side, and lift it off the machine. NOTE: before servicing any
component in the base cabinet, the hoses and spool must be removed from the machine before the tanks can be lifted open.
5/12

5/10 A-9 56041964 - KING COBRA® 500
ENGLISH - AINSTRUCTIONS FOR USE
D
G
E
1
6
7
214
18
19
17
A
CFB
23
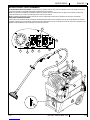
SET-UP AND OPERATION
ELECTRIC CIRCUIT LOCATOR: This system will inform the operator when the two cords are plugged into separate circuits by turning on the green, circuit
locator light (A). This helps to prevent tripping circuit breakers.
NOTE: If the green circuit locator light (A) does not illuminate when the cords are plugged in, then both cords are on the same circuit. Try other outlets with one
of the cords until you get the locator light to come on.
NOTE: If the bypass switch is turned on when both cords are on the same circuit, the breaker in the wall may trip.
ELECTRONIC FLOAT SHUT-OFF
When the recovery tank is full, the electronic fl oat switch will turn the vacuum motor off. This will prevent water from entering the vacuum motor. The fl oat may
not work properly if the fl oat fi lter rod is dirty or if there is heavy foam in the tank. To reset, turn the Vacuum switch off, and empty the tank.

A-10 KING COBRA® 500 - 56041964 5/10
INSTRUCTIONS FOR USEA - ENGLISH
AUTO-FILL (KC-500-ADAF)
OPERATION:
• Attach a 3/4” garden hose to the Auto-Fill Hose Connector (7), and connect the other end of the hose to your water source.
• Make sure the fl oat that hangs from the auto fi ll valve into the tank is free of obstruction and can move freely.
• Turn on the water supply. NOTE: Do not turn the water pressure on high; just turn the water on.
• The auto-fi ll fl oat will automatically shut-off the fl ow of incoming water when the tank is nearly full, and it will allow the valve to open again once the water
level has dropped to a predetermined level.
AUTO-DUMP (KC-500-ADAF)
OPERATION:
Before each use: Always use a clean pre-fi lter bag when operating the machine. If necessary, unscrew the stainless steel fi lter at the bottom of the recovery tank
and clean it. Also make sure the ball fl oat in the recovery tank is clean.
• Attach a 3/4” garden hose to the Dump Hose Connection (14) on the dump pump on the back of the base of the machine.
• Run the other end of the hose into a drain.
• Turn ON the dump pump switch (25).
• NOTE: The dump pump is ‘self-priming.’ You should see water start to fl ow within 30 seconds of the pump turning on. If water does not begin to fl ow, check
the fi lter to see if it is plugged with debris.
After each job: Run clear water though the dump pump to wash out any chemical residue. Remove and clean both the Pre-Filter Bag (22) and the Pump Inlet
Filter (21). Reinstall the fi lter once it is clean. Clean and empty the recovery tank.
DANGER!
Do NOT use solvents, or any chemicals that may be fl ammable, explosive or combustible.
CAUTION!
Always use a defoamer in the recovery tank to prevent water or foam from entering the vacuum motor.
DANGER!
Always unplug the King Cobra from the electrical outlet(s) before cleaning or maintaining. Certain internal components are electrically live, even with switches in
their OFF position.

5/10 A-11 56041964 - KING COBRA® 500
ENGLISH - AINSTRUCTIONS FOR USE
AFTER USING THE MACHINE
1 To empty the Holding Tank, vacuum out all unused solution into the recovery tank using the vacuum hose. Rinse the tank with clean water.
2 Turn all the Power Switches (B, C & 25) to OFF (O). Unplug the Power Cords (17). Coil the cords around the Cord Hooks (24) on the rear of the machine.
3 To empty the recovery tank, loosen the Velcro strap retaining the Recovery Tank Drain Hose (13). Direct the hose to a designated waste water “DISPOSAL
SITE” and remove the plug (hold the end of the hose above the water level in the tank to avoid sudden, uncontrolled fl ow of waste water). Rinse the tank
with clean water. Inspect the drain hose; replace if kinked or damaged.
4 Disconnect the solution and vacuum hoses from the machine, at the Solution Hose Quick Connect (6) and Vacuum Hose Connection (1) respectively. Flush
the vacuum hose with warm water to wash any debris out of the vacuum hose and cleaning tool. Inspect them for damage. Set the wand on the Wand
Holder (3).
5 Wipe the machine with a damp cloth. Do not use abrasive chemicals or solvents.
6 Perform any required maintenance before storage.
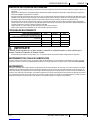
MAINTENANCE SCHEDULE
MAINTENANCE ITEM Daily Weekly Yearly
Check / Clean Tanks & Hoses •
Check / Clean Recovery Tank Shut-Off Float •
Clean Extraction Wand/Tool •
Inspect & Clean Solution Filters •
Check Carbon Brushes •
IMPORTANT!
Motor damage resulting from failure to service the carbon brushes is not covered under warranty. See the Limited
Warranty Statement.
7 Store the machine indoors in a clean, dry place with the recovery tank lid open. Keep from freezing.
POWER CORD MAINTENANCE
Once a week (or more often if necessary), check the power cords for cracked or damaged insulation, exposed wires in the cord or plug, and damaged or missing
ground pin. Repair or replace damaged cord or plug immediately.
MAINTENANCE:
For optimum performance, fl ush the machine with clear water at the end of each working day. Once a month, minimum, run a fl ushing compound through the
machine to break up any mineral or chemical build-up that may have formed. The vacuum motor, pump motors, and the pumps do not require any scheduled
maintenance; however, the motors may require replacement brushes after 1000 - 1500 hours, and the high pressure pumps and unloader valves may require
rebuild kits after 500 -1000 hours (refer to machine part list for numbers). Clean the body with an all purpose detergent, and protect it with an automobile interior
polish. Lubricate the wheels, castors, and quick disconnects with an all purpose silicone spray.

A-12 KING COBRA® 500 - 56041964 5/10
INSTRUCTIONS FOR USEA - ENGLISH
TROUBLESHOOTING:
IF THIS OCCURS CHECK THIS
NO SPRAY
Holding Tank is empty, or fi lter is plugged.
Clogged spray tip(s).
Pump not running or not primed.
Valve on wand not operating.
Solution hose not completely connected to hose or to machine.
PUMP DOES NOT RUN
This pump motor runs on DC voltage, so it should start running as soon as you turn the pump pressure knob
clockwise to increase pressure. If the pump motor does not start running, check the wiring to the motor speed
control board and to the motor.
LOW SUCTION
Debris is plugging cleaning tool or vacuum hose.
Drain hose cap is not completely closed.
Recovery tank lid is not seated or gasket is damaged.
NO SUCTION
KC-500-ADAF: Ball in the fl oat is blocking air fl ow. Turn off the vacuum so the ball will drop down, or the recovery
tank is full and needs to be emptied.
All other KC-500 models: Vacuum inlet screen may be plugged. Remove and clean screen.
No power to motor(s).
Test the switches.
Test the vacuum motors.
LOW HEAT
Spraying too long. Try spraying for 12-15 seconds, or about three strokes.
Heat exchanger needs to be fl ushed.
Wrong tool being used. Too much water passing through. Longer hose or larger diameter hose, than standard.
NO HEAT
Heat is not turned on. The green circuit indicator light must be on.
No power in the wall outlet - check to see if the breaker has tripped.
Call your distributor for additional help.
TECHNICAL SPECIFICATIONS
Rotomolded Body: Lifetime Warranty
Vacuum: 7.2” 3-stage, 140” of water lift
VAC Shutoff: Electronic
Pump: Positive displacement, fully adjustable 0-500PSI
Heat: 2000 Watts, up to 212 °F
Capacity: 16 gallon Holding Tank; 14 gallon recovery tank
Cords: Two, detachable 12/3, hospital grade plugs
Size: 39” H X 21” W X 36” L
Auto dump: 5 gpm
Wheels: 10”, locking, non-marking
Hoses: 25 ft hoses on a reel (patent pending)
Plus: Auto-Fill and Auto-Dump (KC-500-ADAF)


B-2 KING COBRA® 500 - 56041964 5/10
INSTRUCCIONES DE USOB - ESPAÑOL
ÍNDICE
Página
Introducción .................................................................................. B-3
Componentes y servicio ................................................................. B-3
Placa de identifi cación .................................................................... B-3
Desembalaje de la máquina ........................................................... B-3
Instrucciones importantes de seguridad ......................................... B-4
Instrucciones de conexión a tierra .................................................. B-5
Conozca su máquina ...........................................................B-6 – B-7
Panel de control .............................................................................. B-7
Confi guración y operación .............................................B-10 – B-11
Llenado automático ...................................................................... B-12
Vaciado automático ...................................................................... B-12
Después de la utilización
Después de la utilización de la máquina ...................................... B-13
Mantenimiento
Programa de mantenimiento ........................................................ B-13
Mantenimiento del cable de alimentación .................................... B-13
Resolución de problemas ............................................................. B-14
Especifi caciones técnicas ............................................................. B-14
SECCIÓN II – Lista de piezas ............................................ D-1 - D-10
Conjunto de base .................................................................. D-2 - D-3
Conjunto del depósito de retención ....................................... D-4 - D-5
Conjunto del depósito de aspiración ..................................... D-6 - D-7
Sistema de conducciones ...................................................... D-8 - D-9
Diagrama del fl ujo de agua .................................................D-10 - D-11

5/10 B-3 56041964 - KING COBRA® 500
ESPAÑOL - BINSTRUCCIONES DE USO
INTRODUCCIÓN
Este manual lo ayudará a obtener el máximo rendimiento de su extractor. Léalo con atención antes de utilizar la máquina.
Nota: Los números que aparecen en negrita entre paréntesis indican elementos ilustrados en la página B-6, a menos que se indique lo
contrario.
Este producto está destinado exclusivamente al uso comercial.
COMPONENTES Y SERVICIO
Las reparaciones, cuando sean necesarias, deben ser realizadas por su Centro Autorizado de Servicio, que utiliza personal de servicio formado
en fábrica y lleva un inventario de las piezas de repuesto y accesorios originales.
Llame para lo referente a piezas de repuesto y servicio. Por favor, especifi que el modelo y el número de serie cuando hable de su máquina.
MODIFICACIONES
El cliente o usuario no deberá realizar modifi caciones o agregados a la máquina limpiadora que afecten la capacidad y la operación segura
sin la autorización previa por escrito del fabricante. Las modifi caciones sin autorización anularán la garantía de la máquina, y el cliente será
responsable de cualquier accidente que resulte.
PLACA DE IDENTIFICACIÓN
El modelo y número de serie de la máquina se indican en la placa de identifi cación. Esta información es necesaria a la hora de solicitar repuestos
para la máquina. Utilice el siguiente espacio para anotar el modelo y el número de serie de su máquina para futuras consultas.
Modelo ________________________________________
Número de serie _________________________________
DESEMBALAJE DE LA MÁQUINA
Cuando reciba la máquina, examine con atención el cartón de embalaje y la máquina, con el fi n de comprobar si existe algún daño. Si observa
algún daño, guarde la caja de embalaje para que se pueda inspeccionar.
¡ADVERTENCIA!
Los Productos a la venta con este Manual contienen, o pueden contener, productos químicos reconocidos por algunos gobiernos (como el
Estado de California, según lo indica en su Proposición 65, Ley de Advertencia Regulatoria) como causantes de cáncer, defectos de nacimiento
u otros daños reproductivos. En algunas jurisdicciones (incluido el Estado de California), los compradores de estos Productos que los coloquen
en servicio en un emplazamiento laboral o en un espacio de acceso público tienen la obligación regulatoria de realizar determinados avisos,
advertencias o divulgaciones respecto de los productos químicos contenidos o posiblemente contenidos en los Productos utilizados en tal lugar.
Es la responsabilidad del comprador conocer y cumplir con todas las leyes y reglamentaciones relacionadas con el uso de estos Productos en
tales entornos. El Fabricante niega toda responsabilidad de informar a los compradores sobre requisitos específi cos que pueden regir el uso de
los Productos en tales entornos.

B-4 KING COBRA® 500 - 56041964 5/10
INSTRUCCIONES DE USOB - ESPAÑOL
INSTRUCCIONES IMPORTANTES DE SEGURIDAD:
Esta máquina es apta únicamente para su uso comercial, por ejemplo, en hoteles, colegios, hospitales, fábricas, tiendas y ofi cinas, y no para la
limpieza diaria del hogar.
Cuando utilice un aparato eléctrico, se deben respetar las precauciones básicas, incluidas las siguientes:
NOTA: lea todas y cada una de las instrucciones antes de utilizar la máquina.
¡ADVERTENCIA!
Para reducir el riesgo de incendios, descargas eléctricas o lesiones:
•
Antes de cada uso, quite la herramienta de pulverización de la manguera y asegúrese de que las boquillas de
pulverización estén bien sujetadas a la herramienta de pulverización. Las boquillas fl ojas pueden soltarse durante el uso.
• Nunca use disolventes.
• No abandone la máquina mientras esté enchufada. Cuando no la esté utilizando o antes de realizar el servicio, desenchúfela.
• Para evitar descargas eléctricas, no la deje expuesta a la lluvia ni a la nieve. Guárdela y úsela en lugares cubiertos.
• No permita que se utilice como juguete. Es necesario prestar mucha atención si se la usa cerca de niños.
• Utilice sólo de la manera descrita en este manual. Utilice únicamente los accesorios recomendados por el fabricante.
• Nunca agregue al depósito de retención agua a más de 54 °C.
• Si la máquina no funciona correctamente, se ha caído, ha sufrido daños, se ha dejado a la intemperie o ha caído al agua, acuda
a un centro de servicio.
• No tire del cable ni lo utilice a modo de asa, evite que el cable quede atrapado al cerrar una puerta y no tire de él contra bordes
afi lados ni esquinas. No haga pasar la máquina por encima del cable. Mantenga el cable alejado de superfi cies calientes. Para
desenchufar, agarre el enchufe y no el cable.
• No manipule el enchufe, el cable ni la máquina con las manos húmedas.
• Los alargadores deben ser de 12/3 y su longitud no debe superar los 15,24 m.
• No la utilice si observa daños en el cable o el extremo del cable. Si el cable o el enchufe sufren daños, haga que los repare de
inmediato un centro de servicio autorizado.
• No coloque ningún objeto en las aberturas. No utilice la máquina si las aberturas están obstruidas; manténgalas libres de polvo,
hilos, pelo o cualquier otra sustancia que pueda reducir el caudal de aire.
• Mantenga el cabello, las ropas sueltas, los dedos y todas las partes del cuerpo lejos de las aberturas y de las partes en
movimiento.
• No recoja ningún material en combustión o que eche humo, como cigarrillos o cerillas, o cualquier tipo de polvo que
representara una amenaza para la salud. No utilice la máquina para recoger líquidos infl amables o combustibles, como
gasolina, ni en lugares en los que pueda haber dichos líquidos.
• Apague todos los controles antes de desenchufar.
• Tenga un cuidado especial cuando limpie en escaleras.
• Enchufe sólo a una toma de corriente debidamente conectada a tierra.
• El líquido eyectado por la boquilla de pulverización podría ser peligroso debido a su temperatura, presión o contenido químico.
Sea cauto.
• Siempre lea las hojas de información de seguridad de los materiales (MSDS) de las sustancias químicas antes de usarlas.
GUARDE ESTAS INSTRUCCIONES

5/10 B-5 56041964 - KING COBRA® 500
ESPAÑOL - BINSTRUCCIONES DE USO
INSTRUCCIONES DE CONEXIÓN A TIERRA 120VCA
Este artefacto debe conectarse a tierra. En caso de que se produzca algún fallo eléctrico, la conexión a tierra ofrece una vía de resistencia menor
para la corriente eléctrica, reduciendo el riesgo de descarga eléctrica. Este aparato está equipado con un cable con conductor de conexión a
tierra del equipo y enchufe de conexión a tierra. El enchufe debe conectarse a una toma de corriente debidamente instalada y conectada a tierra
de acuerdo con todas las normas y ordenanzas locales.
¡PELIGRO!
La conexión incorrecta del conductor de conexión a tierra del equipo puede suponer un riesgo de descarga eléctrica.
Consulte a un electricista cualifi cado o al personal de servicio en caso de duda acerca de la correcta conexión a tierra de
la toma de corriente. No modifi que el enchufe suministrado junto con el aparato. En caso de que este enchufe no sirva
para la toma de corriente, pida a un electricista cualifi cado que instale una toma de corriente adecuada.
Este aparato se usa con un circuito de 120 voltios nominales, y tiene un enchufe con toma a tierra tal como se muestra en la Figura 1, a
continuación. Se puede usar un adaptador provisorio tal como se ve en las Figuras 2 y 3 en caso de disponerse de un receptáculo sin toma a
tierra como en la Figura 2. Dicho adaptador provisorio se usará solamente hasta que un electricista cualifi cado instale un receptáculo con la toma
a tierra correspondiente (Figura 1). La lengüeta de conexión de color verde que sale del adaptador deberá ser conectada a una toma a tierra
permanente como, por ejemplo, la caja del receptáculo con toma a tierra. Siempre que se use el adaptador, hay que sostenerlo en su lugar con
un tornillo de metal. El uso de adaptadores de conexión a tierra no está aprobado en Canadá.
Sustituya el enchufe si la patilla de tierra está dañada o rota.
El hilo Verde (o Verde/Amarillo) del cordón es el hilo de tierra. Cuando sustituya el enchufe, este hilo sólo debe ir conectado a la patilla de tierra.
Los cables alargadores conectados a esta máquina deben ser del calibre 12, trifi lares, con tres patillas y tomas de pared adecuadas. NO utilice
cables alargadores de más de 15 m.
¡ADVERTENCIA!
• Si se utiliza un alargador, el enchufe y la toma de corriente deben ser herméticos.
• Los alargadores inadecuados pueden ser peligrosos.
ATENCIÓN: PARA AMÉRICA DEL NORTE SOLAMENTE
5/12
Conexion a Tierra
Adaptador
Adaptador
Tornillo de Metal
FIGURA 1 FIGURA 2 FIGURA 3
Receptáculo con
Toma a Tierra
Caja del
Receptáculo con
Toma a Tierra
Lengüeta Para el Tornillo
de Toma a Tierra

B-6 KING COBRA® 500 - 56041964 5/10
INSTRUCCIONES DE USOB - ESPAÑOL
12
3
4
5
6
7
8
9
10
11
12
13
14
15
15
16
17
19
20
21
22
23 24
18
25
CONOZCA SU MÁQUINA
1 Conexión del tubo de aspiración
2 Tapa del depósito de recuperación
3 Soporte de varilla
4 Panel de control
5 Depósito de recuperación
6 Conexión rápida del tubo de la solución
7 Conector del tubo de llenado automático (KC-500-ADAF)
8 Rueda trasera
9 Compartimento de base
10 Depósito de retención
11 Pestillo del depósito
12 Bobina del tubo de aspiración
13 Tubo de vaciado del depósito de recuperación
14 Conexión del tubo de vaciado (KC-500-ADAF)
15 Receptáculo del cable de alimentación
16 Rueda pivotante delantera con freno
17 Cables de alimentación
18 Válvula de disminución de presión
19 Tubo de la solución
20 Filtro de entrada de la bomba de vaciado (KC-500-ADAF)
21 Filtro de entrada de la bomba
22 Bolsa de prefi ltro (KC-500-ADAF)
23 Tubo de aspiración
24 Ganchos de sujeción del cable
25 Interruptor de la bomba de vaciado (KC-500-ADAF)

5/10 B-7 56041964 - KING COBRA® 500
ESPAÑOL - BINSTRUCCIONES DE USO
PANEL DE CONTROL
A Luz localizadora de circuito separado: Esta luz verde se enciende cuando los dos cables de alimentación se enchufan en circuitos
separados. Pruebe con distintas tomas hasta obtener la luz verde. De lo contrario, puede saltar un disyuntor en la pared.
B Interruptor de derivación: Este interruptor enciende el calefactor cuando la luz localizadora de circuito separado no está encendida.
C Interruptor de aspiración: Este interruptor enciende la aspiración.
D Mando de presión de la bomba: Este mando permite ajustar la presión de la bomba entre 0 y 500 PSI.
E Mando de temperatura: Este mando permite ajustar la temperatura del calefactor.
F Luz indicadora del calefactor: Esta luz roja se enciende cuando el calefactor está encendido.
G Manómetro: Indica la presión de pulverización.
A
G
F
CE
B
D

B-8 KING COBRA® 500 - 56041964 5/10
INSTRUCCIONES DE USOB - ESPAÑOL
CONFIGURACIÓN Y OPERACIÓN
¡PRECAUCIÓN!
Tenga cuidado al manipular sustancias químicas peligrosas.
Nunca deje la máquina en funcionamiento si no la está usando de forma activa.
Para editar daños en el motor de aspiración, asegúrese siempre de que el fi ltro del fl otador está limpio y puede desplazarse libremente antes de usar la máquina.
Utilice un desespumante siempre que haya espuma.
¡PELIGRO!
NO use disolventes ni productos químicos que puedan ser infl amables, explosivos o combustibles.
SOLUCIONES DE LIMPIEZA:
Seleccione una pulverización previa adecuada para la superfi cie a limpiar, y aplique la misma. Use un producto de aclarado o detergente neutro (pH de entre 6 y
10) en el King Cobra para evitar un desgaste prematuro de las bombas, las juntas y demás componentes. La garantía no cubre ningún problema provocado por el
uso de productos químicos inadecuados o potentes. No se recomiendan productos químicos en polvo.
1 Antes de cada uso, inspeccione si la máquina, los tubos y las herramientas de limpieza están limpios y completos. Asegúrese de que los tubos están en buen
estado y las boquillas de pulverización están bien ajustadas. Asegúrese de que la bolsa de prefi ltro (22 / KC-500-ADAF únicamente) y el fi ltro de entrada de
la bomba de vaciado (21) están instalados y limpios.
2 KC-500-ADAF: Si no utiliza la función de vaciado automático, sólo asegúrese de que el tapón de latón está bien enroscado en la conexión del tubo de
vaciado (16) en la bomba de vaciado en la parte posterior de la máquina. Si decide utilizar la función de vaciado automático, conecte el tubo de vaciado a la
conexión del tubo de vaciado (16) en la parte posterior de la bomba de vaciado, y coloque el extremo abierto del tubo en un desagüe. Asegúrese de que el
tubo de drenaje del depósito de recuperación (15) está cerrado y la tapa del depósito de recuperación (2) está bien cerrada.
CONSULTE LAS INSTRUCCIONES DE LLENADO AUTOMÁTICO Y VACIADO AUTOMÁTICO EN LAS SIGUIENTES PÁGINAS.
3 KC-500-ADAF: Si opta por usar la función de llenado automático, conecte el tubo de llenado al conector del tubo de llenado automático (7). Encienda la
fuente de agua y deje que el depósito se llene con agua. Cuando use el sistema de llenado automático, el fl otador de llenado automático se enciende y se
apaga automáticamente a medida que el depósito se vacía y luego se llena. NOTA: si no va a usar el sistema del llenado automático, simplemente llene el
depósito con agua y producto químico de limpieza. Siga las instrucciones de los productos químicos relativas a la mezcla y la disolución. No utilice productos
químicos agresivos; pueden dañar las juntas en bombas y válvulas y provocar desgaste prematuro en las bombas.
NOTA: el uso de agua tibia en el depósito puede resultar benefi cioso para la efectividad del intercambiador de calor durante la limpieza, pero nunca utilice
agua con una temperatura que supere los 54°C.
4 Pulverice previamente el área a limpiar con un pulverizador de bombeo, mientras se llena el depósito. Siga las instrucciones de los productos químicos.
5 Enchufe los cables de alimentación (17). No conecte ambos cables a la misma toma de corriente. La luz localizadora de circuito separado verde (A) de la
placa de interruptores se debería encender. Si la luz localizadora no se enciende, verifi que la caja de disyuntores en la pared y/o pruebe con distintas tomas
de corriente. Si está seguro de que los cables están en circuitos separados, encienda el interruptor de derivación (B).
PRECAUCIÓN: Si usa el interruptor de derivación (B) cuando los cables están en el mismo circuito, el disyuntor de la pared se puede desconectar. NOTA: El
receptáculo (15) a la izquierda (visto desde detrás de la máquina) alimenta el calefactor.
La luz roja (F) se enciende solamente cuando el intercambiador del calor está calentando activamente.
6 Presione la palanca en la válvula de disminución de presión (18) para verifi car que no haya contrapresión en el sistema.
7 Conecte el tubo de cebado/sifón a la conexión rápida del tubo de la solución (6), encienda la bomba girando el mando de presión de la bomba (D) para
aumentar la velocidad de la bomba, y encienda el interruptor de aspiración (C). Coloque el extremo abierto del tubo de cebado dentro de la lengüeta del tubo
de entrada de aspiración (1). Utilice su mano para bloquear el área abierta en la lengüeta del tubo. Esto permitirá que la bomba y la aspiradora funcionen
juntas para que el agua circule. El aire debería salir de la bomba en 20 - 60 segundos. Observe cómo fl uye el agua dentro del depósito de recuperación.
Cuando el agua esté transparente (sin aire en ella) y fl uya regularmente, apague la bomba y la aspiración, y retire el tubo de cebado. NUNCA retire el tubo de
cebado si la bomba sigue en funcionamiento.
8 Conecte el tubo de la solución (19) desde la bobina a la conexión rápida del tubo de la solución (6) y conecte el tubo de aspiración (23) desde la bobina a la
conexión del tubo de aspiración (1). Conecte ambos tubos a la herramienta de limpieza.
9 Ajuste el mando de temperatura (E) en el valor de calor deseado. Deje el intercambiador de calor durante dos minutos para que alcance la temperatura de
funcionamiento. La luz roja (F) se apaga cuando el intercambiador de calor ha alcanzado su temperatura de funcionamiento. NOTA: La luz estará encendida
casi todo el tiempo mientras limpia.
10 Encienda la bomba colocando el mando de presión de la bomba (D) en la presión de pulverización deseada (0 - 500 PSI). Lea la presión de pulverización en
el manómetro (G) durante la pulverización. NOTA: cuando suelte el accionador de la varilla, la lectura del manómetro bajará a 0 psi. Sin embargo, la presión
de pulverización se mantendrá en el nivel en que la confi guró. Encienda el interruptor de aspiración (C). NOTA: el motor de aspiración se pondrá en marcha
lentamente para prevenir una gran subida de la corriente.
KC-500-ADAF: Encienda la bomba de vaciado (25). NOTA: la bomba de vaciado se enciende y se apaga automáticamente a medida que el depósito se llena
y luego se vacía. Calentar las conducciones y la herramienta de limpieza puede requerir algunos ciclos.
11 Si no usa las funciones de llenado automático y vaciado automático, apague la bomba (D) y la aspiración (C) cuando el depósito de retención esté bajo, llene
dicho depósito, y vacíe y limpie el depósito de recuperación.
12 Comience la limpieza.
13 Use desespumante en el depósito de recogida siempre que se produzca espuma.
14 Al fi nalizar el trabajo, retire cualquier solución sin usar del depósito de la solución y haga correr algunos litros de agua limpia por el sistema. Vacíe el depósito
de recogida colocando el tubo de vaciado sobre un desagüe o en un cubo, y retire el tapón. Desconecte los tubos de la herramienta de limpieza y enróllelos
en su bobina.
NOTA: Para retirar la bobina de la máquina, con tubos, suelte el tubo de aspiración de la lengüeta en el frontal del depósito. Desconecte el acoplamiento rápido del tubo de
la solución. Empuje el tubo de aspiración al centro de la bobina. Tome la bobina por ambos lados y elévela para sacarla de la máquina. NOTA: antes de realizar cualquier
reparación o tarea de mantenimiento en el cuadro de la base, es necesario retirar los tubos y la bobina de la máquina para poder elevar y abrir los depósitos.
5/12
La page est en cours de chargement...
La page est en cours de chargement...
La page est en cours de chargement...
La page est en cours de chargement...
La page est en cours de chargement...
La page est en cours de chargement...
La page est en cours de chargement...
La page est en cours de chargement...
La page est en cours de chargement...
La page est en cours de chargement...
La page est en cours de chargement...
La page est en cours de chargement...
La page est en cours de chargement...
La page est en cours de chargement...
La page est en cours de chargement...
La page est en cours de chargement...
La page est en cours de chargement...
La page est en cours de chargement...
La page est en cours de chargement...
La page est en cours de chargement...
La page est en cours de chargement...
La page est en cours de chargement...
La page est en cours de chargement...
La page est en cours de chargement...
La page est en cours de chargement...
La page est en cours de chargement...
La page est en cours de chargement...
La page est en cours de chargement...
-
 1
1
-
 2
2
-
 3
3
-
 4
4
-
 5
5
-
 6
6
-
 7
7
-
 8
8
-
 9
9
-
 10
10
-
 11
11
-
 12
12
-
 13
13
-
 14
14
-
 15
15
-
 16
16
-
 17
17
-
 18
18
-
 19
19
-
 20
20
-
 21
21
-
 22
22
-
 23
23
-
 24
24
-
 25
25
-
 26
26
-
 27
27
-
 28
28
-
 29
29
-
 30
30
-
 31
31
-
 32
32
-
 33
33
-
 34
34
-
 35
35
-
 36
36
-
 37
37
-
 38
38
-
 39
39
-
 40
40
-
 41
41
-
 42
42
-
 43
43
-
 44
44
-
 45
45
-
 46
46
-
 47
47
-
 48
48


U.S. Products King Cobra KC-500-S Mode d'emploi
- Catégorie
- Scrubber
- Taper
- Mode d'emploi
dans d''autres langues
Autres documents
-
Dustbane Power Clean 1200 XT - 500 Operations Manual
-
Clarke 04147R Manuel utilisateur
-
Nilfisk-Advance MX 107 C Manuel utilisateur
-
Windsor Dominator 13 Le manuel du propriétaire
-
-
Nilfisk HSC 585 Multi Le manuel du propriétaire
-
Cadet CDT7 Operating Instructions Manual
-
Kärcher Clipper 12 Le manuel du propriétaire
-
-
Dustbane Power Clean 900 XT Operations Manual