KitchenAid KGRT507GAL0 Le manuel du propriétaire
- Catégorie
- Fours
- Taper
- Le manuel du propriétaire
Ce manuel convient également à

and Care Guide
TO THE iNSTALLER: PLEASE LEAVE THIS
iNSTRUCTiON BOOK WITH THE UNIT.
TO THE CONSUMER: PLEASE READ
AND KEEP THiS BOOK FOR FUTURE
REFERENCE.
!_<i>!_?_!. li_i _ i! ¸_!; %..I/_i_>_i?
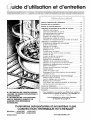
A Note to You ................................................. 2
Range Safety ................................................... 3
Parts and Features ......................................... 5
Using and Caring for Your Cooktop ............. 9
Using the surface burners ..........................9
Energy saving tips .................................... 11
Cookware tips .......................................... 12
Caring for your cooktop ............................ 13
Cleaning your cooktop ............................. 15
Using and replacing the surface light ....... 16
Using and Caring for Your Oven ................. 18
Using the electronic oven control ............. 18
Setting the clock ....................................... 26
Using the timer ......................................... 27
Oven settings ........................................... 28
Cooking tips ............................................. 29
Bake or Convection Bake ........................ 31
Broil .......................................................... 33
Convection Broil ....................................... 35
Convection Roast ..................................... 37
Adjusting the oven temperature ............... 38
Using the temperature probe ................... 40
Using Convect Full Meal .......................... 43
Using EASY CONVECT TM Conversion....46
Timed cooking .......................................... 48
Dehydrating .............................................. 51
Raising (proofing) bread ........................... 53
Cleaning your oven and controls ............. 55
Oven lights ............................................... 57
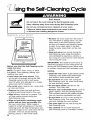
Using the Self-Cleaning Cycle .................... 58
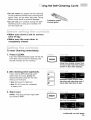
Before you start ........................................ 58
Before setting the controls ....................... 59
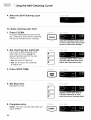
Setting the controls .................................. 59
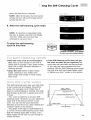
For best cleaning results .......................... 61
How the cycle works ................................ 61
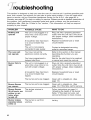
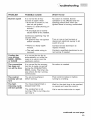
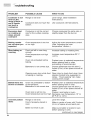
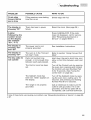
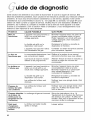
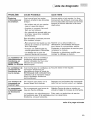
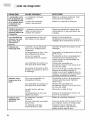
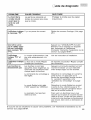
Troubleshooting ............................................ 62
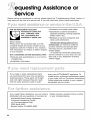
Requesting Assistance or Service .............. 66
Warranty ........................................................ 68
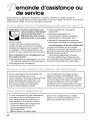
in the U.S.A. for assis|ance or service,
.........call the Consumer Assistance center:
In Canada, for assistance or service,
see page 67.
KITCHENAID ®THERMAL-CONVECTION TM
Gas Freestanding and Slide-in Ranges
Models: KGRT507 KGST307
YKGRT507 YKGST307
9753310A www,kitchenaid,com

Note toYou
KITCHENAID ®designs the best tools for the most important room in your house. To
ensure that you enjoy many years of trouble-free operation, we developed this Use and
Care Guide. It contains valuable information concerning how to operate and maintain
your new appliance properly and safely. Please read it carefully. Also, please complete
and mail the enclosed Product Registration Card.
Whenever you call our Consumer
Assistance Center at 1-800-422-1230 (in
Canada, 1-800-461-5681) or request
service for your appliance, you need to
know your complete model number and
serial number. You can find this information
on the model and serial number plate (see
diagram on pages 5 -6 for location of plate).
Please also record the purchase
information.
Model Number
Serial Number
Purchase/
Installation Date
Builder/Dealer
Name
Address
Phone
NOTE: You must provide proof of purchase
or installation date for in-warranty service.
Keep this book and the sales slip together in a safe place for future reference.
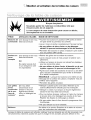
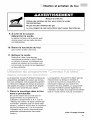
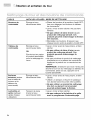
WARNING: if the information in this manual is not followed
exactly, a fire or explosion may result causing property damage,
personal injury or death.
Do not store or use gasoline or other flammable vapors and
liquids in the vicinity of this or any other appliance.
- WHAT TO DO IF YOU SMELL GAS
• Do not try to light any appliance.
• Do not touch any electrical switch; do not use any phone in
your building.
, Immediately call your gas supplier from a neighbor's phone.
Follow the gas supplier's instructions.
• if you cannot reach your gas supplier, call the fire department.
= Installation and service must be performed by a qualified installer,
service agency or the gas supplier.

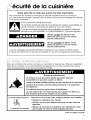
Safety
Your safety and the safety of others is very important.
We have provided many important safety messages in this manual and on your
appliance. Always read and obey all safety messages.
This is the safety alert symbol.
This symbol alerts you to hazards that can kill or hurt you and others.
All safety messages will be preceded by the safety alert symbol and the
word "DANGER" or "WARNING." These words mean:
You will be killed or seriously injured
if you don't follow instructions.
You can be killed or seriously injured
if you don't follow instructions.
All safety messages will identify the hazard, tell you how to reduce the chance of injury,
and tell you what can happen if the instructions are not followed.
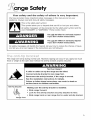
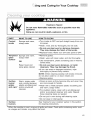
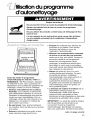
The range will not tip during normal use. However, tipping can occur if you apply too much
force or weight to the open door without the anti-tip bracket properly secured.
Tip Over Hazard
A child or adult can tip the range and be killed.
Connect anti-tip bracket to rear range foot.
Reconnect the anti-tip bracket, if the range is moved.
See the installation instructions for details.
Failure to follow these instructions can result in death or
serious burns to children and adults.
Anti-Tip Bracket
Range Foot
Making sure the anti-tip bracket is installed:
,, Slide range forward.
,, Look for the anti=tip bracket securely attached to f{oor.
o Slide range back so rear range foot is under anti-tip bracket.

i_iil_!_i:!i ange Safety
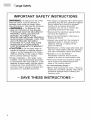
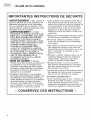
iMPORTANT SAFETY iNSTRUCTIONS
WARNING: To reduce the risk of fire,
electrical shock, injury to persons, or
damage when using the range, follow
basic precautions, including the following:
•WARNING - TOREDUCETHE
RISK OF TIPPING OF THE RANGE,
THE RANGE MUST BE SECURED BY
PROPERLY INSTALLED ANTI-TIP
DEVICES. TO CHECK IF THE
DEVICES ARE INSTALLED PROPERLY,
SLIDE RANGE FORWARD, LOOK FOR
ANTI-TIP BRACKET SECURELY
ATTACHED TO FLOOR, AND SLIDE
RANGE BACK SO REAR RANGE
FOOT IS UNDER ANTI-TIP BRACKET.
•CAUTION - Donot store items of
interest to children in cabinets above a
range or on the backguard of a range -
children climbing on the range to reach
items could be seriously injured.
• Proper Installation - The range, when
installed, must be electrically grounded
in accordance with local codes or, in the
absence of local codes, with the Nation-
al Electrical Code, ANSI/NFPA 70. Be
sure the range is properly installed and
grounded by a qualified technician.
• This range is equipped with a three-prong
grounding plug for your protection against
shock hazard and should be plugged
directly into a properly grounded
receptacle. Do not cut or remove the
grounding prong from this plug.
• Disconnect the electrical supply before
servicing the appliance.
• Never Use the Range for Warming or
Heating the Room.
• Injuries may result from the misuse of
appliance doors or drawers such as
stepping, leaning, or sitting on the
doors or drawers.
• Maintenance - Keep range area clear and
free from combustible materials, gasoline,
and other flammable vapors and liquids.
• Storage in or on the Range -
Flammable materials should not be
stored in an oven or near surface units.
• Top burner flame size should be adjust-
ed so it does not extend beyond the
edge of the cooking utensil.
For self-cleaning ranges -
• Before Self-Cleaning the Oven - Remove
broiler pan and other utensils. Wipe off all
excessive spillage before initiating the
cleaning cycle.
-SAVE THESE INSTRUCTIONS-

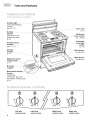
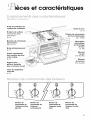
and Features
ilSiiii¸d_:!!i_,_¸iii!i_¸_ _'_,__,1_::::;_,,di_i__sili
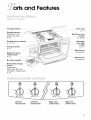
Vent guard piece .........................
Surface
(the style of your
grates may vary)
(p. 9)
Surface burner controls
(p. 10, 11)
Anti-tip bracket
(p. 3)
Model and serial
number plate
(p. 2) ............................
Broil pan
Removable storage
drawer
(containing
broiler pan, grid, and
convection roasting rack)
(p. 8)
.................Oven vent
(p. 7)
Electronic oven
control
(p. 18-29)
Automatic
oven light
switch
(p. 57)
burner
(not shown)
Bake burner
(not shown)
REAR FRONT
[] []
OFF OFF
...Q.....Q..
• D • • • •
Left rear Left front
control knob control knob
Right front
control knob
REAR
@
Right rear
control knob

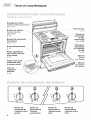
i_iil_!_i_i!i_!ii_rts and Features
!ii_:@,Oiii',iiii"_i,,,,,_,iiiii,,_@,iiOC:Cti_'_ii0 !iii,,_"_s
{ i!i!::::¸_i¸'_:!!__i!__!!i;t_i_i:_ii_,_c!ii¸_i_ig _'!__1o di_'_;_:!i__:!!_;}
Surface light
(some freestanding
models)
(pp. 16, 17)
Surface ......
burners
(the style of your
grates may vary)
(p. 9)
Surface burner
controls
(pp. 10, 11)
Anti-tip
bracket
(p. 3)
Model and serial
number plate
(p. 2)
Broil pan
support
Oven vent
(p. 7)
Electronic
oven control
(pp. 18-29)
Automatic
oven light
switch
(p. 57)
Broil burner
(not shown)
Bake burner
(not shown)
drawer
(containing
broiler pan, grid, and
convection roasting rack)
(p. 8)
OFF OFF _ f OFF OFF
..-... _--.-,o _,; • • ,o _/_/ _,_;• • ,o _,_;. • _oz.........-..
Left rear Left front Right front Right rear
control knob control knob control knob control knob

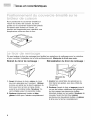
rts and Features
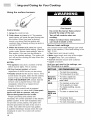
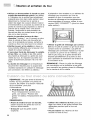
Hot air and moisture escape from the oven
through a vent in the center rear of the
cooktop. The vent lets air circulate properly.
Be careful not to block the vent, or you will
get poor baking/roasting results.
NOTE: Never store plastics, paper, or other
items that could melt or burn near the oven
vent, or any of the surface burners.
Oven vent
'' "' :JJ_:i ":_' Oven door vent
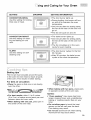
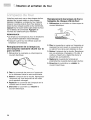
Hot air and moisture may escape from the
door vent during certain oven modes. Some
condensation may be observed occasional-
ly. This will not affect cooking performances.
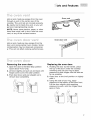
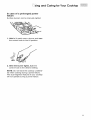
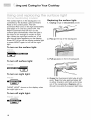
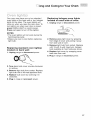
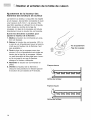
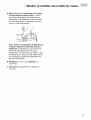
Removing the oven door:
1. Open the door to the Broil Stop position
(open about 4" [10 cm]).
2. Lift door slightly and pull out and back until
hinges come out to the catch position.
3. Push door down and pull straight out to
remove door completely.
Replacing the oven door:
1. Holding the door by the handle, place
1
1
the top of the door under the cooktop
overhang and use your leg to apply
pressure to slide hinges into the slots as
far as possible.
Open door to the broil position or slightly
past it.
Using the side of your leg, apply
pressure to the bottom of the door front.
Lift the door slightly while applying
pressure to push, until the hinges have
gone in fully.

i_iil_!:i_i!i ii_rts and Features
ii}:::_'O_!!_ii_iii'_iiiO,_ii'__"!ii_i_""!_!!iiil;{il;! _!}l"_i};ii_"'_ii_;:;:ii_;i_;,_ii:i;il;;l_,(il;iiiii""'!,Ov,_i;;;iiii_i!_,,!ii"''iiiili"_"'ii_:i_:;:iii!'ff_
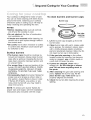
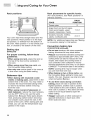
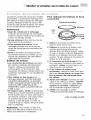
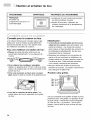
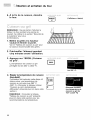
To position the pan over the bake shield, the
two guides on the pan should be placed over
the notches on the shield. The position is
important to maintain an even heat in the
oven.
!!iiil;;il;_,,¸¸Cii!{,_;i_i!i;i_,,
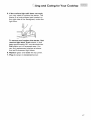
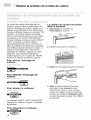
You can remove the storage drawer to make it easier to clean under the range. Use care
when handling the drawer.
Removing the storage drawer: Replacing the storage drawer:
rail
1. Empty drawer of any pots and pans
before removing drawer. Use recessed
area on top edge of drawer to pull draw-
er straight out to the first stop. Lift front
and pull out to the second stop.
2. Lift back slightly and slide drawer all the
way out.
1. Fit ends of drawer slide rails into the
drawer guides on both sides of opening.
2. Lift drawer front and press in until metal
stops on drawer slide rails clear white
stops on drawer guides. Lift drawer front
again to clear second stop and slide
drawer closed.

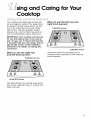
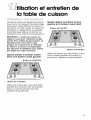
"ngand Caring for Your
Cooktop
LIsill !!i:i:iiii iJ
Your cooktop has sealed gas burners with
an auto-reignition system. The sealed burn-
ers spread the heat evenly across the bot-
tom of the cookware and provide infinite
heat control. The auto-reignition system
senses when a burner flame has gone out
and will automatically reignite that burner.
When to use the left rear and
right front burners:
IMPORTANT: Your cooktop is factory-set
for use with Natural Gas. If you wish to
use L.P. gas, an L.P. Gas Conversion Kit
is included with your new range. See the
appropriate section of the Installation
Instructions for details on making this
conversion.
6,000 BTU burner
6,000 BTU burner
When to use the right rear
and left front burners:
10,000 BTU burner
Use these burners for simmering or for
cooking smaller quantities of food requiring
small cookware.
10,000 BTU burner
Use these burners for cooking large quanti-
ties of food, deep-fat frying, or cooking with
large cookware.

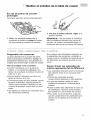
iii and Caring for Your Cooktop
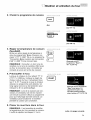
Using the surface burners:
Control knobs
1. Grasp the control knob.
2. Push down and turn to HI. The electric
spark ignitor will ignite the gas flowing into
the burner. When you hear a clicking
sound, you know that the ignitors are
working. Gas is flowing as long as knob is
not set at OFF.
3. When the burner is lit, turn the control
knob to the desired flame setting. (See the
guide under "Burner heat settings" later in
this section.) You can turn the knobs to
any of the marked settings. The ignitor will
turn off and the clicking will stop when the
burner ignites.
NOTES:
• The ignitors may click a number of times
before burner lights. This is normal.
, All four burner ignitors will spark
regardless of which burner you are using.
, Visually check that the burner has lit. If the
burner does not ignite, listen for the clicking
sound. If you do not hear the ignitor click,
TURN THE BURNER OFF. Check that the
service cord is placed firmly in the wall
receptacle. Check for a tripped circuit
breaker or blown fuse.
Check that the control knob is pressed
completely down on valve shaft. If the spark
ignitor still fails to operate, call your
nearest designated service outlet.
Proper grounding and polarity are
necessary for correct operation of the electric
ignition system. If the wall receptacle does
not provide correct polarity, the ignitor will
become grounded and click every once in
a while, even after the burner has ignited.
A qualified electrician should check the wall
receptacle to see if it is wired with correct
polarity.
10
Fire Hazard
Do not let the burner flame extend
beyond the edge of the pan.
Turn off all controls when not
cooking.
Failure to follow these instructions
can result in death or fire.
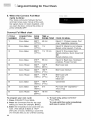
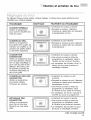
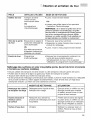
Burner heat settings
Use correct burner heat settings (see chart
later in this section). If the heat setting is too
high, it can:
• Char bacon and cause curling.
, Make eggs tough and crisp at the edges.
, Toughen liver, fish, and seafood.
, Scorch delicate sauces and custards.
• Cause a boilover.
Until you get used to the settings, use
the following as a guide.
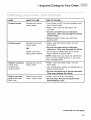
SETTING RECOMMENDED USE
HI • To start food cooking.
• To bring liquid to a boil.
Between • To hold a rapid boil.
MED and • To quickly brown or
HI sear meat.
MED • To maintain a slow boil.
• To fry poultry or meat.
• To make pudding, sauce,
or gravy.
Between • To stew or steam food.
MED and
LO
LO • To simmer food.
• To keep food warm.
• To melt chocolate or butter.

!sing and Caring forYour Cooktop
In case of a prolonged power
failure
Surface burners can be manually lighted.
1. Hold a lit match near a burner and turn
the control knob to the HI position.
2. After the burner lights, turn the
control knob to the desired setting.
NOTE: Do not leave the cooktop unattend-
ed when cooking during a power failure.
The auto-reignition feature of your cooktop
will not operate during a power failure.
11

i:_iil_!_i:!i !sing and Caring for Your Cooktop
,(i,',iiiiiii:iii 0 0 WCIiiii 'iiiiiliii:ii:iiiiiii , i!! i;
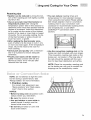
Home canning information
The large diameter of most water-bath or
pressure canners combined with high heat
settings for long periods of time can cause
damage to the cooktop.
To protect your range:
* Center the canner over the surface burner.
Do not extend more than 1 inch (2.54 cm)
outside the burner area.
* Do not place your canner on two surface
burners at the same time.
* Start with hot water, cover with a lid and
bring to a boil; then reduce heat to main-
tain a boil or required pressure levels in a
pressure canner.
* Refer to your canner manual for specific
instructions.
For up-to-date information on canning, con-
tact your local U.S. Government Agricultural
Department Extension Office or companies
who manufacture home canning products.
Using the right cookware makes a
big difference
* The pan should have a flat bottom, straight
sides, and a well-fitting lid.
* Choose medium to heavy gauge
(thickness) cookware.
• The pan material (metal or glass) affects
how quickly and evenly the pan heats.
• When using glass or ceramic cookware,
check to make sure it is suitable for use on
surface burners.
• To avoid tipping, make sure pots and pans
are centered on the grates.
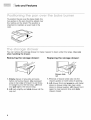
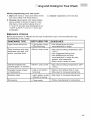
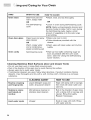
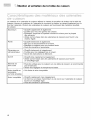
The pan material affects how fast heat transfers from the surface cooking area through the pan
material and how evenly heat spreads over the pan bottom. Choose pans that provide the
best cooking results.
Aluminum
Cast iron
• Heats quickly and evenly.
• Use for all types of cooking.
• Medium or heavy thickness is best for most cooking.
• Used as a core or base in cookware to provide even heating.
• Heats slowly and evenly.
• Good for browning and frying.
• Maintains heat for slow cooking.
• Can be coated with porcelain enamel.
Ceramic or • Heats slowly and unevenly.
ceramic glass • Use on low to medium settings.
• Follow manufacturer's instructions.
Copper • Heats very quickly and evenly.
• Used as a core or base in cookware to provide even heating.
Earthenware • Can be used for cooktop cooking if recommended by the
manufacturer.
• Use on low settings.
Porcelain enamel-on-steel • See cast iron and stainless steel.
or enamel-on-cast iron
Stainless steel
• Heats quickly but unevenly.
• A core or base of aluminum or copper on the cookware
provides even heating.
• Can be coated with porcelain enamel.
12

Jsing and Caring forYour Cooktop
,(iiiiii_i_i:_iiiii;i:_iii__!i_i'_"'_i!!iiiiiiiiiiiii'ii_0_iii''¸__,_,"_,_:,:::::::ii;_,,,_,,,,,_,i!ii"',C_,,0,0¸!if('!'_0,!i:i;i_,,
Your cooktop is designed for ease of care.
You can do most cleaning with items found
around the home. Cleaning your cooktop
whenever spills or soiling occur will help to
keep it looking and operating like new.
NOTES:
• Before cleaning make sure all controls
are off and the cooktop is cool.
• Do not obstruct the flow of combustion
and ventilation air.
• If knobs are removed while cleaning, be
careful not to spill liquids through holes in
the control area.
• Be careful not to allow moisture to collect
in control area. Moisture could cause igni-
tor switches to fail.
Surface burners
• The burner caps should be routinely re-
moved and cleaned. Always clean burner
caps after a spillover. Keeping the burner
caps clean prevents improper ignition and
an uneven flame.
• For proper flow of gas and ignition of the
burner, DO NOT ALLOW SPILLS, FOOD,
CLEANING AGENTS, OR ANY OTHER
MATERIAL TO ENTER THE GAS TUBE
OPENING.
• Occasionally check the burner flames for
proper size and shape as shown later in
this section. A good flame is blue in color.
If flames lift off ports, are yellow, or are
noisy when turned off, you may need to
clean the burners.
To clean burners and burner caps:
Burner cap
iiiii!ii!i!ii!i!ii!i!ii!i!ii!!
Gas tube
(orifice)
1. Lift the burner cap straight up from the
burner base.
2. Clean burner cap with warm, soapy water
and a sponge. For stubborn stains, clean
with a mildly abrasive plastic scrubbing
pad and powdered cleanser. Wipe dry. Do
not clean burner cap in dishwasher.
3. If the gas tube opening or the orifice,
located inside the opening, has become
soiled or clogged, use a cotton swab or
a soft cloth to clean the area.
4. If ports are clogged, clean with a
straight pin. Do not enlarge or distort
port. Do not leave anything stuck in
the ports.
5. After cleaning the gas tube opening and
ports, replace the burner cap. To re-
place burner cap, make sure cap is
properly aligned and leveled.
6. Check the burner after cleaning for proper
lighting.
NOTE: To check oven burner flames for
proper size and shape, see the Installation
Instructions also included with the range.
13

i_i_il_!_i:!iiii_ing and Caring forYour Cooktop
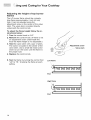
Adjusting the height of top burner
flames
The LO burner flame should be a steady
blue flame approximately 1/inch (6 mm)
high. It can be adjusted using the
adjustment screw in the center of the valve
stem. The valve stem is located directly
underneath the control knob.
To adjust the flame height follow the in-
structions below:
1. Turn the control knob to "LO."
2. Remove the control knob. (If there is not
an adjustment screw underneath the
knob the flame height is not adjustable.)
3. Hold the valve stem with a pair of pliers.
The screw is located in the center of the
valve stem. Use a small fiat head screw-
driver to turn the screw until the flame is
the proper size.
4. Replace the control knob.
........Adjustment screw
......... Valve stem
5. Test the flame by turning the control from
"LO" to "HI," checking the flame at each
setting,
Low flame
'_-_ !.n_l Ln_l Ln_l Ln_l I_rLI
High flame
Q-_ 'm_l t.n..! t.n..! t.n..! LnJ
o
14

, ingand Caring forYour Cooktop
Explosion Hazard
Do not store flammable materials such as gasoline near this
appliance.
Doing so can result in death, explosion, or fire.
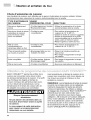
PART
Control
knobs
Tempered
glass
surface
Surface
burner
grates
and caps*
WHAT TO USE HOW TO CLEAN
Sponge and warm,
soapy water
* Turn knobs to OFF and pull straight away from con-
trol panel.
* Wash, rinse, and dry thoroughly. Do not soak.
• Do not use steel wool or abrasive cleansers.
They may damage the finish of the knobs.
• Replace knobs. Make sure all knobs point to OFF.
Sponge and warm,
soapy water
OR
Paper towel and
spray glass cleaner
• Remove grates.
• Wash, wipe with clean water, and dry thoroughly.
• Use nonabrasive, plastic scrubbing pad on heavily
soiled areas.
• Do not use steel wool, abrasives, or harsh
cleansers. They may damage the finish.
• Ifyou use soap or detergent solutions, wipe
thoroughly to prevent filmy residue.
NOTE: When cleaning cooktop with knobs removed,
do not allow water to run down inside unit.
• Replace grates.
Warm, soapy water
and a mildly abrasive
plastic scrubbing pad
and/or powdered
cleanser
• Clean as soon as they become dirty and when they
are cool enough to handle.
• Wash with a mildly abrasive plastic scrubbing pad
and warm, soapy water.
• For stubborn stains, clean with a scrubbing pad
and/or a powdered cleanser and water. Repeat
these cleaning steps as needed.
• Do not put in oven during self-cleaning cycle.
• Do not clean in dishwasher.
Surface See "Caring for your cooktop" earlier in this section
burners for cleaning instructions.
When the cooktop is cool, remove all spills and clean. Food spills containing acids, such
as vinegar and tomato, may affect the finish.
15

i:_iil_!_/::!:ising and Caring for Your Cooktop
L,fsii_i"_"'ii_,{Tictii"'"_lcl
The surface light is in the backguard. It is
controlled by the Surface Light Command
Pads on the control panel. The ON
Command Pad turns on the light immediately
and keeps it on until you press OFF. The
NIGHT Command Pad will turn on the
surface light automatically when the light in
the room is low enough to require a night
light. When the night light comes on, it will
also dim all lights appearing on the display.
Press OFF to turn off the regular surface light
or press NIGHT again to turn off the night
light.
Replacing the surface light:
1. Unplug range or disconnect power.
2. Flip up the top of the backguard.
To turn on the surface light:
!:::!::i:iii!!!i!7!i:'::!
To turn off surface light:
3. Pull up glass on front of backguard.
To turn on night light:
"NIGHT LIGHT" shows on the display when
the night light is on.
To turn off night light:
4. Grasp the fluorescent light tube at both
ends. Turn the tube approximately 90°
in either direction until both ends come
out of the receptacles. Replace with a
20-watt cool-white fluorescent light tube.
16

ii_,_ingand Caring forYour Cooktop
5. If the surface light still does not work,
you may need to replace the starter. The
starter is a knob-shaped part located on
the right side of the backguard, under the
light tube.
ilJJiiiJiiJiiiii_
..... iJ i
I
/
To remove and replace the starter, first
remove light tube. Push starter in and
turn approximately 90° counterclockwise.
Pull starter out of recessed area. You
can find replacement starters at stores
that sell fluorescent light tubes.
6. Replace glass and close the top panel.
7. Plug in range or reconnect power.
17

• and Caring for Your
Oven
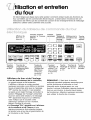
This section tells you, step by step, how to operate all oven functions controlled by the elec-
tronic control. Carefully follow these instructions, along with the cooking tips and cleaning
information, for successful use of your range.
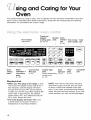
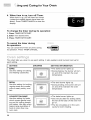
Oven display
(see below)
(p. 26)
I
Oven EASY Convect Full Surface light Oven Timer
setting CONVECTTM Meal pad pads light pad pads
pads conversion (p. 43) (some freestanding (p. 57) (p. 27)
pads models only)
(p. 46) (p. 16)
Timed and
delayed Number Clock
cooking pads pads set/start Time of day/ Start
(pp. 48-51) pad timer display pad
Cancel/off
pad
Display/clock
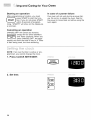
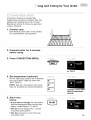
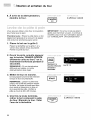
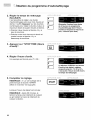
• When you first plug in the range, a tone
will sound, the display will be fully lit for a
few seconds, and the display will show
the last time set and "PF" (power failure).
If, after you set the clock (See "Setting the
clock" later in this section), the display
again shows "PF," your electricity was off
for a while. Reset the clock.
• The time display will show "Err" and
3 short tones will sound if a time or
temperature is incorrectly entered.
NOTE: You have to hold down the pad a
short time to get it to work, and you have
to allow a short time between each pad
entry. If you press a command pad several
times, the pad can stop working. If you wait
a few seconds, you can use the pad again.
18

ii_,,_ingand Caring forYour Oven
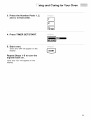
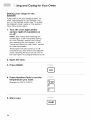
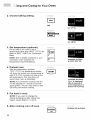
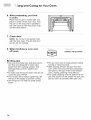
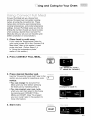
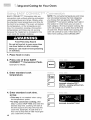
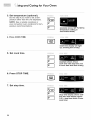
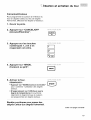
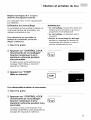
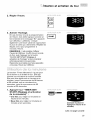
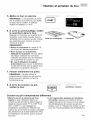
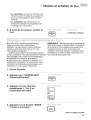
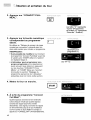
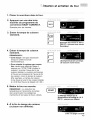
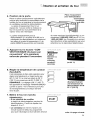
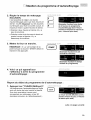
Fahrenheit/Celsius
To set your oven to cook in Celsius instead
of Fahrenheit:
1. Open the door.
2. Press CANCEL/OFF.
CANCELI
3. Press the Number Pads 1, 2,
and 3, in that order.
4. Press BROIL.
5. Start oven.
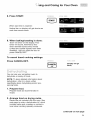
NOTES:
• Press BAKE to confirm that you are
using Celsius.
• Only the temperature and a flashing
degree symbol will appear in the tem-
perature display area when you set
your oven to cook in Celsius.
Repeat the steps above to change
from Celsius to Fahrenheit.
19

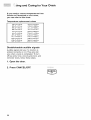
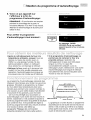
;sing and Caring for Your Oven
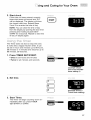
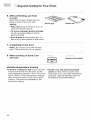
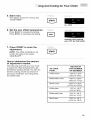
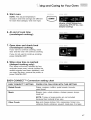
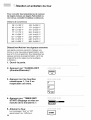
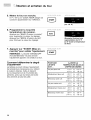
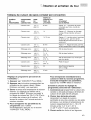
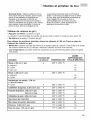
If you need to convert temperatures from
Celsius to Fahrenheit or vice versa,
you can refer to this chart:
Temperature replacement values
38°C=100°F
60°C=140°F
66°C= 150°F
77°C= 170°F
93°C=200°F
121°C=250°F
135°C=275°F
149°C=300°F
163°C=325 °F
177°C=350 °F
191 °C=375°F
204°C=400°F
218 °C=425° F
232°C=450°F
246°C=475°F
260°C=500°F
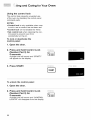
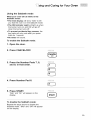
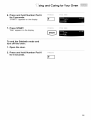
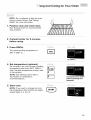
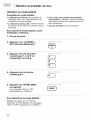
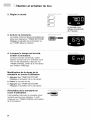
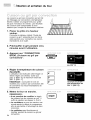
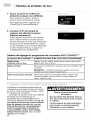
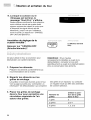
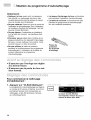
Disable/enable audible signals
Audible signals tell you if a function is
entered correctly or not. They also tell
you when a cycle is completed. To turn
off key entry tone, end-of-cycle tone, and
reminder tones, follow these steps:
1. Open the door.
2. Press CANCEL/OFF.
ICANCEL
20
La page est en cours de chargement...
La page est en cours de chargement...
La page est en cours de chargement...
La page est en cours de chargement...
La page est en cours de chargement...
La page est en cours de chargement...
La page est en cours de chargement...
La page est en cours de chargement...
La page est en cours de chargement...
La page est en cours de chargement...
La page est en cours de chargement...
La page est en cours de chargement...
La page est en cours de chargement...
La page est en cours de chargement...
La page est en cours de chargement...
La page est en cours de chargement...
La page est en cours de chargement...
La page est en cours de chargement...
La page est en cours de chargement...
La page est en cours de chargement...
La page est en cours de chargement...
La page est en cours de chargement...
La page est en cours de chargement...
La page est en cours de chargement...
La page est en cours de chargement...
La page est en cours de chargement...
La page est en cours de chargement...
La page est en cours de chargement...
La page est en cours de chargement...
La page est en cours de chargement...
La page est en cours de chargement...
La page est en cours de chargement...
La page est en cours de chargement...
La page est en cours de chargement...
La page est en cours de chargement...
La page est en cours de chargement...
La page est en cours de chargement...
La page est en cours de chargement...
La page est en cours de chargement...
La page est en cours de chargement...
La page est en cours de chargement...
La page est en cours de chargement...
La page est en cours de chargement...
La page est en cours de chargement...
La page est en cours de chargement...
La page est en cours de chargement...
La page est en cours de chargement...
La page est en cours de chargement...
La page est en cours de chargement...
La page est en cours de chargement...
La page est en cours de chargement...
La page est en cours de chargement...
La page est en cours de chargement...
La page est en cours de chargement...
La page est en cours de chargement...
La page est en cours de chargement...
La page est en cours de chargement...
La page est en cours de chargement...
La page est en cours de chargement...
La page est en cours de chargement...
La page est en cours de chargement...
La page est en cours de chargement...
La page est en cours de chargement...
La page est en cours de chargement...
La page est en cours de chargement...
La page est en cours de chargement...
La page est en cours de chargement...
La page est en cours de chargement...
La page est en cours de chargement...
La page est en cours de chargement...
La page est en cours de chargement...
La page est en cours de chargement...
La page est en cours de chargement...
La page est en cours de chargement...
La page est en cours de chargement...
La page est en cours de chargement...
La page est en cours de chargement...
La page est en cours de chargement...
La page est en cours de chargement...
La page est en cours de chargement...
La page est en cours de chargement...
La page est en cours de chargement...
La page est en cours de chargement...
La page est en cours de chargement...
La page est en cours de chargement...
La page est en cours de chargement...
La page est en cours de chargement...
La page est en cours de chargement...
La page est en cours de chargement...
La page est en cours de chargement...
La page est en cours de chargement...
La page est en cours de chargement...
La page est en cours de chargement...
La page est en cours de chargement...
La page est en cours de chargement...
La page est en cours de chargement...
La page est en cours de chargement...
La page est en cours de chargement...
La page est en cours de chargement...
La page est en cours de chargement...
La page est en cours de chargement...
La page est en cours de chargement...
La page est en cours de chargement...
La page est en cours de chargement...
La page est en cours de chargement...
La page est en cours de chargement...
La page est en cours de chargement...
La page est en cours de chargement...
La page est en cours de chargement...
La page est en cours de chargement...
La page est en cours de chargement...
La page est en cours de chargement...
La page est en cours de chargement...
La page est en cours de chargement...
La page est en cours de chargement...
La page est en cours de chargement...
-
 1
1
-
 2
2
-
 3
3
-
 4
4
-
 5
5
-
 6
6
-
 7
7
-
 8
8
-
 9
9
-
 10
10
-
 11
11
-
 12
12
-
 13
13
-
 14
14
-
 15
15
-
 16
16
-
 17
17
-
 18
18
-
 19
19
-
 20
20
-
 21
21
-
 22
22
-
 23
23
-
 24
24
-
 25
25
-
 26
26
-
 27
27
-
 28
28
-
 29
29
-
 30
30
-
 31
31
-
 32
32
-
 33
33
-
 34
34
-
 35
35
-
 36
36
-
 37
37
-
 38
38
-
 39
39
-
 40
40
-
 41
41
-
 42
42
-
 43
43
-
 44
44
-
 45
45
-
 46
46
-
 47
47
-
 48
48
-
 49
49
-
 50
50
-
 51
51
-
 52
52
-
 53
53
-
 54
54
-
 55
55
-
 56
56
-
 57
57
-
 58
58
-
 59
59
-
 60
60
-
 61
61
-
 62
62
-
 63
63
-
 64
64
-
 65
65
-
 66
66
-
 67
67
-
 68
68
-
 69
69
-
 70
70
-
 71
71
-
 72
72
-
 73
73
-
 74
74
-
 75
75
-
 76
76
-
 77
77
-
 78
78
-
 79
79
-
 80
80
-
 81
81
-
 82
82
-
 83
83
-
 84
84
-
 85
85
-
 86
86
-
 87
87
-
 88
88
-
 89
89
-
 90
90
-
 91
91
-
 92
92
-
 93
93
-
 94
94
-
 95
95
-
 96
96
-
 97
97
-
 98
98
-
 99
99
-
 100
100
-
 101
101
-
 102
102
-
 103
103
-
 104
104
-
 105
105
-
 106
106
-
 107
107
-
 108
108
-
 109
109
-
 110
110
-
 111
111
-
 112
112
-
 113
113
-
 114
114
-
 115
115
-
 116
116
-
 117
117
-
 118
118
-
 119
119
-
 120
120
-
 121
121
-
 122
122
-
 123
123
-
 124
124
-
 125
125
-
 126
126
-
 127
127
-
 128
128
-
 129
129
-
 130
130
-
 131
131
-
 132
132
-
 133
133
-
 134
134
-
 135
135
-
 136
136


KitchenAid KGRT507GAL0 Le manuel du propriétaire
- Catégorie
- Fours
- Taper
- Le manuel du propriétaire
- Ce manuel convient également à