Dirtdevil MCE5500CA Le manuel du propriétaire
- Catégorie
- Aspirateurs
- Taper
- Le manuel du propriétaire

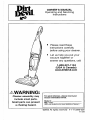
OWNER'S
MANUAL
Operating and Servicing
Instructions
AWARNING:
Cleaner assembly may
include small parts.
Small parts can present
a choking hazard.
Please read these
instructions carefully
before using your cleaner.
Let us help you put your
vacuum together or
answer any questions, call:
1
-800-321 -1
1
34
(USA
&
Canada)
www.dirtdevil.com
For
quick
reference, please record your
vacuum information below.
Model
#:
Mfg. Code:
(Mfg. code located on
the
lower backside of cleaner)
02003
All
rights reserved
#
1-1
13390-000
1 1
lo3


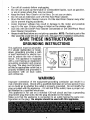
THlS CLEANER IS INTENDED FOR HOUSEHOLD USE ONLY.
IMPORTANT SAFETY INSTRUCTIONS
When you use an appliance, basic precautions should be followed,
including the following:
READ ALL INSTRUCTIONS BEFORE USING THE APPLIANCE.
ALWAYS FOLLOW THESE SAFETY INSTRUCTIONS.
DO NOT LEAVE CLEANER UNATTENDED WHEN PLUGGED IN.
OCCASIONALLY CLEAN DEBRIS FROM BRUSH.
WARNING: FULLY ASSEMBLE CLEANER BEFORE OPERATING.
WARNING: THE CORDS, WIRES, AND/OR CABLES SUPPLIED WITH THlS
PRODUCT CONTAINS CHEMICALS, INCLUDING LEAD OR LEAD COMPOUNDS,
KNOWN TO THE STATE OF CALIFORNIA TO CAUSE CANCER AND BIRTH
DEFECTS OR OTHER REPRODUCTIVE HARM. WASH HANDS AFTER USING.
READ ALL INSTRUCTIONS BEFORE USING THE APPLIANCE.
WARNING: TO REDUCE THE RISK OF FIRE,
ELECTRIC SHOCK OR INJURY:
Connect to a properly grounded outlet only. See Grounding Instructions.
Do not leave appliance when plugged in. Unplug from outlet when not in use
and before servicing.
To reduce the risk of electric shock, use indoors only. Do not immerse. Use
only on surface moistened by cleaning process or small spills.
A
small spill
is considered to be less than one gallon and less than
118
inch deep.
To reduce the risk of fire- Do not use a flammable or combustible liquid to
clean floor.
Do not allow to be used as a toy. Close attention is necessary when used by
or near children.
Use only as described in this manual.
Do not use with damaged cord or plug. If appliance is not working as
it
should, has been dropped, damaged, left outdoors, or dropped into water,
return
it
to a service center for inspection. Call 1-800-321-1 134 or visit our
website at www.dirtdevil.com to locate the nearest service center.
Do not pull or carry by cord, use cord
as
handle, close a door on a cord, or
pull cord around sharp edges or corners. Do not run appliance over cord.
Keep cord away from heated surfaces.
Do not unplug by pulling on cord. To unplug, grasp the plug, not the cord.
Do not handle plug or appliance with wet hands.
Do not put any objects into openings. Do not use with any opening blocked;
keep free of dust, lint, hair, and anything that may reduce air flow.
Keep hair, loose clothing, fingers, and all parts of body away from openings
and moving parts.
Do not pick up anything that is burning or smoking, such as cigarettes,
matches, or hot ashes.
Do not use without dirty water reservoir and filter assembly in place.
2

Turn off all controls before unplugging.
Do not use to pick up flammable or combustible liquids, such as gasoline,
or use in areas where they may be present.
Keep the Hard Floor
Cleansr on the floor. Do not use on stairs.
Do not use an extension cord
with
this Hard Floor Cleaner.
Store the Hard Floor Cleaner indoors. Put the Hard Floor Cleaner away after
use to prevent tripping accidents.
Using improper voltage may result in damage to the motor and possible
injury to the user. Proper voltage is listed on the cleaner plate.
Use only with Dirt Devila Floor Cleaner Concentrate or Dirt DevilaHard Wood
Floor Cleaner Concentrate.
Always install float before any wet pick-up operation.
NOTE:
The float is part of the
filter assemblv inside the dim water tank. See Daae
8
for installation instructions.
GROUNDING INSTRUCTIONS
This appliance must be grounded.
If it should malfunction or break-
down, grounding provides a path
of least resistance for electric cur-
rent to reduce the risk of electric
shock. This appliance is equipped
with
a
cord having an equipment-
grounding conductor and ground-
ing plug. The plug must be insert-
ed into an appropriate outlet that is
properly installed and grounded in
accordance with all local codes
and ordinances.
GROUNDED
-
OUTLET
BOX
WARNING
Improper connection of the equipment-grounding conductor can result in a
risk of electric shock. Check with
a
qualified electrician or service person if you
are in doubt as to whether the outlet is properly grounded. Do not modify the
plug provided with the appliance
-
if it will not fit the outlet, have a proper out-
let installed by a qualified electrician.
This appliance is for use on a nominal 120-volt circuit and has a grounding
attachment plug that looks like the plug illustrated in the sketch.
Make sure that the appliance is connected to an outlet having the same con-
figuration as the plug.
No adapter should be used with this appliance.

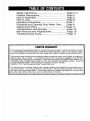
Safety Instructions
............................................
Page
2,
3
Feature Descriptions
........................................
Page
5
How to Assemble
.............................................
Page
6
How to Use
.......................................................
Page
6
Operating Instructions
......................................
Page
7
Emptying and Cleaning Dirty Water Tank
........
Page
8
Cleaning the Filter
............................................
Page
9
Transportation and Storage
..............................
Page
10
Belt Removal and Replacement
.......................
Page
10
Troubleshooting Guide
...................................
Page
11
LIMITED WARRANTY
To the consumer, Royal Appliance Mfg. Co. warrants this vacuum cleaner to be free of defects in materi-
al or workmanship commencing upon the date of the original purchase. Refer to your vacuum cleaner
carton for the length of warranty and save your original sales receipt to validate start of warranty period.
If the vacuum cleaner should become defective within the warranty period, we will repair or replace any
defective parts free of charge. The complete machine must be delivered
to any ROYALm
Authorized Sales
&
Warranty Service Station. Please include complete description of the problem, day
of purchase, copy of original sales receipt and your name, address and telephone number. If you are
not near a Warranty Station, call the factory for assistance at USA
&
Canada:
1-800-321-1134. Use only genuine Royale replacement parts.
The warranty does not include unusual wear, damage resulting from accident or unreasonable use of
the vacuum cleaner. This warranty does not cover brushes, flat belts, filters and bulbs. This warranty
does not cover unauthorized repairs. This warranty gives you specific legal rights and you may also
have other rights (Other rights may vary from state to state in the USA).

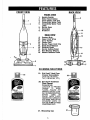
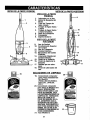
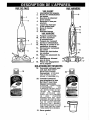
FRONT VlEW
FRONT
VlEW
1.
Handle Switch
2.
Motor Reset Button
3.
Clean Water Tank Cap
4.
Clean/Dirty Water Tank
2 5.
CleanlDirty Water Tank
Latch
6.
Nozzle Base
7.
Squeegee
8.
Brushroll
BACK
VlEW
9.
Comfort Grip
10.
Upper Cord Wrap
11.
Carry Handle
12.
Power Cord
13.
Nozzle Power Cord Clip
14.
Quick Cord Release
4 15.
Solution Pedal
16.
Nozzle Setting Pedal
17.
Non-Marring Wheels
18.
Handle Release Pedal
CLEANING SOLUTIONS
19.
Dirt Devil" Hard Floor
{leaner Concentrate
FOR USE ON VINYL,
ILE, LINOLEUM, ETC.)
20.
Dirt Devil" Hardwood
Floor Cleaner
Concentrate
CAUTION: TO PREVENT
b
AMAGE TO WOOD
FLOORS, FOLLOW THE
MANUFACTURERS CLEAN-
ING RECOMMENDATIONS.
BEFORE USING ON
SEALED WOOD FLOOR,
ENSURE THAT SURFACE IS
NOT WORN, BARE OR HAS
SEPARATED JOINTS. DO
NOT USE IF
ANY
OF THESE
CONDITIONS MIST.
21.
Measuring Cup
5
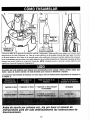
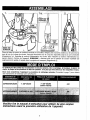
BACK
VlEW

NOZZLE
BASE
I
\
NOZZLE
BASE
I-
_J
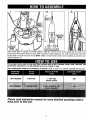
,and nozzle base in upright and locked position. Align the notches of the inner tubing with the hole in thl?
nozzle base. Press down firmly on body until it snaps into place (Diagram la). Push nozzle power cord into
nozzle power cord clip on back of unit.
NOTE: Make sure the excess power cord is tucked up and into car[/
handle (Diagram
2).
The recommended sequence of cleaning is as follows (Refer to page
7
for specific cleanina instructions):
I
DRY
VACUUM
1
I-DRY
VAC
1
-
DRY
VAC
(nozzle raised)
I
OFF
1
Please read instruction manual for more detailed operating instruc-
tions prior to first use.

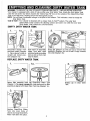
The Hard Floor cleaner can be used to clean wood floors that have been sealed with a oolvurethane coatino
,J
.
.
and can be cleaned with water.
CAUTION:
TO PREVENT DAMAGE TO WOOD FLOORS, FOLLOW THE MANUFACTURERS CLEANING
RECOMMENDATIONS. BEFORE USING ON SEALED WOOD FLOOR, ENSURE THAT SURFACE IS
NOT WORN, BARE OR HAS SEPARATED JOINTS. DO NOT USE IN WET
VACISCRUB MODE. DO
NOT USE IF
ANY
OF THESE CONDITIONS EXIST.
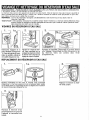
Remove cap from Clean
Water Tank.
Fill remainder of Clean Water Tank with
warm water up to the maxfill line (approx-
imately
24
02.). Replace cap on tank.
brushes
off).
Pour 314 oz. of Dirt
Devila Hard Floor or
Wood Floor Cleaning
Solution Concentrate
into measuring cup.
Replace
CleanIDirty
WaterTank into main
body of cleaner.
Pour Dirt Devil" Floor Cleaner or
Hardwood Floor Cleaner Solution
Concentrate into Clean Water Tank.
DO
NOT USE PINE, SOLVENT, OR
WAX
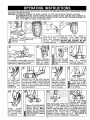
RELEASE pedal to
pu
switch from posi-
tion
1
to position
2
(vacuum on,
Step
on
SOLUTION ONIOFF
pedal to start the flow of
cleaning solution.
NOTE:
Cleaner will continuously
Step on NOZZLE SET-
With both handle switch and
NOZZLE SETTING pedal in
position
2
and SOLUTION
ONIOFF pedal engaged, slow-
ly move cleaner forward and
backward over area to be
cleaned.
Overlao strokes bv
[one inch to preient streaking.1
process, step on-thl!
SOLUTION ONIOFF
pedal to stop the flow
of solution and move
the handle switch from
position
2
to position
1.
Continue o erating
in2- WETSE~UB
&

Your cleaner is equipped with a shut off valve within your Dirty Water Tank. Empty the Dirty Water Tank
when the wet andlor dry debris reaches the "Debris Max Fill" line on the outside of the CleanIDirty Water
Tank or the float rises, shutting off air flow through the nozzle.
NOTE:
You will hear a noticeable change in the pitch
of
the cleaner. This indicates a need to empty the
Dirty Water Tank.
Tank-In-Tank":
Your cleaner is designed with a unique Tank-In-TankTM system. The outer tank
(Clean Water Tank) contains the cleaning solution and water mix while the inner tank
(Dirty Water Tank) collects dry and wet debris.
EMPTY
DIRTY
WATER TANK
Disconnect cleaner from
electrical outlet (Diagram
1). Place cleaner handle in
Push down on CleanIDirty
Water Tank latch while
grabbing handle and pullina
upright and locked posi-
knk upand out from main
tion (Diagram la).
body of cleaner.
REPLACE
DlRN
WATER TANK
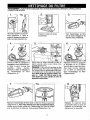
Grasp tab (Diagram 3) and pull up to remove filter
assembly (Diagram 3a) out of tank. Empty contents
into sink (Diagram 3b).
Return filter assembly back into
CleanlDirtv Water
(Diagram
1).
To
ensure a proper
fit, make surearrow on filter
assembly is aligned with Clean Water Tank Cap (Diagram la.)
-I
Replace CleanIDirty Water
Tank into main body of
cleaner and snap CleanIDirty
Water Tank latch into place.
Replace cap on Clean Water
Tank.

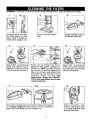
Disconnect cleaner from elec-
Remove CleanIDirty Water
trical outlet (Diagram 1). Place
Tank.
cleaner handle in upright and
locked position (Diagram la).
Remove filter by grasping tab
Remove any loose debris from filter by
(inset) and turning
counter-
tapping the filter against a garbage can.
clockwise. Lift filter up and out (Diagram
5).
NOTE:
For additonal clean-
of filter assembly (Diagram
4).
ing, the filter (a) and filter assembly (b)
may be rinsed under water (Diagram 5a).
Allow filter and filter assembly to air dry
completely before use.
For filter
replacements, please call 1-800-321-
1134 or visit www.dirtdevil.com to locate
a dealer nearest you.
Return filter assembly back into CleanIDirty Water Tank (Diagram
7).
To
ensure a proper fit,
make sure arrow on filter assembly is
aligned with Clean Water Tank Cap (Diagram 7a).
I
I
Pull filter assemblv
UD
and out
Push filter down
ah
into filter
assembly (Diagram
6).
Replace CleanIDirty water
tank into main body of clean-
er and snap cleanldirty water
tank latch into place.

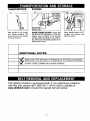
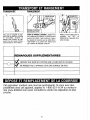
TRANSPORTATION STORAGE
With handle in full upright
BEFORE STORING CLEANER:
ensure that
Move handle switch to
OFF
and locked Dosition, tilt the
NOZZLE
SEllING oedal is in
DRY
VAC
~osition and un~lua from
.
-
cleaner back in rear wheels
position. Run the cleaner for
30
seconds
electrical outlet.
and push forward. with the solution onloff pedal in the off posi-
tion. Make sure that cleaning solution is not
leaking from the unit.
ADDITIONAL
NOTES
b
,
MAKE SURE THAT NOTHING IS PRESSING ON THE NOZZLE SQUEEGEE.
DO NOT STORE CLEANER ON A WOOD SURFACE.
This cleaner contains a permanent belt.
If
you experience problems
with this unit, please call 1-800-321 -1 134 or visit or website at
www.dirtdevil.com
to locate the nearest Service Center.

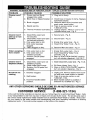
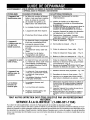
WARNING: TO REDUCE RISK OF PERSONAL INJURY
-
UNPLUG CLEANER BEFORE SERVICING
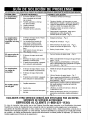
PROBLEM
Cleaner won't
run
Cleaner won't
pick-up or low
suction
Water escaping
from cleaner
Cleaner won't
dispense solution
Brushroll not
rotating
POSSIBLE REASON
1. Power cord not firmly
plugged into outlet.
2. Blown fuse or tripped breaker.
3. Brush clogged.
4. Needs service.
5.
Thermal Protector activated.
1. CleanJDirty water tank
not secured.
2.
CleanIDirty water tank latch
not secured properly.
3. Dirty water tank is full.
4.
Dirty water passage
clogged.
5.
Filter clogged or dirty.
1.
Dirty water tank is full.
2.
Dirty water tank not
installed correctly.
3. Solution OnIOff pedal
engaged.
1.
CleanJDirty water tank not
installed properly.
2.
Clean water tank empty.
3.
Solution OnlOff pedal not
engaged.
1. Brushes clogged.
2.
Belt broken.
3.
Incorrect handle switch
position.
.
~-
I
POSSIBLE SOLUTION
2. Check fuse or breaker in home. Replacc
fuseheset breaker.
3. Remove debris from brushroll and
push motor reset button
4. Take to service center or call
1-800-321 -1 134.
5.
Unplug cleaner. Allow to cool for 30
minutes before use
-
Pg.
3.
1.
Secure tank
-
Pg.
8.
2.
Secure latch
-
Pg. 8.
3.
Empty dirty water tank
-
Pg. 8.
4. Clean Dirty Water Tank
-
Pg. 8.
5.
Remove filter and clean
-
Pg.
9.
1.
Empty Dirty water tank
-
Pg. 8.
2.
Insert CleanIDirty Water Tank
correctly
-
Pg.
9.
3.
Step on SOLUTION ONIOFF pedal to
turn off solution dispense
-
Pg.
5
&
7.
1.
Install CleanIDirty water tank
-
Pg.
7
&
8
2.
Fill Clean Water Tank
-
Pg.
7.
3.
Step on SOLUTION ONIOFF pedal to
turn on solution dispense
-
Pg.
9.
1. Unplug unit. Remove debris from brush.
roll and push reset button on handle.
2.
Take to a service center or call
1-800-321 -1 134.
3. Move handle switch to position 2
(vacuum on, brushes on)
-
Pg.
7.
ANY OTHER SERVICING SHOULD BE DONE BY AN AUTHORIZED SERVICE
REPRESENTATIVE
CUSTOMER SERVICE
(1 -800-321 -1 134)
In the event that further assistance is required, see your Yellow Pages for an authorized Royalm Dealer. Costs
of any transportation to and from any place of repair are to be paid by the owner. The service parts used in
this unit are easily replaced and readily available from an authorized RoyaP Dealer or retailer. Always iden-
tify your cleaner by the model number and manufacturing code when requesting information or ordering
replacement parts. (The model number appears on the bottom of the cleaner.)

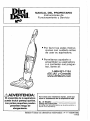
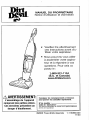
MANUAL DEL PROPIETARIO
lnstrucciones de
Funcionamiento
y
Sewicio
Por favor lea estas instruc-
ciones con cuidado antes
de usar su aspiradora.
Permitanos ayudarle a
ensamblar su aspiradora
o a contestar sus pregun-
tas, llame al:
1-800-321 -1 134
(EE.UU.
y
Canada)
www.dirtdevil.com
'
ADVERTENCIA
Para tener una referencia rapida, anote por
El
ensamble de la
favor
la
informacion de su aspiradora aqui.
la
puede incluir partesp queiias.
Las parts pequeiias pueden
presentar riesgo de
ahogamiento.
02003
Todos 10s derechos reservados
#
1-1 13390-000
1
1 lo3


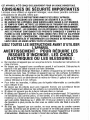
ESTA ASPIRADORA
ESTA
DISEQADA PARA US0
DOMESTICO
SOLAMENTE
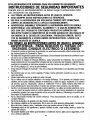
INSTRUCCIONES DE SEGURIDAD IMPORTANTES
Cuando use un electrodomestico se deben seguir precauciones basi-
cas, incluyendo las siguientes:
LEA TODAS LAS INSTRUCCIONES ANTES DE USAR EL APARATO.
SlGA SIEMPRE ESTAS INSTRUCCIONES DE SEGURIDAD.
NO DEJE LA ASPIRADORA SIN VIGILANCIA CUANDO
ESTE
CONECTADA.
LlMPlE LOS DESECHOS EN EL CEPILLO OCASIONALMENTE.
ADVERTENCIA: ENSAMBLE TOTALMENTE
LA
ASPIRADORA ANTES DE USARLA.
ADVERTENCIA: LOS CORDONES, ALAMBRES
Y
10
CABLES SUMINISTRA-
DOS CON ESTE PRODUCT0 CONTIENEN PRODUCTOS
QU~MICOS
QUE
INCLUYEN PLOMO
0
COMPUESTOS DE PLOMO ACERCA DE LOS CUALES SE
HA SABIDO EN EL ESTADO DE CALIFORNIA, PRODUCEN
CANCER,
DEFEC-
TOS DE NAClMlENTO U OTROS
DANOS
REPRODUCTIVOS.
LAVESE
LAS
MANOS
DESPUES
DE USARLA..
LEATODAS
LAS
1NSTR)CCIONES ANTES DE USAR EL APARATO.
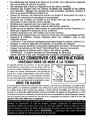
ADVERTENCIA: ARA REDUCIR EL RIESGO DE
INCENDIO.CHOQUE ELECTRIC0
0
LESIONES:
Conecte la unidad a ha toma de corriente con una buena conexion a tierra solamente. Vea
las lnstrucciones de Conexion a Terra.
No deje solo el aparato cuando este conectado. Desconectelo de la toma de corriente cuan-
do no lo use
y
antes de darle servicio.
Para reducir el riesgo de choque electrico, usela solamente en interiores. No la sumerja.
Usela solamente en una supetficie humedecida por el proceso de limpieza o derrames pe-
queiiosSe considera un derrame pequeiio a uno de menos de un galon (4.785 l.)
y
menos
de 118 de pulgada
(3.2
mm) de profundidad.
Para reducir el riesgo de incendio- No use un liquid0 inflamable o combustible para limpiar
el
piso.
No permita que se use como juguete. Ponga mucha atencion cuando la use un niiio o
qerca de niiios.
Usela solamente como se indica en este manual.
No la utilice con el cordon electrico o la clavija daiiados. Si el aparato no trabaja como
debiera, se ha caido, daiiado, dejado en extenores o caido en agua, regreselo a un centro
de servicio para su
inspection.
Llame al 1-800-321-1134 o visite nuestro sitio Web en
www.dirtdevil.com para encontrar
el
centro de servicio mis cercano a su domicilio.
No tire ni la transporte tomandola del cordon electrico, no utilice el cordon electrico como
asa, no cierre la puerta sobre el cordon electrico, ni tire del mismo alrededor de esquinas
o rebordes agudos. No pase el aparato sobre el cordon electrico. Mantenga el cordon elec-
trico lejos de superficies calientes.
No lo desconecte
tirando del cordon electrico. Para desconectarla, tome la clavija, no el
cordon electrico.
No tome la clavija o el aparato con las
manos mojadas.
No coloque objetos en las aperturas. No lo use con una abertura bloqueada; mantengalo
libre de polvo, pelusa, pelo
y
cualquier cosa que pueda reducir el flujo de aire.
Mantenga lejos de las aperturas
y
partes moviles el pelo, ropa suelta, dedos
y
todas las
partes del cuerpo.
No aspire objetos que esten quemandose o emitiendo humo, tales como cigarrillos, ceril-
10s o cenizas calientes.
E2

No la use sin el tanque de agua sucia
y
el conjunto del filtro en sus lugares.
Apague todos 10s controles antes de desconectar.
No la use paraaspirar liquidos inflamables o combustibles, tales como gasolina, ni lo use en
ireas donde pudieran estar presentes.
Mantenga la aspiradora para pisos descubiertos en el suelo.No la use en escaleras.
No use una extension
electrica al usar esta aspiradora para pisos descubiertos.
Guarde la aspiradora para pisos descubiertos en interiores. Guardela despues de su uso para
evitar accidentes de tropiezos.
Usar el voltaje inapropiado puede resultar en daiio al motor
y
posibles lesiones al usuario. El
yoltaje apropiado esti listado en la placa de la aspiradora.
Usela solamente con el limpiador concentrado para pisos Dirt Devil@ o con el limpiador
concentrado para pisos de madera Dirt Devil@
lnstale siempre el flotador antes de cualquier aspirado en mojado. NOTA :El flotador forma
parte del conjunto del filtro dentro del tanque de agua sucia.
Vea las instrucciones de instalacion en la
pagina
8.
GUARDE ESTAS INSTRUCCIONES
Este aparato debe tener conexion a
tierra. En caso de averia o ma1 fun-
cionamiento, la conexion a tierra
proporciona una ruta de menor
resistencia para corriente electrica
a fin de reducir el riesgo de choque
electrico. Este aparato esta equipa-
do con un cable que tiene un con-
ductor de conexion a tierra del
equipo
y
una clavija de conexion a
tierra. La clavija debe insertarse en
una toma de corriente apropiada,
correctamente instalada
y
con cone
I
ion a tierra, segljn todos 10s codiaos
v
dis-
-
posiciones locales.
ADVERTENCIA
Una conexion incorrecta del conductor de conexion a tierra del equipo puede resul-
tar en un riesgo de choque electrico. Comuniquese con un electricista cualificado o
con el tecnico de servicio si no esta seguro si la toma de corriente tiene una buena
conexion a tierra. No modifique la clavija proporcionada con el aparato
-
si esta no
encaja en la toma de corriente, solicite a un electricista cualificado la instalacion de
una
toma de corriente apropiada. Este aparato esta diseiiado para uso en un circuit0
nominal de
120
voltios
y
tiene una clavija con conexion a tierra parecida a la clavija
ilustrada en el diagrama. Asegljrese de que el aparato este conectado a una toma de
corriente que tenga la misma configuracion que la clavija.
Nose debe war un adap-
tador con este aparato.

lnstrucciones de Seguridad
..............................
Pain
E2,
E3
Descripcion de las Caracteristicas
...................
Pagina
E5
Como Ensamblar
..............................................
Pagina
E6
Como Funciona
................................................
Pagina
E6
.....................
lnstrucciones de Funcionamiento Pagina
E7
Como Vaciar
y
Limpiar el Tanque de
Agua Sucia
....................................................
..Pagina
E8
Limpieza del Filtro
...........................................
Pagina
E9
........................
Transporte
y
Almacenamiento
Pagina
El
0
Remocion
y
Reemplazo de la Banda
.............
Pagina
El
0
Guia de Solucion de Problemas
......................
Pagina
Ell
Al consurnidor, Royal Appliance Mfg. Co. le garantiza que esta aspiradora no tiene defectos ni de rnateri-
al ni de mano de obra, la garantia cornienza en la fecha de cornpra original. Vea la caja para inforrnacion
de la
duration
de la garantia y guarde el recibo de cornpra original para hacer valido el inicio del periodo
de garantia.
En caso que la aspiradora rnuestre alglin defect0 dentro del periodo de garantia, repararernos o reern-
plazarernos de rnanera gratuita cualquier parte defectuosa. La rnaquina cornpleta debe ser enviada con
porte pagado a cualquier Estacion Autorizada ROYAL@ de Ventas y Servicio de Garantia. Por favor
incluya una
description
cornpleta del problerna, fecha de cornpra, copia del recibo de cornpra origlnal
y su nornbre, dornicilio y nurnero de telefono. SI no se encuentra cerca de una Estacion de Garantla,
llarne a la fabrica para pedir asistencia en 10s EE.UU.
y
Canada: 1-800-321-1134. Use solamente partes
de repuesto genuinas Royal@.
La garantia no
incluye el desgaste anormal, daiio corno resultado de un accidente o del us0 no ade-
cuado de la aspiradora. Esta garantia no cubre 10s cepillos, bandas planas, filtros ni focos. Esta garan-
tia no cubre reparaciones no autorizadas. Esta garantia le confiere derechos legales especificos y podria
tener tarnbih otros derechos, 10s que varian de estado a estado en 10s EE.UU.

VISTA DE
LA
PARTE FRONTAL
VISTA DE
LA
PARiE POSTERIOR
VISTA DE LA PARTE
FRONTAL
1.
Interruptor en el Asa
2. Boton de Reajuste del
Motor
3.
Tapa del Tanque de
Agua Limpia
4.
Tanque de Agua Sucia
/
Limpia
5. Tanque de Agua Sucia
/
Limpia Cerradura
6.
Base de la Boquilla
7.
Enjuagador
8. Cepillo Giratorio
VISTA
DE
LA PARTE
POSTERIOR
9.
Asa de Confort
10. Enrollamiento Superior
del Cordon
11.
Asa de Transporte
12. Cordon Electrico
13. Abrazadera del Cordon
Electrico
14. Liberacion Rapida del
Cordon Electrico
15. Pedal de la
Solucion
16. Pedal de Ajuste de la
Boquilla
17. Ruedas
que no estro-
pean
18. Pedal de Liberacion del
Asa
19. Concentrado Limpiador
para Pisos Descubiertos
Dirt
Devil@
(PA~~USO
EN-VINILO,
AZULEJO. LINOLEO.
ETC.)
20. Concentrado Limpiador
para Pisos de Madgra Dirt
Devil@ (PRECAU_CION:
PARA EVITAR DAN0 A LOS
PlSOS DE MADERA, SlGA
LAS RECOMENDACIONES DE
LlMPlEZA DEL FABRICANTE.
ANTESDEUSARLOEN
PROS DE MADERA SELLA-
DA, ASEG~~RESE QUE LA
SUPERFlClE NO ESTE DES-
GASTADA, DESCUBIERTA 0
QUE TENGA UNIONES SEPA-
RADAS. NO LO USE SI SE
PRESENTA CUALQUIERA DE
ESTAS CONDICIONES.
Taza Medidora
E5

L
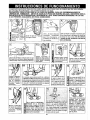
Coloque la base de la boquilla en posicion vertical
I
CUERPO
I
v
aseaurada. Haaa ~resion hacia abaio con firmeza hastn
asegurarla en su sitio (Diagrama la). Pase el cord6n ek&ico de la boqui~~a a tr&s del canal para el cord611
en la parte posterior de la base de la boquilla para evitar pellizcarlo. Empuje el cordon electric0 de la boquil.
la en la abrazadera para el mismo en la parte posterior de la unidad (Diagrama
2).
Alinee las muescas del tubo
interior con las del orificio en la base de la boauilla.
NOTA:
Aseajrese que el resto del corddn elictrico esti
metido en el asa de transporte (Diagrama
2).
Se puede usar este product0 para limpiar pisos descubiertos como azulejo, linoleo, piedra, vinilo,
lam-
inado
y
pisos de madera sellada. No esta diseiiado para usarse en alfombras o tapetes.
La secuencia recomendada de limpieza es como sigue
(Vea /as instrucciones especificas de limpieza en
la
pains
7).
I
AspimdoenSeco
1-
Aspirado en Seco
1-
Aspirado en Seco (boquil-
I I
la levantada)
I
Antes de usarla por primera vez, lea por favor el manual de
instrucciones para ver mas defalladamente /as instrucciones de
funcionamiento.

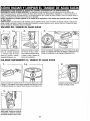
La
aspiradora para
pisos
descubiertos
puede
usarse
para
limpiar
pisos
de
madera
que
han
sido
sellados
con
una
caga
de
poliuretano
y
qug
pueden
limpiarse
con
agua.
PRECAUCION: PARA EVITAR DAN0 A LOS PlSOS DE MADERA, SlGA LAS RECOMENDACIOJJES DE
LlMPlEZA DEL FABRICANTE. ANTES DE USARLO EN PlSOS DE MADERA SELLADA, ASEGURESE QUE LA
SUPERFlClE NO
ESTE
DESGASTADA, DESCUBIERTA
0
QUE TENGA UNIONES SEPARADAS. NO LO USE
SI SE PRESENTA CUALQUIERA DE ESTAS CONDICIONES.
Uene e resto ael Tanq~e ae Agba Lmp~a con agLa
hola hash la linea oe
I
enaoo mbmo laoronmada-
I
moviendo el intemp-
tor
del
asa
de la posi-
ci6n de APAGAOO
(OFF) a la
1
(aspiradora
encendida, cepillos
Mueva el interruptor
iel asa de la oosici6n
I
a la
2
(asbiradora
mcendida, cepillos
3ctivados).
Coloque nuevamente el
Tanque de Agua Limpia
!
Sucia en el cuerpo de laaspk
radon.
Apriete
la cewdura
para asegurar.
Si es necesario, pise el pedal de AJUSTE DE LA BOQUIL-
L4
(NOZZLESEIING) para asegurafse we la boauillase
levantedel plso parael asp rado en seco NOTA
9
el
pedal
oe AJUSTE OE
LA
BOQUILA se encuemia en la pos
c
on
2
(TALIADO Y ASP RADO Eh MOJAOO) el en]lgador
1
evitad
que se aspiren 10s desechos sews.
Pise el pedal de
ENCENDIOO
,
n
APAGADO
DE
LA
SOLUCIO~
para
..
iniciar
. .
el regado de la
salu.
A
clon Ihrno~adora.
NOTA:
La
am;-
radora igarri continuament6 1;
soluc~dn hasfa oue 0;. nueva.
mente elpedal ENCE@IDO/APA
GAD0 DE
LA
SOLUGION
el pedal de ajuste de la
boquilla ambos en la posi-
cibn
I,
aspire en SECO toda
la supeficie solida para
Presione el pedal de LIBERACI~N
DEL
ASA
para mlwar la aspiradora
en la pasicl6n de limpieza.
do, mueva lentarnente la aspiradora
hacia delante
y
atrhs
sobre el
ireaa
ser
limpiada. Encime 10s pases una pulga-
da para evitar el rayado.
la2-TALLAOOYASPIRAOOEN
MOJADO Esto hajar6 la boqu~lla
Para ayudar al proceso de
secado, pise el pedal
ENCENDIDO
1
APAGADO
DE
LA
SOLUGION
para
detener el regado de la
soluci6n
y
mueva el inter-
ru tor del asa de la posi-
citn
2
a la
1.
Continfie
IEN
MOJADO.
I
La page est en cours de chargement...
La page est en cours de chargement...
La page est en cours de chargement...
La page est en cours de chargement...
La page est en cours de chargement...
La page est en cours de chargement...
La page est en cours de chargement...
La page est en cours de chargement...
La page est en cours de chargement...
La page est en cours de chargement...
La page est en cours de chargement...
La page est en cours de chargement...
La page est en cours de chargement...
La page est en cours de chargement...
La page est en cours de chargement...
La page est en cours de chargement...
-
 1
1
-
 2
2
-
 3
3
-
 4
4
-
 5
5
-
 6
6
-
 7
7
-
 8
8
-
 9
9
-
 10
10
-
 11
11
-
 12
12
-
 13
13
-
 14
14
-
 15
15
-
 16
16
-
 17
17
-
 18
18
-
 19
19
-
 20
20
-
 21
21
-
 22
22
-
 23
23
-
 24
24
-
 25
25
-
 26
26
-
 27
27
-
 28
28
-
 29
29
-
 30
30
-
 31
31
-
 32
32
-
 33
33
-
 34
34
-
 35
35
-
 36
36


Dirtdevil MCE5500CA Le manuel du propriétaire
- Catégorie
- Aspirateurs
- Taper
- Le manuel du propriétaire
dans d''autres langues
Documents connexes
-
Dirtdevil Sweeper Vac Le manuel du propriétaire
-
-
-
-
-
Dirt Devil M08245 Manuel utilisateur
-
-
-
-
Dirtdevil Swift Stick Le manuel du propriétaire
