DREAME DRE-D10P Manuel utilisateur
- Catégorie
- Aspirateurs robotiques
- Taper
- Manuel utilisateur

Read this manual carefully before use and keep it for future reference.
User Manual
Auto-Empty Robot Vacuum and Mop
D10 Plus

1
EN
Contents
User Manual
Manuel d'utilisation
Manual de usuario
1
26
51
EN
FR
ES
Safety Information
IMPORTANT SAFETY INSTRUCTIONS
·Do not use outdoors or on wet surfaces.
·Do not allow to be used as a toy. Close attention is necessary when used by or near children, pets or plants.
·Use only as described in this manual. Use only manufacturer’s recommended attachments.
·Do not use with damaged cord or plug. If appliance is not working as it should, has been dropped,
damaged, left outdoors, or dropped into water, return it to a service center.
·Do not pull or carry by cord, use cord as a handle, close a door on cord, or pull cord around sharp
edges or corners. Do not run appliance over cord. Keep cord away from heated surfaces.
·Do not unplug by pulling on cord. To unplug, grasp the plug, not the cord.
·Do not handle charger, including charger plug, and charger terminals with wet hands.
·Do not put any object into openings. Do not use with any opening blocked; keep free of dust, lint, hair,
and anything that may reduce air flow.
READ ALL INSTRUCTIONS BEFORE USING (THIS APPLIANCE), Failure to follow the warnings and instructions
may result in electric shock, re and/or serious injury.
When using an electrical appliance, basic precautions should always be followed, including the following:
WARNING– To reduce the risk of re, electric shock, or injury:
SAVE THESE INSTRUCTIONS
Household use only.

2 3
ENEN Safety Information
·Keep hair, loose clothing, fingers, and all parts of body away from openings and moving parts.
·Do not use to pick up flammable or combustible liquids, such as gasoline, or use in areas where they may be present.
·Do not pick up anything that is burning or smoking, such as cigarettes, matches, or hot ashes.
·Do not use without dust bag.
·Prevent unintentional starting. Ensure the switch is in the off-position before connecting to battery pack, picking up or
carrying the appliance. Carrying the appliance with your finger on the switch or energizing appliance that have the switch on
invites accidents.
·Do not use and store in extremely hot or cold environments (below 0℃/ 32 ℉ or above 40℃/104 ℉). Please charge the robot
in temperature above 0℃/ 32 ℉ and below 40℃/104 ℉.
·Recharge only with the charger specified by the manufacturer. A charger that is suitable for one type of battery pack may
create a risk of fire when used with another battery pack.
·Use appliances only with specifically designated battery packs. Use of any other battery packs may create a risk of injury and fire.
·When battery pack is not in use, keep it away from other metal objects, like paper clips, coins, keys, nails, screws or other
small metal objects, that can make a connection from one terminal to another. Shorting the battery terminals together may
cause burns or a fire.
·Under abusive conditions, liquid may be ejected from the battery; avoid contact. If contact accidentally occurs, flush with
water. If liquid contacts eyes, additionally seek medical help. Liquid ejected from the battery may cause irritation or burns.
·Do not use a battery pack or appliance that is damaged or modified. Damaged or modified batteries may exhibit
unpredictable behavior resulting in fire, explosion or risk of injury.
·Do not expose a battery pack or appliance to fire or excessive temperature. Exposure to fire or temperature above 130°C may
cause explosion.
·Follow all charging instructions and do not charge the battery pack or appliance outside of the temperature range specified in
the instructions. Charging improperly or at temperatures outside of the specified range may damage the battery and increase
the risk of fire.
·Have servicing performed by a qualified repair person using only identical replacement parts. This will ensure that the safety
of the product is maintained.
Safety Information
·Do not modify or attempt to repair the appliance or the battery pack except as indicated in the instructions for use and care.
·Place the cords from other appliances out of the area to be cleaned.
·Do not operate the vacuum in a room where an infant or child is sleeping.
·Do not operate the vacuum in an area where there are lit candles or fragile objects on the floor to be cleaned.
·Do not operate the vacuum in a room that has lit candles on furniture that the vacuum may accidentally hit or bump into.
·Do not allow children to sit on the vacuum.
·Do not use the vacuum on a wet surface.
·Use only with RCS7 supply unit.
·Risk Of Injury. Brush May Start Unexpectedly.
·Switch off the appliance and Remove the brush Before Cleaning or Servicing.
·Unplug before cleaning or servicing.
·This appliance is for use on a nominal 120-V circuit and has a grounding attachment plug that looks like the plug illustrated
in sketch A in Figure 20. Make sure that the appliance is connected to an outlet having the same configuration as the plug. No
adaptor should be used with this appliance.
Caution:
This device complies with Part 15 of the FCC Rules / Innovation, Science and Economic Development Canada’s licence-
exempt RSS(s). Operation is subject to the following two conditions: (1) this device may not cause harmful interference.
(2) this device must accept any interference received, including interference that may cause undesired operation.
Changes or modifications not expressly approved by the party responsible for compliance could void the user's
authority to operate the equipment.

4 5
ENEN Product Overview
Safety Information
MPE Reminding
To satisfy FCC / IC RF exposure requirements, a separation distance of 20 cm or more should be maintained between the
antenna of this device and persons during device operation.
To ensure compliance, operations at closer than this distance is not recommended.
To disable Wi-Fi module on robot, power the robot ON. Place the robot on the Charging Dock. Ensure the Charging
Contacts on robot and the Charging Dock Pins make a connection.
Press and hold the Dock Button on the robot for 20 seconds until the Wi-Fi module is turned o.
When the Wi-Fi module is turned o, press any button on the robot to turn the Wi-Fi module on.
This Device Complies with DHHS Radiation Rules, 21CFR Chapter 1, Subchapter J.
Direct current
Alternating current
This equipment has been tested and found to comply with the limits for a Class B digital device, pursuant to part 15 of
the FCC Rules. These limits are designed to provide reasonable protection against harmful interference in a residential
installation. This equipment generates uses and can radiate radio frequency energy and, if not installed and used
in accordance with the instructions, may cause harmful interference to radio communications. However, there is no
guarantee that interference will not occur in a particular installation. If this equipment does cause harmful interference
to radio or television reception, which can be determined by turning the equipment o and on, the user is encouraged
to try to correct the interference by one or more of the following measures:
—Reorient or relocate the receiving antenna.
—Increase the separation between the equipment and receiver.
—Connect the equipment into an outlet on a circuit dierent from that to which the receiver is connected.
—Consult the dealer or an experienced radio/TV technician for help.
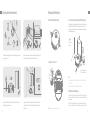
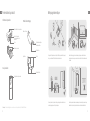
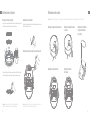
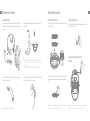
Accessories
Pre-Installed Accessories
Other Accessories
Water Tank Side Brush
Cleaning Tool
Main Brush Dust Bin
Power CordMop Pad
Dust Collection Bag ×2
(1 pre-installed)

6 7
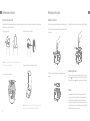
ENEN
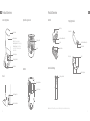
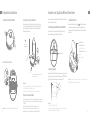
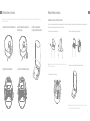
Robot
Product Overview
Power/Clean Button
·Press and hold for 3 seconds
·Press to begin cleaning after the robot is powered on
Dock/Spot Clean Button
·Press to send the robot back to the base
·Press and hold for 3 seconds to start Spot Clean Mode
Status Indicator
·White: Cleaning or cleanup is completed
·Blinking Orange: Error
·Breathing White: Robot is charging when the battery
power is not low
Cover
Reset Button
• Press and hold for 3
seconds to restore the
robot to factory settings
Wi-Fi Indicator
Cleaning Tool
Air Outlet/Speaker
Robot
Robot Sensors
Product Overview
Laser Distance Sensor
Bumper
Return-to-Base Sensor
Cli Sensors
Main Wheel
Cli Sensors
Cli Sensors
Main Wheel
Main Brush
Charging Contacts
Brush Guard Clips
Dust Intake
Universal Wheel
Side Brush
Charging Contacts

8 9
ENEN
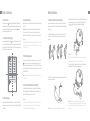
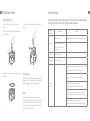
Dust Bin Mopping Module
Dust Collection Bag
Product Overview
Water Tank
Water Inlet
Attaching Area
Slot
Water Tank Release Clip
Mop Pad
Filter
Dust Bag Handle
Dust Intake
Bin Cover Release Clip
Bin Clip
Note: Due to the factory setting, a new dust collection bag has been installed inside already.
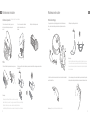
Auto-Empty Base Open the upper cover
Bottom
Back
Product Overview
Upper Cover
Status Indicator
White: The base is plugged in
Breathing White: Robot is charging
Blinking Orange: Dust collection
bag is full/Dust collection bag not
installed/Error
Dust Bag Slot
Air Duct Cover
Mounting Screw
Filter
Signaling Area
Charging Contacts
Dust Intake
Cord Storage Slot
Power Cord Socket

10 11
ENEN
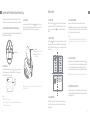
1. Remove the protective strips 3. Connect to a power outlet and start charging
2. Install the side brush
Click
Preparation Before Use
Note:
• Keep the immediate area 1.5 m in front of the base and 0.5 m to its both sides
clear of objects.
• Make sure that no objects might block the signaling area.
Note: Install the side brush until it clicks into place.
Place the base on level ground against the wall and connect it to a power
outlet. Place the robot onto the base to charge. The robot will turn on
automatically and begin charging. It is recommended to fully charge your
robot before rst-time use.
About the Auto-Empty Base
> 12"
> 20"
> 20"
> 60"
Clearing Home Environment
To improve the working eciency of your robot, put away any loose cords ,
rags, slippers, toys, etc.
Open the door of the room to be cleaned, and put the furniture in its
proper place to make more space.
To prevent the robot from not recognizing the area that needs to be
cleaned, do not stand in the front of the robot, threshold, hallway, or
narrow places.
Before cleaning, place a physical barrier at the edge of the stairs and
sofa to ensure safe and smooth operation of the robot.

12 13
ENEN
1. Turn On/O
3. Cleaning Mode
How to Use
Press and hold the button for 3 seconds to turn on the robot. Once the
power indicator turns solid white, the robot is on standby. To turn o the
robot, press and hold the button for 3 seconds when the robot is not
moving.
Dreame Bot D10 Plus has four cleaning modes: Quiet, Standard, Strong,
and Turbo. The default mode is Standard. You can specify the cleaning
mode in the app.
2. Start Cleaning
Press the button briey to turn on the robot. Upon activation, the robot
will accurately map out a route, methodically clean along the edges and
walls, then nish by cleaning each room in an S-shaped pattern to ensure
a thorough job.
5. Spot Clean Mode
When the robot is paused or in Standby Mode, press and hold the button for
3 seconds to start Spot Clean Mode. In this mode, it will clean a square-shaped
area of 1.5×1.5 meters directly around the robot. When the spot cleaning is
done, the robot will automatically return to its original location and power o.
Note: Activating Spot Clean Mode will end the current cleaning task of the robot.
6. Additional App Functions
Follow the instructions on the app interface to use more functions. The version
of the app might have been updated; please follow the instructions based on
the current app version.
4. Pause/Sleep Mode
Pause: Press any button briey to pause the robot during cleaning.
Sleep Mode: If the robot pauses for more than 10 minutes, it automatically
enters the sleep mode, and the power indicator and charging indicator will
go o. To wake up the robot, press any button.
Note:
· The robot will turn off automatically if left in Sleep Mode for more than 12 hours.
· If the robot is paused and placed onto the base, the current cleaning task will
end.
Connect with Mi Home/Xiaomi Home App
Note:
• Only 2.4GHz Wi-Fi is supported.
• The version of the app might have been updated, please follow the instructions
based on the latest app version.
3. Reset Wi-Fi
Simultaneously press and hold the buttons and until you hear a voice
prompt saying, “Waiting for the network conguration.” Once the Wi-Fi
indicator is blinking slowly, the Wi-Fi has been successfully reset.
Note: If your robot cannot connect to the app successfully, reset the Wi-Fi and
add the device again.
Wi-Fi Indicator
·Blinking slowly: To be connected
·Blinking quickly: Connecting
·On: Wi-Fi connected
Open the Mi Home/Xiaomi Home app, tap " " in the upper right, and scan
the QR code above again to add "Dreame Bot D10 Plus". Please follow the
prompts to nish the Wi-Fi connection.
The appliance works with the Mi Home/Xiaomi Home app, which can be
used to control the appliance and make it interact with other smart devices.
1.Download the Mi Home/Xiaomi Home App
Scan the QR code on the robot or search "Mi Home" or "Xiaomi Home" in the app
store to download and install the app.
Under the Cover
2.Add Device
xxxxxx' s home
No home environment info
Add a device
Scan
Devices Rooms

14 15
ENEN
Clean the Dust Bin
Clean the Filter
Routine Maintenance
1. Open the robot cover, then press the dust
bin clip to remove the dust bin.
2. Open the bin cover and empty the
bin as shown in the diagram.
3. Clean the dust intake.
2. Do not wash the lter. Only the dust bin is washable. Thoroughly dry it before re-installing.
1. Remove the lter and tap its basket gently.
Note:
· Do not attempt to clean the lter with brushes or ngers.
· Rinse the dust bin with clean water only. Do not use any detergent.
· Only use the dust bin and lter when they are completely dry.
· The lter is recommended to be cleaned every two weeks and replaced every three months.
* Clean after each use
7. Use the Mopping Function
How to Use
It is recommended that all oors are vacuumed at least three times before
the rst mopping session to achieve a better cleaning eect.
1) Dampen the mop pad and wring out excess water. Insert the mop pad into
the slot of the water tank as shown in the gure, and paste the pad rmly.
3) Align the mopping module as indicated by the arrow, then slide it into the
back of the robot until it clicks into place. Press the button or use the app
to start cleaning.
2) Open the water tank lid, ll the tank with water, then securely close the lid.
4) Press the two side clips inwards and slide the water tank backwards to
separate it from the robot.
Note:
• It is not recommended to use the mopping function on carpets.
• Use the app to adjust the water ow as required.
Note: Do not use detergent or disinfectant.
Note: When the robot is charging or not in use, remove the mopping module,
pour out all the remaining water in the tank, and clean the mop pad to prevent
mildew or odors.
Click
Click
① ② ③

16 17
ENEN
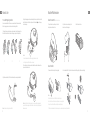
Clean the Main Brush Clean the Side Brush
Clean the Main Wheel/Universal Wheel
Routine Maintenance
Press the brush guard clips inwards to remove the brush guard and lift the
brush out of the robot.
Pull out the side brushes and use the cleaning tool to remove any hair
tangled on the brush.
Pull out the brush covers as shown in the diagram. Use the included cleaning
tool to remove any hairs tangled in the brush.
Note: Do not pull out the hair tangled in the main brush excessively. Otherwise,
the brush may be damaged. Note: Use a tool such as a small screwdriver to separate the axle and tire of the
universal wheel.
Clean the Mopping Module
Routine Maintenance
1. Press the two release clips on the side of the water tank, remove the
mopping module, and pull the mop pad o the mopping module.
3. Clean the mop pad with water only and leave to air dry before re-installing.
2. Pour out the water in the tank. Clean with only water and leave out to air
dry before re-installing.
4. If slow water ow occurs, or the volume is not well-distributed, clean the air
hole in the cover of the water tank.
Note: Do not expose the tank to the sun directly.
Note:
• Remove the pad from the mopping module before cleaning it, and make sure
dirty water does not ow back into the water outlet to avoid clogging.
• For optimal performance, it is recommended to replace the mop pad every 3-6
months.

18 19
ENEN
Replace the Dust Collection Bag
Routine Maintenance
According to the status indicator (blinking orange) and app prompts, replace it with a new one when the dust collection bag is full. It is recommended to replace
the bag every 4-6 weeks.
1. Discard the dust collection bag 3. Install a new dust collection bag
2. Wipe the lter with a dry cloth 4. Close the upper cover of auto-empty base
Note: When taking out the dust collection bag, close the dust bag handle to
avoid dust leaking out.
Note: Do not close the base forcelly, if the upper cover of base cannot be
closed and the dust collection bag is not installed.
Clean the Laser Distance Sensor
Clean the Charging Contact
Clean the Charging
Contact and Dust Intake
Clean the Return-to-Base
Sensor
Clean the Cli Sensor
Routine Maintenance
Note: Wet cloths can damage sensitive elements within the robot and base. Please use dry rags for cleaning.

20 21
ENEN
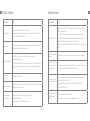
The following table lists possible causes and solutions in terms of dierent light status. For more support,
please refer to the section "FAQ" in this manual.
Status Indicator
Light Status Possible Cause Solution
O
No power supply Check and ensure that the power supply for the base is normal.
The robot in the DND period
The robot with full charge in sleep mode /
White The robot not on the base /
Breathing White The robot is charging /
Blinking Orange Error
Check whether a dust collection bag is installed. If not, install one.
Check whether the dust collection bag is installed in place.
Check whether the upper cover is closed. If not, close the upper cover tightly.
Check whether the bag is full. If so, replace it.
Remove debris around the dust intake of the robot and base.
Unplug the power cord of base, and check whether there are any foreign objects
that block the air duct cover. If any, clean them.
Check whether the dust bin of robot is installed.
For other errors, contact qualied technicians or after-sales service.
Clean the Air Duct
Robot Restarting
Battery
Routine Maintenance
If the air duct is blocked, please clean it according to the following steps.
If the robot stops responding or cannot be turned o, press and hold down
the button for 10 seconds to forcefully turn it o. Then press and hold the
button for 3 seconds to turn the robot on.
The robot contains a high-performance lithium-ion battery pack. Please
ensure that it remains well-charged for daily use to maintain optimal
battery performance. If the robot is not used for an extended period of
time, turn it o and put it away. To prevent damage from over-discharging,
the robot should be recharged at least once every three months.
1. Unscrew mounting screws on the air duct cover and remove the cover plate.
2. Check whether the air duct is blocked by foreign objects. If any, clean them.
3. Reinstall the air duct cover as shown in the diagram.

22 23
ENEN FAQ
Problem Type Solution
Robot cannot connect to Wi-Fi
There is something wrong with the Wi-Fi connection. Reset the Wi-Fi and download the latest version of the Mi Home/
Xiaomi Home app, then try reconnecting.
Location permission is not open. Please ensure the location permission on the app is enabled.
Wi-Fi signal is weak. Make sure the robot is in an area with good Wi-Fi coverage.
5GHz Wi-Fi is not supported. Please ensure your robot connects to 2.4GHz Wi-Fi.
The username or password of Wi-Fi is incorrect. Please enter the correct username and password.
Robot does not perform
scheduled cleaning The robothaslowbattery.Scheduledcleaningwillnotstartunlesstherobothasbeenrechargedintime.
Does leaving the robot on the
base consume power if it is
already fully charged?
Leaving the robot on the base after it's fully charged consumes very little electricity and helps maintain optimal
battery performance.
No water comes out of the
mopping module, or only a
little bit comes out
Check whether there is water inside the water tank.
Clean the mop if it becomes dirty.
Make sure the mop pad is installed correctly according to the user manual.
Clean the blowhole on the top of the water tank.
Robot doesn't resume cleaning
after charging
Make sure the robot is not set to Do Not Disturb mode (DND), which will prevent it from resuming cleaning.
The robot does not resume cleaning when it is manually recharged or placed onto the base.
FAQ
Problem Type Solution
Robot does not turn on
The battery level is low. Recharge the robot on the base, then try it again.
The ambient temperature is too low (below 0° C) or too high (above 40° C). The operating temperature of the robot is
0° C to 40° C.
Robot cannot recharge The base is not receiving power. Please conrm that both ends of the power cord are plugged in correctly.
Poor contact. Clean charging contacts of the base and robot.
Robot cannot return to the base
There are too many obstructions around the base. Place the base in a more open area.
Please clean the signaling area of the base.
Moving the robot may cause it to re-position itself or re-map its surroundings. If the robot is too far from the base, it
might not be able to automatically return on its own, in which case you need to manually place the robot onto the base.
Robot is malfunctioning Turn o the robot and then reactivate it.
Robot is making a strange noise A foreign object may be caught in the main brush, side brush, or one of the main wheels. Stop the robot and remove
any debris.
Robot no longer cleans e-
ciently or leaves dust behind
The dust bin is full. Please clean the dust bin and dust intake.
The lter is blocked. Please clean it.
A foreign object is caught in the main brush. Please clean it.

24 25
ENEN Specications
Model RLS3D
Battery 5200 mAh (Nominal Capacity)
Charging Time Approx. 6 hours
Wireless Connectivity Wi-Fi IEEE 802.11b/g/n 2.4 GHz
OS Compatibility Android 4.4 & iOS 10.0 or above
Rated Voltage 14.4 V
Rated Power 46 W
Operation Frequency 2400-2483.5 MHz
Maximum Output Power < 20 dBm
Model RCS7
Rated Input 120 V ~ 50-60 Hz 4 A
Rated Output 19.8 V 1 A
Robot Auto-EmptyBase
Undernormaluseofcondition,thisequipmentshouldbekeptaseparation
distanceofatleast20cmbetweentheantennaandthebodyoftheuser.
FAQ
Problem Type Solution
Robot returns to the base without
performing auto-empty tasks DND mode prevents the robot from performing auto-empty tasks.
The dust collection bag is full
Check whether the dust collection bag is full. If so, replace it with a new one. It is recommended to replace
the bag every 4-6 weeks. If not, check whether the dust intake or air duct at the bottom of the base is
blocked. Remove any blockage before use.
The auto-empty duration can be
unacceptably long sometimes
When the robot has been performing auto-empty tasks for a period of time, or when the air duct does not
function smoothly, the auto-empty duration will be extended to prevent blockage.
The upper cover of base fails to be closed Check whether a dust collection bag is installed. If not, install one.

26 27
FRFR Informations sur la sécurité
IMPORTANTES MESURES DE SÉCURITÉ
·Ne pas exposer à la pluie, Ranger à l’intérieur.
·Ne pas permettre aux enfants de jouer avec l’appareil. Une attention particulière est nécessaire lorsque
l’appareil est utilize par des enfants ou à proximité de ces derniers.
·N’utiliser que conformément à cette notice avec les accessories recommandés par le fabricant.
·Ne pas utiliser si le cordon ou la fiche est endommagé. Retourner l’appareil à un atelier de reparation s’il ne
fonctionne pas bien, s’il est tombé ou s’il a été endommagé, oublié à l’extérieur ou immergé.
·Ne pas tirer soulever ni trainer l’appareil par le cordon. Ne pas utiliser le cordon comme une poignée, le
coincer dans l’embrasure d’une porte ou l’appuyer contre des arêtes vives ou des coins. Ne pas faire rouler
l’appareil sur le cordon. Garder le cordonà l’écart des surfaces chaudes.
·Ne pas débrancher en tyrant sur le cordon. Tirer plutôt la fiche.
·Ne pas manipuler le chargeur, y compris la prise du chargeur, et les bornes du chargeur avec les mains
mouillées.
·N’insérer aucun objet dans les ouvertures. Ne pas utiliser l’appareil lorsqu’une ouverture est bloquée.
S’assurer que de la poussière, de la peluche, des cheveux ou d’autres matières ne réduisent pas le debit d’air.
·Maintenir les cheveux, les vêtements amples, les doigts et toutes les parties du corps à l’écart des ouvertures
et des pieces mobiles.
L’utilisation d’un appareil électrique demande certaines précautions:
LIRE TOUTES LES INSTRUCTIONS AVANT DE FAIRE FONCTIONNER (CETAPPAREIL), Le non-respect des mises en garde et des
instructions peut causer des chocs électriques, des incendies et/ou des blessures graves.
AVERTISSEMENT- Pour réduire les risques d’incendie, de choc électrique ou de blessure:
CONSERVER CES INSTRUCTIONS
Usage Domestique seulement.
Informations sur la sécurité
·Ne pas aspirer des liquids inflammables ou combustibles, comme de l’essence, et ne pas faire fonctionner
dans des endroits où peuvent se trouver de tells liquides.
·Ne pas aspirer de matières en combustion ou qui dégagent de la fumée, comme des cigarettes, des
allumettes ou des cendres chaudes.
·Ne pas utiliser l’appareil si le sac à poussière ou le filter n’est pas en place.
·Emêcher une mise en marche accidentelle. S’assurer que l’interrupteur est à la position arrêt avant de
raccorder la batterie, de lever ou de déplacer l’appareil. Transporter l’appareil en gardant un doigt sur
l’interrupteur, ou mettre sous tension un appareil dont l’interrupteur est à la position marche peut causer un
accident.
·Ne pas utiliser et entreposer dans un environnement à température extrêmement chaude ou froide (
inférieure à 0°C/32 ℉ ou supérieure à 40°C/104 ℉). Veuillez chargerle robot à une température supérieure à
0°C/32 ℉ et en dessous de 40°C/104 ℉.
·Retirer la batterie de l’appareil avant d’effectuer des réglages, changer les accessoires ou ranger l’appareil.
Ces mesures de sécurité ont pour but d’éviter une mise en marche accidentelle de l’appareil.
·Recharger uniquement avec le chargeur prescrit par le fabricant. Un chargeur convenant à un type de
batterie peut présenter un risque d’incendie lorsqu’il est utilisé avec une autre batterie.
·Utiliser uniquement les batteries recommandées pour l’appareil. L’utilisation d’autres types de batteries peut
présenter un risque de blessure ou d’incendie.
·Lorsque l’appareil n’est pas utilisé, tenir la batterie loin d’objets métalliques comme des trombones, des
pièces de monnaie, des clés, des clous, des vis ou autres petits objets qui pourraient établir une liaison entre
les bornes. Un courtcircuit des bornes des batteries peut causer des brûlures ou un incendie.
·En condition d’usage abusif, du liquide peut s’échapper de la batterie ; éviter tout contact avec ce liquide.
En cas de contact accidentel, rincer abondamment avec de l’eau. En cas de contact avec les yeux, consulter
également un médecin. Le liquide projeté peut causer des irritations ou des brûlures.
·Ne pas utiliser une batterie ou un appareil endommagé ou qui a été modifié. Des batteries endommagées
ou modifies peuvent avoir un comportement imprévisible pouvant causer un incendie, une explosion ou un
risque de blessure.
·Ne pas exposer une batterie ou un appareil à la flamme ou à des températures excessives. L’exposition à une
flamme ou à des températures supérieures à 130 °C peut causer une explosion.

28 29
FRFR
·Respecter toutes les instructions de chargement et ne pas charger la batterie ou l’appareil à des
températures qui ne sont pas incluses dans la gamme de températures indiquées dans la notice
d’instructions. Un chargement mal effctué.
·Confier les réparations à une personne qualifiée qui utilisera uniquement des pièces de remplacement
identiques. Cette façon de faire garantira la sécurité du produit.
·Ne pas modifier ni tenter de réparer l’appareil ou la batterie sauf comme il est indiqué dans les instructions
d’utilisation et d’entretien.
·Éloigner les cordons d’autres appareils de la zone à nettoyer.
·Ne pas utiliser l’aspirateur dans une pièce où un nourrisson ou un enfant dort.
·Ne pas utiliser l’aspirateur dans un endroit où il ya des bougies allumées ou des objets fragiles sur le
plancher à nettoyer.
·Ne pas utiliser l’aspirateur dans une pièce où il ya des bougies allumées sur les meubles que l’aspirateur peut
heurter ou se cogner accidentellement.
·Ne pas laisser les enfants s’assoir sur l’aspirateur.
·Ne pas utiliser l’aspirateur sur une surface mouillée.
·N’utiliser que l’unité d’approvisionnement RCS7.
·Débranchez l'appareil avant de le nettoyer ou de le réparer.
·Cet appareil est conçu pour un fonctionnement sur un circuit nominal de 120 V et possède une fiche de
fixation de mise à la terre qui ressemble à la fiche illustrée dans le croquis A de la figure 20. Veuillez vérifier
que l'appareil est branché à une prise ayant la même configuration que la fiche. Aucun adaptateur ne doit
être utilisé avec cet appareil.
Informations sur la sécurité
L’émetteur/récepteur exempt de licence contenu dans le présent appareil est conforme aux CNR d’Innovation, Sciences et
Développement économique Canada applicables aux appareils radio exempts de licence. L’exploitation est autorisée aux
deux conditions suivantes :
1. L’appareil ne doit pas produire de brouillage;
2. L’appareil doit accepter tout brouillage radioélectrique subi, même si le brouillage est susceptible d’en compromettre le
fonctionnement.
L'antenne installée doit être située de facon à ce que la population ne puissey être exposée à une distance de moin
de 20 cm. Installer l'antenne de facon à ce que le personnel ne puisse approcher à 20 cm ou moins de la position centrale
de l’antenne.
La FCC des éltats-unis stipule que cet appareil doit être en tout temps éloigné d’au moins 20 cm des personnes pendant
son functionnement.
Pour désactiver le module Wi-Fi sur le robot, mettez le robot sous tension et le placez sur le socle de charge. Assurez qu'il
est en train de se charger par les contacts de charge. Appuyez sur le bouton nettoyage concentré pendant 20 secondes
jusqu'à ce que le module Wi-Fi s'éteigne.
Quand le module Wi-Fi sur le robot est déactivé, appuyez sur n'importe quel bouton du panneau pour réactiver le
module Wi-Fi.
Cet appareil est conforme aux règles de radiation du DHHS, 21 CFR chapitre 1, sous-chapitre J.
Courant continu
Courant alternatif
~
Informations sur la sécurité

30 31
FRFR Présentation du produit Présentation du produit
Robot
Bouton d’alimentation/nettoyage
·Appuyer le bouton pendant 3 secondes
·Nettoyer : appuyer pour commencer le nettoyage une fois que le robot
est branché
Bouton de station/Nettoyage Local
·Appuyer pour renvoyer le robot à la station de charge
·Appuyez brièvement pour lancer le mode Spot Clean (nettoyage local)
Indicateur d’état
· Blanc : nettoyage en cours ou terminé
· Clignotant orange : erreur
· Respiration blanche : Le robot est en charge quand la batterie n'est
pas faible
Couvercle
Accessoires
Accessoires préinstallés
Autres accessoires
Réservoir d’eau Brosse latérale
Outil de nettoyage
Bac à poussière
Brosse principale
Câble d’alimentationSerpillière
Sac de poussière ×2
(1 pré-installé)

32 33
FRFR Présentation du produit
Robot
Bouton de réinitialisation
• Appuyez pendant 3 secondes pour
rétablir les paramètres d’usine
Indicateur de Wi-Fi
Outil de nettoyage
Sortie d’air/haut-parleur
Capteurs du robot
Capteur de distance laser
Pare-chocs
Capteur de retour à la base
Capteur de chute
Roues principales
Capteur de chute
Capteur de chute
Roues principales
Brosse principale
Contacts de charge
Clips de garde-brosse
Prise de poussière
Roue universelle
Brosse latérale
Contacts de charge
Base auto-videuse Enlevez le couvercle supérieur
En bas
Retour
Présentation du produit
Couvercle supérieur
Indicateur d'état
Blanc : La base est branchée
Respiration blanche : Le robot est en
charge
Clignotant orange : Sac à poussière
est plein/sac à poussière n'est pas
installé/erreur
Fente pour sac à poussière
Couverture des conduits d'air
Vis de montage
Filtre
Zone de signalisation
Contacts de charge
Prise de poussière
Fente de stockage du câble
Prise pour le câble d'alimentation

34 35
FRFR
Collecteur à poussière Module de nettoyage
Sac à poussière
Présentation du produit
Réservoir d’eau
Entrée d'eau
Zone de xation
Clip de déverrouillage
du réservoir d'eau
Serpillière
Filtre
Poignée de sac à poussière
Prise de poussière
Bouton d'ouverture
du couvercle du bac à
poussière
Clip du collecteur à poussière
Remarque : En raison du réglage en usine, un nouveau sac à poussière a déjà été installé à l'intérieur.
Fente
Nettoyage domestique
Rangez les ls répandus sur le sol, les chions, les pantoues, les jouets,
etc., pour améliorer l'ecacité du travail de votre robot.
Ouvrez la porte de la pièce à nettoyer, et rangez les meubles dans un
endroit approprié pour faire plus de place.
Pour éviter que le robot ne reconnaisse pas la zone à nettoyer, ne restez pas
devant le robot, sur le palier, dans le couloir ou dans les endroits étroits.
Avant le nettoyage, placez une barrière physique au bord des zones
suspendues ou basses pour assurer la sécurité et le bon fonctionnement
du robot.

36 37
FRFR
1. Retirez les bandes de protection 3. Connecter à une prise de courant
2. Installer la brosse latérale
Clic
12"
60"
20"
20"
Préparation avant utilisation
Remarque:
• Assurez-vous qu'il y a une distance de 0,5 mètre ou plus de chaque côté de la base,
et une distance de plus de 1,5 mètre devant celle-ci.
• Assurez-vous qu'aucun objet ne puisse bloquer la zone de signalisation.
Remarque : La brosse latérale est installée quand vous entendez un clic.
Placez la base sur un sol plat contre le mur et connectez à une prise de
courant. Placez le robot sur la base pour le charger. Le robot va s'allumer
alors automatiquement et se chargera. Veuillez le charger pleinement
avant la première utilisation.
Infos sur la base auto-videuse
Connexion avec l’application Mi Home/Xiaomi Home
Remarque:
• Seul le Wi-Fi 2,4GHz est pris en charge.
• La version de l’application pourrait avoir été mise à jour. Suivez les instructions
en fonction de la version actuelle de l’application.
3. Réinitialiser le Wi-Fi
Maintenez simultanément les touches et enfoncées jusqu’à ce que
vous entendiez le message « En attente de la conguration réseau ».
Lorsque le voyant du Wi-Fi clignote lentement, le Wi-Fi a été réinitialisé
avec succès.
Remarque : lorsque votre portable ne parvient pas à se connecter au robot,
réinitialisez le Wi-Fi et ajoutez à nouveau l'appareil.
Indicateur de Wi-Fi
·Clignote lentement: En
recherche de connexion
·Clignote rapidement : connexion
en cours
·Fixe: Wi-Fi connecté
Ouvrez l'application Mi Home/Xiaomi Home app, appuyez sur " " en haut à
droite, et scannez à nouveau le code QR ci-dessus pour ajouter "Dreame Bot
D10 Plus". Suivez les instructions pour réussir la connexion Wi-Fi.
Ce produit fonctionne avec l'application Mi Home/Xiaomi Home. Choisissez
une pour contrôler votre appareil.
1. Téléchargez l'application Mi Home/Xiaomi Home
Scannez le code QR ou recherchez "Mi Home/Xiaomi Home" dans la
boutique d'applications pour le télécharger et l'installer.
Sous le couvercle
2.Ajouter un appareil
xxxxxx' s home
No home environment info
Add a device
Scan
Devices Rooms
La page charge ...
La page charge ...
La page charge ...
La page charge ...
La page charge ...
La page charge ...
La page charge ...
La page charge ...
La page charge ...
La page charge ...
La page charge ...
La page charge ...
La page charge ...
La page charge ...
La page charge ...
La page charge ...
La page charge ...
La page charge ...
La page charge ...
-
 1
1
-
 2
2
-
 3
3
-
 4
4
-
 5
5
-
 6
6
-
 7
7
-
 8
8
-
 9
9
-
 10
10
-
 11
11
-
 12
12
-
 13
13
-
 14
14
-
 15
15
-
 16
16
-
 17
17
-
 18
18
-
 19
19
-
 20
20
-
 21
21
-
 22
22
-
 23
23
-
 24
24
-
 25
25
-
 26
26
-
 27
27
-
 28
28
-
 29
29
-
 30
30
-
 31
31
-
 32
32
-
 33
33
-
 34
34
-
 35
35
-
 36
36
-
 37
37
-
 38
38
-
 39
39


DREAME DRE-D10P Manuel utilisateur
- Catégorie
- Aspirateurs robotiques
- Taper
- Manuel utilisateur
dans d''autres langues
- English: DREAME DRE-D10P User manual
- español: DREAME DRE-D10P Manual de usuario
Documents connexes
Autres documents
-
Mi Mi Robot Vacuum-Mop 2 Pro Manuel utilisateur
-
-
Roborock Q7 Robotic Vacuum Cleaner Manuel utilisateur
-
-
Roborock Q Revo Manuel utilisateur
-
Hoover HGO330HC 011 Manuel utilisateur
-
Roborock Q7 MAX+ ROBOTSTØVSUGER, SVART Manuel utilisateur
-
Roborock Q7 Max Manuel utilisateur
-
 Ultenic Aspirateur Robot - Navigation Lidar - Noir Mode d'emploi
-
Roborock S7 MaxV Manuel utilisateur
