HAEGER AF-D22.001A Manuel utilisateur
- Catégorie
- Friteuses
- Taper
- Manuel utilisateur

RoHS
User instructions / Instruções de uso
Instrucciones de uso / Mode d’emploi
Οδηγίες χρήστη
Digital Air Fryer – Fritadeira sem óleo digital
Freidora sin aceite digital – Friteuse sans huile mumérique
Ψηφιακή Φριτέζα Αέρα
Aero Fryer * AF-D22-001A


1
English
Dear customer
Thank you for having chosen a HÆGER product.
The HÆGER products have been produced to think about the welfare of the consumer
privileging the most raised standards of quality, functionality and assign. We are sure you
will be happy with this appliance.
We assume that the user is familiar with the common procedures of handling household
appliances.
Before using the appliance for the first time please read carefully and thoroughly through
these operating instructions and the safety advice, completely familiarising yourself with
the appliance. Retain these instructions for future reference and pass them on to whoever
might acquire the appliance at a future date.
Intended use
This appliance serves to process food by heat. Do not use it for any other purpose than for
which it was designed. It may only be used in the manner described in these instructions
for use. The device must not be used for commercial purposes. Any other use of this device
is contrary to the intended use and may result in damage to materials or even personal
injury.
This appliance is designed for household use only. It is not intended for use in locations
such as:
– staff kitchens in stores, offices and other workplaces;
– agricultural farms;
– hotel or motel rooms and other living areas;
– bed and breakfast establishments.
The manufacturer/distributor does not accept any liability for damage caused because of
the use of this device contrary to its intended use.
Important Safety Instructions
Please keep this instruction manual in a safe place, along with the warranty card,
purchase receipt and carton for future reference. The safety precautions
enclosed here in reduce the risk of fire, electric shock and injury when correctly
adhered to.
• The input voltage of this product is AC220-240V~, 50-60Hz. Before turning on,
ensure the electrical voltage and frequency of the circuit corresponds to those
indicated on the appliance.
• The fryer should be placed on a flat surface when operating to avoid
overturning.

2
• Do not place the appliance on window sills, sink drainboards, unstable
surfaces, on electric or gas stoves, or in their vicinity. Only place the
appliance on a stable, even, dry surface.
• Improper installation may result in the risk of fire, electric shock and or injury
to persons.
• The manufacturer/distributor is not responsible for any eventual damages
caused by improper or faulty use.
• Attention: This appliance is not designed to be controlled using a
programmed device, external timer switch or remote control.
• The use of accessory attachments not recommended by the
manufacturer/distributor may cause fire, electrical shock or injury. Only use
the appliance with the original accessories from the manufacturer.
• Do not use the appliance near flammable materials such as curtains,
kitchen towels, etc.
• To ensure sufficient air circulation during operation, there must be a
clearance of at least 15 cm on all sides of the appliance. Do not place any
items on to the appliance and do not cover the ventilation openings.
• Avoid contact with hot steam, which is released from the ventilation
openings while the appliance is running.
• Do not overfill the removable basket with a large amount of food. Make
sure that the food placed in the removable basket does not come into
contact with the heating element.
• Do not place your hands into the internal area of the appliance while it
is running.
• Do not fill the removable pan with oil. Filling the pan with oil could result
in a dangerous situation arising. This healthy frying method is based on
the principle of circulating hot air that does not require the use of oil. A
small amount of oil can be added purely for the purpose of flavouring
the food.
• Do not use the appliance to fry foods with a high fat content.
• Do not insert any objects into the fryer nor kink or damage the power cord.
• Power plug must be removed from power socket before cleaning, servicing,
maintenance or moving the fryer. When it is not in use, unplug it.
• The unit has no user-serviceable parts contained within. Do not attempt to
repair, disassemble or modify the fryer.

3
• Do not use chemical, steel wool or abrasive cleaners to clean the outside of the
unit, as these will scratch the stainless steel and die-cast metal surface.
• Close supervision is necessary when any appliance is used by or near children.
Children should be supervised to ensure that they do not play with the
appliance.
• This appliance shall not be used by children from 0 year to 8 years. This
appliance can be used by children aged from 8 years and above and persons
with reduced physical, sensory or mental capabilities or lack of experience
and knowledge if they have been given supervision or instruction concerning
use of the appliance in a safe way and understand the hazards involved.
Children shall not play with the appliance. Keep the appliance and its cord
out of reach of children aged less than 8 years.
• Cleaning and user maintenance shall not be made by children unless older
than 8 and supervised.
Surface are liable to get hot during use.
• When the appliance is in operation, the temperature of accessible surfaces
may be higher. Do not touch the hot surface. Otherwise, this could cause burns.
Use the handle to remove and carry the hot pan and basket. Only place the hot
pan and basket on heat resistant surfaces. When removing the pan out of the
appliance, be especially careful not to scald yourself by the steam that is
released from the food. The residual heat of the appliance means that it
remains hot for a certain time after it is turned off.
• In the event that the food inside the appliance catches on fire, immediately
turn it off and disconnect it from the power socket. Wait until the smoke
coming out of the ventilation openings disappears before sliding out the pan.
• Do not pour icy cold water into the hot pan.
• Always turn off the appliance and disconnect it from the power socket when
leaving it without supervision or when not using it and before moving or
cleaning it. Allow the appliance to cool down before moving or cleaning it.
• To protect against electrical shock, do not submerge the appliance in water or
in any other liquid.
• Do not place heavy items on the power cord. Make sure that the power cord
does not hang over the edge of a table or that it is not touching a hot surface.
• Disconnect the appliance from the power socket by gently pulling the plug of
the power cord, and not the power cord itself. Otherwise, this could damage
the power cord or the socket.

4
• In the event that the power cord is damaged, it must be replaced with an
original power cord that is available at an authorised service centre. It is
forbidden to use the appliance if it has a damaged power cord.
• To avoid the danger of injury by electrical shock, do not repair the appliance
yourself or make any adjustments to it. All repairs must be performed at an
authorised service centre. By tampering with the appliance, you risk voiding
your legal rights arising from unsatisfactory performance or quality warranty.
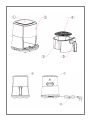
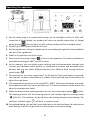
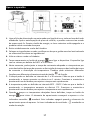
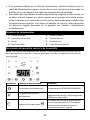
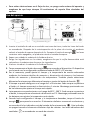
Overview of the components
1. Main body
5. Handle of fry pot
2. Touch Control Panel
6. Air inlet
3. Fry pot
7. Air outlet
4. Removable grid
8. Power cord
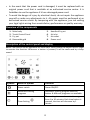
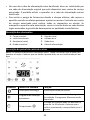
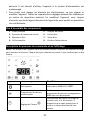
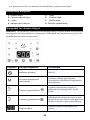
Description of the control panel and display
NOTE: The buttons on the appliance are touch keys. Gently touch the buttons with a finger
to execute the function. Whenever a button is pressed, it will be confirmed by a beep
sound.
Symbol
Name of symbol
Function
Power switch
Power ON/OFF.
Automatic cooking
programs
Automatic cooking program selection
button. 8 different programs are available.
Timer Setting
The cooking time can be set in the range
from 1 to 30 minutes. Each time button is
pressed, the time will decrease by 1
minute.

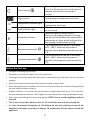
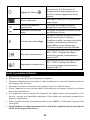
5
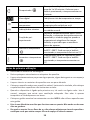
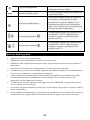
Timer Setting
The cooking time can be set in the range
from 1 to 30 minutes. Each time button is
pressed, the time will increase by 1
minute.
Digital screen
Loop display of temperature and time.
Temperature Indicator Light
This light will be on when temperature is
displayed on the screen.
Time Indicator Light
This light will be on when time is displayed
on the screen.
Preheating Function
When the light is on after start of
function, the heating element is heating;
the light will be off when the temperature
reaches the set time, which indicates that
the heating element stops heating.
Decrease temperature
The temperature can be set in the range
80°C - 200°C. Each time the button is
pressed, the temperature will decrease by
5°C.
Increase temperature
The temperature can be set in the range
80°C - 200°C. Each time the button is
pressed, the temperature will increase by
5°C.
Before the first use
• Remove all packaging material.
• Remove any stickers or labels from the appliance.
• Thoroughly clean the parts with hot water, some washing-up liquid and a non-abrasive
sponge.
• Wipe the inside and outside of the appliance with a moist cloth.
• Place the appliance on a stable, horizontal and level surface, do not place the appliance
on non-heat-resistant surfaces.
• When the device is turned on for the first time, a slight odour will occur. This is normal,
ensure adequate ventilation. This fragrance is only temporary and will disappear soon.
• Place the removable grid in the pan properly. NOTE: do not use the appliance without
this grid.
• This is an air fryer that works on hot air. Do not fill the pan with oil or frying fat.
• In order to prevent disruptions of the airflow do not put anything on top of the
appliance and make sure there is always 10 centimeters of free space around the
appliance.

6
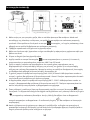
Operating the appliance
1. Put the mains plug in an earthed wall socket, all the backlights will be lit. After self-
inspection of circuit board, the product will return to standby status after 1s. Except
power button , the rest lights are off, and the product will be in standby status.
2. Carefully pull the fry pot out of the air fryer.
3. Put the ingredients in the pan, make sure the removable grid is placed in the pan before
you put in the ingredients.
4. Slide the fry pot back into the air fryer.
5. Gently touch the power button to turn on the appliance. The device switches on
with default settings of 180°C and 25 minutes.
6. At the moment, you can adjust proper cooking time and temperature through time
increase and decrease touch buttons or temperature increase and decrease touch
buttons. You can also select different functions for different food through function
touch button .
7. The time can be set in the range from 1 to 30 minutes. Each time button is pressed,
the time will increase or decrease by 1 minute. Press and hold one of the buttons to
adjust the time faster.
8. The temperature can be set in the range 80°C - 200°C. Each time the button is pressed,
the temperature will increase or decrease by 5°C. Press and hold one of the buttons to
adjust the temperature faster.
9. When the desired time and temperature are set, touch the power button to start.
The heating element will start heating and the red indicator light for working status
will be lit. This indicator will be off when the heating element stops heating. The
ventilator indicator lights will be lit in rotation mode.
10. During food baking, pull out the fry pot and shake or stir the food twice (to realize more
even baking). Push the fry pot back into the product to continue baking.

7
11. After the time has elapsed, the red indicator light goes off which means that the
food cooking is finished. After cooling for 60s the ventilator indicator lights will
stop and you can now remove the fry pot.
Note: Do not turn the basket over as oil or fat stored in the bottom could seep into
the ingredients. Empty the basket into a plate or other container.
12. Remove the plug from the socket if you are no longer going to use the appliance.
Note: Do not touch the pan during and sometime after use, as it gets very hot. Only
hold the pan by the handle.
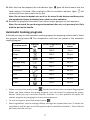
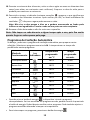
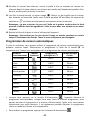
Automatic Cooking programs
If desired you may use the automatic cooking program for preparing certain meals. Select
the program using button M. The temperature and time are preset in the automatic
cooking program.
Function mode
Indicator
light
Pre-set temperature
in °C
Pre-set Time
in min.
Preheat
180°C
3 min
Chips
180°C
25 min
Ribs
180°C
25 min
Chicken wing
180°C
20 min
Shrimp
160°C
20 min
Drumstick
180°C
30 min
Fish
160°C
25 min
Steak
160°C
20 min
Cake
160°C
30 min
• When you press the power button , the device will start the corresponding program.
When you have chosen the wrong program, you can cancel by pressing the power
button. After this you can select another function. It is also possible to adjust the
chosen program by changing the time and temperature.
• To stop a program, press the power button .
• Some ingredients require shaking halfway through the preparation time. To shake the
ingredients, pull the pan out of the appliance by the handle and shake it. Then slide the
pan back into the air fryer.

8
• After the time is elapsed and the red indicator light goes off, check if the
ingredients are ready. If the ingredients are not ready yet, simply slide the pan back
into the appliance and set the timer to a few extra minutes.
• Excess oil from the ingredients is collected on the bottom of the pan.
Pause Operation
The operation will be paused as soon as you remove the basket. In order to turn the
appliance back on, insert the basket again.
NOTE: The appliance will start from the spot it has been paused. If, however, you pull
out the power plug, or If power failure occurs, the product will memorize the working
status and working time before power failure within 2 hours after the drawer is
withdrawn. After the product is powered on again, it will continue operation according
to the status before power failure.
Cleaning and Maintenance
• Prior to cleaning the appliance, disconnect it from the power socket and allow it to cool
down. The appliance will cool down faster when the pan and the basket are removed.
• We recommend cleaning the appliance immediately after it cools down to prevent
food scraps from drying on. These are harder to remove later.
• Wash the pan with the basket using soft dishwashing sponges under running water
with the addition of neutral dishwashing detergent. Then rinse these parts under clean
water, dry thoroughly, and put them back in their place.
• If you are unsuccessful in removing baked on food scraps, which are stuck on the
basket or the pan, then fill the pan with warm water with an addition of neutral
dishwashing detergent and put the basket into it. Allow the water and detergent
solution to act for approximately 10 minutes in order to soak the food scraps. Then
clean both parts in the usual manner.
• Make sure that baked on food scraps do not accumulate on the pan and the basket.
Prior to further use, both parts must be clean.
• Wipe the surface of the appliance using a soft cloth dampened in a solution of warm
water and neutral kitchen detergent. After applying the kitchen detergent, wipe the
appliance with a lightly damp cloth and then thoroughly wipe everything dry. Make
sure that the power cord connection socket does not get wet.
• Do not submerge the appliance in water or in any other liquid.
• Do not use steel wool, abrasive cleaning products, solvents, etc. to clean any part of
this appliance.

9
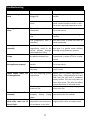
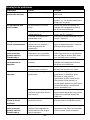
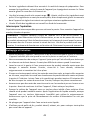
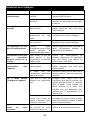
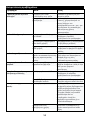
Troubleshooting
Problem
Cause
Solution
The hot air fryer does not
work
The appliance is not
plugged in.
Plug the appliance to an earthed
socket.
You have not set the
timer.
To turn on the appliance, use the
timer control button and the + and -
to set the required preparation time.
The ingredients are not
done.
There is too much food in
the basket
Remove some food. Smaller batches
fry more evenly.
The set temperature is too
low.
Program the temperature to a higher
setting.
The preparation time is
too short.
Set more time to allow the food to
cook completely.
The ingredients are fried
unevenly.
Certain types of
ingredients need to be
stirred halfway through
the preparation time.
Remove the pan from the main body
and give it a gentle shake halfway
through the preparation process.
Fried snacks are not
crispy.
The snacks were meant for
a traditional deep fryer.
Use oven snacks or lightly coat the
ingredients in some oil for a crispier
result.
The pan does not fit into
the appliance property.
Too much food in the
basket.
Remove some food. Smaller batches
fry more evenly.
The basket is not placed
correctly.
Push the basket down into the pan
until it clicks.
White smoke comes out
of the appliance.
You are preparing greasy
ingredients
When you fry greasy ingredients in
the air fryer. a large amount of oil will
leak into the pan and it produces
white smoke. The pan may heat up
more than usual. This does not affect
the performance or the end result.
There's grease from a
previous use.
Make sure you clean the pan properly
after each use.
Fresh chips are fried
unevenly.
You didn't rinse the chips
properly before frying
them.
Rinse the chips properly to remove all
the starch from the outside.
Fresh chips are not crispy
when they come out of
the air fryer.
The crispiness of the fries
depends on the amount of
oil and water in the fries.
Cut the potato smaller and add
slightly more oil for a crispier result.

10
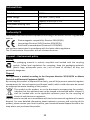
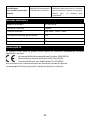
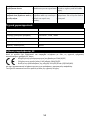
Technical Data
Product Model
AF-D22.001A
Rated Power
1000W
Rated Voltage
220-240V~, 50Hz/60Hz
Rated Capacity
Capacity of the fryer is 2.0L
Continuous Working Time
2h
Chill Time
20 min
Conformity CE
This product has been tested and produced according to all relevant current CE guidelines,
such as:
- Electromagnetic compatibility Directive 2014/30/EU,
- Low voltage Directive (LVD) Directive 2014/35/EU,
- RoHS with its amendments Directive EU 2015/863,
and has been constructed in accordance with the latest safety regulations.
The CE mark attests this product with all relevant directives.
Disposal – Environment policy
Packing
The packaging material is entirely recyclable and marked with the recycling
symbol. Follow local regulations for scrapping. Keep the packaging materials
(plastic bags, polystyrene parts, etc.) out of reach of children, as they are
potentially dangerous.
Disposal
This appliance is marked according to the European directive 2012/19/EU on Waste
Electrical and Electronic Equipment (WEEE).
By ensuring this product is disposed of correctly, you will help prevent potential negative
consequences for the environment and human health, which could otherwise be caused
by inappropriate waste handling of this product.
This symbol on the product, or on the documents accompanying the product,
indicates that this appliance may not be treated as household waste. Instead, it
shall be handed over to the applicable collection point for the recycling of
electrical and electronic equipment.
Disposal must be carried out in accordance with local environmental regulations for waste
disposal. For more detailed information about treatment, recovery and recycling of this
product, please contact your local city office, your household waste disposal service or the
shop where you purchased the product.

11
Warranty Declaration
This unit is covered by a 24 months (*) warranty, from the purchase date, and covers the
repair free of charges of the damaged due to the manufacturer fault or defected
components. The distributor reserves the right to change the unit for an equivalent model.
The warranty does not cover any damaged caused by incorrect use, lightning, incorrect
installation, external factors or any intentional damaged. The warranty does not cover
damage thus attributable to falls, blows, spill, exposure to extreme environmental
conditions or deterioration caused by normal use of plastic parts or keyboards, as well as
by the use of batteries other than those specified in this manual.
For the repairing, during the warranty period, the unit shall be sent to the distributor or
reseller, or to the address indicated by them, and must be jointed the warranty certificated
and the respective original invoice or selling ticket, where the buying date is expressed
indicated.
The consumer is protected by the guarantee provided by Directive 1999/44/CE of
European Parliament and Council of 25 May.
(*) Only for European Union countries

12
Português
Estimado Cliente
Obrigado por ter escolhido um produto HÆGER.
Os produtos HÆGER foram concebidos a pensar no bem-estar do consumidor,
privilegiando os mais elevados padrões de qualidade, funcionalidade e designe. Estamos
certos da sua satisfação pela aquisição deste produto.
Partimos do princípio de que o utilizador possui conhecimentos gerais sobre o
manuseamento com eletrodomésticos.
Antes da primeira utilização, leia cuidadosa e totalmente estas instruções de utilização e
de segurança e familiarize-se com as funções do aparelho. Guarde estas instruções e, se
necessário, entregue-as a terceiros.
Uso previsto
Este aparelho serve para processar alimentos por calor. Não o use para nenhum outro
propósito além do qual foi projetado. Só pode ser usado da maneira descrita nestas
instruções de uso. O dispositivo não deve ser usado para fins comerciais. Qualquer outro
uso deste dispositivo é contrário ao uso pretendido e pode resultar em danos aos
materiais ou até mesmo ferimentos pessoais.
Este aparelho destina-se apenas a uso doméstico. Não se destina para uso em locais, tais
como:
cozinhas do pessoal em lojas, escritórios e outros locais de trabalho;
quintas agrícolas;
quartos de hotel ou motel e outras áreas residenciais;
estabelecimentos com cama e pequeno-almoço.
O fabricante / distribuidor não aceita qualquer responsabilidade por danos causados pelo
uso deste dispositivo contrário ao uso pretendido.
Conselhos e advertências de segurança
Por favor mantenha este manual de instruções em lugar seguro, tal como a
garantia preenchida e talão de venda para efeitos de garantia. As mediadas de
segurança incluídas aqui reduzem risco de fogo, choque elétrico e acidentes
pessoais quando corretamente ligado.
• A tensão de entrada deste produto é AC220-240V ~, 50-60Hz. Antes de ligar a
fritadeira, assegure-se de que a voltagem elétrica e a frequência são a
correspondente à indicada no rótulo do aparelho.
• A fritadeira deve ser colocada numa superfície plana quando em utilização para
que não vire.
• Não coloque o aparelho no parapeito da janela, escorredor do lava-loiça,
superfícies instáveis, em fogões a gás ou elétricos ou nas proximidades. Apenas
coloque o aparelho numa superfície uniforme, seca e estável.

13
• A instalação inadequada pode resultar em risco de incêndio, choque elétrico e
/ ou ferimentos às pessoas.
• O fabricante/distribuidor não se responsabiliza por qualquer eventual avaria
causada por má utilização ou utilização indevida.
• Atenção: Este aparelho não foi concebido para ser controlado através de um
dispositivo programado, interruptor de temporizador externo ou controle
remoto.
• O uso de acessórios não recomendados pelo fabricante/ distribuidor pode
causar incêndio, choque elétrico ou ferimentos. Utilize este aparelho apenas
com os acessórios originais que são fornecidos pelo fornecedor.
• Não utilize o aparelho perto de materiais inflamáveis como cortinas, toalhas
de cozinha, etc.
• Para garantir a circulação de ar durante o funcionamento, deve haver um
espaço de, pelo menos, 15 cm em todos os lados do aparelho. Não coloque
itens no aparelho nem cubra as aberturas de ventilação.
• Evite o contacto com vapor quente, que é libertado pelas aberturas de
ventilação enquanto o aparelho está em funcionamento.
• Não sobrecarregue o recipiente com uma grande quantidade de alimentos.
Certifique-se de que os alimentos colocados não entram em contacto com o
elemento de aquecimento.
• Não coloque as mãos na área interna do aparelho enquanto estiver em
funcionamento.
• Não encha o recipiente com óleo. Encher o cesto com óleo pode resultar numa
situação perigosa. Este método de fritura saudável baseia-se no princípio de
circulação de ar quente que não necessita da utilização de óleo. É possível
adicionar uma pequena quantidade de óleo apenas com a finalidade de
temperar o alimento.
• Não utilize o aparelho para fritar alimentos com elevado teor de gordura.
• A ficha elétrica deve ser retirada da tomada elétrica antes de ser efetuada a
limpeza, manutenção ou na mudança de local da fritadeira. Quando a fritadeira
não se encontra em uso, desligue o botão comutador e retire a ficha da
tomada.
• Não coloque dentro da fritadeira qualquer tipo de objeto nem dobre ou
danifique o cabo elétrico.
• A unidade não contém peças que possam ser reparadas pelo utilizador. Não
tente consertar, desmontar ou modificar a fritadeira.
• Não utilize químicos, esfregões de aço ou produtos abrasivos para limpar o
exterior da fritadeira, pois isso danifica o metal exterior e risca a superfície
metálica.

14
• É necessária supervisão cuidadosa quando qualquer aparelho for usado por
ou perto de crianças. As crianças devem ser supervisionadas para garantir
que não brinquem com o aparelho.
• Este aparelho não deve ser utilizado por crianças com idades compreendidas
entre os 0 e os 8 anos. Este aparelho pode ser utilizado por crianças com mais
de 8 anos e por pessoas com capacidades físicas, sensoriais ou mentais
reduzidas, assim como com falta de experiência e conhecimentos, caso sejam
supervisionadas ou instruídas sobre como utilizar o aparelho de modo seguro
e compreendam os riscos envolvidos. As crianças não devem brincar com o
aparelho. Mantenha o aparelho e respetivo cabo fora do alcance de crianças
com idade inferior a 8 anos.
• A limpeza e manutenção não devem ser realizadas por crianças a não ser que
tenham mais de 8 anos e sejam supervisionadas.
A superfície poderá aquecer durante a utilização.
• Quando o aparelho estiver em funcionamento, a temperatura das superfícies
acessíveis pode ser superior. Não toque na superfície quente, caso contrário,
pode sofrer queimaduras. Utilize a pega para remover e transportar o
recipiente. Coloque o recipiente apenas em superfícies resistentes ao calor. Ao
retirar o recipiente do aparelho, tenha um cuidado especial para não se
queimar com o vapor que é libertado pelos alimentos. O calor residual do
aparelho significa que permanece quente por um determinado período de
tempo depois de ser desligado.
• Caso os alimentos no interior do aparelho peguem fogo, desligue-o
imediatamente desconectando-o da tomada. Espere até que o fumo que sai
das aberturas de ventilação desapareça antes de remover o recipiente.
• Não verta água gelada na cuba quente.
• Desligue sempre o aparelho e desconecte da tomada elétrica quando o deixa
sem supervisão, quando não estiver a ser utilizado e antes de o mover ou
limpar. Deixe o aparelho arrefecer antes de mover ou limpar.
• Não submerja o aparelho em água ou em qualquer outro líquido.
• Não coloque itens pesados sobre o cabo de alimentação. Certifique-se de que
o cabo de alimentação não fica pendurado na extremidade de uma mesa e que
não está em contacto com uma superfície quente.
• Desligue o aparelho da tomada elétrica puxando levemente a ficha do cabo de
alimentação e não pelo próprio cabo. Caso contrário, isto pode danificar o cabo
de alimentação ou a tomada.

15
• No caso de o cabo de alimentação estar danificado, deve ser substituído por
um cabo de alimentação original que está disponível num centro de serviço
autorizado. É proibido utilizar o aparelho se o cabo de alimentação estiver
danificado.
• Para evitar o perigo de ferimentos devido a choque elétrico, não repare o
aparelho sozinho ou efetue quaisquer ajustes no mesmo. Contacte um centro
de serviço autorizado para realizar todas as reparações ou ajustes. Se
manipular o aparelho sem autorização, corre o risco de anular os seus direitos
legais associados à garantia de desempenho ou qualidade insatisfatórios.
Descrição dos elementos
1. Corpo principal
5. Pega do cesto
2. Painel de controlo
6. Entrada de ar
3. Recipiente (cuba)
7. Saída de ar
4. Grade removível
8. Cabo de alimentação
Descrição do painel de controle e visor
NOTE: Os botões do dispositivo são botões táteis. Toque nos botões com o dedo para
executar a função. Cada vez que um botão é pressionado, ele será confirmado por um
bipe.
Símbolo
Nome do símbolo
Função
Interruptor de energia
Alimentação LIGAR/DESLIGAR.
Programas de confeção
automática
Botão de seleção automática do programa
de confeção. 8 programas diferentes estão
disponíveis.
Temporizador
O tempo de confeção pode ser definido na
gama de 1 a 30 minutos. Cada vez que o
botão é pressionado, o tempo diminui em 1
minuto.

16
Temporizador
O tempo de confeção pode ser definido na
gama de 1 a 30 minutos. Cada vez que o
botão é pressionado, o tempo aumenta em
1 minuto.
Visor digital
Exibição em ciclo da temperatura e tempo.
Indicação da
temperatura
Este indicador acenderá quando a
temperatura for exibida no ecrã.
Indicação dos minutos
Este indicador acenderá quando o tempo
for exibido no ecrã.
Função de pré-
aquecimento
Quando o símbolo está aceso após o início
da função, o elemento de aquecimento está
aquecendo; o símbolo apaga-se quando a
temperatura é atingida ao fim tempo
definido, o que indica que a resistência
deixou de aquecer.
Diminuir a temperatura
A temperatura pode ser regulada na gama
de 80°C –200°C. Cada vez que o botão é
pressionado, a temperatura diminui em 5°C.
Aumentar a temperatura
A temperatura pode ser regulada na gama
de 80°C –200°C. Cada vez que o botão é
pressionado, a temperatura aumenta em
5°C.
Antes da primeira utilização
• Retire todo o material de embalagem.
• Retire quaisquer autocolantes ou etiquetas do aparelho.
• Limpe minuciosamente as peças com água quente, algum detergente e uma esponja
não abrasiva.
• Limpe o interior e o exterior do aparelho com um pano húmido.
• Coloque o aparelho sobre uma superfície estável, horizontal e nivelada, não coloque
o aparelho sobre superfícies não resistentes ao calor.
• Quando o dispositivo é ligado pela primeira vez, irá sentir um ligeiro odor. Isto é
normal, assegure que existe uma ventilação adequada. Este odor é apenas
temporário e irá desaparecer em breve.
• Coloque a grelha amovível corretamente na cuba. NOTA: não utilize o aparelho sem
esta grelha.
• Esta é uma fritadeira sem óleo que funciona com ar quente. Não encha a cuba com
óleo ou gordura.
• De modo a manter livre o fluxo de ar, não coloque objetos em cima do aparelho e
certifique-se de que existe sempre 10 cm de espaço à volta do mesmo.

17
Operar o aparelho
1. Ligue a ficha de alimentação a uma tomada com ligação à terra, todas as luzes de fundo
acenderão. Após a autoinspeção da placa de circuito, o produto retornará ao estado
de espera após 1s. Exceto o botão de energia, as luzes restantes estão apagadas e o
produto estará no estado de espera
2. Retire cuidadosamente a cuba da fritadeira.
3. Coloque os ingredientes na cuba, certifique-se de que a grelha amovível está colocada
na cuba antes de colocar os ingredientes.
4. Volte a colocar a cuba na fritadeira.
5. Toque suavemente no botão de energia para ligar o dispositivo. O aparelho liga
com os valores por defeito de 180°C e 25 minutos.
6. Neste momento, pode ajustar o tempo de cozimento adequado e a temperatura por
meio dos botões de toque de aumento e diminuição do tempo ou dos botões de toque
de aumento e diminuição da temperatura. Também pode selecionar diferentes
funções para diferentes alimentos através do botão de função.
7. O tempo pode ser definido no intervalo de 1 a 30 minutos. Cada vez que o botão é
pressionado, o tempo aumenta ou diminui em 1 minuto. Pressione e mantenha-o
pressionado um dos botões para ajustar o tempo mais rapidamente.
8. A temperatura pode ser definida no intervalo 80°C - 200°C. Cada vez que o botão é
pressionado, a temperatura aumenta ou diminui 5°C. Pressione e mantenha-o
pressionado um dos botões para ajustar a temperatura mais rapidamente.
9. Quando o tempo e a temperatura desejados forem definidos, toque no botão de
energia para iniciar. O elemento de aquecimento começará a aquecer e a luz
indicadora vermelha acenderá. Este indicador apagará quando o elemento de
aquecimento parar de aquecer. As luzes indicadoras do ventilador acenderão no
modo de rotação.

18
10. Durante o cozimento dos alimentos, retire a cuba e agite ou mexa os alimentos duas
vezes (para obter um cozimento mais uniforme). Empurre a cuba de volta para o
produto para continuar o cozimento.
11. Decorrido o tempo, o indicador luminoso vermelho apaga-se, o que significa que
a cozedura dos alimentos terminou. Após resfriar por 60s, as luzes indicadoras do
ventilador irão parar e agora pode remover a cuba.
Nota: Não vire a cuba porque o óleo ou a gordura armazenada no fundo pode
infiltrar-se nos ingredientes. Esvazie a cuba em um prato ou outro recipiente.
12. Remova a ficha da tomada se não for mais usar o aparelho.
Nota: Não toque na cuba durante e algum tempo após o uso, pois fica muito
quente. Segure a cuba apenas pela pega.
Programas de Confeção Automática
Se desejar, pode usar o programa de confeção automática para preparar certas
refeições. Selecione o programa com a tecla M. A temperatura e o tempo são
predefinidos nestes programas.
Modo de
Funcionamento
Luz
indicadora
Temperatura
programada
em °C
Tempo
programado
em min.
Pré-aquecimento
180°C
3 min
Batata frita
180°C
25 min
Costeletas
180°C
25 min
Asa de frango
180°C
20 min
Camarão
160°C
20 min
Baqueta
180°C
30 min
Peixe
160°C
25 min
Bife
160°C
20 min
Bolo
160°C
30 min
• Quando prima o botão de energia , o dispositivo iniciará o programa
correspondente. Se tiver escolhido um programa errado, poderá cancelá-lo premindo
o botão de energia. Poderá depois escolher outro programa. Pode também ajustar o
programa escolhido alterando o tempo e a temperatura.
• Para interromper um programa, pressione o botão de energia .
La page est en cours de chargement...
La page est en cours de chargement...
La page est en cours de chargement...
La page est en cours de chargement...
La page est en cours de chargement...
La page est en cours de chargement...
La page est en cours de chargement...
La page est en cours de chargement...
La page est en cours de chargement...
La page est en cours de chargement...
La page est en cours de chargement...
La page est en cours de chargement...
La page est en cours de chargement...
La page est en cours de chargement...
La page est en cours de chargement...
La page est en cours de chargement...
La page est en cours de chargement...
La page est en cours de chargement...
La page est en cours de chargement...
La page est en cours de chargement...
La page est en cours de chargement...
La page est en cours de chargement...
La page est en cours de chargement...
La page est en cours de chargement...
La page est en cours de chargement...
La page est en cours de chargement...
La page est en cours de chargement...
La page est en cours de chargement...
La page est en cours de chargement...
La page est en cours de chargement...
La page est en cours de chargement...
La page est en cours de chargement...
La page est en cours de chargement...
La page est en cours de chargement...
La page est en cours de chargement...
La page est en cours de chargement...
La page est en cours de chargement...
La page est en cours de chargement...
La page est en cours de chargement...
La page est en cours de chargement...
-
 1
1
-
 2
2
-
 3
3
-
 4
4
-
 5
5
-
 6
6
-
 7
7
-
 8
8
-
 9
9
-
 10
10
-
 11
11
-
 12
12
-
 13
13
-
 14
14
-
 15
15
-
 16
16
-
 17
17
-
 18
18
-
 19
19
-
 20
20
-
 21
21
-
 22
22
-
 23
23
-
 24
24
-
 25
25
-
 26
26
-
 27
27
-
 28
28
-
 29
29
-
 30
30
-
 31
31
-
 32
32
-
 33
33
-
 34
34
-
 35
35
-
 36
36
-
 37
37
-
 38
38
-
 39
39
-
 40
40
-
 41
41
-
 42
42
-
 43
43
-
 44
44
-
 45
45
-
 46
46
-
 47
47
-
 48
48
-
 49
49
-
 50
50
-
 51
51
-
 52
52
-
 53
53
-
 54
54
-
 55
55
-
 56
56
-
 57
57
-
 58
58
-
 59
59
-
 60
60


HAEGER AF-D22.001A Manuel utilisateur
- Catégorie
- Friteuses
- Taper
- Manuel utilisateur
dans d''autres langues
- English: HAEGER AF-D22.001A User manual
- español: HAEGER AF-D22.001A Manual de usuario
- português: HAEGER AF-D22.001A Manual do usuário
Documents connexes
Autres documents
-
Taurus AF1500D Manuel utilisateur
-
UFESA Shadow Manuel utilisateur
-
UFESA Apex 3 Manuel utilisateur
-
Black & Decker AF400 Manuel utilisateur
-
Thulos TH-FR2500 Le manuel du propriétaire
-
Oster 3246 Manuel utilisateur
-
Sunbeam 3240 Manuel utilisateur
-
DeLonghi Electric Deep Dryer Manuel utilisateur
-
Bodum 12069-01UK Manuel utilisateur
-