
mr
.steam
®
Feel Good Inc.
AromaSteam
Installation, Operation & Maintenance Manual

mr.steam®
AromaSteam Operation and Installation Instructions
______________________________________________________________________________________________
MS Aroma
Table of Contents
Box Contents . . . . . . . . . . . . . . . . . . . . . . .3
General Installation . . . . . . . . . . . . . . . . . .3
Installation of Hoses . . . . . . . . . . . . . . . . .4
Assembly Diagram . . . . . . . . . . . . . . . . . .5
Electrical Wiring . . . . . . . . . . . . . . . . . . . . .6
Start-up
Initial Priming . . . . . . . . . . . . . . . . . . . . .6
Filling the Pressure Hose . . . . . . . . . . . . .6
Operation . . . . . . . . . . . . . . . . . . . . . . . . . .7
Adjusting amount of oil delivery . . . . . . . .7
Troubleshooting . . . . . . . . . . . . . . . . . . . . .8
Technical Information . . . . . . . . . . . . . . . . .8
PUR 100402 Rev 10.14
Motor Operated
Pumps 24VW
mr.steam®
Sussman-Automatic Corporation®I [email protected] I www.mrsteam.com
43-20 34th Street, Long Island City, NY 11101 I 9410 S. La Cienega Blvd. Inglewood CA 90301
1 800 76 STEAM FAX: 718 472 3256 I 1 800 72 STEAM FAX: 310 216 2944
IMPORTANT NOTE:
The warning
label (supplied) shall be posted in a
conspicious location next to the
steam room door.
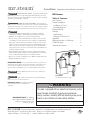
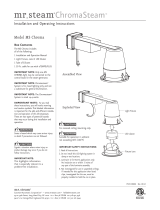
AromaSteam
(for illustrative purposes only)
RISK OF ELECTRIC SHOCK - This pump is supplied with
agrounding conductor and grounding-type attachment plug. To reduce
the risk of electric shock, be certain that it is connected only to a properly
grounded, grounding-type receptacle.
RISQUE DE CHOC ÉLECTRIQUE - Cette pompe est
fournie avec un conducteur de mise à la terre et une fiche de branchement
de type mise à la terre. Pour réduire le risque de choc électrique, assurez
vous qu'il est connecté uniquement à une mise à la terre, à la terre prise.
• Do not use with water soluble fragrance or fragrance containing
emulsifiers or aldehydes. AromaSteam system damage may result.
Mr.Steam oils are approved for operation with this system.
• The use of any oils other than Mr.Steam oils may introduce excessive
concentration of oil into the steam room, resulting in a health hazard.
• Vapors may cause drowsiness and dizziness. Keep out of the reach of
children. In case of contact with eyes, rinse immediately with plenty of
water and seek medical advice. If swallowed, rinse mouth with water
(only if the person is conscious), seek medical advice immediately and
show this container or label.
• Highly Flammable. Keep away from sources of ignition–No smoking.
Keep container tightly closed & in a well-ventilated place. This materi-
al & its container must be disposed of as hazardous waste.
• Not for use in acrylic or fiberglass rooms. Material Safety Data Sheet
(MSDS) available upon request
IMPORTANT NOTE:
As you follow these instructions, you will notice
warning and caution symbols. This blocked information is important for the
safe and efficient installation and operation of this generator. These are
types of potential hazards that may occur during installation and operation:
states a hazard may cause serious injury or death if pre-
cautions are not followed.
signals a situation where minor injury or product damage
may occur if you do not follow instructions.
IMPORTANT NOTE:
This highlights information
that is especially relevant to a problem-free
installation.
WARNING
!
WARNING
!
WARNING
!
CAUTION
!
AVERTISSEMENT
!
This room is equipped with an aromatic oil dispensing system
Leave the room immediately if you have any adverse or
allergic reactions, including difficulty breathing or eye, nasal,
throat, or skin irritation and seek medical attention.
mr
.steam®
43-20 34th Street, Long Island City NY 11101 1-800-76 STEAM www.mrsteam.com
PUR
100405 2/06
WARNING
!

mr.steam®
AromaSteam Operation and Installation Instructions
______________________________________________________________________________________________
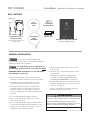
AromaSteam System
&
Bracket Assembly
(with integrated 6 ft. power cord,
8 ft. request cable)
BOX CONTENTS
3
Shipping Hose
1/2 inch NPT
Atomizing Nozzle
Injector with
Injection Hose
Installation & Operation Manual
with Peel-off Warning Label
GENERAL INSTALLATION
Do Not alter or modify any Mr. Steam
product. Doing so may result in an inoperable or hazardous
installation and will void the warranty.
The AromaSteam system is qualified for use
with Mr.Steam®residential and CT steam generators ONLY.
IMPORTANT NOTE: AromaSteam is for use with iSteam®
and iTempoPlus®controls only.
1.Locate the AromaSteam system to monitor the con-
sumption of essential oils and for easy oil replacement.
2. The warning sticker provided must be placed in a
conspicuous location near the steam room door.
3. Mr.Steam®AromaSteam System is designed and
intended for indoor use only and is to be located
indoors in a dry clean location and not subject to
moisture, condensation or similar high humidity envi-
ronments.
4. Do not install AromaSteam Systems outdoors.
5. Do not install AromaSteam Systems in a location
where water could freeze.
6. Do not install AromaSteam Systems near flammable or
corrosive materials and chemicals. Installation in areas
having high concentrations of chlorine (such as pool
equipment room) should be avoided.
CAUTION
!
6 ft.
Pressure
Hose
2 ft. Suction
Hose
with Filter
This room is equipped with an aromatic oil dispensing system
Leave the room immediately if you have any adverse or
allergic reactions, including difficulty breathing or eye, nasal,
throat, or skin irritation and seek medical attention
.
mr
.steam®
43-20 34th Street, Long Island City NY 11101 1-800-76 STEAM www.mrsteam.com
PUR
100405 2/06
WARNING
!
7. Attach the AromaSteam System onto a secure
vertical surface.
8. Provide access to AromaSteam System for servic-
ing, and refills.
9. The system should not be installed in areas
accessible to children. A LOCKED ROOM IS
STRONGLY RECOMMENDED (ie: utility room)
10. Height difference between AromaSteam System
discharge and 90 degree Tis to be held to a max-
imum 6 ft. (see page 5).
11. Do not exceed 30 feet of tubing between the
pump head and atomizing nozzle.
WARNING
!
Warning Sticker (Not actual size)

mr.steam®
AromaSteam Operation and Installation Instructions
______________________________________________________________________________________________
GENERAL INSTALLATION (cont.)
Clearance to heat sources
• Do not install the AromaSteam system directly below or above the Mr. Steam steam
generator where it is subject to heat.
• Minimum distance between the AromaSteam system and a heat source (e.g. steam
generator, heating system) is 1.5 ft. If this minimum distance of 1.5 ft cannot be maintained,
install a radiation plate or heat insulation between the heat source and AromaSteam system.
• Ambient temperature at and around the AromaSteam system should not exceed 90˚ F.
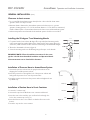
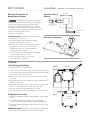
Installing the 90 degree T and Atomizing Nozzle
1. For optimal results locate a brass 90 degree T(not provided) and atomizing nozzle
in the steam supply line within 10 feet of the steam head. If using copper tubing for
steam lines, install a female 1/2 NPT thread to sweat fitting in the downward facing T.
2. Tmust face downward as shown (in figure 2).
3. Screw the atomizing nozzle into 90° Tfitting using teflon tape on the threads.
IMPORTANT NOTE:
Follow the installation instructions for the steam
pipeline in the Mr.Steam Steam Bath Installation and Operation Manual.
Visit www.mrsteam.com to download this document.
Steam Line
90˚ T
Figure 2
1/2 NPT
4
Installation of Pressure Hose to AromaSteam System
1. Unscrew the pressure end nut from the pump head and remove the
shipping hose and the pressure end nut.
2. Insert the pressure hose through the hole of the pressure end nut and
firmly push the pressure hose onto the pressure valve.
3. Screw the pressure end nut onto the pressure valve and tighten the nut
by HAND only.
Installation of Suction Hose in Scent Container
1. Locate the “container cap”.
2. Unscrew the cap from the Mr.Steam scent container and discard.
3. Insert the suction hose with the open end from below through the
hole in the container cap (see Fig. 3).
4. Insert the filter into the scent container so that the filter rests on the
bottom.
5. Screw the cap onto the scent container.
Open End
Container Cap
Suction Hose
Filter
Container Height 8 inches
Figure 3

mr.steam®
AromaSteam Operation and Installation Instructions
______________________________________________________________________________________________
5
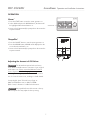
Figure
Suction Suction Pump Pressure Pressure
End Nut Valve Head Valve End Nut
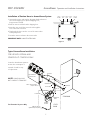
Installation of Suction Hose to AromaSteam System
1. Unscrew the suction end nut from the pump head and remove
short end of shipping hose (discard shipping hose,
keep pressure end nut).
2. Remove suction end nut from the shipping hose.
3. Insert the open end of the suction hose through the
hole of the suction end nut.
4. Firmly push the hose onto the cone of the suction valve
at the pump head.
5. Screw the suction end nut to the suction valve.
IMPORTANT NOTE:
HAND-TIGHTEN ONLY.
Max ht: 6 ft.
iSteam
Steam Line
Typical Mr.Steam
Steam Generator
Cable to Steam Generator
(request cable)
Atomzer Nozzle
Pressure Hose
90˚ T
Suction Hose
Scent Container
Pump Line Cord 120V
(grounded receptacle required)
AromaSteam
System
UTILITY
ROOM
STEAM ROOM
Mounting
Brackets
Steam Head
MaxDistance10ft.
Typical AromaSteam Installation
FOR USE WITH iSTEAM®AND
iTEMPO/PLUS®CONTROLS ONLY
Locate the AromaSteam system to
monitor the consumption of
essential oils and for easy
oil replacement.
NOTE:
CABLES SHOULD
NOT CONTACT STEAM PIPE.
For illustrative Purposes Only
Figure 4

mr.steam®
AromaSteam Operation and Installation Instructions
______________________________________________________________________________________________
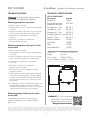
Electrical Connection of
AromaSteam System
AromaSteam
Plug
120 VAC
Outlet
(grounded receptacle
required)
Request Cable
24 VAC to steam generator
(see below)
AromaSteam Wiring
Schematic
AromaSteam Connections
CAUTION
!
This AromaSteam system is factory wired. If
the power cord of the Aroma Steam system is damaged it
must be replaced by the Sussman-Automatic service
department or similarly qualified personnel in order to
avoid an electric shock hazard. All electrical connections to
be made by a licensed, qualified electrician. Disconnect all
power to the steam generator before
making power connections.
IMPORTANT NOTE:
AromaSteam is for use with
iSteam®
and iTempoPlus®controls only.
1. Disconnect all power to the Mr.Steam steambath
generator and remove the top cover.
2. Run the request cable from the AromaSteam System
through one of the knock outs in the side of the
steambath generator. Use a strain relief bushing
or grommet to prevent chafing.
3. Locate the two quick connect tabs labeled "AROMA"
on the PC board in the location show.
4. Connect the request cable to the terminals.
The terminals are not polarized.
6
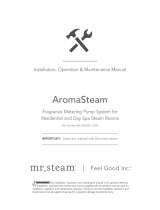
Figure 5
Pressure Valve
Injector
Hose
Push Button
AromaSteam
Metering Pump
START-UP
Initial Priming of the Pump
1. Insure Mr.Steam scent container is full.
2. Insert the short injector hose onto the tip of the injector (see Fig. 5).
3. Unscrew the pressure end nut from the pump head and remove the
pressure hose from the pressure valve.
4. Insert the open end of the injection hose onto the pressure valve
(see Fig. 5).
5. Draw liquid from the injector slowly and evenly. Continue until the
injector is full of liquid.
6. If you have drawn up the injector completely and no liquid is in the
injector, remove the injector hose from the pressure valve.
7. Drain injector. Repeat steps until the injector is filled.
8. Save the oil injector as it will be needed when new oils are used.
Filling the Pressure Hose
1. Insure the AromaSteam System is primed and the scent container
is full.
2. Locate the Push-button at the rear of the metering pump
(see Fig. 6). Depress this push-button to start metering pump.
3. Continue to depress push-button until the pressure hose is filled
with liquid.
IMPORTANT NOTE:
Push button to be used only for initial filling
of the pressure hose, and after new oil bottles are installed.
Figure 6

mr.steam®
AromaSteam Operation and Installation Instructions
______________________________________________________________________________________________
7
OPERATION
iSteam®
1. Press the START button to turn the steam generator on.
2. In the dashboard press the AROMA button, the button will
be highlighted when AromaSteam is on.
3. Aroma oils will automatically be pumped into the steam line
at preset intervals.
iTempoPlus®
1. Press the ON/OFF button to turn the steam generator on.
2. Press the AROMA button, AROMA will be displayed on the
screen when AromaSteam is on.
3. Aroma oils will automatically be pumped into the steam line
at preset intervals.
Adjusting the Amount of Oil Deliver
The AromaSteam system has been factory
set to deliver a suitable amount of aromatic oil into a typical
sized steam room. Please contact the MrSteam Technical
Service Department before changing this setting.
Increasing the settings may introduce excessive concentra-
tion of oil into the steam room, resulting in a health hazard.
Contact the Mr. Steam Technical Service Dept. at
(800) 76-STEAM (East coast) or (800) 72-STEAM
(West Coast) for assistance or additional information.
Only a qualified licensed electrician or factory
authorized personnel may adjust the factory setting.
WARNING
!
WARNING
!
STOP
8:19 AM
20 min. 110˚ F
User 1 User 2
AromaSteam
chroma
timetemp
aroma

mr.steam®
AromaSteam Operation and Installation Instructions
______________________________________________________________________________________________
___________________________________________________________________________________________________________________________________________
2014 © Sussman-Automatic Corporation I Mr.Steam and des., AromaFlo, AutoFlush, AutoSteam, Butler Package, ChromaSteam, Clean Steam...Every Time, Club Therapy, Digital 1, Express Steam, From
Bathroom to Spa, iGenie, iSizing, iSteam, iSteam/Plus, Making Wellness a Way of Life, MusicTherapy, Spa Package, Steam Genie, Steam on Demand, Steam@Home, SteamTherapy, Sussman, Valet
Package, Virtual Spa System, Voice Genie and Voice Wizard are registered trademarks of Sussman-Automatic Corporation. AudioWizard, A Lifetime of Pleasure, Home Wizard, iButler,
iSteamTV, iTempo, iTempo/Plus, MySteam, Smart Sizing, Steam in a Box, SteamStart, SteamStop, The Intelligent Steambath are trademarks of Sussman-Automatic Corporation.
PUR
100402 10.14
8
TROUBLESHOOTING
TO AVOID ELECTRIC SHOCK, DISCON-
NECT POWER TO PUMP BEFORE SERVICING
Metering pump does not prime
1. Check if voltage is available.
2. Check liquid level in scent container. Replenish liquid, if
necessary.
3. Check for air bubbles in the suction hose or the pump
head. To eliminate air bubbles see: Priming Pump.
4. Check valves for contamination. Clean valves, if
necessary.
5. Check filter in container for contamination.
Rinse filter under clean water.
Metering pump does not inject oil into
steam room
1. Check if voltage is available.
2. Check liquid level in scent container. Replenish liquid
if necessary.
3. Check for air bubbles in the suction hose or the pump
head. To eliminate air bubbles see: Priming Pump.
4. Check valves for contamination. Clean valves,
if necessary.
5. Check filter in container for contamination.
Rinse filter under clean water.
6. Check the pressure hose for kinking or jamming.
Straighten or replace.
7. Check if liquid is freely flowing through the atomizing
nozzle when the metering pump is energized. Apply
compressed air through the atomizing nozzle. Attach
the compressed air at the point of connection of the
pressure hose.
8.
For iTempoPlus: ensure the demand button light is ON.
The demand button light should be pressed during
installation, the light will turn on. In the event of a power
outage the button will need to be pressed again.
Metering pump oil delivery too much
or too little
Contact Mr.Steam technical service personnel at
1-800-76 STEAM (East Coast) or 1-800-72-STEAM
(West Coast).
Dimensions: 11.5"W x 9.5"H x 4.5"D
Weight: 5 pounds
Motor voltage 120VAC, 50/60 Hz
Power consumption, total [W] 12 Watt
________________________________________
11.5”
9.5”
TECHNICAL SPECIFICATIONS
LIST OF SPARE PARTS
Description Part No.
Pump Head 103861
Pressure/Suction Hose EO1-1032
(ordered by the foot)
Eucalyptus oil, 1 liter MS OIL 1
Lavender oil, 1 liter MS OIL 2
Evergreen oil, 1 liter MS OIL 3
Energizing Mint oil, 1 liter MS OIL 4
Poho oil, 1 liter MS OIL 5
Atomizing Nozzle 103918
Oil Injector 103983
Filter 103987
Valve Rebuild Kit 104159
WARNING
!
WARRANTY:
To view or download
the Mr. Steam®Control Warranty
and register your product go to
:
blog.mrsteam.com/wr
-
 1
1
-
 2
2
-
 3
3
-
 4
4
-
 5
5
-
 6
6
-
 7
7
-
 8
8


Mr. Steam MS AROMA Guide d'installation
- Taper
- Guide d'installation
- Ce manuel convient également à
dans d''autres langues
Documents connexes
Autres documents
-
MrSteam xButler Package Installation & Operation Manual
-
 Mr.Steam AromaSteam Fragrance Metering Pump System Manuel utilisateur
-
-
-
 Mr.Steam MS-CHROMA 72 ChromaSteam System Manuel utilisateur
-
Mr.Steam MS400EB1 Manuel utilisateur
-
-
 Egro ONE Manuel utilisateur
-
 Egro ONE Manuel utilisateur
-
Rancilio Classe 8 S Original Instructions Manual


