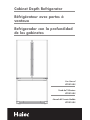
Haier H21BFC45N Series Manuel utilisateur
- Catégorie
- Frigos
- Taper
- Manuel utilisateur
Ce manuel convient également à

User Manual
H21BFC45N
Guide de l’Utilisateur
H21BFC45N
Manual del Usuario Modelo
H21BFC45N
Cabinet Depth Refrigerator
Réfrigérateur avec portes à
vantaux
Refrigerador con la profundidad
de los gabinetes

1
English
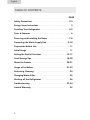
table of contents
PAGE
Safety Precautions ...................................................................2-3
Energy Saver Instructions .......................................................... 3
Installing Your Refrigerator ....................................................4-5
Parts & Features ......................................................................... 6
Removing and Installing the Doors .......................................7-8
Connecting the Water Supply Line .......................................9-10
Preparation before Use ............................................................11
Initial Usage .............................................................................. 11
Setting the Control Functions ............................................. 12-17
Food Storage Tips ............................................................... 18-20
About the Freezer ............................................................... 20-21
Usage of Ice Maker ............................................................ 21-23
Defrosting, Cleaning .................................................................24
Changing Water Filter ..............................................................25
Shutting off the Refrigerator ...................................................26
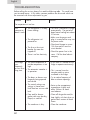
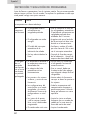
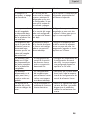
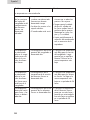
Troubleshooting .................................................................. 27-34
Limited Warranty ......................................................................35

IMPORTANT SAFETY
PRECAUTIONS
Read all of the instructions before using this appliance.
When using this appliance, always exercise basic safety
precautions, including the following:
1. Use this appliance only for its intended purpose as described in this use
and care guide.
2. This refrigerator must be properly installed in accordance with the
installation instructions before it is used. See grounding instructions
in the installation section.
3. Never unplug your refrigerator by pulling on the power cord. Always
grasp the plug firmly and pull straight out from the outlet.
4. Repair or replace all electric service cords that have become frayed or
otherwise damaged immediately. Do not use a cord that
shows cracks or abrasion damage along its length, the plug, or
the connector end.
5. Unplug your refrigerator before cleaning or before making any repairs.
Note: If for any reason this product requires service, we strongly
recommend that a certified technician perform the service.
6. Do not use any electrical device or sharp instrument in defrosting
your refrigerator.
7. If your old refrigerator is not being used, we recommend that you
remove the doors. This will reduce the possibility of danger to children.
8. After your refrigerator is in operation, do not touch the cold surfaces
in the freezer compartment, particularly when hands are damp or wet.
Skin may adhere to these extremely cold surfaces.
9. Do not refreeze foods that have been thawed completely. The
United States Department of Agriculture in Home and Garden Bulletin
No. 69 reads: “…You may safely refreeze frozen foods that have
been thawed if they still contain ice crystals or if they are cold—
below 40° F.”
“… Thawed ground meats, poultry, or fish that have any off-odor or
off-color should not be refrozen and should not be eaten. Thawed ice
cream should be discarded. If the odor or color of any food is poor or
questionable, discard it. The food may be dangerous to eat.”
“…Even partial thawing and re-freezing reduce the quality of foods,
particularly fruits, vegetables, and prepared foods. The eating quality
of red meats is affected less than that of many other foods. Use refrozen
food as soon as possible, to save as much of its eating quality as you
can.”
10. Do not operate your refrigerator in the presence of explosive
fumes.
2
English

English
3
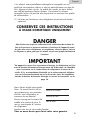
DANGER
Risk of child entrapment. Before you throw away your old refrig-
erator or freezer, take the doors off. Leave the shelves in place so
that children cannot easily climb inside.
Thank you for purchasing our Haier
product. This easy-to-use manual
will guide you in getting the best
use of your refrigerator.
Remember to record the model and
serial number. They are on a label
inside of the refrigerator.
Model number
Serial number
Date of purchase
Staple your receipt to your manual.
You will need it to obtain warranty service.
SAVE THESE INSTRUCTIONS
HOUSEHOLD USE ONLY
IMPORTANT
ENERGY SAVER INSTRUCTIONS
*This product is equipped with energy saver feature. The
refrigerator is shipped with the energy saver feature enabled.
Over time, moisture can form on the front surface of the
refrigerator cabinet and cause rust. If moisture does appear on the
front surface of the refrigerator cabinet, horizontal mullion or top
of freezer drawer, turn off the energy saver feature by following
the instruction on page 16.

English
installing your refrigerator
4
Note: Refrigerator is for freestanding purpose.
Unpacking Your Refrigerator
1. Remove all packaging material. This includes the foam base and all adhesive
tape holding the refrigerator accessories inside and outside. Slide out and
remove plastic or foam guard used to secure the compressor from shipping
damage due to vibration and shock.
2. Inspect and remove any remains of packing, tape or printed materials before
powering on the refrigerator.
Proper Air Circulation
• To ensure that your refrigerator works at the maximum efficiency it was
designed for, you should install it in a location where there is proper air
circulation, plumbing and electrical connections.
• The following are recommended clearances around the
refrigerator:
Sides……………3/4 "(19mm)
Top....................1" (25mm)
Back..................1" (25mm)
Electrical Requirements
• Make sure there is a suitable power outlet (115 volts, 15 amps outlet) with
proper grounding to power the refrigerator.
• Avoid the use of three-plug adapters or cutting off the third grounding in order
to accommodate a two-plug outlet. This is a dangerous practice since it
provides no effective grounding for the refrigerator and may result in
shock hazard.

English
5
Use of Extension Cord
• Avoid the use of an extension cord because of potential safety hazards under
certain conditions. If it is necessary to use an extension cord, use only a 3-wire
extension cord that has a 3-blade grounding plug and a 3-slot outlet that will
accept the plug. The marked rating of the extension cord must be equal to, or
greater than, the electrical rating of the appliance.
Install Limitations
• Do not install your refrigerator in any location not properly insulated or heated,
e.g. garage etc. Your refrigerator was not designed to operate in temperature
settings below 55˚ Fahrenheit.
• Select a suitable location for the refrigerator on a hard, even surface away
from direct sunlight or heat source, e.g. radiators, baseboard heaters, cooking
appliances etc. Any floor unevenness should be corrected with the leveling legs
located on the front bottom corners of the refrigerator.

English
6
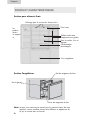
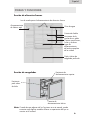
Parts & features
Note: When reviewing this manual for your features some models may
differ in appearance from what is shown in the manual.
Fresh food storage floodlight
Fresh Food Section
Freezer Section
Water filter
Dairy product
stored here
Glide Shelf
Gallon Door Bin
Meats, fruit and
vegetable crispers
Full-width pantry
Deep freeze
lower drawer
Upper storage bin
Lower storage basket
Ice cube bin

Disconected the cable,crew out the earth line.Disconected the
water pipe on the back at the same time,pull out the pipe from
the cabinet,then take the door off.(only PBFS21* and PRFS25*)
English
7
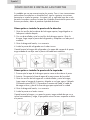
reMoVing anD installing tHe Doors
You may not need to remove the doors, but if you have trouble getting the unit
into its final location, please follow the below door removal and installation
instructions. It is suggested, for your safety, to have two or more people to assist
you in completing the below task to avoid bodily injury, product damage, or
property loss.
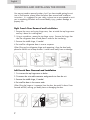
Right French Door Removal and Installation
1. Remove the screws on the top hinge cover, then set aside the top hinge cover
and lay it down for installing later.
2. Using a screwdriver, remove the top hinge screws. Remove the hinge, then
take the refrigerator door off and place it aside for the time being.
3. Remove the middle hinge, if needed.
4. Re-install the refrigerator door in reverse sequence.
When lifting up the refrigerator hinge and separating it from the door body,
please be careful not to drop the door. It could cause bodily harm or damage.
Left French Door Removal and Installation
1. First remove the top hinge cover as below.
2. Disconnect the wire cable connector and ground wire from the unit.
3. Remove the middle hinge, if needed.
4. Re-install the door in the reverse order.
When lifting the hinge as it separates from the door, be careful it doesn’t lean
forward and fall, causing you bodily harm or damaging the door.
Disconected the cable,crew out the earth line.Disconected the
water pipe on the back at the same time,pull out the pipe from
the cabinet,then take the door off.(only PBFS21* and PRFS25*)
Disconected the cable,crew out the earth line.Disconected the
water pipe on the back at the same time,pull out the pipe from
the cabinet,then take the door off.(only PBFS21* and PRFS25*)

English
8
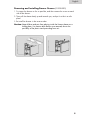
Removing and Installing Freezer Drawer (IF REQUIRED)
1. First open the drawer as far as possible, and then remove the screw on each
side of the drawer.
2. Then pull the drawer body up and towards you, and put it aside in a safe
place.
3. Re-install the drawer in the reverse order.
Caution: Keep children and pets from playing inside the freezer drawer as a
hiding place. Use caution after drawers are removed, due to the
possibility of the plastic track protruding from unit.

English
9
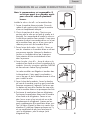
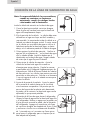
connecting tHe Water suPPly line
Note: It is consumer's responsibility, if not
using a licensed plumber, to follow
your local plumbing codes.
Install the “shut off” valve on the water pipe.
1. Turn off the main water supply pipe. Turn on the
nearest tap until the water pipe is cleaned
completely.
2. Choose the position of the valve. Choose a
position for the valve that is easy to install and
reach. It is recommended to install the valve on the
side of a vertical water pipe. It is better to connect
the valve to a level water pipe on the upside of the
water pipe, not the downside, so the sediment may
flow out from the water pipe.
3. Drilling the “shut off” valve hole: Drill a 1/8”
diameter hole on the water pipe using a sharp drill.
Clean off burrs left on the water pipe by the drill.
Use caution to prevent any water flowing into
the drill.
4. Tightening the “shut off” valve: Tighten the valve
on the cold water pipe using a pipe nip. Follow
the rules specified in the 248CMR of Massachusetts
Federal Piping Standard.
Saddle-backed valves are unlawful in
Massachusetts and forbidden. Please consult a
plumber if you are unsure of the correct method to
install the valve.
5. Tightening the pipe tip: Tighten the bolts of the
pipe tip until the closing circle begins to expand.
Don’t let the bolts of the pipe tip be too tight,
otherwise the water pipe is pressed flat and
will cause a leak.
6. Positioning the water line to the refrigerator:
Position the water line between the cold water pipe
and the refrigerator. Drill a hole in the wall or on
the floor that is near the wall and the location for
the fridge. Add extra length for the water supply
line, about 8 feet (2.4 meters) and make three
circles with the diameter of each circle about 1
foot, so there is extra line to move the fridge in and
out for cleaning (unit away from the wall).

English
10
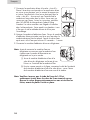
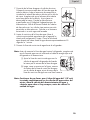
7. Connecting the water line to the “shut off” valve:
Put the tightened nut over the copper or plastic water line,
then the compression fitting, and insert the copper (or
plastic) end inside the “shut off” valve. Make sure the
pipe end sits all the way inside the valve. Tighten
(but don’t over-tighten) the nut. Follow the descriptions
specified in 248CMR of Massachusetts Federal Piping
Standard. Saddle-backed valve is unlawful in
Massachusetts and is forbidden. Please consult a
licensed plumber if you are unsure of the assembly.
8. Clear the water line supply:
Turn on the main water supply until the water in the pipe
becomes clear and clean. Turn off the water valve after
having used water for about 30 seconds – 1 minute.
9. Connect the water supply line to the refrigerator.
Note: Before connecting the water line to the refrigerator, make sure the water
line is not draped over the power cord to the refrigerator or power outlet.
(1) Tighten the water supply line at the fridge water
valve by sliding the nut over the water line end.
(2) Then, as shown in the figure, connect the end
side of the water supply line to the water valve;
tighten the water supply line nut with a crescent
wrench.
Note: Please make sure that the 1/4" water tube is fully inserted
into the water valve prior to tightening. Open the water
supply valve and check for leaks, before positioning the
unit in place.

English
11
PreParing before use
1. Remove all packaging material.
2. Check to make sure all parts and materials are available in the fridge.
Consult the seller for help if you find parts are missing.
3. Place the refrigerator in a good location (See Install Limitations on page 5).
4. Toe grille installation: Open the freezer drawer and remove the basket inside.
Install toe grille with screws from bag.
5. For the convenience of record keeping, the model and serial number,
purchase date, and receipt should be copied and taped to this manual for
safekeeping.
6. It is recommended to clean the refrigerator before use. Before putting food in
the refrigerator, please clean the inside and outside with water and diluted
baking soda. Dip clean cloth in gallon of water and spoonful of baking soda.
7. Position the fridge then plug it in. After the refrigerator is placed on a flat
surface and cleaned, turn on the power then let it run a few hours, then begin
loading it with food.
Initial Usage
1. Plug in the power cord.
2. Change the settings to the temperature desired.
3. Putting the food into the refrigerator: The refrigerator will be cooled completely
after a period of a few hours. After that, frozen and fresh foods can be put
into the refrigerator for normal use.
When changing internal temperatures, a new balance temperature will occur
after a period of time. The length of this period of time depends on the degree of
the temperature change, the ambient temperature, the frequency of door
openings, and the amount of stored food in the fridge.

English
12
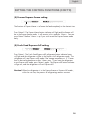
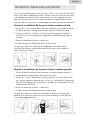
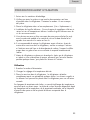
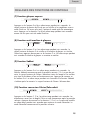
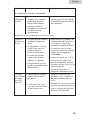
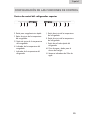
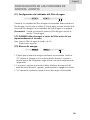
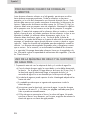
setting tHe control functions
(1) The Top Refrigerator Control Center
E. Quick-freeze Button
F. Freezer Temperature
Adjusting Button
G. Freezer Temperature
Adjusting Button
H. Freezer Temperature
Indicating Area
I. Refrigerator Temperature
Indicating Area
J. Refrigerator Temperature
Adjusting Button
K. Refrigerator Temperature
Adjusting Button
L. Refrigerator Quick-chill Button
M. Water Filter Reset and Energy
Saver Button
N. Water Filter Indicator Light
ENERGY SAVER
E F G H I J K L M N

English
13
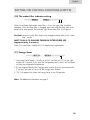
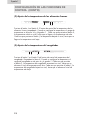
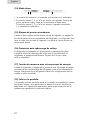
(2) Fresh Food temperature adjustment
Press Button J or Button K: The fresh food temperature control center will flash.
When the temperature is set, the temperature range is 34 to 44 degrees F. Each
time you press Button K, temperature will increase a level, until the highest
temperature level is reached. Each time you press J, the temperature will
decrease a level, until the lowest temperature level is reached.
(3) Freezer temperature adjustment
Press Button F or Button G on the freezer temperature control center: Area H will
flicker. When the temperature is set, the range of the freezer is -6 to 6 degrees F.
Each time you press Button G, the freezer temperature will increase a level, until
the highest temperature level is reached; each time you press Button F, the freezer
temperature will decrease a level, until the lowest temperature level is reached.
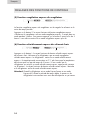
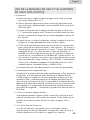
setting tHe control functions (cont'D)
I J K
ENERGY SAVER
F G H
ENERGY SAVER

English
14
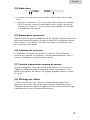
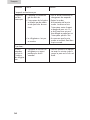
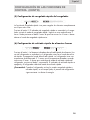
(4) Freezer Express-freeze setting
The function of Express-freeze is to freeze the food completely in the shortest time.
Press Button E: The Express-freeze button indicator will light and the freezer will
be in the Express-freeze mode. It will remain in this mode for 3 hours. You can
press Button E before 3 hours is up if you wish to end the Express-freeze mode
early.
(5) Fresh Food Express-chill setting
Press Button L: The Fresh Food Express-chill refrigerator button indicator lamp
will light and the refrigerator will be in the Express–chill refrigerator mode. The
refrigerator will stop Express–chill mode if the storage temperature is 2° F lower
than its desired temperature or after 3 hours pass. If you want the refrigerator
to exit Express-chill mode, press Button L again. The Express-chill button indicator
will go out, and the refrigerator will exit Express-chill.
Caution! When the refrigerator is in the Express-freeze or Express-chill modes,
within the set time, the process of refrigerating remains constant.
setting tHe control functions (cont'D)
E
ENERGY SAVER
L
ENERGY SAVER

English
15
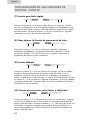
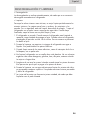
(6) Quick–ice function
Press Button E and M at the same time for three seconds: The indicator light
button N of the water filter will flash, and the freezer will be in the Quick–ice
mode; 24 hours later it will exit the quick-ice mode automatically. Press Button E
and M at the same time for three seconds again to exit the Quick–ice mode.
(7) Stopping icemaker function
Press Button G and J at the same time for three seconds: The indicator lamp E will
flash, and icemaker will turn off. When you press Button G and J at the same
time for three seconds again, the icemaker will turn on again.
(8) Sabbath function
Press Button E and L at the same time for 3 seconds: The Sabbath function will
be in effect after the first sound of the buzzer. If there is no buzzer sound, the
LED screen light will go out, and all the lamps and chimes, as well as the water
dispenser, will not function. Press Button E and L at the same time for 3 seconds
again, and the Sabbath function will turn off after the buzzer sounds. The LED
screen light will now be in effect.
(9) Celsius/Fahrenheit conversion function
Press Button F, G, and J on the control center at the same time for 3 seconds:
Celsius Temperature Readings will be in effect after the first sound of the buzzer.
Press Button F, G, and J on the control center at the same time for 3 seconds
again to switch to Fahrenheit mode. Fahrenheit mode will be in effect after the
first sound of the buzzer.
setting tHe control functions (cont'D)
ENERGY SAVER
E M N
E G J
ENERGY SAVER
E L
ENERGY SAVER
F G J
ENERGY SAVER

English
16
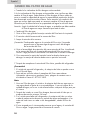
(10) The water filter indicator setting
When the indicator light of the water filter is lit up, the water filter should be
changed. After the water filter is changed, press and hold the water filter reset
button M for one second. The indicator light of the water filter N will go out.
Caution! When the water filter needs to be changed, please refer to the “water
filter” section.
MUST FLUSH 3.75 GALLONS THROUGH FILTER BEFORE USE
(approximately 5 minutes.)
Note: Our water filters comply with CA. propositions requirements.
(11) Energy Saver
1. The energy saver button is initially set to ON. You can see "ES" on the right
display for 3 seconds if you open the refrigeration doors, then it will turn back
to show the refrigeration temperature.
2. By pressing and holding the "energy saver" button M on the control panel for
5 seconds, you can turn on or off the Energy Saver feature.
3. "ES" will appear only when the Energy Saver in the ON position.
Note: See additional information on page 3.
setting tHe control functions (cont'D)
ENERGY SAVER
M N
ENERGY SAVER
M

English
17
(13) Door ajar alarm
When any door is open for over :60 seconds, the door ajar alarm function of the
refrigerator will go off, and the refrigerator will produce buzzers once every :30
seconds. This alerts the user that there is a door left open.
(14) Over-voltage protection
The refrigerator is equipped for over-voltage protection. When the function of
over-voltage is in effect, the refrigerator will turn off automatically. After 5
minutes, the power should be turned back on.
(15) Power-break memorization function
When the refrigerator cuts off from over-voltage protection, the settings of the
refrigerator before the power break are memorized. This allows the refrigerator
to return to the previous settings when it is turned back on.
(16) Fault Display
If the display is broken but you still hear accompanying beeps when you press
buttons, this means the buttons are still working. However, you should call an
after-sales service engineer to fix the problem to ensure optimum performance.
F G K
ENERGY SAVER
(12) Demo mode
1. Compressor and fan motors do not operate in the demo mode.
2. Press Button F, G, and K at the same time for 3 seconds: After the first sound
of the buzzer, the demo mode will be in effect. Press Button F, G, and K at the
same time for 3 seconds again, and the demo mode will be canceled.
setting tHe control functions (cont'D)

English
18
• Short term fresh or frozen food can be placed in the upper fresh food section
or in the ice cream drawer. Keep raw foods near the lower area, away from
ready to eat food in the top area.
• The height of the cantilever shelves can be adjusted to fit your storage needs.
When adjusting the height of the shelf, first remove any foods placed on the
shelf. Then lift up by tilting the front up and pull it up. This will unlatch the rear
hooks. Then place the hooks in a new ladder slot location and tilt back down
into position on an even, horizontal plane.
Caution! Make sure that the two sides of the shelf are in balance, otherwise, the
shelf may fall down or the food may slide.
• Crisper use
The refrigerator is designed to include a fruits, vegetables, and/or deli crisper.
The inside temperature can be adjusted according to the type of food being
stored.
• Turn up the humidity control button on the right side of the crisper, for a high
humidity, to store cucumbers, grapes, oranges, apples, peaches, lettuce, and
other produce that’s high in moisture.
• Turn down the humidity control button on the right side of the crisper to lower
the humidity. This is suitable for storing meats, cheeses, onions, tomatoes and
other drier foods.
• Full-width pantry and its usage
The refrigerator is specially designed to include a full-width pantry. The inside
temperature can be adjusted, depending on the type of food to be stored there.
Note: To avoid damage do not press the air-adjusting button too hard.
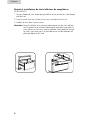
Door bin height adjustment and cleaning
To change location, lift up the door bin while holding it by its two sides, and pull
it straight out. After being cleaned, the door bin can be installed in the reverse
manner, and the position can be adjusted according to the height of the food to
be stored.
Crisper cover removal
Lift up the shelf, then pull it straight out in the direction shown.
Caution! When adjusting the height of the door bin, it is better to keep the
dairy bin above the door bin.
fooD storage tiPs

English
19
• It is recommended to keep some space between foods for good cold air
circulation. The temperatures in the refrigerator are slightly warmer near the
top and colder near the base.
• Changing the Fresh Food Light Bulbs
The voltage and wattage of the fresh food bulbs are: 115volt, 60 Hz – 40W.
(Never use bulbs with power over 40W.)
When changing the light bulbs:
• Pull out the power cord plug from the wall outlet, cutting off the power.
1. Use your hands to press down at the back of the light-shield, releasing
two tabs.
2. Hold the light-shield and pull it out.
• Turn the bulb in a counterclockwise direction, and put in a new bulb by turning
it clockwise.
• Re-install the light-shield back in the tabs in the reverse order, and snap back in
place.
• Removing and installing air curtain (only for servicing if needed).
1. Remove the water filter.
2. Take off the fresh food light-shield, and unscrew the bulb.
3. Remove the screws of the air curtain frame, using a screwdriver.
4. Take down the fresh food air curtain, using your hands to press down
on the air curtain with a little bit of pressure.
• Re-install the air curtain by following these steps in the reverse order.
fooD storage tiPs (cont'D)
La page est en cours de chargement...
La page est en cours de chargement...
La page est en cours de chargement...
La page est en cours de chargement...
La page est en cours de chargement...
La page est en cours de chargement...
La page est en cours de chargement...
La page est en cours de chargement...
La page est en cours de chargement...
La page est en cours de chargement...
La page est en cours de chargement...
La page est en cours de chargement...
La page est en cours de chargement...
La page est en cours de chargement...
La page est en cours de chargement...
La page est en cours de chargement...
La page est en cours de chargement...
La page est en cours de chargement...
La page est en cours de chargement...
La page est en cours de chargement...
La page est en cours de chargement...
La page est en cours de chargement...
La page est en cours de chargement...
La page est en cours de chargement...
La page est en cours de chargement...
La page est en cours de chargement...
La page est en cours de chargement...
La page est en cours de chargement...
La page est en cours de chargement...
La page est en cours de chargement...
La page est en cours de chargement...
La page est en cours de chargement...
La page est en cours de chargement...
La page est en cours de chargement...
La page est en cours de chargement...
La page est en cours de chargement...
La page est en cours de chargement...
La page est en cours de chargement...
La page est en cours de chargement...
La page est en cours de chargement...
La page est en cours de chargement...
La page est en cours de chargement...
La page est en cours de chargement...
La page est en cours de chargement...
La page est en cours de chargement...
La page est en cours de chargement...
La page est en cours de chargement...
La page est en cours de chargement...
La page est en cours de chargement...
La page est en cours de chargement...
La page est en cours de chargement...
La page est en cours de chargement...
La page est en cours de chargement...
La page est en cours de chargement...
La page est en cours de chargement...
La page est en cours de chargement...
La page est en cours de chargement...
La page est en cours de chargement...
La page est en cours de chargement...
La page est en cours de chargement...
La page est en cours de chargement...
La page est en cours de chargement...
La page est en cours de chargement...
La page est en cours de chargement...
La page est en cours de chargement...
La page est en cours de chargement...
La page est en cours de chargement...
La page est en cours de chargement...
La page est en cours de chargement...
La page est en cours de chargement...
La page est en cours de chargement...
La page est en cours de chargement...
La page est en cours de chargement...
La page est en cours de chargement...
La page est en cours de chargement...
La page est en cours de chargement...
La page est en cours de chargement...
La page est en cours de chargement...
La page est en cours de chargement...
La page est en cours de chargement...
La page est en cours de chargement...
La page est en cours de chargement...
La page est en cours de chargement...
La page est en cours de chargement...
La page est en cours de chargement...
La page est en cours de chargement...
La page est en cours de chargement...
La page est en cours de chargement...
-
 1
1
-
 2
2
-
 3
3
-
 4
4
-
 5
5
-
 6
6
-
 7
7
-
 8
8
-
 9
9
-
 10
10
-
 11
11
-
 12
12
-
 13
13
-
 14
14
-
 15
15
-
 16
16
-
 17
17
-
 18
18
-
 19
19
-
 20
20
-
 21
21
-
 22
22
-
 23
23
-
 24
24
-
 25
25
-
 26
26
-
 27
27
-
 28
28
-
 29
29
-
 30
30
-
 31
31
-
 32
32
-
 33
33
-
 34
34
-
 35
35
-
 36
36
-
 37
37
-
 38
38
-
 39
39
-
 40
40
-
 41
41
-
 42
42
-
 43
43
-
 44
44
-
 45
45
-
 46
46
-
 47
47
-
 48
48
-
 49
49
-
 50
50
-
 51
51
-
 52
52
-
 53
53
-
 54
54
-
 55
55
-
 56
56
-
 57
57
-
 58
58
-
 59
59
-
 60
60
-
 61
61
-
 62
62
-
 63
63
-
 64
64
-
 65
65
-
 66
66
-
 67
67
-
 68
68
-
 69
69
-
 70
70
-
 71
71
-
 72
72
-
 73
73
-
 74
74
-
 75
75
-
 76
76
-
 77
77
-
 78
78
-
 79
79
-
 80
80
-
 81
81
-
 82
82
-
 83
83
-
 84
84
-
 85
85
-
 86
86
-
 87
87
-
 88
88
-
 89
89
-
 90
90
-
 91
91
-
 92
92
-
 93
93
-
 94
94
-
 95
95
-
 96
96
-
 97
97
-
 98
98
-
 99
99
-
 100
100
-
 101
101
-
 102
102
-
 103
103
-
 104
104
-
 105
105
-
 106
106
-
 107
107
-
 108
108


Haier H21BFC45N Series Manuel utilisateur
- Catégorie
- Frigos
- Taper
- Manuel utilisateur
- Ce manuel convient également à
dans d''autres langues
- English: Haier H21BFC45N Series User manual
- español: Haier H21BFC45N Series Manual de usuario