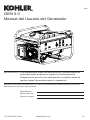
Kohler Gen 5.0 Le manuel du propriétaire
- Catégorie
- Groupes électrogènes
- Taper
- Le manuel du propriétaire

TP-7033-CMP 8/18a KohlerPower.com
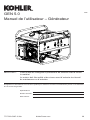
GEN 5.0
Generator Owner's Manual
IMPORTANT: Read all safety precautions and instructions carefully before
operating equipment.
Ensure engine is stopped and level before performing any
maintenance or service.
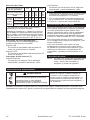
Record product information to reference when ordering parts or obtaining warranty coverage.
Specication
Serial Number
Purchase Date
EN
ESS
FRC

2TP-7033-CMP 8/18a KohlerPower.com
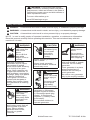
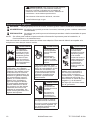
WARNING
Explosive Fuel
can cause res
and severe
burns.
Do not ll fuel
tank while
engine is hot or
running.
Gasoline is extremely
ammable and its vapors
can explode if ignited.
Never refuel while smoking
or in vicinity of an open
ame. Store gasoline only
in approved containers, in
well ventilated, unoccupied
buildings, away from sparks
or ames. Spilled fuel
could ignite if it comes in
contact with hot parts or
sparks from ignition. Never
use gasoline as a cleaning
agent.
WARNING
Rotating Parts
can cause
severe injury.
Stay away while
generator is in
operation.
Keep hands, feet, hair,
and clothing away from all
moving parts to prevent
injury. Never operate
generator with covers,
shrouds, or guards
removed.
WARNING
Hot Parts can
cause severe
burns.
Do not touch
generator while
operating or just
after stopping.
Never operate generator
with heat shields or guards
removed. Do not modify
generator.
Place generator in a place
where pedestrians or
children are not likely to
touch generator.
Be sure to carry generator
only by its carrying handles.
CAUTION
Electrical Shock
can cause injury.
Do not touch
wires while
generator is
running.
Never operate generator in
rain or snow.
Never touch generator
with wet hands or electrical
shock may occur.
WARNING
Accidental
Starts can cause
severe injury or
death.
Disconnect and
ground spark
plug lead(s)
before servicing.
Before working on
generator or equipment,
disable engine as follows:
1) Disconnect spark plug
lead(s). 2) Disconnect
negative (–) battery cable
from battery.
Do not allow children to
operate generator.
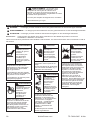
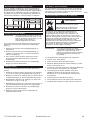
Safety Precautions
DANGER: A hazard that will result in death, serious injury, or substantial property damage.
WARNING: A hazard that could result in death, serious injury, or substantial property damage.
CAUTION: A hazard that could result in minor personal injury or property damage.
NOTE: is used to notify people of important installation, operation, or maintenance information.
Read this manual carefully before operating this machine. This manual should stay with this
machine if it is sold.
WARNING: This Product can expose
you to chemicals, including carbon monoxide
and benzene, which are known to the State of
California to cause cancer and birth defects or
other reproductive harm.
For more information go to
www.P65warnings.ca.gov

3
TP-7033-CMP 8/18a KohlerPower.com
EN
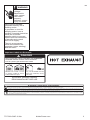
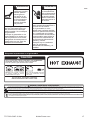
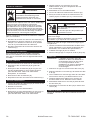
Important Labels on Generator
WARNING / ADVERTENCIA / AVERTISSEMENT
● Hot parts can cause severe burns. / Las piezas calientes pueden causar quemaduras graves. / Les pièces chaudes peuvent causer de graves brûlures.
● Do not touch generator while operating or just after stopping. / No toque el generador durante el funcionamiento o inmediatamente después de pararse. / Ne touchez pas le générateur pendant qu'il tourne ou si
vous venez tout juste de l'arrêter.
● Explosive Fuel can cause fires and severe burns. / La explosión del carburante puede provocar incendios y quemaduras graves. / Carburant explosif pouvant causer des incendies et des brûlures graves.
● Do not fill fuel tank while generator is hot or running. / No llene el tanque de combustible mientras el generador esté caliente o funcionando. / N'ajoutez pas de carburant si le moteur est chaud ou s'il tourne.
● Electrical shock can cause injury. / Las descargas eléctricas pueden provocar lesiones. / Les chocs électriques peuvent causer des blessures.
● Do not touch wires while generator is running. / No toque los cables con el generador en funcionamient. / Ne touchez pas aux le générateur pendant que le moteur tourne.
● Do not connect generator to a building's electrical system unless using an isolation (transfer) switch installed by a certified, licensed electrician. / No conecte el generador al sistema eléctrico de un edificio a menos
que use un aislamiento (transferencia) interruptor instalado por un electricista certificado y certificado. / Ne branchez pas le générateur dans le système électrique d’un bâtiment sauf si un commutateur-converteur
a été installé par un électricien agréé et compétent.
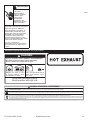
DANGER
Using a generator indoors CAN KILL YOU IN MINUTES.
Generator exhaust contains carbon monoxide.
This is a poison you cannot see or smell.
NEVER use inside a home
or garage, EVEN IF doors
and windows are open.
Only use OUTSIDE and far
away from windows, doors,
and vents.
Avoid other generator hazards.
READ MANUAL BEFORE USE.
WARNING
Hazardous
Voltage.
Backfeed to
utility system
can cause
property
damage, severe
injury, or death.
Never plug a portable
generator directly into a
building outlet.
If generator is used for
standby power, have a
certied, licensed electrician
install an automatic
transfer switch to prevent
inadvertent interconnection
of standby and normal
sources of supply.
There is a permanent
conductor between the
generator (stator winding)
and the frame.

4TP-7033-CMP 8/18a KohlerPower.com
CC
B D D
F
G
OP
EN
Q
AS
L
J
K
R
I
M
H
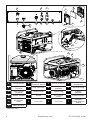
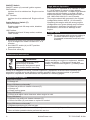
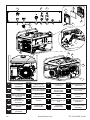
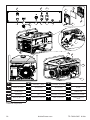
AOn/Off Switch B240/120V/30A
Electrical Socket CCircuit Protector D120V/20A
Receptacle
EGround
Terminal FFuel Tank Cap GFuel Level
Indicator HOil Drain Plug
IOil Fill Plug/
Dipstick JChoke Lever KSpark Plug LCarbon
Canister1
MStarter Handle NScrew OAir Cleaner
Cover PFoam Element
QAir Cleaner
Base RFuel Valve SFuel Filter T
120/240V
Outlet Selector
Switch
UMain Breaker
1California only.
U
T

5
TP-7033-CMP 8/18a KohlerPower.com
EN
Pre-Start Checklist
1. Ensure generator is at least 3.3 ft. (1 m) from
building or other equipment and not covered
with any material.
2. Refer to all warning labels prior to starting.
3. Check oil level using oil ll plug. Add oil if
low. Do not overll.
4. Check fuel level (G). Add fuel if low. Stop
refueling when indicator reaches F (full)
level. Check fuel system components and
lines for leaks. Never refuel while unit is
running.
5. Check that air cleaner components and all air
inlets are unobstructed, equipment covers,
and guards are in place and securely
fastened.
6. Ensure electrical devices (load) are not
connected to generator.
Starting
WARNING
Rotating Parts can cause severe
injury.
Stay away while engine is in
operation.
Keep hands, feet, hair, and clothing away
from all moving parts to prevent injury. Never
operate engine with covers, shrouds, or
guards removed.
NOTE: Choke is not required to start a warm
engine. Push choke lever (J) in to
original position.
1. Turn Fuel ON.
2. Turn choke lever (J) ON.
3. Turn engine to ON and pull rope.
4. Turn choke lever (J) OFF after engine is
warm.
If engine does not start, repeat operation until
engine starts by gradually opening choke lever
(J).
Cold Weather Starting
1. Use proper oil for temperature expected.
2. Disengage all possible external loads.
3. Use fresh winter grade fuel. Winter grade
fuel has higher volatility to improve starting.
Operation
WARNING
Hazardous Voltage.
Backfeed to utility system can
cause property damage, severe
injury, or death.
Never plug a portable generator directly into
a building outlet.
If generator is used for standby power,
have a certied, licensed electrician install
an automatic transfer switch to prevent
inadvertent interconnection of standby and
normal sources of supply.
There is a permanent conductor between the
generator (stator winding) and the frame.
When running speed of generating set has
stabilized (approximately 3 minutes):
1. Check that circuit protectors (C) are pushed
in. Press if necessary.
2. Connect appliances to electrical sockets (B &
D) of generator.
Angle of Operation
Do not operate this engine exceeding maximum
angle of operation; see specication table.
Engine damage could result from insufcient
lubrication.
Cable Selection
Generator
Socket Type 10 A 16 A 32 A
Recommended
Cable Cross
Section
mm2
AWG
mm2
AWG
mm2
AWG
Length
of
Cable
Used
0 to
50 m 4 10 6 9 10 7
51 to
100 m 10 7 10 7 25 3
101 to
150 m110 7 16 5 35 2
1 This cable length is maximum permitted
length, and must not be exceeded.
Installation method=cables on raceway
or non-drilled tablet/Permitted drop in
voltage=5%/Multi-core conductors/Cable
type PVC 70°C (e.g. H07RNF)/Ambient
temperature=86° F (30° C).

6TP-7033-CMP 8/18a KohlerPower.com
ON/OFF Switch
ON/OFF switch (A) controls ignition system.
ON Position:
Ignition circuit is switched on. Engine can be
started.
OFF Position:
Ignition circuit is switched off. Engine will not
run.
Outlet Selector Switch (T)
120/240 Position:
Enables twist lock 30 amp outlet, disables
120V outlets.
120 Position:
Disables twist lock 30 amp outlet, enables
120V outlets.
Stopping
1. Disconnect plugs from electrical sockets (B &
D) to let engine run under no load for 1 or 2
minutes.
2. Set ON/OFF switch (A) to OFF position:
generator stops.
3. Close fuel valve (R).
Maintenance Instructions
WARNING Before working on engine or equipment, disable
engine as follows: 1) Disconnect spark plug
lead(s). 2) Disconnect negative (–) battery cable
from battery.
Accidental Starts can cause
severe injury or death.
Disconnect and ground spark
plug lead(s) before servicing.
Safety is an obligation of owner. Periodic inspection, adjustment and lubrication will keep your
generator in safest and most efcient condition possible. Most important points of generator
inspection, adjustment, and lubrication are explained on following pages.
Maintenance Schedule
After rst 5 Hours
● Change oil.
Every 100 Hours or Annually1
● Clean low-prole air cleaner element (P).
● Change oil.
● Clean cooling areas.
Every 200 Hours2
● Check and adjust valve clearance when engine is cold.
Every 300 Hours
● Replace low-prole air cleaner element (P).
● Check fuel lter (S) and clean or replace if needed.
Every 500 Hours or Annually1
● Replace spark plug (K) and set gap.
1 Perform these procedures more frequently under severe, dusty, dirty conditions.
2 Have a Kohler portable dealer perform this service.
High Altitude Operation
If this engine is operated at an altitude of 4000
ft. (1219 meters) or above, a high altitude
carburetor kit is required. To obtain high altitude
carburetor kit information or to nd a Kohler
authorized dealer, visit KohlerEngines.com or
call 1-800-544-2444 (U.S. and Canada).
This engine should be operated in its original
conguration below 4000 ft. (1219 meters).
Operating this engine with the wrong engine
conguration at a given altitude may increase
its emissions, decrease fuel efciency and
performance, and result in damage to the
engine.
Engine Speed
NOTE: Do not tamper with governor setting to
increase maximum engine speed.
Overspeed is hazardous and will void
warranty.

7
TP-7033-CMP 8/18a KohlerPower.com
EN
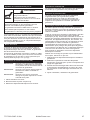
Oil Recommendations
We recommend use of Kohler oils for best
performance. Other high-quality detergent
oils (including synthetic) of API (American
Petroleum Institute) service class SJ or higher
are acceptable. Select viscosity based on air
temperature at time of operation as shown in
table below.
°F -20 020324060
50 80 100
°C -30 -20 -10 0 10 20 30 40
5W-30
10W-30
SAE 30
Check Oil Level
NOTE: To prevent extensive engine wear or
damage, never run engine with oil level
below or above operating range
indicator on dipstick (I).
Ensure engine is cool. Clean oil ll plug/dipstick
(I) areas of any debris.
1. Remove oil ll plug/dipstick (I); wipe oil off.
2. Remove oil ll plug/dipstick (I); check oil
level. Level should be at top of indicator on
dipstick (I).
3. If oil is low, add oil up to point of overowing
ller neck.
4. Reinstall oil ll plug/dipstick (I) and tighten
securely.
Change Oil
Change oil while engine is warm.
1. Clean area around oil ll plug/dipstick (I) and
oil drain plug (H).
2. Remove oil drain plug (H) and oil ll plug/
dipstick (I). Drain oil completely.
3. Reinstall oil drain plug (H). Torque to 13 ft. lb.
(17.6 N·m).
4. Fill crankcase with new oil, up to point of
overowing ller neck.
5. Reinstall oil ll plug/dipstick (I) and tighten
securely.
6. Dispose of used oil in accordance with local
ordinances.
Oil Sentry™ (if equipped)
This switch is designed to prevent engine
from starting in a low oil or no oil condition. Oil
Sentry™ may not shut down a running engine
before damage occurs.
Fuel Recommendations
WARNING
Explosive Fuel can cause res
and severe burns.
Do not ll fuel tank while engine is
hot or running.
Gasoline is extremely ammable and its
vapors can explode if ignited. Never refuel
while smoking or in vicinity of an open ame.
Store gasoline only in approved containers,
in well ventilated, unoccupied buildings, away
from sparks or ames. Spilled fuel could
ignite if it comes in contact with hot parts or
sparks from ignition. Never use gasoline as a
cleaning agent.
NOTE: E15, E20 and E85 are NOT approved
and should NOT be used; effects of
old, stale or contaminated fuel are not
warrantable.
Fuel must meet these requirements:
● Clean, fresh, unleaded gasoline.
● Octane rating of 86(R+M)/2 or higher.
● Research Octane Number (RON) 91 octane
minimum.
● Gasoline up to 10% ethyl alcohol, 90%
unleaded is acceptable.
● Methyl Tertiary Butyl Ether (MTBE) and
unleaded gasoline blend (max 15% MTBE by
volume) are approved.
● Do not add oil to gasoline.
● Do not overll fuel tank.
● Do not use gasoline older than 30 days.

8TP-7033-CMP 8/18a KohlerPower.com
5. Check sediment bowl cover and gasket.
Replace them if they are damaged.
6. Reinstall sediment bowl.
7. Open tank fuel valve (R).
8. Wipe off any trace of fuel with a clean cloth
and check for any leakage.
Spark Plugs
CAUTION
Electrical Shock can cause injury.
Do not touch wires while
generator is running.
Never operate generator in rain or snow.
Never touch generator with wet hands or
electrical shock may occur.
Clean out spark plug recess. Remove spark
plug (K) and replace.
1. Check gap using wire feeler gauge. Adjust
gap, see specication table for adjustment.
2. Install spark plug (K) into cylinder head.
3. Torque spark plug (K) to 20 ft. lb. (27 N·m).
Air Cleaner
NOTE: Operating engine with loose or
damaged air cleaner components
could cause premature wear and
failure. Replace all bent or damaged
components.
1. Remove screw (N) and air cleaner cover (O).
2. Remove foam element (P) from air cleaner
base (Q).
3. Wash foam element (P) in warm water with
detergent. Rinse and allow to air dry.
4. Lightly oil foam element (P) with new engine
oil; squeeze out excess oil.
5. Reinstall foam element (P) into air cleaner
base (Q).
6. Reinstall air cleaner cover (O) and secure
with screw (N).
Breather Tube
Ensure both ends of breather tube are properly
connected.
Fuel Level
WARNING
Explosive Fuel can cause res
and severe burns.
Do not ll fuel tank while
generator is hot or running.
Gasoline is extremely ammable and
its vapors can explode if ignited. Store
gasoline only in approved containers, in
well ventilated, unoccupied buildings, away
from sparks or ames. Spilled fuel could
ignite if it comes in contact with hot parts or
sparks from ignition. Never use gasoline as a
cleaning agent.
Visually check level of fuel. If necessary, ll up.
1. Unscrew fuel tank cap (F).
2. Fill tank until fuel gauge shows F, using
funnel and taking care not to spill any fuel.
3. Screw down fuel tank cap (F) tightly.
Fuel Line
Low permeation fuel line must be installed on
carbureted Kohler Co. engines to maintain EPA
and CARB regulatory compliance.
Fuel Filter
1. Open fuel tank cap (F).
2. Remove fuel lter (S) from tank neck.
3. Clean fuel lter (S) with a non-ammable
solvent or solvent with a high ash point. Dry
it fully. Replace as necessary.
4. Reinstall fuel lter (S).
5. Reinstall fuel tank cap (F).
Sediment Bowl
1. Close fuel valve (R) and remove cover
screws and nuts.
2. Remove cover.
3. Remove sediment bowl.
4. Clean sediment bowl with a non-ammable
solvent or solvent with a high ash point. Dry
it fully.

9
TP-7033-CMP 8/18a KohlerPower.com
EN
AC Rated Power
AC rated power is maximum amount of power
generator can support.
AC Surge Power
AC surge power is additional power generator
momentarily produces to aid in starting of
electrical devices requiring power above
generator's rated power requirements.
Overload (Capacity of Generator)
Never exceed rated load of generator (in Amps
and/or Watts) when it is running continuously.
See specications table for rated outputs.
Before connecting and operating generator,
calculate electrical power required by electric
appliances (in Watts). This electrical power
rating is usually found on manufacturer's
plate on bulbs, electrical appliances, motors,
etc. Sum total of power required by these
appliances should not exceed nominal power
rating of generator.
Circuit protectors (C) will stop power to
protected receptacles (B & D) when an
overload of a connected electrical device is
detected or AC output voltage rises to protect
generator and any connected electric devices.
When overload occurs and power generation
stops, proceed as follows:
1. Turn off any connected electric devices and
stop generator.
2. Reduce total wattage of connected electric
devices within application range.
3. Check for blockages in cooling air inlet and
outlet areas and around control unit. If any
blockages are found, remove them.
4. After checking, restart generator.
Air Cooling
WARNING
Hot Parts can cause severe
burns.
Do not touch generator while
operating or just after stopping.
Never operate generator with heat shields or
guards removed. Do not modify generator.
Place generator in a place where pedestrians
or children are not likely to touch generator.
Be sure to carry generator only by its
carrying handles.
Proper cooling is essential. To prevent over
heating, ensure air cooling inlet and outlet
areas are clean and unobstructed. Avoid
spraying water at wiring harness or any
electrical components. Refer to Maintenance
Schedule.
Ground Terminal
Ground terminal (E) connects earth line for
prevention of electric shock. When electric
device is grounded, be sure to ground
generator also.
Connect generator to ground: Attach a 6 AWG
(10 mm2) copper wire to generator’s ground
connection and to a galvanized steel grounding
rod (not provided) driven 3.3 ft. (1 m) into
ground.
Connecting Alternating Current (AC)
NOTE: Ensure all electric devices including
lines and plug connection are in good
condition before connection to
generator.
NOTE: Ensure total load is within generator
rated output.
NOTE: Ensure receptacle load current is within
receptacle rated current.
1. Start engine.
2. Plug into AC receptacle (B or D).
3. Turn on any electric devices.

10 TP-7033-CMP 8/18a KohlerPower.com
Clean Generating Set
1. Remove all dust and debris from around
exhaust.
2. Clean generating set, particularly alternator
and engine air inlets and outlets, using a
cloth and brush.
3. Check general condition of generating set
and replace any faulty parts.
Transporting Generator
Before transporting generator, check that bolts
are correctly tightened, close fuel valve (R)
and disconnect battery. Generator should be
transported in its normal operating position;
never lay it on its side. Ensure where generator
is to be stored or used is carefully prepared
beforehand.
Repairs/Service Parts
We recommend that you use a Kohler portable
dealer for all maintenance, service, and
replacement parts for engine. To nd a Kohler
portable dealer visit KohlerPower.com or call
1-800-544-2444 (U.S. and Canada).
Storage
Long-term storage of your generator will require
some preventative procedures to guard against
deterioration.
NOTE: Do not connect with any electrical
devices (unloaded operation).
If engine will be out of service for 2 months or
more follow procedure below.
1. Add Kohler PRO Series fuel treatment or
equivalent to fuel tank. Run engine 2-3
minutes to get stabilized fuel into fuel system
(failures due to untreated fuel are not
warrantable).
2. Change oil while engine is still warm from
operation. Remove spark plug (K) and pour
about 1 oz. of engine oil into cylinder(s).
Replace spark plug (K) and crank engine
slowly to distribute oil.
3. Clean generator.
4. Store generator in a dry, well-ventilated
place, with cover placed over it. When
covering generator, be sure to do so only
after engine and mufer/shield have
completely cooled down. Generator must
remain in same position as normal operation.
5. Store generating set in a clean and dry
place.

11
TP-7033-CMP 8/18a KohlerPower.com
EN
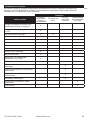
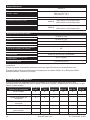
Troubleshooting
Do not attempt to service or replace major engine components, or any items that require special
timing or adjustment procedures. This work should be performed by a Kohler portable dealer.
Problem
Possible Cause
Engine Not
Starting/
Running
Abnormally
Engine
Stopped No Electric
Current
Tripping of
Circuit
Breaker
Load connected to generating set
during start-up ●
Start and Stop control ON or OFF ●
Oil level too low ● ●
Unsuitable fuel ●
Fuel level too low ● ●
Fuel valves closed ●
Clogged fuel lter ●
Clogged fuel strainer ●
Clogged air lter ●
Faulty spark plug ●
Fuel supply blocked or leaking ●
Blocked ventilation inlets ●
Circuit protectors not actuated ●
Faulty appliance supply cord ●
Faulty electrical sockets ●
Faulty alternator ●
Device connected or faulty cord ●
Overload ●

12 TP-7033-CMP 8/18a KohlerPower.com
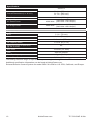
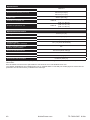
Specications
Model GEN 5.0
Overall Dimensions (L x W x H) 26.4 in. (670 mm)
21.5 in. (545 mm)
21.1 in. (535 mm)
Dry Weight 190 lbs. (86.2 kg)
AC Rated Power 4300 Watt (120 Volts x 35.8 Amps)
(240 Volts x 18.8 Amps)
AC Surge Power 5000 Watt (120 Volts x 41.7 Amps)
(240 Volts x 20.8 Amps)
Engine Specications
Bore 3.1 in. (78 mm)
Stroke 2.3 in. (58 mm)
Displacement 16.9 cu. in. (277 cc)
Oil Capacity (Rell) 1.4 U.S. qt. (1.3 L)
Maximum Angle of Operation
(@ full oil level)* 25°
Run Time 16 hours (1/2 load)
Fuel See fuel section
Fuel Tank Capacity 8 gal. (30.2 L)
Spark Plug Gap 0.03 in. (0.76 mm)
*Exceeding maximum angle of operation may cause engine damage from insufcient lubrication.
Additional specication information can be found at KohlerPower.com.
Exhaust Emission Control System for model GEN 5.0 is EM for U.S. EPA, California, and Europe.

13
TP-7033-CMP 8/18a KohlerPower.com
EN
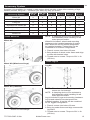
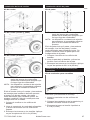
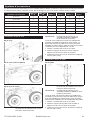
Install Wheel Kit
Wheel Kit
Wheel Kit (Wheels and Legs)
Wheel Kit (4 Wheels)
NOTE: Tilt unit so fuel tank cap is upward to
ensure no fuel leakage.
NOTE: A clamping device or an assistant to
hold assembly while installing kit will
make process easier.
Wheel kit includes 2 wheels and mounting
hardware to be installed opposite of engine
side. Wheel kit and leg kit are designed to
be installed together. 2 wheel kits can be
combined for a 4 wheel conguration.
1. Place 4 screws into holes of frame.
2. Bring bracket of wheel under frame and align
screws with bracket holes.
3. Thread nuts to screws. Torque to 221 in. lb.
(25 N·m).
Install Leg Kit
Leg Kit
NOTE: Tilt unit so fuel tank cap is upward to
ensure no fuel leakage.
NOTE: A clamping device or an assistant to
hold assembly while installing kit will
make process easier.
Leg kit includes 2 legs and mounting hardware.
Leg kit and wheel kit are designed to be
installed together. 2 leg kits can be combined
for a 4 legged conguration.
1. Place 4 screws into holes of frame.
2. Bring leg under frame and align screws with
leg holes.
3. Thread nuts to screws. Torque to 221 in. lb.
(25 N·m).
Accessory System
Accessory kits available for models in table below which includes custom kits consisting of legs,
handles, wheels, lifting kits — whatever you want, any way you want it.
Accessory System PRO 5.2 /
5.2 E PRO 7.5 /
7.5 E GEN 5.0 WP 2.0 WP 3.0 TP 3.0
Wheel Kit ●●●●●●
Leg Kit ●●●●●●
Lifting Kit ●●●
Wheelbarrow Handle Kit ●●●●●●
Cord Management Kit ●●●●●●
Hand Truck Handle Kit ●●●
Isolator Kit ●●●●●●

14 TP-7033-CMP 8/18a KohlerPower.com
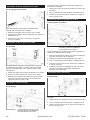
Install Wheelbarrow Handle Kit
Wheelbarrow Handle Kit
Wheelbarrow handle kit includes two
wheelbarrow handles and mounting hardware.
1. Align handle with holes on frame.
2. Place washers between handle and frame
while installing screw.
3. Thread nut to screw. Torque to 4 in. lb.
(0.5 N·m).
Install Cord Management Kit
Cord Kit
Cord management kit includes 2 posts and
mounting hardware. Cord management kit can
be installed anywhere on unit on same side, not
across unit.
1. Place post sides together onto frame.
2. Place 3 nuts into holes in 1 side.
3. While holding together, insert screws into
other side and thread into nuts. Torque to
221 in. lb. (25 N·m).
Install Lift Kit
Lifting Kit
NOTE: A clamping device or an assistant to
hold assembly while installing kit will
make process easier.
Lift kit includes lift bar and mounting hardware.
1. Align lift bar holes under holes of frame.
2. While holding in this position, install screws.
3. Thread nuts to screws. Torque to 221 in. lb.
(25 N·m).
Install Hand Truck Handle Kit
Hand Truck Handle Kit
NOTE: A clamping device or an assistant to
hold assembly while installing kit will
make process easier.
Hand truck handle kit includes hand truck
handle and mounting hardware.
1. Position hand truck handle on unit aligning
frame holes and handle holes.
2. Place washer between handle and frame.
3. While holding in this position, install screws.
4. Thread nuts to screws. Torque to 4 in. lb.
(0.5 N·m).
5. Install release knob through frame. Place
washer and hitch pin on inside of assembly.
Install Isolator Kit
Isolator Kit
Isolator Kit includes 4 isolators and mounting
hardware.
1. Align isolator holes under holes of frame.
2. While holding in this position, install screws.
3. Thread nuts to screws. Torque to 221 in. lb.
(25 N·m).

15
TP-7033-CMP 8/18a KohlerPower.com
ESS
GEN 5.0
Manual del Usuario del Generador
IMPORTANTE: Lea atentamente todas las instrucciones y precauciones de
seguridad antes de poner el equipo en funcionamiento.
Asegúrese de que el motor está parado y nivelado antes de
realizar tareas de mantenimiento o reparación.
Registre la información del producto con el n de consultarla para realizar pedidos de piezas o
para obtener la cobertura de la garantía.
Especicación
Número de serie
Fecha de compra

16 TP-7033-CMP 8/18a KohlerPower.com
ADVERTENCIA
La explosión
del carburante
puede provocar
incendios y que-
maduras graves.
No llene el tan-
que de combus-
tible con el motor
en funcionamien-
to o caliente.
La gasolina es muy
inamable y sus vapores
pueden hacer explosión si se
inaman. No reposte nunca
mientras fuma ni cerca de
una llama al descubierto. Al-
macene la gasolina siempre
en contenedores homolo-
gados, en locales desocu-
pados, bien ventilados y
lejos de chispas o llamas.
El combustible derramado
podría inamarse si entra
en contacto con las piezas
calientes del motor o las
chispas de encendido. No
utilice nunca gasolina como
agente de limpieza.
ADVERTENCIA
Los arranques
accidentales
pueden provocar
lesiones graves
o la muerte.
Antes de llevar a
cabo trabajos de
mantenimiento
o reparación,
desconecte y
aísle el cable de
la bujía.
Antes de realizar cualquier
trabajo en el generador o
en el equipo, desactive el
motor como se indica a
continuación: 1) Desconecte
los cables de las bujías. 2)
Desconecte el cable del polo
negativo (-) de la batería.
No deje que los niños mane-
jen el generador.
ADVERTENCIA
Las piezas ro-
tatorias pueden
causar lesiones
graves.
Manténgase
alejado del ge-
nerador cuando
esté en funciona-
miento.
Para evitar lesiones, man-
tenga las manos, los pies, el
pelo y la ropa alejados de las
piezas en movimiento. No
ponga nunca el generador
en funcionamiento con las
cubiertas, revestimientos
térmicos o protecciones
desmontados.
PRECAUCIÓN
Las descar-
gas eléctricas
pueden provocar
lesiones.
No toque los
cables con el
generador en
funcionamiento.
No utilice nunca el genera-
dor bajo la lluvia o la nieve.
No toque nunca el generador
con las manos mojadas, ya
que podría producirse una
descarga eléctrica.
Precauciones de seguridad
PELIGRO: Un peligro que provoca la muerte, lesiones graves o daños materiales considerables.
ADVERTENCIA: Un peligro que podría provocar la muerte, lesiones graves o daños materiales
considerables.
PRECAUCIÓN: Un peligro que podría provocar lesiones personales o daños materiales de poca
gravedad.
NOTA: Se utiliza para noticar al personal sobre información importante para la instalación, el
funcionamiento o el mantenimiento.
Lea este manual con atención antes de utilizar esta máquina. Este manual deberá acompañar a la
máquina en caso de que esta se venda.
ADVERTENCIA: Este producto puede exponer
a sustancias químicas, monóxido de carbono y
benceno incluidas, indicadas por el estado de
California como causantes de cáncer, defectos de
nacimiento u otros daños reproductivos.
Para obtener información adicional, consulte
www.P65warnings.ca.gov

17
TP-7033-CMP 8/18a KohlerPower.com
ESS
Etiquetas importantes en el generador
WARNING /
ADVERTENCIA / AVERTISSEMENT
● Hot parts can cause severe burns. / Las piezas calientes pueden causar quemaduras graves. / Les pièces chaudes peuvent causer de graves brûlures.
● Do not touch generator while operating or just after stopping. / No toque el generador durante el funcionamiento o inmediatamente después de pararse. / Ne touchez pas le générateur pendant qu'il tourne ou si
vous venez tout juste de l'arrêter.
● Explosive Fuel can cause fires and severe burns. / La explosión del carburante puede provocar incendios y quemaduras graves. / Carburant explosif pouvant causer des incendies et des brûlures graves.
● Do not fill fuel tank while generator is hot or running. / No llene el tanque de combustible mientras el generador esté caliente o funcionando. / N'ajoutez pas de carburant si le moteur est chaud ou s'il tourne.
● Electrical shock can cause injury. / Las descargas eléctricas pueden provocar lesiones. / Les chocs électriques peuvent causer des blessures.
● Do not touch wires while generator is running. / No toque los cables con el generador en funcionamient. / Ne touchez pas aux le générateur pendant que le moteur tourne.
● Do not connect generator to a building's electrical system unless using an isolation (transfer) switch installed by a certified, licensed electrician. / No conecte el generador al sistema eléctrico de un edificio a menos
que use un aislamiento (transferencia) interruptor instalado por un electricista certificado y certificado. / Ne branchez pas le générateur dans le système électrique d’un bâtiment sauf si un commutateur-converteur
a été installé par un électricien agréé et compétent.
DANGER
Using a generator indoors CAN KILL YOU IN MINUTES.
Generator exhaust contains carbon monoxide.
This is a poison you cannot see or smell.
NEVER use inside a home
or garage, EVEN IF doors
and windows are open.
Only use OUTSIDE and far
away from windows, doors,
and vents.
Avoid other generator hazards.
READ MANUAL BEFORE USE.
ADVERTENCIA
Las piezas
calientes pueden
causar quema-
duras graves.
No toque el ge-
nerador durante
el funcionamien-
to o inmediata-
mente después
de pararse.
No ponga nunca el genera-
dor en funcionamiento con
las protecciones térmicas
desmontadas. No modique
el generador.
Coloque el generador en un
lugar donde no lo vayan a to-
car los peatones ni los niños.
Asegúrese de transportar el
generador por sus asas de
transporte únicamente.
ADVERTENCIA
Tensión peligrosa.
La retroalimenta-
ción al sistema de
suministro eléctri-
co puede causar
daños materiales,
lesiones graves o
la muerte.
No conecte nunca un gene-
rador portátil directamente a
la toma de un edicio.
Si el generador se va a
utilizar para corriente auxiliar,
pida a un electricista autoriza-
do y cualicado que instale
un conmutador de transferen-
cia automático para evitar la
interconexión accidental de
las fuentes de alimentación
auxiliar y normal.
Siempre hay un conductor
entre el generador
(devanado del estátor) y el
bastidor.

18 TP-7033-CMP 8/18a KohlerPower.com
CC
B D D
F
G
OP
EN
Q
AS
L
J
K
R
I
M
H
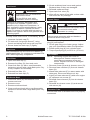
AInterruptor de
encendido/
apagado BTomacorriente
eléctrico de
240/120V/30A CProtector de
circuitos DReceptáculo de
120V/20A
ETerminal de
masa FTapón del tanque
de combustible GIndicador
del nivel de
combustible HTapón de drenaje
del aceite
ITapón de llenado
de aceite/varilla
de nivel JPalanca del
estrangulador KBujía LCartucho de
carbón1
MManivela
del motor de
arranque NTornillo OTapa del ltro de
aire PElemento de
espuma
QSoporte del ltro
de aire RVálvula de
combustible SFiltro de
combustible TInterruptor
120/240 Outlet
Selector
UInterruptor
principal
1Solo California.
U
T

19
TP-7033-CMP 8/18a KohlerPower.com
ESS
Lista de control previa al arranque
1. Asegúrese de que el generador esté al
menos a 1 m (3,3 ft) del edicio o de
cualquier otro equipo y no esté tapado con
ningún material.
2. Consulte todas las etiquetas de advertencia
antes de poner en marcha.
3. Compruebe el nivel de aceite por medio del
tapón de llenado de aceite. Añada aceite si
está bajo. No rellene por encima del límite.
4. Compruebe el nivel de combustible (G).
Añada combustible si está bajo. Deje de
rellenar cuando el indicador haya alcanzado
el nivel F (lleno). Compruebe si los
componentes y las tuberías del sistema de
combustible presentan alguna fuga. No
reposte nunca con la unidad en
funcionamiento.
5. Verique que los componentes del ltro de
aire y todas las entradas de aire están libres
de obstrucciones, y que las cubiertas y
protecciones del equipo están en su sitio y
bien sujetas.
6. Asegúrese de que no haya dispositivos
eléctricos (carga) conectados al generador.
Arranque
3(/,*52
(OXVRGHXQJHQHUDGRUHQLQWHULRUHV38('(0$7$5$81$
3(5621$(1&8(67,Ï1'(0,18726
/RVJDVHVGHHVFDSHGHOJHQHUDGRUSXHGHQFRQWHQHUPRQy[LGR
GHFDUERQR
(VWHHVXQJDVWy[LFRTXHQRVHYHQLVHKXHOH
1RXWLOLFH 181&$HOJHQHUDGRU HQHO
LQWHULRU GH VX KRJDU QL HQ XQ JDUDMH
1,6,48,(5$FRQODVSXHUWDV\
YHQWDQDVDELHUWDV
8WLOLFHVyOR$/$,5(/,%5(
\OHMRVGHYHQWDQDVSXHUWDV
\RULILFLRVGHYHQWLODFLyQ
ADVERTENCIA
Las piezas rotatorias pueden
causar lesiones graves.
Manténgase alejado del motor
cuando esté en funcionamiento.
Para evitar lesiones, mantenga las manos,
los pies, el pelo y la ropa alejados de las
piezas en movimiento. No ponga nunca el
motor en funcionamiento con las cubiertas,
revestimientos térmicos o protecciones
desmontados.
NOTA: El estrangulador no es necesario para
arrancar un motor caliente. Empuje la
palanca del estrangulador (J) hasta su
posición original.
1. Gire el combustible a ON.
2. Mueva la palanca del estrangulador a (J)
ON.
3. Gire el motor a ON y jale el cable.
4. Mueva la palanca del estrangulador a (J)
OFF después de que se caliente el motor.
Si el motor no arranca, repita la operación
hasta que arranque abriendo la palanca del
estrangulador de forma gradual (J).
Arranque en tiempo frío
1. Utilice el aceite apropiado para la
temperatura prevista.
2. Desconecte todas las posibles cargas
externas.
3. Use combustible de grado invierno reciente.
El combustible de grado invierno tiene una
mayor volatilidad que mejora el arranque.
Funcionamiento
ADVERTENCIA
Tensión peligrosa.
La retroalimentación al sistema
de suministro eléctrico puede
causar daños materiales,
lesiones graves o la muerte.
No conecte nunca un generador portátil
directamente a la toma de un edicio.
Si el generador se va a utilizar para corriente
auxiliar, pida a un electricista autorizado
y cualicado que instale un conmutador
de transferencia automático para evitar la
interconexión accidental de las fuentes de
alimentación auxiliar y normal.
Siempre hay un conductor entre el generador
(devanado del estátor) y el bastidor.
Cuando la velocidad de operación del
conjunto de generación se haya estabilizado
(aproximadamente 3 minutos):
1. Verique que los protectores de los circuitos
(C) estén oprimidos. Presione si es
necesario.
2. Conecte los aparatos a los tomacorrientes
eléctricos (B y D) del generador.
Ángulo de funcionamiento
No haga funcionar el motor si supera el ángulo
máximo de funcionamiento, consulte la tabla
de especicaciones. El motor puede dañarse
como resultado de una lubricación insuciente.

20 TP-7033-CMP 8/18a KohlerPower.com
Selección del cable
Tipo de tomacorrien-
te del generador 10 A 16 A 32 A
Sección transversal
del cable recomen-
dada
mm2
AWG
mm2
AWG
mm2
AWG
Longi-
tud del
cable
que se
utilizó
0 a 50 m 4 10 6 9 10 7
51 a 100 m 10 7 10 7 25 3
101 a 150 m110 7 16 5 35 2
1 La longitud de este cable es la máxima
permitida y no se debe exceder.
Método de instalación = cables en el canal o
en la tablilla sin perforaciones/Caída permiti-
da en voltaje = 5%/Conductores multinúcleo/
Tipo de cable PVC 70°C (por ejemplo, H07R-
NF)/Temperatura ambiente = 86 °F (30 °C).
Interruptor de encendido/apagado
El interruptor de encendido/apagado (A)
controla el sistema de encendido.
Posición ON:
El circuito de encendido está activado. El
motor se puede poner en marcha.
Posición OFF:
El circuito de encendido está desactivado. El
motor no arranca.
Interruptor Outlet Selector (T)
120/240 Posición:
Permite giro de bloqueo 30 de salida de
amplicador, desactiva salidas de 120V .
Instrucciones de mantenimiento
ADVERTENCIA Antes de realizar cualquier trabajo en
el motor o en el equipo, desactive el
motor como se indica a continuación: 1)
Desconecte los cables de las bujías. 2)
Desconecte el cable del polo negativo (-)
de la batería.
Los arranques accidentales pueden
provocar lesiones graves o la muerte.
Antes de llevar a cabo trabajos
de mantenimiento o reparación,
desconecte y aísle el cable de la bujía.
La seguridad es una obligación del propietario. La inspección, el ajuste y la lubricación de forma
periódica mantendrán su generador en el estado más seguro y eciente posible. Los puntos más
importantes de inspección, ajuste y lubricación del generador se explican en las siguientes páginas.
120 Posición:
Desactiva giro de bloqueo 30 de salida de
amplicador , permite salidas de 120V.
Parada
1. Desconecte los tapones de los tomacorrientes
eléctricos (B y D) para permitir que el motor
funcione sin carga por 1 o 2 minutos.
2. Fije el interruptor de encendido/apagado (A)
en la posición OFF: se detiene el generador.
3. Cierre de la válvula de combustible (R).
Funcionamiento a gran altitud
Si se hace funcionar este motor a una altitud de
1219 metros (4000 pies) o superior, necesitará
un kit de carburador de gran altitud. Para
obtener información sobre el kit de carburador
de gran altitud o encontrar a un distribuidor
autorizado de Kohler, visite KohlerEngines.com
o llame al 1-800-544-2444 (EE.UU. y Canadá).
Este motor debe ponerse en funcionamiento
en su conguración original por debajo de 1219
metros (4000 pies).
Si se hace funcionar este motor con una
conguración incorrecta a una cierta altitud,
es posible que aumenten las emisiones y que
disminuya la eciencia y el rendimiento del
combustible, y puede producirse daños en el
motor.
Velocidad del motor
NOTA: No altere los ajustes del regulador para
aumentar la velocidad máxima del El
motor. exceso de velocidad es
peligroso y anulará la garantía.
gra
La page est en cours de chargement...
La page est en cours de chargement...
La page est en cours de chargement...
La page est en cours de chargement...
La page est en cours de chargement...
La page est en cours de chargement...
La page est en cours de chargement...
La page est en cours de chargement...
La page est en cours de chargement...
La page est en cours de chargement...
La page est en cours de chargement...
La page est en cours de chargement...
La page est en cours de chargement...
La page est en cours de chargement...
La page est en cours de chargement...
La page est en cours de chargement...
La page est en cours de chargement...
La page est en cours de chargement...
La page est en cours de chargement...
La page est en cours de chargement...
La page est en cours de chargement...
La page est en cours de chargement...
La page est en cours de chargement...
La page est en cours de chargement...
-
 1
1
-
 2
2
-
 3
3
-
 4
4
-
 5
5
-
 6
6
-
 7
7
-
 8
8
-
 9
9
-
 10
10
-
 11
11
-
 12
12
-
 13
13
-
 14
14
-
 15
15
-
 16
16
-
 17
17
-
 18
18
-
 19
19
-
 20
20
-
 21
21
-
 22
22
-
 23
23
-
 24
24
-
 25
25
-
 26
26
-
 27
27
-
 28
28
-
 29
29
-
 30
30
-
 31
31
-
 32
32
-
 33
33
-
 34
34
-
 35
35
-
 36
36
-
 37
37
-
 38
38
-
 39
39
-
 40
40
-
 41
41
-
 42
42
-
 43
43
-
 44
44


Kohler Gen 5.0 Le manuel du propriétaire
- Catégorie
- Groupes électrogènes
- Taper
- Le manuel du propriétaire
dans d''autres langues
- English: Kohler Gen 5.0 Owner's manual
- español: Kohler Gen 5.0 El manual del propietario
Documents connexes
Autres documents
-
ESAB 0707070150 Le manuel du propriétaire
-
Miller Big Blue 600 X Le manuel du propriétaire
-
Miller BOBCAT 230 Manuel utilisateur
-
-
-
-
Miller Trailblazer 325 Diesel Le manuel du propriétaire
-
Lincoln Electric Red-D-Arc GX300 Mode d'emploi