Horizon Fitness 5.0U Le manuel du propriétaire
- Catégorie
- Fitness, gymnastique
- Taper
- Le manuel du propriétaire

5.0U UPRIGHT BIKE OWNER’S MANUAL

3 ENGLISH
30 FRANÇAIS
58 ESPAÑOL

3
UPRIGHT BIKE OPERATION

4
2 ft
60 cm
2 ft
60 cm
2 ft 60 cm
2 ft 60 cm
FRONT
REAR
BIKE
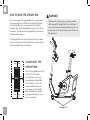
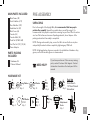
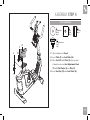
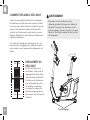
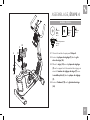
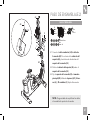
HOW TO MOVE THE UPRIGHT BIKE
Due to the weight of the Upright Bike, it is recommended
that two people move it. While one person lifts the back
of the Upright Bike, the second person firmly holds the
handlebar and tips the Upright Bike forward until it rolls on
the wheels. Carefully move the Upright Bike to the desired
location and then lower it.
If the Upright Bike rocks on the floor after being set down,
turn the leveling feet underneath the front or rear stabilizer
until the rocking motion is eliminated.
To reduce the risk of injury, use extreme caution
while moving the Upright Bike. Do not attempt to
move it over uneven surfaces and make sure there’s
a clear space of 24 inches (minimum) on all sides of
the equipment.
WARNING
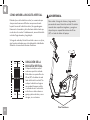
LOCATION OF THE
UPRIGHT BIKE
Place the Upright Bike on a level
surface. There should be
2 feet (60 cm) on each side
surrounding the Upright Bike.
Do not place the cycle in any
area that will block any vent
or air openings. The Upright
Bike should not be located in
a garage, covered patio, near
water or outdoors.
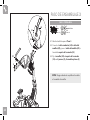
Leveling Feet

5
B
A
A
B
C
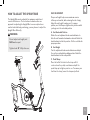
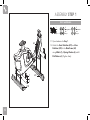
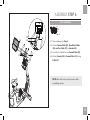
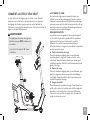
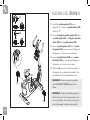
Do not adjust seat height past
MAX mark on post.
Tighten knob "B" fully before use.
WARNING
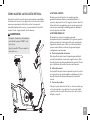
HOW TO ADJUST THE UPRIGHT BIKE
The Upright Bike can be adjusted for maximum comfort and
exercise effectiveness. The instructions below describe one
approach to adjusting the Upright Bike to ensure optimal user
comfort and ideal body positioning; you may choose to adjust the
Upright Bike differently.
SEAT ADJUSTMENT
Proper seat height helps ensure maximum exercise
efficiency and comfort, while reducing the risk of injury.
Adjust the seat height to make sure it’s in proper
position, one that keeps a slight bend in your knee while
your legs are in the extended position.
A. Seat Horizontal Position
Rotate the seat adjustment knob counterclockwise to
slide the seat forward or backward as desired. Rotate the
knob clockwise to lock the position. Test the seat slide for
proper operation.
B. Seat Height
Turn the adjustment knob counterclockwise and adjust
the seat to a comfortable pedaling position. Rotate the
knob clockwise to lock seat position.
C. Pedal Straps
Place the ball of the foot into the strap until it‘s
centered over the pedal, reach down and pull the
pedal strap up to tighten prior to use. To remove your
foot from the strap, loosen the strap and pull out.

6
READ AND SAVE ALL INSTRUCTIONS BEFORE ASSEMBLING OR USING THIS
EXERCISE BIKE. IT IS STRONGLY RECOMMENDED TO TAKE THE FOLLOWING SAFETY
INSTRUCTIONS.
•CAUTION: If you experience chest pains, nausea, dizziness or shortness of breath, stop exercising immediately and consult
your physician before continuing.
•Use this exercise bike for its intended purpose as described in this manual. Do not use attachments that have not been
recommended by the manufacturer.
•Never operate the exercise bike if it is not working properly, or if it has been damaged. Contact Customer Tech Support or
the authorized dealers for examination and repair.
•Do not use the exercise bike without proper footwear. NEVER operate the exercise bike with bare feet.
•Do not wear any clothing that might catch on any moving parts of this exercise bike.
•Keep hands and feet clear at all times from moving parts to avoid injury. Never turn the pedal cranks by hand.
•Do not dismount the exercise bike until the pedals are at a complete STOP.
•Do not attempt to ride the exercise bike in a standing position at high RPMs until you have practiced at slower speeds.
•Do not insert any object, hands or feet into any openings, or expose hands, arms or feet to the drive mechanism or other
potentially moving part of the exercise bike.
•Do not use any equipment that is damaged or has worn or broken parts. Use only replacement parts supplied by Customer
Tech Support or the authorized dealers.
•Do not operate where aerosol (spray) products are being used or when oxygen is being administered.
•Close supervision is necessary when used near children, invalids or disabled people.
•When the exercise bike is in use, young children and pets should be kept at least 3 meters / 10 feet away.
•Ensure that seat adjustment knobs (seat and handlebar fore-and-aft) are properly secured and do not interfere with range
of motion during exercise.
WARNING

7
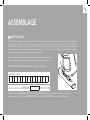
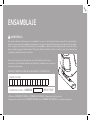
ASSEMBLY
There are several areas during the assembly process that special attention must be paid. It is very important to follow the
assembly instructions correctly and to make sure all parts are firmly tightened. If the assembly instructions are not followed
correctly, the Upright Bike could have parts that are not tightened and will seem loose and may cause irritating noises. To
prevent damage to the Upright Bike, the assembly instructions must be reviewed and corrective actions should be taken.
Before proceeding, find your Upright Bike’s serial number located on
the front stabilizer of the cycle and enter it in the space provided below.
ENTER YOUR SERIAL NUMBER IN THE BOX BELOW:
» Refer to the SERIAL NUMBER and MODEL NAME when calling for service.
» Be sure to enter both the SERIAL NUMBER and MODEL NAME on your warranty card.
SERIAL NUMBER:
MODEL NAME:
HORIZON UPRIGHT BIKE
WARNING

8
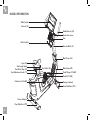
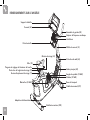
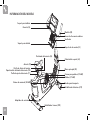
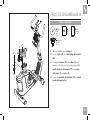
Tablet holder
Console (32)
Seat Adjustment knob (11)
Seat Slider Cap (10)
Seat height knob
Bottle holder
Transport wheels
Front Stabilizer (21F)
Rear Stabilizer (21R)
Crank arms (38 L&R)
Pedals (37 L&R)
Pedal Straps (39 L&R)
Seat slider (36)
Seat (35)
Power Adapter
Handlebar set (30)
Heart rate sensor
Fan
Console Mast (33)
Mast Cover (26)
Main frame (20)
MODEL INFORMATION

9
MAIN PARTS INCLUDED:
Main Frame (20)
Front Stabilizer (21F)
Rear Stabilizer (21R)
Handlebar Set (30)
Mast Cover (26)
Console (32)
Console Mast (33)
Pedal Set (37&39 L&R)
Seat Post Set (10,11,35,36)
Power Adapter
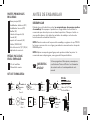
PARTS PACKING
INCLUDED:
1 Hardware Kit
1 Owner’s Manual
HARDWARE KIT:
PRE ASSEMBLY
If you have questions or if there are any missing
parts, contact Customer Tech Support. Contact
information is located on the back panel of this
manual.
UNPACKING
Due to the weight of the Upright Bike, it is recommended that two people
perform the assembly. Unpack the product where you will be using it. It is
recommended that you place a protective covering on your floor. Place the carton
on a level flat surface and remove all packing materials; do not dispose of the
packing materials until assembly is completed.
NOTE: During each assembly step, ensure that ALL nuts and bolts are in place
and partially threaded in before completely tightening any ONE bolt.
NOTE: A light application of grease may aid in the installation of hardware. Any
grease, such as lithium bike grease is recommended.
NEED HELP?
1
Bolt
M8
Qty: 4
2
Spring Washer
Ø8
Qty: 4
3
Flat Washer
Ø8
Qty: 18
5
Bolt
M8
Qty: 4
4
Bolt
M8
Qty: 2
6
Nut
M8
Qty: 4
Tool Kit
5mm Wrench
13/15mm Wrench
Screwdriver
7
Bolt
M5
Qty: 4
8
Flat Washer
Ø10.5
Qty: 1
9
Plate
M10
Qty: 1
10
End Cap
Qty: 1
11
Seat
Adjustment
Knob
Qty: 1

10
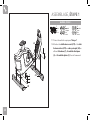
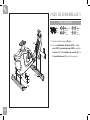
ASSEMBLY STEP 1
1.1 Open hardware for Step 1.
1.2 Attach the Front Stabilizer (21F) and Rear
Stabilizer (21R) to the Main Frame (20)
using 4 Bolts (1), 4 Spring Washers (2) and 4
Flat Washers (3). Tighten firmly.
1
Bolt
M8
Qty: 4
3
Flat Washer
Ø8
Qty: 4
2
Spring Washer
Ø8
Qty: 4
21R
21F
20
1
2
3
STEP 1 HARDWARE :

11
2.1 Attach Lead Wire (24) to Console Cable (23).
Pull through Mast Cover(26) and out opening of
Console Mast (33).
2.2 Slide Mast Cover(26) over Console Mast (33).
2.3 Attach Console Mast (33) to Main Frame (20)
using 6 Bolts (4,5), 4 Nuts (6) and 10 Washers
(3). Tighten firmly.
ASSEMBLY STEP 2
4
Bolt
M8
Qty: 2
3
Flat Washer
Ø8
Qty: 10
5
Bolt
M8
Qty: 4
6
Nut
M8
Qty: 4
33
63
5
3
24
23
23
26
20
STEP 2 HARDWARE :
NOTE: Be careful not to pinch any wires while
assembling console mast.
3 4

12
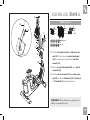
ASSEMBLY STEP 3
3.1 Open hardware for Step 3.
3.2 Attach Lead Wire (24) to Handlebar cable (25)
and feed Handlebar Cable (25) through the
Console Mast (33).
3.3 Attach Handlebar Set (30) to Console Mast
(33) with 4 Bolts (4) and 4 Flat Washers (3).
25
43
4
Bolt
M8
Qty: 4
3
Flat Washer
Ø8
Qty: 4
STEP 3 HARDWARE :
33 24
30
NOTE: Be careful not to pinch any wires while
assembling handlebars.

13
ASSEMBLY STEP 4
4.1 Open hardware for Step 4.
4.2 Insert Plate (9) into Seat Slider (36).
4.3 Place Seat (35) with Plate (9) onto seat post
U-bracket and screw Seat Adjustment Knob
(11) with Flat Washer (8) into Plate (9).
4.4 Insert End Cap (10) onto Seat Slider (36).
10
35
9
8
8
Flat Washer
Ø10.5
Qty: 1
11
Seat Adjustment
Knob
Qty: 1
9
Plate
M10
Qty: 1
10
End Cap
Qty: 1
STEP 4 HARDWARE :
11
36

14
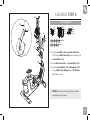
ASSEMBLY STEP 5
5.1 Identify Left Pedal (37L) which is labeled L on
spindle and Right Pedal (37R) labeled R.
5.2 Insert Left Pedal Strap (39L) into Left Pedal
(37L) and Right Pedal Strap (39R) into Right
Pedal (37R).
5.3 Insert Left Pedal (37L) into Left Crank Arm
(38L), ensure screw threads are aligned. Tighten
Counter-clockwise.
5.4 Insert Right Pedal (37R) into Right Crank Arm
(38R), ensure screw threads are aligned. Tighten
Clockwise.
5.5 Use Wrench to fully tighten pedals. No screw
threads should be visible and pedal axle should
be fully seated.
NOTE: Make sure pedals are FULLY TIGHTENED
before use.
37R
38R
37L
39R
39L
NOTE: Left crank arm is reverse threaded so it
is very important to tighten counter-clockwise.
Tightening the opposite direction can damage
pedal or crank arm.

15
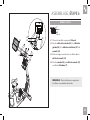
6.1 Open hardware for Step 6.
6.2 Attach Console Cable (23), Handlebar Cables
(25), and Fan Cable (27) to Console (32).
6.3 Carefully tuck all cables into Console Mast (33).
6.4 Attach Console (32) to Console Mast (33) using
4 Bolts (7).
7
Bolt
M5
Qty: 4
STEP 6 HARDWARE :
ASSEMBLY STEP 6
NOTE: Be careful not to pinch any wires while
assembling console.
32 25
7
23
27
33

16
ASSEMBLY STEP 7
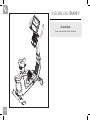
CONGRATULATIONS!
You have successfully assembled your Upright Bike.

17
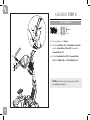
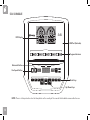
CONSOLE OPERATION

18
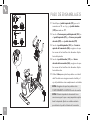
5.0U
SPLIT
0 20 40 60 80 100
ENTER
DISPLAY
RESISTANCE
TIMECADENCE RESISTANCE
STOP
STA RT
PROGRAMS
P1 P5P4P3P2
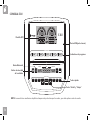
5.0U CONSOLE
Up/Down Keys
Program Indicators
Quick Keys
USB Port (Backside)
LCD Display
Bluetooth Button
Fan Speed Button
NOTE: There is a thin protective sheet of clear plastic on the overlay of the console that should be removed before use.

19
Program Indicators
Quick Keys
USB Port (Backside)
5.0U CONSOLE OPERATION
LCD DISPLAY WINDOWS: time, remain, distance, calories, heart rate, timer, speed, watts, cadence and resistance level.
LCD DISPLAY INDICATORS: indicates what information is being displayed.
START: press to begin exercising, start your workout, or resume exercising after pause.
STOP: press to pause/end your workout. Hold for 3 seconds to reset the console.
SPLIT: press this key to reset the Segment Time count-up timer to 0 seconds.
UP/DOWN KEYS: used to adjust resistance level.
QUICK KEYS: used to instantly jump to the desired resistance level.
DISPLAY/ENTER: used to confirm a selection. Press to change display feedback during workout.
BLUETOOTH: used to connect bluetooth devices. hold to switch between Heart Rate mode and App mode.
ENERGY SAVER: To minimize energy consumption, your machine will enter energy saver mode (ERP) automatically when not
in use and the console will be woken up quickly with a touch of a button.
USB PORT: for charging and software updates, maximum output is 1A/5V.
5.0U CONSOLE DISPLAY
TIME/REMAIN: Shown as minutes: seconds. View the time remaining or the time elapsed in your workout.
HEART RATE: Shown as BPM (beats per minute). Used to monitor your heart rate (displayed when using HR straps).
DISTANCE: Shown as miles. Indicates distance traveled or distance remaining during your workout.
WATTS: Indicates your cycling rate at any moment.
CALORIES: Total calories burned or calories remaining left to burn during your workout.
TIMER: is almost identical to TIME, but will reset to 0s when the split key is pressed.
SPEED: Shown as MPH. Indicate the bike’s overall speed on the road.
RESISTANCE: Shows the current level of resistance.
CADENCE: Shown as RPM. Indicates how fast the foot pedals are moving.

20
PROGRAM INFORMATION
P1) MANUAL: Adjust your resistance manually during your workout.
P2) DISTANCE: Push yourself and go further during your workout with 13 distance workouts. Choose from 1 mile, 2 miles,
5k, 5 miles, 10k, 8 miles, 15k, 10 miles, 20k, half marathon, 15 miles, 20 miles, and marathon goals.
P3) CALORIES: Set goals for burning calories.
P4) FAT BURN: A workout designed specifically to target fat. Promotes weight loss by increasing and decreasing the
resistance, while keeping you in your fat burning zone. Includes 10 levels.
P5) INTERVALS: Improves your strength, speed, and endurance by increasing and decreasing the resistance throughout
your workout to involve your heart and other muscles. Includes 10 levels.
La page est en cours de chargement...
La page est en cours de chargement...
La page est en cours de chargement...
La page est en cours de chargement...
La page est en cours de chargement...
La page est en cours de chargement...
La page est en cours de chargement...
La page est en cours de chargement...
La page est en cours de chargement...
La page est en cours de chargement...
La page est en cours de chargement...
La page est en cours de chargement...
La page est en cours de chargement...
La page est en cours de chargement...
La page est en cours de chargement...
La page est en cours de chargement...
La page est en cours de chargement...
La page est en cours de chargement...
La page est en cours de chargement...
La page est en cours de chargement...
La page est en cours de chargement...
La page est en cours de chargement...
La page est en cours de chargement...
La page est en cours de chargement...
La page est en cours de chargement...
La page est en cours de chargement...
La page est en cours de chargement...
La page est en cours de chargement...
La page est en cours de chargement...
La page est en cours de chargement...
La page est en cours de chargement...
La page est en cours de chargement...
La page est en cours de chargement...
La page est en cours de chargement...
La page est en cours de chargement...
La page est en cours de chargement...
La page est en cours de chargement...
La page est en cours de chargement...
La page est en cours de chargement...
La page est en cours de chargement...
La page est en cours de chargement...
La page est en cours de chargement...
La page est en cours de chargement...
La page est en cours de chargement...
La page est en cours de chargement...
La page est en cours de chargement...
La page est en cours de chargement...
La page est en cours de chargement...
La page est en cours de chargement...
La page est en cours de chargement...
La page est en cours de chargement...
La page est en cours de chargement...
La page est en cours de chargement...
La page est en cours de chargement...
La page est en cours de chargement...
La page est en cours de chargement...
La page est en cours de chargement...
La page est en cours de chargement...
La page est en cours de chargement...
La page est en cours de chargement...
La page est en cours de chargement...
La page est en cours de chargement...
La page est en cours de chargement...
La page est en cours de chargement...
La page est en cours de chargement...
La page est en cours de chargement...
-
 1
1
-
 2
2
-
 3
3
-
 4
4
-
 5
5
-
 6
6
-
 7
7
-
 8
8
-
 9
9
-
 10
10
-
 11
11
-
 12
12
-
 13
13
-
 14
14
-
 15
15
-
 16
16
-
 17
17
-
 18
18
-
 19
19
-
 20
20
-
 21
21
-
 22
22
-
 23
23
-
 24
24
-
 25
25
-
 26
26
-
 27
27
-
 28
28
-
 29
29
-
 30
30
-
 31
31
-
 32
32
-
 33
33
-
 34
34
-
 35
35
-
 36
36
-
 37
37
-
 38
38
-
 39
39
-
 40
40
-
 41
41
-
 42
42
-
 43
43
-
 44
44
-
 45
45
-
 46
46
-
 47
47
-
 48
48
-
 49
49
-
 50
50
-
 51
51
-
 52
52
-
 53
53
-
 54
54
-
 55
55
-
 56
56
-
 57
57
-
 58
58
-
 59
59
-
 60
60
-
 61
61
-
 62
62
-
 63
63
-
 64
64
-
 65
65
-
 66
66
-
 67
67
-
 68
68
-
 69
69
-
 70
70
-
 71
71
-
 72
72
-
 73
73
-
 74
74
-
 75
75
-
 76
76
-
 77
77
-
 78
78
-
 79
79
-
 80
80
-
 81
81
-
 82
82
-
 83
83
-
 84
84
-
 85
85
-
 86
86


Horizon Fitness 5.0U Le manuel du propriétaire
- Catégorie
- Fitness, gymnastique
- Taper
- Le manuel du propriétaire
dans d''autres langues
Documents connexes
Autres documents
-
Horizon Paros 2.0 Exercise Bike Le manuel du propriétaire
-
AFG 7.3AU Le manuel du propriétaire
-
-
SportsArt C545U-16 Le manuel du propriétaire
-
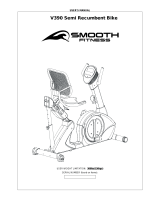 Smooth Fitness V390 Manuel utilisateur
-
-
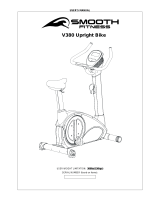 Smooth Fitness V380 Manuel utilisateur
-
Nautilus R514 Exercise Bike Le manuel du propriétaire
-
Schwinn 240 Exercise Bike Le manuel du propriétaire

