Aqueon OptiBright MAX Le manuel du propriétaire
- Taper
- Le manuel du propriétaire

Central Aquatics • 5401 West Oakwood Park Drive • Franklin, WI 53132 Nov2017
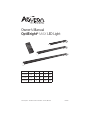
Owner’s Manual
OptiBright
®
MAX LED Light
30" - 36"
48" - 54"
18" - 24"
*Average output at 12" from the center of the light.
Item No. Description
PEAK
PAR
AVG
PAR*
PEAK
LUX
AVG
LUX*
100533615 18-24" 42 22 3177 1788
100533616 30-36" 55 30 4063 2304
100533617 48-54"
59 37 4120 2649

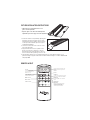
REMOTE LAYOUT
On/Off
Use when setting the timer
function for White, Blue and
RGBs to be on or off
LCD screen will indicate the time of day
(AM/PM) as well as which lights are on:
W/B/RGB
Adjust Brightness
Color intensity can be increased or
decreased in 10% increments
8 Preset Colors
White On/Off
Blue On/Off
Power
RGB On/Off
What is RGB?
Red, green and blue LEDs are mixed
together to create a broad array of
colors. 8 preset options were
created for quick customization.
Set/Enter
Use when setting the time and storing the
timer function for White, Blue and RGBs
RGB Scroll
Scroll through RGB colors in 3 different
speeds.
1. Position the fixture over aquarium by adjusting the
legs (Fig 1) to the proper length so they securely
hold the fixture in place. Always center the fixture
so that it provides maximum exposure of light to
all aquarium inhabitants.
2. Connect the transformer to the connector on the
side of the light fixture.
3. Plug the transformer into an acceptable outlet.
Be sure to incorporate a “drip loop” to prevent
water droplets from running down the cord and
into the outlet should any water get onto the cord.
4. The light fixture will turn on to a standard setting and you can program the fixture to your
preferred settings using the included remote. (Initial standard setting is set to white LED, blue LED
and purple RGB.)
FIXTURE INSTALLATION INSTRUCTIONS
• This product is recommended for use over
glass-covered aquariums.
• Aqueon
®
glass covers fit on the inside lip of the
aquarium to prevent seepage out of the aquarium.

REMOTE INSTRUCTIONS
Installing the Batteries
1. Remove the cover from the back of the remote.
2. Install 2 (AAA) batteries (included).
3. Close the cover – the remote is now ready for use.
Setting the Time
1. Press and hold for 3 seconds until you see the hour blinking
2. Use the
and buttons to set the hour – ‘AM/PM’ will be displayed on the screen.
3. Press . The minutes will be blinking. Use the
and buttons to set the minute.
4. Press . The time will be set.
Setting Desired Manual Color Options
Set the fixture to the desired color combination by following the steps below:
1. Setting the White LEDs
a. Press to turn the White LEDs on – ‘W’ will be displayed on the screen.
b. Use the
and buttons to adjust the color intensity of the White LEDs only.
c. Press to turn the White LEDs off.
2. Setting the Blue LEDs
a. Press to turn the Blue LEDs on – ‘B’ will be displayed on the screen.
b. Use the
and buttons to adjust the color intensity of the Blue LEDs only.
c. Press to turn the Blue LEDs off.
3. Setting the RGB LED Color Option
a. Press one of the 8 preset color options to turn the RGBs on – ‘RGB’ will be displayed
on the screen.
b. Use the
and buttons to adjust the color intensity of the RGBs only.
c. Press to turn the RGBs off.
Note: To set different color intensities for each of the White, Blue and RGBs – each specific
color must be on by itself. If all three colors (or two) are on at the same time the intensity will
be adjusted for all 3 colors to the same intensity. Ex: If you see ‘W’ on the screen and you use
the
and buttons, the color intensity will be adjusted for only the White LEDs. If you
see ‘W’ and ‘B’ on the screen and you use the
and buttons, the color intensity will
be adjusted for the same amount for both the White AND Blue LEDs.
Programming the Timer
Automatic Sunrise/Sunset and Moonrise/Moonset
This light is equipped with automatic 30 minute ramp times to reflect a natural Sunrise/Sunset and
Moonrise/Moonset. When setting the timer, the ‘ON’ and ‘OFF’ times indicate when the LEDs will begin
gradually ramping up or dimming down.
Ex: If you set the ‘ON’ time for 9:00 AM, your light will turn on at 9:00 AM at the lowest light intensity
and will gradually ramp up for 30 minutes to reach full brightness by 9:30 AM. Similarly, if the ‘OFF’
time is set for 6:00 PM, your light will start ramping down at 6:00 PM and won’t be completely off until
approximately 6:30 PM.
Note: Make sure your desired colors are in the ‘ON’ setting before you start programming
the timer. ‘W’, ‘B’ and ‘RGB’ should be displayed on the screen.
1. Press and hold for 3 seconds until you see the hour blinking.
2. Press twice – you will see ‘W’ and ‘ON’ on the screen to set the White LEDs ON.
3. Use the
and buttons to set the hour – ‘AM/PM’ will be displayed on the screen.
4. Press . The minutes will be blinking. Use the
and buttons to set the minute.

LIMITED WARRANTY
Central Aquatics warrants that this product shall be free from defective electrical components due to defects in materials or workmanship for
a period of twelve months from the date of purchase. If a defect is shown, Central Aquatics will, at the sole discretion of Central Aquatics,
either repair or replace the product without charge. No cash refunds will be made. This warranty is provided solely to the original consumer
purchaser of the product and may not be transferred or assigned. You must retain original proof of purchase to validate this warranty.
This warranty does not apply to damage resulting from accident, misuse, abuse, lack of reasonable care, failure to follow safety and
installation instructions, use of the product with non-standard electrical service, or any other defect not resulting from defects in the
electrical components of the product or defects in materials or workmanship. This warranty will not be effective unless and until the Central
Aquatics product is shown to have been used in accordance with the safety and installation instructions accompanying the product,
including the requirement that the product be used over a covered aquarium.
THIS CONSTITUTES THE ENTIRE CENTRAL AQUATICS WARRANTY AND CENTRAL AQUATICS MAKES NO OTHER WARRANTIES, WHETHER
EXPRESS OR IMPLIED, WITH RESPECT TO THE PRODUCT. CENTRAL AQUATICS SPECIFICALLY DISCLAIMS ANY AND ALL IMPLIED WARRANTIES,
INCLUDING, WITHOUT LIMITATION, WARRANTIES OF MERCHANTABILITY AND FITNESS FOR A PARTICULAR PURPOSE. IF CENTRAL AQUATICS
CANNOT LAWFULLY DISCLAIM IMPLIED WARRANTIES UNDER THIS LIMITED WARRANTY, ALL SUCH WARRANTIES, INCLUDING WARRANTIES OF
MERCHANTABILITY AND FITNESS FOR A PARTICULAR PURPOSE ARE LIMITED IN DURATION TO THE DURATION OF THIS WARRANTY.
CENTRAL AQUATICS IS NOT RESPONSIBLE FOR DIRECT, SPECIAL, INCIDENTAL OR CONSEQUENTIAL DAMAGES RESULTING FROM ANY BREACH
OF WARRANTY OR CONDITION, OR UNDER ANY OTHER LEGAL THEORY. CENTRAL AQUATICS EXPRESSLY DISCLAIMS ALL ALLEGED DAMAGES
FOR LOSS OF AQUATIC LIFE, PERSONAL INJURY, AND/OR PROPERTY DAMAGE. Some states and provinces do not allow the exclusion or
limitation of incidental or consequential damages or exclusions or limitations on the duration of implied warranties or conditions, so the
above limitations or exclusions may not apply to you. This warranty gives you specific legal rights, and you may also have other rights that
vary by state or province.
Central Aquatics shall not have any obligations under this warranty unless the owner notifies Central Aquatics in writing of any alleged
defect(s) within 30 days of discovery of the defect(s). Any notice to Central Aquatics must be delivered by United States or electronic mail to
one of the following addresses:
U.S. Mail: Central Aquatics - Aqueon, 5401 West Oakwood Park Drive, Franklin, Wisconsin 53132
Electronic Mail: info@Central-Aquatics.com
Central Aquatics shall be allowed a reasonable period of time to investigate any warranty claim and to perform any testing Central Aquatics
deems necessary to determine the cause of the defect. This warranty shall be interpreted under the laws of the state of Wisconsin.
For additional information regarding this limited warranty, please contact us at the addresses above, or call us at 888-255-4527.
FCC CERTIFICATION
This device complies with Part 15 of the FCC Rules. Operation is subject to the following two conditions:
(1) this device may not cause harmful interference, and (2) this device must accept any interference received, including interference that may
cause undesired operation.
WARNING: Changes or modifications to this unit not expressly approved by the party responsible for compliance could void the user’s
authority to operate the equipment.
NOTE: This equipment has been tested and found to comply with the limits for a Class B digital device, pursuant to Part 15 of the FCC Rules.
These limits are designed to provide reasonable protection against harmful interference in a residential installation. This equipment
generates uses and can radiate radio frequency energy and, if not installed and used in accordance with the instructions, may cause harmful
interference to radio communications.
However, there is no guarantee that interference will not occur in a particular installation. If this equipment does cause harmful interference
to radio or television reception, which can be determined by turning the equipment off and on, the user is encouraged to try to correct the
interference by one or more of the following measures:
• Reorient or relocate the receiving antenna.
• Increase the separation between the equipment and receiver.
• Connect the equipment into an outlet on a circuit different
from that to which the receiver is connected.
• Consult the dealer or an experienced radio/TV technician for help.
TransformerUses a
IMPORTANT CLEANING & SERVICING PRECAUTIONS
CLEANING: It is important to keep this appliance clean. Unplug and remove the unit from the
aquarium. Wipe exposed surfaces carefully with a damp cloth to remove any dust or mineral deposits
which may collect over time. Make sure all surfaces are dry before reinstalling.
SERVICING: In order to assure proper electrical connections and polarity, replacement parts
and servicing should be performed only by a qualified electrician.
5. Press
– you will see ‘W’ and ‘OFF’ on the screen to set the White LEDs OFF. Repeat steps 3-4.
6. Press
– you will see ‘B’ and ‘ON’ on the screen to set the Blue LEDs ON. Repeat steps 3-4.
7. Press
– you will see ‘B’ and ‘OFF’ on the screen to set the Blue LEDs OFF. Repeat steps 3-4.
8. Press
– you will see ‘RGB’ and ‘ON’ on the screen to set the RGBs ON. Repeat steps 3-4.
9. Press
– you will see ‘RGB’ and ‘OFF’ on the screen to set the RGBs OFF. Repeat steps 3-4.
10. Press
– your fixture is now programmed to your custom settings.
Note: If you don’t want to set the LEDs to turn on/off you can leave them both at 12:00AM.
RGB LED Scroll Mode
1. Press to scroll through the different color options at different speeds.
a. 25 – Color will change every 5 seconds.
b. 50 – Color will change every 4 seconds.
c. 75 – Color will change every 3 seconds.
d. 100 – Color will stop scrolling and be set to the color you selected.

IMPORTANT SAFETY INSTRUCTIONS
WARNING – To guard against injury, basic safety precautions should be observed including the following:
1.
READ AND FOLLOW ALL SAFETY INSTRUCTIONS
2. DANGER – To avoid possible electric shock, special care should be taken since water is employed in
vthe use of aquarium equipment. For each of the following situations, do not attempt to repair yourself;
return the appliance to an authorized service facility for service or discard the appliance:
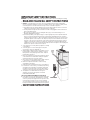
A. If the appliance falls into the water, DON'T reach for it! First unplug it and then retrieve it. If electrical
components of the appliance get wet, unplug the appliance completely.
B. Carefully examine the appliance after installation. It should not be plugged in if there is water on the
parts not intended to be wet.
C. Do not operate any appliance if it has a damaged cord or plug, or if it is malfunctioning or if it is
dropped or damaged in any manner.
D. To avoid the possibility of the appliance plug or receptacle getting wet, position aquarium stand and
tank to one side of the wall-mounted receptacle to prevent water from dripping onto the receptacle
or plug. As shown in the figure, a “drip loop” should be arranged by the user for each cord connecting
an aquarium appliance to the receptacle. The “drip loop” is the part of the cord below the level of the
receptacle, or the connector if an extension cord is used, to prevent water travel along the cord and
coming in contact with the receptacle. If the plug or the receptacle does get wet, DON’T unplug the
cord. Disconnect the fuse to the circuit breaker that supplies power to the appliance. Then unplug and
examine for the presence of water in the receptacle.
3. Close supervision is necessary when any appliance is used by
or near children.
4. To avoid injury, do not contact moving parts or hot parts
such as heaters, reflectors, lamp bulbs, etc.
5. Always unplug an appliance from the outlet when not in use,
before putting on or taking off parts, and before cleaning.
Never yank the cord to pull plug from the outlet. Grasp the
plug and pull to disconnect.
6. Do not use an appliance for other than intended use. The use
of attachments not recommended or sold by the appliance
manufacturer may cause an unsafe condition.
7. Do not install or store the appliance where it will be exposed
to the weather or to temperatures below freezing.
8. Make sure an appliance mounted on a tank is securely
installed before operating it.
9. Read and observe all the important notices on the appliance.
10. If an extension cord is necessary, a cord with a proper rating
should be used. A cord rated for less amperes or watts than
the appliance rating may overheat. Care should be taken to
arrange the cord so that it will not be tripped over or pulled.
11. This appliance is recommended for use over a glass
aquarium cover or panel. The appliance is intended
FOR HOUSEHOLD USE ONLY.
ONLY FOR POLARIZED ATTACHMENT PLUG APPLIANCES
12. If this appliance has a polarized plug (one blade is wider than
the other) as a safety feature, this plug will fit in a polarized
outlet only one way. If the plug does not fit fully in the outlet,
reverse the plug. If it still does not fit, contact a qualified
electrician. Never use with an extension cord unless plug can
be fully inserted. Do not attempt to defeat this safety feature.
13.
SAVE THESE INSTRUCTIONS
APPLIANCE
POWER
SUPPLY
CORD
DRIP LOOP
AQUARIUM

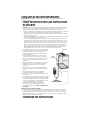
APPAREIL
BOUCLE
D’ÉGOUTTEMENT
AQUARIUM
CORDON
ÉLECTRIQUE
CONSIGNES DE SÉCURITÉ IMPORTANTES
AVERTISSEMENT – Pour protéger contre les blessures, respecter les consignes de sécurité de base,
notamment ce qui suit :
1.
LIRE ET RESPECTER TOUTES LES INSTRUCTIONS
DE SÉCURITÉ.
2. DANGER – Pour écarter les risques de décharge électrique, faire preuve de précautions particulières en
raison de la présence d’eau dans l’aquarium. Dans chacune des situations ci-dessous, ne pas tenter de
réparer soi-même ; renvoyer l’appareil à un centre de réparation agréé ou le mettre au rebut.
A. Si l’appareil tombe dans l’eau, NE PAS y mettre la main ! Débrancher d’abord l’appareil puis le récupérer.
Si des composants électriques de l’appareil sont mouillés, le débrancher immédiatement.
B. Examiner l’appareil avec soin après son installation. Ne pas le brancher s’il y a de l’eau sur des pièces
non destinées à être mouillées.
C. Ne pas utiliser un appareil s’il a un cordon ou une fiche endommagés, s’il fonctionne mal, s’il est tombé
ou s’il a été endommagé d’une quelconque façon.
D. Pour écarter le risque de mouiller la fiche de l’appareil ou la prise de courant, placer le socle et la cuve
de l’aquarium sur le côté par rapport à la prise murale, afin d’éviter que l’eau ne goutte sur la prise ou
la fiche. Prévoir une « boucle d’égouttement », illustrée ci-dessous, sur chaque cordon qui raccorde un
appareil de l’aquarium à la prise de courant. La « boucle d’égouttement » est la portion de cordon en
dessous du niveau de la prise, ou du connecteur si un cordon de rallonge est utilisé, pour empêcher
l’eau de s’écouler le long du cordon et de venir au contact de la prise. Si la fiche ou la prise sont
mouillées, NE PAS débrancher le cordon. Couper l’électricité au niveau du disjoncteur qui alimente
l’appareil. Débrancher ensuite le cordon et voir s’il y a de l’eau dans la prise de courant.
3. Une supervision étroite est nécessaire lors de l’utilisation de
tout appareil électrique par des enfants ou à leur proximité.
4. Pour éviter les blessures, ne pas toucher de pièces en
mouvement ni de pièces chaudes telles que radiateurs,
réflecteurs, ampoules, etc.
5. Toujours débrancher un appareil de la prise de courant
lorsqu’il n’est pas utilisé, avant de poser ou d’enlever des
pièces et avant de le nettoyer. Ne jamais tirer sur le cordon
pour sortir la fiche de la prise. Saisir la fiche et tirer pour
débrancher.
6. Ne pas utiliser un appareil à d’autres fins que celles prévues.
L’emploi d’accessoires non recommandés ni vendus par
le fabricant de l’appareil peut produire une situation
dangereuse.
7. Ne pas installer ni entreposer l’appareil dans un endroit
exposé aux intempéries ou à des températures inférieures
au gel.
8. S’assurer qu’un appareil monté sur un aquarium est
solidement installé avant de le mettre en marche.
9. Lire et respecter toutes les consignes importantes figurant
sur l’appareil.
10. Si un cordon de rallonge est nécessaire, utiliser un cordon de
capacité suffisante. Un cordon prévu pour des intensités (A)
ou des puissances (W) inférieures à celles de l’appareil peut
surchauffer. Veiller à disposer le cordon de manière à éviter
tout risque de trébuchement ou d’arrachement.
11. Cet appareil est recommandé pour une utilisation
sur un couvercle ou panneau d’aquarium en verre.
Ce appareil est destiné à une UTILISATION DOMESTIQUE
SEULEMENT.
APPAREILS À FICHE POLARISÉE SEULEMENT
12. Si cet appareil comporte une fiche polarisée (une lame plus large que l’autre) par mesure de sécurité,
cette fiche ne peut être branchée dans une prise polarisée que dans un sens. Si la fiche ne rentre pas
complètement dans la prise, retourner la fiche. Si elle ne rentre toujours pas, contacter un électricien
qualifié. Ne jamais utiliser avec un cordon de rallonge si la fiche ne s’enfonce par complètement. Ne pas
tenter de contourner ce dispositif de sécurité.
13.
CONSERVER CES INSTRUCTIONS
-
 1
1
-
 2
2
-
 3
3
-
 4
4
-
 5
5
-
 6
6


Aqueon OptiBright MAX Le manuel du propriétaire
- Taper
- Le manuel du propriétaire
dans d''autres langues
- English: Aqueon OptiBright MAX Owner's manual


