
Instructions for use
EN
DE
Gebrauchsanweisung
FR
Mode d’emploi
NL
Gebruiksaanwijzing


ENGLISH Instructions for use Page 4
DEUTSCH Gebrauchsanweisung Seite 22
FRANÇAIS Mode d’emploi Page 40
NEDERLANDS Gebruiksaanwijzing Pagina 58

4
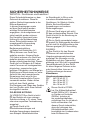
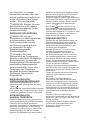
SAFETY INSTRUCTIONS
IMPORTANT to be read and observed
Before using the appliance, read
these safety instructions. Keep them
nearby for future reference.
These instructions and the appliance
itself provide important safety
warnings, to be observed at all times.
The manufacturer declines any
liability for failure to observe these
safety instructions, for inappropriate
use of the appliance or incorrect
setting of controls.
Very young children (0-3 years)
should be kept away from the
appliance. Young children (3-8
years) should be kept away from
the appliance unless continuously
supervised. Children from 8 years
old and above and persons with
reduced physical, sensory or mental
capabilities or lack of experience and
knowledge can use this appliance
only if they are supervised or have
been given instructions on safe
use and understand the hazards
involved.
Children must not play with the
appliance. Cleaning and user
maintenance must not be carried out
by children without supervision.
PERMITTED USE
CAUTION: The appliance is not
intended to be operated by means
of an external switching device,
such as a timer, or separate remote
controlled system.
This appliance is intended to
be used in household and similar
applications such as: staff kitchen
areas in shops, ofces and other
working environments; farm houses;
by clients in hotels, motels, bed
& breakfast and other residential
environments.
This appliance is not for
professional use. Do not use the
appliance outdoors.
The bulb used inside the
appliance is specically designed
for domestic appliances and is not
suitable for general room lighting
within the home (EC Regulation
244/2009).
The appliance is designed for
operation in places where the
ambient temperature comes within
the following ranges, according to
the climatic class given on the rating
plate. The appliance may not work
properly if it is left for a long time at
a temperature outside the specied
range.
Climatic Class Amb. T. (°C)
SN: From 10 to 32 °C
ST: From 16 to 38 °C;
N: From 16 to 32 °C
T: From 16 to 43 °C
This appliance does not
contain CFCs. The refrigerant
circuit contains R600a (HC).
Appliances with Isobutane
(R600a): isobutane is a natural
gas without environmental
impact, but is ammable.
Therefore, make sure the
refrigerant circuit pipes are
not damaged, especially when
emptying the refrigerant circuit.
WARNING: Do not damage the
appliance refrigerant circuit pipes.
WARNING: Keep ventilation
openings, in the appliance enclosure
or in the built-in structure, clear of
obstruction.

5
WARNING: Do not use
mechanical, electric or chemical
means other than those
recommended by the Manufacturer
to speed up the defrost process.
WARNING: Do not use or
place electrical devices inside the
appliance compartments if they are
not of the type expressly authorised
by the Manufacturer.
WARNING: Ice makers and/
or water dispensers not directly
connected to the water supply must
be lled with potable water only.
Do not store explosive substances
such as aerosol cans and do not
place or use gasoline or other
ammable materials in or near the
appliance.
Do not swallow the contents (non-
toxic) of the ice packs (provided with
some models). Do not eat ice cubes
or ice lollies immediately after taking
them out of the freezer since they
may cause cold burns.
For products designed to use
an air lter inside an accessible fan
cover, the lter must always be in
position when the refrigerator is in
function.
Do not store glass containers with
liquids in the freezer compartment
since they may break.
Do not obstruct the fan (if included)
with food items.
After placing the food check that the
door of the compartments closes
properly, especially the freezer door.
Damaged gaskets must be
replaced as soon as possible.
Use the refrigerator compartment
only for storing fresh food and the
freezer compartment only for storing
frozen food, freezing fresh food and
making ice cubes.
Avoid storing unwrapped food
in direct contact with internal
surfaces of the refrigerator or freezer
compartments.
Appliances could have special
compartments (Fresh Food
Compartment, Zero Degree Box,...).
Unless differently specied in the
specic booklet of product, they can
be removed, maintaining equivalent
performances.
C-Pentane is used as blowing
agent in the insulation foam
and it is a ammable gas.
INSTALLATION
The appliance must be handled
and installed by two or more persons
- risk of injury. Use protective gloves
to unpack and install - risk of cuts.
Installation, including water supply
(if any), electrical connections and
repairs must be carried out by a
qualied technician. Do not repair
or replace any part of the appliance
unless specically stated in the user
manual. Keep children away from
the installation site. After unpacking
the appliance, make sure that it has
not been damaged during transport.
In the event of problems, contact
the dealer or your nearest Aftersales
Service. Once installed, packaging
waste (plastic, styrofoam parts
etc.) must be stored out of reach of
children - risk of suffocation. The
appliance must be disconnected
from the power supply before any
installation operation - risk of electric
shock. During installation, make sure
the appliance does not damage the
power cable - risk of re or electric
shock. Only activate the appliance

6
when the installation has been
completed.
Be careful not to damage the
oors (e.g. parquet) when moving the
appliance. Install the appliance on
a oor or support strong enough to
take its weight and in a place suitable
for its size and use. Make sure the
appliance is not near a heat source
and that the four feet are stable and
resting on the oor, adjusting them
as required, and check that the
appliance is perfectly level using a
spirit level. Wait at least two hours
before switching the appliance on, to
ensure that the refrigerant circuit is
fully efcient.
All dimensions and spacing needed
for installation of the appliance are in
the Installation Instruction booklet.
WARNING: When positioning the
appliance, ensure the supply cord is
not trapped or damaged.
WARNING: To avoid a hazard
due to instability, positioning or xing
of the appliance must be done in
accordance with the manufacturer
instructions.
It’s forbidden to place the refrigerator
in such way that the metal hose of
gas stove, metal gas or water pipes,
or electrical wires are in contact with
the refrigerator back wall (condenser
coil).
ELECTRICAL WARNINGS
It must be possible to disconnect
the appliance from the power
supply by unplugging it if plug is
accessible, or by a multi-pole switch
installed upstream of the socket in
accordance with the wiring rules
and the appliance must be earthed
in conformity with national electrical
safety standards.
Do not use extension leads,
multiple sockets or adapters. The
electrical components must not
be accessible to the user after
installation. Do not use the appliance
when you are wet or barefoot.
Do not operate this appliance if it has
a damaged power cable or plug, if
it is not working properly, or if it has
been damaged or dropped.
If the supply cord is damaged, it
must be replaced with an identical
one by the manufacturer, its service
agent or similarly qualied persons
in order to avoid a hazard - risk of
electric shock.
WARNING: Do not locate multiple
portable socket-outlets or portable
power supplies at the rear of the
appliance.
CLEANING AND MAINTENANCE
WARNING: Ensure that the
appliance is switched off and
disconnected from the power supply
before performing any maintenance
operation; never use steam cleaning
equipment - risk of electric shock.
Do not use abrasive or harsh
cleaners such as window sprays,
scouring cleansers, ammable
uids, cleaning waxes, concentrated
detergents, bleaches or cleansers
containing petroleum products
on plastic parts, interior and door
liners or gaskets. Do not use paper
towels, scouring pads, or other harsh
cleaning tools.

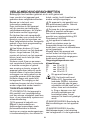
7
DISPOSAL OF PACKAGING
MATERIALS
The packaging material is 100% recyclable
and is marked with the recycle symbol .
The various parts of the packaging must
therefore be disposed of responsibly and
in full compliance with local authority
regulations governing waste disposal.
DISPOSAL OF HOUSEHOLD
APPLIANCES
This appliance is manufactured with
recyclable or reusable materials.
Dispose of it in accordance with local waste
disposal regulations.
For further information on the treatment,
recovery and recycling of household
electrical appliances, contact your local
authority, the collection service for
household waste or the store where you
purchased the appliance. This appliance
is marked in compliance with European
Directive 2012/19/EU, Waste Electrical and
Electronic Equipment (WEEE).
By ensuring this product is disposed of
correctly, you will help prevent negative
consequences for the environment and
human health.
The symbol on the product or on the
accompanying documentation indicates
that it should not be treated as domestic
waste but must be taken to an appropriate
collection centre for the recycling of
electrical and electronic equipment.
ENERGY SAVING TIPS
To guarantee adequate ventilation follow
installation instructions.
Insufcient ventilation at the back of the
product increases energy consumption and
decreases cooling efciency.
Frequent door opening might cause an
increase in Energy Consumption.
The internal temperature of the appliance
and the Energy Consumption may be
affected also by the ambient temperature,
as well as location of the appliance.
Temperature setting should take into
consideration these factors. Reduce door
opening to a minimum.
When thawing frozen food, place it in
the refrigerator. The low temperature of
the frozen products cools the food in the
refrigerator.
Allow warm food and drinks to cool down
before placing in the appliance.
Positioning of the shelves in the refrigerator
has no impact on the efcient usage of
energy. Food should be placed on the
shelves in such way to ensure proper air
circulation (food should not touch each other
and distance between food and rear wall
should be kept).
You can increase storage capacity of frozen
food by removing baskets and, if present,
Stop Frost shelf.
Do not worry about noises coming from the
compressor which are normal operation
noises.
The Gulf Conformity Marking on the
product indicates the conformity
with all the requirements of the
Gulf Technical Regulation for Low
Voltage Electrical Equipment and
Appliances BD-142004-01.

8
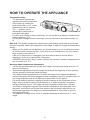
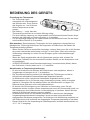
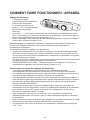
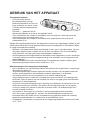
Thermostat setting
• The thermostat automatically
regulates the inside temperature
of the fridge. By rotating the
knob from position 1 to 5, colder
temperatures can be obtained.
• The “
•
“ position shows
thermostat is closed and no
cooling will take place.
• For short-term storage of food in the fridge, you can set the knob between minimum and
medium positions (1-3).
• For long-term storage of food in the fridge, you can set knob to the medium position (3-
4).
Note that: The ambient temperature, temperature of the freshly stored food and how often
the door is opened, affects the temperature in the fridge. If required, change the temperature
setting.
• When you rst switch on the appliance, you should ideally try to run it without any food in
for 24 hours and not open the door. If you need to use it straight away, try not to store a
large quantity of food inside it.
• If the unit is switched off or unplugged, you must allow at least 5 minutes before
restarting in order not to damage the compressor.
• LARDERS (without star rating): Larders (coolers) do not have a freezer compartment but
can cool down to 4 - 6°C.
Warnings about temperature adjustments
• It is not recommended that you operate your fridge in environments colder than 10°C in
terms of its efciency.
• Temperature adjustments should be made according to the frequency of door openings
and the quantity of food kept inside the fridge.
• Your fridge should be operated up to 24 hours according to the ambient temperature
without interruption after being plugged in to be completely cooled. Do not open doors of
your fridge frequently and do not place much food inside it in this period.
• A 5 minute delaying function is applied to prevent damage to the compressor of your
fridge, when you take the plug off and then plug it on again to operate it or when an
energy breakdown occurs. Your fridge will start to operate normally after 5 minutes.
• Your fridge is designed to operate in the ambient temperature intervals stated in the
standards, according to the climate class stated in the information label. We do not
recommend operating your fridge out of stated temperatures value limits in terms of
cooling effectiveness.
• This appliance is designed for use at an ambient temperature within the 16°C - 32°C
range.
HOW TO OPERATE THE APPLIANCE

9
• The fridge is used for storing fresh food for few days.
• Do not place food in direct contact with the rear wall of the refrigerator. Leave some
space around food to allow the circulation of air.
• Do not place hot food or evaporating liquid in the refrigerator.
• Always make sure food is wrapped or stored in closed containers.
• To reduce humidity and avoid formation of frost, never place liquids in unsealed
containers in the refrigerator.
• We recommend that you loosely wrap meat and store it on the glass shelf just above the
vegetable bin, where the air is cooler.
• Store fruit and vegetable items loose in the crisper containers.
• To prevent the cold air escaping, try not to open the door too often, and not leave the
door open for a long time.
FOOD STORAGE IN THE APPLIANCE
• Disconnect the unit from the power supply before cleaning.
• Do not clean the appliance by pouring water.
• Make sure that no water enters the lamp housing and other electrical components.
• The refrigerator should be cleaned periodically using a solution of bicarbonate of soda
and lukewarm water.
• Clean the accessories separately with soap and water Do not clean them in the
dishwasher.
• Do not use abrasive products, detergents or soaps. After washing, rinse with clean water
and dry carefully. When you have nished cleaning, reconnect the plugto the mains
supply with dry hands.
• Clean the condenser with a broom at least twice a year. This will help you to save on
energy costs and increase productivity.
THE POWER SUPPLY MUST BE DISCONNECTED.
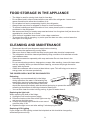
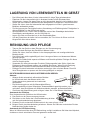
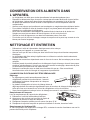
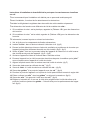
Defrosting
• Defrosting occurs automatically in the fridge
during operation; the water is collected by the
evaporation tray and evaporates automatically.
• The evaporation tray and the water drain hole
should be cleaned periodically with the defrost drain plug to prevent the water from
collecting at the bottom of the fridge instead of owing out.
• You can also clean the drain hole by pouring ½ glass of water down it.
Replacing the light bulb
When replacing the bulb of the fridge;
1. Unplug the unit from the power supply,
2. Press the hooks on the sides of the light cover top
and remove the light cover
3. Change the present light bulb with a new one of
not more than 15 W.
4. Replace the light cover and after waiting 5 minutes plug the unit.
Replacing LED Lighting
If your fridge has LED lighting contact the help desk as this should be changed by
authorized personnel only.
CLEANING AND MAINTENANCE

10
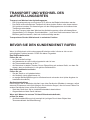
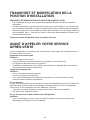
Transportation and changing of Installation position
• The original packages and foamed polystyrene (PS) can be retained if required.
• During transportation, the appliance should be secured with a wide string or a strong
rope. The instructions written on the corrugated box must be followed while transporting.
• Before transporting or changing the installation position, all the moving objects
(ie,shelves,crisper…) should be taken out or xed with bands in order to prevent them
from getting damaged.
Carry your fridge in the upright position.
TRANSPORTATION AND CHANGING OF IN-
STALLATION POSITION
If your fridge is not working properly, it may be a minor problem, therefore check the
following.
The appliance does not operate,
Check if:
• There is a power failure.
• The mains plug is not plugged in properly, or is loose.
• The thermostat setting is on position ““.
• The socket is defective. To check this, plug in another appliance that you know is working
into the same socket.
The appliance performs poorly,
Check if:
• You have overloaded the appliance.
• The door is not closed properly.
• There are not enough ventilation ducts in the kitchen unit as mentioned in the installation
manual.
If there is noise:
The cooling gas which circulates in the fridge circuit may make a slight noise (bubbling
sound) even when the compressor is not running. Do not worry, this is quite normal. If you
hear different sounds, check if:
• The appliance is installed rmly as described in the installation manual.
• Objects on the appliance are vibrating.
If there is water in the lower part of the fridge,
Check if:
• The drain hole for water is not clogged (use defrost drain plug to clean the drain hole).
BEFORE CALLING YOUR AFTER SALES
SERVICE

11
Recommendations
• When there is no power, to prevent any damage to the compressor, you should unplug
the refrigerator. You should delay pluging in 5 – 10 minutes after power is restored.
• If you unplug the refrigerator for any reason you should wait at least 5 min to replug. This
will avoid damage to the refrigerator’s components.
• The cooling unit of your refrigerator is hidden at the rear of the appliance. Therefore,
water droplets or icing may form on the rear surface of your fridge due to the operation
of the compressor at specied intervals. This is normal, there is no need to perform a
defrosting operation unless the icing is excessive.
• If you do not intend to use your fridge for a long time (e.g. in summer holidays), turn the
thermostat to the «
•
» position. After defrosting, clean your fridge and leave the door open
to prevent humidity and smells.
• If the problem persists after you have followed all the instructions above, please consult
to the nearest Authorised Service Centre.
• The appliance you have purchased is designed for domestic use and can only be used
at home and for the stated purposes. It is not suitable for commercial or common use. If
the consumer uses the appliance in a way that does not comply with this, we emphasise
that the manufacturer and the dealer will not be responsible for any repair and failure
within the guarantee period.
Tips for saving energy
1. Install the appliance in a cool, well ventilated room , but not in direct sunlight and not
near a heat source (radiator, cooker ... etc). Otherwise use an insulating plate.
2. Allow warm food and drinks to cool down outside the appliance.
3. Cover drinks or other liquids when placing them in the appliance Otherwise humidity
increases in the appliance. Therefore, the working time gets longer. Also covering drinks
and other liquids helps to preserve smell and taste.
4. Try to avoid keeping the doors open for long periods or opening the doors too frequently
as warm air will enter the cabinet and cause the compressor to switch on unnecessarily
often.
5. Keep the covers of the different temperature compartments (crisper, chiller ... etc ) closed
6. Door gasket must be clean and pliable. Replace gaskets if worn.

12
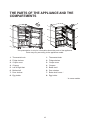
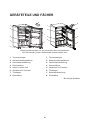
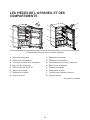
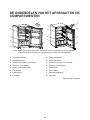
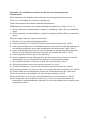
THE PARTS OF THE APPLIANCE AND THE
COMPARTMENTS
1. Thermostat knob
2. Fridge shelves
3. Crisper cover
4. Crispers
5. Left & Right feet
6. Bottle shelf
7. Door shelves
8. Egg holder
1. Thermostat knob
2. Fridge shelves
3. Crisper cover
4. Crispers
5. Bottle shelf
6. Door shelves
7. Butter shelf cover *
8. Egg holder
* In some models
8
2
3
4
5
7
6
1
8
4
3
5
6
2
7
1
This presentation is only for information about the parts of the appliance.
Parts may vary according to the appliance model.

13
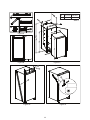
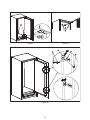
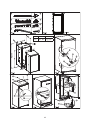
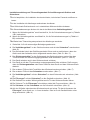
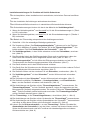
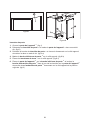
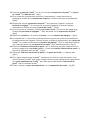
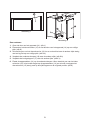
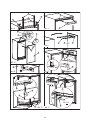
Installation instructions and door reversibility for versions with Rail hinges
! It is recommended that the installation be performed by authorized technical staff
! Before installation, read the instructions carefully.
! Fit the refrigerator/freezer in stable kitchen units only.
! Cabinet dimensions are changed by material of trim ap
1
.
1. If material of trim ap
1
is plastic, look at (Table.1/B1) for cabinet dimensions.
2. If material of trim ap
1
is metal, look at (Table.1/B2) for cabinet dimensions.
! If necessary, reverse the door according to instructions.
1. See g.A for the necessary attachment components.
2. Insert trim ap
1
into slot and screw by screws
6
. (g.D)
3. Pass the power cord through ventilation shaft and position it so that the appliance could
be easily plugged in once it has been installed. (g.B - g.C)
4. Take out the trim gasket
4
located on the side panel of the appliance and stick it on
reverse side of the door hinges of the appliance. (g.D - g.E)
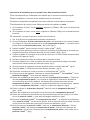
5. Raise the appliance and slide into the kitchen unit.
6. Push the appliance to the reverse side of the door hinges providing that the trim gasket
2
covers the space between the appliance and the kitchen unit.
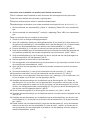
7. Align the front feet with front surface of the kitchen unit. (g.F)
8. Screw the front feet by using screws
5
. (g.F)
9. Screw trim ap
1
to kitchen unit using screws
5
. (g.G)
10. Screw guides
3
to appliance door with screws
6
. (g.H)
11. Lean appliance door to unit door as it is opened at right angle.
12. Slide rails4 into guides
3
aligning the groove. (g.H)
13. Screw the rails
4
to the unit door with screws
5
. (g.H)
14. Set 1~2 mm gap on handle side between unit itself and unit door by adjusting guides
3
.
That is vital for appliance performance. (g.H)

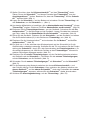
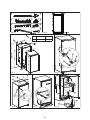
14
Table 1
2
2
1
6
Figure A
Figure B Figure C
Figure D Figure E
mm
A B1 (Plastic) B2 (Metal)
875 875 - 895 875 - 883
Table 1

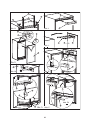
15
Figure GFigure F
Figure H

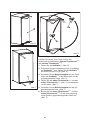
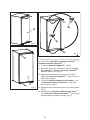
16
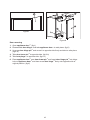
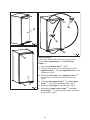
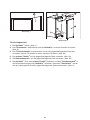
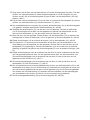
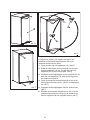
Door reversing
1. Open appliance door
14
. (g.J)
2. Disassemble door hinge
15
and take appliance door
14
to safe place. (g.K)
3. Unscrew door hinge pin
16
and screw it to opposite side rmly and take to safe place.
(g.K.a)
4. Take door lower pin
18
to opposite side. (g.K.b)
5. Take hole plugs
17
to opposite side. (g.K.c)
6. Place appliance door
14
over door lower pin
18
and insert door hinge pin
16
into hinge
hole on appliance door
14
and then screw door hinge
15
rmly onto opposite side of
original position. (g.K)
Figure J
Figure K

17
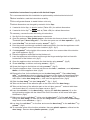
Installation instructions for product with Hettich hinges
! It is recommended that this installation be performed by authorized technical stuff.
! Before installation, read the instructions carefully.
! Fit the refrigerator/freezer in stable kitchen units only.
! Cabinet dimensions are changed by material of trim ap
1
.
1. If material of trim ap
(1)
is plastic, look at (Table.1/B1) for cabinet dimensions.
2. If material of trim ap
(1)
is metal, look at (Table.1/B2) for cabinet dimensions.
! If necessary, reverse the door according to instructions.
1. See g.A for the necessary attachment components.
2. Open the package. Take gasket spacer
(9)
and brake into three as shown in gureD.
Themiddle part is door hang rail
(10)
. The other two parts are unit door spacers
(11)
. (g.D)
3. Insert trim ap
(1)
into slot and screw by screws
(8)
. (g.E)
4. Pass the power cord through ventilation shaft and position it so that the appliance could-
be easily plugged in once it has been installed. (g.B - g.C)
5. Cut trim gasket
(4)
to the height of the recess and stick it on reverse side of the doorhin-
ges of the appliance. (g.E)
6. Raise the appliance and slide into the kitchen unit.
7. Lean the appliance to the kitchen unit through the hinges and align the front feet with
frontsurface of the kitchen unit. (g.F)
8. Open the appliance door and screw the front feet by using screws
(7)
. (g.G)
9. Screw trim ap
(1)
to kitchen unit using screws
(7)
. (g.G)
10. Screw the hinges to the kitchen unit using screws
(7)
. (g.G)
11. Close the appliance door. Unscrew and remove the nuts
(14)
, washers
(13)
and adjustmen-
tbolts
(12)
from the appliance door. (g.H)
12. Remove the liner for the adhesive part on the door hang rails
(10)
. Place door hang
rails
(10)
on theappliance door by inserting the bosses on the holes of the appliance door,
aligning thefront surfaces of the door hang rails(
10)
and the appliance door parallel to
each other. Letthe door hang rails
(10)
, stick onto the appliance door. (g.H)
13. Slide the door hang
(2)
into door hang rails
(10)
. (g.J - g.K)
14. Take out the liners of the adhesive part on the front side of the door hang
(2)
.
15. Take out the liners of the adhesive part on the unit door spacers
(11)
and and stick them
onto theunit door(15), closer to the upper corners. (g.K)
16. Lean the unit door
(15)
to the door hang
(2)
, aligning the unit door spacers(11) on the
left,right and top edges with the sides of the unit or the doors of the nearer and upper
kitchenunits. (g.K)
17. Make sure that the unit door
(15)
sticks onto the door hang
(2)
. Pull the unit door
(15)
al-
lowing the door hang
(2)
to slide out the door hang rails
(10)
. Observe that the door hang
(2)
stays stuck on the unit door
(15)
. (g.L)
18. Lay down the unit door
(15)
on the oor and screw the door hang
(2)
to the unit door
(15)
by
screws
(7)
. (g.L)
19. To overcome some of the furniture mistakes, there are plastic spacers
(A)
sticked on the
door hang
(2)
. Remove these plastic spacers
(A)
. (g.M)

18
20. Remove the door hang rails
(10)
from the appliance door. Screw the adjustment bol-
ts
(12)
to the holes on the appliance door by leaving the necessary space using unit door
spacer
(11)
. (g.N)
21. Open the appliance door. Place the unit door
(15)
onto the appliance door insertingadjust-
ment bolts(12) into the slots on the door hang
(2)
. (g.N)
22. Place the washers
(13)
and screw the nuts
(14)
onto the adjustment bolts
(12)
. (g.N)
23. 1~2 mm gap between the unit itself and unit door is vital for appliance performance.
Close the door and make the accurate adjustment of the unit door
(15)
by screwing orun-
screwing the adjustment bolts
(12)
for vertical adjustment and by the help of the slotson
the door hang
(2)
for other directions. (g.P1)
24. Place the door bottom xings
(5)
to the bottom of the appliance door between theap-
pliance door and unit door
(15)
. Screw the door bottom xings
(5)
to the appliance doorwi-
th screws
(6)
. (g.O)
25. Screw the door bottom xings
(5)
to the unit door
(15)
by screws
(7)
. (g.O)
26. For the adjustment of the space between the unit upper door
(15)
and the unit itself, you-
can unscrew the screws
(6)
then adjust the space between the appliance upper door
(19)
and unit upper door
(15)
by the spring effect of the door bottom xings
(5)
while screwin-
gback the screws
(6)
.
27. Slide the hang cover
(3)
onto the door hang
(2)
. (g.P2)

19
1
2
3
4
5
6
7
8
8
1
8
9
10
11
11
7
7
7
7
mm
A B1 (Plastic) B2 (Metal)
875 875 - 895 875 - 883
Table 1

20
10
14
13
12
10
10
2
215
15
7
2
11
11
12
14
13
12
2
2
3
5
5
6
7
15
11
10
La page est en cours de chargement...
La page est en cours de chargement...
La page est en cours de chargement...
La page est en cours de chargement...
La page est en cours de chargement...
La page est en cours de chargement...
La page est en cours de chargement...
La page est en cours de chargement...
La page est en cours de chargement...
La page est en cours de chargement...
La page est en cours de chargement...
La page est en cours de chargement...
La page est en cours de chargement...
La page est en cours de chargement...
La page est en cours de chargement...
La page est en cours de chargement...
La page est en cours de chargement...
La page est en cours de chargement...
La page est en cours de chargement...
La page est en cours de chargement...
La page est en cours de chargement...
La page est en cours de chargement...
La page est en cours de chargement...
La page est en cours de chargement...
La page est en cours de chargement...
La page est en cours de chargement...
La page est en cours de chargement...
La page est en cours de chargement...
La page est en cours de chargement...
La page est en cours de chargement...
La page est en cours de chargement...
La page est en cours de chargement...
La page est en cours de chargement...
La page est en cours de chargement...
La page est en cours de chargement...
La page est en cours de chargement...
La page est en cours de chargement...
La page est en cours de chargement...
La page est en cours de chargement...
La page est en cours de chargement...
La page est en cours de chargement...
La page est en cours de chargement...
La page est en cours de chargement...
La page est en cours de chargement...
La page est en cours de chargement...
La page est en cours de chargement...
La page est en cours de chargement...
La page est en cours de chargement...
La page est en cours de chargement...
La page est en cours de chargement...
La page est en cours de chargement...
La page est en cours de chargement...
La page est en cours de chargement...
La page est en cours de chargement...
La page est en cours de chargement...
La page est en cours de chargement...
-
 1
1
-
 2
2
-
 3
3
-
 4
4
-
 5
5
-
 6
6
-
 7
7
-
 8
8
-
 9
9
-
 10
10
-
 11
11
-
 12
12
-
 13
13
-
 14
14
-
 15
15
-
 16
16
-
 17
17
-
 18
18
-
 19
19
-
 20
20
-
 21
21
-
 22
22
-
 23
23
-
 24
24
-
 25
25
-
 26
26
-
 27
27
-
 28
28
-
 29
29
-
 30
30
-
 31
31
-
 32
32
-
 33
33
-
 34
34
-
 35
35
-
 36
36
-
 37
37
-
 38
38
-
 39
39
-
 40
40
-
 41
41
-
 42
42
-
 43
43
-
 44
44
-
 45
45
-
 46
46
-
 47
47
-
 48
48
-
 49
49
-
 50
50
-
 51
51
-
 52
52
-
 53
53
-
 54
54
-
 55
55
-
 56
56
-
 57
57
-
 58
58
-
 59
59
-
 60
60
-
 61
61
-
 62
62
-
 63
63
-
 64
64
-
 65
65
-
 66
66
-
 67
67
-
 68
68
-
 69
69
-
 70
70
-
 71
71
-
 72
72
-
 73
73
-
 74
74
-
 75
75
-
 76
76


Indesit I55RM 1110 S 1 Mode d'emploi
- Taper
- Mode d'emploi
- Ce manuel convient également à
dans d''autres langues
- English: Indesit I55RM 1110 S 1 User guide
- Deutsch: Indesit I55RM 1110 S 1 Benutzerhandbuch
- Nederlands: Indesit I55RM 1110 S 1 Gebruikershandleiding
Documents connexes
Autres documents
-
Privileg PRCI 336 Mode d'emploi
-
Telefunken TFEVKS88X10A Le manuel du propriétaire
-
-
 De Dietrich DRL774LJ Une information important
-
VESTEL VEKS3025 Manuel utilisateur
-
-
-
-
 De Dietrich DRP772MJ Le manuel du propriétaire
-

