
1
Model No.
ARK14100
9 PIECE WOVEN HIGH DINING FIRE SET
ITM. / ART. 361198
IMPORTANT, RETAIN FOR FUTURE REFERENCE: READ CAREFULLY
WARNING: If the information in this
manual is not followed exactly, a fire
or explosion may result causing
property damage, personal injury or
loss of life.
Do not store or use gasoline or other
flammable vapors and liquids in the
vicinity of this or any other appliance.
WHAT TO DO IF YOU SMELL GAS.
Do not try to light any appliance.
Do not touch any electrical switch; do
not use any phone in your building.
Immediately call your gas supplier from
a neighbor’s phone. Follow the gas
supplier’s instructions.
If you cannot reach your gas supplier,
call the fire department.
Installation and service must be
performed by a qualified installer,
service agency or the gas supplier
equipment.
Installer: Leave these instructions with
consumer.
Consumer: Keep these instructions for
future reference.
WARNING: Improper installation,
adjustment alteration, service, or
maintenance can cause injury or property
damage. Read the installation, operating,
and maintenance instructions thoroughly
before installing or servicing this
equipment. This appliance must be
installed and the gas cylinder stored in
accordance with the regulations in force.
WARNING: For Outdoor Use Only
FOR USE WITH 5KG PATIO GAS
PROPANE CYLINDER (NOT SUPPLIED)
WITH CLIP-ON CONNECTION OR USE
WITH NATURAL GAS AFTER
CONVERSION KIT (SUPPLIED) IS
INSTALLED.
WARNING: Do Not Burn Wood or any
other materials in this firepit.
WARNING:
USE FACTORY APPROVED
REPLACEMENT PARTS AND
ACCESSORIES ONLY. USE OF
UNAPPROVED PARTS OR
ACCESSORIES CAN VOID THE
WARRANTY ON THIS PRODUCT AND
RESULT IN A HAZARDOUS CONDITION.
PLEASE CONTACT US FOR
INFORMATION REGARDING
REPLACEMENT HOSES,
THERMOCOUPLES, ELECTRODES,
IGNITION MODULES, LAVA ROCKS,
LOGS, ETC.
Conditions for use of the product: This
product is for outdoor use only. Not for
co
mm
e
r
c
i
a
l
use
.
WARNING:
A
parasol shall not be placed on
or shall be used with a se
p
arate base.
Questions, Problems, Missing Parts? Before
returning to your retailer, call our customer
service department in the US and Canada at
1-888-383-1932, Monday-Friday, 9 a.m. – 5
p.m Eastern Time. English and French, or you
may Email [email protected]
International Regions: Please visit
http://www.agio-usa.com/service-center/costco
-international
WARNING: It is UNSAFE to use this product
for cookin
g
!
WARNING: Before placing the burner cover
on, make sure the firepit has been shut off
and the burner has completely cooled
down.
IMPORTANT, RETAIN FOR FUTURE
REFERENCE: READ CAREFULLY

2
TABLE OF CONTENTS
Important Safety Information..........................................................................3
Important Information about Propane ............................................................4
Specification...................................................................................................4
Parts Identification List............................................................................... 5-6
Installation.................................................................................................. 6-7
Natural Gas Conversion............................................................................. 8-9
Batteries.........................................................................................................9
Maintenance ................................................................................................10
Lighting Instructions .....................................................................................10
Burner Cover Assembly ...............................................................................10
Troubleshooting Guide.................................................................................11

3
IMPORTANT SAFETY INFORMATION
The appliance area must be kept clear and free from combustible materials, gasoline, and other
flammable vapors and liquids.
Do not use this appliance if any part has been under water. Immediately call a qualified service
technician to inspect the appliance and to replace any part of the control system and any gas control
which has been under water.
Children and adults should be alerted to the hazards of high surface temperatures and kept
at a safe distance to avoid burns or clothing ignition.
Young children should be carefully supervised when they are anywhere near the appliance.
Clothing or other flammable material should not be hung from the appliance, or placed on or
near the appliance.
Any screen or guard removed for servicing an appliance must be replaced prior to operating
the appliance.
Installation and repair should be done by a qualified service person. The appliance should be
inspected before use and at least annually by a professional service person. More frequent
cleaning may be required as necessary. It is imperative that the control compartments,
burners and circulating air passageways of the appliance be kept clean.
Do NOT burn solid fuels in this gas fireplace.
Do NOT ignite the burner before pouring all of the burner media (fire glass) into the burner pan. The
media must be evenly distributed over the burner.
During initial firing of firepit, please stay away from the firepit for 20 minutes as fire media (fire ice)
may pop and hit someone on the face or eyes.
Do NOT ignite or use the firepit if the burner media (fire glass) are wet. Ensure the burner media are
completely dry before igniting as intense heat could cause the media to crack and pop.
It is UNSAFE to use this product for cooking!
CAUTION: The propane gas pressure regulator provided with this appliance must be used. This
regulator is set for an outlet pressure of 37 mbar.
This outdoor gas appliance is not intended to be installed in or on recreational vehicles and/or boats.
Before each use of this gas appliance, open the LP (Liquid Propane) Tank Drawer and inspect the
LP Hose. If there is evidence of excessive abrasion or wear, or the hose is cut, it must be replaced
prior to the gas appliance being put into operation. Use only the replacement hose assembly
specified in this manual. Inspect the burner before each use of the appliance. The burner must be
replaced prior to the appliance being put into operation if it is evident that the burner is damaged.
Use only the burner listed in these instructions.
Keep the fuel supply hose away from any heated surfaces. Check the tubing or the flexible hose (at
least once per month and each time the cylinder is changed). If it shows signs of cracking, splitting
or other deterioration it shall be exchanged for new hose of the same length and of the equivalent
quality; The tubing or the flexible hose must be changed within the prescribed intervals Shut off the
valve at the gas cylinder or the regulator before moving the appliance Be careful, accessible parts
may be very hot. Keep away from young children
Do Not move the appliance during use.

4
IMPORTANT SAFETY INFORMATION ABOUT
PROPANE (LP) GAS
The cylinder supply system must be arranged for vapor withdrawal.
This appliance shall be used only outdoors in a well-ventilated space and shall not be
used in a building, garage, or any other enclosed space.
When this appliance is not in use, the gas must be turned off at the supply cylinder.
Storage of this appliance indoors is permissible only if the cylinder is disconnected and
removed from the appliance.
Cylinders must be stored outdoors in a well-ventilated area out of the reach of
children .Disconnected cylinders must have protective caps installed and must not be
stored in a building, garage, or any other enclosed areas.
Change the gas cylinder in an amply ventilated area, away from any ignition source
(candle, cigarettes, other flame producing appliances).
Check that the regulator seal is correctly fitted and able to fulfill its function.
Do not obstruct the ventilation holes of the cylinder housing.
Use only the type of gas and the type of cylinder specified by the manufacturer.
In case of violent wind particular attention must be taken against tilting of the appliance.
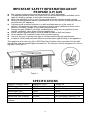
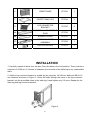
This appliance is for use only with a 5KG Patio Gas Cylinder unless converted for use with
Natural Gas with the provided gas conversion kit. The cylinder must be equipped for a clip-on
regulator. See Figure 1.
Figure 1
SPECIFICATIONS
Appliance Category II2H3P Appliance Type A Country GB
INPUT High Fire Low Fire
Propane(G31) 16 kW 1144 gr per hr. 7.5 kW 536 gr per hr.
Natural Gas (G20) 16 kW 4.0 kW
Propane Regulator Pressure 37 mbar 2.05 mm Injector, Marking: 2.05
Natural Gas Inlet Pressure 20 mbar 3.20 mm Injector, Marking: 3.20
Clearances to combustible
surfaces
Sides 24 in / 60.96 cm Top: 72 in / 182.88 cm

5
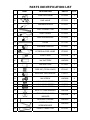
PART DESCRIPTION PART# QTY
A CONTROL KNOB FP2329 1
B GAS VALVE FP3703 1
C THERMOCOUPLE FP2331 1
D FLEX CONNECTOR FP2332 1
E ELECTRODE FP2333 1
F IGNITION MODULE FP2334 1
G CHAIN FP1736 1
H PROPANE ORIFICE FP2205 1
I LP REGULATOR HOSE FP2025 1
J FOOT CAPS FC0759 8
K “AA” BATTERY HW0905 1
L AIR SHUTTER FP1922 1
M FIRE ICE (TOTAL:12KG) FP2147 3
N NATURAL GAS ORIFICE FP2511 1
O M4 SCREW HW0898 4
P 1/4" X 20 MM SCREW HW0036 8
Q 1/4" X 30 MM SCREW HW0038 4
R 1/4" X 35 MM SCREW HW0142 4
S Ø6.5 X 1.0 MM WASHER HW0004 8
T
Ø20 X Ø6.5 X 2.0 MM
WASHER HW0594 8
U HEX BOLT DRIVER HW0252 1
V
CROSS POINT
SCREWDRIVER HW0900 1
W FIREPIT TABLE TOP FP3732 1
PARTS IDENTIFICATION LIST

6
X
FIREPIT BASE FP3733 1
Y
FIREPIT TABLE LEG FP3734 2
Z
LEG CONNECTOR
BRACKET FP3735 2
AA
BURNER PAN PROTECTIVE
RING FP3736 1
BB BURNER COVER FP3737 1
CC
FIREPAN/BURNER
ASSEMBLY FP3738 1
DD ORIFICE HOLDER FP3573 1
INSTALLATION
1. Carefully unpack all items from the box. Place the base in the final position. There must be a
minimum of 60.96 cm / 24 inches of clearance from the side of the table top to any combustible
walls.
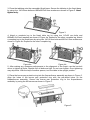
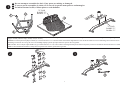
2. Attach a leg connector bracket to a table leg by using two 1/4"x20 mm bolts and Ø6.5x1.0
mm washers as shown in Figure 2. Guide the bolts through the holes in the leg connector
bracket, into the pre-drilled holes in the table leg. Hand tighten only 2-3 turns. Repeat for the
other leg and leg connector bracket.
Figure 2

7
3. Place the tabletop onto the assembled firepit base. Secure the tabletop to the firepit base
by using four 1/4"x20mm bolts and Ø20xØ6.5x2.0mm washers as shown in Figure 3. Hand
tighten only.
Figure 3
4. Attach a complete leg to the firepit table top by using two 1/4"x35 mm bolts and
Ø20xØ6.5x2.0mm washers as shown in Figure 4a. Repeat for the other complete leg. Attach
a complete leg to the firepit base by using two 1/4"x30 mm bolts and Ø6.5x1.0mm washers as
shown in Figure 4b. Repeat for the other complete leg.
Figure 4a Figure 4b
5. After making any necessary adjustments to the alignment of the firepit, use the hex bolt
driver to tighten all bolts. Repeat until all bolts are tight. Do not over tighten. Over tightening
may strip bolts. With the help of another person, turn the table in the upright position.
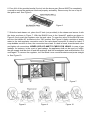
6. Place the burner pan protective ring into the firepan/burner assembly as shown in Figure 5.
Align the holes in the burner pan protective ring with the pre-drilled holes on the
firepan/burner assembly. Secure the burner pan protective ring to the firepan/burner
assembly by using the M4 screws as shown in Figure 5.
Figure 5

8
6. Pour ALL of the provided media (fire ice) into the burner pan. Burner MUST be completely
covered to ensure the appliance functions properly and safely. Remove any fire ice on top of
the ignition well. See Figure 6.
Figure 6
7. Slide the tank drawer out, place the LP tank (not provided) in the drawer and secure it with
the chain as shown in Figure 7. With the BLACK lever in the “down/off” position as shown in
Figure 8, firmly push the regulator onto the tank valve. To open the valve, lift the BLACK lever
and turn the handle 90° clockwise to the “ON” position. See Figure 9. Apply a solution of soapy
water to the tank-regulator connection and to the valve-hose connection to check for leaks. If
soap bubbles continue to form, the connection has a leak. If a leak is found, close the tank valve
and tighten all connections. NEVER USE A FLAME TO CHECK FOR LEAKS. In case of gas
leakage; for instance, in the event of gas leakage, the appliance shall not be used or if alight,
the gas supply shall be shut off and the appliance shall be investigated and rectified before it is
used again. To remove the regulator, turn the Black Lever counterclockwise and press straight
in. See Figure 10.
Figure 7
Figure 8 Figure 9 Figure 10

9
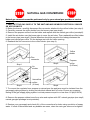
Natural gas conversion must be performed only by your natural gas provider or service
company.
1. SHUT OFF THE GAS SUPPLY TO THE UNIT AND ANY NEARBY ELECTRICAL SOURCE
OR APPLICANCES
2. Below the burner, carefully disconnect flex connector attached to the orifice holder (see step1).
3. Carefully unscrew the orifice holder from the burner pipe (see step2).
4. Remove the propane orifice from the holder and replace with the natural gas orifice (see step2).
5. Install the air shutter over the burner pipe to cover the air holes. Then reattach the orifice holder
to the burner pipe (see step3). Special attention should be payed to the leakage between the
holder and natural gas orifice. Do the leakage test with the valve opening.
6. Reattach the flex connector to the orifice holder. (see step 4).
7. To convert the regulator from propane to natural gas, the appliance must be isolated from the
gas supply piping system by closing its individual manual shut off valve. Ensure any pressure
testing of the gas supply piping system is at test pressure equal to or less than 1/2 psi(3.5KPA)
8. Remove the propane rubber hose from valve and replace with 5/8” natural gas pipe (see step5,
natural gas pipe package is not provided).
9. Restore your gas supply and check ALL of the connections for leaks using a solution of soapy
water. If a leak is discovered and any bubbles are seen, close the main gas valve and re-tighten
Flex
connector
Orifice
holder
Propane
orifice
(2.05mm)
Air
shutter
NaturalGas
orifice
(3.2mm)
Step1 Step2
Step3 Step4

10
ALL the connections. NEVER USE A FLAME TO CHECK FOR GAS LEAKS!
Step5
10. Stick the conversion label on the rating plate as shown in Figure 11.
Metal Rating Plate
Conversion Label
BATTERIES
Make sure the control knob is in the "OFF" position. Unscrew the
push button cap on the ignition module located on the control
panel to access the battery compartment. The ignition module
requires one Alkaline AA size battery. The negative (-) end goes in
first. See Figure 12. Dispose of the battery safely as it may
explode or leak if charged or disposed of in a fire. Make sure of the
polarity. Mercury and cadmium free.
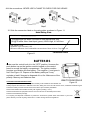
CAUTIONS: BATTERY INSTRUCTIONS
●Always purchase the correct size and grade of battery most suitable for the intended use.
●Always replace the whole set of batteries at one time, taking care not to mix old and new ones, or batteries of different types.
●Clean the battery contacts and also those of the device prior to battery installation.
●Ensure the batteries are installed correctly with regard to polarity (+ and -).
●Remove batteries from equipment which is not to be used for an extended period of time.
●Remove used batteries promptly.
For recycling and disposal of batteries to protect the environment, please check the internet or your local
phone directory for local recycling centers and / or follow local government regulations.
Figure 12
Serial Number _________________ Model Number: ARK14100
PIN: 0063CT7348
Appliance Type A Country: GB
Minimum clearance from combustible constructions: Rear: 60.9 cm. Top 182.8 cm.
This appliance has been converted to use Natural Gas G20.
2H @ 20 mBar Nom. Heat Input (gross) 16KW High, 4.0 kW Low
Figure 11

11
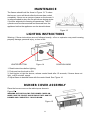
MAINTENANCE
The flames should look like those in Figure 13. To clean
the burner, use a soft brush after the burner has cooled
completely. Never use a vacuum cleaner on the burner. It
is recommended to store the fire pit indoors during winter
if it will be subjected to freezing temperatures. The LP
cylinder must be disconnected and removed from the
appliance before the appliance can be stored indoors.
Figure 13
LIGHTING INSTRUCTIONS
Warning: If these instructions are not followed exactly, a fire or explosion may result causing
property damage, personal injury, or loss of life.
1. Read instructions before lighting.
2. Push and turn the knob to ON.
3. Hold ignitor to light the burner, release control knob after 15 seconds; if burner does not
light , wait 5 minutes ,repeat.
4. Adjust flame to desired flame with the control knob. See Figure 14.
BURNER COVER ASSEMBLY
Place the burner cover on the table top as shown in
Figure15.
WARNING: BEFORE PLACING THE BURNER COVER ON,
MAKE SURE THE FIREPIT HAS BEEN SHUT OFF AND THE
BURNER HAS COMPLETELY COOLED DOWN.
Figure 15
IGNITER BUTTON CONTROL KNOB
Figure 14

12
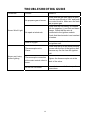
TROUBLESHOOTING GUIDE
PROBLEM CAUSE REMEDY
No propane gas at burner
Check that the gas tank valve is open.
Turn the control knob to “ON” and push
the control knob in. Make sure the tank
has propane gas.
No spark at electrode
Check that the AA battery is installed
with the negative (-) end first and has a
charge. Check that the wire is
connected to the ignition module.
Check that the electrode is not cracked
or broken.
Burner Won’t Light
Lack of oxygen Remove excess fire ice from around
the ignition well.
Thermocouple not in
Flame
Check that the tip of the thermocouple
is even with the top of the ignition well.
Remove any fire ice from the ignition
well.
Thermocouple connection
at the main control valve is
loose.
Tighten the thermocouple nut at the
back of the valve.
Burner won’t stay
lit after lighting
No fire ice on burner Cover the burner with fire ice per the
instructions.

13
1) For use outdoors or in amply ventilated areas.
2) An amply ventilated area must have a minimum of 25% of the surface area open.
3) The surface area is the sum of the walls surface.
The hose should comply with the standard EN16436;
The regulator should comply with the standard EN16129;
Close the gas supply at the valve of the gas cylinder or the regulator after use;
Do not connect the gas cylinder directly to the appliance without the regulator;
The recommended cylinder size is-max diameter: 310mm, max height: 400mm.
Manufacturer:
Agio International Corporation
900 E Hamilton Ave, Suite 100, Campbell, CA 95008, USA
Importer :
Costco Wholesale UK Ltd /
Costco Online UK Ltd
Hartspring Lane
Watford, Herts
WD25 8JS
United Kingdom
01923 213113
www.costco.co.uk
MADE IN CHINA
FABRIQUÉ EN CHINE
HECHO EN CHINA

MADE IN CHINA
CARE AND MAINTENANCE
SPECIAL WARNINGS
FRAMES
Cleaning
Maintenance
- Use mild soap and warm water. Do not use abrasive materials, cleansers or
bleach products. Rinse with clean water and dry thoroughly.
- Periodically clean and dry thoroughly. Be sure to drain any water
accumulated inside the frames. To thoroughly drain frames, remove foot caps and tilt the
frames, if necessary, to remove all water. This is critical. Water allowed to accumulate
inside the frames and then exposed to sub-freezing temperatures can cause damage to the
frame tubing. Such damage is not covered under warranty. Always clean, drain and dry
thoroughly before storing for the winter. For best results, always store or cover your
furniture when not in use.
** When cleaning or moving large or heavy items, always have two people work
together. Never drag furniture.
THIS ITEM IS INTENDED FOR OUTDOOR DOMESTIC USE ONLY, NOT FOR
COMMERCIAL USE.
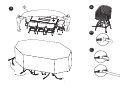
Furniture covers are a great way to protect your set from harsh elements of weather and
UV light. However, it is important to ensure furniture and covers are free of moisture and
debris before covering. It is also necessary to promptly uncover furniture after rain and
during periods of high humidity to prevent moisture build up. Failure to do so can lead to
permanent surface and finish damage.
9 PIECE WOVEN HIGH DINING FIRE SET
ITM. / ART. 361198
1
Agio International Corporation
900 E. Hamilton Avenue,
Suite 100, Campbell,
CA 95008, USA
IMPORTANT,
RETAIN FOR FUTURE
REFERENCE: READ
CAREFULLY
PATIO FURNITURE
ASSEMBLY INSTRUCTIONS
MISSING PARTS OR DAMAGED PARTS?
Please call our customer service
or contact email address at [email protected]
CUSTOMER SERVICE HOURS ARE 9:00AM - 5:00PM
MONDAY - FRIDAY EST.
International Regions:
Please visit http://www.agio-usa.com/service-center/costco-international/
or contact email address at [email protected]
FOR ADDITIONAL SUPPORT ON CARE AND MAINTENANCE OF
YOUR AGIO OUTDOOR FURNITURE PLEASE VISIT OUR WEBSITE
AT: www.agio-usa.com/service-center/maintenance/
US & Canada : 1-888-383-1932 (English and French)
A1K00411
ARK14100

IMPORTANT INFORMATION ABOUT CLAY AND PORCELAIN TILE
Clay / Porcelain Tabletop
About Clay / Porcelain Tile
Care and Maintenance
Clay / Porcelain Tile is a material that is compressed and heated at high temperatures.
Though the material is stain resistant, the grout is porous and could stain. Your tabletop
has been sealed and protected with a specially formulated, high quality sealer to
minimize staining.
The tabletop can retain heat depending on the outside temperature. In sunny hot weather
conditions, care should be exercised when touching the tabletop.
Your tabletop is protected with our specially formulated factory sealer that offers a high
level of protection from all stains and acidic liquids and should not break down over
time or with normal outdoor use.
The tabletop should not require frequent reapplication of sealer to maintain its durability
and the sealer can be easily repaired if it becomes scratched or damaged. However,
should you choose to seal your tabletop, you should use only the sealer that was applied
to your tabletop during its factory production.
Chemical formulations of sealer products vary and could be incompatible with the sealer
that was originally used on your tabletop. Using any sealer other than our factory sealer
might produce undesirable results and will void any applicable warranty. Before you
reseal your tabletop or to obtain our factory sealer, please visit our website at www.agio-
usa.com/claycare or www.agio-usa.com/porcelaincare or call our Customer Service
Center in the US and Canada at 1-888-383-1932.
Cleaning
Spills
Recommendations
Clay and porcelain are virtually maintenance free. Just keep the table clean with mild
soap and water to keep mold & mildew from forming. Simply use clean water and mild
dish soap. Clean the tabletop with a soft, clean, white cloth or sponge.
Never use scouring creams, abrasive cleansers, acids, or petroleum based products.
Rinse with plenty of clean water to remove soap residue. Dry thoroughly after cleaning
to prevent buildup of any residue from minerals that might be present in your water,
even with softened water.
Accidental spills should be cleaned immediately even though your tabletop is sealed.
Wipe spills with a clean, soft white cloth. Rinse with clean, warm water and dry
thoroughly. The special factory sealer forms a protective barrier that will minimize
potential damage to the tabletop by allowing more clean-up time for accidental spills.
To help protect the sealer, use coasters and placemats when dining. Coasters will help
absorb sweating by beverage containers and prevent hot containers such as mugs from
leaving rings. Placemats will catch spills and prevent dishes from scratching the sealer if
dragged across the tabletop. Use trivets or hot pads between dishes and the tabletop to
minimize rapid heat transfer. The tabletop can rapidly draw heat from a hot dish and
potentially crack the dish. Cover your dining set with an outdoor furniture cover when
not in use.
For additional and more detailed information on clay / porcelain tabletop care, sealing
the tabletop or to repair damages, visit our website at www.agio-usa.com/claycare or
www.agio-usa.com/porcelaincare or call our Customer Service Center in the US and
Canada at 1-888-383-1932.
2

SOINS ET ENTRETIEN
AVERTISSEMENTS SPÉCIAUX!
CADRES
:
CET ARTICLE EST CONÇU UNIQUEMENT POUR UNE UTILISATION NON
COMMERCIALE À L'EXTÉRIEUR.
Nettoyage
Entretien
utiliser un savon doux et de l’eau tiède. Ne pas utiliser d’abrasifs, de
détergents, ou d’agents de blanchiment. Rincer à l’eau claire et bien sécher.
: périodiquement, nettoyer et sécher soigneusement. Bien drainer toute l’eau
accumulée dans les cadres. Pour ce faire, enlever le capuchon de pattes et incliner les
cadres, si nécessaire, pour en faire sortir toute l’eau. Ceci est très important. L’eau qui
s’accumule dans les cadres, puis est exposée à des températures sous zéro, peut
endommager les tubes des cadres. De tels dommages ne sont pas couverts par la garantie.
Toujours nettoyer, drainer et sécher soigneusement avant d’entreposer pour l’hiver. Pour
de meilleurs résultats, toujours entreposer ou recouvrir le mobilier qui n’est pas utilisé.
Il est recommandé que deux personnes nettoient ou bougent les articles lourds ou
encombrants. Ne jamais traîner le mobilier.
Les couvre-meubles sont un excellent moyen de protéger votre ensemble de meubles de
patio des éléments climatiques et des rayons UV. Par contre, il est important de s’assurer
que les couvertures et les meubles sont exempts de moisissures et de débris avant de les
couvrir. Il est aussi nécessaire de rapidement découvrir les meubles après la pluie et
durant les périodes de grande humidité afin de prévenir l’accumulation de moisissure.
Sinon, cela pourrait mener à des dommages permanents des surfaces et des finis.
9 PIECES ENSEMBLE EN OSIER DE
RÉSINE TRESSÉ AVEC BRASÉRO
ITM. / ART. 361198
3FABRIQUÉ EN CHINE
Agio International Corporation
900 E. Hamilton Avenue,
Suite 100, Campbell,
CA 95008, USA
IMPORTANT,
À CONSERVER POUR DE
FUTURS BESOINS DE
RÉFÉRENCE : À LIRE
SOIGNEUSEMENT
INSTRUCTIONS D’ASSEMBLAGE POUR
MOBILIER DE PATIO
/
DES PIÈCES MANQUENT OU SONT ENDOMMAGÉES?
Veuillez communiquer avec notre service à la clientèle
Au Canada et aux États-Unis, téléphoner au 1-888-383-1932
ou envoyer un courrier électronique à [email protected].
HEURES D’OUVERTURE DU SERVICE À LA CLIENTÈLE :
9hà17h(HNE) DU LUNDI AU VENDREDI.
Régions internationales :
Veuillez visiter http://www.agio-usa.com/service-center/costco-international/
ou contacter via l'adresse courriel [email protected].
POUR UN SOUTIEN VIDÉO ADDITIONNEL À L’ASSEMBLAGE, POUR
RÉSOUDRE DES PROBLÈMES OU POUR L’ENTRETIEN DU MATÉRIEL DE
PATIO AGIO, SE RENDRE SUR NOTRE SITE WEB :
www.agio-usa.com/service-center/maintenance (en anglais seulement)
A1K00411
ARK14100

4
INFORMATIONS IMPORTANTES SUR
Vos carreaux de terre cuite / Porcelaine
Les carreaux de terre cuite / porcelaine
Soins et entretien
La terre cuite / porcelaine est un matériau comprimé et chauffé à haute température.
Bien que le matériau soit résistant aux taches, le joint est poreux et pourrait être taché.
Votre plateau de table a été scellé et protégé par un joint spécialement conçu et de grande
qualité qui devrait minimiser la formation de taches.
Le plateau de table peut retenir la chaleur en fonction de la température à l’extérieur.
Lors de journées ensoleillées et chaudes, faire preuve de prudence lorsque l'on touche le
plateau de table.
Votre plateau de table est protégé grâce à un scellant d’usine spécialement préparé à cet
effet. Ce produit offre une protection élevée contre les taches et les liquides acides sans
se décomposer avec le temps ou un usage normal à l’extérieur.
Le plateau de table ne nécessite pas d'application régulière de produit d'étanchéité pour
maintenir sa durabilité et le joint peut être facilement réparé s'il est rayé ou endommagé.
Cependant, si vous choisissez rejointoyer votre table, vous devez utiliser uniquement le
même type de joint que celui qui a été appliqué à votre table lors de sa production en
usine.
Les formules chimiques peuvent varier d’un joint à l’autre et être incompatibles avec le
joint d’origine utilisé pour votre plateau de table. Le fait d’utiliser un joint autre que
celui de l’usine pourrait donner des résultats non souhaités et annulera toute garantie
applicable. Avant de rejointoyer votre plateau de table ou pour obtenir le joint de l’usine,
veuillez visiter le site Web www.agio-usa.com/claycare ou
www.agio-usa.com/porcelaincare ou contacter le Centre de service à la clientèle aux
États-Unis et au Canada en composant le 1 888-383-1932.
Nettoyage
Déversements
Recommandations
La terre cuite / porcelaine n’exige à peu près pas d’entretien. Il suffit de nettoyer la table
avec du savon doux et de l’eau pour prévenir la formation de moisissures et de
champignons. Passer sur la table un chiffon blanc, doux et propre ou bien une éponge.
Ne jamais utiliser de crème à récurer, de nettoyant corrosif, d’acide ou de produit à base
de pétrole. Rincer avec beaucoup d’eau propre pour enlever les traces de savon. Sécher
complètement après le nettoyage pour prévenir la formation de résidus provenant de
minéraux éventuels contenus dans l’eau, même s’il s’agit d’une eau purifiée.
Même si le plateau de la table est scellé, les déversements accidentels devraient être
nettoyés immédiatement. Essuyer les éclaboussures avec un linge blanc doux et propre.
Rincer à l'eau chaude propre et sécher soigneusement. Le joint spécial de l’usine forme
une couche protectrice qui minimisera les dommages éventuels causés à la table, en
laissant plus de temps pour nettoyer les déversements.
Au moment des repas, utiliser des sous-verres et des napperons afin de protéger le joint.
Les sous-verres aideront à absorber la condensation provenant des boissons et à
empêcher que des récipients chauds (comme les tasses) laissent des traces sur la table.
Les napperons protégeront contre les déversements et empêcheront que les plats rayent
le plateau si on les glisse dessus.
Utiliser des dessous de plat ou des chauffe-plats entre la vaisselle et le plateau de table
pour minimiser le transfert rapide de chaleur. Le plateau de table peut rapidement aspirer
la chaleur d'un plat chaud et potentiellement le fissurer. Couvrir la table d'une housse
pour meubles d'extérieur lorsqu'elle n'est pas utilisée.
Pour supplémentaire et plus d'information détaillée sur le soin de table d'argile /
porcelaine, le scellant la table ou la réparation de dommages, visiter notre site Web :
www.agio-usa.com/claycare ou www.agio-usa.com/porcelaincare ou téléphoner à notre
service à la clientèle à les États-Unis et Canada au 1-888-383-1932.

5
CUIDADO Y MANTENIMIENTO
ADVERTENCIAS ESPECIALES
ARMAZONES
ESTE ARTÍCULO ESTÁ DISEÑADO SOLAMENTE PARA USO DOMÉSTICO
EN EXTERIORES, NO PARA USO COMERCIAL.
Limpieza
Mantenimiento
- Use un jabón suave y agua tibia. No utilice materiales abrasivos, limpiadores o
productos con blanqueador. Enjuague con agua limpia y seque por completo.
- Limpie periódicamente y seque bien. Asegúrese de vaciar el agua
acumulada dentro del armazón. Para vaciar los armazones, retire las tapas de las patas e
incline los armazones, si es necesario, para sacar toda el agua. Esto es importante. Si se
permite que se acumule el agua dentro de los armazones y luego se exponen a
temperaturas de congelación, puede ocasionar un daño a la tubería del armazón. Tal daño
no lo cubre la garantía. Siempre limpie, vacíe y seque bien antes de almacenar durante el
invierno. Para mejores resultados, siempre guarde o cubra el mueble cuando no lo use.
** cuando limpie o mueva artículos grandes y pesados, siempre deben hacerlo entre dos
personas. Nunca arrastre el mueble.
Las fundas para muebles son una forma estupenda de proteger su conjunto de las
inclemencias del tiempo y de la luz UV. Sin embargo, es importante asegurarse de que los
muebles y las fundas estén libres de humedad y residuos antes de cubrirlos. Además, es
necesario destapar los muebles rápidamente después de la lluvia o durante periodos con
mucha humedad para evitar que se acumule. Si no lo hace, puede dañar permanente la
superficie y el acabado.
9 PIEZAS JUEGO DE COMEDOR
ALTO Y TEJIDO CON FOGÓN
ITM. / ART. 361198
HECHO EN CHINA
Agio International Corporation
900 E. Hamilton Avenue,
Suite 100, Campbell,
CA 95008, USA
IMPORTANTE:
CONSERVE PARA FUTURA
REFERENCIA. LEA
CUIDADOSAMENTE
INSTRUCCIONES DE ENSAMBLE DE
MUEBLES PARA PATIO
HORARIO DE SERVICIO AL CLIENTE DE 9:00 a.m. – 5:00 p.m.
(HORA DEL ESTE) LUNES - VIERNES
(TELÉFONOS Y SERVICIOS NO VÁLIDOS EN ESPAÑA)
Regiones internacionales:
Por favor vista http://www.agio-usa.com/service-center/costco-international/
o envíe un correo electrónico a [email protected]
PARA SOPORTE ADICIONAL EN VIDEO SOBRE EL ENSAMBLE, SOLUCIÓN
DE PROBLEMAS, CUIDADO Y MANTENIMIENTO DEL MUEBLE AGIO PARA
EXTERIORES, VISITE NUESTRA PÁGINA WEB EN:
www.agio-usa.com/service-center/maintenance
¿PARTES DAÑADAS O FALTANTES?
Favor de llamar a nuestro servicio al cliente
E.U.A. y Canadá :1-888-383-1932
o enviar un correo electrónico a [email protected].
A1K00411
ARK14100

6
INFORMACIÓN IMPORTANTE ACERCA DE LOS AZULEJOS DE
CERÁMICA (ARCILLA) Y DE PORCELANA
Superficies de Mesa de Cerámica (arcilla)
y Porcelana
Acerca de los azulejos de cerámica (arcilla) y de porcelana
Cuidado y mantenimiento
Los azulejos o losetas de cerámica (arcilla) y de porcelana son materiales que están comprimidos
y calentados a altas temperaturas.
Aunque la cerámica (arcilla) y la porcelana son resistentes a las manchas, la lechada es porosa y
podría mancharse. La superficie de la mesa ha sido sellada y protegida con un sellador de alta
calidad especialmente formulado para minimizar las manchas.
La superficie de la mesa puede conservar el calor dependiendo de la temperatura del exterior. En
condiciones de clima cálido y soleado, se debe tener cuidado al tocar la superficie de la mesa.
La superficie de la mesa, ya sea de cerámica (arcilla) o de porcelana, está protegida con nuestro
sellador de fábrica especialmente formulado que ofrece un alto nivel de protección contra todas
las manchas y líquidos ácidos y no debe acabarse con el tiempo o con el uso normal en exteriores.
La superficie de la mesa no debería requerir que se aplique con frecuencia el sellador para
mantener su durabilidad y el sellado se puede reparar fácilmente si se raya o daña. Sin embargo,
si elije sellar la superficie de la mesa, debe usar sólo el sellador que se le aplicó a la superficie de
cerámica (arcilla) o porcelana durante su producción en fábrica.
Las fórmulas químicas de los productos selladores varían y pueden ser incompatibles con el
sellador que se utilizó originalmente en la superficie de la mesa. Utilizar un sellador diferente a
nuestro sellador de fábrica puede producir resultados indeseables y anulará cualquier garantía
aplicable. Antes de volver a sellar la superficie de la mesa o de obtener nuestro sellador de
fábrica, visite nuestra página web en o
llame a nuestro Centro de Servicio al Cliente en los E.U.A y Canadá al 1-888-383-1932.
(TELÉFONO Y SERVICIOS NO VÁLIDOS EN MÉXICO)
por favor, www.agio-usa.com/service-center/maintenance/
Limpieza
Derrames
Recomendaciones
La cerámica (arcilla) y la porcelana están virtualmente libres de mantenimiento. Sólo mantenga la
mesa limpia con jabón suave y agua para evitar la formación de moho. Simplemente use agua
limpia y jabón lavaplatos suave. Limpie la superficie de la mesa con un paño blanco suave y
limpio o con una esponja. Nunca use cremas para tallar, limpiadores abrasivos, ácidos o
productos a base de petróleo. Enjuague con abundante agua para retirar los residuos de jabón.
Seque bien después de limpiar para evitar la formación de residuos de minerales que puedan estar
presentes en el agua, incluso en el agua blanda.
Los derrames accidentales deben limpiarse de inmediato aunque la superficie de la mesa, tanto de
cerámica (arcilla) o porcelana estén selladas. Limpie los derrames con un paño blanco limpio y
suave. Enjuague con agua limpia y tibia y seque bien. El sellador especial de fábrica forma una
barrera protectora que minimizará el daño potencial de la superficie de la mesa permitiendo así
mantenerse limpia durante más tiempo en caso de derrames accidentales.
Para ayudar a proteger el sellador, use portavasos y manteles individuales cuando coma. Los
portavasos ayudarán a absorber la humedad de los recipientes con bebidas y a prevenir las marcas
que los recipientes calientes tales como tarros pueden dejar. Los manteles individuales captarán
derrames e impedirán que los platos rayen el sellador si se arrastran por la superficie de la mesa.
Use salvamanteles o almohadillas para recipientes calientes entre los platos y la superficie de la
mesa para minimizar la transferencia rápida de calor. La superficie de la mesa puede extraer
rápido el calor de un plato caliente y quebrar potencialmente el plato. Cubra el juego de comedor
con una funda para muebles de exteriores cuando no lo use.
Importado por: Importadora Primex S.A. de C.V. Blvd., Magnocentro No. 4,
San Fernando La Herradura, Huixquilucan, Estado de México, C.P. 52765,
RFC: IPR-930907-S70, Tel: 52 46 55 00, www.costco.com.mx
Para obtener información adicional y más detallada acerca de los cuidados para las superficies de
mesa de cerámica (arcilla) y de porcelana, sellando la superficie de mesa, o la reparación de
daños, por favor visite nuestro sitio web en o
llame a nuestro Centro de Servicio al Cliente en los Estados Unidos y Canadá al teléfono 1-888-
383-1932. (TELÉFONO Y SERVICIOS NO VÁLIDOS EN MÉXICO)
www.agio-usa.com/service-center/maintenance/

7
*The furniture cover (J) is designed to protect your investment from the elements and will repel water. Please note the cover is not 100% waterproof and moisture may seep in if allowed to collect.
*La housse de protection (J) est conçue pour protéger le mobilier et repoussera l'eau. Il faut toutefois noter qu'elle n'est pas entièrement imperméable et que de l'humidité pourrait suinter si on laisse l'eau s'accumuler.
*La cubierta de los muebles (J) está diseñada para proteger su inversión de la intemperie y repelerá el agua. Observe que la cubierta no es 100% a prueba de agua y la humedad se puede filtrar si se deja acumular
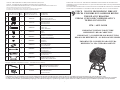
9PIECE WOVEN HIGH DINING FIRE SET
PIÈCES ENSEMBLE EN OSIER DE RÉSINE
TRESSÉ AVEC BRASÉRO
PIEZAS JUEGO DE COMEDOR ALTO Y
TEJIDO CON FOGÓN
QTY
QTÉ
CANT
A
B
C
D
E
F
G
H
I
J
DESCRIPTION
DESCRIPTION
DESCRIPCIÓN
ALLEN WRENCH-1
CLÉ HEXAGONALE-1
LLAVE ALLEN-1
FOOT CAP
CAPUCHON DE PIED
TAPA DE LA PATA
(43 MM) SCREW
(43 MM) VIS
(43 MM) TORNILLO
FACTORY ASSEMBLY ( )ASSEMBLÉ EN USINE ENSAMBLADA DE FÁBRICA
K
L
HW0450
HW0008
HW0007
HW0015
HW0003
HW0847
1
1
1
2
4
4
4
1ALLEN WRENCH-2
CLÉ HEXAGONALE-2
LLAVE ALLEN-2
4
RONDELLE À RESSORT
ARANDELA DE RESORTE
SPRING WASHER
CHAIR FRAME
CADRE DE LA CHAISE
ESTRUCTURA DE LA SILLA
SWIVEL BASE
BASE PIVOTANTE
BASE GIRATORIA
NUT
TUERCA
ÉCROU
"U" METAL PLATE
PLAQUE DE MÉTAL
PLACA DE METAL
The parts shown on parts list are for one single chair.
Les parties qui sont affichées sur la liste des pièces sont pour une seule chaise.
Las piezas que se muestran en la lista de piezas son para una sola silla.
FOOTREST COVER
COUVERTURE DE REPOSE PIEDS
CUBIERTA DE LOS REPOSAPIÉS
4
1FURNITURE COVER
HOUSSE DE PROTECTION
CUBIERTA DEL MOBILIARIO
ZZK03512
FC0880
HW0005
4RONDELLE
ARANDELA
WASHER
ITM. / ART. 361198
IMPORTANT, RETAIN FOR FUTURE
REFERENCE: READ CAREFULLY
IMPORTANT, À CONSERVER POUR DE FUTURS
BESOINS DE RÉFÉRENCE : À LIRE SOIGNEUSEMENT
IMPORTANTE: CONSERVE PARA FUTURA
REFERENCIA. LEA CUIDADOSAMENTE
MAKE SURE YOU HAVE ALL THE PARTS & HARDWARE AS IDENTIFIED ON THE PARTS LIST
VÉRIFIER QUE TOUTES LES PIÈCES ET LA QUINCAILLERIE SONT BIEN TELLES QU'IDENTIFIÉES SUR LA
LISTE DES PIÈCES
LEA ATENTAMENTE ESTE MANUAL ANTES DE USAR O ENSAMBLAR EL PRODUCTO ASEGÚRESE DE
TENER TODAS LAS PARTES YACCESORIOS COMO SE IDENTIFICAN EN LA LISTA DE PIEZAS
*NOTE:PARTSSHOWNONPARTSLISTARENOTTOSCALE.
* NOTE : LES PIÈCES ILLUSTRÉES NE SONT PAS À L'ÉCHELLE.
*NOTA: LAS PIEZAS MOSTRADAS EN LA LISTA DE PIEZAS NO ESTÁN A ESCALA.
PARTS LIST
ZAS
LISTE DES PIÈCES
LISTA DE PIE
ORDER PART #
NUMÉRO DE LA PIÈCE
#PIEZA DEL PRODUCTO
AS0155
AS0156
G0363
La page est en cours de chargement...
La page est en cours de chargement...
La page est en cours de chargement...
-
 1
1
-
 2
2
-
 3
3
-
 4
4
-
 5
5
-
 6
6
-
 7
7
-
 8
8
-
 9
9
-
 10
10
-
 11
11
-
 12
12
-
 13
13
-
 14
14
-
 15
15
-
 16
16
-
 17
17
-
 18
18
-
 19
19
-
 20
20
-
 21
21
-
 22
22
-
 23
23


dans d''autres langues
- English: Costco ARK14100 User guide
- español: Costco ARK14100 Guía del usuario
Autres documents
-
American Hearth OL48TP, OL60TP Le manuel du propriétaire
-
Elementi OFP101BB Le manuel du propriétaire
-
-
 RST Brands OP-PSCLB5MFT-GY-K Mode d'emploi
-
VonHaus 2500555 Manuel utilisateur
-
YOTRIO 5 Piece Motion Fire Chat Set Fire Pit Assembly Instructions
-
-
-
Signature P556-772 Manuel utilisateur
-
Lynx Fire Pit Manuel utilisateur
