NiteRider 6797 Lumina Max 2500 Front Bike Light Mode d'emploi

Taper
Mode d'emploi
USER GUIDE
Federal Communication Commission Compliance
Lumina™ Max - FCC ID: 2AXZQ-24632
This equipment has been tested and found to comply with the limits for
a Class B digital device, pursuant to Part 15 of the FCC Rules. These limits
are designed to provide reasonable protection against harmful interference
in a residential installation.
This equipment generates, uses and can radiate radio frequency energy
and, if not installed and used in accordance with the instructions, may
cause harmful interference to radio communications. However, there is no
guarantee that interference will not occur in a particular installation.
If this equipment does cause harmful interference to radio or television
reception, which can be determined by turning the equipment o and on,
the user is encouraged to try to correct the interference by one of the
following measures:
• Reorient or relocate the receiving antenna.
• Increase the separation between the equipment and receiver.
• Connect the equipment into an outlet on a circuit dierent from that
to which the receiver is connected.
• Consult the dealer or an experienced radio/TV technician for help.
FCC CAUTION:
TO ASSURE CONTINUED COMPLIANCE, ANY CHANGES OR
MODIFICATIONS NOT EXPRESSLY APPROVED BY THE PARTY
RESPONSIBLE FOR COMPLIANCE COULD VOID THE USER’S AUTHORITY
TO OPERATE THIS EQUIPMENT. (EXAMPLE - USE ONLY SHIELDED
INTERFACE CABLES WHEN CONNECTING TO COMPUTER
OR PERIPHERAL DEVICES).
FCC Radiation Exposure Statement
This equipment complies with FCC RF radiation exposure limits set forth
for an uncontrolled environment. This equipment should be installed and
operated with a minimum distance of 20 centimeters between the radiator
and your body.
This transmitter must not be co-located or operating in conjunction with
any other antenna or transmitter.
The antennas used for this transmitter must be installed to provide a
separation distance of at least 20 cm from all persons and must not be
co-located or operating in conjunction with any other antenna or transmitter.
This device complies with Part 15 of the FCC Rules.
Operation is subject to the following two conditions:
(1) This device may not cause harmful interference, and (2) This device
must accept any interference received, including interference that may
cause undesired operation.
Industry Canada Compliance
Lumina Max - (P/N 24632), IC: 26701-24632
This device complies with Industry Canada licence-exempt RSS standard.
Operation is subject to the following two conditions: (1) this device may
not cause interference, and (2) this device must accept any interference,
including interference that may cause undesired operation of the device.
Le présent appareil est conforme aux CNR d’Industrie Canada applicables
aux appareils radio exempts de licence. L’exploitation est autorisée aux deux
conditions suivantes : (1) l’appareil ne doit pas produire de brouillage, et (2)
l’utilisateur de l’appareil doit accepter tout brouillage radioélectrique subi,
même si le brouillage est susceptible d’en compromettre le fonctionnement.
IC Radiation Exposure Statement
This equipment complies with IC RSS-102 radiation exposure limit set
forth for an uncontrolled environment. This equipment should be
installed and operated with minimum distance 20cm between
the radiator and your body.
Cet équipement est conforme aux CNR-102 d’Industrie Canada. Cet
équipement doit êtreinstallé et utilisé avec une distance minimale de 20
centimètres entre le radiateur et votrecorps. Cet émetteur ne doit pas être
co-localisées ou opérant en conjonction avec autreantenne ou émetteur.
Les antennes utilisées pour cet émetteur doivent être installés etfournir une
distance de séparation d’au moins 20 centimètre de toute personne et doit
pas être co-située ni fonctionner en conjonction avec une autre antenne ou
émetteur.
VeriR Integrated NFC Technology
The Lumina™ Max is equipped with integratred NFC Technology.
Tap your mobile device on the VeriR Logo located on the top
of the light to launch the NiteRider® VeriR experience.
Within the NiteRider® VeriR experience you can quickly and easily:
• Learn how to unlock/lock your light
• Register your product
• Access How to / User Guides
• Report your light lost or stolen
LUMINAMAX 2500 USER GUIDE - ENGLISH
UNLOCK BEFORE USE. LOCK THE HEADLAMP BEFORE TRANSIT OR
STORAGE
It is important to lock the headlamp and protect the switch from being
pressed while it is in transit. The headlamp can be easily turned on if placed
in something like a backpack, duel bag or suitcase. The headlamp gets hot
while in operation. To prevent potential damage from high heat or even re, it
is very important to put the headlamp in lock mode and protect the switch
from being pressed. NiteRider® will not be held responsible for damages
to person or property resulting from a failure to follow the ‘lock’ mode
instructions.
WARNING
A bicycle without correct lights and reectors might be dicult for other
people to see, and you might not be able to see. If you can not see, or other
people can not see you, you could have an accident. Make sure your lights
operate correctly and that batteries are charged.
WARNING !!HOT SURFACES!!
DO NOT USE THE LUMINA™ MAX AS A HAND HELD LIGHTING DEVICE
WHEN IN HIGH AND BOOST MODES!
PARTS LIST AND IDENTIFICATION
Please verify the contents of your Lumina™ Boost lighting system:
A. Lumina™ Max Front Light
B. Handlebar Clamp Mount
C. USB-C Charging Cable
D. AC Charging Adapter
MOUNTING THE HANDLEBAR CLAMP MOUNT AND HEAD LIGHT
The Handlebar Clamp Mount (HCM) is designed to t on virtually any
handlebar (25.4mm - 35mm diameter handlebars).
1. Turn the knob counter-clockwise, allowing the hinge to swing open.
2. Place the HCM on the handlebar on the left side of the stem,
orienting the mounting rails with release tab towards rear.
3. Swing the hinge down to make contact with the handlebar.
4. Swing the bolt up, seating the knob into its recess.
5. Turn the knob clockwise to tighten and secure the mount to the handlebar.
RELEASE TAB MOUNTING RAILS
SWITCH #1SWITCH #2
MOUNTING THE HEAD LIGHT ONTO THE HANDLEBAR CLAMP MOUNT
With the light facing forward, align bottom mounting rails of light to top of
rails of HCM. Pull light back along the rails until tabs engage and lock into
place. Test for a secure tment by pushing light forward, ensuring there is no
movement and that tabs have engaged into the light base. Do not push the
release tab when testing for a secure tment.
To remove the head light, press the release tab down and slide the head light
forward.
Note: After mounting the headlamp, adjust it so the beam illuminates your
path without distracting oncoming riders.
OPERATION
Note: The unit can operate in Walk and Low Mode while charging.
1. For the initial power ON, the light will need to be unlocked.
Press and hold any single button for 8-10 seconds to unlock.
2. A single press of power button switch #1 button will power ON in High
Mode. To power ON in Low Mode, press power button switch #2.
3. To increase power, press power button switch #1. To decrease power,
press power button switch #2. Steady light mode settings are in the following
order WALK, LOW, MEDIUM, HIGH, AND BOOST.
A. Walk Mode is indicated by a slow pulse yellow LED
in the LED switch.
B. Low Mode is indicated by a steady yellow LED light
in the LED switch.
C. Medium Mode is indicated by a steady green LED light
in the LED switch.
D. High Mode is indicated by a steady blue LED light
in the LED switch.
E. Boost Mode is indicated by a steady red and blue LED light
in the LED switch.
4. To access ash modes, press and hold any power button switch
for 3 seconds until the light begins to ash.
A. Cycle through 3 ash modes by pressing power button
switch #1 or #2.
B. Flash mode is indicated by a blue LED light in the LED power
button switch that mimics the selected ash pattern.
C. To return to steady light modes, press and hold any power
button switch for 3 seconds until steady ON light appears.
CHARGE TIMES
6:00 hours at 500mA
3:00 hours at greater than 500mA
*Charge times may very.
OPTIMAL VIZ WITH NITERIDER®
While a NiteRider® lighting system will improve your view and visibility,
control and enjoyment of riding, please remember that cycling can be an
inherently dangerous activity. In addition to using your lighting system
properly and riding with extreme caution, NiteRider® urges you to:
• Obey your local trac laws
• Always let someone know where you are going
• Wear a helmet, highly visible and reective clothing
• Carry an auxiliary light and emergency supplies
• Make sure the headlamp and mounting bracket are securely fastened
• Always set your light to lock mode during transport or storage
PROTECTING YOUR INVESTMENT
Properly charge your battery to maximize its lifespan (see the “Battery
Charging and Care” section for detailed information).
The Lumina™ Max will perform in wet weather conditions, but submerging it
in water will damage the system. To prevent water damage, ensure USB port
cover remains tightly sealed while operating your light.
SUPPORT
If you experience diculties during product installation or operation,
NiteRider® provides free telephone support on weekdays from 8:00 am to
4:30 pm (Pacic Time) at 800.466.8366, Ext 4.
You may also e-mail us at support@niterider.com.
WARRANTY
NiteRider® stands behind its products with the following warranties:
• Lifetime warranty: Covers any defects in material and workmanship,
mechanical components (housings, covers, mounts and fasteners) and LEDs
• 2-year warranty: Printed circuit boards, switches, and AC adapters
• 1-year Warranty: Rechargeable battery cells
To obtain warranty service have your original sales receipt.
Contact the NiteRider® Customer Service Department at 800.466.8366, Ext.
4 to obtain a Return Merchandise Authorization (RMA) number. The RMA
number must be prominently displayed on the outside of your package.
The product must be properly packaged to prevent damage in transit.
For International customers, please contact your local NiteRider® Distributor.
Go to: niterider.com/pages/international-distributors
For complete warranty information, please visit our website
vat www.NiteRider.com
5. To power o the light, press and hold any power button switch
until light turns o.
6. To lock / unlock light, press and hold power button for 8-10 seconds.
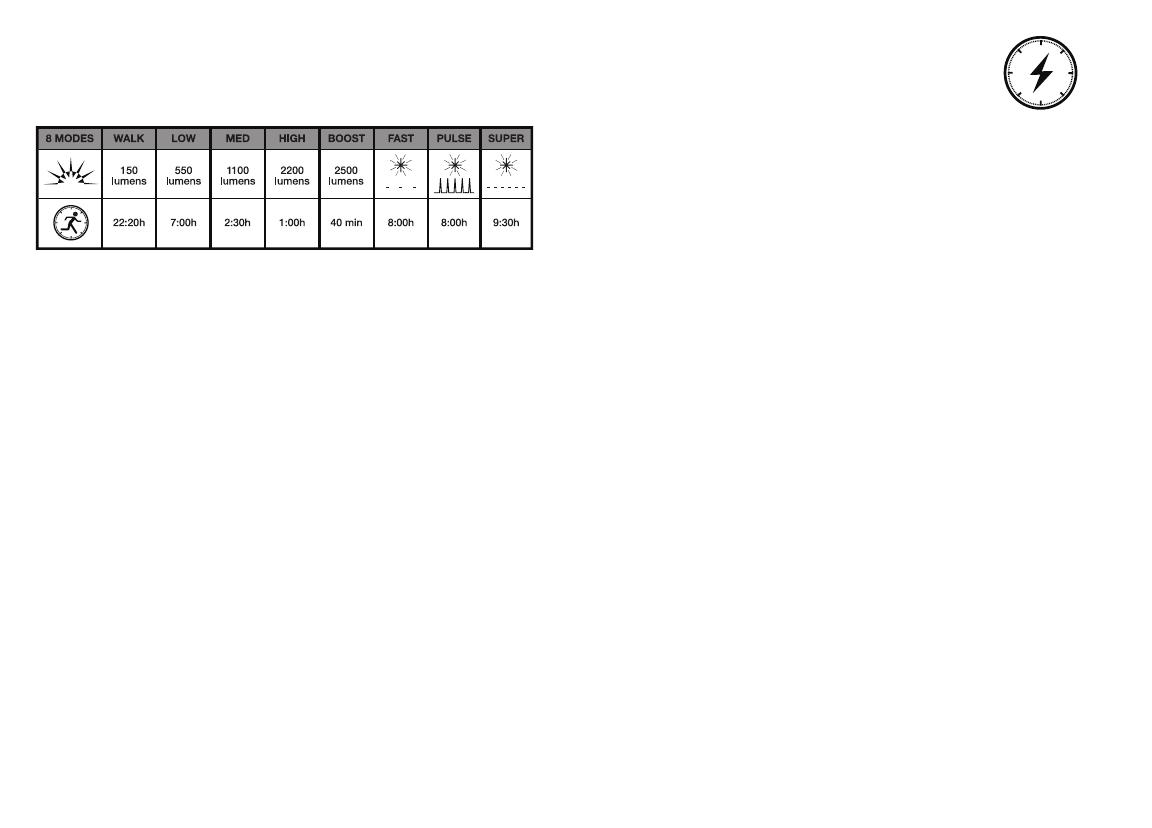
RUN TIMES
8-STEP FUEL GAUGE
The 8-step, LED Fuel Gauge is located on top of the headlamp in front of the
power button. When all four LED’s are lit solid green, the battery is fully charged.
As the battery discharges ⅛ increments of capacity, the LED’s from right to left,
successively go from solid green to blinking green, to out. With only the nal ⅛
capacity remaining one LED blinks red. At this time, the headlamp should be
turned o and the battery recharged.
BATTERY CHARGING AND CARE
1. Plug the USB Charging Cable into the USB port located on the bottom of the
light. Then plug the other end into a powered-on computer or directly to
a wall outlet using an AC adapter (not included).
2. The 8-step fuel gauge will indicate the progress of the charging,
starting at whatever state the battery is at when it is plugged into
the charger. When the battery is fully charged, all 4 green LEDs of the fuel gauge
with light-up steady ON, until the charging adapter is removed.
3. Unplug the AC Adapter from the light by grasping the connectors rather than
the cable.
4. It is good practice to store your light away with a full charge.
For extended periods, charge the light every three months
to maximize its lifespan.
PAIRING WITH OTHER NITELINK™ DEVICES
To pair with any NiteRider® NiteLink™ BLE Short Range Wireless device press
and hold BOTH power buttons switch #1 and switch #2 for 2 seconds and the
BLE Short Range Wireless device will begin scanning for 120 seconds for other
NiteRider® NiteLink™ BLE Short Range Wireless devices that are in pairing
mode. When the device is in pairing mode and scanning, the Blue LED indicator
will ash On 3 seconds, repeating for 120 seconds or until the device connects
with another device. When the device connects with another device then the
Blue LED will turn On Steady for 120 seconds, or until the device is turned ON
if the device is turned ON before 120 seconds.
www.NITERIDER.com
YOUR SAFETY IS OUR PRODUCT
  • Page 1 1
  • Page 2 2
  • Page 3 3
  • Page 4 4
  • Page 5 5

NiteRider 6797 Lumina Max 2500 Front Bike Light Mode d'emploi

Taper
Mode d'emploi