
©Copyright LOTRONIC 2017 1
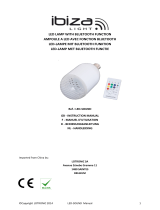
ACTIVE COLUMN TYPE SOUND SYSTEM 2 x 12"/30cm 1000W
ENCEINTE ACTIVE TYPE PUPITRE 2 x 12”/30cm 1000W
AKTIVES BESCHALLUNGSPULT 2 x 12”/30cm 1000W
ACTIEVE GELUIDZUIL 2 x 12”/30cm 1000W
SISTEMA DE SOM ATIVO 2 x 12”/30cm 1000W
AKTIVNI ZVOČNIŠKI SISTEM 2 × 12”/30cm 1000W
BAFLE ACTIVO TIPO PUPITRE 2 x 12”/30cm 1000W
SISTEM DE SUNET 2 × 12”/30cm 1000W
Ref.: STANDUP-PRODJ
GB – Instruction Manual
F – Manuel d’Utilisation
D – Bedienungsanleitung
NL – Handleiding
SI – Navodila za uporabo
PT – Manual de instruções
ES – Manual de instrucciones
RO –Manual de utilizare
Imported from China by
LOTRONIC SA
Avenue Zénobe Gramme 9
1480 Saintes
Belgium

©Copyright LOTRONIC 2017 2
Explanation of signs
The triangle containing a lightning symbol is used to indicate whenever your health is at risk (due to electrocution, for
example).
An exclamation mark in a triangle indicates particular risks in handing or operating the appliance.
The hand symbol refers to useful tips and additional information on using the appliance.
Important Safety instructions and danger warnings
• Please read the manual carefully and keep it for future reference.
• All safety instructions and warnings must be adhered to. They are part of the manual and must be kept with the manual.
• Any guarantee claims are rendered invalid if damage occurs due to non-observance of these operating instructions. We
assume no liability for any consequent damage.
• We assume no liability for personal injury or damage to property caused by incorrect handling or non-observance of the safety
instructions. Any guarantee claims expire in such cases.
• Unauthorized conversions and/or modifications of the appliance are not permitted for safety and licensing reasons (CE).
• The appliance is approved for operation in dry, closed rooms only. Do not operate the device nearby water, such as in
bathrooms or nearby swimming pools.
• The appliance may not be exposed to extreme temperatures (< +5°C / > +35°C) in operation.
• The appliance may not be subjected to strong vibrations or heavy mechanical strain.
• The appliance may not be exposed to excessive moisture (due to dripping or sprayed water, for example).
• Do not place any recipients filled with liquids, such as glasses or vases, on top of or directly next to the appliance. They could
fall over, causing water to enter the appliance. Never pour out liquids above the appliance. Do not place any small objects,
such as coins or paper clips, on the appliance since they could fall inside the appliance. You run a high risk of causing a fire or
life-threatening electrocution! If any liquid or objects enter the appliance nevertheless, pull the mains plug out of the socket
immediately and contact a specialist.
• The appliance has been constructed according to protection class ll (only for double insulated units without earth terminal).
• 230 Vac/50 Hz mains socket may be used as source of power for the appliance. Never try to operate the appliance with any
other voltage.
• Only pull the mains plug out of the socket by the intended gripping surface. Do not pull it by the cable.
• Never plug the mains plug in or out with damp or wet hands.
• Always pull the mains plug out of the mains socket:
Before cleaning the appliance
If there is a thunderstorm
If you will not be using the appliance for a long period of time (>1 week)
• Electrical appliances must be kept out of the reach of children. Be particularly careful if children are present. Children are not
aware of the hazards involved in handing electrical appliances improperly. Children could attempt to poke objects into the
appliance. There is a life-threatening danger of electrocution.
• Do not leave the appliance unattended while operating it.
• Never place the appliance on an unstable or movable surface. Persons could be injured or the appliance damaged by it falling
down.
• When using a rack, make sure it is in a stable position and is transported securely. Installation on uneven, slanted surfaces or
stopping the rack abruptly during transport can result in the rack overturning or appliances falling from or out of the rack and
injuring people.
• Live components can be exposed by opening covers or removing components (unless this can be done without tools). Contact
points can also be live. If the appliance has to be opened in order to calibrate, service, repair or replace components or
assemblies, all of its poles must be disconnected from all sources of voltage first. If the appliance has to be kept open and
under voltage during maintenance or repairs, this work may only be carried out by a specialist who is familiar with the risks
involved and the relevant regulations.
GB

©Copyright LOTRONIC 2017 3
• Never connect the appliance directly after transferring it from a cold to a warm room. The condensation water that forms
could destroy the appliance or result in an electric shock. Allow the device to reach room temperature before connecting it.
Wait until the condensation water has evaporated. This can take some hours.
• Do not place any naked flames such as those of burning candles on or next to the appliance.
• Do not place the appliance on soft surfaces such as carpets or beds. Do not cover the air vents of the appliance. Do not
obstruct the air circulation with objects such as magazines, table cloths or curtains. This prevents the dissipation of heat from
the appliance and can result in overheating.
• Only use the appliance in a moderate climate, not in tropical environments.
• All persons involved in operating, installing and servicing the appliance and putting it into service must be trained and
qualified accordingly and observe these operating instructions.
• Defective mains cables may only be replaced by specialists. Danger of shock hazard!
• Do not leave the packaging material lying around carelessly since it can become a source of danger for children playing with
it.
• The accident prevention regulations and the regulations of the employers’ liability insurance association should be observed
at commercial institutions.
• If you are not sure about the correct connection or if questions arise which are not answered by the operating instructions,
please do not hesitate to contact support or a specialist of your choice. Consult a specialist if you are in doubt the operating
principle or the safety of the product.
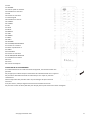
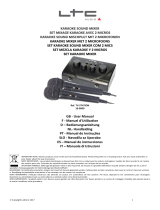
FEATURES
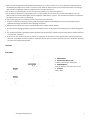
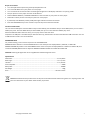
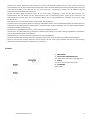
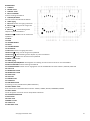
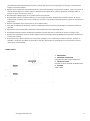
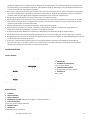
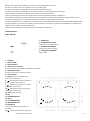
REAR PANEL
1. FM ANTENNA
2. AUX A AUDIO INPUT JACK
Connect to AUX A signal output jack.
3. POWER SWITCH
Press this switch to turn the unit on or off.
4. AC INPUT
230V~, 50Hz.

©Copyright LOTRONIC 2017 4
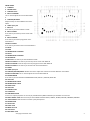
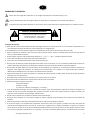
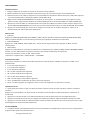
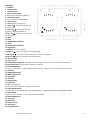
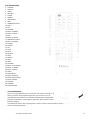
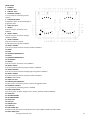
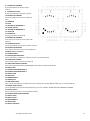
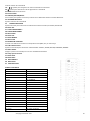
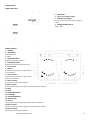
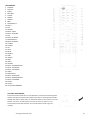
FRONT PANEL
1. STANDBY
2. REVERB effect
3. SCRATCH mode
4. INPUT A VOLUME
This is used to adjust the volume with INPUT
A
5. SCRATCH/DJ EFFECT
Adjust this key to choose different DJ music
effect.
6. USB A input jack
7. INPUT A
Press this key to choose INPUT A mode
8. INPUT A PREV
Press this key to choose previous music with
INPUT A
9. INPUT A PAUSE
Press this key to choose play/pause music
with INPUT A
10. INPUT A NEXT
Press this key to choose next music with INPUT A
11. MUTE
12. ECHO
13. MICROPHONE 1 VOLUME
14. DELAY
15. MICROPHONE 2 VOLUME
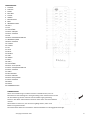
16. LED DISPLAY
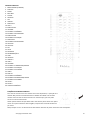
17. INPUT B: Press this key to choose INPUT B mode.
18. INPUT B PREV: Press this key to choose previous music with INPUT B
19. INPUT B PAUSE: Press this key to choose play/pause music with INPUT B
20. INPUT B NEXT: Press this key to choose next music with INPUT B
21. MENU
22. USB B input jack
23. SCRATCH/VOLUME/MULTI: Rotate the knob to adjust the volume and choose different music effect.
24. INPUT B VOLUME: This is used to adjust the volume with INPUT B
25. PHONES MODE
Press this key to choose different EARPHONES mode, INPUT A, INPUT B, INPUT AB
26. YEA mode
27. MICROPHONE 2 JACK
28. MICROPHONE 1 JACK
29. LASER mode
30. USE mode
31. MARVEL mode
32. CLUB mode
33. PORTABLE IN JACK
Connect an output (earphone or line out) of portable device (MP3 or PMP etc) to the PORT. IN connector.
34. PARTY EFFECT mode: Press this key to choose different PARTY effect, THRUST, ALARM, VECTOR, FIREWORK, RAINING
35. PARTY EFFECT: Slide the lever to create a party atmosphere
36. PHONES JACK
37. GEYA mode
38. PROC mode
39. BRING IT mode
40. YEAT mode
41. BEAT BOX mode

©Copyright LOTRONIC 2017 5
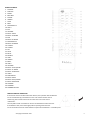
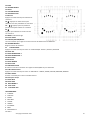
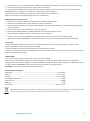
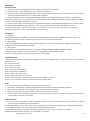
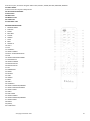
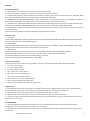
REMOTE CONTROL
1. STANDBY
2. SCRATCH
3. DRUM
4. BEAT BOX
5. X DRIVE
6. TREBLE+
7. LIGHT
8. BASS-
9. DISCONNECT A
10. AUX A
11. BT A
12. VOLUME-
13. INPUT A NEXT
14. INPUT A B.WARD
15. BT B
16. INPUT B F.WARD
17. DISCONNECT B
18. INPUT B B.WARD
19. TUNING+
20. TUNING-
21. FM
22. AUTO
23. MUTE
24. REVER B
25. YEAH
26. TREBLE+
27. BASS+
28. USB-A
29. VOLUME+
30. INPUT A PLAY/PAUSE
31. INPUT A F.WARD
32. INPUT A PREVIOUS
33. USB-B
34. PORTABLE IN
35. INPUT B NEXT
36. INPUT B PLAY/PAUSE
37. INPUT B PREVIOUS
38. CHANNEL-
39. CHANNEL+
40. NUMBER BUTTON
REMOTE CONTROL OPERATION:
If the remote control conflicts with other devices, the operation will be affected.
Do not simultaneously press buttons on the unit and the remote control.
Avoid using two remote controls at the same time as this will cause a
malfunction.
Use only UM-4 "AAA" size batteries. Do not mix old batteries with new ones.
If the batteries leak, clean thoroughly before replacing with new ones.
Do not short two terminals of the batteries. Dispose of old batteries in a suitable place.

©Copyright LOTRONIC 2017 6
OPERATION
Normal Function
1. Be sure to switch off the power and to connect to corresponding input jacks.
2. Turn on the power and wait 3-4 seconds till the speaker functions are connected.
3. Select an audio source by pressing the INPUT A key on the front panel to display FM,AUX A, USB A, BT-A. Press the INPUT B
key on the front panel to display AUX B, USB B, BT-B.
4. Adjust the SCRATCH/VOLUME/MULTI knob on the front panel or the VOL+/- key on the remote control to adjust the setting
of the main volume. Then turn the left push shot to adjust the volume of INPUT A, turn the right push shot to change the volume
of the INPUT B.
5. Press the LIGHT button on the remote control or press the LIGHT button on the front panel to display light mode, then press
the SCRATCH/VOLUME/MULTI knob to change the OFF, R,G, B,RG,RB,GB,RGB, AUTO,DEMO light mode.
6. Press the MUTE key on the panel or remote to mute, press it again to reset.
Press the X Drive on the panel or remote to turn on/off X-Bass effect.
Sound Effect
1. DJ EFFECT
Press SCRATCH, REVB, B.BOX, YEAH, BRING IT, PROC, GEYA on the front panel, or select SCRATCH, REVER B, BEAT BOX, YEAH on
the remote control, then turn the big knob to get the corresponding DJ effects.
2. MUSIC EFFECT
Press “CLUB, MARVEL, USER, LASER, YEAH” on the front panel, then turn the big knob to get the corresponding Music effects.
3. PARTY EFFECT
Press “PARTY EFFECT” on the front panel to select THRUST, ALARM, VECTOR, FIREWORK, RAINING.
Push the PARTY EFFECT rod. At the MAX position, you will get the corresponding PARTY EFFECT.
When you pull the rod back to OFF, the PARTY EFFECT will turn off.
Light color control
To control the light modes coming from the speaker panels by pressing the "MENU" button on the front panel or LIGHT on the
remote control.
• R = red lights flash
• G = green lights flash
• B = blue lights flash
• RG = red and green lights flash
• RB = red and blue lights flash
• GB = green and blue lights flash
• RGB = red, green, and blue lights flash
• Auto = the various color combinations cycle through and flash.
• Demo = lights flash and change color as if they were responding to the beat of the music.
Tuner applications
1. Before using the radio functions, you must attach the supplied antenna. Adjust the antenna to obtain optimum reception.
Press the INPUT A key on the top control panel or the FM key on the remote control, to select "FM" function.
2. Press the CH+/CH- key on the remote control to find radio bands that you have previously saved.
3. Press or hold the TU+/TU- key on the remote control to adjust the radio frequency manually.
4. Press the AUTO key on the remote control, the machine will scan radio channels from low-frequency to high-frequency by
itself and memorize the channels one by one.
KARAOKE function
1. The machine can auto detect whether MIC 1 or MIC2 is inserted. Please turn off the microphone volume and adjust the
volume gradually after inserting the microphone.
2. Press VOL+/- on the remote or adjust the MIC.VOL knobs on the front panel to change the microphone VOLUME.
3. Adjust the ECHO knob on the front panel to change the microphone ECHO.
Note: Do not touch the top of the microphone when singing in order to avoid howling effect.
Adjust the microphone volume gradually to avoid howling effect.

©Copyright LOTRONIC 2017 7
BT pair and connect
• Turn off any BT devices previously paired (linked) with this unit.
• Turn on the BT features on your phone or music player.
• Turn on and set this unit to BT mode. The flashing blue light BT on LED display indicates it is in pairing mode.
• Set your phone or music player to search for BT devices.
• Select STANDUP-PRODJ A / STANDUP-PRODJ B from search results on your phone or music player.
• Select OK or YES to pair this unit with your phone or music player.
• If protected, enter 0000 for passkey steady blue light indicates successful connection.
• Press the DISCONNECT key on the remote or top control panel to disconnect the BT.
Function of USB reader
This unit has two USB jacks. Press the INPUT A key to select USB A, press the INPUT B key to select USB B, then you can insert a
USB to play music. Press the INPUT B key to select USB B, then you can insert the other USB to play music.
When two USB inserted at the same time, you can play music at the same time.
Important: The USB port is intended only for data transfer only, other devices cannot be used with this USB connection. The use
of USB extension cords is not recommended.
HEADPHONE JACK
For private listening, insert a 3.5mm earphone into the PHONE JACK.
PHONES OUTPUT selection. Press the PHONES button on the front panel to display INPUT A, INPUT B, or INPUT AB.
PHONES VOLUME adjustment. Press the PHONES button on the front panel to display INPUT A or INPUT B or INPUT AB, then
rotate the VOLUME/MULTI knob to adjust the PHONES VOLUME of INPUT A or INPUT B or INPUT AB.
CAUTION: Listening At High Power For A Long Moment Could Damage User’s Ears.
Specifications
Subwoofer ...................................................................................................................... 2 x 12”/30cm
Mid-range ....................................................................................................................... 2 x 3”/7.6cm
Tweeter .......................................................................................................................... 1 x 1”/25mm
Class B amplifier ......................................................................................................................... 500W
Max power ............................................................................................................................... 1000W
Net weight ................................................................................................................................... 24kg
Dims .......................................................................................................................... 45 x 40 x 115cm
IMPORTANT NOTE: Electric products must not be put into household waste. Please bring them to a recycling centre. Ask
your local authorities or your dealer about the way to proceed.

©Copyright LOTRONIC 2017 8
CAUTION / ATTENTION/ACHTUNG /
RISK OF ELECTRIC SHOCK – DO NOT OPEN
RISQUE DE CHOC ELECTRIQUE - NE PAS OUVRIR
STROMSCHLAGGEFAHR – NICHT ÖFFNEN
RISC DE SOC ELECTRIC – NU DESCHIDETI
MANUEL DE L’UTILISATEUR
L’éclair dans le triangle attire l’attention sur un danger physique (due à une électrocution p.ex.).
Le point d’exclamation dans le triangle indique un risque dans la manipulation ou l’utilisation de l’appareil.
Le symbole de la main attire l’attention sur des conseils utiles ou des informations supplémentaires sur l’utilisation de cet
appareil.
Consignes de sécurité
• Nous déclinons toute responsabilité pour des dommages aux biens et aux personnes dus à une mauvaise manipulation ou le
non-respect des consignes de sécurité. Le droit de garantie ne s’applique pas.
• Des modifications non-autorisées de l’appareil sont interdites pour des raisons de sécurité et de licence (CE).
• Utiliser uniquement à l’intérieur dans une pièce sèche et fermée. Ne pas utiliser à proximité d’eau tel que dans une salle de
bains ou à proximité d’une piscine.
• Ne pas exposer l’appareil à des températures extrêmes (<+5°C / >+35°C)pendant le fonctionnement.
• Tenir à l’abri des vibrations fortes et des contraintes mécaniques.
• Tenir à l’abri de l’humidité extrême (due à de l’eau pulvérisée p.ex.)
• Ne pas poser de récipients remplis de liquides tels que des verres ou des vases, sur ou à proximité immédiate de l’appareil. Ils
risquent de tomber et de déverser le liquide dans l’appareil. Ne jamais verser de liquides au-dessus de l’appareil.
• Ne pas placer de petits objets tels que des pièces ou des trombones sur l’appareil car ils risquent de tomber à l’intérieur de
l’appareil. Vous risquez de provoquer un incendie ou une électrocution. Si un liquide ou un objet pénètre dans l’appareil,
débranchez immédiatement la prise secteur et contactez votre revendeur.
• L’appareil fait partie de la classe de protection ll. L’appareil doit être alimenté en 230V~ 50Hz. Ne jamais essayer d’alimenter
l’appareil avec une autre tension.
• Pour débrancher la fiche secteur, tirez toujours sur la fiche, jamais sur le cordon.
• Ne jamais brancher ou débrancher la fiche secteur avec des mains mouillées.
• Débranchez toujours l’appareil du secteur:
- avant de le nettoyer
- pendant un orage
- en cas de non-utilisation prolongée (>1 semaine)
• Tenir des appareils électriques hors de la portée des enfants. Soyez particulièrement vigilants en présence d’enfants. Les
enfants ne sont pas conscients du danger d’un appareil électrique. Ils pourraient essayer d’insérer un objet à l’intérieur de
l’appareil ce qui représente un grave danger d’électrocution.
• Ne pas laisser l’appareil sans surveillance pendant son fonctionnement
• Ne jamais placer l’appareil sur une surface instable ou mobile. L’appareil risque de blesser une personne ou de s’abîmer en
tombant.
• L’arrêt brutal pendant le transport peuvent faire basculer le rack en faisant tomber l’appareil.
• En ouvrant le boîtier, vous accédez à des composants sous tension (sauf si vous pouvez y accéder sans outils). Des points de
contacts peuvent également être sous tension. S’il faut ouvrir l’appareil pour le calibrer, l’entretenir, le réparer ou remplacer
des composants, toutes les bornes doivent d’abord être débranchées des sources de tension. S’il faut garder l’appareil ouvert
et sous tension pendant la maintenance ou la réparation, ce travail ne doit être effectué que par un spécialiste qui connait les
F

©Copyright LOTRONIC 2017 9
risques encourus et la règlementation en vigueur.
• Ne jamais brancher l’appareil immédiatement après un passage d’un endroit froid dans un endroit chaud. L’eau de
condensation qui se forme, risqué d’endommager l’appareil ou provoquer un choc électrique. Attendez que l’appareil ait
atteint la température ambiante avant de le brancher. Attendez que l’eau de condensation se soit évaporée ce qui peut
prendre quelques heures.
• Ne pas placer de flamme ouverte telle qu’une bougie sur ou à côté de l’appareil.
• Ne pas placer l’appareil sur une surface molle telle qu’un tapis ou un lit. Ne pas obstruer les orifices de ventilation. Ne pas
empêcher la circulation d’air par des objets tels que des magazines, nappes ou rideaux. Ceci empêche la dissipation de la
chaleur et peut entraîner une surchauffe.
• Utiliser l’appareil uniquement à un environnement modéré. Ne pas utiliser dans un environnement tropical.
• Toutes les personnes impliquées dans l’utilisation, l’installation et la maintenance de cet appareil doivent être formées et
qualifiées et respecter ces consignes.
• Remplacer les câbles secteur défectueux uniquement par un spécialiste. Risque d’électrocution!
• Ne pas laisser trainer le matériel d’emballage car il constitue un danger potentiel pour de jeunes enfants.
• Dans des lieux publics, il convient de respecter la règlementation concernant la prévention d’accidents et le code des
assurances concernant de la responsabilité civile.
• Si vous n’êtes pas sûr de la bonne connexion ou si vous avez des questions auxquelles le mode d’emploi ne répond pas,
n’hésitez pas à demander conseil à un spécialiste ou votre revendeur.
CARACTERISTIQUES
PANNEAU ARRIERE
1. ANTENNE FM
2. ENTRÉE AUDIO AUX A
A brancher sur une sortie AUX A.
3. INTERRUPTEUR M/A
Appuyez pour mettre l’enceinte sous ou hors
tension.
4. ENTRÉE SECTEUR
230V~, 50Hz.
PANNEAU DE CONTROLE
1. STANDBY
2. Mode REVERB.
3. Mode SCRATCH
4. Volume de l’entrée A
Règle le volume de la source branchée sur l’entrée A.
5. SCRATCH/DJ EFFECT
Tournez pour sélectionner un effet sonore DJ.
6. Entrée USB A
7. INPUT A : Appuyez sur cette touche pour sélectionner l’entrée A.
8.
: Appuyez sur cette touche pour sélectionner le titre précédent sur l’entrée A
9. Appuyer pour lire/mettre en pause la musique branchée sur l’entrée A.
10.
: Appuyer pour sélectionner le titre suivant sur l’entrée A.
11. MUTE : coupe le son

©Copyright LOTRONIC 2017 10
12. ECHO
13. VOLUME MICRO 1
14. DELAY
15. VOLUME MICRO 2
16. AFFICHEUR A LED
17. INPUT B
Appuyez sur cette touche pour sélectionner
l’entrée B.
18.
: Appuyez sur cette touche pour
sélectionner le titre précédent sur l’entrée B
19. : Appuyer pour lire/mettre en
pause la musique branchée sur l’entrée B.
20.
Appuyer pour sélectionner le titre suivant
sur l’entrée B
21. MENU: mode d’éclairage
22. Entrée USB B
23. SCRATCH/VOLUME/MULTI
Tournez le bouton pour régler le volume et choisir des effets musicaux différents.
24. VOLUME ENTREE B
Règle le volume de l’entrée B
25. PHONES MODE
Appuyez sur cette touche pour choisir un mode CASQUE : Entrée A, Entrée B, Entrée AB
26. Mode YEA
27. FICHE MICROPHONE 2
28. FICHE MICROPHONE 1
29. Mode LASER
30.Mode USE
31. Mode MARVEL
32. Mode CLUB
33. PORTABLE IN JACK
Branchez une sortie ou écouteur d’un appareil mobile (MP3 etc) sur cette fiche.
34. PARTY EFFECT mode
Appuyez sur cette touche pour choisir un effet PARTY : THRUST, ALARM, VECTOR, FIREWORK, RAINING
35. PARTY EFFECT
Poussez la manette pour créer une ambiance disco
36. Fiche pour casque
37. Mode GEYA
38. Mode PROC
39. Mode BRING IT
40. mode YEAH
41. mode BEAT BOX
TELECOMMANDE
1. STANDBY
2. SCRATCH
3. DRUM
4. BEAT BOX
5. X DRIVE
6. TREBLE+
7. ECLAIRAGE
8. BASS-
9. DISCONNECT A
10. AUX A

©Copyright LOTRONIC 2017 11
11. BT A
12. VOLUME-
13. Avance rapide sur entrée A
14. Précédent sur l’entrée A
15. BT B
16. Suivant sur l’entrée B
17. Décrochage B
18. Précédent sur l’entrée
19. TUNING+
20. TUNING-
21. FM
22. AUTO
23. MUTE
24. REVER B
25. YEAH
26. TREBLE+
27. BASS+
28. USB-A
29. VOLUME+
30. LECTURE/PAUSE ENTREE A
31. Suivant sur l’entrée A
32. Retour rapide entrée A
33. USB-B
34. Entrée MP3
35. Suivant sur l’entrée B
36. LECTURE/PAUSE ENTREE B
37. Précédent sur entrée B
38. Canal-
39. Canal+
40. Touches numériques
UTILISATION DE LA TELECOMMANDE
Si la télécommande est en conflit avec d’autres appareils, son fonctionnement sera
perturbé.
Ne pas appuyer en même temps sur des boutons de la télécommande et sur l’appareil.
Ne pas utiliser deux télécommandes en même temps car il risqué d’y avoir des
interférences.
Utilisez uniquement des piles LR3 "AAA". Ne pas mélanger des piles neuves et
anciennes.
Si les piles ont fui, nettoyer soigneusement avant de remettre des neuves.
Ne pas court-circuiter les deux pôles des piles. Ne pas jeter les piles usées aux ordures ménagères.

©Copyright LOTRONIC 2017 12
FONCTIONNEMENT
Utilisation normale
1. Eteignez l’appareil et connectez vos sources sur les entrées correspondantes.
2. Mettez l’appareil sous tension et attendez 3-4 secondes jusqu’à ce que les haut-parleurs soient opérationnels.
3. Sélectionnez une source audio en appuyant sur la touche INPUT A en façade pour afficher AUX A, BT-A, FM, USB A. Appuyez
sur la touche INPUT B key en façade pour afficher AUX B, USB B, BT-B.
4. Réglez le bouton SCRATCH/VOLUME/MULTI en façade ou la touche VOL+/- sur la télécommande pour régler le volume
général. Ensuite, réglez le volume d’USB A via le fader VOLUME gauche ou le volume d’USB B via le fader VOLUME droit.
5. Appuyez sur la touche LIGHT sur la télécommande ou en façade pour afficher les modes lumineux. Ensuite, appuyez sur le
bouton SCRATCH/VOLUME/MULTI pour passer par les modes lumineux OFF (arrêt), R, G, B, RG, RB, GB, RGB, AUTO, DEMO.
6. Appuyez sur la touche MUTE pour occuper le son. Appuyez à nouveau pour le remettre. Appuyez sur X Drive sur la
télécommande pour activer/désactiver l’effet X-Bass.
Effets sonores
1. EFFETS DJ
Appuyez sur SCRATCH, REVB, B.BOX, YEAH, BRING IT, PROC, GEYA en façade ou sélectionnez SCRATCH, REVER B, BEAT BOX,
YEAH sur la télécommande. Tournez ensuite le gros bouton pour appliquer les effets DJ correspondants.
2. EFFETS MUSICAUX
Appuyez sur “ CLUB, MARVEL, USER, LASER, YEA ». Tournez ensuite le gros bouton pour appliquer les effets musicaux
correspondants.
3. PARTY EFFECT
Appuyez sur “PARTY EFFECT” en façade pour sélectionner un effet Party parmi THRUST, ALARM, VECTOR, FIREWORK, RAINING.
Poussez le curseur PARTY EFFECT. En position maximale, vous entendrez l’effet Party correspondant.
Lorsque vous abaissez le curseur sur OFF, l’effet s’arrête.
Le processus complet est OFF--->PARTY EFFECT---> PARTYMAX
Contrôle de la lumière
Vous pouvez contrôler les modes lumineux des haut-parleurs à l’aide du bouton « MODE » en façade ou « LIGHT »sur la
télécommande.
• R = Les LED rouges clignotent
• G = Les LED vertes clignotent
• B = Les LED bleues clignotent
• RG = Les LED rouges & vertes clignotent
• RB = Les LED rouges & bleues clignotent
• GB = Les LED vertes & bleues clignotent
• RGB = Les LED rouges, vertes & bleues clignotent
• Auto = Les différentes combinaisons de couleur passent et clignotent.
• Demo = Les LEDs clignotent et changent de couleur comme s’ils réagissaient au rythme de la musique.
Utilisation du Tuner
1. Avant de pouvoir écouter la radio, vous devez connecter l’antenne fournie. Orientez-la de façon à obtenir la meilleure
réception.
Appuyez sur la touche INPUT A sur le panneau de commande ou la touche FM sur la télécommande pour sélectionner la
fonction FM.
2. Appuyez sur la touche CH+/CH- sur la télécommande pour trouver des stations que vous avez déjà mémorisées.
3. Appuyez ou maintenez la touche TU+/TU- appuyée sur la télécommande pour régler manuellement la fréquence radio.
4. Appuyez sur la touche AUTO sur la télécommande et toutes les fréquences radio seront scannées de la plus basse à la plus
haute fréquence et mémorisées automatiquement.
Fonction KARAOKE
1. Le système détecte automatiquement quel micro vous utilisez. Baissez complètement le volume du micro et augmentez-le
progressivement après branchement du micro.

©Copyright LOTRONIC 2017 13
2. Appuyez sur VOL+/- sur la télécommande ou réglez le bouton MIC.VOL en façade pour changer le volume du microphone.
3. Tournez le bouton ECHO en façade pour régler l’écho du microphone.
4. Tournez le bouton W.MIC.VOL sur le panneau de contrôle pour régler le volume du micro sans fil ou tournez le bouton
MIC1/MIC2 VOL sur le panneau de contrôle pour changer le volume du microphone.
Note: Ne pas toucher la tête du micro lorsque vous chantez pour éviter un effet Larsen.
Réglez le volume du micro progressivement pour éviter un effet larsen.
Appairage et Connexion Bluetooth
• Eteignez tous les appareils Bluetooth précédemment connectés à cette enceinte.
• Activez la fonction Bluetooth sur votre téléphone ou lecteur de musique.
• Mettez l’enceinte sous tension et activez le mode Bluetooth. Le voyant clignotant bleu sur l’afficheur indique qu’elle est en
mode d’appairage.
• Lancez la recherche sur votre téléphone ou lecteur de musique.
• Sélectionnez STANDUP-PRODJ A / STANDUP-PRODJ B dans la liste des appareils trouvés.
• Sélectionnez OK ou YES pour appairer l’enceinte avec votre smartphone.
• Si besoin, entrez le mot de passe 0000. Le voyant bleu reste allumé pour indiquer que l’appairage a réussi.
• Appuyez sur la touche DISCONNECT sur la télécommande ou le panneau de contrôle pour déconnecter le Bluetooth.
Lecteur USB
Le système possède deux fiches USB. Insérez une ou deux clés USB pour écouter la musique. Appuyez sur INPUT A pour
sélectionner USB A, ou INPUT B pour sélectionner USB B.
Lorsque deux USB sont branchés en même temps, vous pouvez écouter les deux.
Important: Le port USB est exclusivement prévu pour le transfert de données et ne convient à aucune autre utilisation. L’emploi
d’une rallonge USB est déconseillé.
FICHE CASQUE
Pour une écoute privée, insérez un écouteur 3,5mm dans la fiche PHONE.
Sélection de la sortie PHONES : Appuyez sur la touche PHONES en façade pour afficher INPUT A, INPUT B, ou INPUT AB.
Réglage de volume du casque : Appuyez sur la touche PHONES en façade pour afficher INPUT A, INPUT B, ou INPUT AB. Tournez
ensuite le bouton VOLUME/MULTI pour régler le volume du casque de l’entrée sélectionnée.
ATTENTION: L’écoute à es volumes élevés endommage l’ouïe.
Caractéristiques techniques
Subwoofer ...................................................................................................................... 2 x 12”/30cm
Médium ........................................................................................................................... 2 x 3”/7.6cm
Tweeter .......................................................................................................................... 1 x 1”/25mm
Amplificateur de classe B ........................................................................................................... 500W
Puissance max. ......................................................................................................................... 1000W
Poids net ...................................................................................................................................... 24kg
Dimensions ............................................................................................................... 45 x 40 x 115cm
NOTE IMPORTANTE : Les produits électriques ne doivent pas être mis au rebut avec les ordures ménagères. Veuillez les faire recycler là
où il existe des centres pour cela. Consultez les autorités locales ou votre revendeur sur la façon de les recycler.

©Copyright LOTRONIC 2017 14
ANLEITUNG
Zeichenerklärung
Der Blitz im Dreieck weist auf ein Gesundheitsrisiko hin (z.B. Stromschlag).
Das Ausrufezeichen im Dreieck weist auf besondere Gefahren beim Umgang oder Betrieb des Geräts hin.
Die Hand weist auf nützliche Ratschläge und Zusatzinformationen zur Benutzung des Geräts hin.
Sicherheitshinweise
- Die Garantie gilt nicht, wenn die Schäden durch Nichtbeachtung dieser Bedienungsanleitung entstanden sind. Wir
übernehmen für den daraus entstandenen Schaden keine Haftung.
- Wir übernehmen für Personen- und Sachschäden keine Haftung, wenn diese durch unvorschriftsmäßige Handhabung oder
Nichtbeachtung der Anleitung entstanden sind. Der Garantieanspruch verfällt in diesem Fall.
- Aus Sicherheitsgründen darf das Gerät nicht verändert oder umgebaut werden.
- Das Gerät darf nur in trockenen, geschlossenen Räumen benutzt werden. Nicht in Wassernähe wie Badezimmern oder am
Swimmingpool benutzen.
- Das Gerät vor extremen Temperaturen schützen (< +5°C / > +35°C)
- Das Gerät vor starken Erschütterungen und schwerer mechanischer Belastung schützen.
- Das Gerät vor starker Feuchtigkeit schützen (z.B. vor Tropf- bzw. Sprühwasser)
- Keine mit Flüssigkeit gefüllten Behälter wie Gläser oder Vasen auf oder direkt neben das Gerät stellen. Sie können umfallen
und Wasser kann ins Gerät dringen. Niemals Flüssigkeiten über dem Gerät einschenken. Keine Kleinteile wie Münzen oder
Briefklammern aufs Gerät legen. Sie können ins Gehäuse dringen. Es besteht Feuer- und Stromschlaggefahr! Falls doch einmal
Flüssigkeiten oder Gegenstände ins Gerät dringen sollten, ziehen Sie sofort den Netzstecker ab und benachrichtigen Sie einen
Fachmann
- Das Gerät entspricht der Schutzklasse II
- Das Gerät muss mit 230 V~/5 0Hz Hz Netzstrom versorgt werden. Das Gerät niemals mit einer anderen Spannung betreiben.
- Beim Abziehen des Netzsteckers immer an der dafür vorgesehenen Stelle anfassen. Niemals am Kabel ziehen.
- Niemals den Netzstecker mit nassen oder feuchten Händen anfassen.
- In folgenden Fällen immer sofort den Netzstecker abziehen:
• Vor dem Reinigen des Geräts
• Bei Gewitter
• Bei längerem Nichtgebrauch (>1 Woche)
- Elektrogeräte außerhalb der Reichweite von Kindern aufbewahren. In Anwesenheit von Kindern besonders vorsichtig sein.
Kinder sind sich der Gefahren bei falscher Handhabung von Elektrogeräten nicht bewusst. Sie könnten versuchen,
Gegenstände ins Gerät zu stecken und einen Stromschlag erleiden.
- Das Gerät während des Betriebs nicht unbeaufsichtigt lassen.
- Niemals auf eine unstabile oder bewegliche Fläche stellen. Das Gerät kann beim Fallen Personen verletzen und schweren
Schaden nehmen.
- Falls das Gerät in ein Rack eingebaut wird, muss es sich in einer stabilen Lage befinden und sicher transportiert werden. Das
Aufstellen auf einer unebenen, geneigten Fläche, sowie plötzliches Stoppen während des Transports kann zum Umkippen
führen und dabei Personen verletzen.
- Spannungsführende Teile können beim Öffnen des Gehäuses oder beim Herausnehmen von Teilen (außer Teilen, die ohne
Werkzeug ausgewechselt werden können) freigelegt werden. Auch Kontaktpunkte können unter Spannung stehen. Wenn das
VORSICHT - STROMSCHLAGGEFAHR –
NICHT ÖFFNEN
D

©Copyright LOTRONIC 2017 15
Gehäuse zum Eichen, Reparieren oder Ersetzen von Teilen oder Modulen geöffnet werden muss, müssen zuerst alle
Anschlussstellen von der Spannungsquelle getrennt werden. Wenn das Gerät während der Wartung oder Reparatur offen und
unter Spannung stehen muss, darf dies nur von einem Fachmann vorgenommen werden, der die Gefahren und die
entsprechenden Sicherheitsvorschriften kennt.
- Niemals das Gerät sofort einschalten, wenn es von einer kalten Umgebung in einen warmen Raum kommt. Das
Kondenswasser, das sich bildet, kann das Gerät zerstören oder zu Stromschlag führen. Lassen Sie das Gerät erst auf
Raumtemperatur kommen, bevor Sie es anschließen. Warten Sie, bis das Kondenswasser verdampft ist. Das kann einige
Stunden dauern.
- Kein offenes Feuer wie brennende Kerzen auf oder neben das Gerät stellen.
- Das Gerät nicht auf eine weiche Fläche wie Teppiche oder Betten stellen. Nicht die Belüftungsschlitze verstopfen. Nicht die
Luftzirkulation mit Gegenständen wie Zeitschriften, Tischtüchern oder Gardinen behindern. Dies verhindert die Wärmeabfuhr
des Geräts und führt zu Überhitzung.
- Das Gerät nur in gemäßigten Klimazonen, nicht in tropischer Umgebung benutzen.
- Alle Personen, die mit der Bedienung, Installation und Wartung des Geräts zu tun haben, müssen ausgebildet und qualifiziert
sein und diese Bedienungshinweise beachten.
- Defekte Kabel nur von einem Fachmann ersetzen lassen. Stromschlaggefahr!
- Nicht das Verpackungsmaterial für jedermann zugänglich liegen lassen, da es für Kinder eine Gefahrenquelle darstellt.
- Wenn Sie sich über den richtigen Anschluss nicht im Klaren sind oder wenn Fragen auftreten, die nicht von der Anleitung
beantwortet wurden, wenden Sie sich bitte an einen Fachmann.
RÜCKSEITE
1. FM ANTENNE
2. AUX A AUDIO EINGANGSBUCHSE
Zum Anschluss an die AUX A Ausgangsbuchse
3. POWER
Zum Ein- und Ausschalten des Geräts
4. AC EINGANG
230V~, 50Hz.

©Copyright LOTRONIC 2017 16
BEDIENFELD
1. STANDBY
2. REVERB Effekt.
3. SCRATCH Effekt
4. INPUT A LAUTSTÄRKE
Einstellung der Lautstärke von INPUT A
5. SCRATCH/DJ EFFECT
Wahl verschiedener DJ Musikeffekte.
6. USB A Eingang
7. INPUT A: Wahl von Eingang A
8. INPUT A
: Zurück zum vorigen Titel
auf Eingang A
9. INPUT A
: Umschalten zwischen
Abspielen und Pause auf INPUT A
10. INPUT A
: Weiter zum nächsten Titel
auf Eingang A
11. MUTE
12. ECHO
13. MIKROFONLAUTSTÄRKE 1
14. DELAY
15. MIKROFONLAUTSTÄRKE 2
16. LED DISPLAY
17. INPUT B: Wahl von Eingang B.
18. INPUT B
: Zurück zum vorigen Titel auf Eingang B
19. INPUT B
: Umschalten zwischen Abspielen und Pause auf INPUT B
20. INPUT B
: Weiter zum nächsten Titel auf Eingang B
21. BELEUCHTUNG
22. USB B Eingang
23. SCRATCH/VOLUME/MULTI: Drehregler zur Einstellung der Lautstärke und zur Wahl eines Musikeffekts.
24. INPUT B VOLUME: Einstellung der Lautstärke von INPUT B
25. KOPFHÖRERBETRIEB
Drücken, um unter INPUT A, INPUT B, INPUT AB den Eingang zu wählen, den sie im Kopfhörer hören möchten.
26. YEA Effekt
27. MIKROFONBUCHSE 2
28. MIKROFONBUCHSE 1
29. LASER Effekt
30. USE Effekt
31. MARVEL Effekt
32. CLUB Effekt
33. MP3 Eingangsbuchse
Zum Anschluss eines tragbaren Audiospielers (MP3 usw.).
34. PARTY EFFEKT Betrieb
Taste drücken, um den gewünschten Party Effekt zu wählen: THRUST, ALARM, VECTOR, FIREWORK, RAINING
35. PARTY EFFEKT
Regler nach oben schieben, um einen Party Effekt hinzuzufügen
36. KOPFHÖRERBUCHSE
37. GEYA Effekt
38. PROC Effekt
39. BRING IT Effekt
40. YEAH Effekt
41. BEAT BOX Betrieb

©Copyright LOTRONIC 2017 17
FERNBEDIENUNG
1. STANDBY
2. SCRATCH
3. DRUM
4. BEAT BOX
5. X DRIVE
6. TREBLE+
7. BELEUCHTUNG
8. BASS-
9. ABKOPPELN VON A
10. AUX A
11. BT A
12. LAUTSTÄRKE-
13. INPUT A WEITER
14. INPUT A ZURÜCK
15. BT B
16. INPUT B SCHNELLER VORLAUF
17. ABKOPPELN VON B
18. INPUT B ZURÜCK
19. TUNING+
20. TUNING-
21. FM
22. AUTO
23. MUTE
24. REVER B
25. YEAH
26. TREBLE+
27. BASS+
28. USB-A
29. LAUTSTÄRKE+
30. INPUT A PLAY/PAUSE
31. INPUT A SCHNELLER VORLAUF
32. INPUT A ZURÜCK
33. USB-B
34. MP3 EINGANG
35. INPUT B WEITER
36. INPUT B PLAY/PAUSE
37. INPUT B ZURÜCK
38. KANAL-
39. KANAL+
40. NUMMERNTASTEN
FERNBEDIENUNG:
Wenn die Fernbedienung mit anderen Geräten in Konflikt kommt, kann ihr
Betrieb davon beeinträchtigt sein. Nicht gleichzeitig Tasten auf dem Gerät und auf
der Fernbedienung drücken. Niemals zwei Fernbedienungen gleichzeitig
benutzen. Nur UM-4 "AAA" Batterien benutzen. Keine alten und neuen Batterien
mischen.
Wenn Batterien leck waren, erst das Fach sorgfältig säubern, bevor neue
Batterien eingesetzt werden.
Nicht die Pole der Batterien kurzschließen. Gebrauchte Batterien ordnungsgemäß entsorgen.

©Copyright LOTRONIC 2017 18
BEDIENUNG
Normaler Betrieb
1. Gerät ausschalten und Eingangsgeräte an die entsprechenden Buchsen anschließen.
2. Gerät einschalten und 3-4 Sekunden warten, bis alles funktionsfähig ist.
3. Die INPUT A Taste auf dem Bedienfeld drücken, um eine Eingangsquelle unter AUX A, BT-A, FM, USB A zu wählen. Die INPUT
B Taste auf dem Bedienfeld drücken, um LINE, USB B anzuzeigen.
4. Die Hauptlautstärke mit dem SCRATCH/VOLUME/MULTI Regler auf dem Bedienfeld oder mit den VOL+/- Tasten auf der
Fernbedienung einstellen. Dann die Lautstärke von USB A mit dem linken VOLUME Schieberegler und die Lautstärke von USB B
mit dem rechten VOLUME Schieberegler einstellen.
5. Die LIGHT Taste auf der Fernbedienung bzw. dem Bedienfeld drücken, um die Beleuchtungsmöglichkeiten anzuzeigen. Dann
den SCRATCH/VOLUME/MULTI Regler drücken, um OFF, R, G, B, RG, RB, GB, RGB, AUTO, DEMO Betrieb zu wählen.
6. MUTE Taste drücken, um den Ton abzuschalten. Erneut drücken, um den Ton wieder zuzuschalten. X Drive auf der
Fernbedienung drücken, um den X-Bass Effekt ein- und auszuschalten..
Klangeffekte
1. DJ EFFECT
SCRATCH, REVB, B.BOX, YEAH, BRING IT, PROC, GEYA auf dem Bedienfeld oder SCRATCH, REVER B, BEAT BOX, YEAH auf der
Fernbedienung drücken und den großen Drehregler drehen, um den DJ Effekt einzuschleifen.
2. MUSIC EFFECT
“ YEA, CLUB, MARVEL, USER, LASER, ” auf dem Bedienfeld drücken, um einen der verschiedenen Effekte zu wählen. Großen
Drehregler drehen, um den Effekt einzuschleifen.
3. PARTY EFFECT
“PARTY EFFECT” auf dem Bedienfeld drücken, um THRUST, ALARM, VECTOR, FIREWORK, RAINING zu wählen.
Den PARTY EFFECT Regler ganz nach oben schieben, um den gewählten PARTY Effekt auszulösen.
Wenn Sie den Regler wieder nach unten schieben, endet der Party Effekt.
Farbkombinationen
Folgende Farbkombinationen können über die MENU Taste auf dem Bedienfeld oder die LIGHT Taste auf der Fernbedienung
gewählt werden.
● R = Rotes Licht blinkt
● G = Grünes Licht blinkt
● B = Blaues Licht blinkt
● RG = Rotes & grünes Licht blinkt
● RB = Rotes & blaues Licht blinkt
● GB = Grünes & blaues Licht blinkt
● RGB = Rotes, grünes & blaues Licht blinkt
● Auto = die verschiedenen Farbkombinationen werden durchlaufen und blinken.
● Demo = Das Licht blinkt und wechselt die Farbe zum Rhythmus der Musik.
Radio
1. Erst die FM Antenne anschließen, bevor Sie das Radio benutzen können.
2. FM Funktion mit der INPUT A Taste auf dem Bedienfeld bzw. der FM Taste auf der Fernbedienung wählen.
3. Bereits gespeicherte Sender mit den CH+/CH- Tasten auf der Fernbedienung wählen.
4. Mit den TU+/TU- Tasten auf der Fernbedienung die Radiosender manuell einstellen.
5. Die AUTO Taste auf der Fernbedienung drücken, um das Frequenzband von unten nach oben nach Radiosendern abzusuchen
und die Sender automatisch zu speichern.
KARAOKE Betrieb
1. Das Gerät erkennt automatisch ob MIC1 oder MIC2 angeschlossen ist. Mikrofonlautstärke ganz herunterfahren und dann
nach Anschluss des Mikrofons langsam hochfahren.
2. Mikrofonlautstärke mit den VOL+/- Tasten auf der Fernbedienung oder den MIC.VOL Reglern auf dem Bedienfeld einstellen.
3. Echoeffekt des Mikrofons mit dem ECHO Regler auf dem Bedienfeld einstellen.
Hinweis: Während des Gesangs nicht die Oberseite des Mikrofons berühren, um Larsen Effekt zu vermeiden.
Mikrofonlautstärke allmählich erhöhen, um Larsen Effekt zu vermeiden.

©Copyright LOTRONIC 2017 19
Bluetooth Verbindung
1. Alle vorher an dieses Gerät angeschlossenen Bluetooth Geräte ausschalten.
2. Bluetooth Funktion auf Ihrem Smartphone einschalten.
3. Gerät einschalten und Bluetooth Betrieb wählen. Die blaue BT LED auf dem LED Display blinkt, wenn das Gerät zur Bluetooth
Verbindung bereit ist.
4. Aktivieren Sie die Bluetooth Suche auf Ihrem Smartphone.
5. Wählen Sie STANDUP-PRODJ A bzw. STANDUP-PRODJ B in der Liste der gefundenen Geräte.
6. Wählen Sie OK oder YES, um dieses Gerät mit Ihrem Smartphone zu verbinden.
7. Ggf. 0000 eingeben. Wenn die Verbindung erfolgreich erstellt wurde, leuchtet die LED ständig blau.
8. Die DISCONNECT Taste auf der Fernbedienung drücken, um die Verbindung abzubrechen.
USB Player
Das Gerät besitzt zwei USB Eingänge. Mit der INPUT A Taste den Eingang USB A wählen. Sie können nun einen USB Stick
anschließen, um die Musik abzuspielen. Die INPUT B Taste drücken, um USB B zu wählen. Nun den zweiten USB Stick anschließen.
Wenn zwei USB Sticks gleichzeitig angeschlossen sind, können Sie die Musik von beiden Sticks gleichzeitig abspielen.
Wichtig: Die USB Ports sind nur für Datenübertragung. Es können keine anderen Geräte mit diesem USB Anschluss benutzt
werden. Der Einsatz von USB Verlängerungskabeln ist nicht empfehlenswert.
KOPFHÖRERBUCHSE
Um den Klang nur im Kopfhörer zu hören, stecken Sie einen Kopfhörer mit 3,5mm Klinkenstecker in die PHONE Buchse.
Wahl der Musikquelle im Kopfhörer: PHONES Taste auf dem Bedienfeld drücken, um INPUT A, INPUT B oder INPUT AB
anzuzeigen.
Einstellung der Lautstärke im Kopfhörer: PHONES Taste auf dem Bedienfeld drücken, um INPUT A, INPUT B oder INPUT AB
anzuzeigen. Dann den SCRATCH/VOLUME/MULTI Regler drehen, um die Lautstärke der gewählten Musikquelle im Kopfhörer
einzustellen.
VORSICHT: Zu hohe Lautstärke über längere Zeit kann das Gehör beschädigen.
Specifications
Subwoofer ...................................................................................................................... 2 x 12”/30cm
Mittentöner .................................................................................................................... 2 x 3”/7.6cm
Tweeter .......................................................................................................................... 1 x 1”/25mm
Klasse B Verstärker .................................................................................................................... 500W
Höchstleistung ......................................................................................................................... 1000W
Nettogewicht ............................................................................................................................... 24kg
Abmessungen............................................................................................................ 45 x 40 x 115cm
WICHTIGER HINWEIS: Elektrogeräte gehören nicht in den Hausmüll. Sie müssen in speziellen Betrieben recycelt werden. Bringen Sie
sie zu einer speziellen Entsorgungsstelle für Elektrokleingeräte (Wertstoffhof)!

©Copyright LOTRONIC 2017 20
HANDLEIDING
Verklaring van de tekens
De bliksem in de driehoek vestigt de aandacht van de gebruiker op een elektrische schokrisico.
De driehoek met het uitroepteken vestigt de aandacht van de gebruiker op belangrijke gebruik- of
onderhoudsinstructies.
De hand-symbool verwijst naar nuttige tips en aanvullende informatie over het gebruik van het apparaat.
Belangrijke veiligheids en risico waarschuwingen
• Aandachtig de handleiding lezen en bewaren.
• Alle veiligheidsinstructies en waarschuwingen moeten worden nageleefd. Ze maken deel uit van de handleiding en moet
worden bewaard met de handleiding.
• Aanspraak op garantie vervalt als er schade optreedt als gevolg van niet-naleving van deze gebruiksaanwijzing. Wij zijn niet
aansprakelijk voor eventuele daaruit voortvloeiende schade.
• Wij zijn niet aansprakelijk voor persoonlijk letsel of schade aan eigendommen veroorzaakt door ondeskundig gebruik of niet
naleving van de veiligheidsinstructies. Elke aanspraak op garantie vervalt in dergelijke gevallen.
• Onbevoegde conversies en / of wijzigingen van het apparaat zijn niet toegestaan voor reden van veiligheid en vergunningen
(CE)..
• Het apparaat is goedgekeurd voor gebruik in droge, gesloten ruimtes alleen. Niet het apparaat in de buurt van water, zoals in
de badkamer of zwembaden gebruiken.
• Het toestel tijdens de werking niet aan extreme temperaturen blootstellen (< +5°C / > °35°C).
• Het apparaat mag niet worden blootgesteld aan sterke trillingen of zware mechanische belasting.
• Het apparaat mag niet worden blootgesteld aan overmatig vocht (als gevolg van druppels of spatwater, bijvoorbeeld).
• Plaats geen ontvangers gevuld met vloeistoffen, zoals glazen of vazen, op of direct naast het apparaat. Ze kunnen omvallen,
waardoor water in het apparaat binnendringt. Giet nooit vloeistoffen uit boven het toestel. Plaats geen kleine voorwerpen,
zoals munten of paperclips, op het toestel, aangezien zij zou kunnen vallen in het apparaat. Zij kunnen brand of stroomslag
veroorzaken! Als er vloeistof of voorwerpen in het apparaat dringen, trek dan onmiddellijk de stekker uit het stopcontact en
raadpleeg een deskundige.
• Het apparaat is gebouwd volgens beschermingsklasse II (alleen voor dubbel geïsoleerde apparaten zonder aarde terminal).
• Het toestel benodigd een aansluitspanning van 230 Vac/50 Hz .Verzoek nooit het toestel via een andere spanning te voeden.
• Trek de stekker alleen uit het stopcontact via de ervoor bepaalde oppervlak. Niet aan het kabel trekken.
• Nooit de stekker met vochtige of natte handen aanraken.
• Altijd de stekker uit het stopcontact trekken
- Alvorens u het toestel schoonmaakt
- in geval van onweer
- Indien u het toestel over een langere tijd niet gebruikt (>1 week)
• Elektrische apparaten buiten het bereik van kinderen houden. Wees vooral voorzichtig wanneer er kinderen aanwezig zijn.
Kinderen zijn zich niet bewust van de gevaren die betrokken zijn bij elektrische apparaten. Kinderen kunnen proberen
voorwerpen in het apparaat te stekken. Er is een levensbedreigend gevaar van stroomslag.
• Laat het apparaat niet onbeheerd tijdens het gebruik.
• Plaats het apparaat nooit op een instabiele of beweegbare ondergrond. Mensen kunnen gewond raken of het apparaat wordt
beschadigd door het vallen.
NL
OPGELET - GEVAAR VAN
ELEKTRISCHE SCHOK – NIET OPENEN
La page est en cours de chargement...
La page est en cours de chargement...
La page est en cours de chargement...
La page est en cours de chargement...
La page est en cours de chargement...
La page est en cours de chargement...
La page est en cours de chargement...
La page est en cours de chargement...
La page est en cours de chargement...
La page est en cours de chargement...
La page est en cours de chargement...
La page est en cours de chargement...
La page est en cours de chargement...
La page est en cours de chargement...
La page est en cours de chargement...
La page est en cours de chargement...
La page est en cours de chargement...
La page est en cours de chargement...
La page est en cours de chargement...
La page est en cours de chargement...
La page est en cours de chargement...
La page est en cours de chargement...
La page est en cours de chargement...
La page est en cours de chargement...
La page est en cours de chargement...
La page est en cours de chargement...
La page est en cours de chargement...
La page est en cours de chargement...
La page est en cours de chargement...
La page est en cours de chargement...
-
 1
1
-
 2
2
-
 3
3
-
 4
4
-
 5
5
-
 6
6
-
 7
7
-
 8
8
-
 9
9
-
 10
10
-
 11
11
-
 12
12
-
 13
13
-
 14
14
-
 15
15
-
 16
16
-
 17
17
-
 18
18
-
 19
19
-
 20
20
-
 21
21
-
 22
22
-
 23
23
-
 24
24
-
 25
25
-
 26
26
-
 27
27
-
 28
28
-
 29
29
-
 30
30
-
 31
31
-
 32
32
-
 33
33
-
 34
34
-
 35
35
-
 36
36
-
 37
37
-
 38
38
-
 39
39
-
 40
40
-
 41
41
-
 42
42
-
 43
43
-
 44
44
-
 45
45
-
 46
46
-
 47
47
-
 48
48
-
 49
49
-
 50
50


Ibiza Sound STUPDJ-PRO Le manuel du propriétaire
- Taper
- Le manuel du propriétaire
- Ce manuel convient également à
dans d''autres langues
Documents connexes
Autres documents
-
NOVISTAR 945586 Le manuel du propriétaire
-
Lenco PMX-850 Manuel utilisateur
-
LOTRONIC LTC AUDIO 10-7160 Manuel utilisateur
-
 Ibiza Light LED-SOUND Le manuel du propriétaire
-
 LTC Audio TV-STATION Le manuel du propriétaire
-
Lenco PMX-240 Manuel utilisateur
-
Lenco PMX-300 Manuel utilisateur
-
Lenco PMX-250 Manuel utilisateur
-
-
Lenco PMX-350 Manuel utilisateur

