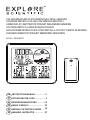
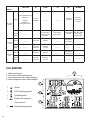
Explore Scientific Weather Station Le manuel du propriétaire
- Catégorie
- Stations météo
- Taper
- Le manuel du propriétaire
Ce manuel convient également à

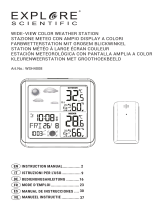
COLOUR WEATHER STATION WITH MULTIPLE SENSORS
STAZIONE METEO A COLORI CON SENSORI MULTIPLI
FARBDISPLAY-WETTERSTATION MIT MEHREREN SENDERN
STATION MÉTÉO À LARGE ÉCRAN COULEUR
ESTACIÓN METEOROLÓGICA CON PANTALLA COLOR Y VARIOS SENSORES
KLEUREN-WEERSTATION MET MEERDERE SENSOREN
Art.No.: WSH4005
IT
ISTRUZIONI PER L’USO ................
DE
BEDIENUNGSANLEITUNG ...........
EN
INSTRUCTION MANUAL ...............2
MODE D‘EMPLOI
FR
MANUAL DE INSTRUCCIONES
ES
NL
MANUEEL INSTRUCTIE
....
........................
...............
9
16
23
30
37

ABOUT THIS INSTRUCTION
MANUAL
These operating instructions are to be
considered a component of the device.
Please read the safety instructions and the
operating instructions carefully before use.
Keep these instructions for renewed use at a later
date. When the device is sold or given to someone
else, the instruction manual must be provided to
the new owner/user of the product. The device
is intended only for indoor use.
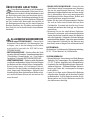
GENERAL WARNINGS
• Risk of electric shock — This device contains
electronic components. Only use the device as
described in the manual; otherwise, you run the
risk of an electric shock.
• Choking hazard — Children should only use the
device under adult supervision. Keep packaging
material, like plastic bags and rubber bands,
out of the reach of children, as these materials
pose a choking hazard.
• Risk of chemical burn — Keep batteries out of
the reach of children! Make sure you insert the
batteries correctly. Leaking battery acid can
lead to chemical burns. Avoid contact of battery
acid with skin, eyes and mucous membranes.
In the event of contact, rinse the affected region
immediately with a plenty of water and seek
medical attention.
•
— Do not expose the
device to high temperatures. Use only the
recommended batteries. Do not short-circuit
trigger a short-circuit, a fire, or an explosion.
• Do not disassemble the device. In the event
of adefect, please contact your dealer. The
dealer will contact the Service Centre and can
send the de vice in to be repaired, if necessary.
• Use only the recommended batteries. Always
replace weak or empty batteries with a new,
complete set of batteries at full capacity. Do
not usebatteries from different brands or with
differentcapacities. The batteries should be
removed from the unit if it has not been used
for a long time.
the device or batteries, or throw them into a fire.
Excessive heat or improper handling could
SCOPE OF DELIVERY
Weather station, 3x Outdoor sensors, Operating
instructions, DC 5V 150 mA Adapter, 9x AAA
batteries.
BEFORE YOU BEGIN
• We recommend using alkaline batteries. If
temperatures regularly fall below 0°C (32°F), we
recommend using lithium batteries.
• Avoid using rechargeable batteries.
(Rechargeablebatteries cannot maintain correct
power requirements.)
• Insert batteries before first use, matching the
polarity in the battery compartment. 3x AAA
Batteries are required for the Weather station
and 2x AAA Batteries are required for the Outdoor
sensor.
2

EN
IT
DE
FR
ES
NL
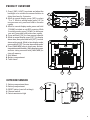
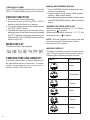
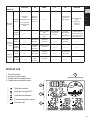
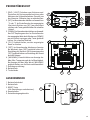
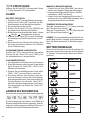
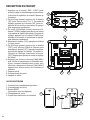
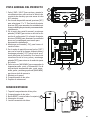
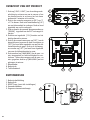
PRODUCT OVERVIEW
1. Press [ SNZ / LIGHT ] to activate and adjust the
backlight or to activate the snooze function to
delay the alarm for 5 minutes.
2. While in normal display, press [ UP ] to select
°C
or
°F. While in setting mode, press [ UP ] to
increase one unit, press and hold to increase
rapidly.
3. While in normal display mode, press and hold
[ DOWN ] to initiate or exit RCC receiving. While
in setting mode, press [ DOWN ] to decrease
one unit, press and hold to decrease rapidly.
4. Press and hold [ CH ] to clear present channel.
5. While in normal display, press [ SET ] to display
alarm time, then press and hold [ SET ] to enter
alarm setting mode. While in time display mode,
press and hold [ SET ] to enter time setting mode.
6. Press [ MAX/MIN ] once to check max. and min.
temperature and humidity. While displaying max.
and min. data, press and hold [ MAX/MIN ] to
clear all memory.
7. Wall Mount.
8. Battery compartment.
9. Table stand.
OUTDOOR SENSOR
1. Battery compartment door.
2. Battery compartment.
3. RESET button (reset all settings).
4. Channel switch.
5. Data transmission light
2
3
4
RESET
1 2 3
AAA 1.5V
AAA 1.5V
5
1
3
1
22
23
4
25
26
7
8
9

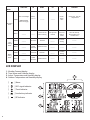
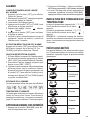
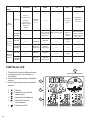
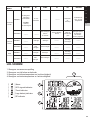
BUTTON
MODE
SNZ/LIGHT
Standard
mode
PRESS
Turn on backlight.
SNOOZE when
alarm is ringing.
HOLD
Time
setting
mode
PRESS
_______
HOLD
_______
Alarm
setting
mode
PRESS
_______
HOLD
_______
UP DOWN CH SET MAX/MIN
_______
Clear present
channel
Check
alarm
time
Enter into
setting
mode
Confirm
setting
C
F
Select
or
Check max. and min.
temperature
Clear all memory
when display max.
and min. data
LCD DISPLAY
1. Weather Forecast display
2. Time/Alarm and Calendar display
3. Indoor Temperature and Humidity display
4. Outdoor Temperature and Humidity display
[ ] Alarm
[ ] RCC signal indicator
[ ] Trend indicator
[ ] Low battery indicator
[ ] RF Indicator
4
_______
Decrease
Quick
Decrease
Decrease
Quick
Decrease
Initiate or exit
RCC receiving
Increase
Quick Increase
Increase
Quick Increase
_______
_______
_______
_______
_______
_______
Confirm
setting
_______
_______
_______
_______
1
2
3
4
_______
_______

EN
IT
DE
FR
ES
NL
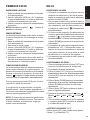
GETTING STARTED
INSERT BATTERIES
1.Remove the battery door from the back.
2.Insert 3x AAA (LR03)/1.5V batteries. Please
ensure the polarities (+/-) of the batteries match
upon installation.
3.Reattach the battery door.
NOTE: Replace batteries when [ ] when the
display is dim.
OUTDOOR SENSOR
The main unit can receive data from up to 3 outdoor
sensors. 3 sensors are included with delivery.
1.Remove the battery door from the back.
2.Select a channel.
3.Insert 2x AAA (LR03)/1.5V batteries. Please
ensure the polarities (+/-) of the batteries match
upon installation.
4.Reattach the battery door.
5.Place the sensor within 30 m (98 ft) of the main
unit using the table stand or wall mount.
TO SEARCH FOR A SENSOR:
The main unit will automatically search for a new
sensor after the batteries are installed. The receiving
process is 3 minutes. During receiving process, the
antenna icon [ ] is flashing. Once receive signal,
monitor will receive the outdoor temperature and
humidity at the same time.
Press and hold [ CH ] to re-register RF data.
If RF registration failed or missed for more than 1
hour, the data will flash “--.-“.
To manually initiate an outdoor sensor search,
press and hold [ CH ].
NOTE: The transmission range may vary depending
on many factors. You may need to experiment with
various locations to get the best results.
CLOCK
CLOCK RECEPTION
1. When you insert or replace the batteries, RCC
reception is initiated. To manually start RCC
reception, press and hold the [ DOWN ] button.
2. After the RCC receives the signal, if you change
the relevant display settings (such as year,
month, day, hour, minute, etc.), the RCC symbol
[ ] will automatically disappear.
3. If the RCC receiving process is successful, a
completed RCC symbol [ ] will be shown in
the display and the date and time will be set
automatically. If it fails, press and hold the [ DOWN ]
button to re-initiate RCC receiving.
4. RCC receiving will automatically start from 1:00
– 5:00 every night. Auto receiving function will
cease if it is successful. If it does not receive
the RCC signal, it will receive in next day.
5. If the device is still not receiving the signal,
please proceed to set the time manually.
SET THE CLOCK MANUALLY
1. Press and hold [ SET ] button to enter into time
and date setting.
2. The setting parameter will flash.
3. Press [ UP ] button once, the figure will increase
1 unit. Press and hold the [ UP ] button, the
figures will increase rapidly.
4. Press [ DOWN ] button once, the figure will
decrease 1 unit. Press and hold the [ DOWN ]
button, the figures will decrease rapidly.
5. Press [ SET ] button to confirm setting and enter
to next parameter.
6. Sequence of setting: Time Zone Hour
Minute Year Month Day
12/24HR Exit
7. If there is no action in 20 seconds or if you
press [ SET ] button, the setting will be saved
and you will exit the setting mode.
°C/°F SETTING
Press [ UP ] button to switch Celsius (°C) /
Fahrenheit (°F).
ALARM
SETTING/ADJUSTING ALARM TIME
1. Press [ SET ] to display the alarm time.
2. Press and hold [ SET ] button to enter alarm
setting mode.
3. The setting parameter will flash.
4. Press [ UP ] or [ DOWN ] button to set the
desired data.
5. Sequence of setting: Hour Minute Exit.
6. Press [ SET ] button to confirm setting and exit.
7. Alarm will turn on automatically when alarm
setting is finished. Alarm time is 2 minutes.
5

TURN ON/OFF ALARM
Press [ SET ] to display the alarm time. Press the
[ UP ] or [ DOWN ] button to turn on/off the alarm.
SNOOZE FUNCTION
1. At the set time, alarm signal rings.
2. During the alarm, press the [ SNZ / LIGHT ]
button to delay the alarm by 5 minutes.
3. To stop the alarm, press any other button, except
for [ SNZ / LIGHT ] button.
4. The alarm will start again at the next alarm time,
unless you turn off the alarm function by pressing
the [ SET ] button to display the alarm time first,
then press the [ UP ] or [ DOWN ] button until the
alarm is set to off.
WEEK DISPLAY
The first two letters are displayed.
TEMPERATURE AND HUMIDITY
The indoor temperature is always displayed in
the right bottom corner of the screen. To receive
outdoor temperature you can connect up to 3
outdoor sensors to the main unit.
MANUAL MEASUREMENT DISPLAY
1. Press [ MAX/MIN ] button to display the max.
and min. temperature.
2. Display order: Current values > MAX (highest
values) > MIN (lowest values)
3. When displaying highest or lowest values, press
and hold [ MAX/MIN ] button to delete all saved
values.
TEMPERATURE TREND INDICATION
When the temperature rises by 1°C / 2°F, the up
arrow icon [ ] appears.
When the temperature drops by 1°C / 2°F, the
down arrow icon [ ] appears.
NOTE: The trend compares the current data with
the data measured 3 hours before. Data is
recorded every 30 minutes.
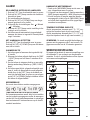
WEATHER FORECAST
This device calculates a weather forecast for the
next 12 hours on basis of the measured values.
It has 6 kinds of dynamic weather forecast.
6
SYMBOL
DESCRIPTION
Sunny
Partly Sunny
Cloudy
Rainy
Stormy
Snowy

BACKLIGHT
When operate with batteries, press [ SNZ / LIGHT ]
to activate backlight for 10 seconds to HIGH light.
When connect with adapter, plug in the adapter to
switch on the backlight to HIGH light. Press [ SNZ /
LIGHT ] to adjust the backlight brightness: HIGH
LOW OFF HIGH
SPECIFICATIONS
MAIN UNIT:
Dimensions
141 x 21 x 124 mm (L x W x H)
Weight
230 g (Exclude batteries)
Power:
DC 5V 150 mA adaptor
3x AAA (LR03) 1.5V batteries
TEMPERATURE:
Indoor temperature display range:
0°C to +50°C (32°F to 122°F)
Outdoor temperature display range:
-40°C to +70°C (-40°F to 158°F)
HUMIDITY:
Indoor/outdoor humidity range:
20% - 99% RH
OUTDOOR SENSOR:
Dimensions:
51 x 39,5 x 95 mm (L x W x H)
Weight:
45 g (Exclude batteries)
Transmission range:
30 m (98 ft)
Temperature range:
-40°C to +70°C (-40°F to 158°F)
Signal frequency:
433 MHz
Maximum transmission power:
under 10mW
Power:
2x AAA (LR03) 1.5V batteries
EC DECLARATION OF
CONFORMITY
Hereby, Explore Scientific GmbH declares
that theequipment type with part number:
WSH4005 is in compliance with Directive:
2014/53/EU. The full text of the EU declaration
of conformity is available at the following internet
address: www.bresser.de/download/WSH4005/
CE/WSH4005_CE.pdf
RCM DECLARATION OF
CONFORMITY
The product complies with electrical
safety, EMC and radio spectrum regulatory
requirements for products supplied to
the Australia or New Zealand market.
NOTES ON CLEANING
• Remove the batteries before cleaning.
• Only use a dry cloth to clean the exterior of the
device. To avoid damaging the electronics, do
not use any cleaning fluid.
• Protect the device from dust and moisture.
EN
IT
DE
FR
ES
NL
7

DISPOSAL
Dispose of the packaging materials properly,
according to their type, such as paper or card
board. Contact your local waste-disposal
service or environmental authority for information
on the proper disposal.
Do not dispose of electronic devices in the
household garbage!
As per the Directive 2002/96/EC of the
European Parliament on waste electrical and
electronic equipment and its adaptation into
German law, used electronic devices must be
collected separately andrecycled in an environ-
mentally friendly manner.
In accordance with the regulations concern
ing batteries and rechargeable batteries,
disposing of them in the normal household
waste is explicitly forbidden. Please make sure to
dispose of your used batteries as required by law
— at a local collection point or in the retail market.
Disposal in domestic waste violates the Battery
Directive. Batteries that contain toxins are marked
with a sign and a chemical symbol.
¹ ² ³
1
battery contains cadmium
2
battery contains mercury
3
battery contains lead
WARRANTY & SERVICE
The regular guarantee period is 2 years and
begins on the day of purchase. To benefit from
an extended voluntary guarantee period as stated
on the gift box, registration on our website is
required.
You can consult the full guarantee terms as well
as information on extending the guarantee period
and details of our services at www.bresser.de/
warranty_terms.
Would you like detailed instructions for this
product in a particular language? Then visit our
website via the link below (QR code) for available
versions.
Alternatively you can also send an email to
[email protected] or leave a message on
+49 (0) 28 72 – 80 74-220*. Please always state
your name, precise address, a valid phone number
and email address, as well as the article number
and name.
*Number charged at local rates in Germany (the amount you
will be charged per phone call will depend on the tariff of your
phone provider); calls from abroad will involve higher costs.
Errors and technical changes reserved.
MANUAL DOWNLOAD:
www.bresser.de/download/WSH4005
SERVICE AND WARRANTY:
www.bresser.de/warranty_terms
8

INFORMAZIONI SUL MANUALE DI
ISTRUZIONI
Queste istruzioni per l'uso fanno parte
dell'apparecchio.
Leggere attentamente le avvertenze di sicurezza
e le istruzioni prima dell'uso.Conservare queste
istruzioni per future consultazioni. In caso di cessione
dell'apparecchio a terzi, consegnare questo manuale
di istruzioni al nuovo utente. Questo apparecchio è
destinato al solo uso in interni.
AVVERTENZE GENERALI
•
RISCHIO DI SCOSSA ELETTRICA — Questo
apparecchio contiene componenti elettronici.
Utilizzare l'apparecchio esclusivamente come
descritto nel manuale per evitare il rischio di
scossa elettrica.
RISCHIO DI SOFFOCAMENTO — I bambini
possono usare l'apparecchio esclusivamente
sotto la supervisione di un adulto. Conservare
i materiali di imballaggio, come sacchetti di
plastica ed elastici, fuori dalla portata dei
bambini per evitare il rischio di soffocamento.
RISCHIO DI USTIONI CHIMICHE — Conservare
le batterie fuori dalla portata dei bambini.
Assicurarsi di inserire le batterie correttamente.
Le fuoriuscite di acido dalle batterie possono
causare ustioni chimiche. Evitare il contatto
dell'acido delle batteria con la pelle, gli occhi
e le mucose. In caso di contatto, risciacquare
immediatamente l'area interessata con
abbondante acqua e consultare un medico.
RISCHIO DI INCENDIO/ESPLOSIONE — Non
esporre l'apparecchio a temperature elevate.
Utilizzare esclusivamente le batterie raccom-
andate. Non corto circuitare l'apparecchio o le
batterie e non bruciarli. L'uso improprio o
l'esposizione a calore eccessivo comportano i
l rischio di corto circuito, incendio o esplosione.
• Non disassemblare l'apparecchio. Se è difettoso,
contattare il rivenditore. Il rivenditore contatterà
il centro di assistenza e provvederà alla ripar-
azione, se necessario.
Utilizzare esclusivamente le batterie raccom-
andate. Sostituire le batterie scariche con un
nuovo gruppo di batterie nuove e completam-
ente cariche. Non usare batterie di marche
differenti o con diversa capacità. Rimuovere
le batterie dall'apparecchio in previsione di un
lungo periodo di inutilizzo.
CONTENUTO DELLA CONFEZIONE
Stazione meteo, 3 sensori esterni, Manuale di
istruzioni, Adattatore CC 5 V 150 mA, 9 batterie
AAA.
PRIMA DELL'USO
• Si raccomanda l'uso di batterie alcaline. Se la
temperatura scende regolarmente sottozero
(0°C/32°F), si raccomanda l'uso di batterie al
litio.
• Evitare l'uso di batterie ricaricabili (le batterie
ricaricabili non sono in grado di mantenere i
corretti requisiti di potenza).
• Inserire le batterie prima dell'uso rispettando
l'orientamento riportato nel vano batteria. La
stazione meteo richiede 3 batterie AAA e ogni
sensore esterno richiede 2 batterie AAA.
EN
IT
DE
FR
ES
NL
9
•
•
•
•

DESCRIZIONE DEL PRODOTTO
1.
Premere [ SNZ / LIGHT ] per attivare e regolare
la retroilluminazione o per posticipare la sveglia
di 5 minuti.
2. In modalità di visualizzazione normale, premere
[ UP] per selezionare l'unità di misura tra
°C
e
°F
.
In modalità di impostazione, premere [{ UP] per
aumentare il valore visualizzato di una unità;
tenerlo premuto per aumentarlo rapidamente.
3. In modalità di visualizzazione normale, tenere
premuto [ DOWN] per avviare o arrestare la sincr-
onizzazione RCC. In modalità di impostazione,
premere [ DOWN] per diminuire il valore visualizzato
di una unità; tenerlo premuto per diminuirlo rapid-
amente.
4. Tenerlo premuto [ CH ] per annullare il canale
corrente.
5. In modalità di visualizzazione normale, premere
[ SET ] per visualizzare l'orario della sveglia, e
tenere premuto [ SET ] per impostare la sveglia.
In modalità di visualizzazione dell'orologio, tenere
premuto [ SET ] per impostare l'ora.
6. Premere [ MAX/MIN ] per visualizzare l'umidità e
la temperatura massima e minima. Durante la
visualizzazione dei valori massimi e minimi, tenere
premuto [ MAX/MIN ] per eliminarli dalla memoria.
7. Supporto per parete
8. Vano batterie
9. Supporto per tavolo
SENSORE ESTERNO
1. Coperchio del vano batterie
2. Vano batterie
3. Pulsante RESET
(ripristino di tutte le impostazioni)
4. Selezione del canale
5. Sensore di trasmissione dei dati
2
3
4
RESET
1 2 3
AAA 1.5V
AAA 1.5V
5
1
10
1
22
23
4
25
26
7
8
9

PULSANTE
MODALITÀ
SNZ/LIGHT
Modalità
normale
PRESSIONE
SINGOLA
Attivazione
della
retroilluminazione.
Posticipo della
sveglia quando
suona.
PRESSIONE
PROLUNGATA
Modalità
impostazione
orologio
_______
_______
_______
_______
UP DOWN CH MAX/MIN
Selezione
dell'unità
di misura
tra °C e °F
_______
_______
_______
_______
Annullamento
del canale
corrente.
Visualizzazione
dell'orario
della sveglia.
Accesso
alla modalità
di
impostazione.
Diminuzione
del valore.
Visualizzazione
della
temperatura
massima
e minima
Durante la
visualizzazione
dei valori massimi e
minimi, eliminazione
dalla memoria.
_______
_______
_______
Modalità
impostazione
sveglia
PRESSIONE
PROLUNGATA
PRESSIONE
PROLUNGATA
PRESSIONE
SINGOLA
PRESSIONE
SINGOLA
DISPLAY LCD
1. Previsioni meteo
2. Orologio/sveglia e data
3. Temperatura e umidità interne
4. Temperatura e umidità esterne
[ ] Indicatore sveglia
[ ] Indicatore segnale RCC
[ ] Indicatore andamento
[ ] Indicatore batteria scarica
[ ] Indicatore RF
EN
IT
DE
FR
ES
NL
11
_______
_______
Diminuzione
del valore.
Diminuzione
rapida
del valore.
Diminuzione
del valore.
Diminuzione
rapida
del valore.
Avvio o arresto
della
sincronizzazione
RCC.
Aumento
del valore.
Aumento rapido
del valore.
Aumento
del valore.
Aumento rapido
del valore.
SET
_______
Diminuzione
del valore.
_______
_______
1
2
3
4
_______
_______

OPERAZIONI PRELIMINARI
INSERIMENTO DELLE BATTERIE
1. Rimuovere il coperchio del vano batterie situato
sul retro dell'unità.
2. Inserire 3 batterie AAA (LR03)/1,5 V. Assicurarsi
di rispettare l'orientamento dei poli (+/-) durante
l'installazione delle batterie.
3. Riposizionare il coperchio del vano batterie.
NOTA: sostituire le batterie quando appare [ ]
o quando la luminosità del display si abbassa.
SENSORE ESTERNO
L'unità principale può ricevere dati da un massimo
di 3 sensori esterni. Nella confezione sono inclusi
3 sensori.
1. Rimuovere il coperchio del vano batterie situato
sul retro dell'unità.
2. Selezionare un canale.
3. Inserire 2 batterie AAA (LR03)/1,5 V. Assicurarsi
di rispettare l'orientamento dei poli (+/-) durante
l'installazione delle batterie.
4. Riposizionare il coperchio del vano batterie.
5. Posizionare il sensore entro 30 m (98 ft) di
distanza dall'unità principale usando il supporto
per tavolo o per parete.
RICERCA DEL SENSORE
Dopo aver installato le batterie, l'unità principale
cercherà automaticamente un nuovo sensore. Il
processo di ricerca richiede >3 minuti. Durante il
processo di ricerca, l'indicatore RF [ ]
lampeggerà. Dopo aver ricevuto il segnale, l'unità
principale visualizzerà la temperatura e l'umidità
esterne.
Tenere premuto [ CH] per riavviare la ricezione RF
dei dati. In caso di mancata ricezione RF entro 1
ora, sul display lampeggerà "--.-".
Per avviare manualmente la ricerca di un sensore
esterno, tenere premuto [ CH ].
NOTA: la portata di trasmissione può variare in
base a diversi fattori. Potrebbe essere necessario
provare diverse punti di installazione per ottenere
i migliori risultati.
OROLOGIO
IMPOSTAZIONE AUTOMATICA DELL'OROLOGIO
1. Dopo aver inserito o sostituito le batterie verrà
avviata la sincronizzazione RCC. Per avviare
manualmente la sincronizzazione RCC, tenere
premuto il pulsante [ DOWN ].
2. In caso di modifica manuale dei parametri
relativi a data e ora (anno, mese, giorno, ora,
minuti, ecc.) dopo la sincronizzazione RCC,
l'indicatore RCC [ ] scomparirà dal display.
3. Al termine del processo di sincronizzazione, il
simbolo RCC [ ] rimarrà acceso sul display,
e la data e l'ora verranno impostate automati-
camente. In caso contrario, tenere premuto il
pulsante [ DOWN ] per riavviare la sincronizza-
zione RCC.
4. La sincronizzazione RCC si avvia automatica-
mente ogni notte tra l'1:00 e le 5:00. La funzione
di sincronizzazione automatica si arresta in caso
di sincronizzazione avvenuta. In caso di mancata
ricezione del segnale RCC, la sincronizzazione
verrà ripetuta il giorno successivo.
5. Se l'orologio non si sincronizza automaticam-
ente, sarà necessario impostarlo manualmente.
IMPOSTAZIONE MANUALE DELL'OROLOGIO
1. Tenere premuto il pulsante [ SET] per accedere
alla modalità di impostazione di data e ora.
2. Il parametro da impostare lampeggerà.
3. Premere il pulsante [ UP ] per diminuire il valore
di 1 unità. Tenere premuto il pulsante [ UP ] per
aumentare rapidamente il valore.
4. Premere il pulsante [ DOWN ] per diminuire il
valore di 1 unità. Tenere premuto il pulsante
[ DOWN ] per diminuire rapidamente il valore.
5. Premere il pulsante [ SET ] per confermare
l'impostazione e passare al parametro successivo.
6. Sequenza dei parametri: Fuso orario Ora
Minuti Anno Mese Giorno
Formato orario 12/24 ore Uscita
7. Se non viene premuto alcun pulsante entro 20
secondi, o se viene premuto il pulsante [ SET ],
le impostazioni verranno memorizzate e l'unità
uscirà dalla modalità di impostazione.
12

IMPOSTAZIONE DELL'UNITÀ DI MISURA °C/°F
Premere il pulsante [ UP ] per selezionare i gradi
Celsius (°C) o Fahrenheit (°F).
SVEGLIA
IMPOSTAZIONE DELL'ORARIO DELLA SVEGLIA
1. Premere il pulsante [ SET ] per visualizzare
l'orario della sveglia.
2.
Tenere premuto il pulsante [ SET ] per accedere
alla modalità di impostazione della sveglia.
3. Il parametro da impostare lampeggerà.
4. Premere il pulsante [ UP ] o [ DOWN ] per
impostare il valore desiderato.
5. Sequenza dei parametri: Ora Minuti
Uscita
5. Premere il pulsante [ SET ] per confermare
l'impostazione e uscire.
6. La sveglia si attiverà automaticamente al
termine dell'impostazione dell'orario della
sveglia. La durata della sveglia è di 2 minuti.
ATTIVAZIONE/DISATTIVAZIONE DELLA SVEGLIA
Premere il pulsante [ SET ] per visualizzare l'orario
della sveglia. Premere il pulsante [ UP ] o [ DOWN ]
per attivare/disattivare la sveglia.
POSTICIPO DELLA SVEGLIA
1. All'orario impostato, la sveglia suonerà.
2.
Quando la sveglia suona, premere il pulsante
[ SNZ / LIGHT ] per posticiparla di 5 minuti.
3. Per arrestare la sveglia, premere qualsiasi
pulsante ad eccezione di [ SNZ / LIGHT ].
4. La sveglia suonerà nuovamente il giorno
successivo, a meno che non venga disattivata:
premere il pulsante [ SET ] per visualizzare
l'orario della sveglia, quindi premere il pulsante
[ UP ] o [ DOWN ] fino alla disattivazione.
GIORNO DELLA SETTIMANA
Sono visualizzate le prime due lettere.
TEMPERATURA E UMIDITÀ
La temperatura interna è sempre visualizzata al
centro del display, sotto l'orologio. Per visualizzare
la temperatura esterna è possibile collegare fino
a 3 sensori esterni all'unità principale.
EN
IT
DE
FR
ES
NL
VALORI MASSIMI E MINIMI
1. Premere [ MAX/MIN ] per visualizzare la
temperatura massima e minima.
2. Sequenza dei parametri: Valori correnti > MAX
(valori massimi) > MIN (valori minimi)
3. Durante la visualizzazione dei valori massimi e
minimi, tenere premuto [ MAX/MIN ] per eliminarli
dalla memoria.
ANDAMENTO DELLE TEMPERATURE
Quando la temperatura sale di 1°C / 2°F, sul display
apparirà l'indicatore [ ] (freccia verso l'alto).
Quando la temperatura scende di 1°C / 2°F, sul
display apparirà l'indicatore [ ] (freccia verso
il basso).
NOTA: l'andamento confronta i dati correnti con i
dati misurati 3 ore prima. I dati vengono rilevati
ogni 30 minuti.
PREVISIONI METEO
Questa unità visualizza le condizioni atmosferiche
delle 12 ore seguenti in base ai valore misurati.
Sono disponibili 6 tipi di previsioni meteo.
13
SIMBOLO
DESCRIZIONE
Soleggiato
Parzialmente
soleggiato
Nuvoloso
Pioggia
Temporali
Neve

RETROILLUMINAZIONE
Quando l'unità è alimentata a batterie, premere
[ SNZ / LIGHT ] per attivare la retroilluminazione
al livello ALTO per 10 secondi.
Dopo aver collegato l'unità all'adattatore, la ret-
roilluminazione si attiverà automaticamente al
livello ALTO. Premere [ SNZ / LIGHT ] per regolare
il livello di luminosità: ALTO BASSO
SPENTO ALTO
SPECIFICHE TECNICHE
UNITÀ PRINCIPALE
Dimensioni
141 x 21 x 124 mm(L x P x H)
Peso
230 g (batterie escluse)
Alimentazione
Adattatore CC 5 V 150 mA
3 batterie AAA (LR03) da 1,5 V
TEMPERATURA
Gamma di temperature interne
Da 0°C a +50°C (da 32°F a 122°F)
Gamma di temperature esterne
Da -40 °C a +70 °C (da -40 °F a 158 °F)
UMIDITÀ:
Gamma di umidità interna/esterna
20% - 99% RH
SENSORE ESTERNO
Dimensioni
51 x 39,5 x 95 mm (L x P x H)
Peso
45 g (batterie escluse)
Portata di trasmissione
30 m (98 ft)
Intervallo di temperature
Da -40 °C a +70 °C (da -40 °F a 158 °F)
Frequenza del segnale
433 MHz
Potenza di trasmissione max
Inferiore a 10 mW
Alimentazione
2 batterie AAA (LR03) da 1,5 V
DICHIARAZIONE DI CONFORMITÀ
CE
Con la presente Explore Scientific GmbH
dichiara che il tipo di apparecchiatura
identificato con il codice WSH4005 è
conforme alla direttiva 2014/53/UE. Il testo integrale
della dichiarazione di conformità UE è disponibile
all’indirizzo Internet: www.bresser.de/download/
WSH4005/CE/WSH4005_CE.pdf
ISTRUZIONI PER LA PULIZIA
• Rimuovere le batterie prima della pulizia.
• Usare esclusivamente un panno asciutto per pulire
le superfici esterne dell'apparecchio. Per evitare
di danneggiare i componenti elettronici, non usare
detergenti liquidi.
• Proteggere l'apparecchio da polvere e umidità.
14

EN
IT
DE
FR
ES
NL
SMALTIMENTO
Smaltire correttamente i materiali di imb-
allaggio in base al tipo, ad esempio carta
o cartone. Contattare il servizio di raccolta
dei rifiuti o l'autorità competente per informazioni
sul corretto smaltimento.
Non smaltire gli apparecchi elettronici nei
rifiuti domestici. Ai sensi della direttiva
2002/96/CE del Parlamento europeo sullo
smaltimento di apparecchiature elettriche ed
elettroniche, così come recepita nelle legislazioni
locali, i dispositivi elettronici usati devono essere
smaltiti separatamente e riciclati nel rispetto
dell’ambiente.
Ai sensi delle normative sulle batterie
standard e ricaricabili, il loro smaltimento
nei rifiuti domestici è espressamente vietato.
Assicurarsi di smaltire le batterie usate confor-
memente alle normative in vigore: portarle presso
gli appositi punti di raccolta o consegnarle al
rivenditore. Il loro smaltimento nei rifiuti domestici
viola la direttiva sulle batterie. Le batterie cont-
enenti sostanze tossiche sono contrassegnate
da un simbolo chimico.
1
Batteria contenente cadmio
2
Batteria contenente mercurio
3
Batteria contenente piombo
¹ ² ³
GARANZIA E ASSISTENZA
Il periodo di garanzia dura 2 anni e ha inizio dalla
data di acquisto. Per richiedere il prolungamento
del periodo di garanzia come riportato sulla confe-
zione, è necessario effettuare la registrazione sul
nostro sito web. I termini completi della garanzia,
le informazioni sulprolungamento del periodo di
garanzia e i dettagli del nostro servizio di assistenza
sono disponibili all'indirizzo www.bresser.de/
warranty_terms.
Per ottenere le istruzioni dettagliate nelle altre lingue
disponibili, visitare il nostro sito web scansionando
il codice QR riportato di seguito.
In alternativa è possibile inviare un'e-mail all'indirizzo
[email protected] o telefonare al numero
+49 (0) 28 72 – 80 74-220*. Fornire il proprio nome,
recapito, numero di telefono e indirizzo e-mail, oltre
al nome e al numero identificativo del prodotto.
*Le chiamate dalla Germania sono addebitate in base alle tariffe
locali (l'importo della chiamata dipende dalle tariffe del proprio
operatore); le chiamate dall'estero sono soggette a cos
ti
maggiori.
DOWNLOAD DEL MANUALE:
www.bresser.de/download/WSH4005
RIPARAZIONI E GARANZIA:
www.bresser.de/warranty_terms
15

ALLGEMEINE WARNHINWEISE
• GEFAHR eines STROMSCHLAGS! — Dieses Gerät
beinhaltet Elektronikteile. Die Nutzung darf nur
erfolgen, wie in der Anleitung beschrieben,
andernfalls besteht die GEFAHR eines
STROMSCHLAGS!
• ERSTICKUNGSGEFAHR! — Kinder sollten das Gerät
nur unter Aufsicht benutzen. Verpackungsmaterialien
(Plastiktüten, Gummibänder, etc.) von Kindern
fernhalten! Es besteht ERSTICKUNGSGEFAHR!
• VERÄTZUNGSGEFAHR! — Batterien außer Reichweite
von Kindern aufbewahren! Achten Sie beim Einlegen
der Batterie auf die richtige Polung. Ausgelaufene
Batteriesäure kann zu Verätzungen führen!
Vermeiden Sie den Kontakt von Batteriesäure mit
Haut, Augen und Schleimhäuten. Spülen Sie bei
Kontakt mit der Säure die betroffenen Stellen sofort
mit reichlich klarem Wasser ab und suchen Sie
einen Arzt auf.
ÜBER DIESER ANLEITUNG
Diese Betriebsanleitung ist als Bestandteil
des Gerätes zu betrachten. Bitte lesen Sie vor
der Nutzung des Geräts die Sicherheitshinweise und
die Bedienungsanleitung aufmerksam durch.
Bewahren Sie diese Bedienungsanleitung für die
erneute Verwendung zu einem späteren Zeitpunkt
auf. Bei Verkauf oder Weitergabe des Gerätes ist
die Bedienungsanleitung an den nachfolgenden
Besitzer/Benutzer des Produkts weiterzugeben.
Das Gerät ist nur für den Betrieb in Innenräumen
bestimmt!
• BRAND-/EXPLOSIONSGEFAHR! —Setzen Sie das
Gerät keinen hohen Temperaturen aus. Benutzen
Sie nur die empfohlenen Batterien. Gerät und
Batterien nicht kurzschließen oder ins Feuer werfen!
Durch übermäßige Hitze und unsachgemäße
Handhabung können Kurzschlüsse, Brände und
sogar Explosionen ausgelöst werden!
• Bauen Sie das Gerät nicht auseinander! Wenden
Sie sich im Falle eines Defekts bitte an Ihren
Fachhändler. Er nimmt mit dem Service-Center
Kontakt auf und kann das Gerät ggf. zur Reparatur
einschicken.
• Benutzen Sie nur die empfohlenen Batterien.
Ersetzen Sie schwache oder verbrauchte Batterien
immer durch einen komplett neuen Satz Batterien
mit voller Kapazität. Verwenden Sie keine Batterien
unterschiedlicher Marken, Typen oder unterschiedlich
hoher Kapazität. Entfernen Sie die Batterien aus
dem Gerät, wenn es längere Zeit nicht benutzt wird!
LIEFERUMFANG
Wetterstation, 3x Außensender, Bedienungsanleitung,
DC 5 V 150 mA Netzteil, 9x AAA Batterien.
VOR DEM GEBRAUCH
• Wir empfehlen die Verwendung von Alkali-Mangan
-Batterien. Bei Temperaturen, die regelmäßig unter
0°C (32°F) fallen, empfehlen wir Lithiumbatterien.
• Verwenden Sie nach Möglichkeit keine Wiederaufl
-adbaren Batterien. (Wiederaufladbare Batterien
können auf Dauer die Leistungsanforderungen
nicht erfüllen.)
• Legen Sie vor dem ersten Gebrauch die Batterien
ein und achten Sie dabei auf die korrekte Polarität
im Batteriefach. 3x AAA Batterien werden für die
Wetterstation und 2x AAA Batterien werden für
den Außensensor benötigt.
16

PRODUKTÜBERSICHT
1. [SNZ / LIGHT]: Drücken zum Aktivieren und
Einstellen der Hintergrundbeleuchtung oder
Aktivieren der Schlummerfunktion (Snooze), um
den Alarmton 5 Minuten lang zu unterbrechen.
2. [ UP ]: Im Normalmodus drücken zur Auswahl von
°C
oder
°F. Im Einstellmodus den angezeigten
Wert durch Drücken von [ UP ] um eine Einheit
erhöhen oder Taste gedrückt halten für schnellen
Vorlauf.
3. [ DOWN ]: Im Normalmodus drücken zur Auswahl
des DCF-Empfangsmodus. Im Einstellmodus
den angezeigten Wert durch Drücken von [ DOWN ]
um eine Einheit verringern oder Taste gedrückt
halten für schnellen Rücklauf.
4. [ CH ]: Gedrückt halten, um den angezeigten
Kanal zu löschen.
5. [ SET ]: Im Normalmodus drücken zur Anzeige
der Weckzeit, dann [ SET ] gedrückt halten zur
Einstellung der Weckzeit. Im Zeitanzeigemodus
[ SET ] gedrückt halten zur Einstellung der Uhrzeit
und des Datums.
6. [ MAX/MIN ]: Einmal drücken zur Anzeige der
Max./Min.-Temperatur und der Luftfeuchtigkeit.
Bei Anzeige der Max./Min.-Werte [ MAX/MIN ]
gedrückt halten, um die Werte zurückzustellen.
7. Aufhängevorrichtung.
8. Batteriefach.
9. Tischständer.
AUSSENSENSOR
1. Batteriefachdeckel.
2. Batteriefach.
3. RESET-Taste
(Alle Einstellungen zurücksetzen).
4. Kanalschalter.
5. Datenübertragungsleuchte
2
3
4
RESET
1 2 3
AAA 1.5V
AAA 1.5V
5
1
EN
IT
DE
FR
ES
NL
17
1
22
23
4
25
26
7
8
9

TASTE
MODUS
SNZ/LIGHT
Standard
-Modus
drücken
Hintergrundbeleuchtung
einschalten.
SNOOZE
(Schlummern),
wenn Alarmton ertönt.
gedrückt
halten
Zeiteinstellungs
-Modus
_______
_______
Alarmeinstellungs
-Modus
_______
_______
UP DOWN CH MAX/MIN
°C oder °F
auswählen.
_______
_______
_______
_______
DCF-Empfang
beginnen oder
beenden.
Angezeigten
Kanal löschen.
Weckzeit
anzeigen.
Einstellmodus
aufrufen.
Einstellung
bestätigen
Max./Min.
-Temperatur
anzeigen.
Max./Min.-Werte
bei Anzeige
zurücksetzen.
_______
_______
_______
drücken
drücken
gedrückt
halten
gedrückt
halten
LCD-ANZEIGE
1. Wettervorhersage
2. Uhrzeit/Weckzeit und Kalender
3. Innentemperatur und Luftfeuchtigkeit
4. Außentemperatur und Luftfeuchtigkeit
[ ] Alarm
[ ] DCF-Empfangssymbol
[ ] Verlaufssymbol
[ ] Symbol für niedrigen
Batteriestand
[ ] Funkempfangssymbol
18
_______
_______
Verringern
Schneller
Rücklauf
Verringern
Schneller
Rücklauf
Erhöhen
Schneller
Vorlauf
Erhöhen
Schneller
Vorlauf
SET
_______
Einstellung
bestätigen
_______
_______
1
2
3
4
_______
_______

ERSTE SCHRITTE
BATTERIEN EINLEGEN
1. Nehmen Sie den Batteriefachdeckel auf der
Rückseite ab.
2. Legen Sie 3 AAA-Batterien (LR03 – 1,5 V) ein.
Achten Sie beim Einlegen der Batterien auf die
richtige Polung (+/-).
3. Schließen Sie das Batteriefach wieder.
HINWEIS: Wechseln Sie die Batterien, wenn das
Symbol [ ] angezeigt wird oder das Display
nur noch schwach leuchtet.
AUSSENSENSOR
Die Wetterstation kann Daten von bis zu 3 Auße-
nsendern empfangen. Im Lieferumfang sind 3
Sender enthalten.
1. Nehmen Sie den Batteriefachdeckel auf der
Rückseite ab.
2. Wählen Sie einen Kanal aus.
3. Legen Sie 2 AAA-Batterien (LR03 – 1,5 V) ein.
Achten Sie beim Einlegen der Batterien auf die
richtige Polung (+/-).
4. Schließen Sie das Batteriefach wieder.
5. Platzieren Sie den Außensender mit dem
Tischständer oder der Aufhängevorrichtung in
höchstens 30 m Entfernung von der Basisstation.
SENDERSUCHE:
Nach dem Einlegen der Batterien sucht die Basi-
sstation automatisch nach einem neuen Sender.
Der Empfangsvorgang dauert 3 Minuten. Während
dieses Empfangsvorgangs blinkt das Antennen-
symbol [ ]. Nach Empfang des Signals überm-
itteltder Außensender gleichzeitig die Außente-
mperatur und die Luftfeuchtigkeit.
Halten Sie die Taste [ CH ] gedrückt, um die Fun-
kkanäle erneut zu registrieren.
Falls länger als 1 Stunde kein Sendersignal em-
pfangen wird, blinkt auf der Anzeige “--.-”.
Halten Sie [ CH ] gedrückt, um manuell eine Au-
ßensendersuche einzuleiten.
HINWEIS: Die Sendereichweite hängt von versc-
hiedenen Faktoren ab. Probieren Sie gegebene-
nfalls mehrere Aufstellorte aus, um beste Erge-
bnisse zu erzielen.
UHRZEIT
EMPFANG DER UHRZEIT
1. Wenn Sie die Batterien einlegen oder wechseln,
versucht die Uhr, das DCF-Signal zu empfangen.
Halten Sie die Taste [ DOWN ] gedrückt, um das
DCF-Signal manuell zu suchen.
2. Wenn die Uhr das DCF-Signal empfängt und
Sie die Einstellungen (wie Jahr, Monat,
Wochentag, Stunde, Minute usw.) manuell ändern,
verschwindet das DCF-Empfangssymbol [ ]
automatisch.
3. Bei erfolgreichem Empfang des DCF-Signals
wird das DCF-Empfangssymbol [ ] auf dem
Display angezeigt, und das Datum und die
Uhrzeit werden automatisch eingestellt. Ist kein
Empfang möglich, können Sie einen erneuten
Empfangsversuch starten, indem Sie die Taste
[ DOWN ] gedrückt halten.
4. Der DCF-Signalempfang findet automatisch
jeden Tag von 1:00 Uhr bis 5:00 Uhr morgens
statt. Bei erfolgreichem Empfang wird die au-
tomatische Empfangsfunktion beendet. Falls
das DCF-Signal nicht empfangen wird, finden
weitere Empfangsversuche am nächsten Tag
statt.
5. Falls die Uhr das Signal nicht empfangen kann,
müssen Sie die Uhrzeit manuell einstellen.
UHRZEIT UND KALENDER MANUELL EINSTELLEN
1. Halten Sie die Taste [ SET ] gedrückt, um in den
Einstellmodus für die Uhrzeit und das Datum
zu gelangen.
2. Der einzustellende Wert blinkt.
3. Durch einmaliges Drücken der Taste [ UP ] wird
der Wert um 1 erhöht. Wenn Sie die Taste [ UP ]
gedrückt halten, wird der Wert im Schnelllauf
erhöht.
4. Durch einmaliges Drücken der Taste [ DOWN ]
wird der Wert um 1 verringert. Wenn Sie die
Taste [ DOWN ] gedrückt halten, wird der Wert
im Schnelllauf verringert.
5. Drücken Sie die Taste [ SET ], um die Einstell-
ung zu bestätigen und zum nächsten Wert zu
springen.
6. Reihenfolge der einzustellenden Werte:
Zeitzone Stunde Minute Jahr
Monat Tag 12/24HR
Einstellmodus verlassen
7. Wenn 20 Sekunden lang keine Taste gedrückt
wird oder wenn Sie die Taste [ SET ] drücken,
wird die Einstellung gespeichert und der Eins-
tellmodus verlassen.
EN
IT
DE
FR
ES
NL
19

°C/°F-EINSTELLUNG
Drücken Sie die Taste [ UP ], um zwischen Celsius
(°C) oder Fahrenheit (°F) auszuwählen.
ALARM
WECKZEIT EINSTELLEN
1. Drücken Sie [ SET ], um die Weckzeit anzuzeigen.
2. Halten Sie die Taste [ SET ] gedrückt, um den
Einstellmodus für die Weckzeit aufzurufen.
3. Der einzustellende Wert blinkt.
4. Drücken Sie die Taste [ UP ] oder [ DOWN ], um
die gewünschte Weckzeit einzustellen.
5. Reihenfolge der einzustellenden Werte: Stunde
Minute Einstellmodus verlassen
5. Drücken Sie die Taste [ SET ], um die Einstellung
zu bestätigen und den Einstellmodus zu verl-
assen.
6. Nach Beenden der Weckzeiteinstellung wird
der Alarm automatisch aktiviert. Der Alarmton
ertönt 2 Minuten lang.
ALARMFUNKTION EIN-/AUSSCHALTEN
Drücken Sie [ SET ], um die Weckzeit anzuzeigen.
Drücken Sie die Taste [ UP ] oder [ DOWN ], um
die Alarmfunktion ein-/auszuschalten.
SCHLUMMERFUNKTION
1. Zur eingestellten Weckzeit ertönt der Alarmton.
2. Wenn der Alarmton ertönt, können Sie den Alarm
durch Drücken der Taste [ SNZ / LIGHT ] für 5
Minuten unterbrechen.
3. Drücken Sie eine beliebige andere Taste außer
[ SNZ / LIGHT ], um den Alarm zu beenden.
4. Der Alarm aktiviert sich danach erneut zur
gleichen Weckzeit, sofern die Alarmfunktion
nicht ausgeschaltet wird. Zum Ausschalten der
Funktion drücken Sie zuerst die Taste [ SET ],
damit die Weckzeit angezeigt wird, und dann
zum Ausschalten des Alarms die Taste [ UP ]
oder [ DOWN ].
ANZEIGE DES WOCHENTAGS
Es werden die ersten beiden Buchstaben angezeigt.
Die Innentemperatur wird immer in der Mitte des
Displays unterhalb der Uhrzeit angezeigt. Zum Em-
pfang der Außentemperatur können Sie bis zu 3
Außensender mit der Basisstation verbinden.
MANUELLE MESSWERTANZEIGE
1. Drücken Sie die Taste [ MAX/MIN ], um die ma-
ximale und minimale Temperatur anzuzeigen.
2. Anzeigereihenfolge: Aktuelle Werte > MAX (H-
öchstwerte) > MIN (Tiefstwerte)
3. Halten Sie bei der Anzeige der Höchst- oder Ti-
efstwerte die Taste [ MAX/MIN ] gedrückt, um a
lle gespeicherten Werte zu löschen.
TEMPERATURVERLAUFSANZEIGE
Wenn die Temperatur um 1°C / 2°F steigt, erscheint
das Pfeil-nach-oben-Symbol [ ].
Wenn die Temperatur um 1°C / 2°F fällt, erscheint
das Pfeil-nach-unten-Symbol [ ].
HINWEIS: Die Verlaufsfunktion vergleicht den ak-
tuellen Wert mit dem 3 Stunden zuvor gemessenen
Wert. Die Werte werden alle 30 Minuten aufgezei-
chnet.
WETTERVORHERSAGE
Dieses Gerät berechnet auf der Grundlage der
Messwerte eine Wettervorhersage für die nächsten
12 Stunden. Es unterscheidet zwischen 6 Wetter-
symbolen.
20
SYMBOL
BEDEUTUNG
Sonnig
Teilweise
bewölkt
Bedeckt
Regen
Sturm
Schnee
La page est en cours de chargement...
La page est en cours de chargement...
La page est en cours de chargement...
La page est en cours de chargement...
La page est en cours de chargement...
La page est en cours de chargement...
La page est en cours de chargement...
La page est en cours de chargement...
La page est en cours de chargement...
La page est en cours de chargement...
La page est en cours de chargement...
La page est en cours de chargement...
La page est en cours de chargement...
La page est en cours de chargement...
La page est en cours de chargement...
La page est en cours de chargement...
La page est en cours de chargement...
La page est en cours de chargement...
La page est en cours de chargement...
La page est en cours de chargement...
La page est en cours de chargement...
La page est en cours de chargement...
La page est en cours de chargement...
La page est en cours de chargement...
-
 1
1
-
 2
2
-
 3
3
-
 4
4
-
 5
5
-
 6
6
-
 7
7
-
 8
8
-
 9
9
-
 10
10
-
 11
11
-
 12
12
-
 13
13
-
 14
14
-
 15
15
-
 16
16
-
 17
17
-
 18
18
-
 19
19
-
 20
20
-
 21
21
-
 22
22
-
 23
23
-
 24
24
-
 25
25
-
 26
26
-
 27
27
-
 28
28
-
 29
29
-
 30
30
-
 31
31
-
 32
32
-
 33
33
-
 34
34
-
 35
35
-
 36
36
-
 37
37
-
 38
38
-
 39
39
-
 40
40
-
 41
41
-
 42
42
-
 43
43
-
 44
44


Explore Scientific Weather Station Le manuel du propriétaire
- Catégorie
- Stations météo
- Taper
- Le manuel du propriétaire
- Ce manuel convient également à
dans d''autres langues
Documents connexes
-
EXPLORE WSH4002 Le manuel du propriétaire
-
Explore Scientific 4007922069241 Le manuel du propriétaire
-
 Explore Scientific WSH4008000000 Le manuel du propriétaire
-
Explore Scientific ST1004H Le manuel du propriétaire
-
 Explore Scientific ST1005H Le manuel du propriétaire
-
Explore Scientific ST1003H Le manuel du propriétaire
-
 Explore Scientific WSH4009000000 Le manuel du propriétaire
-
-
 Explore Scientific Jumbo Le manuel du propriétaire
-
Explore Scientific WSH5001 Manuel utilisateur


Autres documents
-
TFA 35.1142 Manuel utilisateur
-
-
 NASA WS100 Weather Station Manuel utilisateur
-
-
-
Hama 00186379 Le manuel du propriétaire
-
Clatronic WSU 7023 Manuel utilisateur
-
 NASA WS300 Weather Station Manuel utilisateur
-
AEG FU 4002 P Le manuel du propriétaire
-
König KN-WS200 Le manuel du propriétaire

