evolur C147zwOJZIL Le manuel du propriétaire
- Catégorie
- Poussettes
- Taper
- Le manuel du propriétaire

Read all instructions before
assembling and using product.
IMPORTANT - Keep instructions for
future use. 0922R2-365EV
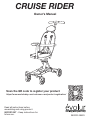
Owner’s Manual
CRUISE RIDER
Scan the QR code to register your product
https://www.evolurbaby.com/customer-care/product-registration/

2www.evolurbaby.com/help
…. for choosing Evolur and congratulations on joining our family;
a family that has been transforming lives for over 30+ years!
We appreciate your feedback and wish you the very best in the
coming years with your new addition. If you have any questions
or concerns please don’t hesitate to reach out to us. One of our
trusted Customer Care representatives will be happy to assist you.
Thank you again for entrusting us to provide you with safe
and affordable baby products and accessories.
THANK YOU...
LIMITED WARRANTY:
• Evolur warrants its product to be free from defects in material and
workmanship and agrees to remedy any such defect.
• This warranty covers 1 year from the date of original purchase.
• This warranty is valid only upon presentation of proof of purchase.
• This is solely limited to the repair or replacement of defective furniture
components and no assembly labor is included.
• This warranty does not apply to any product which has been improperly
assembled, subjected to misuse or abuse or which has been altered or
repaired in any way.
• This warranty gives you specific legal rights and you may also have other
rights which vary from State to State.

3
www.evolurbaby.com/help
WARNINGS
IMPORTANT!
FAILURE TO FOLLOW THESE WARNINGS AND THE ASSEMBLY INSTRUCTIONS COULD RESULT
IN SERIOUS INJURY OR DEATH.
• ADULT ASSEMBLY REQUIRED.
• NEVER LEAVE CHILD UNATTENDED. ALWAYS KEEP CHILD IN VIEW WHILE IN STROLLER.
• AVOID SERIOUS INJURY FROM FALLING OR SLIDING OUT. ALWAYS USE SEAT BELT. AFTER
FASTENING BUCKLES, ADJUST BELTS TO GET A SNUG T AROUND YOUR CHILD.
• AVOID FINGER ENTRAPMENT: USE CARE WHEN FOLDING AND UNFOLDING THE STROLLER.
BE CERTAIN THE STROLLER IS FULLY ERECTED AND LATCHED BEFORE ALLOWING YOUR
CHILD NEAR THE STROLLER.
• NEVER USE STROLLER ON STAIRS OR ESCALATORS. YOU MAY SUDDENLY LOSE CONTROL
OF THE STROLLER OR YOUR CHILD MAY FALL OUT. ALSO, USE EXTRA CARE WHEN GOING
UP OR DOWN A STEP OR CURB.
• AVOID STRANGULATION.
• DO NOT PLACE ITEMS WITH A STRING AROUND YOUR CHILD’S NECK, SUSPEND STRINGS
FROM THIS PRODUCT, OR ATTACH STRINGS TO TOYS.
• USE OF THE STROLLER WITH A CHILD WEIGHING MORE THAN 45 LB (20.5 KG) OR TALLER
THAN 37.8 IN (96CM) WILL CAUSE A HAZARDOUS UNSTABLE CONDITION TO EXIST. USE THE
STROLLER WITH ONLY ONE CHILD AT A TIME.
• TO PREVENT A HAZARDOUS, UNSTABLE CONDITION, NEVER PLACE PURSES, SHOPPING
BAGS, PARCELS OR ACCESSORY ITEMS ON THE HANDLE (OTHER THAN APPROVED
STROLLER BAGS). NEVER PLACE ANYTHING ON THE CANOPY.
• TO PREVENT A HAZARDOUS, UNSTABLE CONDITION, DO NOT PLACE MORE THAN 10 LB (4.5
KG) TOTAL IN THE STORAGE BASKET INCLUDING THE 2 LB (1 KG) IN THE BASKET
POCKET.(IF SUPPLIED)
• TO AVOID BURNS, NEVER PUT HOT LIQUIDS IN THE CUP HOLDERS.(IF SUPPLIED)
• TO PREVENT TIPPING, DO NOT PLACE MORE THAN 3 LB (1.36 KG) TOTAL IN THE
CUPHOLDERS/SNACK TRAY.
• DO NOT USE STORAGE BASKET AS A CHILD CARRIER.
• DO NOT ALLOW YOUR CHILD TO STAND ON THE BASKET. IT MAY COLLAPSE AND CAUSE
INJURY.
• NEVER PLACE CHILD IN THE STROLLER WITH HEAD TOWARD FOOTREST.
• NEVER ALLOW YOUR STROLLER TO BE USED AS A TOY.
• DISCONTINUE USING YOUR STROLLER SHOULD IT BECOME DAMAGED OR BROKEN.
• STROLLER TO BE USED ONLY AT WALKING SPEED PRODUCT NOT INTENDED FOR USE
WHILE JOGGING, SKATING, ETC.
• CAREGIVER MUST ALWAYS HELP CHILD GET INTO AND OUT OF THE STROLLER.
• NEVER LEAVE YOUR CHILD UNATTENDED IN THE STROLLER/RIDER. FIVE POINT SAFETY
HARNESS SHOULD BE KEPT ON AT ALL TIMES WHEN A BABY/CHILD IS IN THE
STROLLER/RIDER. NEVER HANG A SHOPPING BAG, PURSE, DIAPER BAG OR ANY OTHER
BAG TO THE HANDLE OF THE STROLLER/RIDER. ADDITIONAL WEIGHT ON THE HANDLE
COULD TIP THE STROLLER OR A BABY/CHILD COULD GET ENTANGLED BY A STRAP
CAUSING SUFFOCATION OR INJURY. PLEASE FOLLOW ALL SAFETY PROTOCOLS WHILE
USING THIS PRODUCT.

4www.evolurbaby.com/help
WARNINGS (cont.)
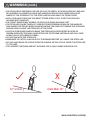
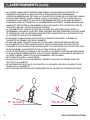
• THE STROLLER IS DESIGNED FOR USE ON FLAT OR GENTLY SLOPING SURFACES, AND MAY
BE UNSTABLE ON HIGHER SLOPING AND UNEVEN SURFACES AND USERS SHOULD BE
AWARE OF THE POSSIBILITY OF THE STROLLER ROLLING AWAY OR TIPPING OVER.
• WITH YOUR HAND THROUGH THE WRIST TETHER STRAP LOOP, PUSH THE STROLLER
HOLDING BOTH HANDLES.
• THE FRONT WHEELS MAY WOBBLE OR OSCILLATE WHEN WALKING FAST.
• THE STROLLER CAN BE TAKEN UP CURB BY EITHER PRESSING DOWN ON THE HANDLES
AND RAISING THE FRONT WHEELS AND MOUNTING THE CURB OR TURNING THE STROLLER
AROUND AND PULLING THE STROLLER UP THE CURB.
• CAUTION IS REQUIRED WHEN PUSHING THE STROLLER ACROSS STEEP SLOPES OR
UNEVEN SURFACES THIS MAY CAUSE STROLLER TO BECOME UNSTABLE AND FALL OVER.
ALWAYS HOLD THE HANDLES FIRMLY.
• DO NOT RUN WITH THE STROLLER.
• WHENEVER YOU STOP, ALWAYS APPLY THE BRAKES BEFORE YOU LEAVE THE STROLLER.
• DO NOT HANG BAGS OR GOODS FROM THE HANDLE AS THIS COULD CAUSE THE STROLLER
TO TIP OVER.
• THE UPRIGHT POSITIONS ARE NOT SUITABLE FOR A CHILD UNDER 6 MONTHS OLD.
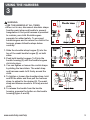
12° or less more than 12°
X

5
www.evolurbaby.com/help
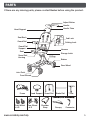
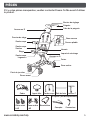
PARTS
If there are any missing parts, please contact Evolur before using the product.
Connecter
Guard Rail
Front Wheel
L & R
Rear Wheel
L & R
Brake Rail
Canopy
Shoulder
Strap
T-BarFrame Head Support
Guard Rail
Guard Rail
Support
Guard Rail
Housing
Seat Back
Seat
Front Wheels
Join-Point
Head Support
Brakes
Storage Latch
2nd Lock
Harness
Handle
Adjust Button
Handle Tube
Rear Wheel
Folding Lock
D-Ring

6www.evolurbaby.com/help
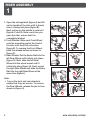
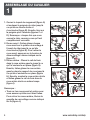
1
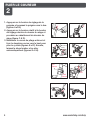
RIDER ASSEMBLY
J
I
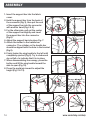
1. Open the storage latch (figure A) and lift
up the handle of the rider until it stands
erect, clicking into place (figure B).
Next, pull up on the handle to extend it
(figures C and D). Note: each time you
open the rider, ensure that it is
completely latched.
2. Front Wheels: Slide each Front Wheel
onto the mounting post at the front of
the rider until they click into place
(figure E). To remove the Front Wheel,
push the release button as shown in
(figure F).
3. Rear Wheels: Put the Brake Rail into the
left Rear Wheel until it clicks into place
(figure G). Next, slide the left Rear
Wheel into the wheel mount until it
clicks into place (figure H). Next, mount
the right Rear Wheel and slide the Brake
Rail into the right Rear Wheel at the
same time (figure I).
Note:
• Tug on the front and rear wheels to
ensure that they are secure. To remove
the Rear Wheels, release the pin lock as
shown in (figure J).

7
www.evolurbaby.com/help
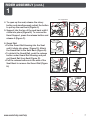
1
RIDER ASSEMBLY (cont.)
4. To open up the seat, release the rotary
button and simultaneously adjust the button
to pull up the seat back (Figure A).
5. Support into the top of the seat back until it
clicks into place (Figure B). To remove the
Head Support, press the release button and
release it (Figure C).
6. Guard Rail:
• Put the Guard Rail Housing into the Seat
until it clicks into place ( Figure D). Attach
the Guard Rail to the Seat Back (Figure E).
• To detach the Guard Rail, push the release
button under Guard Rail Housing and pull
out Guard Rail from Seat (Figure G).
• Pull the release buttons on the side of the
Seat Back to remove the Guard Rail (Figure
H).
Release
Button
H
F
E
G
The rotary button
The adjust
button

8www.evolurbaby.com/help
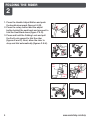
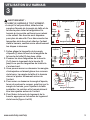
2
FOLDING THE RIDER
1. Press the Handle Adjust Button and push
the handle downward (figures A & B).
2. Press the rotary button and the adjust
button behind the seat back and proceed to
fold the Seat Back down (figure C & D).
3. Press and hold the Folding Lock and pull
the 2nd Lock upward to fold the rider
(figures E and F). Next, allow the rider to
drop and fold automatically (figures G & H).
Folding
Lock
2nd
Lock
The rotary
button
The adjust
button

9
www.evolurbaby.com/help
3
USING THE HARNESS
WARNING:
• USE THE HARNESS AT ALL TIMES.
• When not in use, disconnect shoulder straps
fromthe waist strap and buckle to prevent
trangulation.A five point harness is provided
to restrain your child. Buckletongues
separate for added safety. To econnect
buckletongues and to secure the child in the
harness, please followthe steps below
carefully.
1. Slide the shoulder strap tongue (1) into the
top of the waist buckle tongue (2) on both
sides.
2. Push both buckle tongues (1+2) into the
buckle housing (3) until the buckle tongues
click into place.
3. You can tighten or loosen the crotch straps
by sliding the bar sliders. The waist strap
and harness needs to fit firmly around the
child.
4. To tighten or loosen the shoulder strap, hold
and lift the slider and then pull the harness
strap, to adjust to the desired fit. The waist
strap and harness needs to fit firmly around
child.
5. To release the buckle from the buckle
housing, squeeze the button on the buckle
housing (figure A and B).
A
B
C

10 www.evolurbaby.com/help
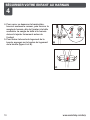
4
SECURING YOUR CHILD TO HARNESS
4. To tighten or loosen the shoulder strap,
hold and lift the slider and then pull the
harness strap, to adjust to the desired fit.
The waist strap and harness needs to fit
firmly around child.
5. To release the buckle from the buckle
housing, squeeze the button on the buckle
housing (figure A and B).

11
www.evolurbaby.com/help
5
USING THE BRAKES
1. Push the brake rail down to park the stroller. Lift
the brakes rail up to release the brakes as shown
in figure A.
WARNING:
• ALWAYS APPLY THE BRAKES WHEN THE
TROLLER IS STATIONARY.
6
ADJUST THE BACKREST
1. Adjustment of the reclined/upright position:
Press the adjust button and the rotary button
to adjust the backrest in reclined or upright
position (figure A).
WARNING:
• ALWAYS APPLY THE BRAKES WHEN THE
TROLLER IS STATIONARY.
The rotary
button
The adjust
button

12 www.evolurbaby.com/help
1. To use the T-bar, remove the Guard Rail from
the Guard Rail Housing and install the T-bar in
its place (figure A).
2. When folding the rider, press the spring button
on Tbar and pull it out from the seat (figure B).
7
USING THE T-BAR
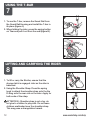
1. To lift or carry the Stroller, ensure that the
storage latch is engaged. rider so the rider is
balanced.
2. Using the Shoulder Strap: Press the spring
hook to attach the shoulder strap onto the the
D-Ring onto the rear oint on the rider. Apply for
both ends of the strap.
ATTENTION : Shoulder strap is not a toy. do
not give to children to play with. Do not leave
children unattended near the shoulder strap.
This may pose a strangulation hazard.
8
LIFTING AND CARRYING THE RIDER
B
A

13
www.evolurbaby.com/help
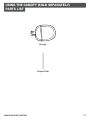
USING THE CANOPY (SOLD SEPARATELY)
PARTS LIST
Canopy
Support Bar

14 www.evolurbaby.com/help
1. Insert the support bar into the fabric
cover.
2. Hold the support bar from the back of
the connector (Fig 3), then put the end
of the support bar into the connector
with another hand (Fig 4 & 5).
3. For the other side, pull out the center
of the support bar slightly and insert
the support bar into the connector
(Fig 6).
4. Adjust the support bar into place Fig. 7.
5. Attach the holder to the handle bar
connector. The cylinder on the handle bar
should be aligned with the hole in the bracket
(Fig 8).
6. Firmly fasten the xing buckle to the left until
completely ejected (Fig 9). Try to shake and
do not fall o to indicate that it is in place.
7. When disassembling the canopy, press the
button and lift the xing buckle toward the
side to open (Fig 10).
8. Press the metal pin inward to adjust the
height (Fig11 & 12).
ASSEMBLY
Fabric
Cover
1
2
3
Connector
5
4
6
78
Handle
connector
9
10
Buckle
11 12

15
www.evolurbaby.com/help
BA
D
C
F
E
HG
USING THE STROLLER CONNECTOR (SOLD SEPARATELY)
The connector can be used for most
compact baby strollers.
1. Press the quick release button on the
connector to connect it to the rider as
shown in figure A/B/C. To detach the
connector, press the quick release
button to remove it.
2. To attach the connector to rear leg of
your baby stroller, use the strap located
on the other end of the connector. Make
sure that the strap is tight enough to
velcro it as shown in figures D/E/F.
ATTENTION:
• When using the connector on the left
rear leg of your baby stroller, connect it
to the right front leg of your Coast
Rider, and vice versa. Refer to Figures
G/H.

16 www.evolurbaby.com/help
CARE AND MAINTENANCE
ROOM CLIMATE CONTROL:
• TO PROLONG THE LIFE OF YOUR STROLLER KEEP IT CLEAN AND DO NOT LEAVE
IT IN THE DIRECT SUNLIGHT OR IN THE CAR BOOT FOR EXTENDED PERIODS OF
TIME.
• REMOVABLE FABRIC COVERS AND TRIMS MAY BE CLEANED USING WARM
WATER WITH A HOUSEHOLD SOAP OR MILD DETERGENT. ALLOW IT TO DRY
FULLY, PREFERABLY AWAY FROM THE DIRECT SUNLIGHT.
• NON REMOVABLE FABRIC COVERS AND TRIMS MAY BE SPOT CLEANED USING
A DAMP SPONGE WITH SOAP OR A MILD DETERGENT. ALLOW IT TO DRY
COMPLETELY BEFORE FOLDING OR STORING IT AWAY.
• IN SOME CLIMATES THE COVERS AND TRIMS MAY BE AFFECTED BY MOLD AND
MILDEW. TO HELP PREVENT THIS OCCURRING, DO NOT FOLD OR STORE THE
PRODUCT IF IT IS DAMP OR WET. ALWAYS STORE THE PRODUCT IN A WELL
VENTILATED AREA.
• WHEN USING YOUR STROLLER AT THE BEACH - COMPLETELY CLEAN YOUR
STROLLER AFTERWARDS TO REMOVE THE SAND AND SALT FROM THE
MECHANISMS AND WHEEL ASSEMBLY. SAND AND SALT WILL CAUSE
PREMATURE WEAR AND CORROSION.
• IF THERE ARE COMPRESSION MARKS ON THE WHEELS - USE A DOMESTIC HAIR
DRYER TO GENTLY WARM (DO NOT OVERHEAT) THE WHEELS AND THE
COMPRESSION MARKS SHOULD SLOWLY DISAPPEAR.
• ALWAYS CHECK PARTS REGULARLY FOR TIGHTNESS OF SCREWS, NUTS, AND
OTHER FASTENERS. TIGHTEN IF REQUIRED. TO MAINTAIN THE SAFETY OF YOUR
NURSERY PRODUCT, SEEK PROMPT REPAIRS FOR BENT, TORN, WORN OR
BROKEN PARTS.

1532 S. WASHINGTON AVE STE1
PISCATAWAY, NJ 08854-9908
www.evolurbaby.com
Follow Us On
to get your nursery featured on our social media.
E-mail: [email protected]
@Evolurbaby @evolurbaby
Chat with us!
Scan the QR code to Live Chat.
Enter our monthly giveaway!
Scan the QR code to register.
TM

Lisez toutes les instructions avant
avant d'assembler et d'utiliser le produit.
IMPORTANT - Conservez les instructions
pour une utilisation ultérieure. 0922R2-365EV
Manuel du propriétaire
CRUISE RIDER
Scannez le code QR pour enregistrer votre produit
https://www.evolurbaby.com/customer-care/product-registration/

2www.evolurbaby.com/help
... pour avoir choisi Evolur et félicitations pour avoir rejoint notre famille ; une
famille qui a transformé des vies depuis plus de 30 ans ! Nous apprécions
vos commentaires et nous vous souhaitons le meilleur dans les années à
venir avec votre nouvelle addition. Si vous avez des questions ou des
préoccupations, n'hésitez pas à nous contacter. L'un de nos représentants
du service clientèle se fera un plaisir de vous aider. Merci encore de nous
avoir fait confiance pour vous fournir des produits et accessoires pour bébés
sûrs et abordables. produits et accessoires pour bébés sûrs et abordables
MERCI...
GARANTIE LIMITÉE :
• Evolur garantit que son produit est exempt de tout défaut de matériel et
de fabrication et s'engage à remédier à tout défaut de ce type.
• Cette garantie couvre 1 an à partir de la date d'achat originale.
• Cette garantie n'est valable que sur présentation d'une preuve d'achat.
• Elle est uniquement limitée à la réparation ou au remplacement des
composants défectueux du meuble et aucune main d'œuvre de montage
n'est incluse.
• Cette garantie ne s'applique pas à un produit qui a été mal assemblé,
soumis à une mauvaise utilisation ou à un abus ou qui a été modifié ou
réparé de quelque façon que ce soit.
• Cette garantie vous donne des droits légaux spécifiques et vous pouvez
également avoir d'autres droits qui varient d'un État à l'autre. droits qui
varient d'un État à l'autre.

3
www.evolurbaby.com/help
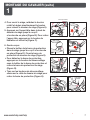
AVERTISSEMENT
IMPORTANT !
• LE NON-RESPECT DE CES AVERTISSEMENTS ET DES INSTRUCTIONS DE MONTAGE PEUT
ENTRAÎNER DES BLESSURES GRAVES OU LA MORT.
• L'ASSEMBLAGE PAR UN ADULTE EST REQUIS.
• NE JAMAIS LAISSER L'ENFANT SANS SURVEILLANCE. TOUJOURS GARDER L'ENFANT EN
VUE LORSQU'IL EST DANS LA POUSSETTE.
• ÉVITER TOUTE BLESSURE GRAVE EN CAS DE CHUTE OU DE GLISSEMENT. TOUJOURS
UTILISER LA CEINTURE DE SÉCURITÉ. APRÈS AVOIR FIXÉ LES BOUCLES, AJUSTEZ LES
CEINTURES POUR QU'ELLES SOIENT BIEN AJUSTÉES AUTOUR DE VOTRE ENFANT.
• ÉVITEZ DE COINCER LES DOIGTS : FAITES ATTENTION EN PLIANT ET DÉPLIANT LA
POUSSETTE. ASSUREZ-VOUS QUE LA POUSSETTE EST COMPLÈTEMENT ÉRIGÉE ET
VERROUILLÉE AVANT DE LAISSER VOTRE ENFANT S'APPROCHER DE LA POUSSETTE.
• NE JAMAIS UTILISER LA POUSSETTE DANS LES ESCALIERS OU LES ESCALATORS. VOUS
POURRIEZ SOUDAINEMENT PERDRE LE CONTRÔLE DE LA POUSSETTE OU VOTRE ENFANT
POURRAIT EN TOMBER. FAITES ÉGALEMENT TRÈS ATTENTION LORSQUE VOUS MONTEZ OU
DESCENDEZ UNE MARCHE OU UN TROTTOIR.
• ÉVITEZ LA STRANGULATION.
• NE PLACEZ PAS D'ARTICLES MUNIS D'UNE FICELLE AUTOUR DU COU DE VOTRE ENFANT,
NE SUSPENDEZ PAS DE FICELLES À CE PRODUIT ET N'ATTACHEZ PAS DE FICELLES AUX
JOUETS.
• L'UTILISATION DE LA POUSSETTE AVEC UN ENFANT PESANT PLUS DE 20,5 KG (45 LB) OU
MESURANT PLUS DE 96 CM (37,8 IN) ENTRAÎNERA UNE SITUATION INSTABLE DANGEREUSE.
UTILISER LA POUSSETTE AVEC UN SEUL ENFANT À LA FOIS.
• POUR ÉVITER UNE SITUATION DANGEREUSE ET INSTABLE, NE JAMAIS PLACER DE SAC À
MAIN, DE SAC À PROVISIONS, DE COLIS OU D'ACCESSOIRES SUR LA POIGNÉE (AUTRES QUE
LES SACS DE POUSSETTE APPROUVÉS). NE PLACEZ JAMAIS RIEN SUR LA CAPOTE.
• POUR ÉVITER TOUTE SITUATION DANGEREUSE ET INSTABLE, NE PLACEZ PAS PLUS DE 4,5
KG (10 LB) AU TOTAL DANS LE PANIER DE RANGEMENT, Y COMPRIS LES 1 KG (2 LB) DANS
LA POCHE DU PANIER (SI FOURNIE).
• POUR ÉVITER LES BRÛLURES, NE METTEZ JAMAIS DE LIQUIDES CHAUDS DANS LES
PORTE-GOBELETS. (SI FOURNI)
• POUR ÉVITER DE BASCULER, NE PLACEZ PAS PLUS DE 1,36 KG (3 LB) AU TOTAL DANS LES
PORTE-GOBELETS ET LE PLATEAU À COLLATION.
• N'UTILISEZ PAS LE PANIER DE RANGEMENT COMME PORTE-ENFANT.
• NE LAISSEZ PAS VOTRE ENFANT SE TENIR DEBOUT SUR LE PANIER. IL POURRAIT
S'EFFONDRER ET CAUSER DES BLESSURES.
• NE JAMAIS PLACER L'ENFANT DANS LA POUSSETTE AVEC LA TÊTE VERS LE REPOSE-PIEDS.
• NE PERMETTEZ JAMAIS À VOTRE POUSSETTE D'ÊTRE UTILISÉE COMME UN JOUET.
• CESSEZ D'UTILISER VOTRE POUSSETTE SI ELLE EST ENDOMMAGÉE OU CASSÉE.
• LA POUSSETTE DOIT ÊTRE UTILISÉE UNIQUEMENT À LA VITESSE DE LA MARCHE ; ELLE
N'EST PAS DESTINÉE À ÊTRE UTILISÉE POUR LE JOGGING, LE PATINAGE, ETC.
• LA PERSONNE QUI S'OCCUPE DE L'ENFANT DOIT TOUJOURS L'AIDER À ENTRER ET SORTIR
DE LA POUSSETTE.
La page est en cours de chargement...
La page est en cours de chargement...
La page est en cours de chargement...
La page est en cours de chargement...
La page est en cours de chargement...
La page est en cours de chargement...
La page est en cours de chargement...
La page est en cours de chargement...
La page est en cours de chargement...
La page est en cours de chargement...
La page est en cours de chargement...
La page est en cours de chargement...
La page est en cours de chargement...
La page est en cours de chargement...
-
 1
1
-
 2
2
-
 3
3
-
 4
4
-
 5
5
-
 6
6
-
 7
7
-
 8
8
-
 9
9
-
 10
10
-
 11
11
-
 12
12
-
 13
13
-
 14
14
-
 15
15
-
 16
16
-
 17
17
-
 18
18
-
 19
19
-
 20
20
-
 21
21
-
 22
22
-
 23
23
-
 24
24
-
 25
25
-
 26
26
-
 27
27
-
 28
28
-
 29
29
-
 30
30
-
 31
31
-
 32
32
-
 33
33
-
 34
34


evolur C147zwOJZIL Le manuel du propriétaire
- Catégorie
- Poussettes
- Taper
- Le manuel du propriétaire
dans d''autres langues
- English: evolur C147zwOJZIL Owner's manual
Documents connexes
Autres documents
-
 Kolcraft ZL018 Manuel utilisateur
-
 Orbit baby G2 Manuel utilisateur
-
 Croozer Kid Plus Le manuel du propriétaire
-
PawHut D00-164V00RD Assembly Instructions
-
 Croozer Kid / Kid Plus 2016-2017 Le manuel du propriétaire
-
Joovy Kooper Manuel utilisateur
-
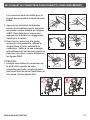
 Contours Contours Options Instruction Sheet
-
Croozer Kid for 1 Le manuel du propriétaire
-
 Kolcraft S77-T-R3 Manuel utilisateur
-
Graco ISPA067AA Manuel utilisateur


