Sony KLV-30MR1 Manuel utilisateur
- Catégorie
- Téléviseurs LCD
- Taper
- Manuel utilisateur

4-094-069-11 (1)
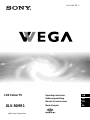
LCD Colour TV
KLV-30MR1
2003 Sony Corporation
Operating Instructions
Bedienungsanleitung
Manual de instrucciones
Mode d’emploi
GB
DE
FR
NL

2
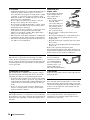
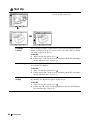
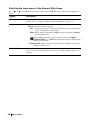
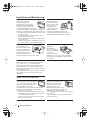
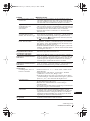
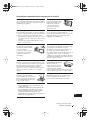
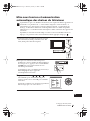
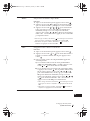
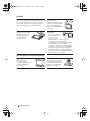
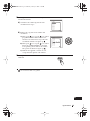
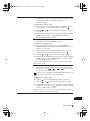
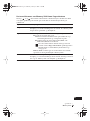
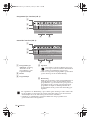
NOTICE FOR CUSTOMERS IN THE UNITED KINGDOM
A moulded plug complying with BS1363 is fitted to this equipment for your safety and convenience.
Should the fuse in the plug supplied need to be replaced, a 5 AMP fuse approved by ASTA or BSI to BS
1362 (i.e. marked with or ) must be used.
When an alternative type of plug is used it should be fitted with a 5 AMP FUSE, otherwise the circuit
should be protected by a 5 AMP FUSE at the distribution board.
If the plug supplied with this equipment has a detachable fuse cover, be sure to attach the fuse cover after
you change the fuse. Never use the plug without the fuse cover. If you should lose the fuse cover, please
contact your nearest Sony service station.
How to replace the fuse
Open the fuse compartment with a blade screwdriver, and replace the fuse.
IMPORTANT
If the plug supplied is not suitable for the socket outlets in your home, it should be cut off and an
appropriate plug fitted in accordance with the following instructions:
The wires in this mains lead are coloured in accordance with the following code:
Blue Neutral
Brown Live
As the colours of the wires in the mains lead of this apparatus may not correspond with the coloured
markings identifying the terminals in your plug, proceed as follows:
The wire which is coloured blue must be connected to the terminal which is marked with the letter N or
coloured black. The wire which is coloured brown must be connected to the terminal which is marked with
the letter L or coloured red. Do not connect either wire to the earth terminal in the plug which is marked
by the letter E or by the safety earth symbol I or coloured green or green and yellow.
WARNING
• To prevent the risk of electric shock, do not insert the plug cut off from the mains lead into a socket
outlet. This plug cannot be used and should be destroyed.
• To prevent the risk of fire or electric shock, do not expose the unit to rain or moisture.
• Dangerously high voltages are present inside the set. Do not open the cabinet. Refer servicing to
qualified personnel only.

3
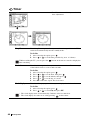
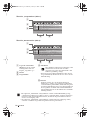
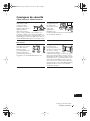
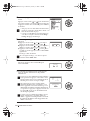
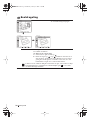
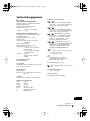
Table of Contents
GB
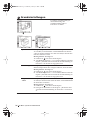
Introduction
Thank you for choosing this Sony LCD Colour Television.
Before operating the TV, please read this manual thoroughly and retain it for future reference.
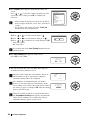
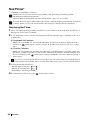
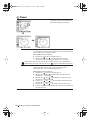
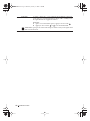
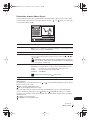
Symbols used in the manual
Table of Contents
Safety Information
Safety Information .....................................................................................................................................5
Precautions ............................................................................................................................................... 11
Overview
Checking the Accessories Supplied ......................................................................................................... 13
Overview of the Display Unit .................................................................................................................. 14
Overview of the Media Receiver Unit Buttons and Indicators ...............................................................15
Overview of the Remote Control Buttons ............................................................................................... 16
Installation
Inserting Batteries into the Remote Control ............................................................................................18
Connecting the Display Unit to the Media Receiver Unit .......................................................................19
Storing the cables in the display stand .....................................................................................................21
Connecting the Aerial and VCR .............................................................................................................. 22
First Time Operation
Switching On the TV and Tuning the TV Automatically .......................................................................23
Menu System
Introducing and Using the Menu System ................................................................................................26
Picture Adjustment ..................................................................................................................................26
Sound Adjustment ...................................................................................................................................28
Screen Control ......................................................................................................................................... 30
Features .................................................................................................................................................... 33
Set Up ...................................................................................................................................................... 36
Timer ....................................................................................................................................................... 40
Unit Status ............................................................................................................................................... 42
“Memory Stick”
About “Memory Stick” ............................................................................................................................43
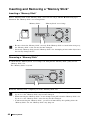
Inserting and Removing a “Memory Stick” ............................................................................................ 46
Using the “Memory Stick” (Memory Stick Home) ................................................................................. 47
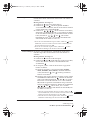
.........Important information.
.........Information on a feature.
1,2 ...........Sequence of instructions.
....Shaded buttons on the remote control
show you the buttons you have to press
to follow the sequence of instructions.
..........Informs you of the result of instructions
followed.
OK
(continued)

4
Table of Contents
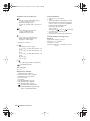
Teletext
Teletext ....................................................................................................................................................55
NexTView
NexTView* .............................................................................................................................................56
Additional Information
Connecting Optional Equipment ............................................................................................................. 59
Using Optional Equipment ...................................................................................................................... 63
Remote Control Configuration for VCR/DVD .......................................................................................64
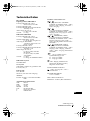
Specifications ...........................................................................................................................................66
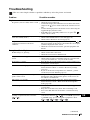
Troubleshooting .......................................................................................................................................69
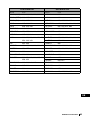
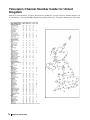
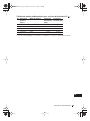
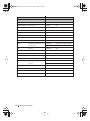
Television Channel Number Guide for United Kingdom ................................................................. 74

5
Safety Information
GB
Safety Information
For Safety
Mains lead and display cable
Unplug the mains lead and the
display cable when moving
the set. Do not move the set
with the mains lead and the
display cable plugged in. It
may damage the mains lead
and the display cable and result in fire or electric shock.
If the set has been dropped or damaged, have it checked
immediately by qualified service personal.
Medical institution
Do not place this unit
in a place where
medical equipment is
in use. It may cause
malfunction of
medical instruments.
For the display unit
Installation
Installation of the display
unit on the wall should be
carried out by qualified
servicemen. Improper
installation may render the
unit unsafe in the event of an
earthquake, etc.
Carrying
Carrying the display unit
requires two or more people.
If you carry the display unit
in a manner other than that
specified, it may drop and a
serious injury may be caused. Be sure two or more
people carry the display unit. When transporting, do
not subject the display unit to shocks or excessive
vibration. The display unit may fall and be damaged
or cause serious injury. When you carry the display
unit for repair or when you move it, pack it using the
original carton and packing material.
(continued)

6
Safety Information
Installation and moving
Ventilation
Never cover the ventilation holes in the
cabinet. It may cause overheating and
result in fire. Unless proper ventilation
is provided, the unit may gather dust
and get dirty. For proper ventilation,
observe the following:
• Do not install the unit turned backwards or sideways.
• Do not install the unit turned over or upside down.
• Do not install the unit on a shelf or in a closet.
• Do not place the unit on a rug or bed.
• Do not cover the unit with cloth, such as curtains, or
items such as news papers, etc.
Outdoor use
Do not install this unit
outdoors. If the unit is
exposed to rain, it may
result in fire or electric
shock. If the unit is
exposed to direct
sunlight, the unit may
heat up and it may damage the unit.
Vehicle or ceiling
Do not install this unit in a
vehicle. Bumping of the
vehicle may cause the set to
fall down and cause injury.
Do not hang this unit from
the ceiling.
Ships and other
vessels
Do not install this unit
in a ship or vessel. If
the unit is exposed to
seawater, it may cause
fire or damage the unit.
Water and moisture
Do not use this unit near water - for example, near a
bathtub or shower room. Also do not expose to rain,
moisture or smoke. It may result in fire or electric shock.
Do not use this unit where insects may enter.
For the display unit
Optional accessories
Observe the following when installing
the display unit using a stand or wall-
mount bracket. If not, the unit may fall
and cause serious injury.
• Be sure to follow the operating instructions supplied
with your stand when installing the unit.
• Be sure to attach the brackets supplied with your
stand.
To prevent the unit from
falling
Place the display unit on a secure,
stable stand. Do not hang anything
on the display unit. The unit may
fall from the stand or wall-
hanging rack unit, causing damage or serious injury.
Do not allow children to climb on to the display unit.

7
Safety Information
GB
Power Sources
Overloading
This set is designed to
operate on a 220-240V AC
supply only. Take care not to
connect too many appliances
to the same mains socket as
this could result in fire or
electric shock.
Mains lead
protection
Pull out the mains lead
by the plug. Do not
pull on the mains lead
itself.
Mains
Do not use a poor fitting mains socket.
Insert the plug fully into the mains. If it is
loose, it may cause arcing and result in
fire. Contact your electrician to have the
mains socket changed.
Wiring
Unplug the mains lead when wiring cables. Be sure
to unplug the mains lead for your safety, when
hooking up.
Moisture
Do not touch the mains lead with a wet
hand. If you plug/unplug the mains lead
with a wet hand, it may cause electric
shock.
Cleaning
Clean the mains plug regularly. If
the plug is covered with dust and
it picks up moisture, its insulation
may deteriorate and result in fire.
Unplug the mains plug and clean
it regularly.
Lightning storms
For your own safety, do not
touch any part of the set, mains
lead or aerial lead during
lightning storms.
(continued)

8
Safety Information
Use
Damage requiring service
If the surface of the display unit cracks, do not touch it
until you have unplugged the mains lead. Otherwise
electric shock may result.
Ventilation holes
Do not insert anything in the
ventilation holes. If metal or
something flammable enters, it
may result in fire or electric
shock.
Servicing
Do not open the cabinet or
remove the rear cover of the
set. Refer to qualified
service personnel only.
Moisture and flammable
objects
• Do not let this unit get
wet. Never spill liquid of
any kind on the unit. If
any liquid or solid object
does fall through, do not operate the unit. It may
result in electric shock or damage to the unit.
Have it checked immediately by qualified
personnel.
• To prevent fire, keep inflammable objects or
naked lights (e.g. candles) away from the set.
For the media receiver unit
Object placement
Do not place anything heavy on
the media receiver unit. It may
damage the unit.
Liquid
Do not place objects containing
liquid on the media receiver
unit. It may result in electric
shock or damage the unit.

9
Safety Information
GB
Additional Safety Information
Electric shock
Do not touch the unit with wet hands. Doing so may cause
electric shock or damage the unit.
Broken glass
Do not throw anything at the
unit. The screen glass may
explode by the impact and
cause serious injury.
Protruding location
Do not install the display unit in protruding locations. If
you install the unit in the following locations, it may
result in injury.
• Do not install the unit in a location where the unit
protrudes, such as on or behind pillar.
• Do not install the unit in a location where you might
bump your head on it.
Oils
Do not install this unit in restaurants that use oil.
Dust absorbing oil may enter into the unit and
damage the unit.
Placement
Never place the set in hot, humid
or excessively dusty places. Do
not install the unit where it may
be exposed to mechanical
vibration.
Corrosion
If you use this set near the seashore, salt may corrode
metal parts of the unit and cause internal damage or
fire. It may also shorten the life of the unit. Steps
should be taken to reduce the humidity and
temperature of the area where the set is located.
Accessories
Secure the display unit properly.
If the display unit is not secured properly, it may fall and
cause injury. Take measures to prevent this by using a
stand or other apparatus on the floor or wall in the
specified manner, referring to the operating instructions
supplied with your stand.
Recommended place for
the media receiver unit
Place the media receiver unit
on a stable, level surface.
Otherwise, the media receiver
unit may fall and cause injury.
Use an optional Sony stand, which has adequate
strength.
Weight
Do not stand on the media receiver unit.
The unit may fall or be broken, causing
injury. Pay special attention when little
children are likely to come near the set.
Cleaning
Unplug the mains lead when cleaning this unit. If
not, it may result in electric shock.
Disposal of the display unit
• Do not dispose of display units with general
household waste.
• The LCD contains a small amount of liquid crystal
and mercury. The fluorescent tube used in this display
also contains mercury. Follow your local ordinances
and regulations for disposal.
(continued)

10
Safety Information
LCD Screen
• Although the LCD screen is made with high-precision
technology and has effective pixels of 99.99% or
more, black dots may appear or bright points of light
(red, blue, or green) may appear constantly on the
LCD screen. This is a structural property of the LCD
panel and is not a malfunction.
• Do not expose the LCD screen surface to the sun.
Doing so may damage the screen surface.
• Do not push or scratch the front filter, or place objects
on top of this unit. The image may be uneven or the
LCD panel may be damaged.
• If this unit is used in a cold place, a smear may occur
in the picture or the picture may become dark.
This does not indicate a failure. These phenomena
improve as the temperature rises.
• Ghosting may occur when still pictures are displayed
continuously. It may disappear after a few moments.
• The screen and cabinet get warm when this unit is in
use. This is not a malfunction.
Mains lead and
display cable
If you damage the mains
lead or display cable, it
may result in fire or
electric shock.
• Do not pinch, bend, or
twist the cable
excessively. The core
lines may be bared or
cut, causing a short -
circuit which may in
fire or electric shock.
• Do not convert or damage the mains lead or
display cable.
• Do not put anything heavy on the mains lead or
display cable. Do not pull the mains lead or
display cable.
• Keep the mains lead or display cable away from
heat sources.
• Be sure to grasp the plug when disconnecting the
mains lead.
Refer to the operating instructions when
disconnecting the display cable. If the mains lead or
display cable is damaged, stop using it and ask your
dealer or Sony service centre to exchange it.
Fluorescent lamp
This unit uses a special fluorescent lamp as its light
source. If the screen image becomes dark, flickers, or
does not appear, the fluorescent lamp has run down and
should be replaced. For replacement, consult qualified
service personnel.
When not in use
For environmental
and safety reasons, it
is recommended that
the set is switched off
when not in use - not
left in standby mode.
Disconnect from the mains.
Cleaning the screen surface
The screen surface is finished with a special coating to
prevent strong light reflections. Be sure to observe the
following precautions to avoid damaging the finish.
• To remove dust from the screen surface, wipe gently
with a soft cloth. If dust is persistent, wipe with a soft
cloth slightly moistened with a diluted mild detergent
solution. You can wash and repeatedly use the soft
cloth.
• Never use any type of abrasive pad, alkaline/acid
cleaner, scouring powder or strong solvent such as
alcohol, benzene or thinner.
Cable wiring
Take care not to catch your feet on the cables. It may
damage the unit.
Installation
Do not install optional components too close to the
display unit. Keep optional components at least 30
cm away from the display unit. If a VCR is installed
in front or at the right side of the display unit, the
picture may distort.
Cooling fan
This display unit uses a cooling fan to avoid overheating.
Note that the noise of the cooling fan may be heard from
the display unit, depending on where the display unit is
installed.
Heat
Do not touch the surface of the display unit. It
remains hot, even after the display unit has been
turned off for some time.

11
Safety Information
GB
Precautions
On viewing the TV comfortably
• To view the TV comfortably, the recommended viewing position is from four to seven times of the
screen’s vertical length away from the TV set.
• View the TV in a moderate light room, as viewing the TV in poor light taxes your eyes. Watching the
screen continuously for long periods of time can also tax your eyes.
On installing the TV set
Installing the display unit
Use the specified wall-mount bracket or stands.
Installing the media receiver unit
Leave enough space for ventilation between the exhaust fan in the rear of unit and the wall.
• Do not install the display unit in places subject to extreme temperature, for example in direct sunlight,
or near a radiator, or heating vent. If the unit is exposed to extreme temperature, the unit may heat up
and it may cause deformations of the casing or cause the unit to malfunction.
• After transporting the display unit directly from a cold to a warm location, or if the room temperature
has changed suddenly, pictures may be blurred or show poor colour over portions of the picture. This
is because moisture has condensed on the mirrors or lenses inside the unit. In this case let the moisture
evaporate before using the unit.
• To obtain a clear picture, do not expose the screen to direct illumination or direct sunlight. If possible,
use spot lighting directed down from the ceiling.
• The TV set is not disconnected from the mains when the switch is in Off position. To disconnect the
set completely, pull the plug from the mains.
On volume adjustment
• Adjust the volume so as not to trouble neighbours. Sound carries very easily at night time. Therefore,
closing the windows or using headphones is suggested.
• When using headphones, adjust the volume so as to avoid excessive levels, as hearing damage may
result.
On image
With extensive use of this TV set in 4:3 mode, the 4:3 screen area might become darker within a 16:9
panel. To avoid this problem, the “Smart” picture mode should be used.
On handling the remote control
• Handle the remote control with care. Do not drop or step on it, or spill liquid of any kind onto it.
• Do not place the remote control in a location near a heat source, or in a place subject to direct sunlight,
or in a damp room.
On handling and cleaning the screen surface of the display unit
To avoid screen degradation, follow the points mentioned below. Do not push on or scratch with hard
objects, or throw anything at the screen. The screen may be damaged.
• Be sure to unplug the mains lead connected to the media receiver unit from the mains before cleaning.
• Do not touch the display panel after operating continuously for a long period as the display panel
becomes hot.
• We recommend that the screen surface is touched as little as possible.
• Clean the screen with a soft cloth.
• Never use any type of abrasive pad, scouring powder, or solvent, such as alcohol or benzine. This type
of contact may result in damage to the screen surface.
(continued)

12
Safety Information
On cleaning the cabinet
• Be sure to unplug the mains lead connected to the media receiver unit from the mains before cleaning.
• Clean the cabinet with a soft cloth.
• Note that material deterioration or screen coating degradation may occur if the display unit is exposed
to a volatile solvent, such as alcohol, thinner, benzine or insecticide, or if prolonged contact is
maintained with rubber or vinyl materials.
• The ventilation holes can accumulate dust over a period of time and the accumulated dust may make
the cooling function of the built-in fan less effective. To prevent this, we recommend removing the dust
periodically (once a month) using a vacuum cleaner.

13
Safety Information
GB
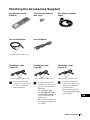
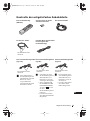
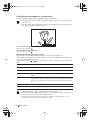
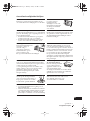
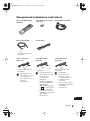
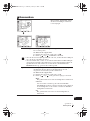
Checking the Accessories Supplied
One Remote Control
(RM-972):
Two size AAA batteries
(R03 Type):
One Display Interface
Cable:
One Coaxial Cable: One AV Mouse:
Two Mains Leads
(Type C-4):
Use these mains leads
(with safety earth) if you
use the set outside the
United Kingdom.
Two Mains Leads
(Type BF):
• Use these mains leads
(with safety earth) if you
use the set in the United
Kingdom.
• See “NOTICE FOR
CUSTOMERS IN THE
UNITED KINGDOM” on
page 2 when using the
mains leads.
• These mains leads may not
be supplied depending on
the country.
Two Mains Leads
(Type C-5):
• Use these mains leads
(with safety earth) if you
use the set in the Swiss
Confederation.
• These mains leads may
not be supplied depending
on the country.
Do not remove ferrite cores.
Do not remove ferrite cores.
Do not remove ferrite cores.
Do not remove ferrite cores.

14
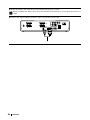
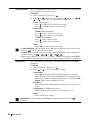
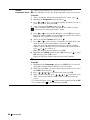
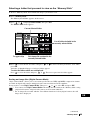
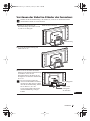
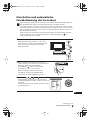
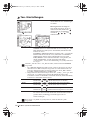
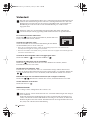
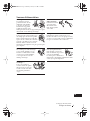
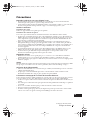
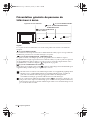
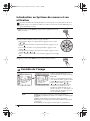
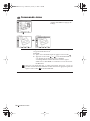
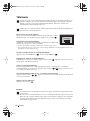
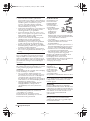
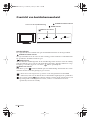
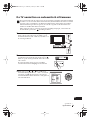
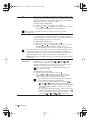
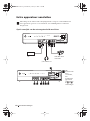
Overview
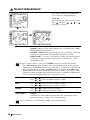
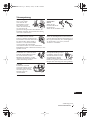
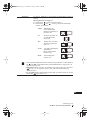
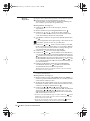
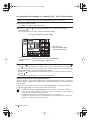
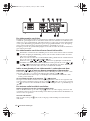
Overview of the Display Unit
About the indicators
The following indicators are on the display unit and the media receiver unit.
POWER/STANDBY indicator
Lights up in green when the TV is switched on. When in standby mode, the indicator lights up in red.
When in PC power saving* mode, the indicator lights up in yellow.
TIMER indicator
When lit, indicates that one of the timers is set. When the on timer is set and the TV is in standby mode,
this indicator lights up in yellow. When one of the off timers is set, this indicator lights up in red. For more
details regarding the timers, refer to “ Timer” on page 40.
PICTURE OFF indicator
Lights up in blue when you press (picture off) on the remote control to switch off the picture. Only
the picture is switched off (the sound remains unchanged).
* If the TV is connected to a personal computer or video graphic board that is DPMS (Display Power
Management System) compliant, the TV will automatically reduce power consumption (PC power
saving mode).
If you connect a personal computer to the PC connector, the “Auto Shutoff ” function cannot
work. After a certain period without a signal from a personal computer, the TV switches into PC
power saving mode, not standby mode.
POWER/STANDBYTIMERPICTURE OFF
POWER/STANDBY indicator
TIMER indicator
PICTURE OFF indicator
Remote control sensor

15
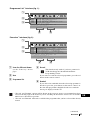
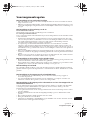
Overview
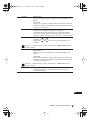
GB
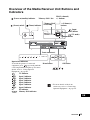
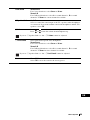
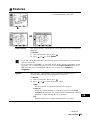
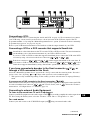
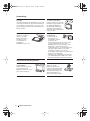
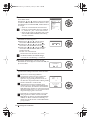
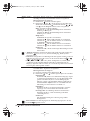
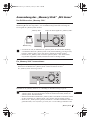
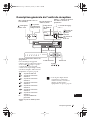
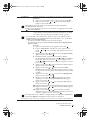
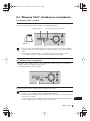
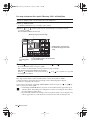
Overview of the Media Receiver Unit Buttons and
Indicators
654321
66
6
PC
MEMORY STICK
PROG
PROG
MENU
PC
OK
L/G/S/I R/D/D/D
MENU OK
PROG
PROG
64321
PC
MEMORY STICK
5
(Power on/standby) indicator
(Power) switch
(Timer) indicator
“Memory Stick” slot
“Memory Stick”
access lamp
PROG (channel)
+/– buttons
2(Volume) +/–
buttons
(Input
select) button
(TV mode)
button
Input select indicators
To watch the picture of connected
equipment, press repeatedly until the
correct input indicator lights up. For more
details, refer to “Using Optional
Equipment” on page 63.
TV indicator
1 Input 1 indicator
2 Input 2 indicator
3 Input 3 indicator
4 Input 4 indicator
5 Input 5 indicator
6 Input 6 indicator
PC PC indicator
MEMORY
Memory Stick indicator
STICK
Menu button
///
buttons
OK button
Front connectors*
* For more details of the front
connectors, refer to “Connecting
Optional Equipment” on page 59.

16
Overview
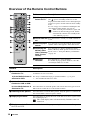
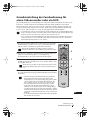
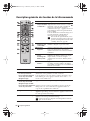
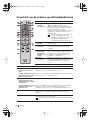
Overview of the Remote Control Buttons
Buttons
Description
a To Temporarily
Switch Off TV:
Press this button to temporarily switch off the TV
(the (power on/standby) indicators on the
display unit and the media receiver unit light up in
red). Press again to switch on the TV from standby
mode.
To save energy we recommend switching the TV
off completely when the TV is not in use.
After a certain period without a signal and
without any button being pressed, the TV
automatically switches into standby mode
(Auto Shutoff, page 41).
b VCR or DVD on/
off:
Press this button to switch your VCR or DVD on
or off.
c Selecting input
source:
Press this button repeatedly until the desired input
symbol of the source appears on the TV screen.
d Displaying the
Memory Stick
Home (“Memory
Stick” picture
viewer):
Press this button to display the Memory Stick
Home (“Memory Stick” picture viewer). For more
details, refer to “Using the Memory Stick Home”
on page 50.
e Selecting
channels:
Press this button to select channels.
For double-digit programme numbers, enter the
second digit within 2.5 seconds.
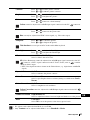
Buttons
Description
f a) If the Media Selector is
switched to TV:
Press this button to watch the last channel selected (the last channel
watched for at least 5 seconds).
b) If the Media Selector is
switched to VCR:
For Sony’s VCR double-digit programme numbers, e.g. 23, press
-/- - first and then the buttons 2 and 3.
g a) If the Media Selector is
switched to VCR or DVD:
Press this button to record programmes.
b) If the Media Selector is
switched to TV:
Press this button to return the picture and sound to the factory preset levels.
This will also return the set to the install condition.
h Switching off the picture: Press this button to switch off the picture. Only the picture is switched off;
the sound remains on. Press again to cancel.
i Displaying the clock: Press this button to display the clock on the TV screen. Press again to turns
the clock display off.
The clock display turns off automatically 5 minutes after it is
turned on.
j This button works in Teletext mode and is also used for programming the remote control to operate
the VCR and DVD.
OK
PROG
MENU
TV
VIDEO

17
Overview
GB
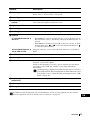
Buttons
Description
k Selecting screen format: Press this button repeatedly to change the format of the screen. For more
details, refer to “Screen Control” on page 30.
l Selecting channels: Press these buttons to select the next or previous channel.
m Displaying the menu
system:
Press this button to display the menu on the TV screen. Press again to
remove the menu display from the TV screen.
n Adjusting the TV volume: Press these buttons to adjust the volume of the TV.
o Selecting Sound effect: Press this button repeatedly to change the sound effect.
p Selecting Picture mode: Press this button repeatedly to change the picture mode.
q Joystick
a) If the Media Selector is
set to TV:
• When MENU is selected, use these buttons to operate the menu system.
For more details, refer to “Introducing and Using the Menu System” on
page 26.
• When MENU is switched off, press OK to show an overview of all TV
channels. Then press
or to select the channel and then press
to watch the selected channel.
b) If the Media Selector is
set to VCR or DVD:
Using these buttons, you can control the main functions of your VCR or
DVD.
r NexTView: For more details, refer to “NexTView*” on page 56.
s Selecting Teletext: Press this button to switch on Teletext.
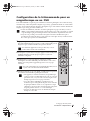
t Media Selector: With this remote control you can operate not only this TV but also the main
functions of your VCR or DVD.
Switch on the equipment you want to operate and then press this button
repeatedly to select VCR, TV or DVD. A green light will light up
momentarily.
An initial set up is required to synchronise this remote control to
your VCR or DVD. This setup depends on the manufacturer. For
more details, refer to “Remote Control Configuration for VCR/
DVD” on page 64.
u Displaying On Screen
information:
Press this button to display all on-screen indications. Press again to cancel.
v Selecting TV mode: Press this button to switch off teletext or video input.
w Muting the Sound: Press this button to mute the TV sound. Press again to restore the sound.
In addition to the TV functions, all coloured buttons as well as green symbols are also used for
Teletext operations. For more details, refer to “Teletext” on page 55.

18
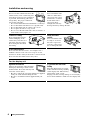
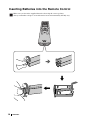
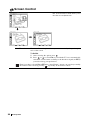
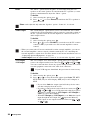
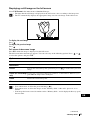
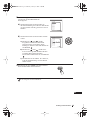
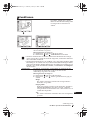
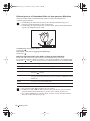
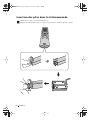
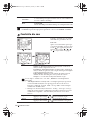
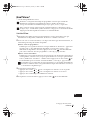
Installation
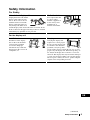
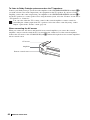
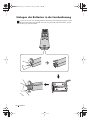
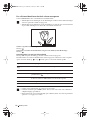
Inserting Batteries into the Remote Control
Make sure you insert the supplied batteries observing the correct polarity.
Always remember to dispose of used batteries in an environmentally friendly way.
m
<

19
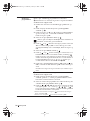
Installation
GB
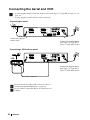
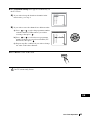
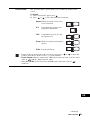
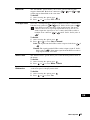
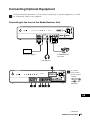
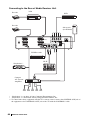
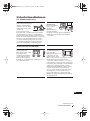
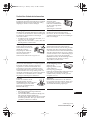
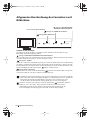
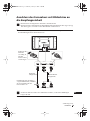
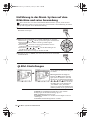
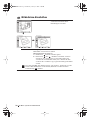
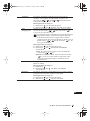
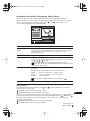
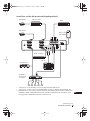
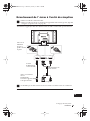
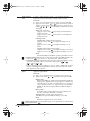
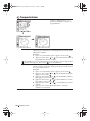
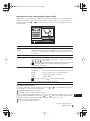
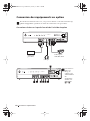
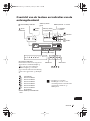
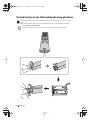
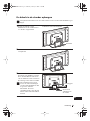
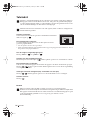
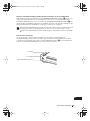
Connecting the Display Unit to the Media Receiver
Unit
• Use the supplied display interface cable.
• Use the supplied mains lead for the display unit (Type C-4, Type BF or Type C-5, see page 13).
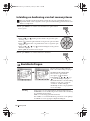
1 Connect the supplied display interface cable and the supplied mains lead for the display unit to the
display unit.
Do not connect to the mains before all connections are completed.
BLACK
DISPLAY SIGNAL IN
WHITEAC IN
Tighten the
screw slowly
until the screw
is stabilized.
Mains leads
(supplied)
After making all
connections,
connect to a wall
outlet.
Display interface
cable (supplied)
To Media receiver unit.
(continued)

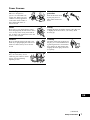
20
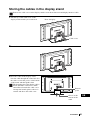
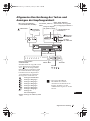
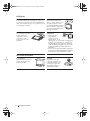
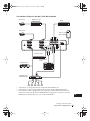
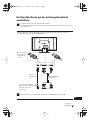
Installation
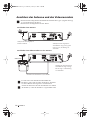
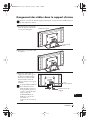
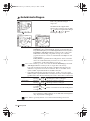
2 Install the display unit using the specified wall-mount bracket or stand.
Before installing the display unit, check the installation instructions of your wall-mount bracket or
stand.
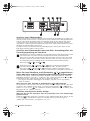
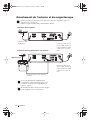
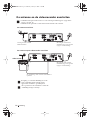
3 Connect the supplied display interface cable to the media receiver unit.
1/
R/D/D/D
55
L/G/S/I
Y
CTRL
S
CENTRE
SPEAKER IN
180W (6 ) MAX
P
B
/C
B
P
R
/C
R
(SMARTLINK)
(SMARTLINK)
AV
MOUSE
W/G/W/GL/G/S/IR/D/D/D
2/
3/
4/
DISPLAY SIGNAL OUT
BLACK WHITE
AC IN
La page est en cours de chargement...
La page est en cours de chargement...
La page est en cours de chargement...
La page est en cours de chargement...
La page est en cours de chargement...
La page est en cours de chargement...
La page est en cours de chargement...
La page est en cours de chargement...
La page est en cours de chargement...
La page est en cours de chargement...
La page est en cours de chargement...
La page est en cours de chargement...
La page est en cours de chargement...
La page est en cours de chargement...
La page est en cours de chargement...
La page est en cours de chargement...
La page est en cours de chargement...
La page est en cours de chargement...
La page est en cours de chargement...
La page est en cours de chargement...
La page est en cours de chargement...
La page est en cours de chargement...
La page est en cours de chargement...
La page est en cours de chargement...
La page est en cours de chargement...
La page est en cours de chargement...
La page est en cours de chargement...
La page est en cours de chargement...
La page est en cours de chargement...
La page est en cours de chargement...
La page est en cours de chargement...
La page est en cours de chargement...
La page est en cours de chargement...
La page est en cours de chargement...
La page est en cours de chargement...
La page est en cours de chargement...
La page est en cours de chargement...
La page est en cours de chargement...
La page est en cours de chargement...
La page est en cours de chargement...
La page est en cours de chargement...
La page est en cours de chargement...
La page est en cours de chargement...
La page est en cours de chargement...
La page est en cours de chargement...
La page est en cours de chargement...
La page est en cours de chargement...
La page est en cours de chargement...
La page est en cours de chargement...
La page est en cours de chargement...
La page est en cours de chargement...
La page est en cours de chargement...
La page est en cours de chargement...
La page est en cours de chargement...
La page est en cours de chargement...
La page est en cours de chargement...
La page est en cours de chargement...
La page est en cours de chargement...
La page est en cours de chargement...
La page est en cours de chargement...
La page est en cours de chargement...
La page est en cours de chargement...
La page est en cours de chargement...
La page est en cours de chargement...
La page est en cours de chargement...
La page est en cours de chargement...
La page est en cours de chargement...
La page est en cours de chargement...
La page est en cours de chargement...
La page est en cours de chargement...
La page est en cours de chargement...
La page est en cours de chargement...
La page est en cours de chargement...
La page est en cours de chargement...
La page est en cours de chargement...
La page est en cours de chargement...
La page est en cours de chargement...
La page est en cours de chargement...
La page est en cours de chargement...
La page est en cours de chargement...
La page est en cours de chargement...
La page est en cours de chargement...
La page est en cours de chargement...
La page est en cours de chargement...
La page est en cours de chargement...
La page est en cours de chargement...
La page est en cours de chargement...
La page est en cours de chargement...
La page est en cours de chargement...
La page est en cours de chargement...
La page est en cours de chargement...
La page est en cours de chargement...
La page est en cours de chargement...
La page est en cours de chargement...
La page est en cours de chargement...
La page est en cours de chargement...
La page est en cours de chargement...
La page est en cours de chargement...
La page est en cours de chargement...
La page est en cours de chargement...
La page est en cours de chargement...
La page est en cours de chargement...
La page est en cours de chargement...
La page est en cours de chargement...
La page est en cours de chargement...
La page est en cours de chargement...
La page est en cours de chargement...
La page est en cours de chargement...
La page est en cours de chargement...
La page est en cours de chargement...
La page est en cours de chargement...
La page est en cours de chargement...
La page est en cours de chargement...
La page est en cours de chargement...
La page est en cours de chargement...
La page est en cours de chargement...
La page est en cours de chargement...
La page est en cours de chargement...
La page est en cours de chargement...
La page est en cours de chargement...
La page est en cours de chargement...
La page est en cours de chargement...
La page est en cours de chargement...
La page est en cours de chargement...
La page est en cours de chargement...
La page est en cours de chargement...
La page est en cours de chargement...
La page est en cours de chargement...
La page est en cours de chargement...
La page est en cours de chargement...
La page est en cours de chargement...
La page est en cours de chargement...
La page est en cours de chargement...
La page est en cours de chargement...
La page est en cours de chargement...
La page est en cours de chargement...
La page est en cours de chargement...
La page est en cours de chargement...
La page est en cours de chargement...
La page est en cours de chargement...
La page est en cours de chargement...
La page est en cours de chargement...
La page est en cours de chargement...
La page est en cours de chargement...
La page est en cours de chargement...
La page est en cours de chargement...
La page est en cours de chargement...
La page est en cours de chargement...
La page est en cours de chargement...
La page est en cours de chargement...
La page est en cours de chargement...
La page est en cours de chargement...
La page est en cours de chargement...
La page est en cours de chargement...
La page est en cours de chargement...
La page est en cours de chargement...
La page est en cours de chargement...
La page est en cours de chargement...
La page est en cours de chargement...
La page est en cours de chargement...
La page est en cours de chargement...
La page est en cours de chargement...
La page est en cours de chargement...
La page est en cours de chargement...
La page est en cours de chargement...
La page est en cours de chargement...
La page est en cours de chargement...
La page est en cours de chargement...
La page est en cours de chargement...
La page est en cours de chargement...
La page est en cours de chargement...
La page est en cours de chargement...
La page est en cours de chargement...
La page est en cours de chargement...
La page est en cours de chargement...
La page est en cours de chargement...
La page est en cours de chargement...
La page est en cours de chargement...
La page est en cours de chargement...
La page est en cours de chargement...
La page est en cours de chargement...
La page est en cours de chargement...
La page est en cours de chargement...
La page est en cours de chargement...
La page est en cours de chargement...
La page est en cours de chargement...
La page est en cours de chargement...
La page est en cours de chargement...
La page est en cours de chargement...
La page est en cours de chargement...
La page est en cours de chargement...
La page est en cours de chargement...
La page est en cours de chargement...
La page est en cours de chargement...
La page est en cours de chargement...
La page est en cours de chargement...
La page est en cours de chargement...
La page est en cours de chargement...
La page est en cours de chargement...
La page est en cours de chargement...
La page est en cours de chargement...
La page est en cours de chargement...
La page est en cours de chargement...
La page est en cours de chargement...
La page est en cours de chargement...
La page est en cours de chargement...
La page est en cours de chargement...
La page est en cours de chargement...
La page est en cours de chargement...
La page est en cours de chargement...
La page est en cours de chargement...
La page est en cours de chargement...
La page est en cours de chargement...
La page est en cours de chargement...
La page est en cours de chargement...
La page est en cours de chargement...
La page est en cours de chargement...
La page est en cours de chargement...
La page est en cours de chargement...
La page est en cours de chargement...
La page est en cours de chargement...
La page est en cours de chargement...
La page est en cours de chargement...
La page est en cours de chargement...
La page est en cours de chargement...
La page est en cours de chargement...
La page est en cours de chargement...
La page est en cours de chargement...
La page est en cours de chargement...
La page est en cours de chargement...
La page est en cours de chargement...
La page est en cours de chargement...
La page est en cours de chargement...
La page est en cours de chargement...
La page est en cours de chargement...
La page est en cours de chargement...
La page est en cours de chargement...
La page est en cours de chargement...
La page est en cours de chargement...
La page est en cours de chargement...
La page est en cours de chargement...
La page est en cours de chargement...
La page est en cours de chargement...
La page est en cours de chargement...
La page est en cours de chargement...
La page est en cours de chargement...
La page est en cours de chargement...
La page est en cours de chargement...
La page est en cours de chargement...
La page est en cours de chargement...
La page est en cours de chargement...
La page est en cours de chargement...
La page est en cours de chargement...
La page est en cours de chargement...
La page est en cours de chargement...
La page est en cours de chargement...
La page est en cours de chargement...
La page est en cours de chargement...
La page est en cours de chargement...
La page est en cours de chargement...
La page est en cours de chargement...
La page est en cours de chargement...
La page est en cours de chargement...
La page est en cours de chargement...
La page est en cours de chargement...
La page est en cours de chargement...
La page est en cours de chargement...
La page est en cours de chargement...
La page est en cours de chargement...
La page est en cours de chargement...
La page est en cours de chargement...
La page est en cours de chargement...
La page est en cours de chargement...
La page est en cours de chargement...
La page est en cours de chargement...
La page est en cours de chargement...
La page est en cours de chargement...
La page est en cours de chargement...
La page est en cours de chargement...
La page est en cours de chargement...
La page est en cours de chargement...
La page est en cours de chargement...
La page est en cours de chargement...
La page est en cours de chargement...
-
 1
1
-
 2
2
-
 3
3
-
 4
4
-
 5
5
-
 6
6
-
 7
7
-
 8
8
-
 9
9
-
 10
10
-
 11
11
-
 12
12
-
 13
13
-
 14
14
-
 15
15
-
 16
16
-
 17
17
-
 18
18
-
 19
19
-
 20
20
-
 21
21
-
 22
22
-
 23
23
-
 24
24
-
 25
25
-
 26
26
-
 27
27
-
 28
28
-
 29
29
-
 30
30
-
 31
31
-
 32
32
-
 33
33
-
 34
34
-
 35
35
-
 36
36
-
 37
37
-
 38
38
-
 39
39
-
 40
40
-
 41
41
-
 42
42
-
 43
43
-
 44
44
-
 45
45
-
 46
46
-
 47
47
-
 48
48
-
 49
49
-
 50
50
-
 51
51
-
 52
52
-
 53
53
-
 54
54
-
 55
55
-
 56
56
-
 57
57
-
 58
58
-
 59
59
-
 60
60
-
 61
61
-
 62
62
-
 63
63
-
 64
64
-
 65
65
-
 66
66
-
 67
67
-
 68
68
-
 69
69
-
 70
70
-
 71
71
-
 72
72
-
 73
73
-
 74
74
-
 75
75
-
 76
76
-
 77
77
-
 78
78
-
 79
79
-
 80
80
-
 81
81
-
 82
82
-
 83
83
-
 84
84
-
 85
85
-
 86
86
-
 87
87
-
 88
88
-
 89
89
-
 90
90
-
 91
91
-
 92
92
-
 93
93
-
 94
94
-
 95
95
-
 96
96
-
 97
97
-
 98
98
-
 99
99
-
 100
100
-
 101
101
-
 102
102
-
 103
103
-
 104
104
-
 105
105
-
 106
106
-
 107
107
-
 108
108
-
 109
109
-
 110
110
-
 111
111
-
 112
112
-
 113
113
-
 114
114
-
 115
115
-
 116
116
-
 117
117
-
 118
118
-
 119
119
-
 120
120
-
 121
121
-
 122
122
-
 123
123
-
 124
124
-
 125
125
-
 126
126
-
 127
127
-
 128
128
-
 129
129
-
 130
130
-
 131
131
-
 132
132
-
 133
133
-
 134
134
-
 135
135
-
 136
136
-
 137
137
-
 138
138
-
 139
139
-
 140
140
-
 141
141
-
 142
142
-
 143
143
-
 144
144
-
 145
145
-
 146
146
-
 147
147
-
 148
148
-
 149
149
-
 150
150
-
 151
151
-
 152
152
-
 153
153
-
 154
154
-
 155
155
-
 156
156
-
 157
157
-
 158
158
-
 159
159
-
 160
160
-
 161
161
-
 162
162
-
 163
163
-
 164
164
-
 165
165
-
 166
166
-
 167
167
-
 168
168
-
 169
169
-
 170
170
-
 171
171
-
 172
172
-
 173
173
-
 174
174
-
 175
175
-
 176
176
-
 177
177
-
 178
178
-
 179
179
-
 180
180
-
 181
181
-
 182
182
-
 183
183
-
 184
184
-
 185
185
-
 186
186
-
 187
187
-
 188
188
-
 189
189
-
 190
190
-
 191
191
-
 192
192
-
 193
193
-
 194
194
-
 195
195
-
 196
196
-
 197
197
-
 198
198
-
 199
199
-
 200
200
-
 201
201
-
 202
202
-
 203
203
-
 204
204
-
 205
205
-
 206
206
-
 207
207
-
 208
208
-
 209
209
-
 210
210
-
 211
211
-
 212
212
-
 213
213
-
 214
214
-
 215
215
-
 216
216
-
 217
217
-
 218
218
-
 219
219
-
 220
220
-
 221
221
-
 222
222
-
 223
223
-
 224
224
-
 225
225
-
 226
226
-
 227
227
-
 228
228
-
 229
229
-
 230
230
-
 231
231
-
 232
232
-
 233
233
-
 234
234
-
 235
235
-
 236
236
-
 237
237
-
 238
238
-
 239
239
-
 240
240
-
 241
241
-
 242
242
-
 243
243
-
 244
244
-
 245
245
-
 246
246
-
 247
247
-
 248
248
-
 249
249
-
 250
250
-
 251
251
-
 252
252
-
 253
253
-
 254
254
-
 255
255
-
 256
256
-
 257
257
-
 258
258
-
 259
259
-
 260
260
-
 261
261
-
 262
262
-
 263
263
-
 264
264
-
 265
265
-
 266
266
-
 267
267
-
 268
268
-
 269
269
-
 270
270
-
 271
271
-
 272
272
-
 273
273
-
 274
274
-
 275
275
-
 276
276
-
 277
277
-
 278
278
-
 279
279
-
 280
280
-
 281
281
-
 282
282
-
 283
283
-
 284
284
-
 285
285
-
 286
286
-
 287
287
-
 288
288
-
 289
289
-
 290
290
-
 291
291
-
 292
292
-
 293
293
-
 294
294
-
 295
295
-
 296
296
-
 297
297
-
 298
298
-
 299
299
-
 300
300
-
 301
301
-
 302
302
-
 303
303
-
 304
304


Sony KLV-30MR1 Manuel utilisateur
- Catégorie
- Téléviseurs LCD
- Taper
- Manuel utilisateur
dans d''autres langues
- English: Sony KLV-30MR1 User manual
- Deutsch: Sony KLV-30MR1 Benutzerhandbuch
- Nederlands: Sony KLV-30MR1 Handleiding
Documents connexes
-
Sony KLV-21SR2 Le manuel du propriétaire
-
Sony klv 23hr2s Manuel utilisateur
-
Sony KLV26HG2 Manuel utilisateur
-
Sony KE-P37XS1 Manuel utilisateur
-
Sony KLV-L23M1 Manuel utilisateur
-
-
Sony VPL-CX5 Manuel utilisateur
-
Sony VPL-CX6 Mode d'emploi
-