Zanussi ZWY180 Manuel utilisateur
- Catégorie
- Machines à laver
- Taper
- Manuel utilisateur

EN
User manual 2
FR
Notice d'utilisation 15
Washing Machine
Lave-linge
ZWY 1100
ZWY 180

Contents
Safety information _ _ _ _ _ _ _ _ _ _ _ _ _ _ _ 2
Safety instructions _ _ _ _ _ _ _ _ _ _ _ _ _ _ 3
Product description _ _ _ _ _ _ _ _ _ _ _ _ _ _ 4
How to run a wash cycle? _ _ _ _ _ _ _ _ _ _ 5
Daily Use _ _ _ _ _ _ _ _ _ _ _ _ _ _ _ _ _ _ _ 6
Programmes table _ _ _ _ _ _ _ _ _ _ _ _ _ _ _ 7
Care and cleaning _ _ _ _ _ _ _ _ _ _ _ _ _ _ _ 8
Operating Problems _ _ _ _ _ _ _ _ _ _ _ _ _ 9
Helpful hints and tips _ _ _ _ _ _ _ _ _ _ _ _ 11
Technical data _ _ _ _ _ _ _ _ _ _ _ _ _ _ _ _ 12
Consumption values _ _ _ _ _ _ _ _ _ _ _ _ _ 12
Installation _ _ _ _ _ _ _ _ _ _ _ _ _ _ _ _ _ _ 13
Environment concerns _ _ _ _ _ _ _ _ _ _ _ _ 14
Subject to change without notice.
Safety information
Before the installation and use of the appliance, carefully read the
supplied instructions. The manufacturer is not responsible if an incor-
rect installation and use causes injuries and damages. Always keep
the instructions with the appliance for future reference.
Children and vulnerable people safety
Warning! Risk of suffocation, injury or permanent disability.
• Do not let persons, children included, with reduced physical sen-
sory, reduced mental functions or lack of experience and knowl-
edge use the appliance. They must have supervision or instruction
for the operation of the appliance by a person who is responsible
for their safety.
• Do not let children play with the appliance.
• Keep all packaging away from children.
• Keep all detergents away from children.
• Keep children and pets away from the appliance door when it is
open.
• If the appliance has a child safety device, we recommend you acti-
vate it.
General Safety
• Before maintenance, deactivate the appliance and disconnect the
mains plug from the mains socket.
• Do not change the specification of this appliance.
2
www.zanussi.com

• Obey the maximum load volume of 5 kg (refer to the “Programme
chart” chapter).
• If the supply cord is damaged, it must be replaced by the manu-
facturer, its service agent or similarly qualified persons in order to
avoid a hazard.
•The operating water pressure (minimum and maximum) must be
between 0,5 bar (0,05 MPa) and 8 bar (0,8 MPa)
• The ventilation openings in the base (if applicable) must not be ob-
structed by a carpet.
• The appliance is to be connected to the water mains using the
new supplied hose-sets. Old hose sets must not be reused.
Safety instructions
Installation
• Remove all the packaging and the transit
bolts.
• Keep the transit bolts. When you move the
appliance again you must block the drum.
• Do not install or use a damaged appliance.
• Do not install or use the appliance where the
temperature is less than 0 °C or where it is
exposed to the weather.
• Obey the installation instruction supplied with
the appliance.
• Make sure that the floor where you install the
appliance is flat, stable, heat resistant and
clean.
• Do not install the appliance where the appli-
ance door can not be fully opened.
• Always be careful when you move the appli-
ance because it is heavy. Always wear safety
gloves.
• Make sure that there is air circulation be-
tween the appliance and the floor.
• Adjust the feet to have the necessary space
between the appliance and the carpet.
Electrical connection
Warning! Risk of fire and electrical shock.
• The appliance must be earthed.
• Make sure that the electrical information on
the rating plate agrees with the power supply.
If not, contact an electrician.
• Always use a correctly installed shockproof
socket.
• Do not use multi-plug adapters and extension
cables.
• Make sure not to cause damage to the mains
plug and to the mains cable. Contact the
Service or an electrician to change a dam-
aged mains cable.
• Connect the mains plug to the mains socket
only at the end of the installation. Make sure
that there is access to the mains plug after
the installation.
• Do not pull the mains cable to disconnect the
appliance. Always pull the mains plug.
• Do not touch the mains cable or the mains
plug with wet hands.
• This appliance complies with the E.E.C. Di-
rectives.
Water connection
• Make sure not to cause damage to the water
hoses.
• The appliance is to be connected to the wa-
ter mains using the new supplied hose-sets.
Old hose sets must not be reused.
3
www.zanussi.com

• Before you connect the appliance to new
pipes or pipes not used for a long time, let
the water flow until it is clean.
• The first time you use the appliance, make
sure that there is no leakage.
Use
Warning! Risk of injury, electrical shock,
fire, burns or damage to the appliance.
• Use this appliance in a household only.
• Obey the safety instructions on the detergent
packaging.
• Do not put flammable products or items that
are wet with flammable products in, near or
on the appliance.
• Make sure that you remove all metal objects
from the laundry.
• Do not put a container to collect possible wa-
ter leakage under the appliance. Contact the
Service to ensure which accessories can be
used.
Care and Cleaning
Warning! Risk of injury or damage to the
appliance.
• Do not use water spray and steam to clean
the appliance.
• Clean the appliance with a moist soft cloth.
Only use neutral detergents. Do not use
abrasive products, abrasive cleaning pads,
solvents or metal objects.
Disposal
Warning! Risk of injury or suffocation.
• Disconnect the appliance from the mains
supply.
• Cut off the mains cable and discard it.
• Remove the door catch to prevent children
and pets to get closed in the appliance.
Service
• Contact the Service to repair the appliance.
We recommend only the use of original spare
parts.
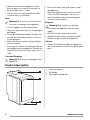
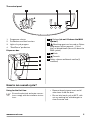
Product description
1
2
3
1. The control panel
2. Lid handle
3. Adjustable levelling feet
4
www.zanussi.com

The control panel
1
2 3 4
1. Programme selector
2. Pushbuttons and their functions
3. Lights of cycle progress
4. "Start/Pause" pushbutton
Dispenser box
1
2
3
4
5
1
Softener (do not fill above the MAX
symbol )
2
Bleaching agent can be used on Cotton
programmes without prewash - 1/4 to 1
glass of diluted bleach (do not fill above the
MAX symbol)
3
Wash
4
Prewash
5
Fabric softener and bleach overflow (if
overfilled)
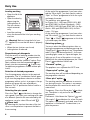
How to run a wash cycle?
Using for the first time
• Ensure the electrical and water connec-
tions comply with the installation instruc-
tions.
• Remove the polystyrene insert and all
other items inside the drum.
• Run an initial wash cycle at 90°C, with-
out any washing but with detergent to
clean the water tank.
5
www.zanussi.com

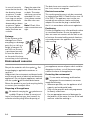
Daily Use
Loading washing
• Open the lid of the
appliance.
• Open the drum by
depressing the
locking button A:
The two shutters
unlock automati-
cally.
• Load the washing,
close the drum and the lid of your washing
machine.
Warning! Before closing the lid of your
appliance, ensure that the drum is properly
closed :
• When the two shutters are closed,
• locking button A released.
Proportioning of detergents
Pour the amount of washing powder into the
washing
and prewash compartments if
you have selected the “prewash” option. Pour
fabric softener into the compartment
and
bleach into the compartment
if necessary
(available on programmes Cotton without pre-
wash).
Selection of desired programme
Turn the programme selector to the required
programme. The “4” pushbutton flashes green.
If you turn the programme selector to another
programme while a cycle is in progress, the ap-
pliance will ignore the new selected pro-
gramme. The “4” pushbutton flashes red for a
few seconds.
Selecting the spin speed
Press the “Spin”
pushbutton to change the
spin speed, if you want your washing to be spun
at a different speed to the one selected by the
appliance. can also select “Rinse hold”
.
Rinse hold
By selecting this function the water of the last
rinse is not emptied out to prevent the fabrics
from creasing.
A
At the end of the programme, if you have selec-
ted the “Rinse hold” , you then need to select a
“Spin” or “Drain” programme to finish the cycle
and empty the water.
The maximum spin speeds are :
for Cotton, Eco : 1000 rpm (ZWY1100), 800
rpm (ZWY180), for Wool, Handwash : 1000
rpm (ZWY1100), 800 rpm (ZWY180), for Syn-
thetics : 800 rpm (ZWY180/1100), for Deli-
cates : 700 rpm.
At the end of the programme, if you have selec-
ted “Rinse hold”
, you then need to select a
“Spin”
or “Drain” programme to finish the
cycle and empty the water.
Selecting options
You must select the different options after se-
lecting the programme and before pressing the
“Start/Pause”
pushbutton (see “Programmes
table”). Press the desired button(s) : the corre-
sponding lights come on. If pressed again, the
lights go out. If one of the options is not com-
patible with the selected programme, the “Start/
Pause”
pushbutton flashes red.
“Prewash” option
The appliance runs a prewash at 30°C max.
“Super quick” option
The washing time will be reduced depending on
the programme selected.
“Rinse plus” option
The washing machine will add one or more rin-
ses during the cycle. This option is recommen-
ded for people with sensitive skin and in soft
water areas.
Temporary : Press the “Rinse plus”
pushbut-
ton. The option is only active for the selected
programme.
Permanent : Hold down the “Options”
and
“Rinse plus”
pushbuttons for a few seconds.
The option is permanently activated, even if the
appliance is switched off. To deactivate it, re-
peat the process.
6
www.zanussi.com

Start of the programme
Press the “Start/Pause” button to start the cy-
cle. The corresponding light will come on green.
It is normal for the programme selector to re-
main stationary during the cycle. The light corre-
sponding to the current cycle is illuminated.
+ : Prewash + Wash
+ : Rinses + Spin
: End of cycle
The drain pump can operate for a short
time when the appliance fills water.
Interrupting a programme
Adding washing during the first 10 mi-
nutes
Press the “Start/Pause”
pushbutton : the
corresponding light will flash green while the
appliance is paused. The lid can only be opened
around 2 minutes after the washing machine
has come to a stop. Press the “Start/Pause”
pushbutton again to continue the programme.
Modifying the programme in progress
Before making any changes to the current pro-
gramme, you need to pause the washing ma-
chine by pressing the “Start/Pause”
push-
button. If the modification is not possible, the
“Start/Pause”
pushbutton flashes red for a
few seconds. If you still decide to change the
programme, you must cancel the current pro-
gramme (see below).
Cancelling the programme
If you want to cancel the programme, turn the
programme selector to the “Stop” position
.
End of the programme
The washing machine stops automatically, the
“Start/Pause”
pushbutton goes out and the
light “End of cycle”
comes on. The lid can
only be opened around 2 minutes after the
washing machine has come to a stop. Turn the
programme selector to the “Stop” position
.
Remove washing. Unplug and close water inlet
tap.
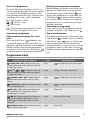
Programmes table
Programme / Type of washing Load Possible options
Cotton (cold - 90°) : White or colour, e.g.
normally soiled work clothes, bed linen, table lin-
en, body linen, towels.
5,0 kg Prewash, Super quick, Rinse plus, Rinse
hold
Eco
1)
( - ) : White or colour, e.g.
normally soiled work clothes, bed linen, table lin-
en, body linen, towels.
5,0 kg Prewash, Rinse plus, Rinse hold
Synthetics (cold - 60°) : Synthetic fabrics,
body linen,fab, coloured farics, non-iron shirts,
blouses.
2,5 kg Prewash, Super quick, Rinse plus, Rinse
hold
Delicates (30° - 40°) : For all delicate materi-
als, for example curtains.
2,5 kg Prewash, Super quick, Rinse plus, Rinse
hold
Wool (30° - 40°) : Machine washable wool
carrying the labels “pure new wool, machine
washable, does not shrink”.
1,0 kg Rinse hold
Mix 20° : Highly energy efficient cold wash
programme for lightly soiled laundry. This pro-
gramme requires a detergent which is active in
cold water.
3,0 kg Rinse plus, Rinse hold
Handwash (cold) : Very delicate items carry-
ing the “wash by hand” label.
1,0 kg Rinse hold
7
www.zanussi.com

Programme / Type of washing Load Possible options
Rinses : Hand washed items can be rinsed in
this programme.
5,0 kg Rinse plus, Rinse hold
Drain : Runs an empty cycle after a Rinse
hold (or Night cycle plus).
5,0 kg
Spin : A spin cycle from 500 to 800/1000
2)
after a Rinse hold option.
5,0 kg
1) Standard programmes for the Energy Label consumption values.
According to regulation 1061/2010, these programmes are respectively the «Standard 60 °C cotton
programme» and the «Standard 40 °C cotton programme». They are the most efficient programmes in terms of
combined energy and water consumptions for washing normally soiled cotton laundry.
The water temperature of the washing phase may differ from the temperature declared for the selected
programme.
2) Depending on model.
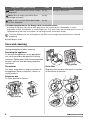
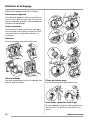
Care and cleaning
Unplug the appliance before cleaning.
Descaling the appliance
To descale the appliance, use an appropriate
non-corrosive product designed for washing
machines. Read product label for recommended
amounts and how often descaling should be
carried out.
The exterior
Use warm soapy water to clean the exterior of
the appliance. Never use alcohol, solvents or
similar products.
Dispenser box
To clean, proceed as follows :
Drain filter
Regularly clean the drain filter which is located
at the bottom of the drum :
1
2
4
3
5
6
8
www.zanussi.com

7
8
9
10
CLACK
11
CLACK
Water inlet filters
To clean, proceed as follows :
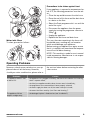
Precautions to be taken against frost
If your appliance is exposed to temperatures be-
low 0°C, the following precautions must be tak-
en:
• Close the tap and disconnect the inlet hose.
• Place the end of this hose and the drain hose
in a basin on the floor.
• Select the Drain programme let it run until the
end of the cycle.
• Disconnect the appliance from the power
supply by turning the programme selector to
“Stop”
.
• Unplug the appliance.
• Replace the inlet hose and drain hose.
This way, the water remaining in the hoses will
be drained away, avoiding any ice formation
which would damage your appliance.
Before turning your appliance on again, ensure
that it is installed in an area where the tempera-
ture will not fall below freezing.
NOTE ! This machine is made for use in normal
inside temperature. Manufacturer is not respon-
sible for freezing damages.
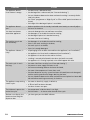
Operating Problems
Numerous checks were carried out on your ap-
pliance before it left the factory. However,
should you notice a malfunction, please refer to
the sections below before contacting the after-
sales service.
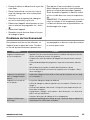
Problems Causes
The appliance doesn’t start
or doesn’t fill:
• the appliance isn’t plugged in correctly, the electrical installation isn’t working,
there is a power failure,
• the lid of your appliance and the drum shutters aren’t closed firmly,
• the programme start command hasn’t been properly selected,
• the water supply has been cut off, the water inlet tap is closed,
• the water inlet filters are dirty (see “Care and cleaning ”).
The appliance fills but
empties straight away:
• the drainage U-piece is fixed too low (see “Installation”).
9
www.zanussi.com

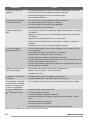
Problems Causes
The appliance doesn’t
rinse or doesn’t empty:
• the drain hose is blocked or bent,
• the drainage filter is obstructed (see “Care and cleaning ”),
• the out of balance detector has been activated: washing is unevenly distrib-
uted in the drum,
• the “Drain” programme or “Night Cycle” or “Rinse hold” option have been se-
lected,
• the height of the drainage U-piece is unsuitable.
The appliance doesn’t
spin:
• balance problem with the laundry load: add more laundry or manually adjust
the items in the drum.
You have found water
around the appliance:
• too much detergent has caused foam to overflow,
• the detergent is unsuitable for machine washing,
• the drainage U-piece isn’t attached correctly,
• the water inlet hose is leaking.
The washing results are
not satisfactory :
• the detergent is unsuitable for machine washing,
• there is too much washing in the drum,
• the wash cycle is unsuitable,
• there isn’t enough detergent.
The appliance vibrates, is
noisy:
• all packaging have not been removed from the appliance (see “Installation”),
• the appliance isn’t level and is unbalanced (see “Installation”),
• the appliance is too close to the wall or furniture,
• washing is unevenly distributed in the drum, the load is too small,
• the appliance is in running in period, noise will disappear with time.
The wash cycle is much
too long:
• the water inlet filters are dirty (see “Care and cleaning ”),
• the power or water supply has been cut off,
• the motor overheating detector has been activated,
• the water inlet temperature is lower than usual,
• the foam detection security system has been activated (too much detergent)
and the washing machine has begun draining the foam,
• the out of balance detector has been activated: an extra phase has been add-
ed to distribute washing more evenly in the drum.
The appliance stops during
a wash cycle:
• the water or electricity supply is defective,
• a “Rinse hold” has been selected,
• the drum shutters are open.
The lid doesn’t open at the
end of the cycle:
• the temperature inside the drum is too high,
• the lid unlocks 1 - 2 minutes after the end of the cycle.
Softener runs directly into
the drum when filling the
dispenser box:
• you have gone past the MAX indicator.
10
www.zanussi.com

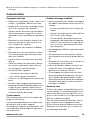
Problems Causes
The “Start/Pause” push-
button
1)
flashes red
2)
:
• the lid is not closed properly,
• the drainage filter is obstructed,
• the drain hose is blocked or bent,
• the drain hose is fixed to high (see "Installation"),
• the drainage pump is blocked,
• the standpipes blocked,
• the water tap is closed, the water supply has been cut off.
1) On some models, the audible signals can sound
2) After solving any problems, press "Start/Pause" pushbutton to restart the interrupted programme.
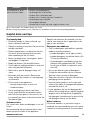
Helpful hints and tips
The laundry load
• Divide the laundry in: white, coloured, syn-
thetics, delicates and wool.
• Obey the washing instructions that are on the
laundry care labels.
• Some coloured items can discolour with the
first wash. We recommend that you wash
them separately for the first times.
• Button up pillowcases, close zippers, hooks
and poppers. Tie up belts.
• Empty the pockets and unfold the items.
• Turn inside out multilayered fabrics, wool and
items with painted illustrations.
• Wash with a special detergent heavy soil
stains.
• Be careful with the curtains. Remove the
hooks and put the curtains in a washing bag
or pillowcase.
• Do not wash in the appliance :
– Laundry without hems or with cuts
– Underwired bras.
• Use a washing bag to wash small items.
• A very small load can cause balance prob-
lems with the spin phase. If this occurs, ad-
just manually the items in the tub and start the
spin phase again.
Stubborn stains
For some stains, water and detergent is not suf-
ficient.
We recommend that you remove these stains
before you put the items in the appliance.
Special stain removers are available. Use the
special stain remover that is applicable to the
type of stain and fabric.
Detergents and additives
• Only use detergents and additives specially
made for washing machines:
– powder detergents for all types of fabric,
– powder detergents for delicate fabrics (40
°C max) and woollens,
– liquid detergents, preferably for low tem-
perature wash programmes (60 °C max)
for all types of fabric, or special for wool-
lens only.
• Do not mix different types of detergents.
• To help the environment, do not use more
than the correct quantity of detergent.
• Obey the instructions that you find on the on
packaging of these products.
• Use the correct products for the type and
colour of the fabric, the programme tempera-
ture and the level of soil.
• If your appliance has not the detergent dis-
penser with the flap device, add the liquid de-
tergents with a dosing device (supplied by
the detergent's manufacturer) or pour the liq-
uid detergent directly into the drum.
Water hardness
If the water hardness in your area is high or
moderate, we recommend that you use a water
softener for washing machines. In areas where
11
www.zanussi.com

the water hardness is soft it is not necessary to
use a water softener.
To know the water hardness in your area, con-
tact your local water authority.
Use the correct quantity of the water softener.
Obey the instructions that you find on the pack-
aging of the product.
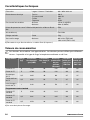
Technical data
Dimensions Width / Height / Depth 600 / 850 / 600 mm
Electrical connection Voltage
Overall power
Fuse
Frequency
230 V
2300 W
10 A
50 Hz
Water supply pressure Minimum
Maximum
0,5 bar (0,05 MPa)
8 bar (0,8 MPa)
Level of protection against ingress of solid particles and moisture IPX4
Water supply
1)
Cold water
Maximum Load Cotton 5 kg
Spin Speed Maximum 800 rpm (ZWY180)
1000 rpm (ZWY1100)
1) Connect the water inlet hose to a water tap with a 3/4'' thread.
Consumption values
The data of this table are approximate. Different causes can change the data: the quantity and
type of laundry, the water and ambient temperature.
Programmes Load
(kg)
Energy con-
sumption
(kWh)
Water con-
sumption (li-
tre)
Approxi-
mate pro-
gramme
duration
(minutes)
Remaining
moisture
(%)
1)
ZWY180
Remaining
moisture
(%)
1)
ZWY1100
Cottons 60 °C 5 1.20 58 120 66 60
Cottons 40 °C 5 0.780 58 120 66 60
Synthetics 40
°C
2,5 0.65 48 80 37 37
Delicates 40 °C 2,5 0.55 53 70 37 37
Wool/Hand
wash 30 °C
1 0.40 48 54 37 32
Standard cotton programmes
Standard 60 °C
cotton
5 0.96 49 214 66 60
Standard 60 °C
cotton
2,5 0.81 33 165 66 60
Standard 40 °C
cotton
2,5 0.59 33 130 66 60
1) At the end of spin phase.
12
www.zanussi.com

Off Mode (W) Left On Mode (W)
0.10 0.98
The information given in the charts above are in compliance with the EU Commission regulation 1015/2010
implementing directive 2009/125/EC.
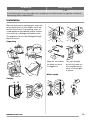
Installation
Remove all protective packaging for transit be-
fore using for the first time. Keep in case nee-
ded for future transit: Transporting a non-se-
cured appliance may damage internal compo-
nents and cause leakages and malfunctions.
The appliance can also be damaged through
physical contact.
Unpacking
2
1
Untying
AB
C
A
1
2
B
2
1
B
C
Keep the transit bolts
for when you move
the appliance.
To install the appli-
ance at the same lev-
el as neighboring fur-
niture, cut these plas-
tic pieces.
Water supply
90
O
90
O
90
O
13
www.zanussi.com

In case of necessity
move the inlet hose in
the direction shown
on picture. To make
this loose the inlet
hose ring nut and po-
sition the inlet hose
downwards as drawn
on picture. Tighten
the ring nut back and
make sure there are
no leaks.
Open the water inlet
tap. Check there are
no leaks. The water
inlet hose can not be
extended. If it is too
short, please contact
the after-sales serv-
ice.
Note ! Check if the
water connections are
tight.
Drainage
Fit the U-piece on the
drainage hose. Place
everything in a drainage
point (or in a sink) at a
height of between 70
and 100 cm. Ensure it
is positioned securely.
Air must be able to en-
ter the end of the hose,
to avoid any risk of siphoning.
max
100 cm
min
70 cm
The drain hose must never be stretched. If it is
too short, contact an engineer.
Electrical connection
This washing machine must only be connected
in single-phased 230 V. Check the fuse size: 10
A for 230 V. The appliance must not be con-
nected with an extension lead or multi-plug
adaptor. Ensure that the plug is earthed and
that it is in accordance with current regulations.
Positioning
Position the appliance on a flat and hard surface
in a ventilated location. Ensure the appliance
does not come into contact with the wall or oth-
er furniture. Accurate levelling avoids vibrations,
noise and prevents the appliance from moving
when running.
Environment concerns
Recycle the materials with the symbol . Put
the packaging in applicable containers to
recycle it.
Help protect the environment and human health
and to recycle waste of electrical and electronic
appliances. Do not dispose appliances marked
with the symbol
with the household waste.
Return the product to your local recycling facility
or contact your municipal office.
Disposing of the appliance
All materials carrying the
symbol are re-
cyclable. Dispose of them at a waste col-
lection site (enquire at your local council) for
collection and recycling. When disposing of
your appliance, remove all parts which could be
dangerous to others: cut off the power supply
cable at the base of the appliance.
Protecting the environment
To save water and energy and therefore
help protect the environment, we recom-
mend the following:
• Whenever possible, use the appliance at full
capacity and avoid partial loads.
• Only use the prewash and soak programmes
for heavily soiled items.
• Use an appropriate amount of detergent for
the hardness of the water, the size of the load
and how soiled the washing is.
14
www.zanussi.com

Sommaire
Consignes de sécurité _ _ _ _ _ _ _ _ _ _ _ 15
Instructions de sécurité _ _ _ _ _ _ _ _ _ _ _ 16
Description de l'appareil _ _ _ _ _ _ _ _ _ _ _ 18
Comment effectuer un cycle de lavage ? _ _ 19
Utilisation Quotidienne _ _ _ _ _ _ _ _ _ _ _ 19
Tableau des programmes _ _ _ _ _ _ _ _ _ _ 21
Entretien et nettoyage _ _ _ _ _ _ _ _ _ _ _ _ 22
Problèmes de fonctionnement _ _ _ _ _ _ _ 23
Conseils utiles _ _ _ _ _ _ _ _ _ _ _ _ _ _ _ _ 25
Caractéristiques techniques _ _ _ _ _ _ _ _ 26
Valeurs de consommation _ _ _ _ _ _ _ _ _ _ 26
Installation _ _ _ _ _ _ _ _ _ _ _ _ _ _ _ _ _ _ 27
En matière de protection de l'environnement
_ _ _ _ _ _ _ _ _ _ _ _ _ _ _ _ _ _ _ _ _ _ _ _ 28
Sous réserve de modifications.
Consignes de sécurité
Avant d'installer et d'utiliser cet appareil, lisez soigneusement les ins-
tructions fournies. Le fabricant ne peut être tenu pour responsable
des dommages et blessures liés à une mauvaise installation ou utili-
sation. Conservez toujours cette notice avec votre appareil pour vous
y référer ultérieurement.
Sécurité des enfants et des personnes vulnérables
Avertissement Risque d'asphyxie, de blessure ou d'invalidité
permanente.
• Cet appareil n'est pas conçu pour être utilisé par des personnes (y
compris des enfants) dont les facultés physiques, sensorielles ou
mentales sont réduites, ou qui manquent d'expérience et de con-
naissances, à moins qu'une personne responsable de leur sécurité
ne les supervise ou leur donne des instructions sur la manière de
l'utiliser.
• Ne laissez pas les enfants jouer avec l'appareil.
• Ne laissez pas les emballages à la portée des enfants.
• Ne laissez pas les détergents à la portée des enfants.
• Tenez les enfants et les animaux éloignés du hublot de l'appareil
lorsque celui-ci est ouvert.
• Si l'appareil est équipé d'un dispositif de sécurité enfants, nous
vous recommandons de l'activer.
15
www.zanussi.com

Sécurité générale
• Avant toute opération d'entretien, éteignez l'appareil et débranchez
la fiche de la prise secteur.
• Ne modifiez pas les caractéristiques de cet appareil.
• Respectez la charge maximale de 5 kg (reportez-vous au chapitre
« Tableau des programmes »).
• Si le câble d'alimentation est endommagé, il doit être remplacé par
le fabricant, son atelier d'entretien ou un technicien qualifié afin
d'éviter tout danger.
• La pression de l'eau en service (minimale et maximale) doit être
comprise entre 0,5 bar (0,05 MPa) et 8 bar (0,8 MPa)
• Les orifices d'aération situés à la base (si présents) ne doivent pas
être obstrués par de la moquette.
• L'appareil doit être raccordé au circuit d'eau à l'aide des tuyaux
neufs fournis. N'utilisez pas de tuyaux provenant d'anciens appa-
reils.
Instructions de sécurité
Installation
• Retirez l'intégralité de l'emballage et les bou-
lons de transport.
• Conservez les boulons de transport. Si vous
devez déplacer à nouveau l'appareil, il est
conseillé de bloquer le tambour.
• N'installez pas et ne branchez pas un appareil
endommagé.
• N'installez pas l'appareil ou ne l'utilisez pas
dans un endroit où la température ambiante
est inférieure à 0 °C ou dans un endroit expo-
sé aux intempéries.
• Suivez scrupuleusement les instructions
d'installation fournies avec l'appareil.
• Assurez-vous que le sol sur lequel vous in-
stallez l'appareil est plat, stable, résistant à la
chaleur et propre.
• N'installez pas l'appareil dans un endroit où il
ne pourrait pas être complètement ouvert.
• Soyez toujours vigilants lorsque vous dépla-
cez l'appareil car il est lourd. Portez toujours
des gants de sécurité.
• Assurez-vous que de l'air circule entre l'appa-
reil et le sol.
• Réglez les pieds pour laisser un espace suffi-
sant entre l'appareil et la surface en moquet-
te.
Branchement électrique
Avertissement Risque d'incendie ou
d'électrocution.
• L'appareil doit être relié à la terre.
• Vérifiez que les données électriques figurant
sur la plaque signalétique correspondent à
celles de votre réseau. Si ce n'est pas le cas,
contactez un électricien.
• Utilisez toujours une prise de courant de sé-
curité correctement installée.
16
www.zanussi.com

• N'utilisez pas d'adaptateurs multiprises ni de
rallonges.
• Veillez à ne pas endommager la fiche secteur
ni le câble d'alimentation. Contactez le servi-
ce après-vente ou un électricien pour rempla-
cer le câble d'alimentation s'il est endomma-
gé.
• Ne branchez la fiche d'alimentation à la prise
de courant qu'à la fin de l'installation. Assu-
rez-vous que la prise de courant est acces-
sible une fois l'appareil installé.
• Ne tirez jamais sur le câble d'alimentation
pour débrancher l'appareil. Tirez toujours sur
la fiche.
• Ne touchez jamais le câble d'alimentation ni la
fiche avec des mains mouillées.
• Cet appareil est conforme aux directives
CEE.
Raccordement à l'arrivée d'eau
• Veillez à ne pas endommager les tuyaux de
circulation d'eau.
• L'appareil doit être raccordé au circuit d'eau à
l'aide des tuyaux neufs fournis. N'utilisez pas
de tuyaux provenant d'anciens appareils.
• Avant de brancher l'appareil à des tuyaux
neufs ou n'ayant pas servi depuis longtemps,
laissez couler l'eau jusqu'à ce qu'elle soit pro-
pre.
• Avant d'utiliser l'appareil pour la première fois,
assurez-vous de l'absence de fuites.
Utilisation
Avertissement Risque de blessure, de
choc électrique, d'incendie, de brûlures ou
de dommage matériel à l'appareil.
• Utilisez cet appareil uniquement dans un en-
vironnement domestique.
• Suivez les consignes de sécurité figurant sur
l'emballage du produit de lavage.
• Ne placez pas de produits inflammables ou
d'éléments imbibés de produits inflammables
à l'intérieur ou à proximité de l'appareil, ni sur
celui-ci.
• Veillez à retirer tout objet métallique du linge
avant chaque lavage.
• Ne placez aucun récipient sous l'appareil
pour récupérer tout éventuel écoulement.
Contactez le service après-vente pour con-
naître les accessoires disponibles.
Entretien et nettoyage
Avertissement Risque de blessure
corporelle ou de dommages matériels.
• Ne pulvérisez pas d'eau ni de vapeur pour
nettoyer l'appareil.
• Nettoyez l'appareil avec un chiffon doux humi-
de. Utilisez uniquement des produits de lava-
ge neutres. N'utilisez pas de produits abra-
sifs, de tampons à récurer, de solvants ni
d'objets métalliques.
Mise au rebut
Avertissement Risque de blessure ou
d'asphyxie.
• Débranchez l'appareil de l'alimentation élec-
trique.
• Coupez le câble d'alimentation et mettez-le
au rebut.
• Retirez le dispositif de verrouillage du hublot
pour empêcher les enfants et les animaux de
s'enfermer dans l'appareil.
Maintenance
• Contactez le service après-vente pour faire
réparer l'appareil. N'utilisez que des pièces
de rechange d'origine.
17
www.zanussi.com

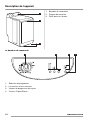
Description de l'appareil
1
2
3
1. Bandeau de commande
2. Poignée de couvercle
3. Pieds de mise à niveau
Le bandeau de commande
1
2 3 4
1. Sélecteur de programmes
2. Les touches et leurs fonctions
3. Voyants de progression des cycles
4. Touche « Départ/Pause »
18
www.zanussi.com

Boîte à produits
1
2
3
4
5
1
Assouplissant (veillez à ne pas dé-
passer le niveau indiqué par le repère
MAX)
2
Un agent blanchissant peut être utilisé
avec les programmes Coton sans prélava-
ge : 1/4 à 1 verre d'eau de Javel diluée (ne
pas dépasser le repère MAX)
3
Lavage
4
Prélavage
5
Trop-plein d'assouplissant et d'eau de Javel
(en cas de remplissage excessif)
Comment effectuer un cycle de lavage ?
Première utilisation
• Assurez-vous que les raccordements
électriques et hydrauliques sont confor-
mes aux instructions d'installation.
• Retirez les éléments en polystyrène et
tout autre élément figurant dans le tam-
bour.
• Effectuez un premier cycle de lavage à
vide à 90 °C, avec lessive pour nettoyer
le réservoir d'eau.
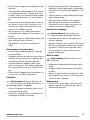
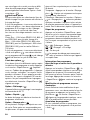
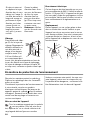
Utilisation Quotidienne
Chargement du linge
• Ouvrez le couver-
cle de l'appareil.
• Ouvrez le tambour
en appuyant sur la
touche A : les
deux portillons
s'ouvrent automa-
tiquement.
• Chargez le linge,
puis fermez le tambour et le couvercle de vo-
tre lave-linge.
Avertissement Avant de fermer le
couvercle de l'appareil, vérifiez que le
tambour a été correctement fermé :
• une fois que les deux portillons sont fermés,
• la touche A est libérée.
A
Quantité de produit de lavage
Verser la quantité de poudre à laver dans les
compartiments lavage et prélavage si
vous avez sélectionné l'option « Prélavage ».
Verser l'assouplissant textile dans le comparti-
ment
et l'eau de Javel dans le compartiment
si nécessaire (disponibles avec les pro-
grammes Coton sans prélavage).
Sélection du programme souhaité
Tournez le sélecteur de programme sur le pro-
gramme souhaité. La touche « 4 » clignote en
vert.
Si vous tournez le sélecteur de programme sur
un autre programme au cours d'un cycle, l'appa-
reil ne tiendra pas compte de ce nouveau pro-
gramme. La touche « 4 » clignote en rouge pen-
dant quelques secondes.
Sélection de la vitesse d'essorage
Appuyez sur la touche « Essorage »
pour
modifier la vitesse d'essorage si vous souhaitez
19
www.zanussi.com

que votre linge soit essoré à une vitesse diffé-
rente de celle proposée par l'appareil. Vous
pouvez également sélectionner l'option « Arrêt
cuve pleine »
.
Arrêt cuve pleine
Lorsque cette option est sélectionnée, l'eau du
dernier rinçage n'est pas évacuée afin d'éviter le
froissage du linge.
À la fin du programme, si vous avez sélectionné
« Arrêt cuve pleine », vous devez sélectionner un
programme d'« Essorage » ou de « Vidange »
afin de terminer le cycle et de vider l'eau.
Les vitesses d'essorage maximales sont les sui-
vantes :
Coton, Éco : 1 000 tr/min ((ZWY1100), 800 tr/
min (ZWY180), pour la Laine, Lavage à la
Main : 1 000 tr/min ((ZWY1100), 800 tr/min
(ZWY180), pour les Synthétiques : 800 tr/min
(ZWY180/1100), pour les textiles Délicats :
700 tr/min.
À la fin du programme, si vous avez sélectionné
« Arrêt cuve pleine »
, vous devez sélection-
ner un programme d'essorage
ou de vidange
afin de terminer le cycle et vider l'eau.
Choix des options
Vous devez choisir les différentes options après
la sélection d'un programme et avant d'appuyer
sur la touche « Départ/Pause »
, (reportez-
vous au « Tableau des programmes »). Appuyez
sur les touches souhaitées : les voyants corres-
pondants s'allument. Si vous appuyez une deu-
xième fois, les voyants s'éteignent. Si l'une des
options n'est pas compatible avec le program-
me sélectionné, la touche « Départ/Pause »
clignote en rouge.
Option « Prélavage »
L'appareil effectue un prélavage à une tempéra-
ture maximale de 30 °C.
Option « Rapide »
La durée de lavage est réduite en fonction du
programme sélectionné.
Option « Rinçage plus »
Un ou plusieurs rinçages sont ajoutés au cours
du cycle. Cette option est recommandée pour
les personnes à la peau sensible et dans les ré-
gions où l'eau ne présente pas un niveau élevé
de dureté.
Temporaire : Appuyez sur la touche « Rinçage
plus »
. L'option est uniquement active pour
le programme sélectionné.
Permanent : Maintenez les touches « Options »
et « Rinçage plus » enfoncées pendant
quelques secondes. L'option est alors activée
de manière permanente, même si l'appareil est
arrêté. Pour la désactiver, répétez la procédure.
Départ du programme
Appuyez sur la touche « Départ/Pause » pour
lancer le cycle. Le voyant correspondant appa-
raît en vert. Il est normal que le sélecteur de
programmes demeure immobile pendant le cy-
cle. Le voyant correspondant au cycle en cours
s'allume.
+ : Prélavage + Lavage
+ : Rinçages + Essorage
: Fin de cycle
La pompe de vidange peut momentané-
ment se mettre en route lorsque l'appareil
se remplit d'eau.
Interruption d'un programme
Ajout de linge au cours des 10 premières
minutes
Appuyez sur la touche « Départ/Pause »
: le
voyant correspondant clignote en vert tant que
l'appareil est en pause. Le couvercle ne peut
être ouvert qu'environ 2 minutes après l'arrêt du
lave-linge. Appuyez de nouveau sur la touche
« Départ/Pause »
pour continuer le program-
me.
Modification du programme en cours
d'exécution
Avant d'effectuer toute modification du pro-
gramme en cours, vous devez mettre le lave-lin-
ge en pause en appuyant sur la touche « Dé-
part/Pause »
. La touche « Départ/Pause »
clignote en rouge pendant quelques secon-
des si la modification n'est pas possible.
Annulation du programme
Si vous souhaitez annuler un programme, tour-
nez le sélecteur de programme sur la position
« Arrêt »
.
20
www.zanussi.com
La page charge ...
La page charge ...
La page charge ...
La page charge ...
La page charge ...
La page charge ...
La page charge ...
La page charge ...
La page charge ...
La page charge ...
La page charge ...
La page charge ...
-
 1
1
-
 2
2
-
 3
3
-
 4
4
-
 5
5
-
 6
6
-
 7
7
-
 8
8
-
 9
9
-
 10
10
-
 11
11
-
 12
12
-
 13
13
-
 14
14
-
 15
15
-
 16
16
-
 17
17
-
 18
18
-
 19
19
-
 20
20
-
 21
21
-
 22
22
-
 23
23
-
 24
24
-
 25
25
-
 26
26
-
 27
27
-
 28
28
-
 29
29
-
 30
30
-
 31
31
-
 32
32


Zanussi ZWY180 Manuel utilisateur
- Catégorie
- Machines à laver
- Taper
- Manuel utilisateur
dans d''autres langues
- English: Zanussi ZWY180 User manual