Maxsa Innovations 44642-CAM-WH Le manuel du propriétaire
- Taper
- Le manuel du propriétaire

1
www.maxsainnovations.com
STOP! READ FIRST!
To use the Solar Security Video Camera and Floodlight, you need a computer.
This camera is compatible with both Microsoft and Apple computers. You will need a computer to sync the time and
date on the camera as well as view the video files after recording them.
Before using the Solar Security Video Camera and Floodlight, you must:
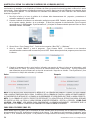
1. Connect the solar panel to the video camera floodlight, make sure the switch is in the OFF position, and set the
solar panel outside in the sun for three days to charge the batteries fully.
2. If using a Windows computer, plug the camera module into a USB port on your computer or laptop and run the
Sync program (See “Setting the Date and Time On the Camera Module” on page 4).
ABOUT YOUR SOLAR SECURITY VIDEO CAMERA & FLOODLIGHT
This video camera floodlight requires no electrical wiring and is ideal for recording video at entrance areas, porches,
driveways, carports, garages, and warehouses. It can even be used as a game camera. The video camera floodlight has
a built-in motion sensor which turns on the camera automatically when movement of a heat source (such as people,
animals, or cars) is detected in the area. In sufficient darkness, the 20 Surface Mount LEDs, with an estimated life of
30,000 hours, also activate and provide over 1100 lumens of light for you to see and for the camera to record. The
camera remains on while motion is detected. The camera saves the recorded videos to the (included) 16GB Micro-SD
card which can hold up to 5 hours of video. When the Micro-SD card is full, the oldest files are overwritten. To access
the videos, the camera module must be disconnected from the light and plugged into a computer’s USB port.
A time control can be adjusted to allow the camera to stay on for 10 - 60 seconds after the motion sensor stops
detecting motion. At night, the time control also controls the floodlight. The light sensitivity can be adjusted to allow the
floodlight to start activating at varying darkness levels.
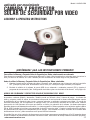
motion-activated
SOLAR SECURITY
VIDEO CAMERA & FLOODLIGHT
Model #: 44642-CAM
ASSEMBLY & OPERATING INSTRUCTIONS

2©2016 MAXSA Innovations, LLC. All Rights Reserved.
An included 3.7V 4.4Ah Lithium-ion rechargeable battery pack will need to be replaced when its charging ability
decreases. When the batteries are fully charged, the floodlight portion will activate for up to 82 one- minute cycles per
night. Low temperatures (14°F/-10°C) can result in limited functionality in the lithium-ion battery pack which may cause
irregular activity in the video camera floodlight. Normal operation will return when the temperature rises.
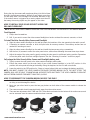
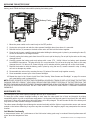
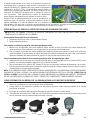
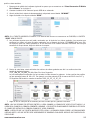
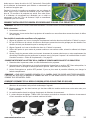
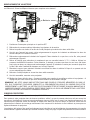
INCLUDED PARTS:
Carefully remove and identify all the parts from their protective packaging and lay them out.
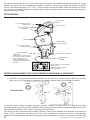
CHOOSING A LOCATION FOR YOUR SOLAR SECURITY VIDEO CAMERA AND FLOODLIGHT
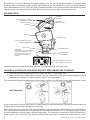
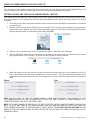
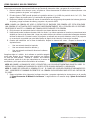
1. The video camera floodlight connects to its solar panel with a 15 foot power cord.
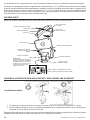
2. Ideally the solar panel should face the southern sky and receive at least 6-8 hours of direct sunlight per day to
maximize the charging of the battery pack as shown in the images below.
The solar panel will charge the battery pack on cloudy days; however, the total battery charge will be less than it would
be on a sunny day. Placing the solar panel in a shaded location or behind a window will prevent the battery pack from
charging and the video camera floodlight from operating.
When deciding where to mount the video camera floodlight, keep in mind that the motion sensor has a field of vision of
180º (horizontal) at a distance of up to 40 feet when the surrounding temperature is 75°F. The distance range increases
in colder temperatures and decreases in warmer temperatures. The camera has a resolution of 1280x720 pixels with a
field of vision of 110° (horizontal). This means the motion sensor may pick up movement the camera does not record.
4 Screws And Masonry Anchors
For Mounting Solar Panel
Solar Panel
15 Foot Power Cable
Solar Panel
Mounting Bracket
Solar Panel
Angle Pivot
2 Screws And Masonry Anchors
For Mounting Main Body
Motion Sensor AUTO/OFF Switch
Removable Video
Camera Module
Duration Time Adjustment Knob (TIME)
Light Sensitivity Adjustment Knob (LUX)
Main Battery Unit
Light Cover
IMPORTANT:
(Push in gray tabs to remove camera
module to view adjustments knobs
on bottom of motion sensor or to
plug the camera module into a
computer)
Ideal Placements

3
www.maxsainnovations.com
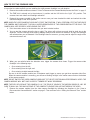
During the day, the camera will record everything in its field of view.
At night, the darkness makes it difficult to see objects more than
25 feet away even if the floodlight has activated. Because of this,
if the motion sensor is triggered by a moving object more than 25
feet away, the moving object may not appear on the video.
HOW TO INSTALL YOUR SOLAR SECURITY VIDEO CAM-
ERA AND FLOODLIGHT:
NOTE: INSTALL YOUR VIDEO CAMERA FLOODLIGHT IN A LOCATION WHERE YOU CAN ACCESS THE CAMERA MODULE.
Tools Required:
1. Phillips head screwdriver.
2. Drill, if you want to mount the video camera floodlight on harder surfaces like cement, concrete, or brick.
To Install The Solar Security Video Camera and Floodlight:
1. Align the video camera floodlight on the wall and mark the locations of the two mounting holes with a pencil.
2. If mounting on cement, concrete, or brick, drill pilot holes for masonry anchors. The masonry anchors are not
needed for mounting on wood.
3. Align the video camera floodlight on the wall and install the two screws using a screwdriver
4. Use the four (4) screws to mount the solar panel onto a solid surface following the same three steps above.
5. Adjust the angle of the solar panel by gently rotating the solar panel to a different locking position. Remember
to face the panel south for direct sunlight exposure. See the “Choosing A Location” section on page 2.
Fully charge the Solar Security Video Camera and Floodlight’s battery pack.
1. Tightly connect the solar panel to the video camera floodlight power cable.
2. Ensure the power switch on the main body of your video camera floodlight is in the OFF position. In this
position, the solar panel will charge the battery during the daytime, but the unit will not activate.
3. Leave the switch in the OFF position for 3 days or longer before initial use to charge the battery pack fully.
NOTE: YOU MUST CHARGE THE VIDEO CAMERA FLOODLIGHT BEFORE MOVING ON TO THE NEXT STEPS. THE
CAMERA WILL NOT BE ABLE TO MAINTAIN AN ACCURATE DATE AND TIME IF THE VIDEO CAMERA FLOODLIGHT
HAS NOT BEEN CHARGED FOR MORE THAN FOUR (4) DAYS.
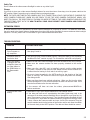
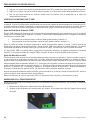
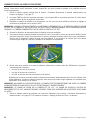
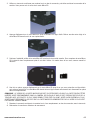
HOW TO DISCONNECT THE CAMERA MODULE/ACCESS THE DIALS
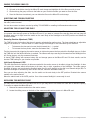
1. Hold the motion sensor by the sides. Be very careful not to put your fingers on the lens of the motion sensor
as doing so could damage the device.
2. Next, use your other hand to press the two gray buttons on both sides of the camera module to release the
module.
3. The camera module should separate directly away from the motion sensor.
4. There are two adjustment dials: TIME and LUX. These dials are located on the bottom of the motion sensor and
can be accessed once the camera module has been removed.
Motion Sensor Lens Gray Button
Camera Module Bottom of motion sensor
with TIME and LUX dials.
12
34

4©2016 MAXSA Innovations, LLC. All Rights Reserved.
HOW TO TEST THE COVERAGE AREA
This section covers the steps you need to take to ensure your camera module will capture the desired area. This section
is important to review anytime you are installing the video camera floodlight in a new location.
1. Remove the camera module as shown in “How To Disconnect the Camera Module/Access the Dials” on page 3.
2. The TIME dial is already set to the minimum (-) position and the LUX dial to the “light” () position. This
ensures short test videos and floodlight activation.
3. Reattach the camera module to the motion sensor once you have checked the dials and switch the video
camera floodlight to the AUTO position.
NOTE: WHEN THE VIDEO CAMERA FLOODLIGHT IS FIRST SWITCHED ON, IT WILL PERFORM A TEST ACTIVATION OF
THE CAMERA AND FLOODLIGHT. THIS WILL HAPPEN REGARDLESS OF THE CONFIGURATION OF THE DIALS. THE
CAMERA WILL NOT RECORD A VIDEO DURING THIS TEST.
4. Point the motion sensor in the direction that you want to detect motion.
5. You can test the camera during the day or night. The videos will not have as much detail at night due to the
darkness. Test the coverage of the area by walking slowly around the area of detection. At night, the floodlight
will activate when you are detected. If the floodlight does not come on, you may need to adjust the angle of the
camera and sensor unit.
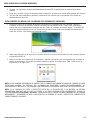
6. When you are satisfied with the detection area, trigger the camera three times. Trigger the camera video
floodlight in the following ways:
• Once entering from the left,
• Once entering from the right, and
• Once entering straight towards the light.
Be sure to let the camera module turn off between each trigger to ensure you get three separate video files.
When the camera module is recording, you will see a blinking red light in the motion sensor and on the bottom
of the camera module.
NOTE: DO NOT SWITCH THE VIDEO CAMERA FLOODLIGHT TO THE OFF POSITION WHILE RECORDING A VIDEO. THE
CAMERA MODULE WILL NOT SAVE A VIDEO IF TURNED OFF WHILE RECORDING.
NOTE: THE FIELD OF VISION OF THE CAMERA IS 110°. THE FIELD OF VISION OF THE MOTION SENSOR IS 180°. BE
SURE TO WALK ALL THE WAY IN FRONT OF THE CAMERA TO ENSURE YOU ARE CAPTURED IN THE VIDEO.
7. Remove the camera module from the video camera floodlight by following the directions in the “How to
Disconnect the Camera Module” section on page 3. Then continue to the “Setting the Date and Time” section
below

5
www.maxsainnovations.com
SETTING THE DATE AND TIME ON THE CAMERA MODULE (WINDOWS)
This section covers the steps you need to take to ensure your camera module has the correct date and time for your
time zone; however it is not required and the video camera floodlight will still function and record videos if this section
is skipped.
You can use a Microsoft or Apple computer. If you are using a computer with Mac OS, please refer to the instructions
for Apple computers, beginning on page 7.
1. To set the time and date, the camera module must be removed from the floodlight and connected to a Windows
compatible computer via the USB port.
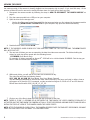
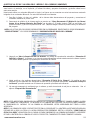
2. Plug the camera module into a USB port on your computer. Your computer should show you two new drives.
Both should be listed in the “Devices with Removable Storage” section in your Computer folder view. One is the
camera, one is the storage card.
NOTE: THE DRIVE LETTERS MAY DIFFER ON YOUR COMPUTER. IDENTIFY THE DRIVE LABELED “REMOVABLE DISK”
AND THE DRIVE LABELED “SYNC CAMERA CLOCK”.
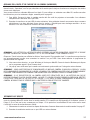
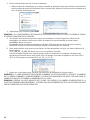
Click “Open folder to view files” on the “Sync Camera Clock” Autoplay box. The camera does not automatically sync
when you plug the camera into a USB port. You must run the program to sync the camera.
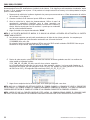
3. You will see two folders: One for Windows and one for MacOS. Open the Windows folder and click the program
called, “Sync Camera Clock”.
4. A pop-up will confirm the camera is now synced to the PC clock.
NOTE: YOU WILL NEED TO SYNC THE CAMERA MODULE AGAIN WHEN SEASONAL TIME CHANGES OCCUR.
THE CAMERA MODULE WILL NOT AUTOMATICALLY ADJUST THE TIME. SYNCING THE CAMERA MODULE TO A
COMPUTER ENSURES YOU HAVE THE PROPER TIME.
NOTE: IF THE VIDEO CAMERA FLOODLIGHT IS OFF OR THE BATTERY HAS NO POWER FOR MORE THAN FOUR (4)
DAYS, THE DATE AND TIME MAY LOSE ACCURACY. REPEAT THE SETTING THE DATE AND TIME SECTION ON PAGE
4 TO SYN THE CAMERA AGAIN. BE SURE THE BATTERY PACK IN THE VIDEO CAMERA FLOODLIGHT IS FULLY
CHARGED AS WELL.

6©2016 MAXSA Innovations, LLC. All Rights Reserved.
VIEWING THE VIDEOS
You must follow the steps in this section anytime you wish to view the videos on the Micro-SD storage card located in
the camera module. If the camera is already plugged into the computer, skip to step 3. If not, start with step 1. If the
product or Micro-SD card is new and no testing has been done, the card will not have any files.
1. Disconnect the camera module by following the steps in HOW TO DISCONNECT THE CAMERA MODULE on
page 3.
2. Plug the camera module into a USB port on your computer.
3. Open the drive for the storage card:
• Use the AutoPlay menu for the Removable Disk that appeared when you first plugged in the camera module
by choosing OPEN FOLDER TO VIEW FILES or your computer may open the drive automatically.
4. Double-click the folder labelled DCIM.
NOTE: IF THE MICRO-SD CARD IS NEW OR IF YOU HAVE NOT DONE THE TEST ACTIVATIONS, THE DCIM FOLDER
WILL NOT EXIST YET.
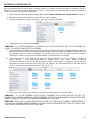
5. The next set of folders you see are named by the date the videos were recorded. The folders holding the
videos for each day will be named with the following format:
YYYYMMDD (Year, Month, Day)
For example, all videos recorded on August 6th, 2016 will be in a folder labeled 20160806. Find the day you
want to view and double-click the folder.
6. Within each folder, you will see all the video files recorded that day.
The video files will have the following format:
YYYY_MM_DD_HH_MM_SS (Year, Month, Day, Hour, Minute, Second)
The time stamp corresponds to the time the video started recording. The hours are listed in military time so
will appear as 00 through 23. For example, a video recorded on August 6th, 2016 at 3:07 and 22 seconds
PM will have the filename 2016_08_06_15_07_22.
7. Click on any of the files to view the video that was recorded at that time.
NOTE: THERE IS A ONE (1) SECOND DELAY BETWEEN THE TIME WHEN THE VIDEO CAMERA FLOODLIGHT IS
ACTIVATED AND THE TIME WHEN THE CAMERA ACTUALLY STARTS RECORDING. MOVING OBJECTS MAY BE WELL
WITHIN THE FIELD OF VIEW OF THE CAMERA WHEN THE VIDEO STARTS.
NOTE: AFTER THE MICRO-SD CARD IS FULL, THE CAMERA RECORDS OVER THE EARLIEST RECORDINGS, SO MAKE
SURE YOU SAVE ANY FILES YOU WANT TO YOUR HARD DRIVE.

7
www.maxsainnovations.com
SAVING THE VIDEOS (WINDOWS)
1. Open the folder on your hard drive where you want to store the videos.
2. Go back to the folder view for the Micro-SD card storage and highlight all of the files you wish to save.
3. Click and drag the group of files to the folder on your hard drive where you want to store the files.
4. Once the files have transferred, you can delete the files on the Micro-SD card storage.
REMOVING THE CAMERA MODULE FROM THE COMPUTER (WINDOWS)
1. Look at the system tray icons (shown in the red square in image 1 below) for the icon of a USB plug with a
green check mark. Hover the mouse over the icon and a box should appear that says Safely Remove
Hardware. You may have to hit an upwards pointing arrow in the system tray to see the icon. This arrow is
circled in red.
2. Right click on the icon of a USB plug with a green check mark and choose Eject USB 2.0 Device.
3. Remove the camera module from the computer and return to the floodlight, but do not reconnect the camera
to the motion sensor yet. You may want to change the TIME and LUX settings, which is covered on page 10.
NOTE: YOU WILL NEED TO SYNC THE CAMERA MODULE AGAIN WHEN SEASONAL TIME CHANGES OCCUR. THE
CAMERA MODULE WILL NOT AUTOMATICALLY ADJUST THE TIME. SYNCING THE CAMERA MODULE TO A WINDOWS
COMPUTER ENSURES YOU HAVE THE PROPER TIME.
NOTE: IF MORE THAN FOUR (4) DAYS PASS WITHOUT CHARGING THE VIDEO CAMERA FLOODLIGHT, THE DATE
AND TIME ON THE CAMERA WILL LOSE ACCURACY. REPEAT THE HOW TO INSTALL YOUR SOLAR SECURITY VIDEO
CAMERA AND FLOODLIGHT SECTION ON PAGE 3 TO FULLY CHARGE THE BATTERY PACK AND SYNC THE CAMERA
AGAIN.

8©2016 MAXSA Innovations, LLC. All Rights Reserved.
USING THE CAMERA MODULE WITH APPLE MAC OS
You will need to reference the main manual for other non-Apple specific operations.
The instructions in this addendum depict the steps to take when using an Apple computer running MacOS. If you are
using a computer with Windows, please refer to the main instructions included with the product.
SETTING THE DATE AND TIME ON THE CAMERA MODULE (MAC OS)
This section covers the steps you need to take to ensure your camera module has the correct date and time for your
time zone; however it is not required and the video camera floodlight will still function and record videos if this section
is skipped.
1. To set the time and date, the camera module must be removed from the floodlight and connected to a computer
via the USB port.
2. Plug the camera module into a USB port on your computer. Two new drives should appear in the upper right-
hand corner of your desktop. The Sync Program drive will appear as a DVD called “SyncCameraClock” and the
storage card will appear as a removable drive called “NO NAME”.
3. Open the “Sync Camera Clock” drive. You will see two folders: “Mac OSX” and “Windows”.
4. Open the “MacOSX” folder and you will see the Sync program. The camera does not automatically sync when
you plug the camera into a USB port. You must run this program to sync the camera.
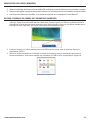
5. When the program opens, you will see a display that shows the date and time on the computer listed as “PC
Clock” and the date and time on the camera listed as “Camera Clock”. They will most likely be different as the
camera has not yet been synced. Click the “Time Synchronize” button to sync the camera clock to the computer
clock.
NOTE: YOU WILL NEED TO SYNC THE CAMERA MODULE AGAIN WHEN SEASONAL TIME CHANGES OC¬CUR.
THE CAMERA MODULE WILL NOT AUTOMATICALLY ADJUST THE TIME. SYNCING THE CAMERA MODULE TO A
COMPUTER ENSURES YOU HAVE THE PROPER TIME.
NOTE: IF THE VIDEO CAMERA FLOODLIGHT IS OFF OR THE BATTERY HAS NO POWER FOR MORE THAN FOUR (4)
DAYS, THE DATE AND TIME ON THE CAMERA MODULE MAY SLIP AND NO LONGER BE ACCU¬RATE ONCE THE
VIDEO CAMERA FLOODLIGHT IS SWITCHED BACK TO AUTO. REPEAT THE SETTING THE DATE AND TIME SECTION
ABOVE TO SYNC THE CAMERA AGAIN. BE SURE THE BATTERY PACK IN THE VIDEO CAMERA FLOODLIGHT IS FULLY
CHARGED AS WELL.
After: Before:

9
www.maxsainnovations.com
VIEWING THE VIDEOS (MAC OS)
You must follow the steps in this section anytime you wish to view the videos on the Micro-SD storage card located in
the camera module. If the camera is already plugged into the computer, skip to step 3. If not, start with step 1. If the
product or Micro-SD card is new and no testing has been done, the card will not have any files.
1. Disconnect the camera module by following the steps in HOW TO DISCONNECT THE CAMERA MODULE on
page 3 of the main instruction booklet included with the product.
2. Plug the camera module into a USB port on your computer.
3. Open the drive for the storage card, labeled NO NAME.
4. Double-click the folder labelled DCIM.
NOTE: IF THE MICRO-SD CARD IS NEW OR IF YOU HAVE NOT TESTED THE COVERAGE AREA (PG. 4 OF THE MAIN
INSTRUCTIONS), THE DCIM FOLDER WILL NOT EXIST YET.
5. The next set of folders you see are named by the date the videos were recorded. The folders holding the
videos for each day will be named with the following format: YYYYMMDD (Year, Month, Day) For example, all
videos recorded on March 23rd, 2016 will be in a folder labeled 20160223. Find the day you want to view and
double-click the folder.
6. Within each folder, you will see all the video files recorded that day. The video files will have the following
format: YYYY_MM_DD_HH_MM_SS (Year, Month, Day, Hour, Minute, Second). The time stamp corresponds
to the time the video started recording. The hours are listed in military time so will appear as 00 through 23.
For example, a video recorded on February 23rd, 2016 at 3:07 and 22 seconds PM will have the filename
2016_02_23_15_07_22.
7. Click on any of the files to view the video that was recorded at that time.
NOTE: THERE IS A ONE (1) SECOND DELAY BETWEEN THE TIME WHEN THE VIDEO CAMERA FLOODLIGHT IS
ACTIVATED AND THE TIME WHEN THE CAMERA ACTUALLY STARTS RECORDING. BECAUSE OF THIS DELAY,
MOVING OBJECTS MAY BE WELL WITHIN THE FIELD OF VIEW OF THE CAMERA WHEN THE VIDEO CAMERA
STARTS RECORDING.
NOTE: AFTER THE MICRO-SD CARD IS FULL, THE CAMERA RECORDS OVER THE EARLIEST RECORDINGS, SO
MAKE SURE YOU SAVE ANY FILES YOU WANT TO YOUR HARD DRIVE.

10 ©2016 MAXSA Innovations, LLC. All Rights Reserved.
SAVING THE VIDEOS (MAC OS)
1. Open the folder on your hard drive where you want to store the videos.
2. Go back to the folder view for the Micro-SD card storage and highlight all of the files you wish to save.
3. Click and drag the group of files to the folder on your hard drive where you want to store the files.
4. Once the files have transferred, you can delete the files on the Micro-SD card storage.
QUESTIONS AND TROUBLESHOOTING
For any questions or troubleshooting, you can refer to the Troubleshooting section starting at the bottom of page 9 in
the main product manual.
You can also contact customer service by calling 703-495-0661 or emailing [email protected].
ADJUSTING THE LUX AND TIME DIALS
The video camera floodlight is factory set to record 10 seconds after motion stops. This is the recommended setting
to conserve video storage space on the Micro-SD card. If you want to increase the recording time and how long the
floodlight stays on at night, move the switch on the main body of the floodlight to the AUTO position and follow the
directions below.
Recording Duration Adjustment (TIME)
The TIME dial sets the duration that the unit remains activated after motion stops. The time period has an adjustable
range of 10 seconds to 1 minute. When it is dark enough, the floodlight is also controlled by the TIME dial.
• To decrease the time period, move the dial toward the ( – ) symbol.
• To increase the time period, move the dial toward the ( + ) symbol.
Test the time period by triggering the motion sensor at night and measure the time period the floodlight stays on. Adjust
the TIME dial until the desired duration is reached. The camera will stop recording at the same time the floodlight turns
off. During the day, only the camera will activate.
A shorter TIME setting will conserve battery life and storage space on the Micro-SD card. For best results, use the
shortest TIME setting for your location as possible.
Light Level Adjustment (LUX)
The LUX dial controls the amount of darkness needed for the motion sensor to be able to trigger the floodlight. It does
not impact the camera which will activate at all times, day or night, regardless of the floodlight. The video camera
floodlight is factory set to activate the floodlight when there is more daylight so the dial is set towards bright (). To
allow the floodlight to activate only after the sun has set, move the dial toward dark ().
Once you are done adjusting the dials, turn the switch on the main body to the OFF position. Re-attach the camera
module to the motion sensor.
Move the switch back to the AUTO position. Your video camera floodlight is now ready for use!
REPLACING THE MICRO-SD CARD
You may want to use more than one Micro-SD card or you may want to use a Micro-SD card with a different capacity.
To remove or replace the Micro-SD card:
1. Remove the camera module from the motion sensor.
2. Locate the sliding cover on the back of the camera module with a picture of a Micro-SD card.

11
www.maxsainnovations.com
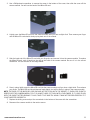
3. Use a Phillips-head screwdriver to remove the screw in the bottom of the cover, then slide the cover off the
camera module. You will see the back of the Micro-SD card.
4. Lightly press the Micro-SD card into the camera module until you hear a slight click. Then remove your finger
and the Micro-SD card should slowly spring back out of the module.
5. Grab the back end of the Micro-SD card with your fingertips and remove it from the camera module. To replace
the Micro-SD card, push it back into the slot on the back of the camera module. Be sure it is in the correct
orientation! This can be seen in the image below.
6. Once in place, lightly press the Micro-SD card into the camera module until you hear a slight click. Then release
your finger. The Micro-SD card should bounce back slightly, but still be firmly in place in the camera module.
NOTE: THE BACK OF THE MICRO-SD CARD SHOULD NOT BE FLUSH WITH THE GASKET. IT SHOULD BE SLIGHTLY
DEEPER INTO THE CAMERA MODULE SO IT IS ALMOST HARD TO TOUCH WITH YOUR FINGER. IF IT LOOKS FLUSH
WITH THE GASKET AFTER HEARING IT CLICK, TAKE IT OUT AND TRY AGAIN. IT MAY NOT RECORD PROPERLY IF IT
IS NOT INSERTED CORRECTLY.
7. Replace the sliding cover and put the screw back in the bottom of the cover with the screwdriver.
8. Reconnect the camera module to the motion sensor.

12 ©2016 MAXSA Innovations, LLC. All Rights Reserved.
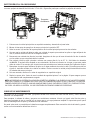
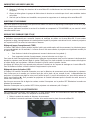
REPLACING THE BATTERY PACK
When the charging ability of the battery pack decreases, it should be replaced with a new 3.7V/4.4Ah Lithium-Ion
battery pack. Follow the steps below when replacing the battery pack.
1. Move the power switch on the main body to the OFF position.
2. Unplug the solar panel and take the video camera floodlight down from where it is mounted.
3. Remove the four (4) screws on the back of the main unit that hold the halves together.
4. Once the unit is open, carefully remove the bracket holding the battery pack in place by unscrewing the two (2)
screws as indicated in the diagram above.
5. Carefully unplug the battery pack from the unit. Be sure to pull at the plug. Do not pull by the wires as this may
damage the unit.
6. Carefully remove the battery pack and replace with a new 3.7V / 4.4Ah Lithium Ion battery pack obtained
from MAXSA Innovations. The plug will only fit in one orientation. Do not force the plug into place as this may
damage the unit. If it does not fit, rotate the plug until it matches with the receiving end on the circuit board.
7. Replace the bracket to hold the battery pack in place by using the two (2) screws removed in step 4, taking
care not to damage any cables.
8. Re-assemble the main unit by screwing the two (2) halves of the main body together securely.
9. Once assembled, remount your video camera floodlight.
10. Repeat the steps in the “How to Install Your Solar Security Video Camera and Floodlight” on page 3 to ensure
your new battery pack is charged fully.
NOTE: DO NOT DISPOSE OF BATTERY PACK IN GENERAL HOUSEHOLD TRASH OR INTO A FIRE SINCE THE BATTERY
PACK MAY EXPLODE. CONSULT YOUR LOCAL REGULATIONS FOR CORRECT DISPOSAL OF THE BATTERY PACK. THE
BATTERY PACK MAY ALSO BE RETURNED TO MAXSA INNOVATIONS AT 8412 CATHEDRAL FOREST DRIVE, FAIRFAX
STATION, VA 22039 FOR DISPOSAL. DO NOT TAKE APART THE BATTERY PACK SINCE IT CONTAINS CORROSIVE
CHEMICALS.
MAINTENANCE TIPS:
The LED lights in your video camera floodlight will last up to 30,000 hours.
To keep your video camera floodlight looking its best, keep the solar panel free of dust and deposits by wiping
occasionally with a dry cloth or with warm soapy water. It is important that the solar panel is kept free of dirt and debris
at all times. A dirty solar panel will not allow the battery to be fully charged. This will shorten the life of the battery and
may cause the video camera floodlight to malfunction.
The video camera floodlight should always be mounted vertically with the light on top and motion sensor and camera
module on the bottom. Mounting it any other way than as shown in the image on page 2 may compromise the camera
function.
Cold Weather Functionality
In temperatures below 14ºF, performance of the Lithium-ion battery pack may be reduced. Normal performance will
return when the temperature rises.
Battery Pack

13
www.maxsainnovations.com
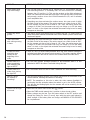
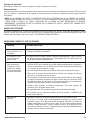
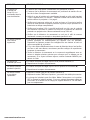
PROBLEM POSSIBLE SOLUTIONS
I cannot see the
Sync Program on
my computer.
• The camera module may not be properly plugged-in. Remove the module and
then plug it back in.
Computer wants to
format the disk. • The micro-SD may not be installed properly. Follow the steps in the “Replacing
the Micro-SD Card” section on page 7 to re-install the micro-SD card properly.
When the camera
is plugged into the
computer, there are
no video folders in
the DCIM folder on
the Removeable
Disk.
• Make sure the video camera floodlight has been switched to the AUTO position.
• Make sure the camera module has been properly attached to the motion
sensor.
• Make sure the micro-SD card is installed properly and the rubber gasket
is in place. The back of the micro-SD little deeper into the camera module so it
is almost hard to hearing it click, take it out and try again.
• Be sure to leave the switch in the AUTO position for the duration of the light
cycle as turning it OFF before the end of the cycle will prevent the video(s)
from being stored.
• Make sure there have been multiple activations. When you first turn the video
camera floodlight on, it runs a test activation but does not record a video. It will
record all activations after the test activation.
• If the camera still does not store the videos, please contact MAXSA for
further assistance.
Time and Date seem
wrong. • Remember to sync your camera whenever a time change occurs.
• If the date and time are off considerably, the battery pack may need to be
recharged. If the video camera floodlight has not charged for more than four (4)
days, it may cause a loss of accuracy. Turn the video camera floodlight off and
let it charge for 3 days while the camera module is plugged into the light. After
3 days, remove the camera module and sync it with your computer. Plug the
camera module back into the bottom of the motion sensor and move the switch
on the main body to the AUTO position. The date and time should be correct.
TROUBLESHOOTING:
Safety Tips
Do not immerse the video camera floodlight in water or any other liquid.
Storage
If you wish to store your video camera floodlight indoors for more than two or three days, turn the power switch to the
OFF position. Battery capacity may be reduced during prolonged storage.
NOTE: THE DATE AND TIME ON THE CAMERA WILL SLIP IF MORE THAN 4 DAYS PASS WITHOUT CHARGING THE
VIDEO CAMERA FLOODLIGHT. WHEN YOU ARE READY TO USE THE VIDEO CAMERA FLOODLIGHT AGAIN, YOU
MUST FOLLOW ALL THE DIRECTIONS AS THOUGH YOU WERE SETTING UP THE VIDEO CAMERA FLOODLIGHT FOR
THE FIRST TIME. START WITH THE HOW TO INSTALL YOUR SOLAR SECURITY VIDEO CAMERA AND FLOODLIGHT
SECTION ON PAGE 3.
EXTENSION CORDS:
A 15-foot extension cord is available for the video camera floodlight for purchase for $14.95. This extension cord allows
the solar panel to be placed higher or further away from the video camera floodlight to ensure maximum direct sunlight
exposure. To order, please call 703-495-0661 or go to www.maxsainnovations.com.

14 ©2016 MAXSA Innovations, LLC. All Rights Reserved.
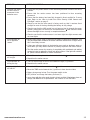
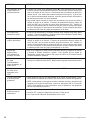
PROBLEM POSSIBLE SOLUTIONS
Night videos show
very dark footage • The LUX dial may be pointed too far towards the (). This prevents the light
from activating unless it is extremely dark. Turn the LUX dial so it is halfway
between the () and the (). This sets the product so the light activates at
dusk. Your videos should now have more light. If the light still does not activate
early enough, continue to turn the LUX dial towards the () until it activates
at an acceptable time.
• Something may have activated the motion sensor but never made it within
the field of view of the camera. The motion sensor has a field of view of 180°,
but the camera only has a field of view of 110°. Also, the motion sensor has
a range of 40 feet, but the camera can only see things up to 25 feet away
when it is dark, so the object that activated the camera may be too far away
to appear on the video.
Videos only show
ground. • The motion sensor and camera may be pointed too low. Try raising them to
direct them more towards the desired area. Aim for where a person’s torso and
head would appear.
There are videos
with nothing moving
in them.
• Something may have activated the motion sensor but never made it within
the field of view of the camera. The motion sensor has a field of view of 180°,
but the camera only has a field of view of 110°. Also, the motion sensor has
a range of 40 feet, but the camera can only see things up to 25 feet away
when it is dark, so the object that activated the camera may be too far away
to appear on the video.
It looks like there
should be more
footage at the
beginning of the
video.
• There is a one (1) second delay between when the video camera floodlight is
activated and when the camera starts recording. This means moving objects
may be well within the field of vision of the camera when the video starts.
Should there be a
video immediately
after switching the
light to AUTO?
• No, the video camera floodlight performs a test activation when it is first
switched to AUTO. No video is recorded during this test.
Should there be a
video of me turning
the light OFF
• No. The camera does not save a video if switched OFF while recording.
How do I know
the camera is
recording?
• You will see a blinking red light in the motion sensor and on the bottom of the
camera module, denoting the camera is recording.
• NOTE: The exception to this rule is when the video camera floodlight is
performing the test activation when the switch is put in the AUTO position.
You will see the blinking lights, but the camera will not be recording for the
test activation.
Light is not as bright
as normal. • Move the LUX control more to the dark ( ) position.
• Move the TIME control towards the (-) position to have shorter videos.
• Battery charge may be low. Turn the power switch to the OFF position and
charge the battery for three (3) sunny days with the solar panel placed in
direct sunlight. If the battery does not charge, call MAXSA at 703-495-0661
for a replacement.

15
www.maxsainnovations.com
PROBLEM POSSIBLE SOLUTIONS
Light will not switch
on when there is
movement in the
detection area.
• Ensure that the power switch on the main body has been turned to the AUTO
position.
• Ensure that the motion sensor has been positioned to face oncoming
movement.
• Ensure that the battery has been fully charged in direct sunlight for 3 sunny
days. Refer to the “How to Install Your Solar Security Video Camera and
Floodlight” section on page 3.
• Check to see that the solar panel is facing south so that it receives direct
sunlight for most of the day, enabling the battery to fully charge.
• Check to see that the LUX control has not been set too far towards the moon
symbol. Setting the LUX control too far towards dark ( ) will cause the video
camera floodlight to turn on only in complete darkness.
• Check to see that the motion sensor is not near night time light sources such
as street lights.
Light switches on
for no apparent
reason.
• Moving trees, traffic, pets or birds may be getting in the area of detection. This
may be unavoidable; however the sensor could be redirected to a height where
this is less likely to occur.
• If there are reflective objects in the detection area such as windows, water, or
white walls, you may need to redirect or possibly reposition the motion sensor.
• Test the motion sensor by covering it completely with cardboard and waiting
several minutes to make sure it does not detect motion. If the light still switches
on, please contact MAXSA for further assistance.
Light only switches
on at night. • The LUX control may be set too far towards the dark ( ) position.
• Reposition the motion sensor.
Light switches on
during the day • The LUX control may be set too far towards the light () position.
• Reposition the motion sensor.
Light quickly flashes
on and off. • Move the LUX control more to the dark ( ) position.
• Move the TIME control towards the (-) position to have shorter videos.
• Battery charge may be low. Turn the power switch to the
• OFF position and charge the battery for three (3)
• sunny days with the solar panel placed in direct sunlight. If the battery does not
charge, call MAXSA for a replacement. Our number is 703-495-0661.

16 ©2016 MAXSA Innovations, LLC. All Rights Reserved.
MAXSA Innovations, LLC.
8412 Cathedral Forest Dr
Fairfax station, VA 22039
Tel: 703-495-0661
www.maxsainnovations.com
[email protected] V16.12
ONE YEAR LIMITED WARRANTY
MAXSA Innovations, LLC warrants to the original consumer/purchaser that this product shall be free of defects in
material and workmanship under normal use and circumstances for a period of one (1) year from the date of original
purchase for use. When the original consumer/purchaser returns the product pre-paid to MAXSA Innovations, LLC,
8412 Cathedral Forest Dr; Fairfax Station, VA 22039; USA within the warranty period with a copy of the purchase
receipt, and if the product is defective, MAXSA Innovations, LLC will at its option repair or replace such. This warranty
shall constitute the sole liability of MAXSA Innovations, LLC concerning the product. MAXSA Innovations, LLC expressly
disclaims all other warranties INCLUDING, WITHOUT LIMITATION, THE WARRANTIES OF MERCHANT ABILITY AND
FITNESS FOR A PARTICULAR PURPOSE. NO PERSON, FIRM, OR COPORATION IS AUTHORIZED TO ASSUME FOR
MAXSA Innovations, LLC ANY OTHER LIABILITY IN CONNECTION WITH THE SALE AND USE OF THE PRODUCT.
MAXSA Innovations, LLC and agents and distributors will bear no liability whatsoever for incidental or consequential
damages or charges of any kind. Some states do not allow the reclusion or limitation of incidental or consequential
damages, so the above disclaimer regarding incidental or consequential damages may not apply to you. This warranty
is void if the product has been damaged or tampered with or if the product or any such parts have been opened. In all
cases of damage during shipment, a claim must be filed with the shipping carrier and not with MAXSA Innovations,
LLC. This warranty gives you specific legal rights; you may also have other rights which vary from state to state.
SPECIFICATIONS
FLOODLIGHT
POWER SOURCE Solar – amorphous solar panel
FUNCTION Motion-activated
POWER STORAGE 3.7V/4.4Ah lithium-ion battery pack
LIGHT/CAMERA DURATION 10 - 60 Seconds after motion stops
LUMENS 1100
LIGHT COLOR 6500K (cool white or daylight color)
WEATHERPROOF RATING IP44
MAXIMUM FLOODLIGHT RUNTIME Up to 82 minutes on a full charge
MOTION DETECTION ANGLE 180°
MAXIMUM DETECTION DISTANCE 40 Feet (12.2 Meters)
SECURITY CAMERA
CAMERA ANGLE: 110°
CAMERA RESOLUTION 1280X720 pixels
CAMERA CAPTURE SPEED 30 Frames/sec daytime, 15 frames/sec nighttime.
INCLUDED VIDEO STORAGE 16 GB Micro-SD card
HOURS OF VIDEO ON INCLUDED
STORAGE Up to 5 hours
COMPUTER COMPATIBILITY: Windows (Microsoft), Mac OS (Apple)
MADE IN CHINA
Please save these instructions for future reference.

17
www.maxsainnovations.com
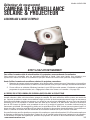
¡DETÉNGASE! ¡LEA LAS INSTRUCCIONES PRIMERO!
Para utilizar la Cámara y Proyector Solar de Seguridad por Video, usted necesita un ordenador
Esta cámara es compatible con los ordenadores Microsoft y Apple. Usted necesitará un ordenador para sincronizar la
hora y la fecha en la cámara, así como también para ver los archivos de videos luego de las grabaciones.
Antes de utilizar la Cámara y Proyector Solar de Seguridad por Video, usted debe:
1. Conecte el panel solar a la cámara de video y proyector solar, asegúrese que el interruptor esté en la posición
OFF, y coloque el panel solar directamente a la luz solar por 3 días para cargar la batería por completo.
2. Enchufe el módulo de la cámara al puerto USB de su ordenador u ordenador personal (PC) y ejecute el
programa de sincronización (Vea “Configuración de la fecha y hora en el módulo de la cámara” en la página 4).
ACERCA DE SU CÁMARA Y PROYECTOR SOLAR DE SEGURIDAD POR VIDEO
Esta cámara de video y proyector no requiere cables eléctricos y es ideal para grabar videos en áreas de entradas
de porches, cocheras garajes y almacenes. También puede ser utilizada como cámara de juegos. La cámara de
video y proyector posee un sensor de movimiento incorporado el cual enciende la cámara automáticamente cuando
el movimiento de una fuente de calor (como personas, animales o vehículos) se detecta en el área. En medio de
suficiente obscuridad, las 20 superficies de montaje LEDs, con una duración estimada de 30,000 horas, también
genera más de 1100 lúmenes de luz para que facilitar su visión y la grabación de la cámara. La cámara permanece
prendida mientras está detectando movimiento. La cámara guarda los videos grabados en la tarjeta de memoria Micro
SD de 16GB (incluida) el cual tiene una capacidad de hasta 5 horas de video. Cuando la tarjeta micro-SD está llena,
las grabaciones más viejas son re-emplazadas por las nuevas. Para acceder los videos, el módulo de la cámara debe
desconectarse de la luz y bebe conectarse en el puerto USB del ordenador.
Es posible fijar uno de los controles de tiempo para que la cámara permanezca encendida por 10 a 60 segundos luego
de que el detector de movimientos se detiene. Durante la noche, este control del tiempo también controla el proyector.
activada por movimiento
CAMARA Y PROYECTOR
SOLAR DE SEGURIDAD POR VIDEO
Model #: 44642-CAM
ASSEMBLY & OPERATING INSTRUCTIONS

18 ©2016 MAXSA Innovations, LLC. All Rights Reserved.
La sensibilidad de la luz puede fijarse para que el proyector comiese a activarse a diferentes niveles de obscuridad.
Tendrá que ser reemplazado cuando su capacidad de carga disminuye un 3,7 4.4AH de iones de litio batería recargable
incluida. Cuando las baterías están completamente cargadas, la porción de reflector se activará para un máximo de 82
ciclos de un minuto por noche. Las bajas temperaturas (14 ° F / -10 ° C) pueden dar lugar a una funcionalidad limitada
en el paquete de baterías de iones de litio que puede causar la actividad irregular en el proyector de la cámara de vídeo.
El funcionamiento normal volverá cuando la temperatura sube.
INCLUDED PARTS:
Retire con cuidado e identifique todas las piezas del envase protectiva y ponlas en frente de usted.
CHOOSING A LOCATION FOR YOUR SOLAR SECURITY VIDEO CAMERA AND FLOODLIGHT
1. El reflector de la cámara de vídeo se conecta a su panel solar con un cable de alimentación de 15 pies.
2. Para una óptima exposición solar y una máxima iluminación de luz, coloque el panel solar en una posición que
recibe por lo menos 6-8 horas de luz solar al día.
Colocación del panel solar en un lugar con sombra o incluso detrás de una ventana no permitirá que la batería se cargue
completamente, reduciendo el número de horas que la luz funcionará por la noche.
Tornillos y anclajes para montaje
en panel solar
Panel solar
Cable de alimentacíon
El panel solar
soporte de montaje
Para el ajustamiento
de montaje
2 Tornillos y anclajes para
montaje en cuerpo de la
lámpara
Sensor de movimiento AUTO/OFF Interruptor
Módulo de video
cámara movible
Botón de ajuste para tiempo de duración (TIME)
Botón de ajuste de sensibilidad a la luz (LUX)
Unidad de la bateria principal
Cubierta de la luz
IMPORTANTE:
Empuje las lengüetas grises hacia
adentro para remover el módulo de
la cámara y poder ver los botones
de fijación en el fondo del sensor, o
para conectar el módulo de la
cámara al ordenador
Las Ubicaciones Ideales

19
www.maxsainnovations.com
Al decidir dónde montar la luz, tener en cuenta que el sensor de
movimiento tiene un campo de visión de 180 º (horizontal) a una
distancia de hasta 12.2 medidors (40 pies) cuando la temperatura
ambiental es de 24°C (75°F). La temperatura exterior tendrá un
impacto en la distancia de detección. La cámara cuenta con una
resolución de 1280x720 de píxeles con un campo de visión de
110° (horizontal). Esto significa que el sensor de movimientos
puede detectar movimientos que la cámara no capta o graba.
Durante el día, la cámara grabará todo lo que se encuentre en su
campo de visión. En la noche, la obscuridad dificulta la visión de
objetos localizados a 25 pies de distancia aun si el proyector ha
sido activado. Por esta razón, si el sensor de movimientos ha sido activado por un objeto en movimiento localizado a
más de 25 pies de distancia, el objeto en movimiento podría no aparecer en el video.
CÓMO INSTALAR SU CÁMARA Y PROYECTOR SOLAR DE SEGURIDAD POR VIDEO:
NOTE:INSTALE SU CÁMARA Y PROYECTOR SOLAR DE SEGURIDAD POR VIDEO EN UN LUGAR DONDE PUEDA
TENER ACCESO EL MÓDULO DE LA CÁMARA.
Herramientas Necesarias Para La Instalación:
1. Instalación sencilla con sólo un destornillador Phillips!
2. Taladro eléctrico opcional.
Para instalar su cámara y proyector solar de seguridad por video:
1. Monte la luz de seguridad sobre una superficie sólida, usando los dos (2) tornillos de chapa metálica/para
madera incluidos. Pueda montar la luz de seguridad, ya sea vertical o horizontalmente.
2. Use los cuatro (4) tornillos de chapa metálica/para madera incluidos para montar el panel solar sobre una
superficie sólida. Se puede ajustar el ángulo del panel solar girando suavemente el panel solar a una posición
diferente. Recuerde que debe posicionar el panel al sur para la exposición directa al sol.
Cargar completamente la batería de la cámara y proyector solar de seguridad por video.
1. Asegúrese de que el interruptor en el cuerpo principal de la luz de seguridad está en la posición OFF. En esta
posición, el panel solar cargará la batería sin que se active la unidad.
2. Deje el interruptor en la posición OFF durante 3 días con el panel solar colocado directamente a la luz solar.
Esto asegurará que la batería de su luz solar de seguridad tenga una carga completa antes de ajustar el sensor
de movimiento y el funcionamiento normal.
NOTA: SI LA CÁMARA DE VIDEO Y PROYECTOR ESTÁ EN LA POSICIÓN OFF, O LA BATERÍA HA ESTADO DESCARGADA
POR MÁS DE (4) DÍAS, LA FECHA Y LA HORA PODRÍAN ESTAR ERRÓNEAS. REPITA LA SECCIÓN “CÓMO FIJAR LA
FECHA Y LA HORA” LOCALIZADA EN LA PAGINA 20 PARA SINCRONIZAR LA CÁMARA NUEVAMENTE. ASEGÚRESE
DE QUE LA BATERÍA EN LA CÁMARA DE VIDEO Y PROYECTOR, TAMBIÉN ESTÉ COMPLETAMENTE CARGADA.
CÓMO DESCONECTAR EL MÓDULO DE LA CÁMARA/ACCESO A LOS BOTONES GIRATORIOS
1. Sostenga el sensor de movimiento por los lados. Tenga mucho cuidado de no poner los dedos en el lente del
sensor de movimiento por que esto puede dañar el dispositivo.
2. Luego, utilice su otra mano para presionar los dos botones grises en ambos lados del módulo de la cámara
para liberar el módulo.
3. El módulo de la cámara debe separarse directamente opuesto al sensor de movimiento.
4. There are two adjustment dials: TIME and LUX. These dials are located on the bottom of the motion sensor and
can be accessed once the camera module has been removed.
Lente del sensor de movimiento Bóton gris
Módulo de la cámara Parte inferior del sensor de
movimiento con indicadores
TIME y LUX
12
34

20 ©2016 MAXSA Innovations, LLC. All Rights Reserved.
CÓMO EVALUAR EL REA DE COBERTURA
Esta sección trata de los pasos a seguir para asegurarse que el módulo de su cámara capte el área deseada. Es
importante revisar estas instrucciones cada vez que instale la cámara de video y proyector en un local nuevo.
1. Retire el módulo de la cámara como se indica en “Cómo desconectar el módulo de la cámara/Acceso a los
botones giratorios de ajuste” en la página 3.
2. El botón giratorio TIME ya está ajustado a la posición mínima (-) y el LUX a la posición de la “luz” (). Esto
asegura videos de prueba cortos y la activación del proyector activation.
3. Remonte el módulo de la cámara al sensor de movimiento una vez que haya chequeado los botones giratorios
de ajuste y ponga la cámara de video y proyector a la posición AUTO.
NOTA: CUANDO LA CÁMARA DE VIDEO Y PROYECTOR SE ENCIENDE POR PRIMERA VEZ, ESTA REALIZARÁ
UNA PRUEBA DE ACTIVACIÓN ESTO SUCEDERÁ INDEPENDIENTEMENTE DE LA POSICIÓN DE LOS BOTONES
GIRATORIOS DE AJUSTE. LA CÁMARA NO TOMARA VIDEOS DURANTE ESTA PRUEBA
4. Dirija el sensor de movimiento hacia la dirección que desee detectar movimiento.
5. Usted puede probar la cámara durante el día o la noche. Los videos captados en la noche no presentaran tanto
detalles por causa de la obscuridad. Haga una prueba del área de cobertura, caminando lentamente alrededor
del área de detección. Durante la noche, el proyector se activará una vez que le detecte a usted. Si el proyector
no se enciende, es posible que usted deba ajustar el ángulo de la cámara y el sensor de la unidad.
6. Cuando esté satisfecho con el área de detección, dispare la cámara tres veces. Dispare la cámara de la
siguiente forma:
• Una vez entrando desde la izquierda,
• Una vez entrando desde la derecha, y
• Una vez entrando en dirección directa a la cámara
hacia la luz.
Asegúrese dejar el módulo de la cámara en posición apagada
entre cada disparo de la cámara para asegurar que obtiene
un video por cada disparo. Cuando el módulo de la cámara
está grabando, podrá ver la luz roja intermitente en el sensor de
movimiento y en la parte inferior del módulo de la cámara.
NOTA: NO CAMBIE LA CÁMARA DE VIDEO Y PROYECTOR A LA POSICIÓN OFF MIENTRAS GRABE EL VIDEO. EL
MÓDULO DE LA CÁMARA NO GUARDARÁ EL VIDEO SI ESTÁ APAGADA DURANTE LA GRABACIÓN.
NOTA: EL CAMPO DE VISIÓN DE LA CÁMARA ES 110°. EL CAMPO DE VISIÓN DEL SENSOR DE MOVIMIENTO ES
180°. ASEGÚRESE DE CAMINAR EN FRENTE DE LA CÁMARA PARA ASEGURAR QUE USTED AS CAPTADO EN
EL VIDEO.
7. Separe el módulo de la cámara de la cámara de video y proyector siguiendo las instrucciones en la sección
3 “Cómo Desconectar El Módulo De La Cámara”. Luego continúe a la sección abajo “Ajuste De La Fecha Y
La Hora”
180°sensor de
movimiento un
capo de vision
110° la cámara
un capo de vision
110˚
La page charge ...
La page charge ...
La page charge ...
La page charge ...
La page charge ...
La page charge ...
La page charge ...
La page charge ...
La page charge ...
La page charge ...
La page charge ...
La page charge ...
La page charge ...
La page charge ...
La page charge ...
La page charge ...
La page charge ...
La page charge ...
La page charge ...
La page charge ...
La page charge ...
La page charge ...
La page charge ...
La page charge ...
La page charge ...
La page charge ...
La page charge ...
La page charge ...
-
 1
1
-
 2
2
-
 3
3
-
 4
4
-
 5
5
-
 6
6
-
 7
7
-
 8
8
-
 9
9
-
 10
10
-
 11
11
-
 12
12
-
 13
13
-
 14
14
-
 15
15
-
 16
16
-
 17
17
-
 18
18
-
 19
19
-
 20
20
-
 21
21
-
 22
22
-
 23
23
-
 24
24
-
 25
25
-
 26
26
-
 27
27
-
 28
28
-
 29
29
-
 30
30
-
 31
31
-
 32
32
-
 33
33
-
 34
34
-
 35
35
-
 36
36
-
 37
37
-
 38
38
-
 39
39
-
 40
40
-
 41
41
-
 42
42
-
 43
43
-
 44
44
-
 45
45
-
 46
46
-
 47
47
-
 48
48


Maxsa Innovations 44642-CAM-WH Le manuel du propriétaire
- Taper
- Le manuel du propriétaire
dans d''autres langues
Documents connexes

Autres documents
-
ZOSI ZSS-SP3 Manuel utilisateur
-
 CEMONJARDIN 97337590 Mode d'emploi
-
Swann SOWHDFLOCAMW2PK Manuel utilisateur
-
Swann SWIFI-FLOCAM2BR Guide de démarrage rapide
-
Netatmo "Exclu" Je sécurise ma maison et ses ext Le manuel du propriétaire
-
Radiant NOCSUS Guide d'installation
-
Netatmo Exterieure intelligente avec sirène Le manuel du propriétaire
-
Goal Zero Torch 500 Mode d'emploi
-
Lorex W452AJ Series 2K Wired Floodlight Security Camera Mode d'emploi
-
Elvox 68TC Mode d'emploi
