Palm Treo 700P Manuel utilisateur
- Catégorie
- Téléphones portables
- Taper
- Manuel utilisateur

Quick Reference Guide 1
Guide de référence rapide 57
Guía de referencia rápida 129
ML_QRG.book Page 1 W ednesday,O ctober11,2006 3:47 PM

ML_QRG.book Page 2 W ednesday,O ctober11,2006 3:47 PM

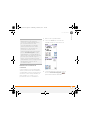
Intellectual property notices
© 2006 Palm, Inc. All rights reserved. Trademark, copyright, patent,
and other intellectual property notices are set forth on page ii within
Your Palm
®
Treo
™
700P Smartphone User Guide installed on the
user’s computer.
Disclaimer and limitation of liability
Palm, Inc. assumes no responsibility for any damage or loss resulting
from the use of this manual. Palm, Inc. assumes no responsibility for
any loss or claims by third parties that may arise through the use of
this product. Palm, Inc. assumes no responsibility for any damage or
loss caused by deletion of data as a result of malfunction, dead
battery, or repairs of this product.
ML_QRG.book Page 1 W ednesday,O ctober11,2006 3:47 PM

ML_QRG.book Page 2 W ednesday,O ctober11,2006 3:47 PM

CONTENTS
3
Contents
Chapter 1: Moving around on your smartphone . . . . . . . . . . . . . . . . . . . . . . . . . . . . . . 5
Palm
®
Treo
™
700P smartphone overview . . . . . . . . . . . . . . . . . . . . . . . . . . . . . . . . . 5
Upgrading from another Palm OS
®
device . . . . . . . . . . . . . . . . . . . . . . . . . . . . . . . .6
Moving around on the screen . . . . . . . . . . . . . . . . . . . . . . . . . . . . . . . . . . . . . . . . . 9
Using the keyboard . . . . . . . . . . . . . . . . . . . . . . . . . . . . . . . . . . . . . . . . . . . . . . . . .11
Opening applications . . . . . . . . . . . . . . . . . . . . . . . . . . . . . . . . . . . . . . . . . . . . . . . . 14
Synchronizing information . . . . . . . . . . . . . . . . . . . . . . . . . . . . . . . . . . . . . . . . . . . .15
Maximizing battery life . . . . . . . . . . . . . . . . . . . . . . . . . . . . . . . . . . . . . . . . . . . . . . . 16
Chapter 2: Your phone . . . . . . . . . . . . . . . . . . . . . . . . . . . . . . . . . . . . . . . . . . . . . . . . . 17
Turning your smartphone on and off . . . . . . . . . . . . . . . . . . . . . . . . . . . . . . . . . . . . 17
Making calls . . . . . . . . . . . . . . . . . . . . . . . . . . . . . . . . . . . . . . . . . . . . . . . . . . . . . . .19
Receiving calls . . . . . . . . . . . . . . . . . . . . . . . . . . . . . . . . . . . . . . . . . . . . . . . . . . . . . 20
Using voicemail . . . . . . . . . . . . . . . . . . . . . . . . . . . . . . . . . . . . . . . . . . . . . . . . . . . .21
What can I do when I’m on a call? . . . . . . . . . . . . . . . . . . . . . . . . . . . . . . . . . . . . . .22
Creating a speed-dial favorite button . . . . . . . . . . . . . . . . . . . . . . . . . . . . . . . . . . . .26
Using a hands-free device . . . . . . . . . . . . . . . . . . . . . . . . . . . . . . . . . . . . . . . . . . . .27
Customizing ringer settings . . . . . . . . . . . . . . . . . . . . . . . . . . . . . . . . . . . . . . . . . . .27
What are all those icons? . . . . . . . . . . . . . . . . . . . . . . . . . . . . . . . . . . . . . . . . . . . . .28
Chapter 3: Your email, messages, and web browser . . . . . . . . . . . . . . . . . . . . . . . . . 31
The VersaMail
®
application . . . . . . . . . . . . . . . . . . . . . . . . . . . . . . . . . . . . . . . . . . . .31
Messaging . . . . . . . . . . . . . . . . . . . . . . . . . . . . . . . . . . . . . . . . . . . . . . . . . . . . . . . . 36
Web browser . . . . . . . . . . . . . . . . . . . . . . . . . . . . . . . . . . . . . . . . . . . . . . . . . . . . . .37
Chapter 4: Your contacts, calendar, and documents . . . . . . . . . . . . . . . . . . . . . . . . . . 41
Contacts . . . . . . . . . . . . . . . . . . . . . . . . . . . . . . . . . . . . . . . . . . . . . . . . . . . . . . . . . . 41
ML_QRG.book Page 3 W ednesday,O ctober11,2006 3:47 PM

CONTENTS
4
Calendar . . . . . . . . . . . . . . . . . . . . . . . . . . . . . . . . . . . . . . . . . . . . . . . . . . . . . . . . . . 42
Documents . . . . . . . . . . . . . . . . . . . . . . . . . . . . . . . . . . . . . . . . . . . . . . . . . . . . . . . . 42
Chapter 5: Your photos, videos, and music . . . . . . . . . . . . . . . . . . . . . . . . . . . . . . . . . 43
Camera . . . . . . . . . . . . . . . . . . . . . . . . . . . . . . . . . . . . . . . . . . . . . . . . . . . . . . . . . . . 43
Pocket Tunes
™
. . . . . . . . . . . . . . . . . . . . . . . . . . . . . . . . . . . . . . . . . . . . . . . . . . . . . 44
Chapter 6: Check out these features . . . . . . . . . . . . . . . . . . . . . . . . . . . . . . . . . . . . . . 49
Index . . . . . . . . . . . . . . . . . . . . . . . . . . . . . . . . . . . . . . . . . . . . . . . . . . . . . . . . . . . . . . 51
Crow barQRGTOC.fm Page 4 W ednesday,O ctober11,2006 3:56 PM

CHAPTER
1
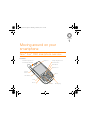
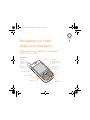
Moving around on your
smartphone
Palm
®
Treo
™
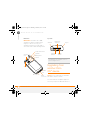
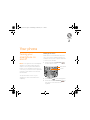
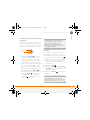
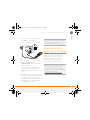
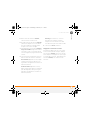
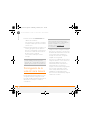
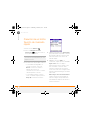
700P smartphone overview
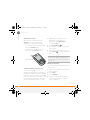
Front view
Indicator light (phone
and charge indicator)
Calendar
5-way navigator and
Center button
Earpiece
Menu
Send
Phone
Side button
Volume
button
Power/End
Messaging
Applications
ML_QRG.book Page 5 W ednesday,O ctober11,2006 3:47 PM

MOVING AROUND ON YOUR SMARTPHONE
UPGRADING FROM ANOTHER PALM OS
®
DEVICE
6
1
CHAPTER
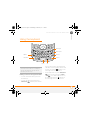
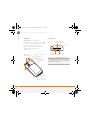
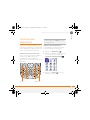
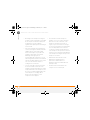
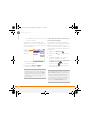
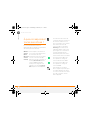
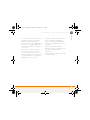
Back view
IMPORTANT The Palm
®
Tre o
™
700P
smartphone speaker includes a large
magnet, so be sure to keep your
smartphone away from credit cards or
other items that could be demagnetized.
Top view
Upgrading from
another Palm
OS
®
device
NOTE If you’re setting up your first Palm
OS
®
device, skip this section.
You can transfer all compatible apps and
info from your previous Palm OS device to
Camera
lens
Battery door
release
Speaker
Self-portrait mirror
Multi-
connector
Headset
jack
Microphone
Stylus
DID
YOU
KNOW
?
The Ringer switch silences all
sounds. When you need quiet, there’s no
need to navigate menus.
Antenna
Ringer
switch
Stylus
Expansion
card slot
Infrared
(IR) port
ML_QRG.book Page 6 W ednesday,O ctober11,2006 3:47 PM

MOVING AROUND ON YOUR SMARTPHONE
UPGRADING FROM ANOTHER PALM OS
®
DEVICE
7
1
CHAPTER
your new Treo 700P smartphone. This
includes your calendar events, contacts,
memos, and tasks, as well as your app
settings and any compatible third-party
apps and any files that are compatible with
the Palm OS software version 5.4.9 on your
new Treo smartphone.
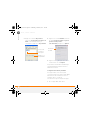
Incompatible files are quarantined.
Quarantined files are not installed on your
smartphone; they are placed in a new
folder on your computer: C:\Program
Files\Palm\device name\PalmOS5
Incompatible Apps. (On some systems
Palm may be replaced with palmOne or
Handspring.)
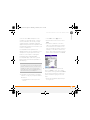
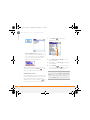
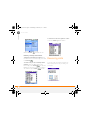
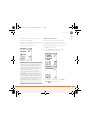
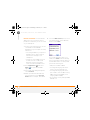
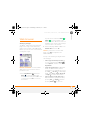
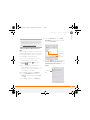
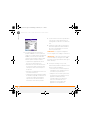
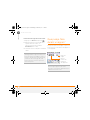
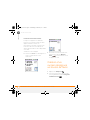
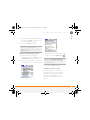
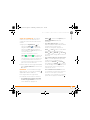
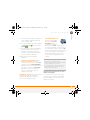
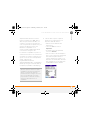
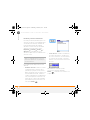
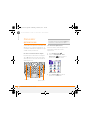
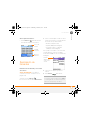
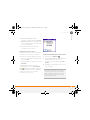
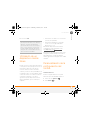
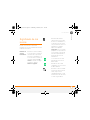
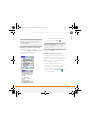
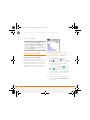
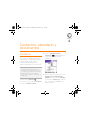
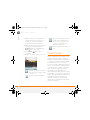
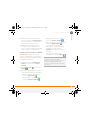
1 Calculate how much space your apps
and info occupy on your previous Palm
OS device:
• From Applications View, open the
menus.
• Select Info on the App menu.
• At the bottom of the screen, select
Size.
• Look at the numbers on the Free
Space line and subtract the number
on the left from the number on the
right to calculate the space used. For
example, on the device shown here,
22.4 – 17.5 = 4.9. This means that the
space used on this device is 4.9MB.
2 If the space used on your previous
device is 60MB or less, go to step 3.
If the space used is greater than 60MB,
do any of the following to reduce the
space used before going to the next
step:
• Delete any third-party apps that you
no longer use.
TIP
Some third-party utilities let you back up
your old device’s info onto an expansion card
and then transfer the info to your Treo 700
P
smartphone. We do not recommend this
method because any incompatible apps are
also transferred to your smartphone.
ML_QRG.book Page 7 W ednesday,O ctober11,2006 3:47 PM

MOVING AROUND ON YOUR SMARTPHONE
UPGRADING FROM ANOTHER PALM OS
®
DEVICE
8
1
CHAPTER
• Move large files, such as eBooks and
images, to an expansion card.
• Move third-party apps to an expansion
card.
• Purge old info in apps such as
Calendar (Date Book), Tasks (To Do),
and email. See the documentation
that came with your previous device
for instructions.
3 Sync your previous device with your
previous desktop software to back up
your info one last time.
4 Install the desktop synchronization
software from your new Palm Software
Installation CD (see the Read This First
booklet).
IMPORTANT Do not sync your new Treo
700
P smartphone with any previous
versions of Palm
®
Desktop software.
5 When prompted, do the following
during the installation process:
• Connect your new smartphone to
your computer (see the Read This
First booklet).
• Indicate whether you want to sync
only the info in your PIM apps
(Calendar, Contacts, Memos, and
Tasks) or all info and apps (excluding
apps known to be incompatible).
• Select a device name for your new
smartphone; be sure to select the
same name that you used for your old
device. (This is the name that appears
in the User list in Palm Desktop
software.)
MAC ONLY If you have pictures on your
previous device, copy them from your
previous device to an expansion card or
beam them to your new Treo 700
P
smartphone.
6 If you plan to continue using your
previous device, perform a hard reset to
remove its device name. (See the
documentation that came with your
previous device for hard reset
instructions.) The next time you sync
your previous device with your
computer, assign it a new name.
If any third-party apps are quarantined
during the installation, do not manually
install them. Contact the developer for
software updates and info about
compatibility with your new smartphone.
ML_QRG.book Page 8 W ednesday,O ctober11,2006 3:47 PM

MOVING AROUND ON YOUR SMARTPHONE
MOVING AROUND ON THE SCREEN
9
1
CHAPTER
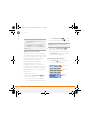
Moving around on
the screen
To move around your smartphone screen,
you can use the 5-way navigator for
one-handed navigation, or you can tap
items on the screen with the stylus. With
use, you will find your own favorite way to
scroll, highlight, and select menu items.
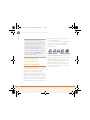
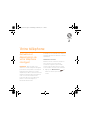
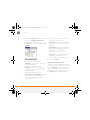
The 5-way includes the following buttons:
Highlighting and selecting items
On most screens, one item—a button, a
list entry, or a check box—is highlighted by
default. The highlight identifies which item
is affected by your next action. Use Left ,
Right , Up , and Down on the
5-way to move the highlight from one item
to another.
Learn to recognize the highlight. It can take
two forms:
• Border glow: When an entire screen, an
onscreen button (such as Done, New, or
OK), or a pick list is highlighted, a glow
appears around its border. If an entire
list screen is highlighted, the glow
appears at the top and bottom of the
screen only; to highlight the first item in
the list, press Center .
Up
Right
Left
Down
Center
TIP
If the item you want doesn’t appear on the
screen, try tapping the onscreen scroll arrows
to view more info.
ML_QRG.book Page 9 W ednesday,O ctober11,2006 3:47 PM

MOVING AROUND ON YOUR SMARTPHONE
MOVING AROUND ON THE SCREEN
10
1
CHAPTER
• Colored background: When text, a
phone number, an email address, a web
link, or an item in a list is highlighted,
the item is displayed as white text
against a colored background.
After highlighting an item, you can select
(activate) it by pressing Center , or by
tapping the item with the stylus.
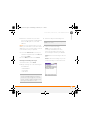
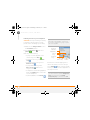
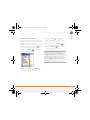
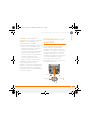
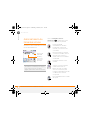
Selecting menu items
Many applications have menus to give you
access to additional features. These menus
are usually hidden from view, but they
appear when you press the Menu key
in the lower-right corner of the keyboard.
1 Press Menu to display an
application’s menus.
2 Press Right and Left to switch
between menus.
3 Press Up and Down to highlight a
menu item.
4 Press Center to select the menu
item, or press Menu to close the
menu and cancel your selection.
TIP
Most menu items have a shortcut. To use
a menu shortcut, press Menu + the shortcut
letter. You don’t have to open a menu to use a
menu shortcut. For example, in Calendar, you
can press Menu + N to create a new event.
Menu shortcut
ML_QRG.book Page 10 W ednesday,O ctober 11,2006 3:47 PM

MOVING AROUND ON YOUR SMARTPHONE
USING THE KEYBOARD
11
1
CHAPTER
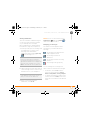
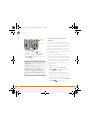
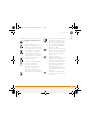
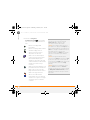
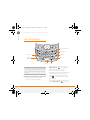
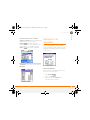
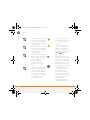
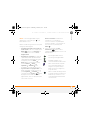
Using the keyboard
Entering lowercase and uppercase letters
• To enter lowercase letters, press the
desired keys.
• To enter an uppercase letter, press
Shift/Find and then press a letter
key. You don’t need to press and hold
Shift while entering a letter. When Shift
is active, an up arrow appears in the
lower-right corner of the screen.
• To turn Caps Lock on, press Shift/Find
twice. To turn it off, press Shift/
Find once. When Caps Lock is on,
an underlined up arrow appears in
the lower-right corner of the screen.
Menu
Backspace
Return
AltSpace
Option
Shift/Find
Backlight
TIP
When using the keyboard, most people
find it easiest to hold the Treo smartphone
with two hands and use the tips of both
thumbs to press the keys.
ML_QRG.book Page 11 W ednesday,O ctober 11,2006 3:47 PM

MOVING AROUND ON YOUR SMARTPHONE
USING THE KEYBOARD
12
1
CHAPTER
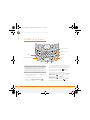
Entering numbers, punctuation, and
symbols
Numbers, punctuation, and symbols
appear above the letters on the keys.
To enter these characters, do one of
the following:
• Press Option , and then press the
key with the desired character shown
above the letter. You don’t need to press
and hold Option while pressing the
second key. When Option is active, the
symbol appears in the lower-right
corner of the screen.
• To turn Option Lock on, press Option
twice. To turn it off, press Option
once. When Option Lock is on, the
symbol appears in the lower-right
corner of the screen.
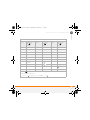
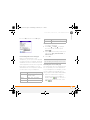
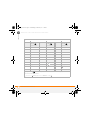
Entering other symbols and accented
characters
Symbols and accented characters that do
not appear on the keyboard are sometimes
called alternate characters because they
are entered using the Alt key.
1 Enter the character that corresponds to
the symbol or accented character you
want. See the table on the next page.
2 Press Alt .
3 Press Up , Down , Right , or
Left to highlight the desired
character.
4 Press Center to insert the
character.
Letter
Symbol
DID
YOU
KNOW
?
Some application views
automatically default to Option Lock, such as
the Dial Pad View in the Phone application or
the Calculator. In this case, you do not need
to press Option to enter numbers.
DID
YOU
KNOW
?
Alternate characters are
grouped by their similarity to the base key. For
example, when you press Alt + E you can
access the following alternate characters:
e é, è, ë, ê, and .
ML_QRG.book Page 12 W ednesday,O ctober 11,2006 3:47 PM

MOVING AROUND ON YOUR SMARTPHONE
USING THE KEYBOARD
13
1
CHAPTER
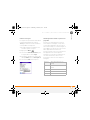
0
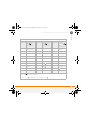
Symbols and accented characters
Enter… Then press
Alt to
select…
Enter… Then press
Alt to
select…
Enter… Then press
Alt to
select…
a á à ä â ã å æ n ñ u ú ù ü û
A Á À Ä Â Ã Å Æ N Ñ U Ú Ù Ü Û
b or B ß o ó ò ö ô œ õ x or X x ¤
c ç ¢ © O Ó Ò Ö Ô Œ Õ y ý ÿ
C Ç ¢ © p or P ¶ Y Ý Ÿ
e é è ë ê r or R ® ! ¡
E É È Ë Ê s ß š ? ¿
i í ì ï î S ß Š : :-) :-( ;-)
I Í Ì Ï Î t or T ™ $ £ ¥ ¢
l or L £
Press Alt by itself, after a space or at the beginning or end of a line, to select these
commonly used characters:
; _ • \ % = ° ÷ £ ¥ ¢ [ ] { } < > « » © ® ™ ~ ^ ø |
ML_QRG.book Page 13 W ednesday,O ctober 11,2006 3:47 PM

MOVING AROUND ON YOUR SMARTPHONE
OPENING APPLICATIONS
14
1
CHAPTER
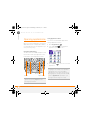
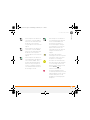
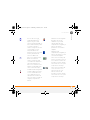
Opening applications
When you open an application using either
Applications View or an application button,
you automatically close the application you
were previously using.
Using the quick buttons
The front of the Treo 700
P smartphone has
three buttons that open applications. The
fourth button opens Applications View.
Using Applications View
You can access all available applications
through Applications View.
1 Press Applications .
2 Use the 5-way to highlight the
application you want to use.
3 Press Center to open the selected
application.
TIP
You can open a button’s secondary
application by pressing Option and then
pressing the quick button.
Phone
Calendar Messaging
Applications
TIP
Enter the first few letters of an app name
to highlight it. For example, if you press P, it
highlights Phone; if you then press R, it
highlights Prefs. If you pause and then press
R, it highlights the first app that starts with R.
TIP
Press Applications repeatedly to cycle
through the various categories of apps.
ML_QRG.book Page 14 W ednesday,O ctober 11,2006 3:47 PM

MOVING AROUND ON YOUR SMARTPHONE
SYNCHRONIZING INFORMATION
15
1
CHAPTER
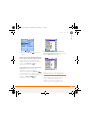
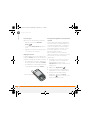
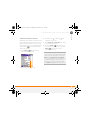
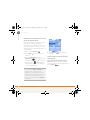
Synchronizing
information
Synchronizing means that info you enter in
one place (your smartphone or your
computer) appears in the other, so there’s
no need to enter the info twice. We
recommend that you sync your
smartphone with your computer frequently
to keep your info up-to-date (and backed
up) in both locations.
The info from all the following applications
is updated by default each time you sync:
BEFORE YOU BEGIN You must install
Palm
®
Desktop software from the Palm
Software Installation CD that came with
your Treo 700
P smartphone—even if you
sync with Outlook or another third-party
application. See the Read This First guide
for instructions.
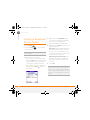
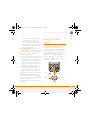
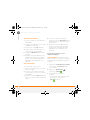
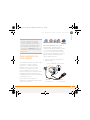
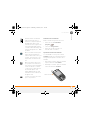
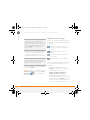
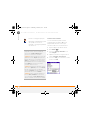
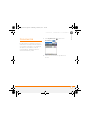
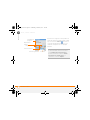
1 Connect your Treo 700
P smartphone to
your computer.
2
Press the
sync
button on the sync cable.
Messages on both your computer and
your smartphone indicate that
synchronization is in progress.
3 Wait until you see the message on your
smartphone that the HotSync
®
operation is complete; then disconnect
the sync cable. Do not disconnect the
sync cable until you see this message.
TIP
Problems synchronizing? See Yo u r
Palm
®
Treo
™
700P Smartphone User Guide for
troubleshooting suggestions.
Sync cable
Sync button
Use adapter if needed
ML_QRG.book Page 15 W ednesday,O ctober 11,2006 3:47 PM

MOVING AROUND ON YOUR SMARTPHONE
MAXIMIZING BATTERY LIFE
16
1
CHAPTER
Maximizing battery
life
Battery life depends on how you use your
smartphone. You can maximize the life of
your battery by following a few easy
guidelines:
• Charge your smartphone whenever
you’re at your desk, or charge it
overnight. The lithium-ion battery has a
much longer useful life when it is
topped off frequently, versus charging it
after it is fully drained.
• Your smartphone’s wireless features
(phone, email, messaging, and web)
and media features (camera, media
players, eBooks, and games) consume
more power than its organizer features.
If you spend a lot of time using the
wireless and media features, keep an
eye on the battery icon and charge
when necessary.
• If you don’t plan to use the wireless
features on your smartphone for a
while, turn off your phone (see “Turning
your phone on and off” on page 18) and
let all calls be picked up by voicemail.
• As with any mobile phone, if you are in
an area with no wireless coverage, your
smartphone searches for a signal, which
consumes power. If you cannot move to
an area of better coverage, temporarily
turn off your phone. While your phone is
off, you can continue to use your
smartphone’s nonwireless features.
• Turn down the screen brightness.
• Decrease the settings in Power
Preferences and turn off Beam Receive.
• Turn off the Bluetooth
®
feature if you’re
not using it.
TIP
You can buy an extra battery as a spare for
long plane trips or periods of heavy use. To
purchase batteries that are compatible with
your smartphone, go to www.palm.com/
treo700pcdma-mytreo.
ML_QRG.book Page 16 W ednesday,O ctober 11,2006 3:47 PM

CHAPTER
2
Your phone
Turning your
smartphone on
and off
NOTE In this guide the term smartphone
describes your device and its physical
aspects. The term phone describes the
feature of your smartphone that lets you
connect to your wireless service provider’s
network to make and receive calls and
transmit data.
The phone and the screen of your
smartphone can be turned off and on
separately.
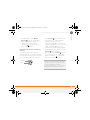
Waking up the screen
Wake up the screen and leave the phone
off to use only the organizer features, for
example, when you’re on a plane and want
to look at your calendar.
1 Press and release Power/End
to wake up the screen.
2 Press Center to turn off Keyguard.
3 Press and release Power/End to
turn off the screen and lock the
keyboard.
Center
Power/End
ML_QRG.book Page 17 W ednesday,O ctober 11,2006 3:47 PM

YOUR PHONE
TURNING YOUR SMARTPHONE ON AND OFF
18
2
CHAPTER
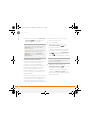
Turning your phone on and off
When your phone is on, it is connected to
your wireless service provider’s network (if
you are in a coverage area) so that you can
make and answer phone calls and use
wireless services, such as email,
messaging, and the web browser.
During initial setup, your phone is
automatically turned on, so you can use
wireless services right away. If you turn off
your phone, you can still use the organizer
and media features such as Contacts and
Pocket Tunes.
1 Wake up the screen.
2 Press and hold Power/End to
turn on your phone.
You know your phone is on and that
you’re inside a coverage area when you
see the signal-strength icon at the
top of the Main View in the Phone app.
3 Press and hold Power/End
again to turn off your phone.
You know your phone is off when you
see Phone Off at the top of the Main
View in the Phone application.
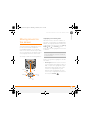
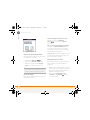
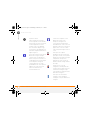
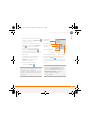
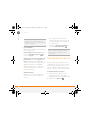
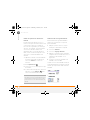
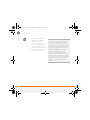
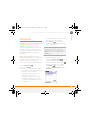
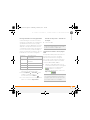
Opening the Phone application
• Press Phone to open the Main
View in the Phone application.
TIP
You can also press any of the quick buttons
or the Applications button to wake up your
smartphone screen.
TIP
You can set how long the screen stays on.
Press Applications, select Preferences,
select Power, and then adjust the Auto-off
after setting.
TIP
If you’re outside a coverage area, No
Service appears in the upper-left corner.
Favorite
buttons
Dial Pad
Status icons
ML_QRG.book Page 18 W ednesday,O ctober 11,2006 3:47 PM
La page est en cours de chargement...
La page est en cours de chargement...
La page est en cours de chargement...
La page est en cours de chargement...
La page est en cours de chargement...
La page est en cours de chargement...
La page est en cours de chargement...
La page est en cours de chargement...
La page est en cours de chargement...
La page est en cours de chargement...
La page est en cours de chargement...
La page est en cours de chargement...
La page est en cours de chargement...
La page est en cours de chargement...
La page est en cours de chargement...
La page est en cours de chargement...
La page est en cours de chargement...
La page est en cours de chargement...
La page est en cours de chargement...
La page est en cours de chargement...
La page est en cours de chargement...
La page est en cours de chargement...
La page est en cours de chargement...
La page est en cours de chargement...
La page est en cours de chargement...
La page est en cours de chargement...
La page est en cours de chargement...
La page est en cours de chargement...
La page est en cours de chargement...
La page est en cours de chargement...
La page est en cours de chargement...
La page est en cours de chargement...
La page est en cours de chargement...
La page est en cours de chargement...
La page est en cours de chargement...
La page est en cours de chargement...
La page est en cours de chargement...
La page est en cours de chargement...
La page est en cours de chargement...
La page est en cours de chargement...
La page est en cours de chargement...
La page est en cours de chargement...
La page est en cours de chargement...
La page est en cours de chargement...
La page est en cours de chargement...
La page est en cours de chargement...
La page est en cours de chargement...
La page est en cours de chargement...
La page est en cours de chargement...
La page est en cours de chargement...
La page est en cours de chargement...
La page est en cours de chargement...
La page est en cours de chargement...
La page est en cours de chargement...
La page est en cours de chargement...
La page est en cours de chargement...
La page est en cours de chargement...
La page est en cours de chargement...
La page est en cours de chargement...
La page est en cours de chargement...
La page est en cours de chargement...
La page est en cours de chargement...
La page est en cours de chargement...
La page est en cours de chargement...
La page est en cours de chargement...
La page est en cours de chargement...
La page est en cours de chargement...
La page est en cours de chargement...
La page est en cours de chargement...
La page est en cours de chargement...
La page est en cours de chargement...
La page est en cours de chargement...
La page est en cours de chargement...
La page est en cours de chargement...
La page est en cours de chargement...
La page est en cours de chargement...
La page est en cours de chargement...
La page est en cours de chargement...
La page est en cours de chargement...
La page est en cours de chargement...
La page est en cours de chargement...
La page est en cours de chargement...
La page est en cours de chargement...
La page est en cours de chargement...
La page est en cours de chargement...
La page est en cours de chargement...
La page est en cours de chargement...
La page est en cours de chargement...
La page est en cours de chargement...
La page est en cours de chargement...
La page est en cours de chargement...
La page est en cours de chargement...
La page est en cours de chargement...
La page est en cours de chargement...
La page est en cours de chargement...
La page est en cours de chargement...
La page est en cours de chargement...
La page est en cours de chargement...
La page est en cours de chargement...
La page est en cours de chargement...
La page est en cours de chargement...
La page est en cours de chargement...
La page est en cours de chargement...
La page est en cours de chargement...
La page est en cours de chargement...
La page est en cours de chargement...
La page est en cours de chargement...
La page est en cours de chargement...
La page est en cours de chargement...
La page est en cours de chargement...
La page est en cours de chargement...
La page est en cours de chargement...
La page est en cours de chargement...
La page est en cours de chargement...
La page est en cours de chargement...
La page est en cours de chargement...
La page est en cours de chargement...
La page est en cours de chargement...
La page est en cours de chargement...
La page est en cours de chargement...
La page est en cours de chargement...
La page est en cours de chargement...
La page est en cours de chargement...
La page est en cours de chargement...
La page est en cours de chargement...
La page est en cours de chargement...
La page est en cours de chargement...
La page est en cours de chargement...
La page est en cours de chargement...
La page est en cours de chargement...
La page est en cours de chargement...
La page est en cours de chargement...
La page est en cours de chargement...
La page est en cours de chargement...
La page est en cours de chargement...
La page est en cours de chargement...
La page est en cours de chargement...
La page est en cours de chargement...
La page est en cours de chargement...
La page est en cours de chargement...
La page est en cours de chargement...
La page est en cours de chargement...
La page est en cours de chargement...
La page est en cours de chargement...
La page est en cours de chargement...
La page est en cours de chargement...
La page est en cours de chargement...
La page est en cours de chargement...
La page est en cours de chargement...
La page est en cours de chargement...
La page est en cours de chargement...
La page est en cours de chargement...
La page est en cours de chargement...
La page est en cours de chargement...
La page est en cours de chargement...
La page est en cours de chargement...
La page est en cours de chargement...
La page est en cours de chargement...
La page est en cours de chargement...
La page est en cours de chargement...
La page est en cours de chargement...
La page est en cours de chargement...
La page est en cours de chargement...
La page est en cours de chargement...
La page est en cours de chargement...
La page est en cours de chargement...
La page est en cours de chargement...
La page est en cours de chargement...
La page est en cours de chargement...
La page est en cours de chargement...
La page est en cours de chargement...
La page est en cours de chargement...
La page est en cours de chargement...
La page est en cours de chargement...
La page est en cours de chargement...
La page est en cours de chargement...
La page est en cours de chargement...
La page est en cours de chargement...
La page est en cours de chargement...
La page est en cours de chargement...
La page est en cours de chargement...
La page est en cours de chargement...
La page est en cours de chargement...
La page est en cours de chargement...
-
 1
1
-
 2
2
-
 3
3
-
 4
4
-
 5
5
-
 6
6
-
 7
7
-
 8
8
-
 9
9
-
 10
10
-
 11
11
-
 12
12
-
 13
13
-
 14
14
-
 15
15
-
 16
16
-
 17
17
-
 18
18
-
 19
19
-
 20
20
-
 21
21
-
 22
22
-
 23
23
-
 24
24
-
 25
25
-
 26
26
-
 27
27
-
 28
28
-
 29
29
-
 30
30
-
 31
31
-
 32
32
-
 33
33
-
 34
34
-
 35
35
-
 36
36
-
 37
37
-
 38
38
-
 39
39
-
 40
40
-
 41
41
-
 42
42
-
 43
43
-
 44
44
-
 45
45
-
 46
46
-
 47
47
-
 48
48
-
 49
49
-
 50
50
-
 51
51
-
 52
52
-
 53
53
-
 54
54
-
 55
55
-
 56
56
-
 57
57
-
 58
58
-
 59
59
-
 60
60
-
 61
61
-
 62
62
-
 63
63
-
 64
64
-
 65
65
-
 66
66
-
 67
67
-
 68
68
-
 69
69
-
 70
70
-
 71
71
-
 72
72
-
 73
73
-
 74
74
-
 75
75
-
 76
76
-
 77
77
-
 78
78
-
 79
79
-
 80
80
-
 81
81
-
 82
82
-
 83
83
-
 84
84
-
 85
85
-
 86
86
-
 87
87
-
 88
88
-
 89
89
-
 90
90
-
 91
91
-
 92
92
-
 93
93
-
 94
94
-
 95
95
-
 96
96
-
 97
97
-
 98
98
-
 99
99
-
 100
100
-
 101
101
-
 102
102
-
 103
103
-
 104
104
-
 105
105
-
 106
106
-
 107
107
-
 108
108
-
 109
109
-
 110
110
-
 111
111
-
 112
112
-
 113
113
-
 114
114
-
 115
115
-
 116
116
-
 117
117
-
 118
118
-
 119
119
-
 120
120
-
 121
121
-
 122
122
-
 123
123
-
 124
124
-
 125
125
-
 126
126
-
 127
127
-
 128
128
-
 129
129
-
 130
130
-
 131
131
-
 132
132
-
 133
133
-
 134
134
-
 135
135
-
 136
136
-
 137
137
-
 138
138
-
 139
139
-
 140
140
-
 141
141
-
 142
142
-
 143
143
-
 144
144
-
 145
145
-
 146
146
-
 147
147
-
 148
148
-
 149
149
-
 150
150
-
 151
151
-
 152
152
-
 153
153
-
 154
154
-
 155
155
-
 156
156
-
 157
157
-
 158
158
-
 159
159
-
 160
160
-
 161
161
-
 162
162
-
 163
163
-
 164
164
-
 165
165
-
 166
166
-
 167
167
-
 168
168
-
 169
169
-
 170
170
-
 171
171
-
 172
172
-
 173
173
-
 174
174
-
 175
175
-
 176
176
-
 177
177
-
 178
178
-
 179
179
-
 180
180
-
 181
181
-
 182
182
-
 183
183
-
 184
184
-
 185
185
-
 186
186
-
 187
187
-
 188
188
-
 189
189
-
 190
190
-
 191
191
-
 192
192
-
 193
193
-
 194
194
-
 195
195
-
 196
196
-
 197
197
-
 198
198
-
 199
199
-
 200
200
-
 201
201
-
 202
202
-
 203
203
-
 204
204


Palm Treo 700P Manuel utilisateur
- Catégorie
- Téléphones portables
- Taper
- Manuel utilisateur
dans d''autres langues
- English: Palm Treo 700P User manual
- español: Palm Treo 700P Manual de usuario
Documents connexes
-
PALMOME 650 Manuel utilisateur
-
Mode TREO 600 Le manuel du propriétaire
-
Palm Treo 650 Le manuel du propriétaire
-
-
-
-
-
-
Palm Portable Keyboard Manuel utilisateur
-
Autres documents
-
Sony DCR-TRV950 Manuel utilisateur
-
Sony PC120E Manuel utilisateur
-
-
 Imperii Electronics imperii Hexa GPSports SmartWatch Manuel utilisateur
-
 Wiley 978-1-1180-2240-5 Fiche technique
-
AIRIS KIRA Serie Manuel utilisateur
-
LG LGP895.AINDBK Manuel utilisateur
-
LG LGD505.ABALBK Manuel utilisateur
-
Audio Technica AT-MP100 Le manuel du propriétaire
-
HeathZenith HZ-9302-WH Manuel utilisateur

