La page est en cours de chargement...

1
Flat Washer x12
Lock Nut
x6
Hex Bolt x2
Eye Bolt x4
Specications subject to change without notice. Les spécications expsent pout changer sans la notication. Las especicaciones sujetas cambiar sin nota.
Manufactured for / fabriqué pour / fabricado para: Backyard Play Systems • 1000 Ternes Drive, Monroe, MI 48162 • USA • 1-866-890-2211 • customerservice@backyard-play.com
Made in China / Fait en China / Hecho en China • Printed in China / Imprimé en China / Impreso en China
LA 7422
Quick Link
Glider Chain
Glider End
Glider Seat
x4
x6
x2
x1
Dual-Ride Glider
Glider
Glider
NE 3452
WS 3452
WARNING: Assembly by adult.
AVERTISSEMENT: L’assemblage dolt être exécuté par un adulte.
ADVERTENCIA: El ensamblaje lo debe hacer un adulto.
WARNING: Assembly by adult.
AVERTISSEMENT: L’assemblage dolt être exécuté par un adulte.
ADVERTENCIA: El ensamblaje lo debe hacer un adulto.
WRENCH
CLÉ
LLAVE
SOCKET & WRENCH
DOUILLE ET CLÉ DE
CUBO DE DE LLAVE DE
TRINQUETE
TAPE MEASURE
RUBAN À MESURER
CINTAMÉTRICA
SCREWDRIVER
TOURNEVIS
DESTORNILLADOR
Tools required:
Outils requis:
Herramientas requeridas:

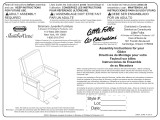
2
GLIDER ASSEMBLE
Washer
Hex Bolt
Washer
Eye Bolt
Lock Nut
Washer
IMPORTANT! Even though some hardware may be inserted by manufacturer,
tighten all Lock-Nuts as indicated to verify they are fully engaged.
Lock Nut
Washer
Tighten Lock Nut
until three (3) threads
are exposed.
90o
Eye bolts should be oriented
perpendicular with Glider seat. Eye Bolt
TOP VIEW It is helpful to use a screwdriver
to hold eye bolt in place when
tightening lock nut.
Tighten Lock Nut
until three (3) threads
are exposed.

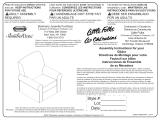
3
GLIDER FINAL INSPECTION
8” minimum between Glider and ground.
Adjust Chains at Top.
!IMPORTANT!
Inspect and conrm
tightness of all
Lock-Nuts and Quick Clips.
!IMPORTANT!
Attach (2) Chains per Swing
Hanger (not included) using
quick links
Quick Link
x4
Chain End Link
Glider Chain
Tighten clips securely with a wrench.
8” minimum between Glider and ground.
Adjust Chains at Top.
/