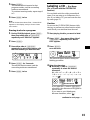
Sony MDX-C800REC Manuel utilisateur
- Catégorie
- Lecteur CD
- Taper
- Manuel utilisateur

© 2000 Sony Corporation
Operating Instructions
Mode d’emploi
Manual de instrucciones
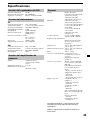
US
FM/AM
MiniDisc Recorder
MDX-C800REC
For installation and connections, see the supplied installation/connections manual.
Owner’s Record
The model and serial numbers are located on the bottom of the unit.
Record the serial number in the space provided below.
Refer to these numbers whenever you call upon your Sony dealer regarding this
product.
Model No. MDX-C800REC Serial No.
FR
ES
FM/AM MiniDisc Recorder MDX-C800REC

2
Warning
This equipment has been tested and found to
comply with the limits for a Class B digital
device, pursuant to Part 15 of the FCC Rules.
These limits are designed to provide
reasonable protection against harmful
interference in a residential installation. This
equipment generates, uses, and can radiate
radio frequency energy and, if not installed
and used in accordance with the instructions,
may cause harmful interference to radio
communications. However, there is no
guarantee that interference will not occur in a
particular installation. If this equipment does
cause harmful interference to radio or
television reception, which can be determined
by turning the equipment off and on, the user
is encouraged to try to correct the interference
by one or more of the following measures:
— Reorient or relocate the receiving antenna.
— Increase the separation between the
equipment and receiver.
— Connect the equipment into an outlet on a
circuit different from that to which the
receiver is connected.
— Consult the dealer or an experienced radio/
TV technician for help.
You are cautioned that any changes or
modifications not expressly approved in this
manual could void your authority to operate
this equipment.
CAUTION
The use of optical instruments with this
product will increase eye hazard.
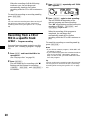
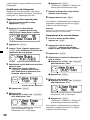
Welcome !
Thank you for purchasing the Sony MiniDisc
Recorder. This unit lets you enjoy a variety of
features using the following controller
accessories:
Optional accessories
Rotary commander RM-X4S
Card remote commander RM-X91
In addition to the MD playback and radio
operations, you can expand your system by
connecting optional CD/MD units*
1
.
When you play a CD TEXT disc*
2
on a
connected optional CD unit with the CD TEXT
function, the CD TEXT information will appear
on the display.
*
1
You can connect MD changers, CD changers, MD
players, or CD players.
*
2
A CD TEXT disc is an audio CD that includes
information such as the disc name, artist name
and track names.
This information is recorded on the disc.
Precautions
•If your car was parked in direct sunlight
resulting in a considerable rise in
temperature inside the car, allow the unit to
cool off before operating it.
•If no power is being supplied to the unit,
check the connections first. If everything is in
order, check the fuse.
•If your car is equipped with a power
antenna, it will extend automatically while
the unit is operating.
•Do not use the CUSTOM FILE feature while
driving, or perform any other function which
could divert your attention from the road.
•Do not edit the MD while driving.
•Make sure that the vehicle’s battery and
charging system are functioning properly
prior to using Timer-off recording and the
REC Continue mode function. Under certain
unusual conditions, use of the Timer-off
recording and the REC Continue mode
function could cause the vehicle’s battery to
be discharged to a degree that would prevent
the vehicle from starting. For the maximum
current drain per connection, refer to the
“connection diagram” of the supplied
installation/connections.

3
•Be careful if your car is equipped with an
electric current detector-type car-alarm
system: when Timer-off recording or REC
Continue mode ends, the alarm may
mistakenly go off, detecting a change in the
car’s electrical current.
•When an optional TV/video unit is
connected, the monitor stays on during
Timer-off recording or REC Continue mode.
Turn the monitor off before leaving the car to
reduce the likelihood of battery drain or
theft.
If you have any questions or problems
concerning your unit that are not covered in
this manual, please consult your nearest Sony
dealer.
Notes on recording
If you are going to make a recording that
cannot be done over, it is recommended to
make a test recording before actual recording.
IN NO EVENT SHALL SELLER BE LIABLE
FOR ANY DIRECT, INCIDENTAL, OR
CONSEQUENTIAL DAMAGE OF ANY
NATURE, OR LOSSES OR EXPENSES
RESULTING FROM ANY DEFECTIVE
PRODUCT OR THE USE OF ANY
PRODUCT.
Moisture condensation
On a rainy day or in a very damp area,
moisture may condense on the lenses inside
the unit. Should this occur, the unit will not
operate properly. In such a case, remove the
disc and wait for about an hour until the
moisture has evaporated.
To maintain high sound quality
If you have drink holders near your audio
equipment, be careful not to splash juice or
other soft drinks onto the unit and MD. Sugary
residues on the unit or MD may contaminate
the lenses inside the unit, reduce the sound
quality, or prevent sound reproduction
altogether.
Notes on MDs
Since the disc itself is housed in a cartridge,
free from accidental contact with your fingers
and dust, MDs can withstand a certain degree
of rough handling. However, dirt or dust on
the surface of the cartridge or a warped
cartridge may cause a malfunction. Observe
the following for best results.
Never touch the surface of the disc itself by
deliberately opening the shutter on the
cartridge.
When you eject the MD, the shutter may be
open. In such a case, close the shutter
immediately.
Do not expose the MD to direct sunlight or
heat sources such as hot-air ducts. Do not leave
it in a car parked in direct sunlight where there
can be a considerable rise in temperature.
Make sure the MD is not left on the dashboard
or rear tray of a car, etc. where the temperature
can also be excessive.

4
Notes on attaching labels
Be sure to attach labels on cartridges correctly,
as failing to do so may cause the MD to
become stuck in the unit.
•Attach the label in a suitable position.
•Remove old labels before putting new ones
on.
•Replace labels that are beginning to peel
away from the MD.
Cleaning
Wipe the surface of the cartridge from time to
time with a soft, dry cloth.
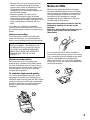
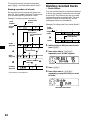
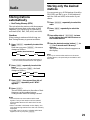
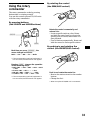
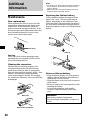
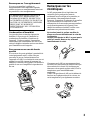
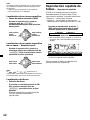
Protecting a recorded MD
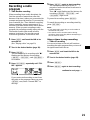
To record-protect an MD, slide open the tab at
the side of the MD.
With the tab in this position, the MD cannot be
recorded on. To record on the MD, slide the
tab closed.
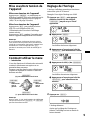
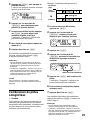
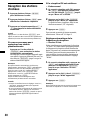
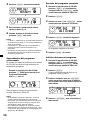
Slide open the tab.
Tab

5
Table of Contents
Location of controls ............................................. 6
Getting Started
Resetting the unit ................................................. 8
Detaching the front panel ................................... 8
Turning the unit on/off ....................................... 9
How to use the menu
— An introductive guide ............................... 9
Setting the clock ................................................... 9
MD Player
CD/MD Unit (optional)
Playing a disc ...................................................... 10
Playing tracks repeatedly
— Repeat Play ............................................... 12
Playing tracks in random order
— Shuffle Play ............................................... 13
Creating a program
— Program Memory .................................... 13
Labeling a CD
— Disc Memo* .............................................. 15
Locating a disc by name
— List-up* ..................................................... 17
* Functions available with optional CD/MD unit.
Recording on an MD
Recording from a CD or MD by the track
— Track recording ........................................ 18
Recording a whole CD or MD
— Disc recording .......................................... 19
Recording from a CD or MD in a specific track
order
— Program recording ................................... 20
Recording a radio program
— Time Machine recording ......................... 21
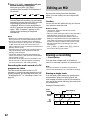
Editing an MD
Erasing a recording
— Erase function........................................... 22
Dividing recorded tracks
— Divide function ........................................ 24
Combining recorded tracks
— Combine function .................................... 25
Moving recorded tracks
— Move function .......................................... 26
Labeling an MD .................................................. 27
Radio
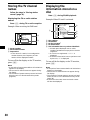
Storing stations automatically
— Best Tuning Memory (BTM)................... 29
Storing only the desired stations ..................... 29
Receiving the stored stations............................ 30
Storing station names
— Station Memo ........................................... 31
Locating a station by name
— List-up ....................................................... 32
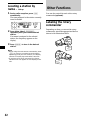
Other Functions
Labeling the rotary commander ...................... 32
Using the rotary commander ........................... 33
Adjusting the sound characteristics ................ 34
Quickly attenuating the sound ........................ 34
Changing the sound and display settings ...... 35
Selecting the spectrum analyzer ...................... 36
TV/Video (optional)
Watching the TV ................................................. 36
Watching a video................................................ 36
Storing TV channels automatically ................. 37
Storing only the desired TV channels ............. 37
Storing the TV channel names ......................... 38
Displaying the information stored
on a disc.......................................................... 38
Watching the TV or video while listening
to a CD or MD
— Simultaneous Play ................................... 39
Additional Information
Maintenance........................................................ 40
Removing the unit ............................................. 41
System limitations of MDs................................ 41
Specifications ...................................................... 43
Troubleshooting guide ...................................... 44

6
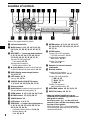
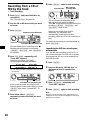
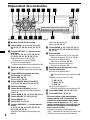
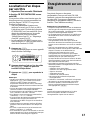
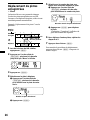
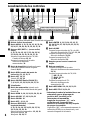
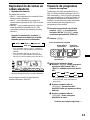
Location of controls
Refer to the pages listed for details.
1 Volume control dial
2 MENU button 9, 11, 13, 14, 15, 16, 23,
24, 25, 26, 27, 28, 29, 30, 31, 35, 36, 37,
39
3 DISC/PRST +/– (cursor up/down) buttons
9, 11, 13, 14, 15, 16, 17, 23, 24, 25, 26,
27, 28, 29, 30, 31, 32, 35, 36, 37, 39
During CD/MD playback:
Disc change 12, 19
During radio reception:
Preset stations select 30
4
Z (eject) button (located on the front side
of the unit behind the front panel) 10, 11
5 DSPL (display mode change) button
11, 16, 22, 27
6 LIST button 16, 31
List-up 17, 32, 38
7 SOURCE (Radio/CD/MD/TV) button
7, 9, 10, 11, 13, 16, 29, 30, 36, 37, 39
8 Display window
9 Reset button (located on the front side of
the unit behind the front panel) 8
0 OPEN button 8, 10, 11, 18, 19, 20, 21, 40
qa MD REC button 17, 18, 19, 20, 21
qs SOUND button 34
qd OFF button* 6, 8, 9, 11
qf SEEK/AMS –/+ (cursor left/right) buttons
9, 11, 13, 14, 16, 23, 24, 25, 26, 27, 28,
30, 31, 34, 35, 36, 39
Automatic Music Sensor 12, 18, 19
Manual Search 12
Seek 29, 30, 37
qg ENTER button 9, 11, 13, 14, 15, 16, 17,
23, 24, 25, 26, 27, 28, 29, 30, 31, 32, 35,
36, 37, 39
qh MODE button
During CD or MD playback:
CD/MD unit select 11, 16
During radio reception:
Band select 29, 30
During TV reception:
Unit select 36
qj Receptor for the card remote
commander
qk Number buttons
During radio reception:
Preset number select 29, 30
During CD/MD playback:
(1) REP 12, 22
(2) SHUF 13, 22
(3) PGM 14
During TV reception:
Preset number select 37
ql REC MENU button 18, 19, 20, 21, 22
w; REC STOP button 18, 20, 21
* Warning when installing in a car
without ACC (accessory) position on
the ignition switch
Be sure to press (OFF) on the unit for 2
seconds to turn off the clock display after
turning off the ignition.
When you press (OFF) only momentarily,
the clock display does not turn off and this
causes battery drain.
MDX-C800REC
D
I
S
C
+
P
R
S
T
+
D
I
S
C
–
P
R
S
T
-
LIST
DSPL
OFF
ENTER
MENU
SOUND
SOURCE
-
SEEK/AMS
OPEN
MODE
MD REC
REC STOP
REC MENU
Xz
x
REP
SHUF PGM
1 2 3 4 56

7
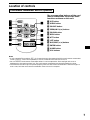
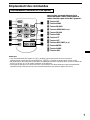
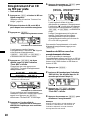
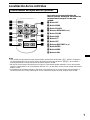
Location of controls
Card remote commander RM-X91 (optional)
The corresponding buttons of the card
remote commander control the same
functions as those on this unit.
1 OFF button
2 MENU button
3 SOURCE button
4 SEEK/AMS (B/b) buttons
5 SOUND button
6 DSPL button
7 ATT button
8 LIST button
9 DISC/PRST (V/v) buttons
q; ENTER button
qa MODE button
qs VOL buttons
OFF
SEEK SEEK
OPEN/CLOSE
MENU LIST
SOUND
ENTER
DISC
DISC
SOURCE
DSPL MODE
VOLATT
Notes
• A unit turned off by pressing (OFF) for 2 seconds cannot be operated with the card remote commander
unless (SOURCE) on the unit is pressed, or a disc is inserted to activate the unit first.
• Do not leave the card remote commander where it can be exposed to direct sunlight such as on a
dashboard or the steering wheel, etc. The card remote commander may be deformed by the heat.
• The MiniDisc recorder may not operate properly with the card remote commander in direct sunlight. In
such a case, hold the card remote commander close to the unit’s receptor.

8
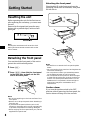
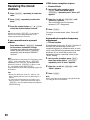
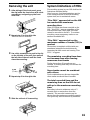
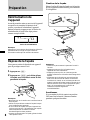
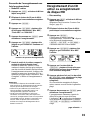
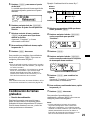
Getting Started
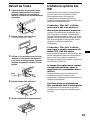
Resetting the unit
Before operating the unit for the first time or
after replacing the car battery, you must reset
the unit.
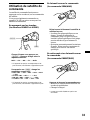
Remove the front panel and press the reset
button with a pointed object, such as a ball-
point pen.
Reset button
Note
Pressing the reset button will erase the clock
setting and some stored contents such as the
station memo.
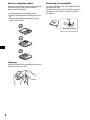
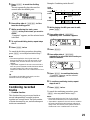
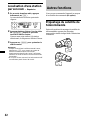
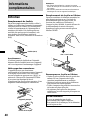
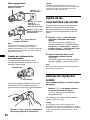
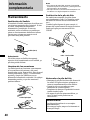
Detaching the front panel
You can detach the front panel of this unit to
protect the unit from being stolen.
1 Press (OFF).
2 Press (OPEN), then slide the front panel
to the right side, and pull out the left
side of the front panel.
Notes
• Do not put anything on the inner surface of the
front panel.
• Be sure not to drop the panel when detaching it
from the unit.
• If you detach the panel while the unit is still
turned on, the power will turn off automatically
to prevent the speakers from being damaged.
• When carrying the front panel with you, use the
supplied front panel case.
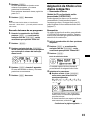
1
2
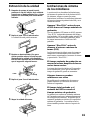
Attaching the front panel
Place the hole A in the front panel onto the
spindle B on the unit as illustrated, then push
the left side in.
x
Notes
• Be careful not to attach the front panel upside
down.
• Do not press the front panel too hard against the
unit when attaching it.
• Do not press too hard or put excessive pressure
on the display window of the front panel.
• Do not expose the front panel to direct sunlight
or heat sources such as hot air ducts, and do not
leave it in a humid place. Never leave it on the
dashboard of a car parked in direct sunlight or
where there may be a considerable rise in
temperature.
Caution alarm
If you turn the ignition switch to the OFF
position without removing the front panel, the
caution alarm will beep for a few seconds.
A
B

9
Turning the unit on/off
Turning on the unit
Press (SOURCE) or insert an MD into the unit.
For details on operation, refer to page 10 (MD/
CD) and page 29 (radio).
Turning off the unit
Press (OFF) to stop MD/CD playback or FM/
AM reception (the key illumination and
display remain on).
Press (OFF) for 2 seconds to completely turn
off the unit.
Note
If your car has no ACC position on the ignition
switch, be sure to turn the unit off by pressing
(OFF) for 2 seconds to avoid car battery drain.
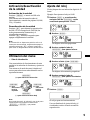
How to use the menu
— An introductive guide
One operational feature of this unit is selecting
functions/settings from a menu.
After entering Menu mode, you move the
cursor to select each item with the following
buttons:
(DISC/PRST)
(+): to select upwards
(SEEK/AMS)
(+): to select
rightwards
(SEEK/AMS)
(–): to select
leftwards
(DISC/PRST)
(–): to select downwards
SOURCE
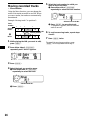
Setting the clock
The clock uses a 12-hour digital indication.
Example: To set the clock to 10:08
1 Press (MENU), then press either side of
(DISC/PRST) repeatedly until “Clock”
appears.
1 Press (ENTER).
The hour indication flashes.
2 Press either side of (DISC/PRST) to set
the hour.
3 Press the (+) side of (SEEK/AMS).
The minute indication flashes.
4 Press either side of (DISC/PRST) to set
the minute.
2 Press (ENTER).
The clock starts.
After the clock setting is completed, the
display returns to normal play mode.
Note
In Menu mode the “v” in the left of the display
indicates the selectable buttons of
(DISC/PRST) and (SEEK/AMS).

10
MD Player
CD/MD Unit (optional)
In addition to playing an MD with this unit
alone, you can also control external CD/MD
units.
Note
If you connect an optional CD unit with the CD
TEXT function, the CD TEXT information will
appear on the display when you play a CD TEXT
disc.
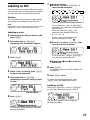
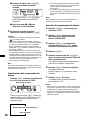
Playing a disc
Playing an MD (with this unit)
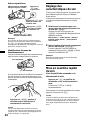
1 Press (OPEN) and insert the MD.
2 Close the front panel.
Playback starts automatically.
If an MD is already inserted, press (SOURCE)
repeatedly until “MD” appears to start
playback.
B Radio (band indication)
MD b CD* b
* If the corresponding optional equipment is not
connected, this item will not appear.
The title of the MD* and the track title* will
appear on the display window, then the
playing time will appear.
MD indication Disc name*/track title*
* Only if these titles are prerecorded on the MD
(Some characters cannot be displayed).
Elapsed playing time
Z
Notes
• If your car has no ACC (accessory) position on the
ignition switch, be sure to turn on the unit
before you set the clock (see page 9).
• In the initial setting, the clock indication appears
while the unit is turned off.
When D.INFO mode is set to ON, the time is
always displayed (page 35).
Track number
Labeled side up

11
To Press
Stop playback (OFF)
Eject the MD (OPEN) then Z
Note
When the last track on the MD is over, the track
number indication returns to “1,” and playback
restarts from the first track of the MD.
With optional unit connected, the MD in MD unit
2 will be played from the beginning, after the MD
in the main unit is played to the end.
Playing a CD or MD
(with optional CD/MD unit)
1 Press (SOURCE) repeatedly to select
“CD” or “MD.”
B Radio (band indication)
MD b CD* b
* This item will not appear if the optional CD
unit is not connected.
2 Press (MODE) until the desired unit
appears.
CD/MD playback starts.
Changing the display item
Each time you press (DSPL) during MD, CD,
or CD TEXT disc playback, the item changes as
follows:
V
Disc name*
1
/Artist’s name*
2
V
Track name*
3
*
1
If you have not labeled the CD or CD TEXT disc
(“Labeling a CD” on page 15), or if there is no
disc name prerecorded on the MD, “NO
D.Name” appears on the display.
*
2
If you play a CD TEXT disc, the artist’s name
appears on the display after the disc name.
(Only for CD TEXT discs with the artist’s name.)
*
3
If the track name of a CD TEXT disc or MD is not
prerecorded, “NO T.Name” appears on the
display.
After you select the desired item, the display
will automatically change to the Motion
Display mode after a few seconds.
In the Motion Display mode, all the items are
scrolled on the display one by one in order.
Notes
• If you use personalized labels, they will always
take priority over the original CD TEXT
information when such information is displayed.
• Some letters cannot be displayed during MD or
CD TEXT playback.
Tip
The Motion Display mode can be turned off. (See
“Changing the sound and display settings” on
page 35.)
Automatically scrolling a disc name
— Auto Scroll
If the disc name, artist name, or track name on
an MD or a CD TEXT disc exceeds 10
characters and the Auto Scroll function is on,
information automatically scrolls across the
display as follows:
• The disc name appears when the disc has
changed (if the disc name is selected as the
display item).
• The track name appears when the track has
changed (if the track name is selected as the
display item).
• The disc or track name appears depending on
the setting when you press (SOURCE) to select
an MD or CD TEXT disc.
If you press (DSPL) to change the display
item, the disc or track name of the MD or CD
TEXT disc is scrolled automatically whether
you set the function on or off.
1 During playback, press (MENU).
2 Press either side of (DISC/PRST)
repeatedly until “A.Scrl off” appears.
3 Press the (+) side of (SEEK/AMS) to select
“A.Scrl on.”
4 Press (ENTER).
To cancel Auto Scroll, select “A.Scrl off” in
step 3.

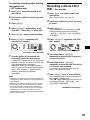
12
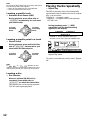
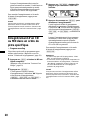
LIST
ENTER
-
SEEK/AMS
MODE
REP
SHUF PGM
1 2 3 4 56
Note
For some CD TEXT discs with very many characters,
the following cases may happen:
— Some of the characters are not displayed.
— The information does not scroll.
Locating a specific track
— Automatic Music Sensor (AMS)
During playback, press either side of
(SEEK/AMS) momentarily for each track
you want to skip.
SOURCE
Locating a specific point in a track
— Manual Search
During playback, press and hold either
side of (SEEK/AMS). Release when you
have found the desired point.
SOURCE
Note
If “
” or “ ” appears on the
display, you have reached the beginning or the
end of the disc and you cannot go any further.
Locating a disc
— Disc Selection
When an optional CD/MD unit is
connected, press either side of
(DISC/PRST) to select the desired disc.
The desired disc on the current optional
CD/MD unit begins playback.
To locate
preceding
tracks
To locate
succeeding
tracks
To search
forward
To search
backward
Playing tracks repeatedly
— Repeat Play
The MD in the main unit will automatically
repeat itself when it reaches the end. As repeat
play, you can select:
•Repeat 1 — to repeat a track.
•Repeat 2 — to repeat a disc in the optional
CD/MD unit.
During playback, press (1) (REP)
repeatedly until the desired setting
appears on the display.
B Repeat 1 B Repeat 2*
Repeat off b
* “Repeat 2” is only available when you
connect one or more optional CD/MD units.
Repeat Play starts.
To return to normal play mode, select “Repeat
off.”

13
LIST
ENTER
-
SEEK/AMS
MODE
REP
SHUF PGM
1 2 3 4 56
Playing tracks in random
order — Shuffle Play
You can select:
•Shuf 1 — to play the tracks on the current
disc in random order.
•Shuf 2 — to play the tracks in the current
optional CD/MD unit in random order.
•Shuf all — to play all the tracks in all the
connected CD/MD units (including this unit)
in random order.
During playback, press (2) (SHUF)
repeatedly until the desired setting
appears on the display.
B Shuf 1 B Shuf 2*
1
B Shuf all*
2
Shuf off b
*
1
“Shuf 2” is only available when you connect
one or more optional CD/MD units.
*
2
“Shuf all” is only available when you
connect one or more optional MD units, or
when you connect two or more optional CD
units.
Shuffle Play starts.
To return to normal play mode, select “Shuf
off.”
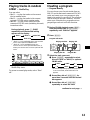
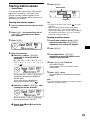
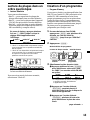
Creating a program
— Program Memory
You can choose your favorite tracks from an
MD/CD on the main and connected CD/MD
units, and create your own program to play
them in the order of your choice. The program
will be stored in the unit’s memory. You can
select up to 24 tracks for a program and one
program per each unit with this function.
1 During CD/MD playback, press (MENU),
then press either side of (DISC/PRST)
repeatedly until “PGM Sel” appears.
2 Press (ENTER).
Program edit mode
3 Select the track you want.
1 Press (SOURCE) repeatedly to select
this unit (“MD” or “MD1”) or optional
CD/MD units.
B CD1* B CD2* B ...
... b MD2* b MD1 b
* If the corresponding optional equipment
is not connected, these items will not
appear.
2 Press either side of (DISC/PRST) for
more than 2 seconds until the desired
disc appears.
3 Press either side of (SEEK/AMS)
repeatedly to select the track.
continue to next page t
Playing disc No.
Playing unitPlaying track No.
Program No.

14
Program No.
4 Press (ENTER) momentarily.
x
5 To continue entering tracks, repeat steps
3 and 4.
6 When you finish entering tracks, press
(MENU) twice.
Notes
•“**Wait**” appears on the display while the unit
is reading the data, or if a disc has not been
inserted into the unit.
•“*Mem FULL*” appears on the display if you try
to enter more than 24 tracks into a program.
• Repeat play and shuffle play will be suspended
until Program Edit mode is over.
Playing the stored program
Changing the disc order on the CD/MD unit
will not affect program memory play.
During CD/MD playback, press (3) (PGM)
to play the stored program.
PGM on y PGM off
To return to normal play mode, select “PGM
off.”
Notes
• “NO Data” appears on the display if no track is
stored in the program.
• If a track stored in program memory is not on a
disc in the magazine, the track will be skipped.
• If the discs in the magazine contain no tracks
stored in program memory, or if the program
information has not been loaded yet, “Not
Ready” appears.
Erasing an entire program
1 During CD/MD playback, press (MENU),
then press either side of (DISC/PRST)
repeatedly until “PGM Sel” appears.
2 Press (ENTER).
3 Press the (–) side of (DISC/PRST)
repeatedly until “All Erase” appears.
4 Press (ENTER) for 2 seconds.
The entire program is erased.
5 Press (MENU) twice.
Adding tracks to the program
1 During CD/MD playback, press (MENU),
then press either side of (DISC/PRST)
repeatedly until “PGM Sel” appears.
2 Press (ENTER).
When adding a track to the end of a
program, skip step 3.
3 Press either side of (DISC/PRST)
repeatedly to select the program number
where you want to insert a new track.
4 Press (SEEK/AMS) to select the new track.

15
5 Press (ENTER).
The selected track is inserted at that
program number, and the succeeding
tracks are renumbered.
To continue inserting tracks, repeat steps 3
to 5.
6 Press (MENU) twice.
Note
Once all 24 slots have been filled, “*Mem FULL*”
appears on the display, and you cannot insert
more tracks.
Erasing tracks in a program
1 During CD/MD playback, press (MENU),
then press either side of (DISC/PRST)
repeatedly until “PGM Sel” appears.
2 Press (ENTER).
3 Press either side of (DISC/PRST)
repeatedly to select the program with
the track number you want to erase.
4 Press (ENTER) for 2 seconds.
The selected track is erased, and the
succeeding tracks are renumbered.
5 Press (MENU) twice.
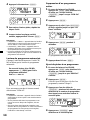
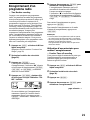
Labeling a CD — Disc Memo
(For a CD unit with the CUSTOM FILE
function)
You can label each disc with a personalized
name. You can enter up to 8 characters for a
disc. If you label a CD, you can locate the disc
by name (page 17).
Caution
Do not use the CUSTOM FILE feature while
driving, or perform any other function which
could divert your attention from the road.
1 Start playing the disc you want to label.
2 Press (MENU), then press either side of
(DISC/PRST) repeatedly until “Name
Edit” appears.
3 Press (ENTER).
Name Edit mode
The unit will repeat the disc during the
labeling procedure.
4 Enter the characters.
1 Press the (+) side of (DISC/PRST)
repeatedly to select the desired
characters.
(A t B t C t ··· Z t 0 t 1 t 2 t
··· 9 t + t – t * t / t \ t > t <
t . t )
If you press the (–) side of (DISC/PRST)
repeatedly, the characters will appear in
reverse order.
If you want to put a blank space
between characters, select “ .”
continue to next page t

16
Note
Some letters cannot be displayed during MD or CD
TEXT disc playback.
Erasing the disc memo
1 Press (SOURCE) repeatedly to select
“CD.”
2 Press (MODE) repeatedly to select the CD
unit with the CUSTOM FILE function.
3 Press (MENU), then press either side of
(DISC/PRST) repeatedly until “Name Del”
appears.
4 Press (ENTER).
5 Press either side of (DISC/PRST)
repeatedly to select the disc name you
want to erase.
The stored names will appear from the
earliest ones entered.
6 Press (ENTER) for 2 seconds.
The name is erased.
Repeat steps 5 and 6 if you want to erase
other names.
7 Press (MENU) twice.
The unit returns to normal CD play mode.
Notes
• To erase the disc memo, play a CD on the CD unit
in which the disc memo you want to erase is
stored.
• When a personalized label for a CD TEXT disc is
erased, the original CD TEXT information will
appear on the display.
2 Press the (+) side of (SEEK/AMS) after
locating the desired character.
If you press the (–) side of (SEEK/AMS),
you can move back to the left.
3 Repeat steps 1 and 2 to enter the
entire name.
5 To return to normal CD play mode, press
(ENTER).
Tips
• To erase or correct a name, enter “
” for each
character.
• There is another way to start labeling a CD: Press
(LIST) for 2 seconds instead of performing steps
2 and 3. You can also complete the operation by
pressing (LIST) for 2 seconds instead of step 5.
• You can label CDs on a unit without the CUSTOM
FILE function if that unit is connected along with
a CD unit that has the function. The disc name
will be stored in the memory of the CD unit with
the CUSTOM FILE function.
Note
Repeat play, shuffle play, and program play will be
suspended until Name Edit mode is over.
Displaying the disc memo
Press (DSPL) during CD or CD TEXT disc
playback.
Disc memo
Each time you press (DSPL) during CD or
CD TEXT disc playback, the item changes
as follows:
V
Disc memo name*
1
V
Track name*
2
*
1
If you use personalized labels, they will
always take priority over the original CD
TEXT information when such information is
displayed.
*
2
If you connect an optional CD unit with the
CD TEXT function, the CD TEXT information
will appear on the display when you play a
CD TEXT disc.

17
Locating a disc by name
— List-up (For a CD unit with the CD TEXT
function/CUSTOM FILE function or an MD
unit)
You can use this function for discs that have
been assigned custom names or for CD TEXT
discs. You can locate the disc by
— its custom name: when you assign a name
for a CD or an MD using a CD unit with the
CUSTOM FILE function or an MD unit.
(For information on disc names, see
“Labelling a CD” and “Labelling an MD”
on pages 15 and 27).
— the CD TEXT information: when you play a
CD TEXT disc on a CD unit with the CD
TEXT function.
1 Press (LIST).
The name assigned to the current disc
appears on the display.
2 Press either side of (DISC/PRST)
repeatedly until you find the desired
disc.
3 Press (ENTER) to play the disc.
Notes
• When using the card remote commander, press
(LIST) to return to normal play mode. When
operating just by the unit’s button, the display
returns to normal play mode after 5 seconds.
• The track names are not displayed during MD or
CD TEXT disc playback.
• If there are no discs on the CD/MD unit, “NO
Disc” appears on the display.
• If a disc has not been assigned a custom name,
“********” appears on the display.
• If you use personalized labels, they will always
take priority over the original CD TEXT
information when such information is displayed.
• Some letters cannot be displayed during MD or
CD TEXT disc playback.
• If the disc information has not been read yet by
the unit, “?” is displayed.
• If an optional TV system is connected, the disc
name appears on the display of the TV system
but not on the unit’s display.
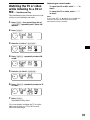
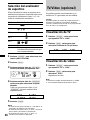
Recording on an MD
You can record individual tracks/discs or
programed tracks played on a connected CD/
MD unit onto the MD on this unit. You can
also record a radio program with the “Time
Machine recording” feature.
Notes on recording
• When the whole playback time of the CD/MD is
longer than the remaining recordable time of
the MD, recording will stop when the recordable
MD becomes full.
• A recording may fail if there is too much
difference in temperature between the unit and
the MD.
• Recorded sound may drop out if you perform
recording while the unit is subject to excessive
vibration (such as when driving on a rough road,
etc.).
• Once you finish recording on or editing the MD,
be sure to eject the MD before you turn off the
ignition or disconnect the power-supply leads of
the unit.
Recording is completed when the unit updates
the TOC (Table of Contents) information and
then the MD is ejected. The lamp located at the
bottom of the MD slot flashes during updating
of the TOC information.
• You cannot perform the following operations
during recording or recording stand-by:
—selecting another track*
—selecting another radio program*
—ejecting an MD
—labeling an MD
—selecting Menu mode.
* Unselectable only during recording
• “Protected” appears when the tab for record-
protection is open.
• Repeat play, shuffle play, and program play will
be canceled when (MD REC) is pressed.
Tip
The unit automatically locates the end of the MD’s
recorded section and starts to record from that
point.

18
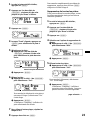
Information of the playing CD
Recording from a CD or
MD by the track
— Track recording
1 Press (OPEN) and insert the MD to be
recorded on.
(See “Playing a disc” on page 10.)
2 Play the CD or MD from which you want
to record.
3 Press (MD REC).
The unit stands by for recording with “z”
flashing and the buttons for recording
((MD REC), (REC STOP), and (REC MENU))
lit in amber.
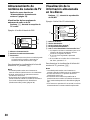
4 Press (REC MENU) repeatedly until
“Track. REC” appears.
Each time you press (REC MENU),
recording mode changes as follows:
B Track. REC B Disc. REC
Normal REC b PGM. REC* b
* If you did not create a program, this item will
not appear.
If you want the actual recording to start
from the point on the track where you press
(MD REC) next, select “Normal REC” in
this step.
5 Press either side of (SEEK/AMS)
repeatedly to select the track you want
to record.
Remaining recordable time
Information of the playing CD
6 Press (MD REC) again to start recording.
The unit locates the beginning of the
selected track and starts recording.
Then “z” stops flashing and the buttons for
recording ((MD REC), (REC STOP), and
(REC MENU)) light in red.
When the recording of the track is
completed, the unit beeps and
automatically stands by for further
recording while the CD or MD continues to
play.
To cancel the recording or recording stand-by,
press (REC STOP).
Inserting the MD to record upon
afterwards
You can still start recording even if a CD or
MD in the connected CD/MD unit is already
playing and an MD is yet to be inserted into
this MD recorder.
1 Press (MD REC).
2 Insert an MD while “REC NO Disc” is
displayed (within 10 seconds after
step 1).
3 Press (REC MENU) repeatedly until
“Track. REC” appears.
4 Press (MD REC) again to start recording.
Note
Be sure to insert an MD while “REC NO Disc” is
displayed. If the indication disappears, recording
stand-by is canceled.
MD’s track No.
MD’s elapsed
recording time

19
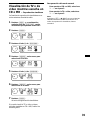
Recording a whole CD or
MD — Disc recording
1 Press (OPEN) and insert the MD to be
recorded on.
(See “Playing a disc” on page 10.)
2 Play the CD or MD from which you want
to record.
3 Press (MD REC).
The unit stands by for recording with “z”
flashing and the buttons for recording
((MD REC), (REC STOP), and (REC MENU))
lit in amber.
4 Press (REC MENU) repeatedly until “Disc.
REC” appears.
5 Press either side of (DISC/PRST)
repeatedly to select the disc from which
you want to record.
6 Press either side of (SEEK/AMS)
repeatedly to select the track from which
you want to start recording.
If you want to record the whole disc, be
sure to choose the first track.
7 Press (MD REC) again to start recording.
The recording starts from the beginning of
the currently playing track.
Then “z” stops flashing and the buttons for
recording ((MD REC), (REC STOP), and
(REC MENU)) light in red.
continue to next page t
Continuing recording after turning
the ignition off
— REC Continue mode
1 Press (OPEN) and insert the MD to be
recorded on.
2 Play the CD or MD from which you want
to record.
3 Press (MD REC).
4 Press (REC MENU) repeatedly to select
“Disc. REC,” “Track. REC,” or “PGM. REC.”
5 Press (MD REC) again to start recording.
6 Press (REC MENU) repeatedly until
“Continue on” appears.
Recording continue indication
7 Turn the ignition off and detach the
front panel before you leave the car.
During REC Continue mode, the unit keeps
beeping to indicate the state of the unit, and
stops beeping when recording is
completed. When you turn the ignition to
the ACC position and attach the front panel
again, “REC Complete!” appears on the
display if recording is completed
successfully.
Notes
• Frequent use of REC Continue mode feature may
cause battery drain. Make sure that the battery is
well charged.
• Be sure not to start the engine of the car again
during REC Continue mode. Recording may fail.
• When an optional TV/video unit is connected,
the monitor stays on during Timer-off recording
or REC Continue mode. Turn the monitor off
before leaving the car to reduce the likelihood of
battery drain or theft.

20
When the recording of all the following
tracks are over, the unit beeps and
automatically stands by for further
recording while the CD or MD continues to
play.
To cancel the recording or recording stand-by,
press (REC STOP).
Tip
You can continue recording even after turning off
the ignition to leave the car (see “Continuing
recording after turning the ignition off” on page
19).
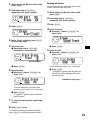
Recording from a CD or
MD in a specific track
order
— Program recording
You must have a program created to use this
function. (See “Creating a program” on page
13.)
1 Press (OPEN) and insert the MD to be
recorded on.
(See “Playing a disc” on page 10.)
2 Press (MD REC).
The unit stands by for recording with “z”
flashing and the buttons for recording
((MD REC), (REC STOP), and (REC MENU))
lit in amber.
3 Press (REC MENU) repeatedly until “PGM.
REC” appears.
4 Press (MD REC) again to start recording.
The unit locates the beginning of the
selected program and starts recording.
Then “z” stops flashing and the buttons for
recording ((MD REC), (REC STOP), and
(REC MENU)) light in red.
When the recording of the program is
completed, the unit beeps and
automatically stands by for further
recording while the CD or MD continues to
play.
To cancel the recording or recording stand-by,
press (REC STOP).
Notes
• If you did not create a program, “PGM. REC” will
not appear in step 3.
• If you created a program that includes the MD to
play on this recorder, “Not Ready” appears in
step 3. In such a case, you must erase such tracks
from the program.
Tip
You can continue the recording even after turning
off the ignition to leave the car (see “Continuing
recording after turning the ignition off” on page
19).
La page est en cours de chargement...
La page est en cours de chargement...
La page est en cours de chargement...
La page est en cours de chargement...
La page est en cours de chargement...
La page est en cours de chargement...
La page est en cours de chargement...
La page est en cours de chargement...
La page est en cours de chargement...
La page est en cours de chargement...
La page est en cours de chargement...
La page est en cours de chargement...
La page est en cours de chargement...
La page est en cours de chargement...
La page est en cours de chargement...
La page est en cours de chargement...
La page est en cours de chargement...
La page est en cours de chargement...
La page est en cours de chargement...
La page est en cours de chargement...
La page est en cours de chargement...
La page est en cours de chargement...
La page est en cours de chargement...
La page est en cours de chargement...
La page est en cours de chargement...
La page est en cours de chargement...
La page est en cours de chargement...
La page est en cours de chargement...
La page est en cours de chargement...
La page est en cours de chargement...
La page est en cours de chargement...
La page est en cours de chargement...
La page est en cours de chargement...
La page est en cours de chargement...
La page est en cours de chargement...
La page est en cours de chargement...
La page est en cours de chargement...
La page est en cours de chargement...
La page est en cours de chargement...
La page est en cours de chargement...
La page est en cours de chargement...
La page est en cours de chargement...
La page est en cours de chargement...
La page est en cours de chargement...
La page est en cours de chargement...
La page est en cours de chargement...
La page est en cours de chargement...
La page est en cours de chargement...
La page est en cours de chargement...
La page est en cours de chargement...
La page est en cours de chargement...
La page est en cours de chargement...
La page est en cours de chargement...
La page est en cours de chargement...
La page est en cours de chargement...
La page est en cours de chargement...
La page est en cours de chargement...
La page est en cours de chargement...
La page est en cours de chargement...
La page est en cours de chargement...
La page est en cours de chargement...
La page est en cours de chargement...
La page est en cours de chargement...
La page est en cours de chargement...
La page est en cours de chargement...
La page est en cours de chargement...
La page est en cours de chargement...
La page est en cours de chargement...
La page est en cours de chargement...
La page est en cours de chargement...
La page est en cours de chargement...
La page est en cours de chargement...
La page est en cours de chargement...
La page est en cours de chargement...
La page est en cours de chargement...
La page est en cours de chargement...
La page est en cours de chargement...
La page est en cours de chargement...
La page est en cours de chargement...
La page est en cours de chargement...
La page est en cours de chargement...
La page est en cours de chargement...
La page est en cours de chargement...
La page est en cours de chargement...
La page est en cours de chargement...
La page est en cours de chargement...
La page est en cours de chargement...
La page est en cours de chargement...
La page est en cours de chargement...
La page est en cours de chargement...
La page est en cours de chargement...
La page est en cours de chargement...
La page est en cours de chargement...
La page est en cours de chargement...
La page est en cours de chargement...
La page est en cours de chargement...
La page est en cours de chargement...
La page est en cours de chargement...
La page est en cours de chargement...
La page est en cours de chargement...
La page est en cours de chargement...
La page est en cours de chargement...
La page est en cours de chargement...
La page est en cours de chargement...
La page est en cours de chargement...
La page est en cours de chargement...
La page est en cours de chargement...
La page est en cours de chargement...
La page est en cours de chargement...
La page est en cours de chargement...
La page est en cours de chargement...
La page est en cours de chargement...
La page est en cours de chargement...
La page est en cours de chargement...
La page est en cours de chargement...
La page est en cours de chargement...
La page est en cours de chargement...
La page est en cours de chargement...
La page est en cours de chargement...
La page est en cours de chargement...
La page est en cours de chargement...
La page est en cours de chargement...
La page est en cours de chargement...
La page est en cours de chargement...
-
 1
1
-
 2
2
-
 3
3
-
 4
4
-
 5
5
-
 6
6
-
 7
7
-
 8
8
-
 9
9
-
 10
10
-
 11
11
-
 12
12
-
 13
13
-
 14
14
-
 15
15
-
 16
16
-
 17
17
-
 18
18
-
 19
19
-
 20
20
-
 21
21
-
 22
22
-
 23
23
-
 24
24
-
 25
25
-
 26
26
-
 27
27
-
 28
28
-
 29
29
-
 30
30
-
 31
31
-
 32
32
-
 33
33
-
 34
34
-
 35
35
-
 36
36
-
 37
37
-
 38
38
-
 39
39
-
 40
40
-
 41
41
-
 42
42
-
 43
43
-
 44
44
-
 45
45
-
 46
46
-
 47
47
-
 48
48
-
 49
49
-
 50
50
-
 51
51
-
 52
52
-
 53
53
-
 54
54
-
 55
55
-
 56
56
-
 57
57
-
 58
58
-
 59
59
-
 60
60
-
 61
61
-
 62
62
-
 63
63
-
 64
64
-
 65
65
-
 66
66
-
 67
67
-
 68
68
-
 69
69
-
 70
70
-
 71
71
-
 72
72
-
 73
73
-
 74
74
-
 75
75
-
 76
76
-
 77
77
-
 78
78
-
 79
79
-
 80
80
-
 81
81
-
 82
82
-
 83
83
-
 84
84
-
 85
85
-
 86
86
-
 87
87
-
 88
88
-
 89
89
-
 90
90
-
 91
91
-
 92
92
-
 93
93
-
 94
94
-
 95
95
-
 96
96
-
 97
97
-
 98
98
-
 99
99
-
 100
100
-
 101
101
-
 102
102
-
 103
103
-
 104
104
-
 105
105
-
 106
106
-
 107
107
-
 108
108
-
 109
109
-
 110
110
-
 111
111
-
 112
112
-
 113
113
-
 114
114
-
 115
115
-
 116
116
-
 117
117
-
 118
118
-
 119
119
-
 120
120
-
 121
121
-
 122
122
-
 123
123
-
 124
124
-
 125
125
-
 126
126
-
 127
127
-
 128
128
-
 129
129
-
 130
130
-
 131
131
-
 132
132
-
 133
133
-
 134
134
-
 135
135
-
 136
136
-
 137
137
-
 138
138
-
 139
139
-
 140
140
-
 141
141
-
 142
142
-
 143
143
-
 144
144


Sony MDX-C800REC Manuel utilisateur
- Catégorie
- Lecteur CD
- Taper
- Manuel utilisateur
dans d''autres langues
- English: Sony MDX-C800REC User manual
- español: Sony MDX-C800REC Manual de usuario
Documents connexes
-
Sony CDX-C5000RX Le manuel du propriétaire
-
-
-
Sony CDX-4005 Mode d'emploi
-
-
-
-
Sony MDX-CA580 Manuel utilisateur
-
Sony CDX-M750 Mode d'emploi
-
Sony M650 Manuel utilisateur