
Bluetooth Stereo Media Phone
User’s Manual
With additional Operation Instruction
for Skype using IVT software
Version1.0

1
Copyright
Copyright 2005 by X-Micro Technology Corp., All rights reserved. No part of
this publication may be reproduced, transmitted, transcribed, stored in a
retrieval system, or translated into any language or computer language, in
any form or by any means, electronic, mechanical, magnetic, optical,
chemical, manual or otherwise, without the prior written permission of X-Micro
Technology Corp.
Disclaimer
X-Micro Technology Corp. makes no representations or warranties, either
expressed or implied, with respect to the contents hereof and specifically
disclaims any warranties, merchantability or fitness for any particular purpose.
Any software described in this manual is sold or licensed "as is". Should the
programs prove defective following their purchase, the buyer (and not this
company, its distributor, or its dealer) assumes the entire cost of all necessary
servicing, repair, and any incidental or consequential damages resulting from
any defect in the software. Further, X-Micro Technology Corp., reserves the
right to revise this publication and to make changes from time to time in the
contents hereof without obligation to notify any person of such revision or
change.
All brand and product names mentioned in this manual are trademarks and/or
registered trademarks of their respective holders.

2
INFORMATION TO USER
Model Name: XBT-DG7X, XBT-HS3X
Federal Communication Commission Interference Statement
This equipment has been tested and found to comply with the limits for a
Class B digital device, pursuant to Part 15 of the FCC Rules. These limits are
designed to provide reasonable protection against harmful interference in a
residential installation.
This equipment generates, uses and can radiate radio frequency energy
and, if not installed and used in accordance with the instructions, may cause
harmful interference to radio communications. However, there is no
guarantee that interference will not occur in a particular installation. If this
equipment does cause harmful interference to radio or television reception,
which can be determined by turning the equipment off and on, the user is
encouraged to try to correct the interference by one of the following
measures:
* Reorient or relocate the receiving antenna.
* Increase the separation between the equipment and receiver.
* Connect the equipment into an outlet on a circuit different from that to which
the receiver is connected.
* Consult the dealer or an experienced radio/TV technician for help.

3
This device complies with Part 15 of the FCC Rules. Operation is subject
to the following two conditions: (1) This device may not cause harmful
interference, and (2) this device must accept any interference received,
including interference that may cause undesired operation.
FCC Caution: Any changes or modifications not expressly approved by the
party responsible for compliance could void the user's authority to operate
this equipment.
IMPORTANT NOTE:
FCC Radiation Exposure Statement:
* This equipment complies with FCC radiation exposure limits set forth for
an uncontrolled environment.
This equipment should be installed and operated with minimum distance
20cm between the radiator & your body.
* This transmitter must not be co-located or operating in conjunction with
any other antenna or transmitter.

4
TABLE OF CONTENT
1.Introduction .................................................................................................6
1.1 Bluetooth Stereo Headset
1.2 Package Contents
2. Headset Features ..................................................................................... 6
3. LED Indication .......................................................................................... 7
4. Charge Battery and Reset the Headset ................................................... 7
4.1 Charge Battery
5. Turn On / Off the Headset ........................................................................ 8
5.1 To turn the Headset On
5.2 To turn the Headset Off
6. Connect With PC/Notebook ..................................................................... 8
6.1 Pair with your PC/Notebook
6.2 Play Music with PC and Notebook
6.2.1 Button Functionality Under Music Mode
7. Connect with Skype ……..................................................................... …..13
7.1 Configure Audio Gateway to work with Skype
7.2 Pair Headset with PC
7.3 Establish Link between BTW Software and Skype
7.4 Configure Skype’s Settings
7.5 Basic Operation within Skype Mode
8. Link with Mobile Phone............................................................................. 18
8.1 Pairing
8.2 Connect with Mobile Phone
8.3 Answer & End a Phone Call

5
9. Multiple Links ………………………….................................................. ….23
9.1 Pair both side first
9.2 Switch between Mobile Phone and PC(music)
9.3 Switch between PC(music) and PC(Skype)
9.4 Switch between Mobile phone and PC(Skype)
10. FAQ ..................................................................................................... ..25
11. Support………. ....................................................................................27

6
1 INTRODUCTION
Thank you for your purchasing of our X-Micro Bluetooth Stereo Media
Phone. Bluetooth is a technology which is very popular in short range
wireless communication. It allows wireless connections between Bluetooth
devices such as cellular phones, personal digital assistants (PDA), desktop
and notebook computers, input-output devices (mouse, keyboards,
printers)...etc.
1.1 Bluetooth Stereo Headset
This Bluetooth headset offers the latest innovation in Bluetooth
technology. It features crystal clear stereo sound, which is a remarkable
break through that others do not have. With this Bluetooth stereo headset,
you can connect it wirelessly with other Bluetooth devices such as mobile
phone, desktop or notebook computer, PDA (with audio gateway profile
supported) within a range of 10 meters. (BTW software version 2.0.1.2101
or higher is recommended.)
1.2 Package Content
* Bluetooth stereo headset.
* Detachable stereo earpiece with
microphone.
* USB cable.
* User’s manual.
* 5VDC power adapter (Optional)
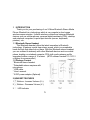
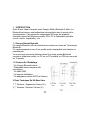
2 HEADSET FEATURES
1
Buttons : Increase Volume (V+).
2
Buttons : Decrease Volume (V-).
3
LED Indicator

7
4 Play/Talk Button : Answer call, Play music, Pause.
5
On/Off Button : Power on/off, End Call,Stop Music, Pairing.
6 Charging Port
7
Reverse Button: Reverse, Previous Song Title.
8
Forward Button: Forward, Next Song Title.
3 LED Indication and Definition
1. Stand-By Mode - Red LED flash in slow pace.
2. Pairing Mode - Blue and Red LED flash simultaneous.
3. PC Mode - Red LED flash regularly.
4. Mobile Mode - Blue LED flash regularly.
5. Battery Low - Red LED blinks about 2 seconds interval.
6. Charge Mode - Red LED stays solid without blinking.
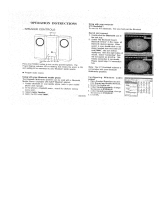
4 CHARGE BATTERY AND RESET THE HEADSET
The headset comes with a build-in high capacity battery; please let the
battery be fully charged before first time use.
1. Connect the USB charging cable into the headset charging port (Fig.1).
The red LED stays ON continuously without blinking.
The unit will automatically switch to “ON” status regardless its status is
On or Off.
2. Once the battery has been fully charged, the red LED light will start to
blink.

8
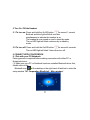
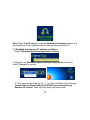
5 Turn On / Off the Headset
5.1 To turn on: Press and hold the On/Off button
for around 1 second,
Both red and blue light will blink one time
simultaneous to indicate the headset is on.
The headset is now turned on and in stand-by mode.
The red LED light will blink continuously in stand-by
mode.
5.2 To turn off: Press and hold the On/Off button
for around 4 seconds.
The red LED light will blink 3 times then turn off.
6 CONNECT WITH PC/NOTEBOOK
6.1 Pair with your PC/Notebook
Pairing process is required before making connection with either PC or
Notebook device.
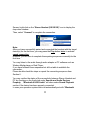
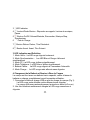
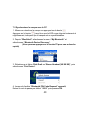
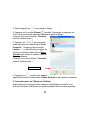
(1) Make sure your PC or Notebook has been installed Bluetooth driver first,
double click on the
Bluetooth icon
at the desktop or the right hand of task bar to enter the
setup window “IVT Corporation BlueSoleil – Main window”.

9
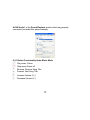
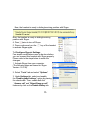
(2) Turn on the headset, press and hold on the On/Off Button briefly for
about 3 seconds.
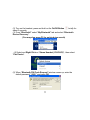
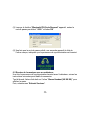
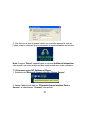
(3) From “BlueSoleil” select “My Bluetooth” tab and select “Bluetooth
Device Discovery”.
(You may also press F5 for quick device search)
(4) Select and Right Click on “Stereo Headset (VX.XX.XX)” , then select
“Pair Device”.
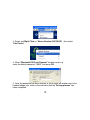
(5) When “Bluetooth PIN Code Request” window comes up, enter the
default password “ 0000 ” and press OK.

10
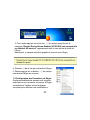
(6) Once the password has been entered, a check mark will appear next to
the headset shape icon, which is the indication that the “Pairing process”
has been completed.
6.2 Play music with PC and Notebook
Once the pairing process is completed with the PC or Notebook device, do
the following to establish the connection:
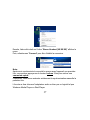
First, right click on the “Stereo Headset (VX.XX.XX)” icon to display the
drop-down window.
Then, select “Refresh Services”.

11
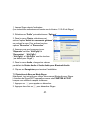
Second, right click on the “Stereo Headset (VX.XX.XX)” icon to display the
drop-down window.
Then, select “Connect” to complete the connection.
Note:
After you have successfully paired and connected the headset with the target
device(s) for the first time, you may press the Play
button twice to activate
speed connection
.
However, you do have to complete these pairing sequences manually for the
first time.
You may listen to the audio through audio adapter or PC software such as
Window Media player or Real Player.
If you have followed these sequence but still not able to establish the
connection.
Please double check the steps or repeat the connecting sequence from
Section 6.
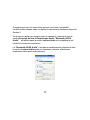
You may confirm the status of the connectivity between Stereo Headset and
PC by checking on the Audio tab under Sounds and Audio Devices
Property. “Bluetooth AV/HS Audio” will show under Sound Playback
section if the device has been properly connected.
In case your operation system does not automatically set with “Bluetooth

12
AV/HS Audio” at the Sound Playback section after being properly
connected, just select this option manually.
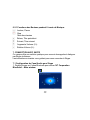
6.2.1 Button Functionality Under Music Mode
Play music, Pause
Stop music,Power off
Reverse, Previous Song Title.
Forward, Next Song Title.
Increase Volume (V+).
Decrease Volume (V-).

13
7. CONNECT WITH SKYPE
This headset offers a convenient solution to receive and dial out calls from
Skype remotely.
The following instructions will take you through the steps to connect with
Skype.
7.1 Configure audio gateway to work with Skype
1. Double click on the Bluetooth icon to activate IVT Corporation
BlueSoleil – Main window.
7.2 Pair Headset With PC
1. Turn on or reactivate the headset by pressing
icon.
Be sure to press the
key continuously until single red LED light is blinking
regularly with slow
beat, which indicates the headset is now under pairing mode.
2. From “BlueSoleil” select “My Bluetooth” tab and select “Bluetooth
Device Discovery”. (You may also press F5 for quick device search)

14
3. Select and Right Click on “Stereo Headset (VX.XX.XX)” , then select
“Pair Device”.
4. When “Bluetooth PIN Code Request” window comes up,
enter the default password “ 0000 ” and press OK.
5. Once the password has been entered, a check mark will appear next to the
headset shape icon, which is the indication that the “Pairing process” has
been completed.

15
Note: When “Paired” appears under the Additional Information column, it is
an indication that your headset has been successfully paired with PC.
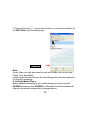
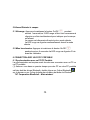
7.3 Establish link between IVT software and Skype
1. Select “Bluetooth Human Interface Device Service”.
2. Right click on “Bluetooth Human Interface Device Service” first and
select “Connect” to activate.
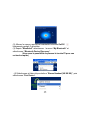
3. Then, press continuously on the
key of the headset until a message
“Remote Device Stereo Headset (VX.XX.XX) has connected to my
Headset AG service!” show up at the lower right hand corner.

16
Now, the headset is ready in dialing/receiving position with Skype.
Now, the headset is ready in dialing/receiving
position with Skype.
4. Press
twice to turn off Skype.
5. Press continuously on the
key of the headset
to activate Skype again.
7.4 Configure Skype’s Settings
Few simple modifications need to be done before
you can connect this headset with Skype properly.
Please refer to the steps below to make the
changes.
1. Activate Skype from your computer.
(The following steps are based on Skype
Version 1.2.0.48)
2. Select “Tools” tab and select “Options”
3. Under Hotkeys tab, select and enable
the “Enable global hotkeys” option by placing
the check mark. Then, enable both the
“Answer call” and “Reject/Hang up call”
features by click on the Enable Hotkey tab.

17
4. Make sure the Hotkey value for “Answer call” is set as “Alt+PgUp”, and
“Reject/Hang up call” is set as “Alt+PgDn” in order to work properly.
(“Alt+PgUp” and “Alt+PgDn” is the default value of Skype.)
5. Under Sound Devices tab, change the default value of Audio In and
Audio Out to Bluetooth Audio.
6. Press Save to complete the setup.
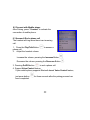
7.5 Basic Operation within Skype Mode
Now, you are ready to use your Bluetooth headset to work with Skype. As a
prerequisite, Skype’s interface MUST remain as the ACTIVE WINDOW when
using your headset to control remotely.
1. Press on Play key
once to dial out or receive incoming calls.
2. Press
twice to turn off Skype.
3. Press continuously on the
key of the headset to activate Skype again.
4. Press on Forward key
for 3 seconds or press on Ctrl +Tab keys to
switch in between tabs under Skype environment.
(Make sure Skype’s “Contact tab” remains as the ACTIVE window.)
5. Switch between
and keys to rotate between contact names under
the Contact tab, and press on Play key
to initiate the call. The cursor
must not stay in the INPUT Box
area
in order to let your headset control Skype remotely.
(Make sure Skype’s “Contact tab” remains as the ACTIVE window.)

18
6. Press on Play key once to dial out after you entered the numbers at
the INPUT Box or by the number pad.
INPUT Box
Note:
Under Skype you may also listen to music on the side, but it is set under
“Mono Tone” and without
remote control function because the controlling priority has been preserved
for Skype’s functionality.
8. Link with Mobile Phone
Before headset connecting to your mobile phone you need to do their
PAIRING procedures first. PAIRING is a Bluetooth function that Bluetooth
devices can remain constant link to designate device.

19
Note:
This headset is not comprehensive support to all models of
Bluetooth mobile phone.
Please make sure with your dealer if it supports connection to
your mobile phone or not.
The following PAIRING procedure is taking one of mobile phone as an
example; other mobile phones may have different but similar PAIRING
procedures.
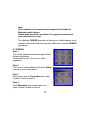
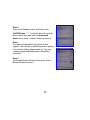
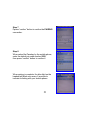
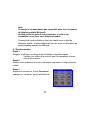
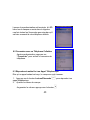
8.1 PAIRING
Step 1
Turn off the headset and turn on again before
initiating the pairing.
Please refer to Sec. 5 for the turn off/on
operations
Step 2
Turn on your mobile phone and find the Setup
manual in your mobile phone.
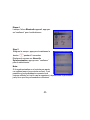
Step 3
Move cursor keys to Connection item, press
“confirm” button to select it.
Step 4
When Bluetooth item screen comes out,
press “confirm” button to select it.
La page est en cours de chargement...
La page est en cours de chargement...
La page est en cours de chargement...
La page est en cours de chargement...
La page est en cours de chargement...
La page est en cours de chargement...
La page est en cours de chargement...
La page est en cours de chargement...
La page est en cours de chargement...
La page est en cours de chargement...
La page est en cours de chargement...
La page est en cours de chargement...
La page est en cours de chargement...
La page est en cours de chargement...
La page est en cours de chargement...
La page est en cours de chargement...
La page est en cours de chargement...
La page est en cours de chargement...
La page est en cours de chargement...
La page est en cours de chargement...
La page est en cours de chargement...
La page est en cours de chargement...
La page est en cours de chargement...
La page est en cours de chargement...
La page est en cours de chargement...
La page est en cours de chargement...
La page est en cours de chargement...
La page est en cours de chargement...
La page est en cours de chargement...
La page est en cours de chargement...
La page est en cours de chargement...
La page est en cours de chargement...
La page est en cours de chargement...
La page est en cours de chargement...
La page est en cours de chargement...
La page est en cours de chargement...
La page est en cours de chargement...
-
 1
1
-
 2
2
-
 3
3
-
 4
4
-
 5
5
-
 6
6
-
 7
7
-
 8
8
-
 9
9
-
 10
10
-
 11
11
-
 12
12
-
 13
13
-
 14
14
-
 15
15
-
 16
16
-
 17
17
-
 18
18
-
 19
19
-
 20
20
-
 21
21
-
 22
22
-
 23
23
-
 24
24
-
 25
25
-
 26
26
-
 27
27
-
 28
28
-
 29
29
-
 30
30
-
 31
31
-
 32
32
-
 33
33
-
 34
34
-
 35
35
-
 36
36
-
 37
37
-
 38
38
-
 39
39
-
 40
40
-
 41
41
-
 42
42
-
 43
43
-
 44
44
-
 45
45
-
 46
46
-
 47
47
-
 48
48
-
 49
49
-
 50
50
-
 51
51
-
 52
52
-
 53
53
-
 54
54
-
 55
55
-
 56
56
-
 57
57


X-Micro XBT-DG7X Manuel utilisateur
- Catégorie
- Écouteurs
- Taper
- Manuel utilisateur
dans d''autres langues
- English: X-Micro XBT-DG7X User manual
Documents connexes
Autres documents
-
Philips BASS+ SHB4385 Manuel utilisateur
-
 Juster SETBISC705N Manuel utilisateur
-
Hama 00057188 Le manuel du propriétaire
-
 Mr Handsfree BLUE DONGLE 2 Le manuel du propriétaire
-
Logitech CORDLESS HEADSET FOR PC AND MOBILE PHONES Le manuel du propriétaire
-
Philips SHB6102/05 Manuel utilisateur
-
Philips SHB7100/7102/7103 Manuel utilisateur
-
-
-

