Rodgers Imagine Series 351 Le manuel du propriétaire
- Taper
- Le manuel du propriétaire

OWNER’S MANUAL
IMAGINE 351D (Drawknobs)
IMAGINE 351T (Tabs)
EXPERIENCE ELEVATED

2
Dear Rodgers Imagine Owner,
Thank you very much for your purchase of a new Rodgers Imagine Series organ, built in the Rodgers
facility in Hillsboro, Oregon. It is our honor and pleasure to welcome you to our worldwide group of
Rodgers owners who enjoy the rich tradition of the Rodgers sound.
Since 1958, the Rodgers story has been one of continuous leadership in innovation of sound quality
and performance in the pipe organ industry. Throughout our history, Rodgers has put musical
purpose and sound advancement first in product development. That's why Rodgers organs are found
in such prestigious performance venues as Carnegie Hall, educational institutions like The Juilliard
School, homes of leading performing artists, and thousands of houses of worship around the world.
Our goal is simply to develop and manufacture the finest American built digital organ available with
an exquisite sound that elevates any occasion.
Since 2016, the premium Rodgers brand has been part of the Global Organ Group, a family-owned
company which is solely and continuously focused on developing digital pipe organ instruments. The
Global Organ Group provides not only financial strength and stability, but also the vast expertise of
its team of specialized engineers with decades of experience in digital pipe organ technology, striving
for continuous improvement and innovation.
An organ purchase is a major investment and the Rodgers team wants to have a long and positive
relationship with you as a Rodgers owner, supporting you, your dealer and/or their technician(s)
throughout the years. To do the best possible job and to activate your warranty, the Rodgers
Customer Support department asks you to take a moment to let us know about your purchase. So
please, register online at www.rodgersinstruments.com/warranty.
On behalf of our complete Rodgers team, thank you again for your confidence and for the opportunity
to build your new Rodgers Imagine organ.
Best wishes,
John Moesbergen
CEO Rodgers Instruments US LLC

3
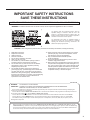
Before using this unit, carefully read the section “IMPORTANT SAFETY INSTRUCTIONS” (p. 3), “USING THE UNIT SAFELY” (p. 5), and
“IMPORTANT NOTES” (p. 9). These sections provide important information concerning the proper operation of the unit. Additionally,
in order to feel assured that you have gained a good grasp of every feature provided by your new unit, the Owner’s Manual should
be read in its entirety. The manual should be saved and kept on hand as a convenient reference.
CAUTION
The lightning flash with arrowhead symbol, within an
equilateral triangle, is intended to alert the user to the
presence of uninsulated “dangerous voltage” within the
product’s enclosure that may be of sufficient magnitude to
constitute a risk of electric shock to persons.
The exclamation point within an equilateral triangle is
intended to alert the user to the presence of important
operating and maintenance (servicing) instructions in the
literature accompanying the product.
INSTRUCTIONS PERTAINING TO A RISK OF FIRE, ELECTRIC SHOCK, OR INJURY TO PERSONS.
IMPORTANT SAFETY INSTRUCTIONS
SAVE THESE INSTRUCTIONS
WARNING - When using electric products, basic precautions should always be followed, including the following:
1. Read these instructions.
2. Keep these instructions.
3. Heed all warnings.
4. Follow all instructions.
5. Do not use this apparatus near water.
6. Clean only with a dry cloth.
7. Do not block any of the ventilation openings. Install in
accordance with the manufacturers instructions.
8. Do not install near any heat sources such as radiators,
heat registers, stoves, or other apparatus (including
amplifiers) that produce heat.
9. Do not defeat the safety purpose of the polarized or
grounding-type plug. A polarized plug has two blades with
one wider than the other. A grounding type plug has two
blades and a third grounding prong. The wide blade or the
third prong are provided for your safety. If the provided plug
does not fit into your outlet, consult an electrician for
replacement of the obsolete outlet.
WARNING:
IMPORTANT:
As the colours of the wires in the mains lead of this apparatus may not correspond with the coloured markings identifying the
terminals in your plug, proceed as follows:
The wire which is coloured GREEN-AND-YELLOW must be connected to the terminal in the plug which is marked by the letter E or
by the safety earth symbol or coloured GREEN or GREEN-AND-YELLOW.
The wire which is coloured BLUE must be connected to the terminal which is marked with the letter N or coloured BLACK.
The wire which is coloured BROWN must be connected to the terminal which is marked with the letter L or coloured RED.
For additional safety, all externally accessible metal parts (such as headphones, Aux-in/out, MIDI, USB, toe pistons, etc.) are
oating from safety earth.
THIS APPARATUS MUST BE EARTHED
THE WIRES IN THIS MAINS LEAD ARE COLOURED IN ACCORDANCE WITH THE FOLLOWING CODE.
GREEN-AND-YELLOW: EARTH, BLUE: NEUTRAL, BROWN: LIVE
For the U.K.
10. Protect the power cord from being walked on or pinched
particularly at plugs, convenience receptacles, and the
point where they exit from the apparatus.
11. Only use attachments/accessories specified
by the manufacturer.
12. Unplug this apparatus during lightning storms or when
unused for long periods of time.
13. Refer all servicing to qualified service personnel. Servicing
is required when the apparatus has been damaged in any
way, such as power-supply cord or plug is damaged, liquid
has been spilled or objects have fallen into the apparatus,
the apparatus has been exposed to rain or moisture, does
not operate normally, or has been dropped.
WARNING: To reduce the risk of fire or electric shock, do not expose this apparatus to rain or moisture.
AVERTISSEMENT
POUR RÉDUIRE LE RISQUE
D’INCENDIE OU DE CHOC ÉLECTRIQUE, N'EXPOSEZ PAS
CET APPAREIL À LA PLUIE OU À L’HUMIDITÉ.
CAN ICES-3(B)/NMB-3(B)
RODGERS INSTRUMENTS US LLC

4
CAUTION
Le symbole de l'éclair éché dans un triangle équilatéral
prévient l'utilisateur de la présence d'une « tension dangereuse
» non isolée à l’intérieur de l’appareil, qui peut être
susamment élevée pour présenter un risque d'électrocution.
Le point d'exclamation dans un triangle équilatéral prévient
l'utilisateur de la présence d'instructions d'emploi et d'entretien
importantes dans la documentation qui accompagne l'appareil.
INSTRUCTIONS RELATIVES AU RISQUE D'INCENDIE, D’ÉLECTROCUTION OU DE BLESSURE.
CONSIGNES DE SÉCURITÉ IMPORTANTES
CONSERVEZ CES INSTRUCTIONS
AVERTISSEMENT – Lors de l’utilisation d’un appareil électrique, toujours prendre des précautions de base, y compris les suivantes :
AVERTISSEMENT : Pour réduire le risque d'incendie ou d’électrocution, ne pas exposer cet appareil à la pluie ou à l'humidité.
1. Lire ces instructions.
2. Conserver ces instructions.
3. Tenir compte de tous les avertissements.
4. Suivre toutes les instructions.
5. Ne pas utiliser cet appareil près de l'eau.
6. Nettoyer uniquement avec un chion sec.
7. Éviter d'obstruer les ouvertures de ventilation. Installer l'appareil
conformément aux instructions du fabricant.
8. Ne pas installer l'appareil à proximité de sources de chaleur telles
que radiateurs, grilles à registre, poêles ou autres appareils qui
émettent de la chaleur (y compris les amplicateurs).
9. Ne pas supprimer la fonction de sécurité de la che polarisée ou de
mise à la terre. Une che polarisée comporte deux lames, dont l'une
est plus large que l'autre. Une che de mise à la terre comporte deux
lames, plus une broche de mise à la terre. La lame la plus large et la
troisième broche assurent votre sécurité. Si la che fournie n’entre pas
dans la prise de courant, demander à un électricien de remplacer la
prise obsolète.
10. Protéger le cordon d'alimentation de façon à éviter de marcher
dessus ou de le pincer, en particulier au niveau des ches, des
prises de courant et du point de sortie de l'appareil.
11. Utiliser uniquement les accessoires spéciés par le fabricant.
12. Débrancher cet appareil pendant les orages ou s'il reste
longtemps inutilisé.
13. Coner toute réparation à un technicien compétent. L'appareil
doit être réparé lorsqu’il est endommagé de quelque manière que
ce soit, par exemple si le cordon d'alimentation ou la che est
endommagée, si un liquide a été renversé ou des objets sont
tombés dans l'appareil, si l'appareil a été exposé à la pluie ou à
l'humidité, s’il ne fonctionne pas normalement, ou s’il est tombé sur
le sol.
AVERTISSEMENT
POUR RÉDUIRE LE RISQUE
D’INCENDIE OU DE CHOC ÉLECTRIQUE, N'EXPOSEZ PAS
CET APPAREIL À LA PLUIE OU À L’HUMIDITÉ.
CAN ICES-3(B)/NMB-3(B)
RODGERS INSTRUMENTS US LLC
Avant d’utiliser cet appareil, lire attentivement les sections intitulées : « CONSIGNES DE SÉCURITÉ IMPORTANTES » (p. 4), «
UTILISATION SÉCURITAIRE DE L’APPAREIL » (p. 6) et « REMARQUES IMPORTANTES » (p. 10). Ces sections donnent des renseignements
importants sur le fonctionnement de l’appareil. En outre, pour bien comprendre chaque fonctionnalité de votre nouvel appareil,
vous devez prendre soin de lire intégralement le Manuel du propriétaire. Conserver le manuel à portée de la main aux ns de
référence.

5
USING THE UNIT SAFELY
WARNING
Make sure that the power cord is grounded
Connect mains plug of this model to a
mains socket outlet with a protective
earthing connection.
Do not disassemble or modify by yourself
Do not open or perform any internal
modications on the unit.
Do not repair or replace parts by yourself
Do not attempt to repair the unit, or
replace parts within it (except when this
manual provides specic instructions
directing you to do so), or use internal
connections for optional external
speakers. Refer all servicing to your
retailer, or Rodgers Instruments US LLC,
as listed on the “Notice to Users” (p.
11).
Do not use or store in the following types of
locations
• Subject to temperature extremes
(e.g., direct sunlight in an enclosed
vehicle, near a heating duct, on top of
heat-generating equipment); or are
• Damp (e.g., baths, washrooms, on wet
oors); or are
• Exposed to steam or smoke; or are
• Subject to salt exposure; or are
• Humid; or are
• Exposed to rain or moisture; or are
• Dusty or sandy; or are
• Subject to high levels of vibration and
shakiness.
Indoor use only.
WARNING
Connect the power cord to an outlet of the correct
voltage
The unit should be connected to a power
supply only of the type described as
marked under the keyboard deck of unit.
Do not bend the power cord or place heavy objects
on it
Do not excessively twist or bend the
power cord, nor place heavy objects
on it. Doing so can damage the cord,
producing severed elements and short
circuits. Damaged cords are re and
shock hazards!
To prevent possible hearing damage, do not listen at
high volume levels for long periods.
This unit, either alone or in combination
with an amplier and headphones or
speakers, may be capable of producing
sound levels that could cause permanent
hearing loss. Do not operate for a long
period of time at a high volume level, or
at a level that is uncomfortable. If you
experience any hearing loss or ringing
in the ears, you should immediately
stop using the unit, and consult an
audiologist.
Don’t allow foreign objects or liquids to enter unit;
never place containers with liquid on unit
Do not place containers containing liquid
(ower vases) on this product. Never
allow foreign objects (e.g., ammable
objects, coins, wires) or liquids (e.g.,
water or juice) to enter this product.
Doing so may cause short circuits, faulty
operation, or other malfunctions.
Adults must provide supervision in places where
children are present
When using the unit in locations where
children are present, be careful so no
mishandling of the unit can take place.
An adult should always be on hand to
provide supervision and guidance.
WARNING
Turn o the unit if an abnormality or malfunction
occurs
Immediately turn the unit o, remove the
power cord from the outlet, and request
servicing by your retailer, or Rodgers
Instruments US LLC, as listed on the
“Notice to Users” (p. 11) page when:
• The power-supply cord or the plug has
been damaged; or
• If smoke or unusual odor occurs; or
• Objects have fallen into, or liquid has
been spilled onto the unit; or
• The unit has been exposed to rain (or
otherwise has become wet); or
• The unit does not appear to operate
normally or exhibits a marked change
in performance.
Do not drop or subject to strong impact
Protect the unit from strong impact.
(Do not drop it!)
Do not share an outlet with an unreasonable
number of other devices
Do not force the unit’s power-supply cord
to share an outlet with an unreasonable
number of other devices. Be especially
careful when using extension cords—the
total power used by all devices you have
connected to the extension cord’s outlet
must never exceed the power rating
(watts/amperes) for the extension cord.
Excessive loads can cause the insulation
on the cord to heat up and eventually
melt through.
Do not use overseas
Before using the unit in a foreign country,
consult with your retailer, or Rodgers
Instruments US LLC, as listed on the
“Notice to Users” (p. 11).
Used for instructions intended to alert the
user to the risk of injury or material
damage should the unit be used
improperly.
* Material damage refers to damage or
other adverse effects caused with
respect to the home and all its
furnishings, as well to domestic animals
or pets.
Used for instructions intended to alert the
user to the risk of death or severe injury
should the unit be used improperly.
The symbol alerts the user to things that must be
carried out. The specific thing that must be done is
indicated by the design contained within the circle. In the
case of the symbol at left, it means that the power-cord
plug must be unplugged from the outlet.
The symbol alerts the user to important instructions or
warnings.The specific meaning of the symbol is
determined by the design contained within the triangle. In
the case of the symbol at left, it is used for general
cautions, warnings, or alerts to danger.
The symbol alerts the user to items that must never be
carried out (are forbidden). The specific thing that must
not be done is indicated by the design contained within
the circle. In the case of the symbol at left, it means that
the unit must never be disassembled.
About WARNING and CAUTION Notices
About the Symbols
ALWAYS OBSERVE THE FOLLOWING

6
UTILISATION SÉCURITAIRE DE L’APPAREIL
Avertissement
Vérier que le cordon d’alimentation est relié à la terre
Brancher la che principale de ce modèle
dans une prise de courant mise à la terre.
Ne pas démonter ni modier
Ne pas ouvrir l’appareil ni tenter de le
modier.
Ne pas réparer ni remplacer soi-même les pièces
Ne pas tenter de réparer l’appareil, ni d’en
remplacer les pièces (sauf si le présent manuel
fournit des instructions précises en ce sens).
Confiez toute réparation à un technicien
en vous adressant à votre revendeur ou à
Rodgers Instruments US LLC (voir l’« Avis aux
utilisateurs », p. 6).
Ne pas utiliser ni ranger dans des endroits
présentant les caractéristiques suivantes :
• des températures extrêmes (p. ex.
exposition directe au soleil dans un
véhicule fermé, à proximité d’un
conduit de chauage, au-dessus d’un
appareil qui émet de la chaleur);
• présence d’eau (p. ex. salle de bain ou
de toilettes, sols mouillés);
• exposition à la vapeur ou à la fumée;
• risque d’exposition au sel;
• humidité;
• exposition à la pluie;
• exposition à la poussière ou au sable;
• exposition à de fortes vibrations ou
secousses.
Utilisation intérieure seulement.
Brancher le cordon d’alimentation dans une prise de
tension appropriée
L’appareil doit être branché à une source
d’alimentation du type indiqué sous le
clavier.
Avertissement
Ne pas plier le cordon d’alimentation ni poser d’objet
lourd dessus
Ne pas tordre ni plier excessivement le
cordon d’alimentation, et ne pas poser
d’objet lourd dessus, ce qui risquerait
d’endommager le cordon, de rompre ses
composants et de provoquer un court-
circuit. Les cordons endommagés posent
des risques d’incendie et d’électrocution!
Pour éviter d’éventuels dommages auditifs,
n’écoutez pas à des niveaux de volume élevées
pendant de longues périodes
Cet appareil, seul ou combiné avec
un amplicateur et un casque ou des
enceintes, peut générer des niveaux
sonores susceptibles d’occasionner
une perte auditive permanente. Ne pas
faire fonctionner longtemps à niveau
sonore élevé ou inconfortable. Si vous
constatez une perte auditive ou des
bourdonnements d’oreille, cessez
immédiatement d’utiliser l’appareil et
consultez un audiologiste.
Éviter que des objets étrangers ou des liquides
pénètrent dans l’appareil; ne jamais placer de
récipients contenant du liquide sur l’appareil
Ne pas poser de récipients contenant du
liquide (vases) sur cet appareil.
Ne jamais laisser d’objets étrangers
(p. ex. objets inammables, pièces de
monnaie, ls) ni de liquides (p. ex. eau
ou jus) pénétrer dans l’appareil. La
présence d’objets étrangers ou de liquide
risque de provoquer un court-circuit, un
défaut de fonctionnement ou d’autres
défectuosités.
Ne pas laisser les enfants sans surveillance en
présence de l’appareil
Si l’appareil est utilisé en présence
d’enfants, veiller à le protéger de
toute manipulation incorrecte. Un
adulte doit toujours être présent pour
assurer la supervision et expliquer le
fonctionnement de l’appareil.
Avertissement
Éteindre l’appareil en cas d’anomalie ou de
défectuosité
Éteindre immédiatement l’appareil,
débrancher le cordon d’alimentation et
demander l’intervention d’un technicien
en vous adressant à votre revendeur ou à
Rodgers Instruments US LLC (voir l’« Avis
aux utilisateurs », p. 6), dans les situations
suivantes :
• le cordon d’alimentation ou la che est
endommagée;
• l’appareil émet de la fumée ou une
odeur inhabituelle;
• un objet est tombé ou du liquide a
pénétré dans l’appareil;
• l’appareil a été exposé à la pluie (ou
s’est mouillé d’une autre manière);
• l’appareil ne semble pas fonctionner
normalement ou présente un
rendement signicativement altéré.
Éviter de laisser tomber l’appareil ou de le
soumettre à un choc important
Protéger l’appareil des impacts. (Ne pas
le laisser tomber!).
Ne pas brancher l’appareil dans une prise de courant
déjà occupée par un trop grand nombre d’appareils
Éviter de brancher un trop grand nombre
d’appareils dans la même prise de
courant. User de prudence dans l’emploi
de rallonges : la puissance totale utilisée
par l’ensemble des appareils branchés
sur la rallonge ne doit jamais dépasser
la puissance nominale (watts/ampères)
de la rallonge. Les charges excessives
peuvent faire surchauer et fondre
l’isolation de la rallonge.
Ne pas utiliser l’appareil à l’étranger
Avant d’utiliser l’appareil dans un pays
étranger, consulter votre détaillant ou
Rodgers Instruments US LLC (voir l’« Avis
aux utilisateurs », p. 6).
Utilisé pour les instructions visant à prévenir
l'utilisateur d’un risque de blessure ou de
dommages matériels en cas d’utilisation
incorrecte de l’appareil.
* Par dommages matériels, on entend les
dommages ou les autres conséquences
préjudiciables relatives au domicile et à son
ameublement, de même qu’aux animaux de
compagnie.
Utilisé pour les instructions visant à prévenir
l'utilisateur d’un danger de mort ou d’un risque
de blessure grave en cas d’utilisation incorrecte
de l’appareil.
Le symbole attire l’attention de l'utilisateur sur une obligation.
L’action obligatoire est représentée à l’intérieur du cercle. Le
symbole présenté à gauche, par exemple, indique que le cordon
d'alimentation doit être débranché de la prise de courant.
Le symbole attire l’attention de l'utilisateur sur des instructions
ou des avertissements importants. L’image représentée à
l’intérieur du triangle indique la signification précise du symbole.
Le symbole présenté à gauche est utilisé pour des mises en garde,
des avertissements ou des alertes de nature générale signalant des
dangers.
Le symbole attire l’attention de l'utilisateur sur des
manipulations interdites. La manipulation interdite est
représentée à l’intérieur du cercle. Le symbole présenté à gauche,
par exemple, indique l’interdiction de démonter l’appareil.
À propos des symboles
TOUJOURS OBSERVER LES CONSIGNES SUIVANTES
INSTRUCTIONS POUR PRÉVENIR LES INCENDIES, LES CHOCS ÉLECTRIQUES ET LES BLESSURES
À propos des messages de type AVERTISSEMENT et ATTENTION
AVERTISSEMENT
ATTENTION

7
USING THE UNIT SAFELY
CAUTION
Place in a well ventilated location
The unit should be located so that its
location or position does not interfere
with its proper ventilation.
Grasp the plug when connecting or disconnecting
the power cord
Always grasp only the plug on the
power-supply cord when plugging into,
or unplugging from, an outlet.
Periodically clean the power cord’s plug
At regular intervals, you should unplug
the power plug and clean it by using
a dry cloth to wipe all dust and other
accumulations away from its prongs.
Also, disconnect the power plug from
the power outlet whenever the unit is to
remain unused for an extended period of
time. Any accumulation of dust between
the power plug and the power outlet can
result in poor insulation and lead to re.
Manage cables for safety
Try to prevent cords and cables from
becoming entangled. Also, all cords and
cables should be placed so they are out
of the reach of children.
Avoid climbing on top of the unit, or placing heavy
objects on it
Never climb on top of, nor place heavy
objects on the unit.
CAUTION
Do not connect or disconnect the power cord with
wet hands
Never handle the power cord or its
plugs with wet hands when plugging
into, or unplugging from, an outlet.
Cautions when moving this unit
Since this product is very heavy, you
must make sure that a sucient number
of people are on hand to help, so you can
lift and move it safely, without causing
strain. Make sure to have a rm grip,
to protect yourself from injury and the
instrument from damage.
If you need to move the instrument,
consult with your retailer, or Rodgers
Instruments US LLC, as listed on the
“Notice to Users” (p. 11).
Unplug the power cord from the outlet before
cleaning
Before cleaning the unit, turn it o and
unplug the power cord from the outlet.
If there is a possibility of lightning strike, disconnect
the power cord from the outlet
Whenever you suspect the possibility of
lightning in your area, pull the plug on
the power cord out of the outlet.
Take care not to get ngers pinched by lid
Be careful so you don’t get your ngers
pinched when you handle any moving
parts such as the following:
• Lid
Adult supervision is recommended
whenever small children use the unit.
CAUTION
Precautions concerning use of bench
When using the bench, please observe
the following points:
• Do not allow two or more persons to sit
on the bench.
• Do not adjust the height while sitting
on the bench.
Do not remove the speaker grille and speaker
Do not remove the speaker grille and
speaker by any means. Speaker not user
replaceable. Shock hazardous voltages
and currents are present inside the
enclosure.
Disconnecting power from AC mains
To completely disconnect this apparatus
from the AC mains, disconnect the power
supply cord plug from the AC receptacle.
The power supply cord must be accessible
The mains plug of the power supply cord
shall remain readily accessible.
or
The power switch must be accessible
The main power switch is the main
power disconnect device for this unit.
Therefore, the power switch shall be
readily accessible.
WARNING

8
ATTENTION
Placer dans un endroit bien aéré
L’appareil doit être placé d’une manière
qui n’interfère pas avec sa propre
ventilation.
Saisir la che pour brancher ou débrancher le cordon
d’alimentation
Toujours saisir uniquement la che du
cordon d’alimentation au moment de
brancher ou de débrancher l’appareil.
Nettoyer régulièrement la che du cordon
d’alimentation
À intervalles réguliers, débrancher la
che d’alimentation et nettoyer avec
un chion sec pour enlever toutes les
poussières et autres saletés des broches.
Veiller également à débrancher l’appareil
lorsqu’il reste longtemps inutilisé.
L’accumulation de poussière entre la
che et la prise de courant peut entraîner
une isolation insusante et un risque
d’incendie.
Gérer les câbles avec précaution
Essayer d’éviter que les câbles ne
s’emmêlent, et garder tous les câbles
hors de la portée des enfants.
Ne pas monter sur l’appareil, ni poser d’objets lourds
dessus
Ne jamais grimper sur l’appareil; éviter
d’y poser des objets lourds.
ATTENTION
Ne pas brancher ni débrancher le cordon
d’alimentation avec des mains mouillées
Ne jamais manipuler le cordon
d’alimentation ni les ches avec
des mains mouillées au moment de
brancher ou de débrancher l’appareil.
Précautions à prendre lors du transport de l’appareil
Cet appareil est très lourd. Veiller à
disposer d’un nombre susant de
personnes pour le soulever et le déplacer
en toute sécurité, sans forcer indûment.
Il faut disposer d’une prise solide, an
d’éviter de se blesser et d’endommager
l’instrument. Avant de déménager
l’instrument, consultez votre détaillant
ou Rodgers Instruments US LLC (voir l’«
Avis aux utilisateurs », p. 6).
Débrancher le cordon d’alimentation avant de
nettoyer l’appareil
Éteindre l’appareil et débrancher le
cordon d’alimentation de la prise de
courant avant de nettoyer l’appareil.
Débrancher le cordon d'alimentation s’il y a risque
de foudre.
Chaque fois qu’il y a risque d’orage
dans la région, débrancher le cordon
d'alimentation de la prise de courant.
Veiller à ne pas se pincer les doigts sous le couvercle
User de prudence pour éviter de se
coincer les doigts en manipulant des
pièces mobiles, comme les suivantes :
Le couvercle
La surveillance d’un adulte est
recommandée lorsque de jeunes enfants
utilisent l’appareil.
ATTENTION
Précautions concernant l’utilisation du banc
Respecter les consignes suivantes lors de
l’utilisation du banc :
• Ne pas laisser deux personnes ou plus
s’asseoir sur le banc.
• Ne pas régler la hauteur tandis que
quelqu’un est assis sur le banc.
Ne pas enlever la grille du haut-parleur ni le
haut-parleur
Ne pas tenter d’aucune façon d’enlever la
grille du haut-parleur ni le haut-parleur.
Le haut-parleur ne peut être remplacé
par l’utilisateur. L’intérieur du boîtier
présente des risques d’électrocution,
ainsi que des tensions et des courants
dangereux.
Débranchement du cordon d’alimentation de la prise
secteur
Pour enlever toute alimentation
électrique de l'appareil, débrancher le
cordon d'alimentation de la prise de
courant.
Garder le cordon d’alimentation accessible
La che principale du cordon
d’alimentation doit rester facilement
accessible.
ou
L’interrupter d’alimentation doit être
accessible
L’interrupter d’alimentation est le
dispositif de coupure d’alimentation
principal de cet appareil. Per conséquent,
l’interrupter d’alimentation doit être
facilement accessible.
Avertissement
UTILISATION SÉCURITAIRE DE L’APPAREIL

9
IMPORTANT NOTES
Power Supply
• Do not connect this unit to same electrical outlet
that is being used by an electrical appliance that
is controlled by an inverter or a motor (such as a
refrigerator, washing machine, microwave oven, or
air conditioner). Depending on the way in which
the electrical appliance is used, power supply noise
may cause this unit to malfunction or may produce
audible noise. If it is not practical to use a separate
electrical outlet, connect a power supply noise lter
between this unit and the electrical outlet.
• To prevent malfunction and equipment failure,
always make sure to turn o the power on all your
equipment before you make any connections.
• Although the LCD and LEDs are switched o when
the unit is turned o, this does not mean that the
unit has been completely disconnected from the
source of power. If you need to turn o the power
completely, rst turn o the unit’s switch, then
unplug the power cord from the power outlet. For
this reason, the outlet into which you choose to
connect the power cord’s plug should be one that
is within easy reach and readily accessible.
• The supply voltage tolerance for 120V and 240V
units is -10% to +10%. The operating ambient
temperature range is 32-113
º
F (0-45
º
C).
NOTE
The settings you were editing will be lost when the
unit is turned o. If you want to keep your settings,
you must save your settings before turning the
unit o.
Placement
• Using the unit near power ampliers (or other
equipment containing large power transformers)
may induce hum. To alleviate the problem, change
the orientation of this unit; or move it farther away
from the source of interference.
• This device may interfere with radio and television
reception. Do not use this device in the vicinity of
such receivers.
• Noise may be produced if wireless communications
devices, such as cell phones, are operated in the
vicinity of this unit. Such noise could occur when
receiving or initiating a call, or while conversing.
Should you experience such problems, you should
relocate such wireless devices so they are at a
greater distance from this unit, or switch them o.
• Do not expose the unit to direct sunlight, place it
near devices that radiate heat, or otherwise subject
it to temperature extremes. Also, do not allow
lighting devices that normally are used while their
light source is very close to the unit (such as a piano
light), or powerful spotlights to shine upon the
same area of the unit for extended periods of time.
Excessive heat can deform or discolor the unit.
• Do not allow rubber, vinyl, or similar materials to
remain on this unit for long periods of time. Such
objects can discolor or otherwise harmfully aect
the nish.
• Do not allow objects to remain on top of the
keyboard or pedal board. This can be the cause
of malfunction, such as keys ceasing to produce
sound.
• Do not paste stickers, decals, or the like to this
instrument. Peeling such matter o the instrument
may damage the exterior nish.
• Do not put anything that contains water on this
unit. Also, avoid the use of insecticides, perfumes,
alcohol, nail polish, spray cans, etc., near the unit.
Swiftly wipe away any liquid that spills on the unit
using a dry, soft cloth.
Maintenance
• To clean the unit, use a dry, soft cloth; or one that
is slightly dampened. Try to wipe the entire surface
using an equal amount of strength, moving the
cloth along with the grain of the wood. Rubbing
too hard in the same area can damage the nish.
• Never use benzine, thinners, alcohol or solvents of
any kind, to avoid the possibility of discoloration
and/or deformation.
Repairs and Data
• Please be aware that all data contained in the
unit’s memory may be lost when the unit is sent for
repairs. Important data should always be backed
up the USB drive, or written down on paper (when
possible). During repairs, due care is taken to avoid
the loss of data. However, in certain cases (such
as when circuitry related to memory itself is out
of order), we regret that it may not be possible to
restore the data, and Rodgers assumes no liability
concerning such loss of data.
Additional Precautions
• Please be aware that the contents of memory can
be irretrievably lost as a result of a malfunction,
or the improper operation of the unit. To protect
yourself against the risk of loosing important data,
we recommend that you periodically save a backup
copy of important data you have stored in the USB
drive.
• Unfortunately, it may be impossible to restore
the contents of data that was stored in the unit’s
memory or USB drive once it has been lost. Rodgers
US LLC assumes no liability concerning such loss
of data.
• Use a reasonable amount of care when using the
unit’s buttons, sliders, or other controls; and when
using its jacks and connectors. Rough handling can
lead to malfunctions.
• Never strike or apply strong pressure to the display.
• When disconnecting all cables, grasp the connector
itself—never pull on the cable. This way you will
avoid causing shorts, or damage to the cable’s
internal elements.
• A small amount of heat will radiate from the unit
during normal operation.
• To avoid disturbing others nearby, try to keep the
unit’s volume at reasonable levels. You may prefer
to use headphones, so you do not need to be
concerned about those around you.
• When you need to transport the unit, pack it in
shock-absorbent material. Transporting the unit
without doing so can cause it to become scratched
or damaged, and could lead to malfunction.
• Do not apply undue force to the music stand while
it is in use.
• Some connection cables contain resistors. Do not
use cables that incorporate resistors for connecting
to this unit. The use of such cables can cause the
sound level to be extremely low, or impossible
to hear. For information on cable specications,
contact the manufacturer of the cable.
• Due to the structural design of this instrument,
small pets or other animals could end up getting
trapped inside it. If such a situation is encountered,
you must immediately turn o the unit and
disconnect the power cord from the outlet. You
should then consult with the retailer from whom
the instrument was purchased, or contact Rodgers
Instruments US LLC, as listed on the “Notice to
Users” (p. 11).
• When opening or closing the lid, please be careful
not to get your ngers pinched between the
movable part and the panel.
• The explanations in this manual include
illustrations that depict what should typically be
shown by the display.
Note, however, that your unit may incorporate
a newer, enhanced version of the system (e.g.,
includes newer sounds), so what you actually see
in the display may not always match what appears
in the manual.
Before Using External Memories
Using External Memories
• Carefully insert the USB drive all the way in—until it
is rmly in place.
• Never touch the terminals of the USB drive. Also,
avoid getting the terminals dirty.
• USB drive is constructed using precision
components; handle the cards carefully, paying
particular note to the following.
• To prevent damage to the cards from static
electricity, be sure to discharge any static
electricity from your own body before handling
the cards.
• Do not touch or allow metal to come into contact
with the contact portion of the cards.
• Do not bend, drop, or subject cards to strong
shock or vibration.
• Do not keep cards in direct sunlight, in closed
vehicles, or other such locations.
• Do not allow cards to become wet.
• Do not disassemble or modify the cards.
IMPORTANT NOTES

10
Alimentation
• Ne pas brancher cet appareil dans une prise de
courant déjà utilisée par un appareil électrique
contrôlé par un onduleur (réfrigérateur, lessiveuse,
four micro-ondes, climatiseur, etc.) ou comportant
un moteur. Suivant le mode d’utilisation de
l’appareil électrique, le bruit induit peut nuire au
fonctionnement de l’instrument ou produire un
bruit audible. Si, pour des raisons pratiques, il est
impossible d’utiliser une prise distincte, brancher
un ltre de bruit induit entre cet appareil et la prise
de courant.
• Avant de brancher l’appareil à d’autres appareils,
mettre l’ensemble des appareils hors tension, de
façon à éviter d’endommager les haut-parleurs et
les autres périphériques.
• Bien que l’écran et les voyants s’éteignent lorsqu’on
éteint l’appareil, celui-ci peut rester activé par
la source d’alimentation. S’il faut désactiver
l’alimentation complètement, appuyer d’abord sur
le commutateur pour désactiver l’appareil, puis
débrancher le cordon d’alimentation de la prise de
courant. C’est pourquoi la prise de courant choisie
pour brancher le cordon d’alimentation doit être
facilement accessible.
• La tolérance de tension d’alimentation pour les
unités 120V et 240V est comprise entre -10% et
+10%. La plage de température ambiante de
fonctionnement est 32-113
º
F (0-45
º
C).
NOTE
Si l’appareil est éteint pendant la modication des
paramètres, les nouveaux réglages seront perdus.
Pour les conserver, il faut les enregistrer avant de
l’éteindre.
Emplacement
• Lorsque l’appareil est utilisé à proximité
d’amplicateurs de puissance (ou de tout
autre équipement contenant d’importants
transformateurs de puissance), un bourdonnement
peut se faire entendre. Pour atténuer le problème,
changer l’orientation de l’appareil ou l’éloigner de
la source d’interférence.
• Cet appareil peut interférer avec la réception radio
et télévision. Ne pas l’utiliser à proximité de ce type
de récepteurs.
• Un bruit peut se faire entendre si des appareils de
communication sans l, tels que des téléphones
cellulaires, sont utilisés à proximité de l’appareil. Ce
type de bruit peut se produire lors de la réception
ou de l’émission d’un appel, ou pendant une
conversation téléphonique. En cas de problème
de ce genre, éteindre les appareils sans l
concernés ou les déplacer de façon à les éloigner
susamment de l’appareil.
• Éviter d’exposer l’appareil à la lumière directe
du soleil, de le placer à proximité d’appareils qui
émettent de la chaleur, de le laisser à l’intérieur
d’un véhicule fermé et de le soumettre de quelque
manière que ce soit à des températures extrêmes.
Éviter en outre de laisser les appareils d’éclairage
dont l’utilisation normale place la source lumineuse
très près de l’appareil (comme une lampe de piano)
ou de puissants projecteurs éclairer longtemps la
même partie de l’appareil. Une chaleur excessive
peut déformer ou décolorer l’appareil.
• Ne pas laisser d’objets de caoutchouc, de vinyle ou
de matériaux semblables sur l’appareil pendant
longtemps. Ces objets peuvent décolorer ou
abîmer la nition de l’appareil.
• Ne pas laisser d’objets sur le clavier ou le pédalier.
Le poids de ces objets risque de provoquer des
défectuosités, par exemple des touches qui ne
produisent aucun son.
• Ne pas coller d’autocollants, de décalcomanies
ou autres images sur l’appareil. Au moment de les
enlever, la nition risque de s’abîmer.
• Ne jamais placer sur l’appareil quelque chose qui
contient de l’eau. Éviter en outre d’utiliser des
insecticides, des parfums, de l’alcool, du vernis
à ongles, des vaporisateurs, etc., à proximité de
l’appareil. Si du liquide est renversé sur l’appareil,
l’essuyer rapidement avec un linge sec et doux.
Entretien
• Pour nettoyer l’appareil, utiliser un chion sec
et doux ou un chion légèrement imbibé d’eau.
Essayer d’essuyer toute la surface en appuyant
également, dans le sens des bres du bois. Ne pas
frotter trop fort en un seul endroit, pour éviter
d’endommager la nition.
• Ne jamais utiliser de benzine, de diluant, d’alcool ni
de solvants an d’éviter tout risque de décoloration
ou de déformation.
Réparations et données
• Veuillez prendre note que toutes les données
enregistrées dans la mémoire de l’appareil peuvent
se perdre lorsque l’appareil est envoyé pour
réparation. Il est important de toujours sauvegarder
les données sur une clé de mémoire USB, ou de
les inscrire sur papier (si possible). Durant les
réparations, les techniciens prennent soin d’éviter
toute perte de données. Malheureusement,
dans certains cas (comme un bris des circuits de
mémoire), il peut s’avérer impossible de récupérer
les données, et Rodgers ne peut assumer aucune
responsabilité quant aux données perdues.
Précautions Supplémentaires
• Il est important de savoir que le contenu dela mémoire
peut être dénitivement perdu en cas d’erreur technique
ou de défectuosité de l’appareil. Pour prévenir le
risque de perte des données importantes, nous
recommandons aux utilisateurs de faire régulièrement
des copies de sauvegarde de ce qui se trouve dans la
mémoire de l’appareil et sur la clé de mémoire USB.
• Malheureusement, si le contenu de la mémoirede
l’appareil ou de la clé USB est perdu, sa
récupération pourrait s’avérer impossible, et
Rodgers ne peut pas assumer la responsabilité des
données perdues.
• Manipuler avec un soin raisonnable les boutons, index
et autres commandes de l’appareil, de même que les
prises audio et les connecteurs. Une manipulation
non soignée peut entraîner des dysfonctionnements.
• Ne jamais frapper l’écran ou y appliquer une forte
pression.
• Pour débrancher un câble, le saisir par le
connecteur – ne jamais tirer sur le câble lui-même,
de façon à éviter de causer des mauvais contacts ou
d’endommager ses éléments internes.
• Il est normal que l’appareil dégage un peu de
chaleur pendant qu’il fonctionne.
• Pour éviter de déranger les gens à proximité,
essayer de garder le volume à un niveau
raisonnable. Il est aussi possible d’utiliser des
écouteurs pour ne pas avoir à s’en soucier.
• Si l’appareil doit être transporté, le protéger
d’abord avec un emballage antichoc. Autrement,
il risque d’être égratigné ou endommagé, et un
dysfonctionnement pourrait s’ensuivre.
• Éviter d’appliquer une trop grande force sur le
lutrin lorsqu’il est en cours d’utilisation.
• Certains câbles de connexion contiennent des
résisteurs; aux ns de connexion à cet appareil,
éviter d’utiliser ces câbles, qui peuvent rendre le son
extrêmement faible, voire inaudible. Pour obtenir les
caractéristiques techniques de câbles en particulier,
prière de communiquer avec le fabricant concerné.
• En raison de la conception structurelle de cet
instrument, il pourrait arriver que des petits
animaux domestiques ou autres se retrouvent
coincés à l’intérieur. En pareille situation, éteindre
immédiatement l’appareil et le débrancher de la
prise de courant. Ensuite, consulter le détaillant qui a
vendu l’instrument ou communiquer avec Rodgers
Instruments aux coordonnées indiquées dans l’avis
aux utilisateurs (Notice to Users, p. 11).
• En ouvrant ou en refermant le couvercle, faire
attention de ne pas se coincer les doigts entre la
partie mobile et le panneau.
• Les explications fournies dans ce manuel
comprennent des illustrations qui indiquent ce qui
apparaît habituellement à l’écran.
Il est toutefois à noter que l’appareil pourrait
comporter une version mise à jour ou améliorée
du système (p. ex. une banque sonore renouvelée),
de telle sorte que l’achage à l’écran peut ne pas
correspondre à ce qui est montré dans le manuel.
Avant d’utiliser une mémoire externe
Pour l’utilisation d’une mémoire externe
Insérer soigneusement la clé de mémoire USB
jusqu’au fond, en s’assurant qu’elle tient bien en
place.
• Ne pas appliquer de force excessive sur la clé USB
lorsqu’elle est branchée.
• Les clés USB sont des instruments de précision; il
faut les manipuler avec précaution, en veillant à ce
qui suit :
• L’électricité statique peut endommager une clé USB.
Prendre soin de décharger le corps de son électricité
statique avant de manipuler une clé USB.
• Ne pas toucher la partie de contact de la clé USB,
ni la mettre en contact avec du métal.
• Éviter de plier et de faire tomber les clés USB, et de les
soumettre à des vibrations ou à des chocs violents.
• Éviter de laisser des clés USB exposées à la
lumière directe du soleil, dans des véhicules
fermés ou dans d’autres lieux semblables.
• Garder les clés USB à l’abri de l’humidité.
• Ne jamais essayer de démonter ou de modier
une clé USB.
REMARQUES IMPORTANTES

11
Contents
USING THE UNIT SAFELY .................................. 5
IMPORTANT NOTES ....................................... 9
Imagine 351 Quick Tour .................................. 12
The Display .....................................................14
Thumb Pistons ..................................................15
Expression Shoes and Toe Pistons ..........................16
Control Knobs ...................................................16
External Connectors .............................................16
Headphones ....................................................16
Selecting Stops (Sounds) ................................. 17
Selecting a Sound Variation (Voice Palette) .......................17
Organ Type ............................................. 17
List of Stops ............................................. 18
Library/MIDI A and Library/MIDI B Thumb Pistons ................19
Organ Stop Library .............................................19
Orchestral Library ...............................................20
MIDI Channel ...................................................20
Storing a Combination of Stops .......................... 21
Storing or Recalling a Registration ...............................21
Resetting the Sound Settings (General Cancel) ...................21
Using Memory Levels ............................................22
Selecting a Memory Level .................................22
Recalling a Registration from a Dierent Memory Level .....22
NEXT: Recalling Registrations Successively .......................22
Using a USB Drive to Store and Recall Stop Combinations .........23
Preparing USB Drive .......................................23
Selecting USB Memory Folder .............................23
Copying an entire Memory level from the Organ to the USB
Drive ......................................................23
Recalling a Registration from USB Memory .................23
List of Demo Songs . . . . . . . . . . . . . . . . . . . . . . . . . . . . . . . . . . . . . . 24
Making Settings in the Menus ............................ 25
Storing Your Settings (Customize) ...............................25
Menu List .......................................................26
Demo .....................................................26
USB Memory ..............................................26
Hymn Player ..............................................26
Song Recorder ............................................27
Pitch/Tuning ..............................................28
Room Type ................................................28
Stop Library ...............................................29
Console ...................................................30
Pipe Disable ...............................................31
Expression Pedal ..........................................31
Tremulant .................................................32
Crescendo ................................................32
Audio .....................................................32
MIDI ......................................................33
Save/Load (USB) ...........................................33
Utility .....................................................33
Enhanced Orchestral Coupler User’s Guide ................ 34
About the Keyboards .................................... 38
Recording Your Performances ............................ 39
Recording a Song ...............................................39
Play Back the Recorded Song ....................................39
Saving a Recorded Song .........................................39
Deleting a Recorded Song .......................................40
Playing Back a Saved Song ......................................40
Hymn Player ............................................ 41
To Enter the Hymn Player ........................................41
Selecting Hymn ...........................................41
Playing a Hymn .................................................41
Playing a Prelude ................................................41
Hymn Player Song List by Hymn Tune Names ....................42
Hymn Player Song List by Common Hymn Titles ..................44
Saving and Loading Settings on USB Drive ................ 47
Formatting USB Drive ...........................................47
Deleting a Memory Level from USB Drive ........................47
Copying a Memory Level (Bank) .................................47
Saving and Loading Voice Setup .................................48
Saving to USB Drive .......................................48
Loading a Voice Setup .....................................48
Deleting a Voice Setup ....................................48
Reset Procedures ........................................ 49
Returning all Settings to the Factory Default State ................49
Backing Up/Loading Data .......................................49
Displaying the Version ...........................................49
List of Shortcuts ......................................... 49
Specications ........................................... 50
Notice to Users
Information in this document is subject to change without notice. No part of this manual may be translated into any language, stored in a retrieval
system, reproduced or transmitted in any form or by any means, electronic or mechanical, including photocopying and recording, for any purpose
without the express written permission of Rodgers Instruments US LLC.
RODGERS INSTRUMENTS US LLC
8117 NE Jacobson Street, Building 7, Suite D-200
Hillsboro, Oregon 97124
(503) 648-4181
http://www.rodgersinstruments.com/
Rodgers instruments are manufactured and protected under one or more
of the following U.S. patents: 4,622,878, 5,060,179, 5,087,798, 5,091,613,
5,225,619, 5,262,581, 5,508,472, 6,369,310, 6,399,868
Copyright ©2021. Rodgers Instruments US LLC. All rights reserved. Created
and printed in the United States of America.
Rodgers®, Rodgers Imagine Series™, Rodgers Inspire Series™, Rodgers Innity
Series™, Rodgers Artist Series™, Library Access™, Natural Pipe Realism™,
Pipe Dimensional Imaging™, Dimensional Sound Modeling®, Parallel Digital
Imaging®, Voice Palette™, PDI™, are trademarks or registered trademarks of
Rodgers Instruments US LLC , Hillsboro, Oregon.

12
Imagine 351 Quick Tour
External
Connectors
Expression Shoes
(2 Shoes)
Thumb
Pistons
Pedalboard
Stop
Drawknobs
Toe Pistons
USB Drive Port
Headphone Jack
Keyboard Cover
Power Switch
Music Rest
Display screen
Control Knobs
Cover lock
Crescendo Shoe
Imagine 351D

13
External
Connectors
Expression Shoes
(2 Shoes)
Pedalboard
Toe Pistons
USB Drive Port
Headphone Jack
Keyboard Cover
Power Switch
Music Rest
Display screen
Control Knobs
Cover lock
Crescendo Shoe
Thumb
Pistons
Stop
Tablets
Imagine 351 Quick Tour
Imagine 351T

14
Imagine 351 Quick Tour
The Display Screen
Contents of the Main Screen
1. Memory level number
2. General piston number
3. USB status indicator
4. Keyboard transposition status
Range (semitones)
-6–+5
5. Reference pitch (master tuning)
6. Open/closed status position of the Crescendo shoe.
7. Open/closed status position of the Choir/Great/Pedal expression shoe.
8. Open/closed status position of the Swell expression shoe.
9. Temperament
Available Settings
EQUAL, WERCK., KIRN.2, KIRN.3, VALLO., MEAN.D, MEAN.E, PYTHG., M.BACH
7
2
3
4
6
5
1
8
9

15
Imagine 351 Quick Tour
Piston Explanation
1 ZIMBEL This piston toggles on/o the Zimbelstern.
2 ORGAN TYPE This piston allows you to select Organ Type by rotating the SELECT knob.
3 SET Hold in SET and press a general or divisional piston, then release both, to capture the active stops to that piston.
4
LIB/MIDI A
LIB/MIDI B
Each division includes 2 pistons. Turning on any LIB/MIDI piston makes playable an onboard Library voice or a external MIDI
channel (if a MIDI sound module is connected). Please refer to page 19 for detailed information.
5 General Pistons 1-10 Each of these pistons can store a combination of sounds (registration) from the entire organ (all divisions).
6
Memory Level M1,
M–, M+
Use these pistons when you want to switch memory levels. The organ has a total of 50 memory levels. [M1] piston selects
Memory Level 1. Pressing [M-] will decrease Memory Levels. Pressing [M+] will increase Memory Levels.
7 Divisional Couplers Each of these pistons couple one division to another.
8 Divisional Pistons 1-5 Each of these pistons can store the sounds (registration) for the SWELL, GREAT, or CHOIR divisions.
9 TREM Tremulant pistons for each division. This adds vibrato (cyclic modulation) to the sound.
10 FLT TREM ALT This piston engages an alternate tremulant setting for the manual utes of the organ.
11
PIPES OFF This piston silences wind-blown pipes if they are connected to the organ.
ANC ON This piston plays the digital stops assigned as pipes if pipes are connected to the organ.
12
INT AUDIO OFF This piston turns o the internal speakers.
MAIN OFF This piston turns o the main organ speakers.
ANT ON This piston turns on the antiphonal organ speakers.
13 ALL EXPR SW This piston assigns the expression of all divisions to the Swell expression shoe.
14 GT/PED UNENCL This piston causes the Great and Pedal divisions to be non-expressive (Unenclosed).
15 NEXT This piston advances the General pistons.
16
TRANSP -
TRANSP +
At each press of these pistons, the pitch of the entire organ is transposed one half-step down or up. Pressing 0 (Cancel)
returns the organ’s pitch to normal. The LCD screen displays the transposed value ranging from -6 to +5 half-steps.
17 CHIMES This piston allows you to play the Chimes voice on the Great manual.
18 HYMN PLAYER This piston accesses the Hymn Player mode.
19
STOP This stops playback or recording of a song.
PLAY/PAUSE This starts or pauses playback of a song.
REC Use this when you want to record your playing.
20
BASS This Bass coupler causes the lowest note played on the Great manual to play stops active in the PEDAL division.
MEL SW This Melody Swell coupler causes the highest note played on the Great manual to play stops active in the SWELL division.
MEL CH
This Melody Choir coupler piston causes the highest note played on the Great manual to play stops active in the CHOIR
division.
21 FULL ORGAN This piston engages a full organ registration.
22 [0] General Cancel This turns o, or cancels, all stops, couplers, and pistons, so that no sounds are selected.
HYMN
PLAYER
ORGAN
TYPE
PED
LIB/MIDI
A
PED
LIB/MIDI
B
M1
GT/PD
UNENCL
ALL
EXPR
SW
MEL
SW
MEL
CH
SW
TO
PED
GT
TO
PED
CH
TO
PED
CH
LIB/MIDI
A
CH
LIB/MIDI
B
GT
LIB/MIDI
B
GT
LIB/MIDI
A
SW
LIB/MIDI
B
SW
LIB/MIDI
A
TRANSP
-
SW
TO
GT
NEXT
PIPES
OFF
FLT
TREM
ALT
SW
TO
CH
CH
TO
GT
ANC
ON
TRANSP
+
TREM
TREM
TREM
ZIMBEL
5
1
Thumb Pistons
2 3 4 6
8
4
12 13 14
17
2018 19 21 22
7
15
16
7
10 11
7
9

16
Imagine 351 Quick Tour
Expression Shoes and Toe Pistons
Control Explanation
1 Expression Shoes
The left shoe controls the expression of the
Choir, Great & Pedal. The center shoe controls
the expression of the Swell.
2 Crescendo Shoe
This shoe gradually adds a predetermined
selection of stops as it is pressed forward.
3 5 x Toe Pistons General Pistons 1-5.
4 5 x Toe Pistons Pedal divisional Pistons 1-5.
5 2 x Toe Pistons
Reversible pistons Great to Pedal, Previous
(optional).
6 2 x Toe Pistons Reversible pistons Next, Full Organ (optional).
Control Knobs
[MENU/SELECT] Knob
Turn: When you’re in a menu screen, turn this knob to navigate to the
menu item you want to operate.
Press: Enters a menu, or nalizes a setting item.
[EXIT MENU/VALUE] Knob
Turn: Adjusts a setting.
Press: Returns you to the previous menu, or cancels an operation.
[VOLUME] Knob
This adjusts the volume level of the entire organ.
[REVERB] Knob
This adjusts the volume level of reverberation.
External Connectors
The external connectors are located under the keyboards, to the
right side.
1 2 3
1. OUTPUT L/MONO, R Jacks
You can connect an external amplied speaker system here so that the
sound of the organ is played from the connected speakers.
2. (AUX) INPUT L/MONO, R Jacks
You can connect an external sound module or similar device here so
that its audio is heard from the organ’s speakers.
3. MIDI IN, OUT Connectors
You can connect an external MIDI device here to exchange performance
data with the organ.
Headphones
1. Location of Headphone Port
A 1/4” stereo headphone port is located to the left of the keyboards.
(See illustration on page 12 or 13).
NOTE
When a headphone jack is inserted, the organ’s speakers are
automatically muted.
! To prevent malfunction and equipment failure, always turn o the unit
before making any connections.
! Carefully insert the USB drive all the way in until it is rmly in place.
! This unit is equipped with a protection circuit. A brief interval (a few
seconds) after turning the unit on is required before it will operate normally.
! If you need to turn o the power completely, rst turn o the unit, then
unplug the power cord from the power outlet.
3
1
4
MENU
EXIT MENU
REVERBVOLUME
SELECT VALUE
5
6
2

17
Selecting Stops (Sounds)
By pulling the drawknobs or pressing the tablets you can play a variety of pipe organ sounds. The sounds assigned to the drawknobs or stop tablets are
called “stops.”
The drawknobs or stop tablets are organized into groups called “divisions.” If a drawknob or stop tablet is lit, you’ll be able to play the corresponding stop.
Selecting a Sound Variation (Voice Palette)
1. Pull a drawknob or press a stop tablet.
The “Voice Palette” screen will appear, showing the variation of the selected stop.
If the indicator blinks momentarily when you press a tablet, a variation is already selected for the stop.
If the “Voice Palette” screen is not shown, return to the main screen (press the [EXIT MENU/VALUE] knob a number of times) and perform the procedure from step
1.
2. Turn the [EXIT MENU/VALUE] knob.
You can choose from four sound variations: VP0 through VP3. Refer to the List of Stops on the next page.
NOTE
Press and hold the general cancel [0] piston for several seconds, the settings will be reset to “Default Voice Palettes.”
MENU EXIT MENU
SELECT VALUE
ORGAN TYPE
The Organ Type thumb piston automatically selects Voice Palette stops which are specic to an organ sound genre.
1. Press the [ORGAN TYPE] piston. It will light up.
2. Turn the [MENU/SELECT] knob to select an Organ Type.
Menu item Explanation
American Eclectic (Voice Palette 0 - the engraved stop names.) Transparency and clarity of tone, eclectic specication characteristic of American organ builders
English Cathedral (Voice Palette 1.) Broad 8’ fundamental tone and smooth dark reeds typical of Willis and Harrison & Harrison organs
French Romantic (Voice Palette 2.) Warm 8’ ensemble and bright, ery reeds characteristic of 19th-century Cavaillé-Coll tonal style
German Baroque (Voice Palette 3.) Articulate and bright tonal spectrum in the North German style of 17th-century Arp Schnitger organs
3. Turn on any drawknob or stop tablet. The appropriate Voice Palette will be selected.
4. To return to the main screen, press the [ORGAN TYPE] piston again.
NOTE
All Voice Palette variations are always available. For example, you can change a particular stop’s onscreen selection to any of the alternate Voice Palette
selections.

18
GREAT Division (Middle Keyboard)
Engraving (VP0) American Eclectic VP1 English Cathedral VP2 French Romantic VP3 German Baroque
Violone 16’ Double Open Diapason 16’ Montre 16’ Prinzipal 16’
Principal 8’ Open Diapason 8’ Montre 8’ Prinzipal 8’
Chimney Flute 8’ Rohrute 8’ Bourdon 8’ Rohröte 8’
Gemshorn 8’ Salicional 8’ Gambe 8’ Quintatön 8’
Octave 4’ Principal 4’ Prestant 4’ Oktave 4’
Spitzute 4’ Waldute 4’ Flûte Ouverte 4’ Gemshorn 4’
Quint 2-2/3’ Twelfth 2-2/3’ Quinte 2-2/3’ Nasat 2-2/3’
Super Octave 2’ Fifteenth 2’ Doublette 2’ Super Oktave 2’
Cornet V Cornet IV Cornet IV Kornett V
Fourniture IV Mixture IV Grand Fourniture IV Mixtur VI
Trumpet 8’ Tromba 8’ Trompette 8’ Trompete 8’
Chimes (thumb piston)
Zimbelstern (thumb piston)
SWELL Division (Upper Keyboard)
Engraving (VP0) American Eclectic VP1 English Cathedral VP2 French Romantic VP3 German Baroque
Bourdon Doux 16’ Bourdon 16’ Dulciane 16’ Lieblich Gedackt 16’
Geigen Principal 8’ Horn Diapason 8’ Montre 8’ Prinzipal 8’
Bourdon 8’ Stopped Diapason 8’ Traverse Flute 8’ Holzgedackt 8’
Flute Céleste II 8’ Unda Maris II 8’ Flûte Céleste II 8’ Voce Umana 8’
Viola Céleste II 8’ Voile Céleste II 8’ Voix Céleste II 8’ Schwebung II 8’
Octave 4’ Octave Gamba 4’ Prestant 4’ Oktave 4’
Flute Traverse 4’ Flute 4’ Flûte Octaviante 4’ Flöte 4’
Nazard 2-2/3’ Quintute 2-2/3’ Nasard 2-2/3’ Nasard 2-2/3’
Octavin 2’ Lieblich Piccolo 2’ Flûte à Bec 2’ Waldöte 2’
Tierce 1-3/5’ Seventeenth 1-3/5’ Tierce 1-3/5’ Quinte 1-1/3’
Plein Jeu IV Mixture III Fourniture III Schar IV
Double Trumpet 16’ Contra Trumpet 16’ Bombarde 16’ Posaune 16’
Trumpet 8’ Trumpet 8’ Trompette 8’ Trompete 8’
Oboe 8’ Cornopean 8’ Hautbois 8’ Dulzian 8’
Clarion 4’ Clairon 4’ Petite Clairon 4’ Rohr Schalmei 4’
CHOIR Division (Lower Keyboard)
Engraving (VP0) American Eclectic VP1 English Cathedral VP2 French Romantic VP3 German Baroque
Principal 8’ Diapason 8’ Montre 8’ Spitz Prinzipal 8’
Holzgedackt 8’ Gedackt 8’ Bourdon 8’ Singendgedeckt 8’
Erzähler Céleste II 8’ Muted Violins II 8’ Dulcett Céleste II 8’ Unda Maris II 8’
Octave 4’ Principal 4’ Prestant 4’ Oktave 4’
Koppelute 4’ Orchestral Flute 4’ Nachthorn 4’ Blocköte 4’
Kelin Octave 2’ Super Octave 2’ Italian Principal 2’ Oktave 2’
Larigot 1-1/3’ Nineteenth 1-1/3’ Quinte 1-1/3’ Oktave 1’
Mixture IV Plein Jeu IV Cymbale IV Zimbel IV
Corno di Bassetto 16’ Basson 16’ Hautbois 16’ Dulzian 16’
Clarinet 8’ English Horn 8’ Bombarde 8’ Krummhorn 8’
Festival Trumpet 8’ Royal Tuba 8’ Tromba del Guibileo 8’ Trompette en Chamade 8’
List of Stops

19
List of Stops
Library/MIDI A and Library/MIDI B Thumb Pistons
Sounds for user settings can be assigned to the [LIBRARY/MIDI] A or B thumb pistons (couplers) and played together with the organ sounds of each
division. The sounds that are available as user settings consist of the “Organ Stop Library” and the “Orchestral Instrument Library.” The two libraries dier
as follows in the way that reverb and tremulant will operate.
Organ Stop Library
• The tremulant eect will be applied for each division. If the expression pedal is enabled, the expression pedal will aect the selections of the Organ Stop
LIbrary along with the organ’s regular stops.
• The velocity settings are ignored for organ stops.
Orchestral Instrument Library
• The tremulant eect will not be applied.
• The velocity settings range from keyboard velocity to a xed setting from 2-127.
Organ Stop Library
PEDAL Division (Pedalboard)
Engraving (VP0) American Eclectic VP1 English Cathedral VP2 French Romantic VP3 German Baroque
Contra Bourdon 32’ Open Wood 32’ Contra Violon 32’ Untersatz 32’
Principal 16’ Open Diapason 16’ Principal 16’ Prinzipalbass 16’
Subbass 16’ Bourdon 16’ Soubasse 16’ Bordun 16’
Violone 16’ Lieblich Bourdon 16’ Contre Basse 16’ Grossgamba 16’
Octave 8’ Diapason 8’ Prestant 8’ Oktave 8’
Bass Flute 8’ Flute 8’ Bourdon 8’ Gedackt Bass 8’
Choral Bass 4’ Fifteenth 4’ Prestant 4’ Oktave 4’
Mixture IV Mixture III Plein Jeu III Hintersatz III’
Contra Bombarde 32’ Double Waldhorn 32’ Contre Hautbois 32’ Bombarde 32’
Bombarde 16’ Trombone 16’ Bombarde 16’ Posaune 16’
Trumpet 8’ Tromba 8’ Trompette 8’ Trompete 8’
Clarion 4’ Hautbois 4’ Clairon Harmonique 4’ Rohr Schalmei 4’
1. Principal 32’ *
2. Contra Violone 32’ *
3. Contra Bourdon 32’ *
4. Diapante Grave 21-2/3’ *
5. Lieblich Gedackt 16’
6. Dulciana 16’
7. Open Wood 16’
8. Spitzute 16’
9. Quint 10-2/3’
10. English Diapason 8’
11. Italian Principal 8’
12. Gemshorn 8’
13. Gamba 8’
14. Gamba Céleste II 8’
15. Aeoline 8’
16. Flute Harmonique 8’
17. Gross Flute 8’
18. Quint 5-1/3’
19. Oktav 4’
20. Principal 4’
21. Rohröte 4’
22. Orchestral Flute 4’
23. Unda Maris II 4’
24. Gross Tierce 3-1/5’
25. Violetta in Quinta 2-2/3’
26. Nazard 2-2/3’
27. Salicional 2’
28. Piccolo 2’
29. Tierce 1-3/5’
30. Larigot 1-1/3’
31. Septième 1-1/7’
32. Siöte 1’
33. Jeu de Clochette II
34. Grave Cornet V
35. Tertian II
36. Pedal Grand Mixtur VI *
37. Harmonics V
38. Tierce Fourniture VI
39. Grand Mixtur IV-VIII
40. Klein Mixture III
41. Double Ophicleide 32’ *
42. Contre Bombarde 32’ *
43. Contra Fagott 16’
44. Pontical Trumpet 16’
45. Rankett 16’
46. Trompet 8’
47. Second Trompette 8’
48. French Horn 8’
49. Hautbois 8’
50. Rohr Schalmei 8’
51. Dulzian 8’
52. Cromorne 8’
53. Oboe 8’
54. Regal 8’
55. Vox Humana 8’
56. Vox Humaine 8’
57. Tuba Mirabilis 8’
58. State Trumpet 8’
59. Chamades 8’
60. Trumpet de Fete 8’
61. Clarion 4’
62. Second Clairon 4’
63. Schalmei 4’
64. 16+4 Flute Célestes IV
65. 16+4 Célestes IV
66. 16+8+4 Célestes VI
67. 16+8+4 Célestes + Vox
68. Barker Noise
200. 16+8 Voxes II
201. 16+4 Voxes II
202. Tibia 8’
203. Tibia 4’
204. Viols d’Orch 8 ‘II
205. Viols d’Orch 8’ II Trem
206. Tuba 8’ Trem
207. Cornopean 8’ Trem
208. Tibia 16+8+Vox 16+8
209. Tibia 16842+Strings
210. Tib 84+Q+Vx+Cel
211. Vox 16+8+Célestes
212. Tib 84+VDO Cel
213. Tib 84+Vox+Cel
214. Tib 84+Cel+Tuba
215. Tibia 4 + Cel 8
216. Tib 42+Str168
217. Tibia 4 + Kinura
218. Str8+Tib2+Glock
219. Tibia 4 + Glock
*These stops have a limited range of 34 notes (C1-A34)

20
List of Stops
Sustaining an Orchestral Voice
The Orchestral voices listed above with (S) are sustainable. By default, pressing pedal key F#19 acts as a sustain pedal for those voices. You may rest
your heel on pedal key F18 and press your toe on F#19 to activate the sustain function (like you would for an acoustic piano). When any Library/
MIDI A or B piston is turned on and set to a sustainable voice, pedal notes F18 to G32 are silent.
Pedal F# Sustain function can be disabled in menu 8 “Console” (refer to page 30 for more information). When the F# function is set to NONE, all 32
pedal notes will play normally. The kick-switch and/or a toe piston can also be congured as sustain without muting pedal notes F18-G32.
The sustain parameter can be turned on or o per individual Orchestral sustaining voice. The SUSTAIN menu parameter appears only for Grand
Piano, Electric Piano, Celesta, Orch Harp, String Ensemble, Orchestra, Slow Strings, Octave Strings, Choir Aahs, Choir Oohs.
MIDI Channel
Please refer to pages 29-30 for more information.
(S) designates this orchestral voice will sustain. Refer to “Sustaining an Orchestral Voice” below.
(NVS) designates this voice is not velocity-sensitive; it is set to a xed velocity.
(KS) The kick-switch can activate or deactivate the tremulant rotor eect for Drawbars 1 and 2 voices if the kick-switch is congured as GOSP ROTOR. Refer to the
Owner’s Manual for more information.
(L) This orchestral voice has a limited note range from C13 to C61.
• When the orchestral instrument is displayed onscreen, the selection can be changed by rotating the EXIT MENU/VALUE knob.
• When the orchestral instrument is displayed onsceen, you may rotate the MENU/SELECT knob to navigate to adjustable parameters. Rotate the EXIT
MENU/VALUE knob to change the parameter’s value: Source/MIDI CH, Name, Level, Octave, Velocity.
• If the Velocity value is set to KBD, the orchestral voice responds to your touch on the velocity-sensitive keyboard.
• LIBRARY/MIDI A and B selections and parameter settings can be saved to a piston for immediate recall.
• Orchestral selections do not respond to the organ’s Tremulant control.
• The orchestral selection responds to the same expression as organ stops of that division.
• The orchestral selection responds to couplers.
• LIBRARY/MIDI A and B selections can be played together with organ stops.
Library/MIDI A and Library/MIDI B Thumb Pistons
Orchestral Library
300. Grand Piano (S)
301. Electric Piano (S)
302. Harpsichord 8 (NVS)
303. Harpsichord 4 (NVS)
304. Harpsichord Lute (NVS)
305. Harpsichord 8+4 (NVS)
306. Celesta (S)
307. Xylophone (L)
308. Orchestral Harp (S)
309. Drawbars 1(NVS) (KS)
310. Drawbars 2 (NVS) (KS)
311. Guitar
312. Acoustic Bass
313. String Ensemble (S)
314. Orchestra (S)
315. Slow Strings (S)
316. Octave Strings (S)
317. Violin (S) (L)
318. Saxophone
319. Orchestral Trumpet (L)
320. Trombone
321. Bright Brass
322. Brass Ensemble
323. French Horn
324. Tuba (Limited note range from C1 to F54)
325. Orchestral Flute (L)
326. Bagpipes (Drone notes C1-F18. Limited note range from C25 to C49)
327. Pan Pipes (L)
328. Orchestral Oboe (L)
329. Orchestral Clarinet
330. Bandoneon
331. Choir Aahs (S)
332. Choir Oohs (S)
333. Organ Chimes
334. Tubular Bells
335. Handbells
336. Timpani (Limited range C1-A#47)
La page est en cours de chargement...
La page est en cours de chargement...
La page est en cours de chargement...
La page est en cours de chargement...
La page est en cours de chargement...
La page est en cours de chargement...
La page est en cours de chargement...
La page est en cours de chargement...
La page est en cours de chargement...
La page est en cours de chargement...
La page est en cours de chargement...
La page est en cours de chargement...
La page est en cours de chargement...
La page est en cours de chargement...
La page est en cours de chargement...
La page est en cours de chargement...
La page est en cours de chargement...
La page est en cours de chargement...
La page est en cours de chargement...
La page est en cours de chargement...
La page est en cours de chargement...
La page est en cours de chargement...
La page est en cours de chargement...
La page est en cours de chargement...
La page est en cours de chargement...
La page est en cours de chargement...
La page est en cours de chargement...
La page est en cours de chargement...
La page est en cours de chargement...
La page est en cours de chargement...
La page est en cours de chargement...
La page est en cours de chargement...
La page est en cours de chargement...
La page est en cours de chargement...
-
 1
1
-
 2
2
-
 3
3
-
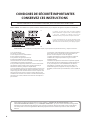 4
4
-
 5
5
-
 6
6
-
 7
7
-
 8
8
-
 9
9
-
 10
10
-
 11
11
-
 12
12
-
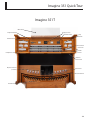 13
13
-
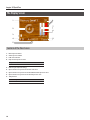 14
14
-
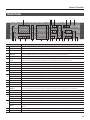 15
15
-
 16
16
-
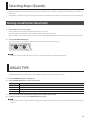 17
17
-
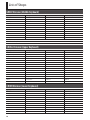 18
18
-
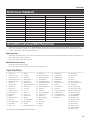 19
19
-
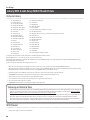 20
20
-
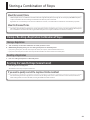 21
21
-
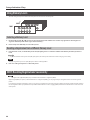 22
22
-
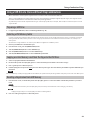 23
23
-
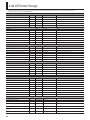 24
24
-
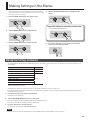 25
25
-
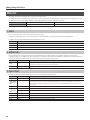 26
26
-
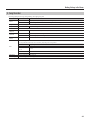 27
27
-
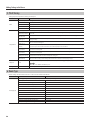 28
28
-
 29
29
-
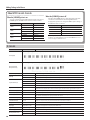 30
30
-
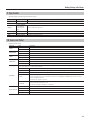 31
31
-
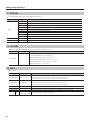 32
32
-
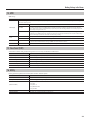 33
33
-
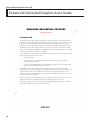 34
34
-
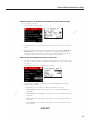 35
35
-
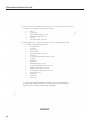 36
36
-
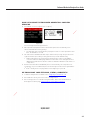 37
37
-
 38
38
-
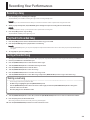 39
39
-
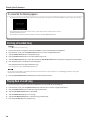 40
40
-
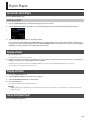 41
41
-
 42
42
-
 43
43
-
 44
44
-
 45
45
-
 46
46
-
 47
47
-
 48
48
-
 49
49
-
 50
50
-
 51
51
-
 52
52
-
 53
53
-
 54
54


Rodgers Imagine Series 351 Le manuel du propriétaire
- Taper
- Le manuel du propriétaire
dans d''autres langues
Documents connexes
-
Rodgers Imagine Series 351 Le manuel du propriétaire
-
Rogers Inspire Series 343 Mode d'emploi
-
-
-
-
-
-
Autres documents
-
Yamaha F-400 Le manuel du propriétaire
-
-
Johannus Opus 200 Manuel utilisateur
-
Roland C-190 Manuel utilisateur
-
-
Kawai LH-2C Manuel utilisateur
-
-
Glorious GLO-WDV2-MS-MB Mode d'emploi
-
 Glorious Record Box Advanced Manuel utilisateur
-
