Philips HD7769 Manuel utilisateur
- Catégorie
- Cafetières
- Taper
- Manuel utilisateur
Ce manuel convient également à

HD7769


1
3
2
4 5
6
7
8
9
10
11
12
13
14
1715
16 18 21 23
19 20 22
24
25
26
1


English 6
Dansk 15
Deutsch 24
Français 34
Italiano 44
Nederlands 54
Norsk 64
Suomi 73
Svenska 82

English
Introduction
Thank you for buying Philips. To register your new product, please go to www.philips.com/grindbrew.
On this website, you can also find handy videos, delicious recipes, frequently asked questions and get
support.
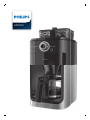
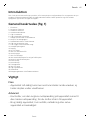
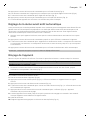
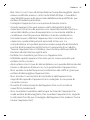
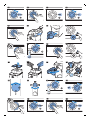
General description (Fig. 1)
1 Filter basket
2 Drip stop
3 Filter basket holder
4 Water level indicator
5 Water reservoir lid
6 Bean container lid
7 Bean container selector
8 Coarseness knob
9 Fresh bean duo container
10 Grinder funnel lid
11 Lock of grinder funnel lid
12 Water filling hole
13 Display
14 On/off button
15 Pre-ground coffee icon
16 Number of cups
17 Coffee cup icon
18 Strength select coffee bean icon
19 Strength select button
20 Timer button
21 Control knob
22 Time indication
23 Timer icon
24 Glass jug lid
25 Glass jug
26 Bean chute cleaning brush
Important
Danger
-
Never immerse the appliance in water or any other liquid, nor
rinse it under the tap.
Warning
-
Check if the voltage indicated on the appliance corresponds to
the local mains voltage before you connect the appliance.
-
Do not use the appliance if the plug, the mains cord or the
appliance itself is damaged.
6
English

-
If the mains cord is damaged, you must have it replaced by
Philips, a service center authorized by Philips or similarly qualified
persons in order to avoid a hazard.
-
Connect the appliance to an earthed wall socket.
-
This appliance can be used by children aged from 8 years and
above and by persons with reduced physical, sensory or mental
capabilities or lack of experience and knowledge if they have
been given supervision or instruction concerning use of the
appliance in a safe way and if they understand the hazards
involved. Cleaning and user maintenance shall not be made by
children unless they are older than 8 and supervised. Keep the
appliance and its cord out of reach of children aged less than 8
years.
-
Children shall not play with the appliance.
-
Only use this appliance for its intended purpose to avoid
potential hazard or injury.
-
Do not let the mains cord hang over the edge of the table or
worktop on which the appliance stands.
-
Never pour water into the bean container, as this damages the
appliance.
-
Do not touch the grinding burrs of the of the appliance, especially
when the appliance is connected to a wall socket.
-
Do not touch the hot surfaces of the appliance when it operates.
-
Do not empty the water reservoir by tilting the appliance, as this
can damage the appliance. To empty the appliance, follow the
instructions for flushing the appliance (see 'Flushing the
appliance').
-
If a problem occurs that you cannot solve by means of this user
manual, contact the Consumer Care Center in your country. If the
problem cannot be solved, take the appliance to a service center
authorized by Philips for examination or repair. Do not attempt to
repair the appliance yourself, otherwise your warranty becomes
invalid.
7
English

Caution
-
Do not place the appliance on a hot surface and prevent the
mains cord from coming into contact with hot surfaces.
-
Do not place the appliance in a cabinet when in use.
-
Unplug the appliance if problems occur during grinding or
brewing and before you clean it.
-
Keep the plug and the wall socket dry.
-
Do not lift and move the appliance while it is operating.
-
The jug is hot during and after brewing. Always hold the jug by its
handle.
-
Never use the jug in a microwave oven.
-
Wait until the appliance has cooled down before you store it. The
hotplate and the coffee jug may be hot.
-
After you have unpacked the appliance, make sure it is complete
and undamaged. If in doubt, do not use the appliance but contact
the Consumer Care Center in your country.
-
This appliance is intended for normal household use only. It is not
intended for use in environments such as staff kitchens of shops,
offices, farms or other work environments. Nor is it intended to be
used by clients in hotels, motels, bed and breakfasts and other
residential environments.
Electromagnetic fields (EMF)
This Philips appliance complies with all applicable standards and regulations regarding exposure to
electromagnetic fields.
Before first use
Setting the clock
1 Put the mains plug in the wall socket. The time indication flashes on the display to indicate that
you have to set the clock time.
2 Turn the control knob to set the hour. The hour indication flashes (Fig. 2).
3 Press the center of the control knob to confirm the hour (Fig. 3).
4 The minutes indication starts flashing to indicate that you have to set the minutes (Fig. 4).
5 Turn the control knob to set the minutes (Fig. 5).
6 Press the center of the control knob to confirm the minutes (Fig. 6).
7 The display shows the set clock time. The coffeemaker is now ready for use.
8
English

Setting the automatic switch-off time
You can choose how long you want your coffee to stay hot after brewing by adjusting the time after
which the appliance automatically switches off. The default automatic switch-off time is 30 minutes.
The maximum automatic switch-off time is 120 minutes. To adjust the automatic switch-off time,
follow the steps below.
1 Make sure that the appliance is switched off but the mains plug is in the wall socket.
2 Press the center of the control knob until the display starts flashing.
3 Turn the control knob to increase or decrease the time. 1 is 10 minutes, 2 is 20 minutes, 3 is 30
minutes and so on until 12 is 120 minutes.
4 Press the center of the control knob to confirm the automatic switch-off time.
Note: The appliance always saves the last setting.
Flushing the appliance
Always flush the coffeemaker once before first use by following the steps below.
Warning: Never pour water into the bean container, as this damages the coffeemaker.
1 Open the water reservoir lid. Fill the water reservoir with fresh cold water up to the 8-cup indication
(Fig. 7).
Caution: Do not put coffee beans or pre-ground coffee in the water reservoir.
2 Close the water reservoir lid.
3 Put the jug in the appliance (Fig. 8).
4 Press the on/off button (Fig. 9). The display lights up and the appliance beeps.
5 Press the strength select button (Fig. 10).
6 Turn the control knob to choose the pre-ground coffee setting (Fig. 11). The pre-ground coffee icon
starts flashing.
7 Press the center of the control knob twice to confirm (Fig. 12). The appliance starts the flushing
process.
8 Let the appliance operate until the flushing process is finished. It is finished when the appliance
stops beeping.
9 Empty the jug.
10 Press the on/off button to switch off the appliance (Fig. 13).
Using the appliance
Filling the water reservoir
There are indications for 2 to 10 cups (275ml to 1375ml) on the water-level window. You can use these
indications to determine how much water to put in the water reservoir. The reflection changes from
light to dark for each cup of water added.
1 Open the water reservoir lid and fill the water reservoir with the required amount of cold water (Fig.
7).
Note: Do not fill the water reservoir beyond the 10-cup indication.
Note: Make sure that the amount of water you pour into the water reservoir is consistent with the
number of cups you want to brew. The coffeemaker uses all the water in the water reservoir.
9
English

Using coffee beans
Warning: Always keep the water reservoir lid closed when you fill the coffee bean
container with coffee beans. Otherwise coffee beans can fall into the water reservoir
and block up the water inlet.
1 Open the coffee bean container lid (Fig. 14).
2 Fill the fresh bean duo container with coffee beans. You can fill the two containers with two
different types of coffee beans. Make sure that there are enough coffee beans in the duo container
for the amount of coffee you want to brew (Fig. 15).
Note: Always make sure that the fresh bean duo bean container is at least half full.
Warning: To prevent the grinder from jamming, do not use unroasted or caramelized
beans. Use coffee beans instead of espresso beans, as espresso beans may damage
the grinder.
3 Open the filter basket holder (Fig. 16).
4 Place a paper filter (type 1x4 or no. 4) or the permanent filter in the filter basket (Fig. 17).
5 Close the filter basket holder and place the jug in the appliance (Fig. 8).
6 Turn the coarseness knob to select the desired type of grind (from fine to coarse). There are nine
grind settings (Fig. 18).
Tip: The coarseness knob allows you to choose between 9 different settings. The icons indicate 3
preselected optimal settings, but you can choose any setting in between. We advise you to
experiment with the different grind settings to find out which setting you prefer.
7 Turn the container selector to choose between the two containers (Fig. 19).
Note: Whenever you switch between coffee bean containers or coffee beans, there will always be
traces of coffee left of the previously ground type of coffee beans. Clean the grinder funnel after
you switch to a new type of coffee bean to prevent this.
8 Press the strength button (Fig. 10). The coffee bean icons start flashing.
9 Turn the control knob to select the desired coffee strength: 1 bean for mild coffee, 2 beans for
medium-strong coffee or 3 beans for strong coffee (Fig. 20).
10 Press the center of the control knob to confirm the strength (Fig. 6).
11 To select the number of cups, turn the control knob until the desired number of cups flashes on the
display (Fig. 21).
Note: Please keep in mind that the coffeemaker uses all the water in the water reservoir. If you
select a number of cups that is smaller than the amount of water, the coffee becomes weaker than
you intended.
12 Press the center of the control knob to confirm the number of cups (Fig. 6).
13 Press the center of the control knob again (Fig. 6). The appliance beeps and starts grinding the
required amount of coffee beans. When the grinding process is finished, the appliance starts
brewing coffee.
14 Wait until the coffeemaker has stopped beeping before you remove the jug.
Note: After brewing, coffee drips from the filter basket for several seconds.
15 The appliance keeps your coffee hot until it switches off automatically. If you do not need your
coffee to be kept hot, press the on/off button to switch off the appliance (Fig. 13).
Using pre-ground coffee
If you want to use pre-ground coffee instead of coffee beans, follow the steps below.
10
English

1 Open the water reservoir lid and fill the water reservoir with the required amount of cold water (Fig.
7).
2 Open the filter basket holder (Fig. 16).
3 Place a paper filter (type 1x4 or no. 4) or the permanent filter in the filter basket (Fig. 17).
4 Put pre-ground coffee in the paper filter or in the permanent filter.
5 Close the filter basket holder.
6 Put the jug in the appliance (Fig. 8).
7 Press the on/off button (Fig. 9). The display lights up.
8 Press the strength select button (Fig. 10).
9 Turn the control knob to choose the pre-ground coffee setting (Fig. 11). The pre-ground coffee icon
lights up.
10 Press the center of the control knob to confirm (Fig. 6).
11 Then press the center of the control knob again to start the brewing process (Fig. 6).
12 Wait until the coffeemaker has stopped beeping before you remove the jug.
Note: After brewing, coffee drips from the filter basket for several seconds.
13 The appliance keeps your coffee hot until it switches off automatically. If you do not need your
coffee to be kept hot, press the on/off button to switch off the appliance (Fig. 13).
Setting the timer
The timer enables you to program the time at which you want the brewing process to start. Make sure
that all steps of brewing coffee with either preground coffee or coffee beans have been taken before
you set the timer.
1 Press the timer button (Fig. 22) and the timer icon will appear on the display. The hour indication
flashes to indicate that you have to set the hour.
2 Turn the knob to set the hour (Fig. 23).
3 Press the center of the control knob to confirm the hour (Fig. 24). The minutes indication starts
flashing to indicate that you have to set the minutes.
4 Turn the control knob to set the minutes (Fig. 25).
5 Press the center of the knob to confirm the minutes and the time set (Fig. 24). The timer is set and
the brewing process will start at the preset time.
Note: To cancel the timer, simply press the timer button again and the timer icon will disappear from
the display.
Drip stop function
The drip stop function enables you to remove the jug from the coffeemaker before the brewing
process is finished. When you remove the jug, the drip stop stops the flow of coffee into the jug.
Note: The brewing process does not stop when you remove the jug. If you do not put the jug back into
the appliance within 20 seconds, the filter basket overflows.
Cleaning and maintenance
Cleaning after every use
Never immerse the appliance in water or any other liquid, nor rinse it under the tap.
11
English

1 Press the on/off button to switch off the appliance (Fig. 13).
2 Remove the mains plug from the wall socket.
3 Wipe the outside of the coffeemaker with a damp cloth (Fig. 26).
4 Clean the filter basket and the permanent filter with hot water and some washing-up liquid or
clean them in the dishwasher.
Cleaning the grinder funnel
Important: Clean the grinder funnel every 1 to 2 weeks to prevent clogging with ground coffee. This
is easily and quickly done by following the steps below.
Note: Make sure the coffee bean container is empty before you start the cleaning procedure.
1 Press the on/off button to switch off the appliance (Fig. 13).
2 Open the filter basket holder (Fig. 16).
3 Place a paper filter (type 1x4 or no. 4) or the permanent filter in the filter basket (Fig. 17).
4 Close the filter basket holder.
5 Use the end of the bean chute cleaning brush to open the grinder funnel lid (Fig. 27).
6 Press and hold the strength select button for 4 seconds (Fig. 28). The grinder starts cleaning itself.
7 When the grinder has stopped cleaning, use the bean chute cleaning brush to brush ground coffee
residues into the lower part of the funnel (Fig. 29). The ground coffee residues fall into the filter
basket.
8 Close the lid of the grinder funnel.
9 Remove the paper filter or permanent filter with the ground coffee residues.
Descaling the coffeemaker
Descale the coffeemaker when you notice excessive steaming or when the brewing time increases. It
is advisable to descale the coffeemaker every two months. Only use white vinegar to descale, as other
products may cause damage to the coffeemaker. For more information on descaling, see
www.philips.com/descale-coffeemaker.
Warning: Never use vinegar with an acetic acid content of 8 % or more, natural vinegar,
powder descalers or tablet descalers to descale the appliance, as this may cause
damage.
1 Open the water reservoir lid.
2 Fill the water reservoir with white vinegar (4% acetic acid) up to the 10-cup indication (Fig. 7).
3 Place a paper filter (type 1x4 or no. 4) or the permanent filter in the filter basket and close the filter
basket holder (Fig. 17).
4 Put the empty jug in the appliance (Fig. 8).
5 Put the mains plug in the wall socket.
6 Press the on/off button to switch on the appliance (Fig. 9). The display lights up.
7 Press the strength select button and turn the control knob to choose the pre-ground coffee setting
(Fig. 11).
8 Press the center of the control knob to confirm (Fig. 6).
9 Press the center of the control knob again to start the brewing process (Fig. 6).
10 Wait until half of the vinegar has flowed into the jug (Fig. 30). Then press the on/off button to
interrupt the brewing process. Let the vinegar act for at least 15 minutes.
11 Press the on/off button to switch the coffeemaker back on (Fig. 9).
12
English

12 Press the center of the control knob twice to let the appliance complete the brewing process (Fig.
12).
13 Empty the jug and remove the paper filter or the permanent filter with the scale residues.
14 Fill the water reservoir with fresh cold water and press the center of the control knob twice to start
another brewing process (Fig. 12). Let the coffeemaker complete the entire brewing process and
empty the jug.
Note: If necessary, repeat step 14 until the water that comes out of the appliance no longer tastes
or smells of vinegar.
15 Clean the filter basket and the jug with hot water and some washing-up liquid.
16 Press the on/off button on the front of the appliance to switch off the appliance (Fig. 13).
Ordering accessories
To buy accessories or spare parts, visit www.philips.com/parts-and-accessories or go to your Philips
dealer. You can also contact the Philips Consumer Care Center in your country (see the international
warranty leaflet for contact details).
Warranty and support
If you need information or support, please visit www.philips.com/support or read the international
warranty leaflet.
Recycling
-
This symbol means that this product shall not be disposed of with normal household waste
(2012/19/EU) (Fig. 31).
-
Follow your country's rules for the separate collection of electrical and electronic products. Correct
disposal helps prevent negative consequences for the environment and human health.
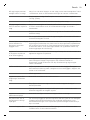
Troubleshooting
This chapter summarizes the most common problems you could encounter with the appliance. If you
are unable to solve the problem with the information below, visit www.philips.com/support for a list
of frequently asked questions or contact the Consumer Care Center in your country.
Problem
Solution
The appliance does not
work.
Put the mains plug in the wall socket and press the on/off button to
switch on the appliance.
Make sure that the voltage indicated on the appliance corresponds to
the local mains voltage.
Fill the water reservoir with water.
Close the lid of the grinder funnel.
The grinder does not work
or does not work properly.
Make sure that you did not select pre-ground coffee. If the symbol for
pre-ground coffee is visible on the display, you selected pre-ground
coffee.
Clean the grinder funnel by following the instructions.
13
English

When I use the grinder,
the coffee is too weak.
Make sure that the number of cups you selected is consistent with the
amount of water in the water reservoir. Please keep in mind that the
coffeemaker uses up all the water in the water reservoir.
Use the strength select button to set the coffee strength to ‘strong’.
Use coffee beans of a stronger blend or flavor.
When I use pre-ground
coffee, the coffee is too
weak.
Make sure that the amount of pre-ground coffee in the filter is
consistent with the amount of water in the water reservoir. Please keep
in mind that the appliance uses up all the water in the water reservoir.
Use ground coffee of a stronger blend or flavor.
To increase the coffee strength, increase the amount of pre-ground
coffee or decrease the amount of water.
The filter overflows when I
remove the jug from the
appliance while it is
brewing coffee.
If you remove the jug for more than 20 seconds during the brewing
process, the drip stop causes the filter basket to overflow. Also note that
the coffee does not reach its full taste before the end of the brewing
process. Therefore we advise you not to remove the jug and pour out
the coffee before the end of the brewing process.
The appliance continues
to drip long after the
brewing process has
ended.
The dripping is caused by condensation of steam. It is completely
normal that the appliance drips for some time.
If the dripping does not stop, the drip stop may be clogged. To clean the
drip stop, open the filter basket holder and take out the filter basket.
Rinse the filter basket and the drip stop under the tap.
The coffee is not hot
enough.
The coffee in the jug cools down faster if you brew only a few cups. The
coffee stays hot longer if you brew 10 cups, which is a full jug.
Descale the appliance.
The appliance does not
start cleaning the grinder
funnel.
Make sure that the appliance is plugged in.
Open the lid of the grinder funnel before you press and hold the
strength select button.
Press and hold the strength select button for 4 seconds until the grinder
starts cleaning itself.
The appliance works but
makes a beeping sound.
Please check if the lid of the grinder funnel is closed properly.
The coffee beans seem to
be used up quickly.
To brew a perfect cup of coffee, the appliance needs a certain amount
of ground coffee. The amount of coffee beans the appliance uses to
obtain the optimal amount of ground coffee per cup is normal.
The timer does not work. Make sure to complete all steps for brewing coffee with coffee beans or
pre-ground coffee before you set the timer.
14
English

Dansk
Introduktion
Tak, fordi du har købt et Philips-produkt. Gå til www.philips.com/grindbrew for at registrere dit nye
produkt. På dette websted finder du også praktiske videoer, lækre opskrifter og ofte stillede
spørgsmål, og her kan du også få support.
Generel beskrivelse (fig. 1)
1 Filterkurv
2 Drypstop-funktion
3 Holder til filterkurv
4 Vandstandsindikator
5 Låg til vandtank
6 Låg til beholder til bønner
7 Vælger af beholder til kaffebønner
8 Knap til formalingsgrad
9 Dobbeltbeholder til friske bønner
10 Låg over kværnens tragt
11 Lås til låget over kværnens tragt
12 Vandpåfyldningshul
13 Display
14 On/off-knap
15 Ikon for formalet kaffe
16 Antal kopper
17 Ikon for kaffekop
18 Ikon med kaffebønne for valg af kaffestyrke
19 Knap til valg af kaffestyrke
20 Timer-knap
21 Kontrolknap
22 Tidsangivelse
23 Ikon for timer
24 Låg til glaskande
25 Glaskande
26 Rengøringsbørste til kaffebønneslisken
Vigtigt
Fare
-
Apparatet må aldrig kommes ned i vand eller andre væsker, ej
heller skylles under vandhanen.
Advarsel
-
Kontrollér, om den angivne netspænding på apparatet svarer til
den lokale netspænding, før du slutter strøm til apparatet.
-
Brug aldrig apparatet, hvis netstik, netledning eller selve
apparatet er beskadiget.
15
Dansk

-
Hvis netledningen beskadiges, må den kun udskiftes af Philips, et
autoriseret Philips-serviceværksted eller en tilsvarende
kvalificeret fagmand for at undgå enhver risiko.
-
Apparatet skal sluttes til en stikkontakt med jordforbindelse.
-
Dette apparat kan bruges af børn fra 8 år og op og personer med
nedsatte fysiske, sensoriske eller mentale evner eller manglende
viden eller erfaring, hvis de er blevet vejledt eller instrueret i brug
af apparatet på en sikker måde, og hvis de forstår de involverede
risici. Rengøring og vedligeholdelse må ikke foretages af børn,
medmindre de er over 8 år gamle og under opsyn. Hold apparatet
og dets ledning uden for rækkevidde af børn under 8 år.
-
Lad ikke børn lege med apparatet.
-
Brug kun dette apparat til dets tilsigtede formål for at undgå
potentielle farer og skader.
-
Lad aldrig ledningen hænge ud over kanten af det bord eller den
plads, som apparatet står på.
-
Hæld aldrig vand i beholderen til kaffebønner, da det kan
beskadige kaffemaskinen.
-
Undgå at røre ved kværnbladene i apparatet, især når apparatet
er tilsluttet en stikkontakt.
-
Rør aldrig ved apparatets varme dele under betjening.
-
Tøm ikke vandtanken ved at vippe apparatet, da det kan
beskadige apparatet. Tøm vandtanken ved at følge vejledningen
for gennemskylning af apparatet (se 'Gennemskylning af
apparatet').
-
Skulle der opstå problemer, som du ikke kan afhjælpe vha. denne
brugervejledning, bedes du kontakte det lokale Philips
Kundecenter. Hvis du ikke kan løse problemet, skal du aflevere
apparatet hos et autoriseret Philips-serviceværksted. Forsøg ikke
at reparere apparatet selv, da din garanti ellers bliver ugyldig.
Forsigtig
-
Stil aldrig apparatet på et varmt underlag, og sørg for, at
netledningen ikke kommer i berøring med varme flader.
16
Dansk

-
Placer ikke apparatet i et skab, mens den er i brug.
-
Tag stikket ud af stikkontakten, hvis der opstår problemer under
formaling eller brygning samt før rengøring af apparatet.
-
Både stik og stikkontakt skal holdes tørre.
-
Undlad at flytte eller løfte apparatet under brug.
-
Kanden er varm under og efter brygningen. Brug altid håndtaget,
når du skal løfte kanden.
-
Brug aldrig kanden i en mikroovn.
-
Læg aldrig apparatet væk, før det er helt afkølet. Varmepladen og
kaffekanden kan være varme.
-
Efter udpakningen af apparatet skal du kontrollere, at det er helt
og ubeskadiget. Hvis du er i tvivl, bør du ikke bruge apparatet men
kontakte dit lokale Philips Kundecenter.
-
Dette apparat er kun beregnet til hjemmebrug. Det er ikke
beregnet til brug i miljøer som f.eks. personalekøkkener i butikker,
på kontorer, på gårde eller andre arbejdspladser. Det er heller ikke
beregnet til brug af kunder på hoteller, moteller, bed and
breakfast eller andre beboelsesmiljøer.
Elektromagnetiske felter (EMF)
Dette Philips-apparat overholder alle branchens gældende standarder og regler angående
eksponering for elektromagnetiske felter.
Før apparatet tages i brug
Indstilling af uret
1 Sæt stikket i en stikkontakt. Timeangivelsenblinker på displayet for at indikere, at du skal indstille
klokkeslættet.
2 Drej kontrolknappen for at indstille klokken. Timeangivelsen blinker (fig. 2).
3 Tryk midt på kontrolknappen for at bekræfte timeangivelsen (fig. 3).
4 Minutangivelsen begynder at blinke for at indikere, at du skal indstille antal minutter (fig. 4).
5 Drej kontrolknappen for at indstille antal minutter (fig. 5).
6 Tryk midt på kontrolknappen for at bekræfte antal minutter (fig. 6).
7 Displayet viser klokkeslættet. Kaffemaskinen er nu klar til brug.
Indstilling af automatisk slukketid
Du kan vælge, hvor længe kaffen skal holdes varm efter brygning ved at indstille den tid, hvor
apparatet automatisk skal slukke. Standardindstillingen for automatisk slukketid er 30 minutter.
17
Dansk

Maksimumindstillingen for automatisk slukketid er 120 minutter. Følg nedenstående trin for at indstille
den automatiske slukketid.
1 Kontrollér, at apparatet er slukket, og at stikket er sat i stikkontakten.
2 Tryk midt på kontrolknappen, indtil displayet begynder at blinke.
3 Drej kontrolknappen for at skrue tiden frem eller tilbage. 1 er 10 minutter, 2 er 20 minutter, 3 er 30
minutter op til 12, der er 120 minutter.
4 Tryk midt på kontrolknappen for at bekræfte den automatiske slukketid.
Bemærk: Apparatet gemmer altid den sidste indstilling.
Gennemskylning af apparatet
Husk altid at gennemskylle kaffemaskinen før første brug ved at følge nedenstående trin.
Advarsel: Hæld aldrig vand i beholderen til kaffebønner, da det kan beskadige
kaffemaskinen.
1 Åbn låget til vandtanken. Fyld vandtanken med friskt, koldt vand op til markeringen (fig. 7) for 8
kopper.
Forsigtig: Kom ikke kaffebønner eller formalet kaffe i vandtanken.
2 Luk låget til vandtanken.
3 Sæt kanden i apparatet (fig. 8).
4 Tryk på on/off-knappen (fig. 9). Displayet lyser, og apparatet bipper.
5 Tryk på knappen (fig. 10) til valg af kaffestyrke.
6 Drej kontrolknappen for at vælge indstillingen (fig. 11) til formaling af kaffe. Ikonet for formaling af
kaffe begynder at blinke.
7 Tryk endnu en gang midt på kontrolknappen for at bekræfte (fig. 12). Apparatet går i gang med
gennemskylningen.
8 Lad apparatet køre, indtil skylningen er afsluttet. Skylningen er afsluttet, når apparatet stopper med
at bippe.
9 Tøm kanden.
10 Sluk for apparatet (fig. 13) ved at trykke på on/off-knappen.
Sådan bruges apparatet
Påfyldning af vandtanken
Der er angivelser for 2 til 10 kopper (275ml til 1375ml) på vandstandsruden. Du kan bruge disse
angivelser til at afgøre, hvor meget vand du skal hælde i vandtanken. Reflektionen ændres fra lys til
mørk for hver kop vand, der hældes i.
1 Åbn låget til vandtanken, og fyld vandtanken med den påkrævede mængde koldt vand (fig. 7).
Bemærk: Fyld aldrig vandtanken til op over mærket for 10 kopper.
Bemærk: Sørg for, at den mængde vand du hælder i vandtanken, svarer til antallet af kopper, du vil
brygge. Kaffemaskinen bruger alt vandet i vandtanken.
18
Dansk

Brug af kaffebønner
Advarsel: Sørg for, at låget til vandtanken altid er lukket, når du fylder kaffebønner i
beholderen til kaffebønner. Ellers er der risiko for, at der falder kaffebønner ned i
vandtanken, der tilstopper vandindtaget.
1 Åbn låget (fig. 14) til kaffebønnebeholderen.
2 Fyld dobbeltbeholderen til friske kaffebønner med kaffebønner. Du kan fylde de to beholdere med
to forskellige slags kaffebønner. Sørg for, at der er nok kaffebønner i dobbeltbeholderen til den
mængde kaffe, du vil brygge (fig. 15).
Bemærk: Sørg altid for, at dobbeltbeholderen til friske bønner er mindst halvt fuld.
Advarsel: Brug ikke uristede eller karamelliserede bønner, der kan forårsage, at
kværnen låser sig fast. Brug kaffebønner i stedet for espressobønner, idet
espressobønner kan beskadige kværnen.
3 Åbn holderen til filterkurven (fig. 16).
4 Sæt et papirfilter (type 1x4 eller nr. 4) eller det permanente filter i filterkurven (fig. 17).
5 Luk filterkurven, og placer kanden i produktet (fig. 8).
6 Drej på knappen til formalingsgrad for at vælge den ønskede type maling (fra fin til grov). Der er ni
formalingsindstillinger (fig. 18).
Tip: Med knappen for formalingsgrad kan du vælge mellem ni forskellige indstillinger. Ikonerne
angiver tre forudvalgte optimale indstillinger, men du kan også vælge alle indstillinger mellem
ikonerne. Vi anbefaler, at du eksperimenterer med de forskellige malingsindstillinger for at finde ud
af, hvilken indstilling du foretrækker.
7 Drej beholdervælgeren for at vælge mellem de to beholdere (fig. 19).
Bemærk: Når du skifter mellem kaffebønnebeholdere eller kaffebønner, vil der altid være rester af
kaffe tilbage fra den tidligere malede kaffebønnetype. For at undgå dette kan du rengøre
kaffebønneslisken, når du skifter til en ny type kaffebønner.
8 Tryk på knappen til valg af kaffestyrke (fig. 10). Ikonet for kaffebønner begynder at blinke.
9 Drej kontrolknappen for at vælge den ønskede kaffestyrke: 1 bønne for mild kaffe, 2 bønner for
kaffe af mediumstyrke eller 3 bønner for stærkkaffe (fig. 20).
10 Tryk midt på kontrolknappen for at bekræfte styrken (fig. 6).
11 Du vælger antallet af kopper ved at dreje kontrolknappen, indtil det ønskede antal kopper blinker
på displayet (fig. 21).
Bemærk: Husk, at kaffemaskinen bruger alt vandet i vandtanken. Hvis du vælger et antal kopper,
der er mindre end den tilsvarende vandmængde, vil kaffen blive svagere.
12 Tryk midt på kontrolknappen for at bekræfte antallet af kopper (fig. 6).
13 Tryk midt på kontrolknappen endnu en gang (fig. 6). Kaffemaskinen bipper, og begynder at male
den ønskede mængde kaffebønner. Når bønnerne er malet, begynder maskinen at brygge kaffe.
14 Vent, indtil kaffemaskinen er stoppet med at bippe, inden du fjerner kanden.
Bemærk: Efter brygningen drypper der kaffe fra filterkurven i flere sekunder.
15 Apparatet holder kaffen varm, indtil det slukkes automatisk. Hvis du ikke har brug for at få kaffen
holdt varm, skal du trykke på on/off-knappen for at slukke apparatet (fig. 13).
Brug af formalet kaffe
Hvis du vil bruge formalet kaffe i stedet for kaffebønner, skal du følge nedenstående trin.
1 Åbn låget til vandtanken, og fyld vandtanken med den påkrævede mængde koldt vand (fig. 7).
19
Dansk

2 Åbn holderen til filterkurven (fig. 16).
3 Sæt et papirfilter (type 1x4 eller nr. 4) eller det permanente filter i filterkurven (fig. 17).
4 Put formalet kaffe i papirfiltret eller i det permanente filter.
5 Luk holderen til filterkurven.
6 Sæt kanden i apparatet (fig. 8).
7 Tryk på on/off-knappen (fig. 9). Displayet lyser.
8 Tryk på knappen til valg af kaffestyrke (fig. 10).
9 Drej kontrolknappen for at vælge indstillingen til formaling af kaffe (fig. 11). Ikonet for formaling af
kaffe lyser.
10 Tryk midt på kontrolknappen for at bekræfte (fig. 6).
11 Tryk derefter midt på kontrolknappen igen for at starte brygningen (fig. 6).
12 Vent, indtil kaffemaskinen er stoppet med at bippe, inden du fjerner kanden.
Bemærk: Efter brygningen drypper der kaffe fra filterkurven i flere sekunder.
13 Apparatet holder kaffen varm, indtil det slukkes automatisk. Hvis du ikke har brug for at få kaffen
holdt varm, skal du trykke på on/off-knappen for at slukke apparatet (fig. 13).
Indstilling af timeren
Timeren gør det muligt at indstille det tidspunkt, hvor brygningen skal starte. Sørg for, at alle trin i
kaffebrygning med enten formalet kaffe eller kaffebønner er valgt, før du indstiller timeren.
1 Tryk på timer-knappen (fig. 22), og timerikonet vises på skærmen. Timetallet blinker for at indikere,
at du skal indstille antal timer.
2 Drej på knappen for at indstille antal timer (fig. 23).
3 Tryk midt på kontrolknappen for at bekræfte timeangivelsen (fig. 24). Minutangivelsen begynder at
blinke for at indikere, at du skal indstille antal minutter.
4 Drej kontrolknappen for at indstille antal minutter (fig. 25).
5 Tryk midt på kontrolknappen for at bekræfte antal minutter og det indstillede klokkeslæt (fig. 24).
Timeren er indstillet, og brygningen starter på det angivne tidspunkt.
Bemærk: Hvis du vil annullere timeren, skal du blot trykke på timer-knappen igen, så timerikonet
forsvinder fra displayet.
Drypstop-funktion
Drypstop-funktionen gør det muligt at fjerne kanden fra kaffemaskinen, inden bryggeprocessen er
færdig. Når du fjerner kanden, stopper drypstop-funktionen kaffens løb ned i kanden.
Bemærk: Brygningen stopper ikke, når du fjerner kanden. Hvis du ikke stiller kanden tilbage i apparatet
inden for 20 sekunder, flyder filterkurven over.
Rengøring og vedligeholdelse
Rengøring efter hver brug
Apparatet må aldrig kommes ned i vand eller andre væsker, ej heller skylles under
vandhanen.
1 Sluk for apparatet (fig. 13) ved at trykke på on/off-knappen.
20
Dansk
La page est en cours de chargement...
La page est en cours de chargement...
La page est en cours de chargement...
La page est en cours de chargement...
La page est en cours de chargement...
La page est en cours de chargement...
La page est en cours de chargement...
La page est en cours de chargement...
La page est en cours de chargement...
La page est en cours de chargement...
La page est en cours de chargement...
La page est en cours de chargement...
La page est en cours de chargement...
La page est en cours de chargement...
La page est en cours de chargement...
La page est en cours de chargement...
La page est en cours de chargement...
La page est en cours de chargement...
La page est en cours de chargement...
La page est en cours de chargement...
La page est en cours de chargement...
La page est en cours de chargement...
La page est en cours de chargement...
La page est en cours de chargement...
La page est en cours de chargement...
La page est en cours de chargement...
La page est en cours de chargement...
La page est en cours de chargement...
La page est en cours de chargement...
La page est en cours de chargement...
La page est en cours de chargement...
La page est en cours de chargement...
La page est en cours de chargement...
La page est en cours de chargement...
La page est en cours de chargement...
La page est en cours de chargement...
La page est en cours de chargement...
La page est en cours de chargement...
La page est en cours de chargement...
La page est en cours de chargement...
La page est en cours de chargement...
La page est en cours de chargement...
La page est en cours de chargement...
La page est en cours de chargement...
La page est en cours de chargement...
La page est en cours de chargement...
La page est en cours de chargement...
La page est en cours de chargement...
La page est en cours de chargement...
La page est en cours de chargement...
La page est en cours de chargement...
La page est en cours de chargement...
La page est en cours de chargement...
La page est en cours de chargement...
La page est en cours de chargement...
La page est en cours de chargement...
La page est en cours de chargement...
La page est en cours de chargement...
La page est en cours de chargement...
La page est en cours de chargement...
La page est en cours de chargement...
La page est en cours de chargement...
La page est en cours de chargement...
La page est en cours de chargement...
La page est en cours de chargement...
La page est en cours de chargement...
La page est en cours de chargement...
La page est en cours de chargement...
La page est en cours de chargement...
La page est en cours de chargement...
La page est en cours de chargement...
La page est en cours de chargement...
La page est en cours de chargement...
La page est en cours de chargement...
La page est en cours de chargement...
La page est en cours de chargement...
La page est en cours de chargement...
La page est en cours de chargement...
-
 1
1
-
 2
2
-
 3
3
-
 4
4
-
 5
5
-
 6
6
-
 7
7
-
 8
8
-
 9
9
-
 10
10
-
 11
11
-
 12
12
-
 13
13
-
 14
14
-
 15
15
-
 16
16
-
 17
17
-
 18
18
-
 19
19
-
 20
20
-
 21
21
-
 22
22
-
 23
23
-
 24
24
-
 25
25
-
 26
26
-
 27
27
-
 28
28
-
 29
29
-
 30
30
-
 31
31
-
 32
32
-
 33
33
-
 34
34
-
 35
35
-
 36
36
-
 37
37
-
 38
38
-
 39
39
-
 40
40
-
 41
41
-
 42
42
-
 43
43
-
 44
44
-
 45
45
-
 46
46
-
 47
47
-
 48
48
-
 49
49
-
 50
50
-
 51
51
-
 52
52
-
 53
53
-
 54
54
-
 55
55
-
 56
56
-
 57
57
-
 58
58
-
 59
59
-
 60
60
-
 61
61
-
 62
62
-
 63
63
-
 64
64
-
 65
65
-
 66
66
-
 67
67
-
 68
68
-
 69
69
-
 70
70
-
 71
71
-
 72
72
-
 73
73
-
 74
74
-
 75
75
-
 76
76
-
 77
77
-
 78
78
-
 79
79
-
 80
80
-
 81
81
-
 82
82
-
 83
83
-
 84
84
-
 85
85
-
 86
86
-
 87
87
-
 88
88
-
 89
89
-
 90
90
-
 91
91
-
 92
92
-
 93
93
-
 94
94
-
 95
95
-
 96
96
-
 97
97
-
 98
98


Philips HD7769 Manuel utilisateur
- Catégorie
- Cafetières
- Taper
- Manuel utilisateur
- Ce manuel convient également à
dans d''autres langues
- italiano: Philips HD7769 Manuale utente
- English: Philips HD7769 User manual
- Deutsch: Philips HD7769 Benutzerhandbuch
- Nederlands: Philips HD7769 Handleiding
- dansk: Philips HD7769 Brugermanual
- svenska: Philips HD7769 Användarmanual
- suomi: Philips HD7769 Ohjekirja
Documents connexes
-
Philips GRIND & BREW HD7768/90 Le manuel du propriétaire
-
Philips HD7769/00 Manuel utilisateur
-
-
-
-
-
-
Philips HD7761/00 Manuel utilisateur
-
-
Autres documents
-
Princess 249411 Le manuel du propriétaire
-
Beko CFM 4350 B Manuel utilisateur
-
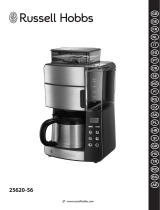 Russell Hobbs 25620-56 Manuel utilisateur
-
 Russell Hobbs 25610-56 Manuel utilisateur
-
-
Beko CFM6350I Le manuel du propriétaire
-
Electrolux EKF4040 Manuel utilisateur
-
-
Elta KM117TB Manuel utilisateur
-

