KitchenAid 10" Mode d'emploi
- Catégorie
- Petits appareils de cuisine
- Taper
- Mode d'emploi
Ce manuel convient également à

COUNTERTOP OVEN
F
OUR DE COMPTOIR
HORNO PARA MOSTRADOR
INSTRUCTION S/INSTR UCTIONS/INSTRUCCIONES
6
SLICE/
T
RANCHE/
R
EBANADAS
KCO111
W10321638B

2
TABLE OF CONTENTS
KITCHENAID
®
COUNTERTOP
OVEN SAFETY......................................................2
ELECTRICAL REQUIREMENTS .........................4
KITCHENAID
®
COUNTERTOP OVEN
FEATURES............................................................5
KITCHENAID
®
COUNTERTOP OVEN
CONTROLS ..........................................................6
Countertop Oven Features................................7
PREPARING THE KITCHENAID
®
COUNTERTOP OVEN FOR USE.........................8
KITCHENAID
®
COUNTERTOP OVEN USE ........9
Understanding Positions of the Countertop
Oven Rack.........................................................9
Baking (and Reaheating) with the
Countertop Oven.............................................10
Broiling (and Top Browning) with the
Countertop Oven.............................................10
Toasting with the Countertop Oven................11
Warming (Plus Keeping Warm and Heating)
with the Countertop Oven...............................11
Countertop Oven Use Tips .............................12
Food Cooking Tips..........................................12
Choosing Bakeware for Countertop
Oven Use:........................................................13
KITCHENAID
®
COUNTERTOP OVEN CARE ...13
Cleaning Your Countertop Oven.....................13
TROUBLESHOOTING........................................14
PROOF OF PURCHASE AND PRODUCT
REGISTRATION .................................................14
WARRANTY........................................................15
Hassle-Free Replacement Warranty –
50 United States and District of Columbia .....15
Hassle-Free Replacement Warranty –
Canada............................................................16
How to Arrange for Warranty Service in
Puerto Rico......................................................16
How to Arrange for Service after the
Warranty Expires – All Locations ....................16
How to Arrange for Service Outside these
Locations.........................................................16
How to Order Accessoriesand Replacement
Parts ................................................................16
TABLE DES MATIÈRES
CONSIGNES DE SÉCURITÉ DU FOUR DE
COMPTOIR.........................................................17
SPÉCIFICATIONS ÉLECTRIQUES ...................19
CARACTÉRISTIQUES DU FOUR DE
COMPTOIR KITCHENAID
®
................................20
COMMANDES DU FOUR DE COMPTOIR
KITCHENAID
®
.....................................................21
Caractéristiques du four de comptoir.............22
PRÉPARATION DU FOUR DE COMPTOIR
KITCHENAID
®
POUR UTILISATION.................23
UTILISATION DU FOUR DE COMPTOIR
KITCHENAID
®
.....................................................24
Clarification des positions de la grille du
four de comptoir..............................................24
Cuisson au four (et réchauffage) avec le
four de comptoir..............................................25
Cuisson au gril (et gratinage) avec le four
de comptoir .....................................................25
Grillage avec le four de comptoir....................26
Réchauffage (plus maintien au chaud et
chauffage) avec le four de comptoir ...............26
Conseils pour l'utilisation du four
de comptoir .....................................................27
Conseils de cuisson ........................................27
Choix des ustensiles de cuisson au four pour
utilisation dans le four de comptoir : ..............28
ENTRETIEN DU FOUR DE COMPTOIR
KITCHENAID
®
.....................................................28
Nettoyage du four de comptoir.......................28
DÉPANNAGE......................................................29
PREUVE D’ACHAT ET ENREGISTREMENT
DU PRODUIT......................................................29
GARANTIE DU FOUR DE COMPTOIR
KITCHENAID
®
.....................................................30
Garantie de remplacement sans difficulté -
pour les 50 États des États-Unis et le district
fédéral de Columbia........................................31
Garantie de remplacement sans difficulté -
Canada............................................................31
Dispositions nécessaires pour un service
sous garantie à Porto Rico..............................31
Dispositions nécessaires pour une
intervention de dépannage après expiration
de la garantie - Tous les pays.........................32
Dispositions nécessaires pour un service en
dehors de ces pays.........................................32
Commander des accessoires et des pièces de
rechange..........................................................32

3
ÍNDICE
SEGURIDAD DEL HORNO PARA
MOSTRADOR.....................................................33
REQUISITOS ELÉCTRICOS..............................35
CARACTERÍSTICAS DEL HORNO PARA
MOSTRADOR KITCHENAID
®
............................36
CONTROLES DEL HORNO PARA
MOSTRADOR KITCHENAID
®
...........................37
Características del horno para mostrador......38
PREPARACIÓN DEL HORNO PARA
MOSTRADOR KITCHENAID
®
PARA EL USO..39
USO DEL HORNO PARA MOSTRADOR
KITCHENAID
®
.....................................................40
Explicación de las posiciones de la rejilla del
horno para mostrador .....................................40
Cómo hornear (y recalentar) con el horno para
mostrador........................................................41
Cómo asar a la parrilla (y dorar) con el horno
para mostrador................................................41
Cómo tostar con el horno para mostrador.....42
Cómo calentar (y mantener caliente) con el
horno para mostrador .....................................42
Consejos para el uso del horno para
mostrador........................................................43
Consejos para la cocción de alimentos..........43
Selección de utensilios de hornear para el
horno de mostrador: .......................................44
CUIDADO DEL HORNO PARA MOSTRADOR
KITCHENAID
®
.....................................................44
Limpieza del horno para mostrador................44
SOLUCIÓN DE PROBLEMAS ...........................45
COMPROBANTE DE COMPRA Y REGISTRO
DEL PRODUCTO ...............................................45
GARANTÍA DEL HORNO PARA MOSTRADOR
KITCHENAID
®
.....................................................46
Garantía de reemplazo sin dificultades –
en los 50 estados de Estados Unidos y el
Distrito de Columbia .......................................46
Garantía de reemplazo sin dificultades - en
Canadá............................................................47
Cómo obtener servicio bajo la garantía en
Puerto Rico......................................................47
Cómo obtener servicio después de que
expire la garantía - En todas las ubicaciones.47
Cómo obtener servicio en otros lugares ........48
Cómo pedir accesorios y piezas de repuesto 48
KITCHENAID
®
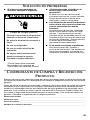
COUNTERTOP OVEN SAFETY
You can be killed or seriously injured
if you don't immediately follow
instructions.
You can be killed or seriously injured
if you don't follow instructions.
All safety messages will tell you what the potential hazard is, tell you how to reduce
the chance of injury, and tell you what can happen if the instructions are not followed.
Your safety and the safety of others are very important.
We have provided many important safety messages in this manual and on your
appliance. Always read and obey all safety messages.
This is the safety alert symbol.
This symbol alerts you to potential hazards that can kill or hurt you
and others.
All safety messages will follow the safety alert symbol and either the
word “DANGER” or “WARNING.” These words mean:
DANGER
WARNING

4
IMPORTANT SAFEGUARD
S
When using electrical appliances, basic safety precautions should always be followed,
including the following:
■ Read all instructions.
■ Do not touch hot surfaces. Use handles or knobs.
■ To protect against electrical shock, do not immerse cord, plugs, or any parts of the
oven in water or other liquid.
■ Close supervision is necessary when any appliance is used by or near children.
■ Unplug from outlet when not in use, before putting on or taking off parts, and before
cleaning. Allow to cool before putting on or taking off parts.
■ Do not operate any appliance with a damaged cord or plug or after the appliance
malfunctions or has been damaged in any manner. Return appliance to the nearest
Authorized Service Center for examination, repair or adjustment.
■ The use of accessory attachments not recommended by the appliance manufacturer
may cause injuries.
■ Do not let cord hang over edge of table or counter, or touch hot surfaces.
■ Do not place on or near a hot gas or electric burner, or in a heated oven.
■ Extreme caution must be used when moving an appliance containing hot oil or other
hot liquids.
■ Use extreme caution when removing broiler pan tray or disposing of hot grease.
■ Oversize foods or metal utensils must not be inserted in a Countertop Oven as they
may create a fire or risk of electric shock.
■ A fire may occur if Countertop Oven is covered or touching flammable material,
including curtains, draperies, walls and the like, when in operation. Do not store any
item on top of the appliance when in operation.
■ Do not clean with metal scouring pads. Pieces can break off the pad and touch
electrical parts, creating a risk of electric shock.
■ Extreme caution should be exercised when using containers constructed of materials
other than metal or glass.
■ Do not store any materials, other than manufacturers recommended accessories, in
this oven when not in use.
■ Do not place any of the following materials in the oven: paper, cardboard, plastic, or
anything similar.
■ Do not cover crumb drawer or any part of the oven with metal foil. This will cause
overheating of the oven.
■ To turn the oven off, rotate the time control knob to the 0 (off) position, rotate the toast
timer to the Off position, and the power indicator light will be off.
■ To disconnect, turn any control to “off,” then remove plug from wall outlet.
■ Do not use outdoors.
■ Do not use appliance for other than intended use.
■ This product is designed for household use only.
SAVE THESE INSTRUCTIONS

5
ELECTRICAL REQUIREMENTS
Voltage: 120 volts, AC only.
Hertz: 60 Hz
NOTE: This countertop oven has a 3-prong
grounded plug. To reduce the risk of
electrical shock, this plug will fit in an outlet
only one way. If the plug does not fit in the
outlet, contact a qualified electrician. Do not
modify the plug in any way.
Do not use an extension cord. If the power
supply cord is too short, have a qualified
electrician or technician install an outlet near
the appliance.
A short power supply cord (or detachable
power supply cord) should be used to
reduce the risk resulting from becoming
entangled in or tripping over a longer cord.
Longer detachable power supply cords or
extension cords are available and may be
used if attention is exercised in their use.
If a longer detachable power supply cord or
extension cord is used:
■ The marked electrical rating of the
cord set or extension cord should be
at least as great as the electrical
rating of the appliance.
■ The cord should be arranged so that
it will not drape over the countertop
or tabletop where it can be pulled on
by children or tripped over
unintentionally.
If the appliance is of the grounded type, the
extension cord should be a grounding-type
3-wire cord.
Electrical Shock Hazard
Plug into a grounded 3 prong
outlet.
Do not remove ground prong.
Do not use an adapter.
Do not use an extension cord.
Failure to follow these instructions
can result in death, fire, or
electrical shock.
WARNING

6
KITCHENAID
®
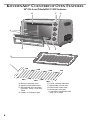
COUNTERTOP OVEN FEATURES
10" (25.4 cm) Model KCO111 Features
A. Rack-positioning slots
B. Upper cooking elements
C. Countertop oven controls:
Function, Temp, Time and
Toast
D. Power on indicator light
E. Lower cooking elements
F. Removable crumb tray
G. Countertop oven door
H. Broiler pan with grill
I. 2 position countertop oven
rack; up or down
A
BC
D
E
F
G
H
I

7
KITCHENAID
®
COUNTERTOP OVEN CONTROLS
A. Power on indicator light
B. Function control knob
C. Temperature control knob
D. Time control knob
E. Toast control knob
A
C
B
D
E

8
Countertop Oven Features
Cooking Elements
Four cooking elements produce up to
1440 watts for baking, broiling, toasting, and
warming for even heating.
Control Panel
Four large knobs have versatile settings for
Function, Temperature, Time and Toast. The
Power on indicator light glows blue when
the oven is operating.
Broil Pan with Grill
An easy-to-clean broil pan is used with a
special grill for baking, broiling, and
warming. The broil pan with grill can be
placed directly on the oven rack in the
desired location for cooking.
Countertop Oven Rack
The 6-slice capacity rack is reversible for
optimal cooking positions.
Countertop Oven Cavity
The 10" (25.4 cm) deep, 0.5 cu. ft
(0.014 cu. m) cavity features a nonstick
coating for ease of cleaning.
Toast Timer Control
For more accurate toasting; dark, medium
or light. The timer control bell will sound
when the desired toast selection is ready.
Countertop Oven Door
The durable metal-framed door has a large
stainless steel handle and a see-through,
tempered glass window.
Countetop Oven Cabinet
Stylish stainless steel front is matched with
baked enamel-coated sides.
Cook Timer
The countertop oven has a cook timer that
can be used for up to 60 minutes of
continuous cooking.
Rack-Positioning Slots
Upper and lower slots along the oven sides,
combined with the reversible oven rack, can
hold the food in up to 4 cooking positions.
The lower rack position slot contains a rack
stop.
Removable Crumb Tray
The Crumb tray is located inside the oven
and can be accessed by opening the oven
door for cleaning. Hand washing is
recommended.

9
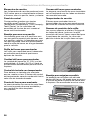
PREPARING THE KITCHENAID
®
COUNTERTOP
OVEN FOR USE
Before First Use:
1. Place the countertop oven on a dry, flat,
level surface such as a countertop or
table.
2. Be sure the sides, back and top of the
oven are at least 4" (10.16 cm) away
from any walls, cabinets or objects on
the counter or table.
3. Remove all accessories and wash in hot,
sudsy water. Dry thoroughly before
placing in the oven.
4. Remove all packaging materials and
labels, if present.
NOTE: Upon first use, the oven may
produce light smoke. This is normal.
Before Each Use:
1. Remove all items not required for the
next cooking procedure.
2. Plug into a grounded 3 prong outlet. The
countertop oven should be the only
appliance operating on the circuit.
3. The countertop oven is now ready to
use.
Electrical Shock Hazard
Plug into a grounded 3 prong
outlet.
Do not remove ground prong.
Do not use an adapter.
Do not use an extension cord.
Failure to follow these instructions
can result in death, fire, or
electrical shock.
WARNING

10
KITCHENAID
®
COUNTERTOP OVEN USE
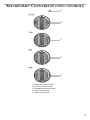
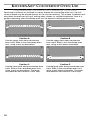
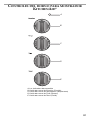
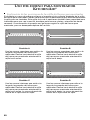
Understanding Positions of the Countertop Oven Rack
Food cooks uniformly as warmed air moves around the countertop oven rack. Up to 6
slices of bread may be placed directly on the rack for toasting. This unique 4-position rack
also holds the broil pan with grill, baking pans, dishes, or standard bakeware. Here is a
guide to adjusting your countertop oven rack for optimal cooking performance.
Position A Position B
Use the upper slots along countertop
oven walls. Slide in the countertop oven
rack, using a rack-up orientation.
Use the upper slots along countertop
oven walls. Slide in the countertop oven
rack, using a rack-down orientation.
Position C Position D
Use the lower slots along countertop oven
walls. Slide in the countertop oven rack,
using a rack-up orientation. The lower
rack position slot contains a rack stop.
Use the lower slots along countertop oven
walls. Slide in the countertop oven rack,
using a rack-down orientation. The lower
rack position slot contains a rack stop.

11
Baking (and Reaheating) with the
Countertop Oven
Both the top and bottom cooking elements
will cycle on and off while baking in order to
maintain the desired oven temperature.
Recommended Rack Positions:
When first using the countertop oven,
position the countertop oven rack as shown
by Position C (lower slot, rack up) in the
“Understanding Positions of the Oven Rack”
section. Then, adjust as needed for your
cooking situation. Remember to allow space
for food to rise.
To Bake:
1. Place the rack in a low position so that
the food to be baked or heated will be in
the center of the countertop oven.
2. Close door.
3. Turn the Function control knob to BAKE.
4. Turn the Temperature control knob to
the right to the desired temperature.
Bake according to package or recipe
instructions (usually 350°F – 425°F
[177°C – 218°C]).
5. Preheat the countertop oven for
5 minutes for baking (and reheating) by
turning the Time control knob to the
right past the 10-minute position, then
moving it back to the first dot (5-minute
position). After 5 minutes, the bell will
sound and the countertop oven will
automatically shut off.
6. Place the food in the center of the rack
and close the door.
7. Turn the Time control knob to the right
to the desired time. When the time has
elapsed, the bell will sound and the
countertop oven will automatically shut
off. Turn the Time control knob to “0”
(off) if food is removed before the time
has elapsed.
Broiling (and Top Browning) with
the Countertop Oven
Only the top cooking elements will heat
when this oven function is selected.
Recommended Rack Positions:
Use the upper slots along the countertop
oven walls. Position the countertop oven
rack as shown in Position B (upper slot, rack
down) in the “Understanding Positions of
the Oven Rack” section. Place the broil pan
with grill (with food) on the countertop oven
rack.
NOTE: Food to be broiled should be at least
1" (2.5 cm) from the cooking elements on
the top of the countertop oven. For delicate
foods such as fish or chicken, or for less
browning, place the rack in a lower position.
To Broil:
1. Place the food to be broiled on the grill
with broil pan, and then close the oven
door. The countertop oven does not
have an open door broil feature. The
door must be closed when broiling.
2. Set the Function control knob to BROIL.
3. Turn the Temperature control knob
clockwise to Broil/450°.
4. Turn the Time control knob to the right
to the desired time.
5. Monitor the broiling progress.
6. When broiling food on both sides, set
the Time control knob for the time
desired for one side. When the bell
sounds, the oven will automatically shut
off. Open the countertop oven door. Use
a pot holder to pull the rack and pan
about halfway out of the countertop
oven. Turn the food, slide the rack and
pan back into the countertop oven, and
close the door. Turn the Time control
knob to a desired time for the other side.
7. When the time elapses, a bell will sound
and the countertop oven will
automatically shut off.
8. If food is to be removed before the bell
sounds, turn the Time control knob to
“0” (off) to shut off the countertop oven.
Then, remove the food.
Toasting with the Countertop
Oven
Both the top and bottom cooking elements
will heat when this function is selected.
Recommended Rack Positions:
Use the lower slots along countertop oven
walls. Position the countertop oven rack as
shown in Position C (lower slot, rack up) in
the “Understanding Positions of the Oven
Rack” section.
To Toast:
1. For best results, place the bread to be
toasted directly on the rack and toward
center of the countertop oven.
2. Toast up to six slices of bread. When
toasting only one or two slices of bread,
center the bread in the countertop oven.

12
3. Close the countertop oven door.
4. Turn the Function control knob to the
TOAST setting.
5. Turn the Temperature control knob to
the right to the Broil/450° setting.
6. Turn the Toast control knob to the right
to the desired toast color; Dark, Medium
or Light. Toast ready bell will not sound
unless the control knob is turned past
first dot before turning the control to the
Light icon.
TIP: For more consistent results,
preheat countertop oven for 5 minutes
prior to first batch of toast. First batch of
toast is typically lighter than the selected
setting on a cold oven. Preheating the
countertop oven, or adding more time to
first batch, yields more accurate
toasting on first batch.
7. The bell will sound and the countertop
oven will automatically shut off when
toasting has finished.
8. Turn the Time control knob to “0” (off) if
toast is removed before the bell sounds.
9. Adjust Time control knob settings as
needed to get desired results.
NOTE: It is normal for condensation to form
on the door when toasting moist or fresh
breads.
IMPORTANT: Countertop oven will only
operate when the Toast function is selected
and the Toast timer is used to select time.
The Time control knob does not work with
the Toast function.
Warming (Plus Keeping Warm
and Heating) with the
Countertop Oven
The upper and lower cooking elements are
on during warming.
Recommended Rack Positions:
Select the rack-positioning slots, oven rack,
and broil pan with grill positions to match
the size of food being heated. When first
using the countertop oven, position the
oven rack as shown in Position C
(bottom slot, rack up) in the “Understanding
Positions of the Oven Rack” section. Adjust
as needed for your cooking situation.
To Warm:
1. Turn the Function control knob to the
BAKE setting.
2. Turn the Temperature control knob to a
desired setting. Warm is the lowest
temperature setting available.
3. Turn the Time control knob to a desired
setting.
Countertop Oven Use Tips
Setting very short times
When setting timer for 5 minutes or less,
turn the Time control knob beyond the
10-minute mark. Then, turn the knob back
to the desired time.
Are guesstimates OK?
Experience will teach you how much time to
use for toasting various kinds of bread.
Frozen, dark or whole-grain breads require a
longer time. Fresh, soft or white breads
require a shorter time.
For foods that melt
When cooking small pieces of foods or
foods that will melt, use the broil pan. This
will keep food from falling onto the cooking
elements.
To minimize cleanup
Spray the broil pan with nonstick cooking
spray for easier cleanup when cooking wet
or sticky foods. Wash pan thoroughly after
each use to avoid buildup of cooking spray.
Size limits for food
For best results, food and/or oven-safe
containers (see “Food Cooking Tips”
section) must fit into the countertop oven
without touching the cooking elements or
inside walls of oven. The door must close
completely.
When oven is off
Turn the Temperature control knob to Warm,
or minimum setting, when countertop oven
is not in use.
For extended use
When cooking for a long time at high
temperatures, you may detect a slight odor
from the oven insulation materials. This is
normal.

13
Food Cooking Tips
■ Check food cooking progress through
the clear, tempered glass door window.
Your countertop oven wiII be more
energy efficient if you open the door less
often.
■ If top of food item browns too fast, lower
the rack position or reduce oven
temperature. If bottom of food item
browns too fast, raise rack position or
reduce oven temperature.
■ Be sure all foods and/or containers fit in
the countertop oven without touching
cooking elements or keeping door from
closing.
■ Remove all plastic and/or paper
wrappers from foods before cooking.
■ Use only loosely covered oven-safe
containers. Airtight containers may
cause food to boil over or splatter.
■ Follow package directions when
preparing frozen or packaged foods.
Preheating the oven is not necessary.
■ Oven surfaces can become hot during
cooking. Touch only the door handle
and knobs during oven operation.
■ Do not place items on top or near
countertop oven while in use.
■ Replace cardboard, glass or plastic lids
with aluminum foil for use in the
countertop oven.
Choosing Bakeware for
Countertop Oven Use:
■ The broil pan included with the oven is
suitable for items such as cookies, rolls,
biscuits, nachos and steaks.
■ A variety of standard baking dishes,
such as a 9" (22.9 cm) round or square
cake pan, a 6 cup (1.5 L) muffin pan,
small baking sheets, and 1 and 2 qt
(0.95 mL and 1.9 L) round, square and
rectangular casserole dishes, may be
used. The oven door must close
completely.
■ Choose bakeware made of metal, oven-
safe glass, ceramic or silicone.
■ Use lowest oven rack position when
using deep, oven-safe glass or ceramic
containers and allow at least 1" (2.5 cm)
airspace between the top of the
container and the upper cooking
elements.
■ Do not use glass lids. If a cover is
desired, use a loosely fitted sheet of
aluminum foil shiny side up or down.
■ Many convenience foods are packaged
in nonmetallic containers suitable for
use in microwave ovens. Check
package directions to determine
whether the container is suitable for use
in a regular oven.
KITCHENAID
®
COUNTERTOP OVEN CARE
Cleaning Your Countertop Oven
■ Make sure the Time control knob is in
the 0 (off) position. Then, unplug from
the wall socket before cleaning.
■ Allow oven and accessories to cool
completely before cleaning.
■ Do not use abrasive cleaners or metal
scouring pads. They could scratch the
surface.
■ Wipe the outside of the oven with a
clean, damp cloth and dry thoroughly. A
nonabrasive liquid cleaner may be used
for stubborn stains. Rinse and dry
thoroughly.
■ Hand washing is recommended for
racks and pan. Remove all items from
the countertop oven. Wash the rack,
broil pan, and grill in hot, sudsy water.
Rinse and dry thoroughly.
To clean the crumb tray, slide it out of
the oven and brush off crumbs. Wipe
with a damp cloth and dry thoroughly.
NOTE: The oven rack, broil pan and grill
are dishwasher safe, but hand washing
is recommended.
■ To remove baked-on stains, scrub with a
paste made from baking soda and
water. Rinse and dry thoroughly.
■ The walls on the inside of the oven have
a nonstick coating for easy cleaning.
Remove heavy spatter after use with a
nylon or polyester mesh pad, sponge or
cloth dampened with warm water. Dry
with a paper towel or soft, dry cloth.
IMPORTANT: Do not use cleaning agents,
cleansers or metal scouring pads on the
inner oven coating as they may reduce its
effectiveness.

14
TROUBLESHOOTING
■ If your countertop oven should fail to
operate, check the following:
Is the countertop oven plugged into a
grounded 3 prong outlet?
■ Is the fuse in the circuit to the
countertop oven in working order?
If you have a circuit breaker box, make
sure the circuit is closed. Try unplugging
the countertop oven, then plug it back
in.
■ Upper cooking elements visibly glow,
but bottom cooking elements do not.
The upper cooking elements use higher
power for better browning performance.
The lower cooking elements are on, but
may not visibly glow like the upper
cooking elements. This is normal and
your countertop oven is working
properly.
■ If the problem cannot be corrected:
See the “KitchenAid Warranty and
Service” sections. Do not return the
countertop oven to the retailer – retailers
do not provide service.
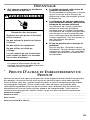
PROOF OF PURCHASE AND PRODUCT
REGISTRATION
Always keep a copy of the sales receipt showing the date of purchase of your countertop
oven. Proof of purchase will assure you of in-warranty service.
Before you use your countertop oven, please fill out and mail your product registration card
packed with the unit. This card will enable us to contact you in the unlikely event of a
product safety notification and assist us in complying with the provisions of the Consumer
Product Safety Act. This card does not verify your warranty. Please complete the following
for your personal records:
Model Number ___________________________________________________________________________
Serial Number ___________________________________________________________________________
Date Purchased__________________________________________________________________________
Store Name and Location_________________________________________________________________
Electrical Shock Hazard
Plug into a grounded 3 prong
outlet.
Do not remove ground prong.
Do not use an adapter.
Do not use an extension cord.
Failure to follow these instructions
can result in death, fire, or
electrical shock.
WARNING

15
KITCHENAID
®
COUNTERTOP OVEN WARRANTY
DISCLAIMER OF IMPLIED WARRANTIES; LIMITATION OF REMEDIES IMPLIED
WARRANTIES, INCLUDING TO THE EXTENT APPLICABLE WARRANTIES OF
MERCHANTABILITY OR FITNESS FOR A PARTICULAR PURPOSE, ARE EXCLUDED TO
THE EXTENT LEGALLY PERMISSIBLE. ANY IMPLIED WARRANTIES THAT MAY BE
IMPOSED BY LAW ARE LIMITED TO ONE YEAR, OR THE SHORTEST PERIOD ALLOWED
BY LAW. SOME STATES AND PROVINCES DO NOT ALLOW LIMITATIONS OR
EXCLUSIONS ON HOW LONG AN IMPLIED WARRANTY OF MERCHANTABILITY OR
FITNESS LASTS, SO THE ABOVE LIMITATIONS OR EXCLUSIONS MAY NOT APPLY TO
YOU.
IF THIS PRODUCT FAILS TO WORK AS WARRANTED, CUSTOMER’S SOLE AND
EXCLUSIVE REMEDY SHALL BE REPAIR OR REPLACEMENT ACCORDING TO THE
TERMS OF THIS LIMITED WARRANTY. KITCHENAID AND KITCHENAID CANADA DO
NOT ASSUME ANY RESPONSIBILITY FOR INCIDENTAL OR CONSEQUENTIAL
DAMAGES. This warranty gives you specific legal rights and you may also have other
rights which vary from state to state or province to province.
Hassle-Free Replacement Warranty –
50 United States and District of Columbia
We’re so confident the quality of our
products meets the exacting standards of
KitchenAid that, if your countertop oven
should fail within the first year of ownership,
KitchenAid will arrange to deliver an
identical or comparable replacement to your
door free of charge and arrange to have
your original toaster returned to us. Your
replacement unit will also be covered by our
one year limited warranty. Please follow
these instructions to receive this quality
service.
If your KitchenAid
®
countertop oven should
fail within the first year of ownership, simply
call our toll-free Customer Satisfaction
Center at 1-800-541-6390 Monday through
Friday, 8 a.m. to 8 p.m. (Eastern Time), or
Saturday, 10 a.m. to 5 p.m. Give the
consultant your complete shipping address.
(No P.O. Box numbers, please.)
When you receive your replacement
countertop oven, use the carton and
packing materials to pack up your original
coutnertop oven. In the carton, include your
name and address on a sheet of paper
along with a copy of the proof of purchase
(register receipt, credit card slip, etc.).
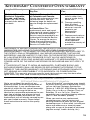
Length of Warranty: KitchenAid Will
Pay For:
KitchenAid Will Not Pay
For:
50 United States, the
District of Columbia,
Canada, and Puerto
Rico: One-year limited
warranty from date of
purchase.
50 United States, the District
of Columbia and Canada:
Hassle-free replacement of your
countertop oven. See the
following page for details on
how to arrange for replacement.
OR
In Puerto Rico: The
replacement parts and repair
labor costs to correct defects in
materials and workmanship.
Service must be provided by an
Authorized KitchenAid Service
Center. To arrange for service,
follow the instructions in the
“How to Arrange for Warranty
Service in Puerto Rico.”
A. Repairs when oven is
used in other than
normal single family
home use.
B. Damage resulting
from accident,
alteration, misuse or
abuse or use with
products not
approved by
KitchenAid.
C. Replacement parts or
repair labor costs for
countertop oven
when operated
outside the country of
purchase.

16
Hassle-Free Replacement Warranty – Canada
We’re so confident the quality of our
products meets the exacting standards of
the KitchenAid
®
brand that, if your
countertop oven should fail within the first
year of ownership, KitchenAid Canada will
replace your countertop oven with an
identical or comparable replacement. Your
replacement unit will also be covered by our
one year limited warranty. Please follow
these instructions to receive this quality
service.
If your KitchenAid
®
countertop oven should
fail within the first year of ownership, take
the countertop oven or ship collect to an
Authorized KitchenAid Service Centre.
In the carton include your name and
complete shipping address along with a
copy of the proof of purchase (register
receipt, credit card slip, etc.). Your
replacement countertop oven will be
returned prepaid and insured. If you are
unable to obtain satisfactory service in this
manner call our toll-free Customer
eXperience Centre at 1-800-807-6777.
Or write to us at:
Customer eXperience Centre
KitchenAid Canada
200 - 6750 Century Ave.
Mississauga, ON L5N 0B7
How to Arrange for Warranty Service in Puerto Rico
Your KitchenAid
®
countertop oven is
covered by a one-year limited warranty from
the date of purchase. KitchenAid will pay for
replacement parts and labor costs to correct
defects in materials and workmanship.
Service must be provided by an Authorized
KitchenAid Service Center.
Take the countertop oven or ship prepaid and
insured to an Authorized KitchenAid Service
Center. Your repaired countertop oven will be
returned prepaid and insured. If you are
unable to obtain satisfactory service in this
manner, call toll-free 1-800-541-6390 to learn
the location of a Service Center near you.
How to Arrange for Service after the Warranty Expires – All Locations
Before calling for service, please review the
“Troubleshooting” section.
For service information in the 50 United
States, District of Columbia, and Puerto
Rico,
call toll-free 1-800-541-6390.
Or write to:
Customer Satisfaction Center
KitchenAid Portable Appliances
P.O. Box 218, St. Joseph, MI 49085-0218
Or contact an Authorized Service Center
near you.
For service information in Canada,
call toll-free 1-800-807-6777.
Or write to:
Customer eXperience Centre
KitchenAid Canada
200 - 6750 Century Ave.
Mississauga, ON L5N 0B7
How to Arrange for Service Outside these Locations
Consult your local KitchenAid dealer or the
store where you purchased the countertop
oven for information on how to obtain
service.
For service information in Mexico,
call the KitchenAid
®
line 01-800-002-2767
How to Order Accessories and Replacement Parts
To order accessories or replacement
parts for your countertop oven in the 50
United States, District of Columbia, and
Puerto Rico,
call toll-free 1-800-541-6390 Monday
through Friday, 8 a.m. to 8 p.m. (Eastern
Time), or Saturday, 10 a.m. to 5 p.m.
Or write to:
Customer Satisfaction Center
KitchenAid Portable Appliances
P.O. Box 218
St. Joseph, MI 49085-0218
To order accessories or replacement
parts for your countertop oven in
Canada,
call toll-free 1-800-807-6777.
Or write to:
Customer eXperience Centre
KitchenAid Canada
200 - 6750 Century Ave.
Mississauga, ON L5N 0B7
To order accessories or replacement
parts for your countertop oven in Mexico,
For service information in Mexico,
call the KitchenAid
®
line 01-800-002-2767

17
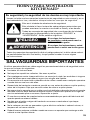
CONSIGNES DE SÉCURITÉ DU FOUR DE COMPTOIR
MESURES DE SÉCURITÉ
IMPORTANTES
Lors de l’utilisation d’appareils électriques, il faut toujours observer certaines précautions
élémentaires de sécurité, y compris les suivantes :
■ Lire toutes les instructions.
■ Ne pas toucher de surface chaude. Utiliser les poignées ou les boutons.
■ Pour éviter toute décharge électrique, ne pas immerger le cordon, les prises ou la
totalité du four dans l’eau ou dans tout autre liquide.
■ Une surveillance attentive s’impose lorsqu’un appareil ménager est utilisé par ou à
proximité d’enfants.
■ Débrancher l’appareil lorsqu’il n’est pas utilisé, avant d’y ajouter des pièces ou d’en
enlever et avant de le nettoyer. Attendre le refroidissement total avant d’installer ou de
retirer des pièces.
■ Ne pas faire fonctionner un appareil dont le cordon ou la prise est endommagé(e),
lorsque l’appareil ne fonctionne pas correctement ou lorsqu’il a été endommagé d’une
quelconque façon. Retourner l’appareil au centre de service agréé le plus proche pour
examen, réparation ou réglage.
■ L’utilisation d’accessoires de fixation non recommandés par le fabricant de l’appareil
peut causer des blessures.
■ Ne pas laisser le cordon pendre sur le côté d’une table ou d’un comptoir, ou toucher
une surface chaude.
Risque possible de décès ou de
blessure grave si vous ne suivez pas
immédiatement les instructions.
Risque possible de décès ou de
blessure grave si vous ne suivez pas
les instructions.
Tous les messages de sécurité vous diront quel est le danger potentiel et vous
disent comment réduire le risque de blessure et ce qui peut se produire en cas de
non-respect des instructions.
Votre sécurité et celle des autres est très importante.
Nous donnons de nombreux messages de sécurité importants dans ce manuel et sur
votre appareil ménager. Assurez-vous de toujours lire tous les messages de sécurité
et de vous y conformer.
DANGER
Voici le symbole d’alerte de sécurité.
Ce symbole d’alerte de sécurité vous signale les dangers
potentiels de décès et de blessures graves à vous et à d’autres.
Tous les messages de sécurité suivront le symbole d’alerte de
sécurité et le mot “DANGER” ou “AVERTISSEMENT”. Ces mots
signifient :
AVERTISSEMENT

18
■ Ne pas placer sur ou près d’un brûleur électrique ou à gaz chaud, ou dans un four
chaud.
■ La plus grande prudence s'impose lors du déplacement d'un appareil contenant de
l'huile chaude ou tout autre liquide.
■ La plus grande prudence s'impose lors du déplacement de la lèchefrite ou du
déversement de la graisse chaude.
■ On ne doit insérer ni aliments surdimensionnés, ni ustensiles en aluminium dans le four
posable car ils peuvent présenter un risque d'incendie ou de décharge électrique.
■ Lorsque le four posable est en cours de fonctionnement, un incendie peut se produire
si le four posable est recouvert par un matériau inflammable ou en contact avec celui-
ci, notamment des rideaux, draperies, parois et autres objets assimilés. Ne pas
entreposer d’objet sur le dessus de l’appareil pendant son fonctionnement.
■ Ne pas nettoyer avec des tampons à récurer métalliques. Des morceaux pourraient se
détacher et toucher les pièces électriques, créant un risque de décharge électrique.
■ La plus grande prudence s'impose lors de l’utilisation de récipients conçus à base de
matériaux autres que le métal ou le verre.
■ Ne pas entreposer dans ce four de matériel autre que les accessoires recommandés
par le fabricant pendant son fonctionnement.
■ Ne placer aucun des matériaux suivants dans le four : papier, carton, plastique ou tout
matériau similaire.
■ Ne pas couvrir le ramasse-miettes ou toute partie du four avec du papier aluminium.
Ceci entraînera la surchauffe du four.
■ Pour éteindre le four, tourner le bouton de commande de durée à la position 0 (arrêt),
tourner la minuterie de grillage à la position Off (arrêt), et le témoin lumineux s'éteindra.
■ Pour la déconnexion, mettre toutes les commandes en position “off” (arrêt), puis retirer
la fiche de la prise murale.
■ Ne pas utiliser à l'extérieur.
■ Ne pas utiliser l'appareil pour un autre usage que celui pour lequel il est conçu.
■ Ce produit est conçu uniquement pour un usage domestique.
CONSERVER CES INSTRUCTIONS

19
SPÉCIFICATIONS ÉLECTRIQUES
Volts : 120 volts C.A. uniquement.
Hertz : 60 Hz
REMARQUE : Ce four de comptoir possède
une prise de mise à la terre à 3 broches.
Pour réduire le risque de choc électrique,
cette fiche ne peut être insérée dans une
prise que dans un seul sens. Si cette fiche
ne convient pas à la prise, contacter un
électricien qualifié. Ne pas modifier la prise
de quelque manière que ce soit.
Ne pas utiliser de câble de rallonge. Si le
cordon d’alimentation électrique est trop
court, faire installer une prise près de
l’appareil électroménager par un électricien
ou un technicien de service qualifié.
On doit utiliser un cordon d’alimentation
court (ou détachable) afin de réduire le
risque qu'une personne s'emmêle dans un
cordon d'alimentation qui serait plus long ou
trébuche dessus.
Des cordons d'alimentation détachables ou
de rallonge plus longs sont disponibles et
peuvent être utilisés s’ils sont employés
avec précaution.
Si on utilise un cordon d'alimentation
détachable ou de rallonge plus long :
■ Les caractéristiques électriques
indiquées de l'ensemble de cordon
ou de rallonge doivent être au moins
aussi élevées que les
caractéristiques électriques de
l'appareil.
■ Le cordon doit être disposé de sorte
qu'il ne pende pas par dessus le
plan de travail ou la table de cuisine,
où des enfants pourraient tirer
dessus ou trébucher dessus
involontairement.
Si l'appareil comporte une mise à la terre, la
rallonge doit être un cordon de type mise à
la terre à 3 conducteurs.
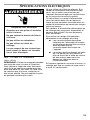
AVERTISSEMENT
Risque de choc électrique
Brancher sur une prise à 3 alvéoles
reliée à la terre.
Ne pas enlever la broche de liaison
à la terre.
Ne pas utiliser un adaptateur.
Ne pas utiliser un câble de
rallonge.
Le non-respect de ces instructions
peut causer un décès, un incendie
ou un choc électrique.

20
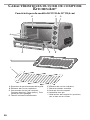
CARACTÉRISTIQUES DU FOUR DE COMPTOIR
KITCHENAID
®
Caractéristiques du modèle KCO111 de 10" (25,4 cm)
A. Encoches de positionnement de la grille
B. Éléments de cuisson supérieurs
C. Commandes du four de comptoir :
Function (fonction), Temp (temp.), Time
(durée) et Toast (grillage)
D. Témoin lumineux d'alimentation
E. Éléments de cuisson inférieurs
F. Ramasse-miettes amovible
G. Porte du four de comptoir
H. Lèchefrite avec gril
I. Grille de four de comptoir à 2 positions;
vers le haut ou vers le bas
A
BC
D
E
F
G
H
I
La page est en cours de chargement...
La page est en cours de chargement...
La page est en cours de chargement...
La page est en cours de chargement...
La page est en cours de chargement...
La page est en cours de chargement...
La page est en cours de chargement...
La page est en cours de chargement...
La page est en cours de chargement...
La page est en cours de chargement...
La page est en cours de chargement...
La page est en cours de chargement...
La page est en cours de chargement...
La page est en cours de chargement...
La page est en cours de chargement...
La page est en cours de chargement...
La page est en cours de chargement...
La page est en cours de chargement...
La page est en cours de chargement...
La page est en cours de chargement...
La page est en cours de chargement...
La page est en cours de chargement...
La page est en cours de chargement...
La page est en cours de chargement...
La page est en cours de chargement...
La page est en cours de chargement...
La page est en cours de chargement...
La page est en cours de chargement...
-
 1
1
-
 2
2
-
 3
3
-
 4
4
-
 5
5
-
 6
6
-
 7
7
-
 8
8
-
 9
9
-
 10
10
-
 11
11
-
 12
12
-
 13
13
-
 14
14
-
 15
15
-
 16
16
-
 17
17
-
 18
18
-
 19
19
-
 20
20
-
 21
21
-
 22
22
-
 23
23
-
 24
24
-
 25
25
-
 26
26
-
 27
27
-
 28
28
-
 29
29
-
 30
30
-
 31
31
-
 32
32
-
 33
33
-
 34
34
-
 35
35
-
 36
36
-
 37
37
-
 38
38
-
 39
39
-
 40
40
-
 41
41
-
 42
42
-
 43
43
-
 44
44
-
 45
45
-
 46
46
-
 47
47
-
 48
48


KitchenAid 10" Mode d'emploi
- Catégorie
- Petits appareils de cuisine
- Taper
- Mode d'emploi
- Ce manuel convient également à
dans d''autres langues
- English: KitchenAid 10" User guide
- español: KitchenAid 10" Guía del usuario
Documents connexes
-
KitchenAid Oven KCO222 Manuel utilisateur
-
KitchenAid KCO111OB0 Le manuel du propriétaire
-
-
-
KitchenAid 12" Convection Digital Mode d'emploi
-
-
-
-