
English
French
Italian
German
Spanish
Japanese
04
10
16
22
28
34
VeloxTM
User Manual
Magnetic Wireless Charging
Air Vent Mount

5
Product Information
At a Glance
Device Compatibility
Product Specifications
Installing the Magnetic Wireless
Charging Mount
Attaching the Air Vent Mount
Connecting to Power
Mounting your phone
01
02
Index
For optimal mounting and charging, please follow
the detailed instructions within this manual when
using the Velox Magnetic Wireless charging
mount.
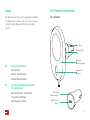
01 Product Information
USB-C Power
Cable
Vent Clip
Magnetic
Mounting Head
Alignment
Magnet
12V Power
Outlet Adaptor
Rotating Ball
Joint
At a Glance

76
Device Compatibility
Velox products are designed for use with
MagSafe Compatible iPhones and cases.
Compatible devices include iPhone 13, iPhone
13 mini, iPhone 13 Pro, iPhone 13 Pro Max and
the iPhone 12 Series.
iPhone 13 Pro Max & 13 Pro iPhone 13 & 13 Mini
Input Output
DC 12V ~ 24V
DC 5V ~ 3A
DC 9V ~ 2A
DC 12V ~ 1.5A
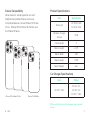
Product Specifications
Car Charger Specifications
Item Specification
Total Input DC 9.0V-1.67A
DC 5.0V-2.0A
Wireless Charger
Output 7.5 W
Cable Length 4′
Mount Length 2.22″
Mount Width 2.61″
Mount Height 3.58″
Mount Weight 5 oz.
iOttie is not liable for possible damages due to product
misuse.
*
EN

98
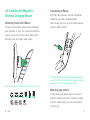
Attaching the Air Vent Mount
Simply push the Velox mount onto the blade of
your vehicle’s air vent. The silicon texture of the
prongs will ensure that the mount does not fall
o even when driving on rough roads.
02 Installing the Magnetic
Wireless Charging Mount
Mount is designed to be used only with FLAT air vent blades.
*
Connecting to Power
Plug the cable into your vehicle’s 12V power
socket by using the included adaptor.
Alternatively, you may plug the cable into your
vehicle’s USB-C outlet.
Mounting your phone
Simply place your phone against the mount,
and the magnets will hold it in place, charging
will start automatically. You are now ready to
start driving.
The Velox Magnetic Wireless Charger does not have
an On/O switch. Once the cable is plugged in and the
vehicle is turned on, the mount will stay on.
*
EN

The Velox Magnetic Wireless Charging
Air Vent Mount & Velox Magnetic Air Vent Mount is
backed by a 2 year warranty.

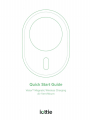
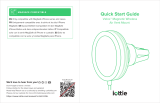
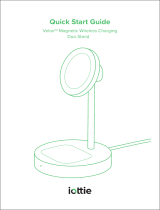
Quick Start Guide
Velox™ Magnetic Wireless Charging
Air
Vent
Mount
i ttie

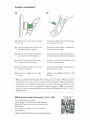
Product Installation
0
rnn
Attach VeloxN mount
to
your
vehicle's
air vent.
Fixez
le
support
Velox
sur
la
bouche
d'aeration
de
votre
vehicule.
c
Bringen
Sie
die
Velox-Halterung an
der
Luftung lhres Fahrzeugs an.
Fissa ii
supporto
Velox alla presa
d'aria della tua automobile.
Fije el
soporte
Velox a la ventila
de
aire
de
su vehfculo.
Velox~si:,,t-~i!iiili:iO)I7.,._/t-l;:i&l'J
f;jlta;l"o
e
Connect the USB-C cable
to
the 12V adap-
tor
included
in t
he
box.
Branchez
le
cable USB-C a l'
adaptateur
12V inclus dans
le
boitier
.
Verbinden
Sie
das
USB-C-Kabel
dem
in
der
Verpackung enthaltenen 12V Adapter.
Collega ii
cavo
USB-C all'adattatore 12V
incluso nella confezione.
Conecte el cable USB-C
al
adap
t
ador
de
1
2V
incluido en la caja.
USB-C-T-:7'J1,~ll5)ffll0)
12V7~79-
/;:t}l
~L.a:9
o
EN
Only
compat
ible
with
MagSafe iPhone series and accessories. I
FR
Uniquement
compatible
avec
la
serie
et
les
accessoires
iPhone
Magsafe.
/
GE
AusschlieBlich
kompatibel
mit
der
MagSafe iPhone-Reihe
und
dem
entsprechenden
Zubehor. /
IT
Compatibile
solo
con la
serie
MagSafe
di
iPhone e accessori. I ES Solo es
compat-
ible
con la serie y accesorios MagSafe para iPhone. /
JP
MagSafe iPhone:.,1
)-;(t:f;j
nidbO)h~
.'t
L,a;l"o
We'd love
to
hear from you! 0 0 @ D
Don't
forget
to
leave a
review
Follow
@iottie
for
the
latest
news
and
updates!
N
eed
help? Reach
out
to
us
directly
by
emailing:
cs@iottie.com
Please visit
our
website
for
more
information
www
.iottie.
com
https
://
www
.iottie.com/
manua
l/
veloxwire
lessavm
Scan
OR
code for
full manual

FCC Caution
Any
Changes
or
modifications
not
expressly
approved
by
the party responsible
for
compliance
could
void
the
user's authority
to
operate
the
equipment
This device complies with part
15
of
the
FCC Rules. Operation is subject
to
the following
two
conditions:
(1)
This device
may
not
cause harm-
ful interference, and (2) this device must
accept
any
interference received, including interference
that
may
cause undesired operation.
Note: This
equipment
has
been
tested
and
found
to
comply
with
the
limits
for
a Class 8 digital
device,
pursuant
to
part
15
of
the
FCC Rules.
These
limits are
designed
to
provide
reasonable
protection
against harmful
interference
in a residential installation. This
equipment
generates,
uses
and
can radiate radio
frequency
energy
and,
1f
not
installed
and
used
in
accordance
with
the
instructions,
may
cause
harmful
interference
to
radio
communications.
However,
there
is
no
guarantee
that
Interference will
not
occur
in
a particular installation.
If
this
equipment
does
cause
harmful
interference
to
radio
or
television reception,
which
can
be
determined
by
turning
the
equipment
off
and
on,
the
user
is
encouraged
to
try
to
correct
the
interference
by
one
or
more
of
the
following
measures:
• Reorient
or
relocate
the
receiving
antenna.
• Increase
the
separation
between
the
equipment
and
receiver.
• Connect the equipment into an outlet on a circuit different from that
to
which the receiver is connected.
•
Consult
the
dealer
or
an
experienced
radionv
technician
for
help.
FCC RF Radiation Exposure Sta
tement
1.
This Transmitter must
not
be
co-located
or
operating in conjunction with
any
other antenna
or
transmitter.
2.
This equipment complies with
RF
radiation exposure limits set forth for an uncontrolled environment
3. This
equipment
should
be
installed
and
operated
with minimum distance
20cm
between
the
radiator &
your
body
IC Warning
This device complies with Industry Canada license-exempt
RSS
standard(s). Operation is subject
to
the
following
two
conditions:
(1)
this device
may
not
cause interference,
and
(2) this device must
accept
any
interference, including interference that
may
cause undesired operation
of
the
device.
Le
present
appareil
est
conforme
aux
CNR
d'lndustrie
Canada
applicables
aux
appareils
radio
exempts
de
licence. L'exploitation est autorisee
aux
deux
conditions
suivantes :
(1)
l'appareil
ne
doit
pas
produire
de
brouillage,
et
(2) l'utilisateur
de
l'appareil
doit
accepter
tout
brouillage
radioelectrique subi,
meme
si
le
brouillage est susceptible
d'en
compromettre
le
fonctionnement.
The
device
has
been
evaluated
to
meet
general
RF
exposure
requirement.
To
maintain
com-
pliance
with
RSS-102 -Radio
Frequency
(RF)
Exposure guidelines, this
equipment
should
be
installed
and
operated
with
a
minimum
distance
of
20cm
between
the
radiator
and
your
body.
Le d1spositif
de
a
ete
evalue a
repondre
general
rf
exposition
exigence.pour
maintenir
la
con-
formite
avec
les
directives
d'exposition
du
RSS-102-Radio
Frequence
(RF).
ce
materiel
doit
etre
installe
et
exploite
a
une
distance
minimale
de
20
cm
entre
le
radiateur
et
votre
corps.
-
 1
1
-
 2
2
-
 3
3
-
 4
4
-
 5
5
-
 6
6
-
 7
7
-
 8
8


dans d''autres langues
- English: iOttie Velox User manual
Documents connexes
-
 iOttie vlxwcg211 Velox Magnetic Wireless Charger Mini Air Vent Mount Manuel utilisateur
-
iOttie 606MGIO202 Le manuel du propriétaire
-
 iOttie Velox Magnetic Wireless Air Vent Mount Mode d'emploi
-
 iOttie MGSFIO202 Mode d'emploi
-
 iOttie Velox Magnetic Mini Flush Mount Car Phone Holder Manuel utilisateur
-
 iOttie MGSFIO104 Velox Magnetic Flush Mount Manuel utilisateur
-
iOttie MGSFIO102 Manuel utilisateur
-
iOttie Velox Manuel utilisateur
-
iOttie MGSFIO101 Manuel utilisateur
-
iOttie One Touch Wireless 2 Manuel utilisateur


