Dash My Pint Ice Cream Maker Le manuel du propriétaire
- Catégorie
- Fabricants de crème glacée
- Taper
- Le manuel du propriétaire

DPIC100
model # DPIC100
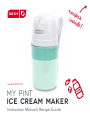
my pint
ice cream maker
Instruction Manual | Recipe Guide
r
e
c
i
p
e
s
i
n
s
i
d
e
!

table of contents ∙ 3
Important Safeguards .................................................................... 4-7
Parts & Features ................................................................................. 8
Before Using ..................................................................................... 9
Making Ice Cream in Electric Mode ....................................... 10-11
Making Ice Cream in Manual Mode ....................................... 12-13
Cleaning & Maintenance ............................................................... 14
Recipes ....................................................................................... 15-22
Sundae Ideas ............................................................................. 24-25
Customer Support .......................................................................... 26
Warranty ........................................................................................... 27
MY PINT
ICE CREAM Maker
t
h
e
d
a
s
h
t
e
a
m
!

important safeguards ∙ 5 4 ∙ important safeguards
• Please read and save instruction and
care manual.
• Read all instructions carefully.
• Remove all bags and packaging from
appliance
before use.
• Do not use appliance outdoors or for
commercial purposes.
• Never leave appliance unattended
when in use.
• Only use the appliance on a stable, dry
surface.
• Make sure the appliance is cleaned
thoroughly before using.
• Do not use appliance for other than its
intended use. For household use only.
Do not use outdoors.
• Close supervision is necessary when
any appliance is used by or near
children. Children should be supervised
to ensure that they do not play with
the appliance.
When using electrical appliances, basic safety precautions should be followed, including:
IMPORTANT SAFEGUARDS IMPORTANT SAFEGUARDS
• Do not operate this appliance with a
damaged cord, damaged plug, after the
appliance malfunctions, is dropped, or
damaged in any manner. Return
appliance to the nearest authorized service
facility for examination, repair, or
adjustment.
• For maintenance other than cleaning,
please contact StoreBound directly at
1-800-898-6970 from 7AM-7PM PST
Monday-Friday or by email at
• Do not place appliance on or near a
hot gas burner, hot electric burner, or
in a heated oven. Extreme caution must
be used when moving an appliance
containing hot oil or other hot liquids.
Always attach plug to appliance rst,
then plug cord into the wall outlet. To
disconnect, turn any control to “off”, then
remove plug from wall outlet. Do not use
appliance for other than intended use.
• Refrain from using attachments that are
not recommended by the appliance
manufacturer, as this may result in re,
electric shock, or personal injury.
IMPORTANT SAFEGUARDS: PLEASE
READ AND SAVE THIS INSTRUCTION
AND CARE MANUAL.
IMPORTANT SAFEGUARDS: PLEASE
READ AND SAVE THIS INSTRUCTION
AND CARE MANUAL.
• Do not let the power cord touch hot
surfaces or hang over the edges of
tables or counters.
• This appliance is not intended for use
by persons (including children) with
reduced physical, sensory, or mental
capabilities, or lack of experience and
knowledge unless they are provided
with supervision and instruction
concerning use of the appliance by a
person responsible for their safety.
• Always be sure to unplug the appliance
from outlet prior to moving, cleaning,
storage, and when not in use.
• StoreBound shall not accept liability for
damages caused by improper use of
the appliance.
• Improper use of the appliance can result
in property damage or even in personal
injury.
• This appliance has a polarized plug (one
blade is wider than the other). To reduce
the risk of electric shock, this plug will t
in a polarized outlet only one way.
If the plug does not completely t in the
outlet, reverse the plug. If it still does
not t, contact a qualied electrician.
Do not attempt to modify the plug in
any way.
• Turn the appliance OFF, then unplug
from the outlet when not in use, before
assembling or disassembling parts and
before cleaning.
To unplug, grasp the plug and pull from
the outlet. Never pull from the power
cord.
• A short power supply cord is to be
provided to reduce the risk resulting
from becoming entangled in or tripping
over a longer cord. An extension cord
may be used if care is exercised in its
use. If an extension cord is used, the
marked electrical rating of the extension
cord should be at least as great as the
electrical rating of the appliance. The
extension cord should be arranged so
that it will not drape over the countertop
or tabletop where it can be pulled on by
children or tripped over unintentionally.
If the appliance is of the grounded type,
the cord set or extension cord should
be a grounding-type 3-wire cord.

garanties importantes ∙ 7 6 ∙ garanties importantes
important safeguards
• Lisez toutes les instructions.
• Retirez tous les sacs et emballages de
l'appareil avant de l'utiliser.
• Ne laissez jamais l'appareil sans surveillance
lorsqu'il est en marche.
• Assurez-vous de nettoyer soigneusement
l'appareil avant de l'utiliser.
• N'utilisez pas l'appareil à des ns autres que
celles prévues. Pour un usage domestique
uniquement. Ne pas l’utiliser à l'extérieur.
• Une étroite surveillance est nécessaire
lorsqu’un appareil est utilisé par ou à
proximité d'enfants.
• N'utilisez pas l'appareil si le cordon ou
la che sont endommagés, après un
dysfonctionnement ou une chute ou encore
un dommage quelconque de l'appareil.
Retournez l'appareil à l'établissement de
service agréé le plus proche pour examen,
réparation ou réglage.
• Pour tous travaux d’entretien autre que le
nettoyage, veuillez contacter StoreBound
directement au
1-800-898-6970, de 7 h à 19 h HNP, du lundi
au vendredi, ou par courriel à l'adresse
• Évitez de placer l'appareil sur ou près d'un
chauffage électrique ou au gaz chaud, ou
dans un four chauffé.
• Utilisez uniquement des accessoires
recommandés par le fabricant de l’appareil
pour éviter tout risque d’incendie, de choc
électrique ou
de blessures.
• Ne laissez pas le cordon toucher des surfaces
chaudes ou pendre de la table ou du
comptoir.
• Cet appareil n'est pas conçu pour être utilisé
par des personnes (y compris les enfants)
dont les capacités physiques, sensorielles ou
mentales sont réduites, ou des personnes
inexpérimentées ou disposant de
connaissances insufsantes, excepté sous la
surveillance d'une personne responsable de
leur sécurité qui leur donne des instructions
concernant l'utilisation de l'appareil.
• Assurez-vous de toujours débrancher
l'appareil de la prise avant de le déplacer, le
nettoyer et le ranger ainsi que lorsque vous ne
l’utilisez pas.
• StoreBound ne peut être tenu responsable de
tout dommage résultant d'un usage abusif de
l’appareil.
garanties importantes garanties importantes
• Une utilisation inappropriée de l’appareil
peut endommager l’appareil ou même
causer une blessure.
• Cet appareil a une che polarisée (une lame
est plus large que l'autre). Pour réduire le
risque de choc électrique, cette che est
conçue pour ne pouvoir s'insérer dans une
prise polarisée que dans un sens.
• Si la che n'entre pas complètement dans la
prise, inversez-la. Si elle n’entre toujours pas,
contactez un électricien qualié.
• N'essayez pas d’altérer la che de quelque
façon que ce soit. Un cordon d'alimentation
court est fourni pour réduire les risques
d'enchevêtrement ou de trébuchement. Une
rallonge peut être utilisée avec prudence. En
cas d'utilisation d'une rallonge, la puissance
électrique indiquée sur la rallonge doit être
au moins aussi grande que la puissance
électrique de l'appareil. La rallonge doit
être placée de telle sorte qu'elle ne soit pas
étalée sur le comptoir ou la table, où elle
pourrait être tirée par un enfant ou causer un
trébuchement.
• N'utilisez pas d'objets pointus ou
d'ustensiles à l'intérieur du bol de
refroidissement ou du récipient de
refroidissement. Utilisez une spatule en
caoutchouc ou une cuillère en bois.
• Ne placez jamais le bol ou le récipient
de refroidissement dans un four, sur une
cuisinière ou dans un four à micro-ondes.
• Après utilisation, une fois que le produit n'est
plus froid, laver le bol de refroidissement à
l'aide d'une éponge ou d'un chiffon doux
avec de l'eau tiède et un détergent doux.
N'utilisez jamais de produits chimiques
abrasifs ou agressifs pour nettoyer votre
appareil. Rincer complètement et essuyer
l'appareil.
• Le bol de refroidissement n'est PAS
compatible avec le lave-vaisselle.
• Ne jamais laver les pièces en plastique avec
des solvants de nettoyage agressifs.
• Lorsque le bol de refroidissement est froid,
ne le touchez pas avec les mains mouillées.
• N'utilisez PAS l'appareil dans un congélateur
ou un réfrigérateur.
• La quantité maximale de mélange liquide
pouvant être versée dans l'appareil est de
1 tasse.
• Vérifiez que le bol de refroidissement n'est
pas endommagé avant utilisation. Ne pas mal
manipuler le bol de refroidissement.
L’utilisation d’appareils électriques nécessite de prendre des mesures de
sécurité de base, y compris:
GARANTIES IMPORTANTES:
VEUILLEZ LIRE ET CONSERVER CE
MODE D’EMPLOI ET D’ENTRETIEN
GARANTIES IMPORTANTES:
VEUILLEZ LIRE ET CONSERVER CE
MODE D’EMPLOI ET D’ENTRETIEN

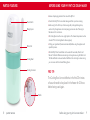
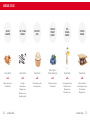
8 ∙ parts & features before using your my pint ice cream maker ∙ 9
BeforE USING YOUR my pint ice cream makerparts & Features
Motor Unit
Cooling Bowl
Cooling Container
Power Switch
Mixing Spoon
Paddle
PRO TIP:
• Remove all packaging materials from around the My Pint.
• Check that the My Pint has no visible damage and that no parts are missing.
• Before using for the rst time, or before using after prolonged storage time,
wash and dry the appliance and accompanying accessories. See “Cleaning &
Maintenance” for instructions.
• The Cooling Bowl must be in an upright position. The freezer temperature must be
at least -2℉ for the Cooling Bowl to freeze properly.
• Chilling your ingredients (freezer recommended) before using the appliance will
speed the process.
• The Dash My Pint Ice Cream Maker can be used with two modes, Electric and
Manual. The Electric Mode involves turning on the appliance using the Motor Unit.
The Manual Mode can be used without the Motor Unit and simply involves mixing
your ice cream with the included Mixing Spoon.
The Cooling Bowl is most effective in the rst 20 minutes
of use and needs to be placed in the freezer for 24 hours
before being used again.

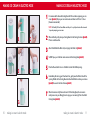
making ice cream in electric mode ∙ 11 10 ∙ making ice cream in electric mode
Making ice cream In Electric Mode Making ice cream In Electric Mode
1
2
When sufciently cold, place your Cooling Bowl into the Cooling Container (photo B).
Place on a stable surface.
It is recomended to freeze the Cooling Bowl for 24 hours before preparing your ice
cream (photo A). Prepare your ice cream mixture and allow to chill from 1-3 hours
(freezer recommended).
NOTE: The Dash My Pint Ice Cream Maker can hold up to 1 cup of liquid mixture. Do not exceed
1 cup when preparing your ice cream.
Press the Power Switch to turn on the Motor Unit with the Paddle spinning.
Immediately after turning your Power Switch on, gently lower the Motor Unit with the
spinning Paddle into the Cooling Bowl and allow the Paddle to combine your mixture
(photo E). Be sure to hold onto the base (photo F).
When the mixture is fully frozen and rises to ll the Cooling Bowl, the ice cream is
ready to serve. Use your Mixing Spoon to enjoy your ice cream right from the chilled
Cooling Bowl (photo G)!
Attach the Paddle to the Motor Unit, and plug in the Motor Unit (photo C).
3
SLOWLY pour your chilled ice cream mixture into the Cooling Bowl (photo D).
4
5
6
7
A
D
E
G
F
B C
1
2
When sufciently cold, place your Cooling Bowl into the Cooling Container (photo B).
Place on a stable surface.
It is recomended to freeze the Cooling Bowl for 24 hours before preparing your ice
cream (photo A). Prepare your ice cream mixture and allow to chill from 1-3 hours
(freezer recommended).
NOTE: The Dash My Pint Ice Cream Maker can hold up to 1 cup of liquid mixture. Do not exceed
1 cup when preparing your ice cream.
Press the Power Switch to turn on the Motor Unit with the Paddle spinning.
Immediately after turning your Power Switch on, gently lower the Motor Unit with the
spinning Paddle into the Cooling Bowl and allow the Paddle to combine your mixture
(photo E). Be sure to hold onto the base (photo F).
When the mixture is fully frozen and rises to ll the Cooling Bowl, the ice cream is
ready to serve. Use your Mixing Spoon to enjoy your ice cream right from the chilled
Cooling Bowl (photo G)!
Attach the Paddle to the Motor Unit, and plug in the Motor Unit (photo C).
3
SLOWLY pour your chilled ice cream mixture into the Cooling Bowl (photo D).
4
5
6
7

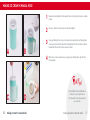
12 ∙ making ice cream in manual mode
Making ice cream In MANUAL Mode CLEANING & MAINTENANCE
When the ice cream is ready to serve, enjoy with your Mixing Spoon right from the
Cooling Bowl!
A
C
C
h
e
f
T
i
p
!
The Dash My Pint Ice Cream Maker can
hold up to 1 cup of liquid mixture.
Do not exceed 1 cup when preparing
your ice cream.
B
D
Making ice cream In MANUAL Mode
1
2
Pour your chilled ice cream mixture into the Cooling Bowl.
Remove the Cooling Bowl from the freezer. Place in the Cooling Container on a stable
surface.
Using your Mixing Spoon, stir your ice cream mixture quickly with your Mixing Spoon
coming into contact with the side of the Cooling Bowl. This will allow the ice cream to
freeze faster. Mix and stir until the ice cream is frozen.
3
4
making ice cream in manual mode ∙ 13 12 ∙ making ice cream in manual mode

CLEANING & MAINTENANCE
1. The Cooling Bowl and Paddle can be cleaned with warm water and mild
detergent.
2. DO NOT place any of the parts in the dishwasher. The Motor Unit can
be cleaned using a damp cloth. NEVER immerse the Motor Unit in water
or other liquids.
3. Ensure that all parts of the appliance are dried thoroughly.
4. Never place the Cooling Bowl in the freezer if it is still wet.
5. Do not store the Paddle or the Mixing Spoon in the freezer.
14 ∙ cleaning & maintenance

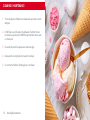
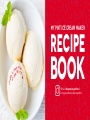
get cooking, tastiness awaits!
RECIPE
BOOK
MY PINT Ice Cream MakER
Follow us @unprocessyourfood
for recipes, videos, & daily inspiration
v
a
n
i
l
l
a
i
c
e
c
r
e
a
m
e
c
i
p
e
o
n
p
a
g
e
1
8
!

recipes ∙ 19
2 cups heavy cream
1 cup milk
¾ cup sugar
1 tbsp vanilla extract
CLASSIC VANILLA
ice cream
18
1. Prepare the ice cream mixture: In a bowl, stir together the cream and milk. Add the
sugar and whisk until the sugar is dissolved, 3 to 4 minutes.
2. Test for graininess by tasting a small amount of the liquid; it should feel smooth on
the tongue and there should be no sugar visible on the bottom of the bowl when it
is stirred or spooned out.
3. Continue whisking, if necessary, to ensure that the texture of the nished ice cream
will be smooth. Stir in the vanilla.
4. Chill the mixture in the refrigerator until you are ready to make your ice cream.
5. When ready, add one cup of your mixture to the My Pint Ice Cream Maker and
press start to begin churning.
Ingredients:
Directions:

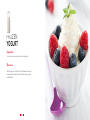
recipes ∙ 21
1 cup of your favorite yogurt avor (can be Greek Yogurt)
FROZEN
YOGURT
Add the yogurt to your My Pint Ice Cream Maker and press start
to begin freezing. Enjoy! Top with a drizzle of honey or granola
for Greek Yogurt.
20
Ingredients:
Directions:

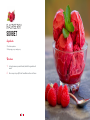
recipes ∙ 23
7-8 oz fresh raspberries
3-4 tbsp sugar syrup, or maple syrup
raspberry
sorbet
1. In a food processor or personal blender, blend all the ingredients until
smooth.
2. Pour one cup into your My Pint Ice Cream Maker and churn until frozen.
22
Ingredients:
Directions:

sundae ideas ∙ 25
24 ∙ sundae ideas
SuNDAE ideas
SALTED
CARAMEL
frozen
yogurt
parfait
piña
colada
sundae
birthday
cake
s'mores
sundae
Classic Vanilla
Frozen Yogurt or
Frozen Greek Yogurt
Classic Vanilla
Classic Vanilla
Classic Vanilla
Salted caramel sauce
Crushed toffee
Salted caramel sauce
Crushed toffee
Fresh pineapple, diced
Shredded coconut
Whipped cream
Maraschino cherry
Crumbled sugar cookie
Rainbow sprinkles
Mini marshmallows
Crushed graham crackers
Chocolate chips
Whipped cream
with with
with
with
with
HOT FUDGE
SUNDAE
Classic Vanilla
Hot fudge
Toasted walnuts
Whipped cream
Maraschino cherry
Sprinkles (optional)
with

WARRANTY
26 ∙ customer support
customer support
warranty ∙ 27
warranty
STOREBOUND, LLC – 1 YEAR LIMITED WARRANTY
Your StoreBound product is warranted to be free from defects in material and workmanship for a period of
one (1) year from the date of the original purchase when utilized for normal and intended household use.
Should any defect covered by the terms of the limited warranty be discovered within one (1) year, StoreBound,
LLC will repair or replace the defective part. To process a warranty claim, contact Customer Support at
1-800-898-6970 for further assistance and instruction. A Customer Support agent will assist you by
troubleshooting minor problems. If troubleshooting fails to x the problem, a return authorization will be
issued. Proof of purchase indicating the date and place of purchase is required and should accompany
the return. You must also include your full name, shipping address, and telephone number. We are
unable to ship returns to a PO box. StoreBound will not be responsible for delays or unprocessed
claims resulting from a purchaser’s failure to provide any or all of the necessary information. Freight
costs must be prepaid by the purchaser.
Send all inquiries to [email protected].
There are no express warranties except as listed above.
REPAIR OR REPLACEMENT AS PROVIDED UNDER THIS WARRANTY IS THE EXCLUSIVE REMEDY OF
THE CUSTOMER. STOREBOUND SHALL NOT BE LIABLE FOR ANY INCIDENTAL OR CONSEQUENTIAL
DAMAGES OR FOR BREACH OF ANY EXPRESS OR IMPLIED WARRANTY ON THIS PRODUCT EXCEPT
TO THE EXTENT REQUIRED BY APPLICABLE LAW. ANY IMPLIED WARRANTY OF MERCHANTABILITY
OR FITNESS FOR A PARTICULAR PURPOSE ON THIS PRODUCT IS LIMITED IN DURATION TO THE
DURATION OF THIS WARRANTY.
Some states do not allow the exclusion or limitation of incidental or consequential damages, or
limitations on how long an implied warranty lasts. Therefore, the above exclusions or limitations may
not apply to you. This warranty gives you specic legal rights and you may also have other rights,
which vary from state to state.
REPAIRS
DANGER! Risk of electric shock! The Dash My Pint Ice Cream Maker is an electrical appliance.
Do not attempt to repair the appliance yourself under any circumstances.
Contact Customer Support regarding repairs to the appliance.
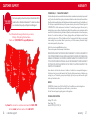
TECHNICAL SPECIFICATIONS
Voltage 120V ~ 60Hz
Power Rating 12W
Stock#: DPIC100_20171207_V8
7am
–
7pm
Our US-based customer support team is at your service
Monday - Friday during the times below.
Reach us at 1 (800) 898-6970 or suppor[email protected]
Dash values quality and workmanship and stands behind this
product with our Feel Good Guarantee
™
. To learn more about
our commitment to quality, visit bydash.com/feelgood.
8am
–
8pm
9am
–
9pm
10am
–
10pm
Hey Hawaii! You can reach our customer service team from 5AM to 5PM.
And also, Alaska, feel free to reach out from 6AM - 6PM.
feel good
guarantee
™

1-800-898-6970 | @unprocessyourfood | bydash.com
-
 1
1
-
 2
2
-
 3
3
-
 4
4
-
 5
5
-
 6
6
-
 7
7
-
 8
8
-
 9
9
-
 10
10
-
 11
11
-
 12
12
-
 13
13
-
 14
14
-
 15
15


Dash My Pint Ice Cream Maker Le manuel du propriétaire
- Catégorie
- Fabricants de crème glacée
- Taper
- Le manuel du propriétaire
dans d''autres langues
Documents connexes
-
Dash DPIC100 Manuel utilisateur
-
Dash Deluxe Ice Cream Maker Manuel utilisateur
-
Dash Mini Waffle Bowl Maker Le manuel du propriétaire
-
-
Dash Retro Milkshake Maker Manuel utilisateur
-
-
Dash Mini Waffle Maker Le manuel du propriétaire
-
-
-
Dash Everyday Manuel utilisateur