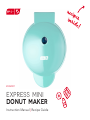
Dash Express Mini Donut Maker Le manuel du propriétaire
- Taper
- Le manuel du propriétaire

#DDM007
Express Mini
Donut Maker
Instruction Manual | Recipe Guide

Important Safeguards ....................................................................4–7
Parts & Features ..................................................................................8
Using Your Express Mini Donut Maker ....................................10–15
Tips & Tricks .......................................................................................16
Cleaning & Maintenance .................................................................18
Troubleshooting ..........................................................................19-20
Recipes .........................................................................................23-37
Customer Support ........................................................................... 38
Warranty ............................................................................................ 39
Express Mini
Donut Maker

IMPORTANT SAFEGUARDS
∙ 4 ∙
• READ AND SAVE THIS INSTRUCTION MANUAL.
• For Household Use Only.
• Read all instructions.
• Remove all bags and packaging from appliance
before use.
• Never leave appliance unattended when in use.
• Make sure the appliance is cleaned thoroughly
before using.
• Do not use appliance for other than intended use.
For household use only. Do not use outdoors.
• Warning: Hot surfaces! Never touch the Cooking
Surface or Cover while appliance is in use. Always
lift and lower the Cover by the Cover Handle.
• DO NOT lift the Cover so that your arm is over the
Cooking Surface as it is hot and may cause injury.
Lift from the side.
• To prevent the risk of re, electric shock, or
personal injury, do not put cord, plug, or
appliance in or near water or other liquids. The
Express Mini Donut Maker is NOT dishwasher
safe.
• Never use abrasive cleaning agents to clean your
appliance as this may damage the Express Mini
Donut Maker and its non-stick Cooking Surface.
• Do not operate this appliance with a damaged
cord, damaged plug, after the appliance
malfunctions, is dropped, or damaged in
any manner. Return appliance to the nearest
authorized service facility for examination, repair
or adjustment.
IMPORTANT SAFEGUARDS: PLEASE READ AND
SAVE THIS INSTRUCTION AND CARE MANUAL.
IMPORTANT SAFEGUARDS: PLEASE READ AND
SAVE THIS INSTRUCTION AND CARE MANUAL.
When using electrical appliances, basic safety precautions should be followed, including:
• Always be sure to unplug the appliance from
outlet prior to moving, cleaning, storage, and
when not in use.
• StoreBound shall not accept liability for damages
caused by improper use of the appliance.
• Improper use of the Express Mini Donut Maker
can result in property damage or even in personal
injury.
• This appliance has a polarized plug (one blade is
wider than the other). To reduce the risk of electric
shock, this plug will t in a polarized outlet only
one way. If the plug does not completely t in
the outlet, reverse the plug. If it still does not t,
contact a qualied electrician. Do not attempt to
modify the plug in any way.
• A short power supply cord is to be provided
to reduce the risk resulting from becoming
entangled in, or tripping over, a longer cord. An
extension cord may be used if care is exercised
in its use. If an extension cord is used, the marked
electrical rating of the extension cord should
be at least as great as the electrical rating of
the appliance. If the appliance is grounded, the
extension cord should be a grounding 3-wire
cord. The extension cord should be arranged
so that it will not drape over the countertop or
tabletop where it can be pulled on by children or
tripped over unintentionally.
∙ 5 ∙
• DO NOT use the Express Mini Donut Maker near
water or other liquids, with wet hands, or while
standing on a wet surface.
• For maintenance other than cleaning, please
contact StoreBound directly at 1-800-898-6970
from 7AM – 7PM PST Monday – Friday or by email
at support@storebound.com.
• Do not use metal utensils on the Cooking Surface
as this will damage the non-stick surface.
• This appliance is not intended for use by
persons (including children) with reduced
physical, sensory, or mental capabilities, or
lack of experience and knowledge unless they
are provided with supervision and instruction
concerning use of the appliance by a person
responsible for their safety.
• Do not place appliance on or near a hot gas
burner, hot electric burner, or in a heated oven.
• Extreme caution must be used when moving an
appliance containing hot oil or other hot liquids.
• Refrain from using attachments that are not
recommended by the appliance manufacturer, as
this may result in re, electric shock, or personal
injury.
• Allow Express Mini Donut Maker to cool
completely before putting on or taking off parts,
and before moving, cleaning, or storing.
• Close supervision is necessary when any
appliance is used by or near children.
• Do not let the cord touch hot surfaces or hang
over the edge of tables or counters.

GARANTIES IMPORTANTES
∙ 6 ∙
• Veuillez lire et conserver ce manuel d’utilisation.
• Pour usage domestique seulement.
• Lisez toutes les instructions.
• Retirez tous les sacs et emballages de l’appareil avant
utilisation. Attention: surfaces chaudes! Ne touchez
jamais la surface de cuisson ou le couvercle lorsque
l’appareil est en marche. Soulevez et abaissez
toujours le couvercle à l’aide de sa poignée.
• NE soulevez PAS le couvercle de sorte que votre
bras soit au-dessus de la surface de cuisson car il est
chaud et peut causer des blessures. Soulevez sur le
côté.
• Pour éviter tout risque d’incendie, de choc électrique
ou de blessure, ne branchez pas de cordon, de
che ni d’appareil dans ou près de l’eau ou d’autres
liquides. Le mini fabricant de beignets Express ne va
N’UTILISEZ PAS l’Express Mini Donut Maker près de
l’eau ou d’autres liquides, avec les mains mouillées
ou debout sur une surface humide.
• Pour tout entretien autre que le nettoyage, veuillez
contacter StoreBound directement au 1-800-898-
6970 de 7h à 19h, du lundi au vendredi ou par
courrier électronique.
• à support@storebound.com.
• N’utilisez pas d’ustensiles en métal sur la surface
de cuisson car cela endommagerait la surface
antiadhésive.
• Cet appareil n’est pas destiné à être utilisé par
des personnes (y compris des enfants) ayant des
capacités physiques, sensorielles ou mentales
réduites, ou manquant d’expérience et de
connaissances, à moins de recevoir une surveillance
et des instructions concernant leur utilisation par une
personne responsable de leur sécurité.
• Ne placez pas l’appareil sur ou à proximité d’un
brûleur à gaz chaud, d’un brûleur électrique chaud
ou dans un four chauffé.
• Une extrême prudence doit être utilisée lors du
déplacement d’un appareil contenant de l’huile
chaude ou d’autres liquides chauds.
• Évitez d’utiliser des accessoires qui ne sont pas
recommandés par le fabricant de l’appareil car cela
pourrait provoquer un incendie, un choc électrique
ou des blessures. PAS au lave-vaisselle.
• N’utilisez jamais d’agents nettoyants abrasifs
pour nettoyer votre appareil car cela pourrait
endommager l’Express Mini Donut Maker et sa
surface de cuisson antiadhésive.
• Ne pas utiliser cet appareil avec un cordon ou une
che endommagé, après un dysfonctionnement de
l’appareil, une chute ou un endommagement de
quelque manière que ce soit. Renvoyez l’appareil à
un centre de service agréé le plus proche pour un
examen, une réparation ou un réglage.
• Ne laissez jamais l’appareil sans surveillance pendant
son utilisation.
• Assurez-vous que l’appareil est nettoyé à fond avant
de l’utiliser.
• Laissez l’Express Mini Donut Maker refroidir
complètement avant d’ajouter ou de retirer des
pièces, et avant de le déplacer, de le nettoyer ou de
le stocker.
• Une surveillance étroite est nécessaire lorsqu’un
appareil est utilisé par ou à proximité d’enfants.
GARANTIES IMPORTANTES:
VEUILLEZ
LIRE
ATTEN-
TIVEMENT
CE
MANUEL
AVANT
D’UTILISER
L’APPAREIL.
GARANTIES IMPORTANTES:
VEUILLEZ
LIRE
ATTEN-
TIVEMENT
CE
MANUEL
AVANT
D’UTILISER
L’APPAREIL.
• Ne laissez pas le cordon toucher des surfaces
chaudes ou pendre du bord de tables ou de
comptoirs.
• Assurez-vous toujours de débrancher l’appareil de la
prise de courant avant de le déplacer, de le nettoyer,
de le ranger et lorsqu’il n’est pas utilisé.
• StoreBound n’acceptera aucune responsabilité pour
les dommages causés par une utilisation incorrecte
de l’appareil.
• Une mauvaise utilisation de l’Express Mini Donut
Maker peut provoquer des dommages matériels,
voire corporels.
• Cet appareil est doté d’une che polarisée (une
des lames est plus large que l’autre). Pour réduire
le risque de choc électrique, cette che ne peut
être insérée dans une prise polarisée. Si la che ne
s’insère pas complètement dans la prise, inversez-
la. Si le problème persiste, contactez un électricien
qualié. N’essayez pas de modier la che de
quelque manière que ce soit.
• Un cordon d’alimentation court doit être fourni pour
réduire le risque résultant de l’enchevêtrement ou
de la chute d’un cordon plus long. Une rallonge
peut être utilisée si elle est utilisée avec soin. Si une
rallonge est utilisée, le calibre électrique indiqué doit
être au moins égal à celui de l’appareil. Si l’appareil
est mis à la terre, la rallonge doit être un cordon à 3
ls avec mise à la terre. La rallonge doit être disposée
de manière à ce qu’elle ne pende pas sur le comptoir
ou la table, où elle pourrait être tirée par des enfants
ou faire trébucher dessus par inadvertance.
∙ 7 ∙
Lors de l’utilisation d’appareils électriques, des précautions élémentaires de sécurité doivent être
respectées, notamment:

∙ 8 ∙
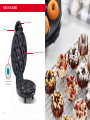
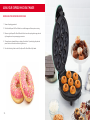
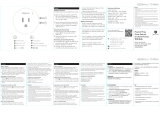
PARTS & FEATURES
Nonstick Donut Mold Plate
Cover Lid
Cover Lid Handle
Indicator Light
(Top of Cover)

∙ 11 ∙
∙ 10 ∙
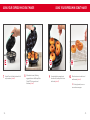
using YOUR Express Mini Donut Maker
BEFORE USING YOUR EXPRESS MINI DONUT MAKER
1. Remove all packaging materials.
2. Check that the Express Mini Donut Maker has no visible damage and that no parts are missing.
3. Before using the Express Mini Donut Maker for the rst time or after prolonged storage, wash and
dry the appliance and any accompanying accessories.
4. If the appliance is preheated before use, donuts will cook faster. To preheat, plug the polarized
power cord into a wall socket and allow red light to turn on.
5. Once the Indicator Light has turned off, the Express Mini Donut Maker is fully heated.

∙ 12 ∙ ∙ 13 ∙
USING YOUR Express Mini Donut Maker USING YOUR Express Mini Donut Maker
A AA A
A cB d
FPO FPOFPO FPO
Place the appliance on a stable, at,
heat-resistant surface.
Allow the appliance to fully preheat. The
Indicator Light will turn off when fully heated.
Prepare batter using any one of the
included recipes, or using a store-
bought dough. Using store-bought
dough can reduce prep time.
TIP: to get a more accurate pour for
donuts, place the mixture into a pastry
bag or a plastic bag with a small hole cut
in the corner (photo B).
TIP: Lay a heat-resistant lining, such as
a cooking tray, beneath the appliance
to shield the countertop from any
potential drips (photo A).
Squeeze the button on the Cover Lid
Handle and lift Cover Lid.
Add batter to Donut Mold Plate until
about ¾ full (photo D).
1 5 6
TIP: The Donut Mold Plate has a non-
stick coating that releases food easily,
but for best performance you can use a
butter, oil, or a cooking spray to lightly
grease the cooking surface (photo C).
A AA A
A cB d
3
4
Plug the appliance into a wall socket.
The Indicator Light will illuminate upon
being plugged in, indicating the Donut
Maker is on.
2

∙ 14 ∙ ∙ 15 ∙
Section Title Section TitleUSING YOUR Express Mini USING YOUR Express Mini Donut Maker
A AA A
E GF H
Use the Cover Lid Handle to lower the lid
and press down (photo E).
Use a toothpick to remove donuts
from the mold, as they will be hot on
both sides (photo G).
Allow donuts to cook, following
suggested times in the Recipe Guide
(Page 23-37) or to your desired
doneness (photo F).
7 9
8
USING YOUR Express Mini Donut Maker
Place donuts on a wire rack to cool
and decorate (photo H).
10
TIP: If frosting donuts, do so on a
wire rack over wax paper.

∙ 16 ∙
1. Be sure not to overll the Donut Mold Plate, as this may cause batter to spill into neighboring molds
or onto the heating plate once the batter expands while cooking. We recommend adding batter
until each mold is ¾ full.
2. Cooking spray, oil, and butter are not necessary to prevent sticking in the molds, but using them
may help the donuts release more easily.
3. Plugging in the Donut Maker to preheat for a few minutes before adding batter will speed up the
preparation process by eliminating the waiting time.
4. Be sure to follow the cleaning guidelines, outlined in “Cleaning & Maintenance,” to avoid scratching
or damaging the non-stick coating.
5. When lling back cavities with batter, ensure the Cover Lid is fully open and exercise caution to
avoid burning ngertips.
6. An amount of time as small as 30 seconds can make a big difference in whether donuts are cooked
to satisfaction or overcooked, so be sure to keep a timer handy. We recommend baking for 1 ½
minutes on one side, then ipping and baking for another 4 minutes on the other side.
7. Use a toothpick to ip the donuts to avoid putting ngertips at risk near the hot Donut Mold Plate.
8. To add batter to molds, scoop batter into 1-gallon freezer size plastic bag and seal partway.
Snip off ” from corner of the bag and, with the open corner facing the Donut Maker, squeeze bag
until each mold is ¾ full. Fold the bag between rounds of baking to avoid leakage or dripping.
9. The hottest part of the Donut Mold Plate is directly in the center, so ll the center mold with batter
last to reduce the risk of overcooking it.
10. Get creative when frosting! Use a spoon to drizzle glaze or toppings for detailed frosting projects.
11. Try making the donuts ahead of time! They’ll stay fresh in a sealed bag for up to two days.
TIPS & TRICKS
¹
8
/

∙ 19 ∙
Cleaning & Maintenance troubleshooting
• Remove the plug from the wall socket and let the Donut Maker cool down completely.
• Make sure the appliance has cooled down completely before cleaning the non-stick Donut Mold
Plates.
• Thoroughly clean the appliance after every use.
• Do not clean the Donut Mold Plates with metal kitchen utensils or abrasive cleaning materials, as they
may damage the non-stick coating.
• Wipe the outside of the Donut Maker with a moist, soft cloth.
• Alternatively, the Donut Mold Plates can be cleaned with hot water, dish soap, and a non-abrasive
sponge.
• Clean the Donut Mold Plates with a soft cleaning brush to remove any batter residue.
• Make sure that the appliance is unplugged and all parts are clean and dry before storing.
PROBLEM POSSIBLE CAUSE SOLUTION
The Donut Maker does not
turn on.
The appliance is not plugged in. Plug the Donut Maker
a grounded wall socket.
The batter is not done after
the recommended time.
The batter is clumpy or too
dense.
Allow an additional few minutes
of cooking.
The plastic bag method of
putting batter onto the Donut
Mold Plate is not working.
You are using the incorrect size
bag.
Ensure that you are using a
1-gallon freezer-size bag.
Batter is cooked unevenly in the
Donut Maker.
Various batters need different
amounts of exposure to heat.
Batter is being cooked
improperly.
Make sure nothing is stuck to the
Donut Mold Plates that may be
blocking the heat from reaching
the batter.
To properly cook the batter in
the recipe guide, bake on one
side for 1 ½ minutes. Then, using
a toothpick, ip donuts and bake
for another 4 minutes.
∙ 18 ∙

∙ 20 ∙ ∙ 21 ∙
troubleshooting
PROBLEM POSSIBLE CAUSE SOLUTION
The Cover Lid won’t close.
Something may be stuck
between the handle and the
Donut Mold Plates.
Remove item that is stuck
between handle and Donut Mold
Plate and clean any impacted
surface.
The Donut Maker’s non-stick
coating does not work.
The non-stick coating may be
blocked by dried grease or
crust from a previous donut.
Wipe the non-stick Donut Mold
Plates with a soft, moist towel or
another non-abrasive cleaning
utensil.

Section Title Section Title
Follow us @unprocessyourfood
for recipes, videos, & daily inspiration
Donut Maker
Express Mini
RECIPE
GUIDE

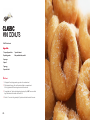
Ingredients:
1 ½ cups all-purpose our
2 tsp baking powder
½ cup sugar
¼ tsp salt
1 large egg
½ cup whole milk
Yield: 28 mini donuts
classic
mini donuts
Directions:
1. Mix together our, baking powder, sugar and salt in a medium bowl.
2. Whisk together the egg, milk, vanilla extract and butter in a separate bowl.
Mix dry ingredients into the wet ingredients until well combined.
3. Scoop batter into 1-gallon plastic bag and seal partway. Snip off ” from corner of the
bag. Add batter to donut molds until about ¾ full.
4. Bake for 1 ½ minutes. Using a toothpick, ip donuts and bake for another 4 minutes.
∙ 24 ∙
1 tsp vanilla extract
4 tbsp unsalted butter, melted
¹
8
/
Ingredients:
1 ½ cups all-purpose our
2 tsp baking powder
½ cup sugar
¼ tsp salt
1 large egg
½ cup whole milk
Yield: 28 mini donuts
classic
mini donuts
∙ 24 ∙
1 tsp vanilla extract
4 tbsp unsalted butter, melted
¹
8
/
classic
mini donuts
¹
8
/

∙ 26 ∙ ∙ 27 ∙
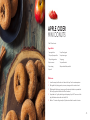
Ingredients:
1 cup apple cider
1 ½ cups all-purpose our
1 ½ tsp baking powder
½ tsp cinnamon
¼ tsp nutmeg
¼ tsp salt
Yield: 28 mini donuts
apple cider
mini donuts
Directions:
1. In small saucepan, boil the cider until reduced to ½ cup. Cool to room temperature.
2. Mix together our, baking powder, cinnamon, nutmeg and salt in a medium bowl.
3. Whisk together Greek yogurt, sugar, egg, vanilla extract and butter in a separate bowl.
Mix the dry ingredients into the wet until well combined.
4. Scoop batter into 1-gallon plastic bag and seal partway. Snip off ” from corner of the
bag. Add batter to donut molds until about ¾ full.
5. Bake for 1 ½ minutes. Using a toothpick, ip donuts and bake for another 4 minutes.
¼ cup Greek yogurt
½ cup brown sugar
1 large egg
1 tsp vanilla extract
4 tbsp unsalted butter, melted
¹
8
/

∙ 28 ∙
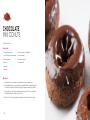
Ingredients:
1 ½ cups all-purpose our
cup Dutch process cocoa powder
2 tsp baking powder
¼ tsp salt
1 large egg
½ cup sugar
Yield: 28 mini donuts
CHOCOLATE
mini donuts
Directions:
1. Mix together our, cocoa powder, baking powder and salt in a medium bowl.
2. Whisk together the egg, sugar, vanilla extract and melted butter in a separate bowl. Mix
in half the our mixture, then half the Greek yogurt. Repeat until batter is just blended.
3. Scoop batter into 1-gallon plastic bag and seal partway. Snip off ” from corner of the
bag. Add batter to donut molds until about ¾ full.
4. Bake for 1 ½ minutes. Using a toothpick, ip donuts and bake for another 4 minutes.
¼ cup sour cream or Greek yogurt
1 tsp vanilla extract
3 tbsp butter, melted
cup whole milk
¹
8
/
¹
³
/
2
/
3

∙ 30 ∙ ∙ 31 ∙
Ingredients:
¾ cup all-purpose our
1 tsp baking powder
½ tsp cinnamon
¼ tsp salt
½ cup brown sugar
1 large egg
Yield: 21 mini donuts
banana bread
mini donuts
Directions:
1. Mix together our, baking powder, cinnamon and salt in a medium bowl.
2. Whisk together the sugar and egg in a separate bowl. Thoroughly mix in mashed
banana, vanilla extract and oil. Add the dry ingredients, mixing until well combined.
3. Scoop batter into 1-gallon plastic bag and seal partway. Snip off ” from corner of the
bag. Add batter to donut molds until about ¾ full.
4. Bake for 1 ½ minutes. Using a toothpick, ip donuts and bake for another 4 minutes.
½ cup mashed banana
1 tsp vanilla extract
¼ cup vegetable oil
¹
8
/
Ingredients:
1 ½ cups all-purpose our
2 tsp baking powder
cup sugar
½ tsp cinnamon
cup almond milk
2 tbsp applesauce
Yield: 28 mini donuts
vegan
mini donuts
Directions:
1. Mix together our, baking powder, and sugar in a medium bowl.
2. Whisk together vegan or almond milk, apple sauce, vanilla and melted vegan butter
in a separate bowl. Add the dry ingredients, mixing until well combined.
3. Scoop batter into 1-gallon plastic bag and seal partway. Snip off ” from corner of
the bag. Add batter to donut molds until about ¾ full.
4. Bake for 1 ½ minutes. Using a toothpick, ip donuts and bake for another 4 minutes.
1 tsp vanilla extract
4 tbsp vegan butter, melted
¹
8
/
2
/
3
2
/
3

∙ 32 ∙ ∙ 33 ∙
Ingredients:
1 ½ cups all-purpose our
½ cup rainbow sprinkles
2 tsp baking powder
½ cup sugar
¼ tsp salt
1 large egg
Yield: 28 mini donuts
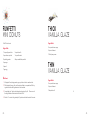
funfetti
mini donuts
Directions:
1. Mix together our, baking powder, sugar, sprinkles and salt in a medium bowl.
2. Whisk together the egg, milk, vanilla extract and butter in a separate bowl. Mix dry
ingredients into the wet ingredients until well combined.
3. Scoop batter into 1-gallon plastic bag and seal partway. Snip off ” from corner of
the bag. Add batter to donut molds until about ¾ full.
4. Bake for 1 ½ minutes. Using a toothpick, ip donuts and bake for another 4 minutes.
½ cup whole milk
1 tsp vanilla extract
4 tbsp unsalted butter, melted
¹
8
Ingredients:
¾ cup confectioners sugar
½ tsp vanilla extract
2 ½ tbsp heavy cream
Ingredients:
¾ cup confectioners sugar
½ tsp vanilla extract
2 tbsp whole milk
thick
vanilla glaze
thin
vanilla glaze
¹
8
/

∙ 35 ∙∙ 34 ∙
Ingredients:
¾ cup confectioners sugar
3 tbsp Dutch process cocoa powder
½ tsp vanilla extract
2 ½ tbsp half and half
Ingredients:
¾ cup confectioners sugar
1 tbsp lemon juice
1 tsp lemon zest
chocolate
glaze
lemon
glaze
Ingredients:
½ cup confectioners sugar
2 tbsp peanut powder
2 tbsp whole milk
Ingredients:
½ cup confectioners sugar
¼ cup Nutella
1 ½ tbsp whole milk
peanut butteR
glaze
Nutella
glaze
∙ 35 ∙
Ingredients:
¾ cup confectioners sugar
1 tbsp maple syrup
1 tbsp whole milk
Ingredients:
½ cup granulated sugar
2 tsp ground cinnamon
¼ cup melted butter, for dipping
MAPLe
glaze
CINNAMON
SUGAR
∙ 35 ∙

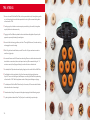
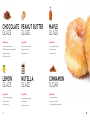
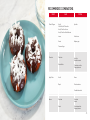
DONUT GLAZE TOPPING
Classic & Vegan
Vanilla
Half Vanilla, Half Chocolate
Vanilla, Tinted for Unicorn
Vanilla, Tinted for Cookie Monster
Lemon
Peanut
Cinnamon Sugar
Sprinkles
Fresh berries
Raspberry jam
Chocolate Chocolate
Peanut Butter
Sprinkles
Shredded coconut
Chocolate s prinkles
Chopped peanuts
Apple Cider
Vanilla
Maple
Pecans
Dried cranberries
Crumbled bacon bits
Banana Chocolate
Peanut
Chocolate
Peanuts
Chocolate sprinkles
Chopped peanuts
RECOMMENDED COMBINATIONS
∙ 37 ∙

7am
–
7pm
Our US-based customer support team is at your service
Monday - Friday during the times below.
Reach us at 1 (800) 898-6970 or [email protected]
Dash values quality and workmanship and stands behind this
product with our Feel Good Guarantee
™
. To learn more about our
commitment to quality, visit bydash.com/feelgood.
8am
–
8pm
9am
–
9pm
10am
–
10pm
Hey Hawaii! You can reach our customer service team from 5AM to 5PM.
And also, Alaska, feel free to reach out from 6AM - 6PM.
feel good
guarantee
™
CUSTOMER SUPPORT
∙ 38 ∙
warranty
STOREBOUND, LLC — 1 YEAR LIMITED WARRANTY
Your StoreBound product is warranted to be free from defects in material and workmanship for a period of one
(1) year from the date of the original purchase when utilized for normal and intended household use. Should any
defect covered by the terms of the limited warranty be discovered within one (1) year, StoreBound, LLC will repair
or replace the defective part. To process a warranty claim, contact Customer Support at 1(800)898-6970 for
further assistance and instruction. A Customer Support agent will assist you by troubleshooting minor problems.
If troubleshooting fails to x the problem, a return authorization will be issued. Proof of purchase indicating the
date and place of purchase is required and should accompany the return. You must also include your full name,
shipping address, and telephone number. We are unable to ship returns to a PO box. StoreBound will not be
responsible for delays or unprocessed claims resulting from a purchaser’s failure to provide any or all of the
necessary information. Freight costs must be prepaid by the purchaser.
Send all inquiries to support@storebound.com.
There are no express warranties except as listed above.
REPAIR OR REPLACEMENT AS PROVIDED UNDER THIS WARRANTY IS THE EXCLUSIVE REMEDY OF THE
CUSTOMER. STOREBOUND SHALL NOT BE LIABLE FOR ANY INCIDENTAL OR CONSEQUENTIAL DAMAGES
OR FOR BREACH OF ANY EXPRESS OR IMPLIED WARRANTY ON THIS PRODUCT EXCEPT TO THE EXTENT
REQUIRED BY APPLICABLE LAW. ANY IMPLIED WARRANTY OF MERCHANTABILITY OR FITNESS FOR A
PARTICULAR PURPOSE ON THIS PRODUCT IS LIMITED IN DURATION TO THE DURATION OF THIS WARRANTY.
Some states do not allow the exclusion or limitation of incidental or consequential damages, or limitations on
how long an implied warranty lasts. Therefore, the above exclusions or limitations may not apply to you. This
warranty gives you specic legal rights and you may also have other rights, which vary from state to state.
REPAIRS
DANGER! Risk of electric shock! The Dash Express Mini Donut Maker is an electrical appliance.
Do not attempt to repair the appliance yourself under any circumstances.
Contact Customer Support regarding repairs to the appliance.
TECHNICAL SPECIFICATIONS
Model: DDM007
Voltage: 120V ~ 60Hz
Power Rating: 760W
Stock#: DDM007_20190711_V4
∙ 39 ∙
La page est en cours de chargement...
-
 1
1
-
 2
2
-
 3
3
-
 4
4
-
 5
5
-
 6
6
-
 7
7
-
 8
8
-
 9
9
-
 10
10
-
 11
11
-
 12
12
-
 13
13
-
 14
14
-
 15
15
-
 16
16
-
 17
17
-
 18
18
-
 19
19
-
 20
20
-
 21
21


Dash Express Mini Donut Maker Le manuel du propriétaire
- Taper
- Le manuel du propriétaire
dans d''autres langues
Documents connexes
-
Dash Express Mini Donut Maker Le manuel du propriétaire
-
Dash Donut Maker Manuel utilisateur
-
-
Dash DCM009 Manuel utilisateur
-
-
Dash Mini Pie Maker Le manuel du propriétaire
-
Dash Retro Milkshake Maker Manuel utilisateur
-
-
-
Autres documents
-
Silvercrest SDM 1000 A1 User Manual And Service Information
-
Inventum DM070 Manuel utilisateur
-
Inventum DM06 Le manuel du propriétaire
-
Bestron ADM218SD Manuel utilisateur
-
Tristar SA-1124 Manuel utilisateur
-
 Securifi PP-WHT-US Mode d'emploi
-
BETTY CROCKER 29400017 Mode d'emploi
-
CHAUVET DJ FUNFETTI-SHOT Guide de référence
