
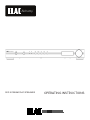
DDP-2 PREAMP/DAC/STREAMER
OPERATING INSTRUCTIONS
Alchemy
™

ELAC Alchemy DDP-2 Preamplifier | www.elac.com | Page 1
Safety Instructions
1. General information
• Please read and follow these safety instructions.
• Keep them safe for future reference.
• Observe all warnings on the preamplifier and in the manual. Please check the amplifier for damage
before use. The amplifier must be in perfect working condition. Damaged parts may lead to personal
injury.
2. Use only as directed
• Connect the preamplifier according to the instructions in the manual.
3. Location
• Install the preamplifier on a level surface only
• When choosing the location of the preamplifier do not place them in locations that are:
• In direct sunlight
• Very humid
• Prone to vibrations
• Exceptionally hot or cold
WARNING! Please ensure the product is perfectly stable to avoid injury from tip-over. Do not install the
preamplifier near any heat sources such as radiators, heating valves, stoves, or other apparatus that produce
heat, or in areas where there is a risk of explosion.
• Do not block any ventilation openings. Install in accordance with the instructions.
• Do not install the preamplifier in a closed rack or in a closed cupboard.
• Do not put burning candles on or near the preamplifier.
• Do not install the preamplifier near transformers because electromagnetic stray fields can cause hum
noise.
• In combination with certain materials / lacquers / material surfaces, anti-slip feet may cause colored
imprints on the surfaces.
4. Overload
• Extreme overload of the device due to very high volume may cause damage to individual components.
Because of the possible danger, you should never leave the amplifier under extreme overload conditions
unattended.

ELAC Alchemy DDP-2 Preamplifier | www.elac.com | Page 2
5. Service
• DANGER! Do not open the amplifier because there may be dangerous voltages inside. Servicing to be
carried out by qualified service personnel only.
• Servicing is required when the amplifier has been damaged in any way, such as damage to the power
supply cord or the plug, or when liquid has been spilled or objects have fallen onto the amplifier, the
amplifier has been exposed to rain or moisture, does not operate normally, or has been dropped. To
reduce the risk of electric shock, do not open the amplifier. Servicing should be carried out by qualified
service personnel only.
6. Cleaning
• NOTE: Clean only with soft, smooth cloth or with dust brush. Do not use scouring agents, alcohol,
benzene, furniture polish or other agents for cleaning! Modern furniture is often coated with multiple
varnishes and plastics which can be treated with chemical agents. Some of these agents contain
substances which degrade or soften the rubber feet. Therefore we advise that you place an anti-slip mat
underneath the amplifier.
7. Volume
• CAUTION! Continuous high volume may cause severe damage to your hearing. Please listen responsibly.
8. Disposal
• The packaging is made from recyclable materials. Dispose of this in an environmentally friendly manner.
At end of life dispose of the preamplifier as e-waste. The amplifier must be recycled in accordance with
local legislation. Ask your local government for further information on recycling as the device contains
valuable raw materials.

Philosophy
Thank you for purchasing this ELAC product.
Since the time we started (1926), ELAC has always striven to achieve the very best.
Your new ELAC amplifier is built to the highest standards using high-quality components that are carefully
constructed to deliver the best-in-class sound quality. They are developed by a passionate group of individuals
whose sole purpose is to bring a new dimension of sound quality into your home. Enjoy!
Before Use
Avoid damage to the amplifier and other components:
• Carefully unbox the amplifier to avoid physically damaging your preamplifier.
Remote Control
Power: The power button will cycle the power on and o
Mute: Mutes all audio coming from the preamplifier
VOL + : Increases the volume
VOL - : Decreases the volume
<< : For Future Media Control Use
>> : For Future Media Control Use
Play/Pause: For Future Media Control Use
INPUT< : Cycles through the inputs going left
INPUT>: Cycles through the inputs going right
BAL L: Changes the Audio Balance towards the left speaker
BAL R: Changes the Audio Balance towards the right speaker
UP SAMPLE: Turns the Up Sample Feature On/O
FILTER: Cycles through the 4 Filter Presets
ELAC Alchemy DDP-2 Preamplifier | www.elac.com | Page 3

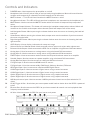
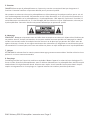
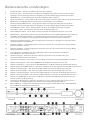
Controls and Indicators
1. POWER Button—Used to power the preamplifier on and o
2. Headphone Jack—Use this jack to listen to music privately using headphones. Music will muted from the
variable audio outputs when selected (Fixed level outputs will still be active)
3. MUTE Indicator — This LED will illuminate when the MUTE function is active
4. Headphone Indicator—This LED will illuminate when headphones are connected to the headphone jack
5. MUTE Button—Used to activate the MUTE Function which will disable all output of the preamp when
active
6. Headphone Output Selector—This button will activate the headphone output when selected. Music will
muted from the variable audio outputs when selected (Fixed level outputs will still be active)
7. Left Navigation Button—Mimics pressing the selector knob to enter the menus and rotating the knob left
one click.
8. Select Button—Mimics pressing the selector knob, except under certain conditions if you have entered
the menu using the knob
9. Right Navigation Button—Mimics pressing the selector knob to enter the menus and rotating the knob
right one click.
10. OLED Display—Use to display information for setup and usage
11. Volume Control and Selector Knob—Used to control volume, inputs and various other adjustments
12. Balanced Audio Output—Used to connect the DDP-2 to an amplifier using Balanced XLR connections
13. Analog Input 1—Used to connect an analog source using unbalanced RCA connections
14. Analog Input 2—Used to connect an analog source using unbalanced RCA connections
15. FIXED Output—Used to connect to another device that will provide volume control to an amplifier
16. Variable Output—Used to connect to a power amplifier using unbalanced RCA connections
17. Analog Balanced Input—Used to connect to a balanced XLR based source
18. I²S Digital Input 2—Used to connect HDMI based I²S sources
19. I²S Digital Input 1—Used to connect to Mini- DIN Based (Alchemy Standard) I²S Source
20. AES Digital Input—Used to connect to a Balanced AES Digital Source
21. COAX Digital Input 2—Used to connect a Digital source using a coaxial connector
22. COAX Digital Input 1 —Used to connect a Digital source using a coaxial connector
23. Optical Digital Input 2—Used to connect a Digital source using a optical connector
24. Optical Digital Input 2—Used to connect a Digital source using a optical connector
25. USB Asynchronous Input—Used to connect a USB Asynchronous based source (See website for PC
driver)
26. 12 Volt Trigger In/Out— Used when you want to power on/o another device when the DDP-2 is powered
on/o
27. Ethernet Port—Used to connect the DDP-2 to your home network for control and music playback from
3rd party services/devices
28. AC Inlet—Used to connect the DDP-2 to your homes main power
ELAC Alchemy DDP-2 Preamplifier | www.elac.com | Page 4

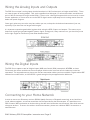
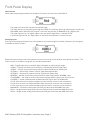
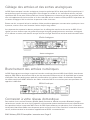
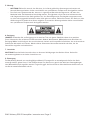
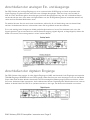
Wiring the Analog Inputs and Outputs
The DDP-2 can accept 3 analog inputs (one balanced pair via XLR and two pairs of single ended RCAs.) There
are several types of analog outputs. Two are the expected variable type (i.e. volume controlled; one balanced
pair via XLR and one pair of single ended RCAs.) There is also a fixed-gain output which can be used in a home-
theater application, or if one wants to use the DDP-2 digital section separately from its analog section. See the
below rear panel diagrams.
Once again, please try to use the very best cables you can, and opt for the balanced connection if you can,
especially if you intend to use longer cable lengths.
It is important to practice good cable hygiene while wiring the DDP-2 inputs and outputs. That means try to
keep each signal type grouped together (power, digital, analog) and, if they need to cross, you should try to do
that at right angles to minimize any interaction between them.
Wiring the Digital Inputs
The DDP-2 can support a total of 8 digital inputs (USB, two-Coaxial (RCA), two optical, AES/EBU, and two
I²S formats) plus those available via the media player which can be accessed over the ethernet or wireless
connection. For top performance, please use the best connection cables you have available. Digital cables ARE
dierent from audio cables, and the DDP-2 is good enough to let you appreciate the dierence.
Connecting to your Home Network
In order to access our Discovery services (ROON, Spotify Connect, or Bluetooth streaming), or to check for or
install software updates, an internet connection must be provided by the Ethernet port. It is possible to use
DDP-2 internal WiFi connection to do these things, but the initial connection must be wired, after which one can
change to wireless. To access the wireless internet connection, please see additional DDP-2 instructions at
www.elac.com.
ELAC Alchemy DDP-2 Preamplifier | www.elac.com | Page 5

Powering on and Controlling the DDP-2
Initial Power On
Press the POWER button to turn DDP-2 on.
At initial power on the DDP-2 will go through a brief warmup period during which it will be in mute. The Alchemy
Logo will be displayed on the front display as the unit warms up.
The screen will go blank just before DDP-2 unmutes and restores the last known status condition of all functions.
You will hear a number of relay clicks, which is normal.
The Indicators
There are two LEDs on the front of DDP-2. The first one indicates when the DDP-2 has been placed in MUTE
mode, the other when the HEADPHONE output has been selected (which shuts o the variable line outputs, but
not the fixed output.)
The Controls
Following the two LEDs there are five buttons with the following functionality –
• MUTE toggles the mute relays for all outputs (including fixed), shutting o the sound completely. The
MUTE LED comes on when engaged. Pressing the button again will UNMUTE the DDP-2 and extinguish
the LED.
• PHONES engages the headphone output , shutting o the sound from the level controlled (but not fixed)
outputs completely. The HEADPHONE LED comes on when engaged. Pressing the button again will
turn o the headphones and LED and turn the variable outputs back on.
• “<” mimics pressing the selector knob to enter the menus, rotating the selector knob left one click,
except under certain conditions if you have entered the menu using the knob.
• SELECT mimics pressing the selector knob, except under certain conditions if you have entered the
menu using the knob.
• “>” mimics pressing the selector knob to enter the menus and rotating the selector knob right one click,
except under certain conditions if you have entered the menu using the knob.
To the right of the display window is the selector knob.
During normal operation this is your volume knob. Turning it left reduces the playing volume and brings the
numbers in the display closer to minimum (00.0). Turning it right increases the playing volume and brings the
numbers in the display closer to maximum (99.5)
Pressing the knob brings up the input selection and settings menus. After 5 seconds of inactivity the menus exit
and the status screen automatically returns.
ELAC Alchemy DDP-2 Preamplifier | www.elac.com | Page 6

Front Panel Display
Status Screen
Under normal operating conditions the display will show the current status of the DDP-2
• The upper left corner will indicate the selected input.
• The lower left corner show the type of signal the DDP-2 is receiving, either by indicating the sample rate,
DSD, MQA, status, NO LOCK if the signal is invalid or not present, or ANALOG if not a digital input.
• The upper right corner , for digital inputs it tells you which digital filter is selected (F1-F4)
• In the lower right corner, for digital inputs, if resolution enhancement is selected or not.
Selecting Inputs
Pressing and rotating the knob (or the similar buttons) will scroll through all available selections, plus bring you
to setup and feature screens.
Rotate the knob until you reach the input you want to use, then press the knob or enter button to select it. The
order of inputs is as follows, along with any needed explanations:
• USB – Type B input from an enabled Type A computer or media player output
• COAX 1 – 75 Ohm terminated and transformer isolated RCA jack for S/Pdif input
• COAX 2 – 75 Ohm terminated and transformer isolated RCA jack for S/Pdif input
• OPTICAL 1 – Galvanically isolated “toslink”-type plastic optical fiber
• OPTICAL 2 – Galvanically isolated “toslink”-type plastic optical fiber
• AES/EBU – 110 Ohm terminated and transformer isolated XLR jack for AES/EBU input
• I²S ALCHEMY – our original standard for communicating I2S bus signals over 5-pin minidin
• I²S HDMI – a newer implementation of dierential I2S signals over an HDMI cable
• I²S–D1 -One of three user-defined outputs from the internal streamer (see instructions)
• I²S–D2 -One of three user-defined outputs from the internal streamer (see instructions)
• I²S–D3 -One of three user-defined outputs from the internal streamer (see instructions)
• BALANCED – Balanced analog input over XLR jack terminated with 100K Ohm load
• RCA-1 – Single ended analog audio input over RCA jack terminated with 100K Ohm load
• RCA-2 – Single ended analog audio input over RCA jack terminated with 100K Ohm load
ELAC Alchemy DDP-2 Preamplifier | www.elac.com | Page 7

Control and Setup
Menu Selections
Rotating past the Input selections will get you to four menu setup items. Press ENTER and rotate the knob or
use the buttons to change the setting. Note that these settings are stored PER INPUT and will be recalled the
next time this input is selected:
Balance—Shifts the selected input balance Left or Right up to 9.5db from center, or o (---)
Input Set—Brings up the following sub-menu for this specific selected input
FILTER 1/2/3/4 – Selects one of 4 digital output filters
F1: Linear phase, fast roll-o
F2: Linear phase, slow roll-o
F3: Minimum phase, fast roll-o
F4: Minimum phase, slow roll-o (apodizing)
ResEnh on/o—Selects if resolution enhancement is to be applied or not
Phase +/- - Selects positive or negative output polarity
Upsamp on/o—Selects if upsampling to the highest available sample rate will be applied
ELAC Alchemy DDP-2 Preamplifier | www.elac.com | Page 8

Control and Setup
DISP SET—Sets if and when the display screen goes o after using any function, the choices are 10Min, 5
Min, 60 Sec, 15 Sec, & OFF. Using any control will wake up the display, although the first press (or turn) will be
ignored.
ABOUT—Displays the following status screen about your DDP-2
Controls: Software Version Number
DSP: Software Version Number
Front Panel: Software Version Number
OS: Software Version Number
ETH: Displays the assigned I/P address for the Ethernet connection
WiFi: Displays the assigned I/P address for the WiFi connection
STREAMING SETUP
ROON
Your DDP-2 is what is called a ROON ENDPOINT. This means that any ROON CORE or SERVER will see the
DDP-2 as an audio location it can stream to. Of course we recommend the ELAC DISCOVERY series of products
as your ROON server, but there are many others, plus you can use your computer. Just remember, that however
you decide to do it, the ROON server and the DDP-2 must be connected to the same network, preferably over
the Ethernet connection. A wireless connection may be used, but we only suggest that if a wired connection is
inconvenient or unavailable. Wired connections are capable of higher speed and tend to be much more reliable
and less susceptible to interference, dropouts and other disturbances.
After connecting your ROON server and powering up, you will see the DDP-2 has three available endpoints
named I2S–D1, I2S–D2 & I2S–D3. You may pick any or all of these as your ROON endpoint. If you pick multiple
endpoints then you can send independent streams to each of them, as desired. Once you have your endpoint(s)
selected you can start playing. Select the appropriate input on DDP-2 to play that stream. If you selected to
play independent streams, then selecting each on the DDP-2 will give you the stream you selected.
Please visit www.elac.com for the most up-to-date features, firmware and user guides
FIRMWARE UPDATES
To check for or perform a firmware update please navigate to the About Page and write down the IP address for
the DDP-2 (Please note that the DDP-2 must be connected to your home network to perform a firmware update).
Enter the IP address for the DDP-2 into a web browser on your home computer or tablet and select firmware
update.
ELAC Alchemy DDP-2 Preamplifier | www.elac.com | Page 9

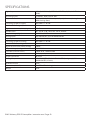
SPECIFICATIONS
Digital Inputs USB, (2) COAXIAL, (2) OPTICAL, AES/EBU, (2) I2S (ALCHEMY &
HDMI)
Streaming Inputs ETHERNET, BLUETOOTH, WIFI
Supported Services PCM, DSD, DoP, ROON endpoint, Spotify Connect (Coming Soon,
MQA (Coming Soon)
Frequency response (digital) 10hz-20khz +/- 0.2dB
Nominal THD+N (digital) <0.01%
Signal-to-noise ratio (1 kHz) (digital) >110dB
Sample Rates 44.1, 48. 88.2, 96, 176.4, 192, 352.8, 384KHz
Output Voltage (digital) 7.0V RMS @0dBFs
Analog Inputs XLR BALANCED, (2) RCA UNBALANCED
Input impedance RCA=18K, XLR=36K
Frequency response (analog) 10hz-20khz +/- 0.2dB
Nominal THD+N (analog) <0.001%
Signal-to-noise ratio (1 kHz) (analog) >110dB
Output Voltage (analog) >10.0V RMS
Crosstalk (L-to-R or R-to-L) >110dB 10-1K, >80dB 1K-20K
Gain 12dB (input dependent)
Output impedance 50 Ohms
Analog Outputs XLR BALANCED, (1) RCA UNBALANCED (fixed gain) (1) RCA
UNBALANCED (variable)
Available finishes Black
Dimensions (HxWxD) 2" x 17.5" x 15" including jacks
Weight 14 lbs
ELAC Alchemy DDP-2 Preamplifier | www.elac.com | Page 10

ELAC Americas Inc.
North America Limited Liability Warranty
Passive Speakers (No built-in amplifier)
ELAC Americas INC. warrants to the original purchaser that this product be free from defects and or
workmanship for a period of3 (Three)years from the original date of purchase. During this time period, repair or
replacement of parts will be free of charge to the original owner (See below limitations). Shipping to and return
from the repair center will be the responsibility of the original purchaser.
Powered Subwoofers
ELAC Americas INC. warrants to the original purchaser that this product be free from defects and or
workmanship for a period of3 (Three)years on the cabinet and speaker driver and1 (One)year on the amplifier
from the original date of purchase. During this time period, repair or replacement of parts will be free of
charge to the original owner (See below limitations). Shipping to and return from the repair center will be the
responsibility of the original purchaser.
Electronics (Including Wireless Speakers)
ELAC Americas INC. warrants to the original purchaser that this product be free from defects and or
workmanship for a period of1 (One)years from the original date of purchase. During this time period, repair or
replacement of parts will be free of charge to the original owner (See below limitations). Shipping to and return
from the repair center will be the responsibility of the original purchaser.
B-Stock (Reconditioned/Open Box) Product Warranty
ELAC Americas INC. warrants to the original purchaser that this product be free from defects and or
workmanship, unless otherwise stated in product description, for a period of90 daysfrom the original date of
purchase. During this time period, repair or replacement of parts will be free of charge to the original owner
(See below limitations). Shipping to and return from the repair center will be the responsibility of the original
purchaser.
Limitations
Warranty begins on the date of original purchase from an authorized ELAC Americas Inc. dealer.
Product is warranted only if used in home applications within the max power rating specified in this manual.
Commercial use of this product is not warranted.
• Product that has been modified or altered in anyway will not be warranted.
• Product that has been abused or subjected to faulty equipment will not be warranted.
• Products with defaced or removed serial numbers will not be warranted.
If service is required
In the event that service is required, please contact ELAC America at 888-541-0996 or at
[email protected]to arrange for service or replacement. You will be responsible to provide proof of
purchase (Copy or original sales receipt). Shipping to and from our repair center will be the responsibility of the
original purchaser.
Warranty Outside of North America
This warranty applies to products purchased in the United States and Canada. For warranty claims outside of
North America please contact the local dealer/distributor in the country of purchase.
ELAC Alchemy DDP-2 Preamplifier | www.elac.com | Page 11

DDP-2 PREAMP/DAC/STREAMER
OPERATING INSTRUCTIONS
Alchemy
™

Consignes de sécurité
1. Informations générales
• Veuillez lire et suivre ces consignes de sécurité.
• Conservez-les afin de les consulter ultérieurement.
• Respectez tous les avertissements inscrits sur le préamplificateur et dans le manuel. S'il vous plaît,
vérifiez si le préamplificateur est endommagé avant de l'utiliser. Le préamplificateur doit être en parfait
état de fonctionnement. Les pièces endommagées peuvent causer des blessures corporelles.
2. 2. Utilisez seulement selon les directives.
• Connectez le préamplificateur conformément aux instructions du manuel.
3. 3. Emplacement
• Installez uniquement le préamplificateur sur une surface plane
• Lorsque vous choisissez l'emplacement du préamplificateur, ne le placez pas aux endroits suivants :
• Sous les rayons directs du soleil
• Très humides
• Sujets aux vibrations
• Très chauds ou très froids
ATTENTION! Afin d'éviter toute blessure causée par le basculement de cet appareil, veuillez-vous assurer qu'il
est parfaitement stable. N'installez pas le préamplificateur à proximité de sources de chaleur telles que des
radiateurs, des valves de chauage, des poêles ou autres appareils qui produisent de la chaleur ou dans des
endroits présentant des risques d'explosion.
• Ne bloquez pas les ouvertures de ventilation. Installez conformément aux instructions.
• N'installez pas le préamplificateur dans un espace confiné ou un placard fermé.
• Ne placez pas de bougies allumées sur ou près du préamplificateur.
• N'installez pas le préamplificateur à proximité de transformateurs car des champs parasites
électromagnétiques peuvent provoquer des bourdonnements OHM.
• En combinaison avec certains matériaux/vernis/surfaces de matériaux, les pieds antidérapants ou les
rondelles des pointes peuvent laisser des traces colorées sur les surfaces.
4. Surcharge
• Une surcharge extrême de l'appareil en raison d'un volume très élevé pourrait endommager certains
composants de l'appareil. En raison de dangers potentiels, vous ne devez jamais laisser l'amplificateur
sans surveillance lors de conditions de surcharge extrême.
ELAC Alchemy DDP-2 Preamplifier | www.elac.com | Page 1

5. Entretien
DANGER! N'ouvrez pas le préamplificateur car il pourrait y transiter une tension électrique dangereuse à
l'intérieur. L’entretien doit être uniquement eectué par un personnel qualifié.
Un entretien est nécessaire lorsque le préamplificateur a été endommagé de quelque manière que ce soit, tel
que l'endommagement du cordon d'alimentation ou de la fiche électrique, ou si du liquide a été renversé ou si
des objets sont tombés sur le préamplificateur, si le préamplificateur a été exposé à la pluie ou à l'humidité, s'il
ne fonctionne pas normalement, ou s'il a été échappé. Afin de réduire les risques d'électrocution, n'ouvrez pas
le préamplificateur. L'entretien doit être uniquement eectué par un personnel qualifié.
6. Nettoyage
REMARQUE : Nettoyez uniquement avec un chion doux et souple ou une brosse à dépoussiérer. N’utilisez pas
de produits abrasifs, d’alcool, de benzène, de cire pour meubles ou autres produits de nettoyage! Le mobilier
moderne est souvent revêtu de multiples couches de vernis et de plastique qui peuvent être traités avec des
agents chimiques. Certains de ces agents contiennent des substances qui dégradent ou ramollissent les pieds
de caoutchouc. Par conséquent, nous vous conseillons de placer un tapis antidérapant sous le préamplificateur.
7. Volume
ATTENTION! Un volume élevé en continu peut endommager gravement votre audition. Veuillez utiliser les haut-
parleurs à un niveau sonore convenable.
8. Recyclage
L’emballage est fabriqué à partir de matériaux recyclables. Mettez l’appareil au rebut de façon écologique. En
fin de vie utile, éliminez le préamplificateur avec les déchets électroniques. Le préamplificateur doit être recyclé
conformément à la réglementation locale. Informez-vous auprès de vos autorités locales pour obtenir de plus
amples renseignements sur le recyclage, car l’appareil contient des matières premières précieuses.
ELAC Alchemy DDP-2 Preamplifier | www.elac.com | Page 2

Philosophie
Merci d’avoir fait l’achat de ce produit ELAC.
Depuis nos débuts en 1926, ELAC a toujours aspiré à atteindre l’excellence.
Votre nouvel amplificateur ELAC est conçu selon les normes les plus élevées. Il est doté de composantes de
qualité supérieure qui sont soigneusement fabriqués pour procurer la meilleure qualité sonore de leur catégorie.
Ils sont conçus par des gens passionnés dont le seul but est d’amener à votre foyer une nouvelle dimension de
qualité sonore. Profitez-en!
Avant l’utilisation
Évitez d’endommager les haut-parleurs et les autres composantes :
• Déballez soigneusement le pr
ELAC Alchemy DDP-2 Preamplifier | www.elac.com | Page 3

Commandes et voyants lumineux
1. Bouton marche/arrêt « POWER » - Utilisé pour allumer et éteindre préamplificateur
2. Prise d’écouteurs - Utilisez cette prise pour écouter de la musique en privé en utilisant des écouteurs.
Une fois sélectionnée, dans le cas de sorties audio variables, la musique sera mise en sourdine (les sorties à
niveau fixe seront toujours actives)
3. Indicateur sourdine « MUTE » - Ce voyant s’allume lorsque la fonction MUTE est activée.
4. Indicateur d’écouteurs - Ce voyant s’allumera lorsque des écouteurs sont connectés à la prise d’écouteurs.
5. Bouton sourdine « MUTE » - Utilisé pour activer la fonction sourdine qui désactivera toutes les sorties du
préampli lorsqu’il est actif.
6. Sélecteur de sortie d’écouteurs - Ce bouton active la sortie des écouteurs lorsqu’il est sélectionné. Une fois
sélectionnée, dans le cas de sorties audio variables, la musique sera mise en sourdine (les sorties à niveau
fixe seront toujours actives)
7. Bouton de navigation gauche - Simule la pression sur un bouton sélecteur, comme si vous appuyez pour
accéder aux menus et pivotez d’un clic vers la gauche.
8. Sélectionnez le bouton -Simule la pression sur un bouton-sélecteur, sauf lors de certaines conditions, si
vous êtes déjà entré dans le menu à l’aide du bouton-sélecteur.
9. Bouton de navigation de droite - Simule la pression d’un bouton sélecteur comme si vous appuyez pour
accéder aux menus et pivotez d’un clic vers la gauche.
10. Achage DELO - Permet d’acher des informations sur la configuration et l’utilisation
11. Bouton de contrôle et de sélection du volume - Utilisé pour contrôler le volume, les entrées et divers
autres réglages
12. Sortie audio symétrique - Utilisée pour connecter le DDP-2 à un amplificateur en utilisant du filage XLR symétrique
13. Entrée analogique 1 - Utilisé pour connecter une source analogique en utilisant du filage RCA asymétrique
14. Entrée analogique 2 - Utilisé pour connecter une source analogique en utilisant du filage RCA asymétrique
15. Sortie FIXE « FIXED Output » - Utilisée pour la connexion à un autre dispositif qui fournira le contrôle du
volume à un amplificateur
16. Sortie variable « Variable Output » - Utilisée pour connecter un amplificateur de puissance en utilisant du
filage RCA asymétrique
17. Entrée analogue symétrique « Analog Balanced Input » - Utilisée pour connecter une source XLR symétrique
18. Entrée numérique 2 I²S - Utilisée - Utilisée pour connecter des sources HDMI I²S
19. Entrée numérique 1 I²S - Utilisée pour connecter une source Mini-DIN (la norme Alchemy) I²S
20. Entrée numérique AES - Utilisée pour connecter une source numérique AES équilibrée
21. Entrée coaxiale 2 - Utilisée pour connecter une source numérique en utilisant un connecteur coaxial
22. Entrée coaxiale 1 - Utilisée pour connecter une source numérique en utilisant un connecteur coaxial
23. Entrée numérique optique 2 - Utilisé pour connecter une source numérique en utilisant un connecteur optique
24. Entrée numérique optique 2 - Utilisé pour connecter une source numérique en utilisant un connecteur optique
25. Entrée asynchrone USB - Utilisée pour connecter une source asynchrone USB (parcourez sur le site Web
pour le pilote PC)
26. Entrée/sortie déclencheur 12 volts - Utilisée lorsque vous souhaitez qu’un autre appareil mette en
marche/arrête votre DPA-2.
27. Port Ethernet - Utilisé pour connecter le DDP-2 à votre réseau domestique pour le contrôle et la lecture de
musique à partir de tiers services ou dispositifs
28. Fiche AC - Utilisée pour brancher le DDP-2 à une source d’alimentation électrique
ELAC Alchemy DDP-2 Preamplifier | www.elac.com | Page 4

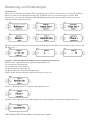
Câblage des entrées et des sorties analogiques
Le DDP-2 peut accepter 3 entrées analogiques (une paire symétrique XLR et deux paires RCA asymétriques). Il
existe plusieurs types de sorties analogiques. Deux de type de variable (c.-à-d. contrôle de volume; une paire
symétrique XLR et une paire RCA asymétrique). Il existe également une sortie de gain fixe qui peut être utilisée
dans une application de cinéma-maison ou si vous souhaitez utiliser la section numérique DDP-2 séparément de
sa section analogique. Voir les schémas du panneau arrière ci-dessous.
Encore une fois, essayez d’utiliser les meilleurs câbles possible et optez pour une connexion symétrique si vous
le pouvez, surtout si vous avez l’intention d’utiliser de plus longs câbles.
Il est important de respecter les bonnes pratiques lors du câblage des entrées et des sorties du DDP-2. Ceci
signifie que vous devez essayer de garder chaque type de signal groupé (puissance, numérique, analogique)
et s’ils doivent se croiser, vous devriez essayer de le faire à angle droit afin de minimiser toute interaction entre
eux.
Branchement des entrées numériques
Le DDP-2 peut prendre en charge un total de 8 entrées numériques (formats USB, Coaxial (RCA), deux formats
optiques, AES / EBU et deux formats I2S) en plus des connexions Ethernet ou sans fil disponibles par le lecteur
multimédia. Pour des performances optimales, veuillez utiliser les meilleurs câbles de connexion disponibles.
Les câbles numériques SONT diérents des câbles audio et le DDP-2 est assez bon pour vous permettre d’en
apprécier la diérence.
Connexion à votre réseau domestique
Pour accéder à nos services Discovery (ROON, Spotify Connect ou diusion en continu Bluetooth), ou pour
rechercher ou installer des mises à jour logicielles, une connexion Internet doit être fournie par le port Ethernet.
Il est possible d’utiliser la connexion WiFi interne du DDP-2 pour eectuer ces opérations, mais la connexion
initiale doit d’abord être câblée avant de pouvoir passer en mode sans fil. Pour accéder à la connexion Internet
sans fil, veuillez consulter les instructions supplémentaires DDP-2 sur www.elac.com.
Entrées analogiques
Sorties analogiques
Entrées numériques
ELAC Alchemy DDP-2 Preamplifier | www.elac.com | Page 5

Mise sous tension et contrôle du DDP-2
Mise sous tension initiale
Appuyez sur le bouton « POWER » pour allumer le DDP-2.
Lors de la mise sous tension initiale, le DPA-2 eectuera une brève période d’échauement au cours de laquelle
il reste muet. Vous verrez le logo Alchemy durant la période de réchauement.
L’écran devient blanc juste avant l’activation de DDP-2 et la restauration de la dernière configuration connue de
toutes les fonctions. Vous entendrez un certain nombre de relais cliquer, ce qui est normal.
Les voyants lumineux
Il y a deux voyants lumineux à l’avant du DDP-2. Le premier indique que le DDP-2 a été placé en mode sourdine
« MUTE » , le second lorsque la sortie écouteurs « HEADPHONE » a été sélectionnée (ce qui ferme les sorties
variables, mais pas la sortie fixe).
Les contrôles
Après les deux voyants lumineux, les cinq boutons ont les fonctionnalités suivantes :
• Sourdine « MUTE »bascule en sourdine toutes les sorties (y compris les fixes), coupant complètement le
son. Le voyant lumineux « MUTE » s’allume lorsque cette fonction est activée. En appuyant de nouveau
sur le bouton, la sourdine du DDP-2 sera désactivée et le voyant s’éteindra.
• ÉCOUTEURS « PHONES » active la sortie des écouteurs en coupant complètement le son des sorties au
niveau contrôlé (mais non fixe). Le voyant « HEADPHONE » s’allume lorsqu’il est activé. En appuyant de
nouveau sur le bouton, les écouteurs et le voyant s’éteindront puis les sorties variables se réactiveront.
• « < » Simule une pression sur le bouton-sélecteur comme pour entrer dans les menus et pivoter d’un
clic vers la gauche, sauf lors de certaines conditions si vous êtes déjà entré dans le menu à l’aide du
bouton-sélecteur.
• « SELECT » - Simule la pression sur un bouton-sélecteur, sauf lors de certaines conditions, si vous êtes
déjà entré dans le menu à l’aide du bouton-sélecteur.
• « > » Simule une pression sur le bouton-sélecteur, comme pour entrer dans les menus et pivoter d’un clic
vers la droite, sauf dans certaines conditions, si vous êtes déjà entré dans le menu à l’aide du sélecteur.
Le bouton de sélection est situé à droite de la fenêtre d’achage.
En mode de fonctionnement normal, il s’agit du bouton de volume. Si vous le tournez vers la gauche, le volume
de lecture est réduit et les nombres à l’écran se rapprochent du minimum (00.0). Si vous le tournez vers la
droite, le volume de lecture augmente et les nombres de l’écran se rapprochent du maximum (99.5)
En appuyant sur le bouton, les menus de sélection d’entrée et de réglages s’achent. Après 5 secondes
d’inactivité, les menus disparaissent et l’écran d’état réapparaît automatiquement.
ELAC Alchemy DDP-2 Preamplifier | www.elac.com | Page 6

Achage du panneau avant
• Le coin supérieur gauche indiquera l’entrée sélectionnée.
• Le coin inférieur gauche indique le type de signal reçu par le DDP-2, soit en indiquant la fréquence
d’échantillonnage, « DSD », « MQA », « Status », soit le signal est invalide ou absent « NO LOCK » ou s’il
ne s’agit pas d’une entrée numérique « ANALOG ».
• Pour les entrées numériques, le coin supérieur droit indique le filtre numérique sélectionné (F1-F4)
• Pour les entrées numériques, le coin inférieur droit indique si l’amélioration de la résolution est
sélectionnée ou non.
Écrans de fonctionnalités.
Écran d’état « Status Screen »
Sélection des entrées
Tournez le bouton jusqu’à l’entrée que vous souhaitez utiliser, puis appuyez sur le bouton-sélecteur ou sur le
bouton Entrée pour confirmer votre sélection. L’ordre des entrées, y compris toutes les explications nécessaires,
est le suivant :
• USB - Entrée de type B depuis un ordinateur compatible de type A ou de la sortie d’un lecteur
multimédia
• COAX 1 - Prise RCA à terminaison 75 ohms avec transformateur isolé pour entrée S / Pdif
• COAX 2 - Prise RCA à terminaison 75 ohms avec transformateur isolé pour entrée S / Pdif
• FIBRE OPTIQUE 1 - Fibre optique en plastique « Type Toslinkll » isolé galvanique
• FIBRE OPTIQUE 2 - Fibre optique en plastique « Type Toslinkll » isolé galvanique
• AES/EBU - Prise XLR à terminaison 110 ohm, avec transformateur isolé pour entrée AES / EBU
• I²S ALCHEMY - Notre norme originale pour la communication des signaux de bus I²S via une mini-borne
à 5 broches
• I²S HDMI - Une nouvelle implémentation des signaux diérentiels de 12£ sur un câble HDMI
• I²S - D1 - Une des trois sorties du streamer interne définies par l’utilisateur (voir Instructions)
• I²S - D2 - Une des trois sorties du streamer interne définies par l’utilisateur (voir les instructions)
• I²S - D3 - Une des trois sorties du streamer interne définies par l’utilisateur (voir les instructions)
• SYMÉTRIQUE - Entrée analogique symétrique avec terminaison XLR et une charge de 100K ohms
• RCA-1 - Entrée audio analogique asymétrique avec terminaison RCA et une charge de 100K ohm
• RCA-2 - Entrée audio analogique asymétrique avec terminaison RCA et une charge de 100K ohms
ELAC Alchemy DDP-2 Preamplifier | www.elac.com | Page 7
La page est en cours de chargement...
La page est en cours de chargement...
La page est en cours de chargement...
La page est en cours de chargement...
La page est en cours de chargement...
La page est en cours de chargement...
La page est en cours de chargement...
La page est en cours de chargement...
La page est en cours de chargement...
La page est en cours de chargement...
La page est en cours de chargement...
La page est en cours de chargement...
La page est en cours de chargement...
La page est en cours de chargement...
La page est en cours de chargement...
La page est en cours de chargement...
La page est en cours de chargement...
La page est en cours de chargement...
-
 1
1
-
 2
2
-
 3
3
-
 4
4
-
 5
5
-
 6
6
-
 7
7
-
 8
8
-
 9
9
-
 10
10
-
 11
11
-
 12
12
-
 13
13
-
 14
14
-
 15
15
-
 16
16
-
 17
17
-
 18
18
-
 19
19
-
 20
20
-
 21
21
-
 22
22
-
 23
23
-
 24
24
-
 25
25
-
 26
26
-
 27
27
-
 28
28
-
 29
29
-
 30
30
-
 31
31
-
 32
32
-
 33
33
-
 34
34
-
 35
35
-
 36
36
-
 37
37
-
 38
38


Elac Alchemy Series DDP-2 Le manuel du propriétaire
- Taper
- Le manuel du propriétaire
- Ce manuel convient également à
dans d''autres langues
Documents connexes
-
Elac DPA-2 Series Le manuel du propriétaire
-
-
Elac Discovery Connect DS-C101W-G Le manuel du propriétaire
-
-
-
-
-
Autres documents
-
 Musical Fidelity MX-HPA Mode d'emploi
-
 Mark Levinson NO519 Le manuel du propriétaire
-
Pioneer U-05 Manuel utilisateur
-
-
ADVANCE X-PREAMP Le manuel du propriétaire
-
 Musical Fidelity MX-DAC Mode d'emploi
-
JBL 4329P Le manuel du propriétaire
-
Fostex HP-A8C Le manuel du propriétaire
-
OEHLBACH XXL DAC Ultra Manuel utilisateur
-
Johansson 8210 HDMI Streamer Le manuel du propriétaire


