Elac Discovery Connect DS-C101W-G Le manuel du propriétaire
- Catégorie
- Hauts-parleurs portatifs
- Taper
- Le manuel du propriétaire

Discovery Connect DS-C101W-G
OPERATING INSTRUCTIONS

ELAC Discovery Connect | www.elac.com | Page 1
Important Safety Instructions
1. General information
• Please read and follow these safety instructions.
• Keep them safe for future reference.
• Observe all warnings on the unit and in the manual. Please check the speaker for damage before use.
The unit must be in perfect working condition. Damaged parts may lead to personal injury.
2. Use only as directed
• Connect the unit according to the instructions in the manual.
3. Location
• Install the unit on a level surface only
• When choosing the location for this device do not place them in locations that are:
• In direct sunlight
• Very humid
• Prone to vibrations
• Exceptionally hot or cold
Do not block any ventilation openings. Install in accordance with the manufacturer’s instructions.
• Do not install this device in a closed rack or in a closed cupboard.
• Do not put burning candles on or near the device.
• Do not install the device near transformers because electromagnetic stray fields can cause hum
noise on woofers.
4. Service
DANGER! Do not open the cabinet because the components and conductors may carry dangerous levels
electricity! Servicing to be carried out by qualified service personnel only.
Servicing is required when the loudspeaker has been damaged in any way, such as damage to
the power supply cord or the plug, or when liquid has been spilled or objects have fallen into the
loudspeaker, the speaker has been exposed to rain or moisture, does not operate normally, or has been
dropped. To reduce the risk of electric shock, do not open the loudspeaker. Servicing to be carried out
by qualified service personnel only.

ELAC Discovery Connect | www.elac.com | Page 2
5. Cleaning
NOTE: Clean only with soft, smooth cloth or with dust brush. Do not use scouring agents, alcohol,
benzene, furniture polish or other agents for cleaning! Modern furniture is often coated with multiple
varnishes and plastics which can be treated with chemical agents. Some of these agents contain
substances which degrade or soften the rubber feet.
6. Disposal
The packaging is made from recyclable materials. Dispose of this in an environmentally friendly manner.
At end of life do not dispose the speaker with the standard household waste. The speaker must be
recycled in accordance with local legislation. Ask your local government for further information on
recycling as the device contains valuable raw materials. Disable the speaker before disposal.
7. Power
This unit is only intended to be connected to voltages that are listed on the rear panel of the cabinet.
Connection to any other voltage may cause irreversible damage to the subwoofer and will void the
warranty. Use of plug adapters is not recommended because they may allow connection to voltages
other than those printed on the back of this subwoofer.
8. Compliance Information for the Wireless Transmitter
The term “IC:” before the radio certification number only signifies that Industry Canada technical
specifications were met. This equipment complies with FCC and IC radiation exposure limits set forth for
an uncontrolled environment. This equipment should be installed and operated with minimum distance
20cm between the radiator and your body. This transmitter must not be co-located or operating in
conjunction with any other antenna or transmitter.
Operation is subject to the following two conditions: (1) this device may not cause interference, and (2)
this device must accept any interference, including interference that may cause undesired operation of
the device.
To reduce potential radio interference to other users, the antenna type and its gain should be so
chosen that the equivalent isotopically radiated power is not more than that permitted for successful
communication.

ELAC Discovery Connect | www.elac.com | Page 3
Philosophy
Thank you for purchasing this ELAC product.
Since the time we started (1926), ELAC has always striven to achieve the very best.
Your new ELAC speakers are built to the highest standards using high-quality components that are carefully
constructed to deliver the best-in-class sound quality. They are developed by a passionate group of individuals
whose soul purpose is to bring a new dimension of sound quality into your home. Enjoy!

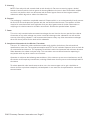
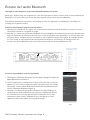
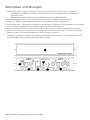
Controls and Indicators
1. Multi-Function LED—This LED is used to show the current status of the Discovery Connect.
• The brightness of this LED can be changed using the free iOS/Android App or web interface.
• Please refer to separate sections of this manual for further explanations of the LED status
2. Power Input— Used for providing power to the unit from the included AC power supply.
3. Output 1—Provides native digital output from the Discovery Music Server and Roon Cores.
4. Ethernet Input—Use this when connecting the Discovery Connect to your wired home network (Best solution).
See page 5 for how to connect to a wireless network.
5. Bluetooth Pair/Reset Button— Used to begin the Bluetooth Pairing Process for audio devices.
6. Wireless Pair Button—This button is used to pair the Discovery Connect with other AirX products.—See
Page 11 for pairing instructions
7. Output 2—Provides analog and digital outputs from the Discovery Music Server, Roon Cores, Spotify Connect,
AirPlay, and Bluetooth. The output is fixed at 96Khz 24-Bit
1
2
3
4
7
6
5
ELAC Discovery Connect | www.elac.com | Page 4

ELAC Discovery Connect | www.elac.com | Page 5
Connecting to your Home Network
Wired Connection
1. Connect an Ethernet cable (Not provided) to an available LAN port on your router or switch to the Ethernet
input on the back of the Discovery Connect.
2. Apply power to the Discovery Connect by connecting the power cord to an available outlet and to the power
input on the Connect.
3. The status LED will begin flashing during the power on phase and will go solid once it has connected to the
network and is ready to play music.
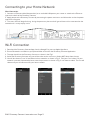
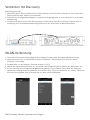
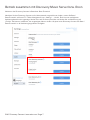
Wi-Fi Connection
1. Download the Discovery Connect App from the Google Play store or Apple App Store.
2. Ensure Bluetooth is enabled on your phone/tablet and launch the Discovery Connect Application.
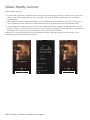
3. The app should find the Discovery Connect as shown in the Fig. 1
4. Select the Discovery Connect and you will be taken to the main menu. Select WiFi Setup from the top.
5. You will be shown a list of all available wireless networks as shown in Fig 2. Find yours and select it. If your
network is password protected please enter the password as shown in Fig. 3 and choose submit. The unit will
reboot and you will connected to your home network.
Fig 1 Fig 2 Fig 3

ELAC Discovery Connect | www.elac.com | Page 6
Connecting the Discovery Connect
Output 1—Native Digital Output
Output 1 –Provides a native digital output from the Discovery Connect. With no sample rate conversion for
content up to 192khz 24-Bit quality. This output does not support AirPlay, Bluetooth or Spotify Connect. Simply
connect the optical/coaxial output from the Discovery Connect to the Optical Input on your integrated amp/
receiver/preamp/DAC.
Output 2—Analog and Digital Output Combined Output
Output 2 –Provides both digital and analog outputs from the Discovery Connect. All content is sample rate
converted to 96kHz 24-Bit unless the AirX2 output is activated. In this case, content is sample rate converted
to 44.1kHz 16-Bit. This output supports Roon Ready, Discovery Ready, Spotify Connect, AirPlay, and Bluetooth
content.

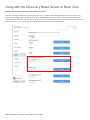
Using with the Discovery Music Server or Roon Core
Enabling the Discovery Connect in Roon/Roon Essentials
After connecting the Discovery Connect to your home network, launch Roon/Roon Essentials on your PC or
tablet. Go to Settings and then Audio. A list of all available audio devices will be listed. Locate the Discovery
Connect and click enable. You can also change the default name for the Connect. Now, the Discovery Connect
will be available in the audio output section of the Roon/Roon Essentials Application.
ELAC Discovery Connect | www.elac.com | Page 7

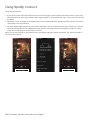
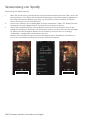
Using Spotify Connect
Using Spotify Connect
1. If you have already connected the Discovery Connect to your home network, proceed to step 2. If you have
not connected it to your home network please go to page 7 and complete the steps. Then return to step 2 on
this page.
2. Download, install and login to the Spotify App on your phone/tablet/PC. Spotify Connect requires a Premium
subscription to use this feature.
3. Start the Spotify App and you will see “Device Available” text at the bottom of the app. Click on this and you
will be presented will all of the Spotify Connect devices available. Select the Discovery Connect and now
music will start playing on the Discovery Connect.
Note: The volume control on your phone and in the Spotify app will now be linked with the volume control on
the Discovery Connect.
ELAC Discovery Connect | www.elac.com | Page 8

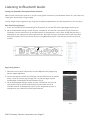
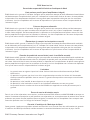
Listening to Bluetooth Audio
Pairing your Bluetooth Smartphone/Tablet for Audio
Note: Please note that this process is only for playing back audio from your Bluetooth device. It is not necessary
to pair your device when using the App.
You can begin the paring process by using the smartphone application or the pairing button on the rear panel.
Rear Panel Pairing Process
1. Press and hold the BT Pair button (Fig 1) for 5 seconds or until the LED status light begins flashing red.
2. Go to the Bluetooth settings section on your smartphone and scan for new devices (Fig 2). Select the
Discovery Connect from the list of available devices. It prompted for a pass code, accept that one that is
displayed on your device and choose pair/connect. All audio from your connected device will now come
from the Discovery Z3. Please note that when using Bluetooth you wil have two volume controls (Phone
and Z3)
App Pairing Process
1. Download and install the Discovery Connect App from the Google Play
Store or Apple App Store
2. Launch the App and select the Discovery Connect from the list of devices
(If this is your first time using the app). On t he Control page activate
the Bluetooth Discoverable On/O selection (Fig 3).
3. Go to the Bluetooth settings section on your smartphone and scan for
new devices (Fig 2). Select the Discovery Connect from the list of
available devices. It prompted for a pass code, accept that one that is
displayed on your device and choose pair/connect.
Fig 3
ELAC Discovery Connect | www.elac.com | Page 9

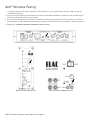
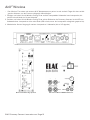
AirX² Wireless Pairing
• Pairing the wireless transmitter with other AirX products is very simple. Please follow the below steps to
complete the process.
1. Press and hold the Wireless Pair button on the AirX compatible subwoofer or speakers until the LED begins
to flash rapidly (Around 2 times per second).
2. Press and hold the Wireless Pair button on the back of the Discovery Connect until the wireless pair LED on
the subwoofer or Argo Speakers stops flashing and goes o (No LED means the speaker is wirelessly paired.)
3. Repeat with additional speakers/subwoofers (Up to 3 units)
Wireless Pair Button Argo Speakers Wireless Pair Button SUB3070 Subwoofer
ELAC Discovery Connect | www.elac.com | Page 10

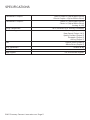
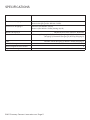
SPECIFICATIONS
Connections: Output 1 Optical Output x 1 (Up to 96kHz 24-bit)
Coaxial Output x 1 (Up to 192kHz 24-bit)
Connections: Output 2 Optical x 1 (Up to 96Khz 24-bit)
Coaxial x 1 (Up to 96kHz 24-bit)
Analog: x1 (L/R)
Other Connections: Wi-Fi, Ethernet, AirX² Wireless, Bluetooth
End Point Support Discovery (Output 1 & 2)
Roon Ready (Output 1 & 2)
Spotify Connect (Output 2)
Bluetooth (Output 2)
AirPlay (Output 2)
DAC 192kHz 24-bit (Output 1)
96kHz 24-bit (Output 2)
AirX² Resoultion 44.1kHz 16-Bit
AirX² Channels 3
App Support iOS and Android Support
ELAC Discovery Connect | www.elac.com | Page 11

ELAC Americas Inc.
North America Limited Liability Warranty
Passive Speakers (No built-in amplifier)
ELAC Americas INC. warrants to the original purchaser that this product be free from defects and or
workmanship for a period of3 (Three)years from the original date of purchase. During this time period, repair or
replacement of parts will be free of charge to the original owner (See below limitations). Shipping to and return
from the repair center will be the responsibility of the original purchaser.
Powered Subwoofers
ELAC Americas INC. warrants to the original purchaser that this product be free from defects and or
workmanship for a period of3 (Three)years on the cabinet and speaker driver and1 (One)year on the amplifier
from the original date of purchase. During this time period, repair or replacement of parts will be free of
charge to the original owner (See below limitations). Shipping to and return from the repair center will be the
responsibility of the original purchaser.
Electronics (Including Wireless Speakers)
ELAC Americas INC. warrants to the original purchaser that this product be free from defects and or
workmanship for a period of1 (One)years from the original date of purchase. During this time period, repair or
replacement of parts will be free of charge to the original owner (See below limitations). Shipping to and return
from the repair center will be the responsibility of the original purchaser.
B-Stock (Reconditioned/Open Box) Product Warranty
ELAC Americas INC. warrants to the original purchaser that this product be free from defects and or
workmanship, unless otherwise stated in product description, for a period of90 daysfrom the original date of
purchase. During this time period, repair or replacement of parts will be free of charge to the original owner
(See below limitations). Shipping to and return from the repair center will be the responsibility of the original
purchaser.
Limitations
• Warranty begins on the date of original purchase from an authorized ELAC Americas INC. dealer.
• Product is warranted only if used in home applications within the max power rating specified in this
manual. Commercial use of this product is not warranted.
• Product that has been modified or altered in anyway will not be warranted.
• Product that has been abused or subjected to faulty equipment will not be warranted.
• Products with defaced or removed serial numbers will not be warranted.
If service is required
In the event that service is required, please contact ELAC America at 888-541-0996 or at
[email protected]to arrange for service or replacement. You will be responsible to provide proof of
purchase (Copy or original sales receipt). Shipping to and from our repair center will be the responsibility of the
original purchaser.
Warranty Outside of North America
This warranty applies to products purchased in the United States and Canada. For warranty claims outside of
North America please contact the local dealer/distributor in the country of purchase.
ELAC Discovery Connect | www.elac.com | Page 12

Discovery Connect DS-C101W-G
MODE D’EMPLOI

Instructions de sécurité importantes
1. Renseignements généraux
• Veuillez lire et suivre ces consignes de sécurité.
• Conservez-les pour consultation future.
• Observez tous les avertissements inscrits sur l’appareil et dans le manuel. Vérifiez si le haut-parleur est
endommagé avant de l’utiliser. L’appareil doit être en parfait état de marche. Les pièces endommagées
peuvent causer des blessures corporelles.
2. Utilisez l’appareil seulement selon les directives
• Branchez l’appareil conformément aux instructions du manuel.
3. Emplacement
• Installez l’appareil uniquement sur une surface plane
• Ne placez pas cet appareil dans les emplacements suivants :
• Sous les rayons directs du soleil
• Très humides
• Sujets aux vibrations
• Très chauds ou très froids
Ne bloquez pas les ouvertures de ventilation. Eectuez l’installation conformément aux instructions du fabricant.
• N’installez pas cet appareil dans une étagère ou un placard fermés.
• Ne placez pas de bougies allumées sur l’appareil ou à proximité.
• N’installez pas l’appareil près de transformateurs, car les champs électromagnétiques peuvent
provoquer des bruits de fond dans les haut-parleurs de graves.
4. Entretien
DANGER! N’ouvrez pas le boîtier, car un volume dangereux d’électricité peut transiter par les composantes et
les conducteurs! L’entretien doit être uniquement eectué par un personnel qualifié.
Un entretien est nécessaire lorsque le haut-parleur a été endommagé de quelque manière que ce soit, par
exemple en cas d’endommagement du cordon d’alimentation ou de la prise ou, lorsque du liquide a été
renversé ou que des objets sont tombés dans le haut-parleur, que le haut-parleur a été exposé à la pluie ou à
l’humidité ou, qu’il ne fonctionne pas normalement ou a été échappé. Pour réduire les risques d’électrocution,
n’ouvrez pas le haut-parleur. L’entretien doit être uniquement eectué par un personnel qualifié.
ELAC Discovery Connect | www.elac.com | Page 1

5. Nettoyage
REMARQUE : Nettoyez uniquement avec un chion doux et souple ou une brosse à dépoussiérer.
N’utilisez pas de produits abrasifs, d’alcool, de benzène, de cire pour meubles ou autres produits de
nettoyage! Les meubles modernes sont souvent revêtus de multiples couches de vernis et de plastique
qui peuvent être traités avec des agents chimiques. Certains de ces agents contiennent des substances
qui dégradent ou ramollissent les pieds en caoutchouc.
6. Mise au rebut
L’emballage est fabriqué à partir de matériaux recyclables. Mettez l’appareil au rebut de façon
écologique. Au terme de son cycle de vie, ne jetez pas le haut-parleur avec les ordures ménagères.
Les haut-parleurs doivent être recyclés conformément à la réglementation locale. Informez-vous auprès
de vos autorités locales pour obtenir de plus amples renseignements sur le recyclage, car l’appareil
contient des matières premières précieuses. Désactivez le haut-parleur avant de le mettre au rebut.
7. Électricité
Cet appareil est uniquement destiné à être connecté aux tensions répertoriées sur le panneau arrière
du boîtier. Le branchement à toute autre tension peut causer des dommages irréversibles au caisson
de basses et annulera la garantie. L’utilisation d’adaptateurs n’est pas recommandée, car ils peuvent
permettre un branchement à des tensions autres que celles imprimées à l’arrière de ce caisson de
basses.
8. Informations relatives à la conformité pour le transmetteur sans fil
Le terme « IC: » situé avant le numéro de certification radio signifie seulement que les spécifications
techniques du ministère de l’Industrie du Canada ont été respectées. Cet équipement est conforme aux
limites d’exposition aux rayonnements établies par le Conseil fédéral des communications et le ministère
de l’Industrie du Canada pour un environnement non contrôlé. Cet équipement doit être installé et utilisé
en respectant une distance minimale de 20 cm entre l’élément rayonnant et le corps. Cet émetteur ne
doit pas être proche d’une autre antenne ou d’un autre émetteur ou fonctionner en conjonction ces
derniers.
L’utilisation de ce dispositif est autorisée seulement aux deux conditions suivantes : (1) il ne doit
pas produire de brouillage et (2) l’utilisateur du dispositif doit être prêt à accepter tout brouillage
radioélectrique reçu même si ce brouillage est susceptible de compromettre le fonctionnement du
dispositif.
Pour réduire les interférences radio potentielles avec d’autres utilisateurs, le type d’antenne et son
gain doivent être choisis de manière à ce que la puissance isotrope rayonnée équivalente ne soit pas
supérieure à celle permise pour une communication réussie.
ELAC Discovery Connect | www.elac.com | Page 2

Philosophie
Merci d’avoir fait l’achat de ce produit ELAC.
Depuis nos débuts (1926), ELAC a toujours aspiré à atteindre l’excellence.
Vos nouveaux haut-parleurs ELAC sont conçus selon les normes les plus élevées, et sont dotés de composants
de qualité supérieure qui sont soigneusement fabriqués pour procurer la meilleure qualité sonore de leur
catégorie. Ils sont conçus par des gens passionnés dont le seul but est d’amener à votre foyer une nouvelle
dimension de qualité sonore. Amusez-vous!
ELAC Discovery Connect | www.elac.com | Page 3

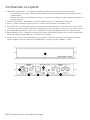
Commandes et voyants
1. Voyant DEL multifonction – Ce voyant est utilisé pour acher l’état actuel du Discovery Connect.
• La luminosité de ce voyant à DEL peut être modifiée à l’aide de l’application gratuite iOS/Android ou
l’interface Web.
• Veuillez vous référer aux diérentes sections de ce manuel pour obtenir de plus amples explications sur
l’état des voyants
2. Entrée d’alimentation – Utilisée pour alimenter l’appareil à partir de l’alimentation CA fournie.
3. Sortie 1 – Sortie numérique native à partir du serveur musical Discovery et de Roon Cores.
4. Entrée Ethernet – Utilisez cette option lorsque vous connectez le Discovery Connect à votre réseau câblé
domestique (meilleure solution). Consultez la page 5 pour savoir comment se connecter à un réseau sans fil.
5. Bouton Bluetooth Pair/Reset – Pour lancer le processus de jumelage Bluetooth pour les appareils audio.
6. Bouton Wireless Pair – Ce bouton est utilisé pour jumeler le Discovery Connect avec d’autres produits AirX.
Consultez la page 11 pour obtenir les instructions de jumelage.
7. Sortie 2 – Fournit des sorties analogiques et numériques à partir du serveur musical Discovery, de Roon
Cores, de Spotify Connect, d’AirPlay et de Bluetooth. La sortie est réglée à 96 kHz – 24 bits.
1
2
3
4
7
6
5
ELAC Discovery Connect | www.elac.com | Page 4

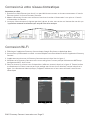
Connexion à votre réseau domestique
Connexion par câble
1. Branchez un câble Ethernet (non fourni) à un port LAN de votre routeur ou de votre commutateur à l’entrée
Ethernet située à l’arrière du Discovery Connect.
2. Mettez le Discovery Connect sous tension en branchant le cordon d’alimentation à une prise et à l’entrée
d’alimentation du Connect.
3. Le voyant d’état commence à clignoter pendant la phase de mise sous tension et il devient fixe une fois que
l’appareil est connecté au réseau et qu’il est prêt à lire de la musique.
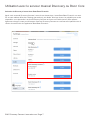
Connexion Wi-Fi
1. Téléchargez l’application Discovery Connect depuis Google Play Store ou Apple App Store.
2. Assurez-vous que Bluetooth est activé sur votre téléphone ou votre tablette et lancez l’application Discovery
Connect.
3. L’application devrait trouver le Discovery Connect comme indiqué dans la figure 1.
4. Sélectionnez le Discovery Connect et vous serez redirigé vers le menu principal. Sélectionnez WiFi Setup
(configuration Wi-Fi) dans le haut.
5. Une liste de tous les réseaux sans fil disponibles s’achera, comme indiqué sur la figure 2. Trouvez le vôtre
et sélectionnez-le. Entrez le mot de passe qui protège votre réseau (le cas échéant), comme indiqué sur la
figure 3, et sélectionnez Submit (envoyer). L’appareil redémarrera et vous serez connecté à votre réseau
domestique.
Fig 1 Fig 2 Fig 3
ELAC Discovery Connect | www.elac.com | Page 5

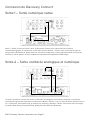
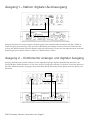
Connexion de Discovery Connect
Sortie 1 – Sortie numérique native
Sortie 1 – Sortie numérique native à partir de Discovery Connect. Sans conversion de fréquence
d’échantillonnage pour un contenu de qualité allant jusqu’à 192 kHz – 24 bits. Cette sortie ne prend pas en
charge AirPlay, Bluetooth ou Spotify Connect. Connectez simplement la sortie optique/coaxiale du Discovery
Connect à l’entrée optique de votre amplificateur/récepteur/préamplificateur/CNA intégré.
Sortie 2 – Sortie combinée analogique et numérique
La sortie 2 comprend à la fois des sorties numériques et analogiques du Discovery Connect. La fréquence
d’échantillonnage de tout le contenu est convertie à 96 kHz – 24 bits, sauf si la sortie AirX2 est activée. Dans ce
cas, la fréquence d’échantillonnage du contenu est convertie à 44,1 kHz – 16 bits. Cette sortie prend en charge
le contenu Roon Ready, Discovery Ready, Spotify Connect, AirPlay et Bluetooth.
ELAC Discovery Connect | www.elac.com | Page 6
La page est en cours de chargement...
La page est en cours de chargement...
La page est en cours de chargement...
La page est en cours de chargement...
La page est en cours de chargement...
La page est en cours de chargement...
La page est en cours de chargement...
La page est en cours de chargement...
La page est en cours de chargement...
La page est en cours de chargement...
La page est en cours de chargement...
La page est en cours de chargement...
La page est en cours de chargement...
La page est en cours de chargement...
La page est en cours de chargement...
La page est en cours de chargement...
La page est en cours de chargement...
La page est en cours de chargement...
La page est en cours de chargement...
La page est en cours de chargement...
La page est en cours de chargement...
-
 1
1
-
 2
2
-
 3
3
-
 4
4
-
 5
5
-
 6
6
-
 7
7
-
 8
8
-
 9
9
-
 10
10
-
 11
11
-
 12
12
-
 13
13
-
 14
14
-
 15
15
-
 16
16
-
 17
17
-
 18
18
-
 19
19
-
 20
20
-
 21
21
-
 22
22
-
 23
23
-
 24
24
-
 25
25
-
 26
26
-
 27
27
-
 28
28
-
 29
29
-
 30
30
-
 31
31
-
 32
32
-
 33
33
-
 34
34
-
 35
35
-
 36
36
-
 37
37
-
 38
38
-
 39
39
-
 40
40
-
 41
41


Elac Discovery Connect DS-C101W-G Le manuel du propriétaire
- Catégorie
- Hauts-parleurs portatifs
- Taper
- Le manuel du propriétaire
dans d''autres langues
Documents connexes
-
Elac Discovery Z3 Le manuel du propriétaire
-
-
-
-
-
-
Elac DCB41 Le manuel du propriétaire
-
-
-