Josef Kihlberg c.561M22 Manuel utilisateur
- Catégorie
- Agrafeuses
- Taper
- Manuel utilisateur

05.20
c.561M22
Top stapler
Lockhäftare
Deckelhefter
Agrafeuse
From serie no 1403567
Från serienummer 1403567
Ab Serie-Nr. 1403567
A partir du no de série 1403567
ENGLISH 3
SVENSKA 13
DEUTSCH 24
FRANÇAIS 35
Before using the tool,
read the operating in-
structions carefully.
Läs igenom bruks-
anvisningen noga innan
du använder klammer-
verktyget.
Vor dem Gebrauch des
Gerätes die Betriebs-
anleitung aufmerksam
lesen.
Avant l’utilisation de
l’appareil, consultez
soigneusement le
mode d’emploi.
OPERATING INSTRUCTIONS Translation of original manual
BRUKSANVISNING Originalmanual
BETRIEBSANLEITUNG Übersetzung der Originalbetriebsanleitung
MODE D‘EMPLOI Traduction du mode d’emploi original

205.20
Josef Kihlberg c.561M22
1 TECHNICAL DATA
TABLE OF CONTENTS
Weight 1,6 kg (3,5 lbs)
Dimensions Length 455 mm (17,9“)
Width 104 mm (4,1“)
Height 320 mm (12,6“)
Magazine capacity 150 staples
Staple leg length 22 mm (7/8“)
Nose length 0 mm (0,0 in.)
FASTENERS
Staple JK561-22K (7/8“) Art.No 400158
Page
1 Technical data 2
2 General information 3
2.1 Information on environmental protection 3
3 Safety instructions 4
4 Description 5
4.1 Design 5
4.2 Function 5
4.3 Installation 5
5 Operating instructions 6
5.1 Adjust the staple leg length 6
5.2 Adjust the penetration depth 6
5.3 Adjust staple clinch 7
5.4 Control the clinch 7
5.5 Loading the stapler 8
5.6 Operating the stapler 8
6 Preventive and corrective maintenance 9
6.1 Cleaning the stapler 9
6.2 Removing jammed staples 9
6.3 Replace the driver blade/anvils 10
7 Trouble shooting 11
8 Spare parts kit 42
9 Parts list with recommended wear parts 43
Exploded drawing 44
SE JOSEF KIHLBERG AB
Industrigatan 37B
SE-544 50 HJO
Telephone: +46 503 328 00
Fax: +46 503 328 01
Internet: www.kihlberg.com

05.20 3
Josef Kihlberg c.561M22
CAUTION!
Used where there is
danger to life and health.
WARNING!
Used for danger which
can cause material
damage.
NOTE!
Used for general infor-
mation and information
which if not followed can
cause faults in the
operating sequence.
2 GENERAL INFORMATION
These operating instructions are intended to simplify
familiarisation with the staplers and the possibilities
of application for the intended purpose. The operating
instructions contain important information concerning
the safe, proper and efcient use of the staplers. Ob-
servation of the information will help to avoid danger,
reduce repairs and stoppages and increase the reli-
ability and service life of the top stapler.
The operating instructions must always be available
at the place of operation of the staplers. They must
be read and observed by all persons concerned with
work on the top stapler. This work specically includes
operation, relling of operating material, fault elimina-
tion and maintenance.
In addition to the operating instructions and the regu-
lations for accident prevention effective in the country
of use and place of application, the recognised tech-
nical regulations for safety and proper working must
also be observed.
2.1 INFORMATION ON ENVIRONMENTAL
PROTECTION
This stapler is manufactured without any physical or
chemical substances which could be dangerous to
health. For disposal of all the parts, the governmental
instructions must be observed.
DECLARATION OF CONFORMITY
We take sole responsibility for declaring that the
c.561M22 top stapler, to which this declaration
refers, is in full compliance with the current require-
ments of the guidelines laid down by the council
on 17th May 2006 (2006/42/EC) “Machine
Guidelines“.
According to norm: ISO 12100:2010
SE-544 50 HJO, 04.05.2020
Plant Manager:
Thor-Björn Elmers
Agent for the publication of technical documentation:
Josef Kihlberg AB, Industrigatan 37B, SE-544 50 HJO

405.20
Josef Kihlberg c.561M22
Use for the intended purpose
The top stapler is intended for stapling of card board.
This stapler was designed and manufactured for safe
handling during the stapling operation.
Possible misuse
Do not re any staples into the air or use the stapler
with any other materials than mentioned above.
Servicing
The following maintenance work must be carried out
at regular intervals, varying with working conditions
and workload:
– clean the stapler regularly.
– check the condition of the stapler at regular inter-
vals for defects or worn parts. Never use a stapler
that has defective or worn parts (for servicing tasks
refer also to chapter 6.1 until 6.3).
3 SAFETY INSTRUCTIONS
Inform yourself!
Read the operating
instructions carefully.
Protect yourself!
When operating the
stapler, wear eye, ear
protection.
Warning: Danger of
crushing!
Do not put your ngers
underneath the nozzle.
Warning:
Never leave a loaded
tool unattended!
Original
JOSEF KIHLBERG
staples must be used
exclusively!
Original
JOSEF KIHLBERG
spare parts must be
used exclusively!
Not using original spare
parts will dissolve the
warranty and the liability.
.,+/%(5*
2ULJLQDO
KIHLBERG
Original

05.20 5
Josef Kihlberg c.561M22
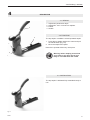
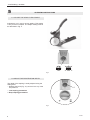
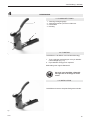
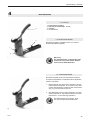
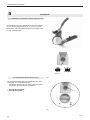
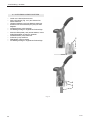
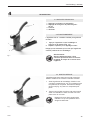
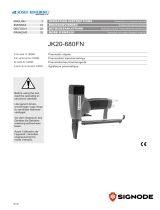
4 DESCRIPTION
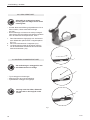
4.2 FUNCTION
The top stapler c.561M22 is a hand operated stapler.
1. Press the top stapler against the carton and pull
the handle down (Fig.1/4).
2. Move the stapler and repeat.
Never re it operate without any work piece.
4.1 DESIGN
1 Adjustment penetration depth
2 Adjustment. not in us at 22 mm staplers.
3 Pusher
4 Handle
Fig. 1
1
2
3
4
Warning: before stapling ensure that
your hand or any other part of your
body is not underneath the nozzle.
4.3 INSTALLATION
The top stapler is delivered fully assembled ready to
use.
Fig. 2

605.20
Josef Kihlberg c.561M22
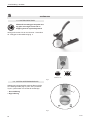
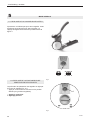
5 OPERATING INSTRUCTIONS
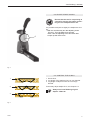
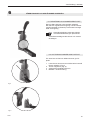
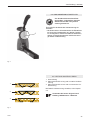
5.1 ADJUST THE STAPLE LEG LENGHT
Adjustment: not in use for 22 mm stalers. This stapler
is only for 22 mm staples. The stapler setting must be
as described in Fig. 3.
Fig. 3
Fig. 4
5.2 ADJUST THE PENETRATION DEPTH
The depth of the stapling is easily adjused using the
setting knob.
– Depress the knob (Fig. 4/1) and turn it to any of the
ve positions.
– Low stapling penetration
= Deep stapling penetration
1
22mm

05.20 7
Josef Kihlberg c.561M22
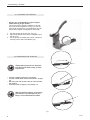
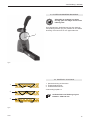
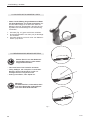
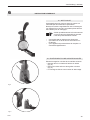
5.3 ADJUST STAPLE CLINCH
Be sure that the tool is not pointing at
yourself or anyone else when connec-
ting it to the compressed air line.
It is possible to adjust how tightly the staples are clos-
ing.
– With a 3 mm Allen key turn the adjusting screw
(Fig. 5/1). Turn clockwise for a stronger
clinch. Turn the adjusting screw anti clock wise
to open up the clinch more.
Fig. 5
Fig. 6
To short
Correct
To long staple
Fel
To short
Correct
To long staple
Fel
To short
Correct
To long staple
Fel
3
2
1
1
5.4 CONTROL THE CLINCH
1 Good clinch.
2 Leg length of the staple too long or over bended.
3 Leg length of staple too short or not enough
bended.
If necessary adjust staple clinch, see chapter 5.3.
Always use Josef Kihlberg original
staples: JK561-22.

805.20
Josef Kihlberg c.561M22
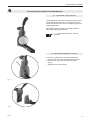
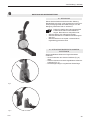
5.5 LOADING THE STAPLER
–Always use Josef Kihlberg original staples
JK561 with leg length 22 mm.
The correct type of staple is marked on the left
hand side of the magazine. Ensure you use the
right length of staples for your application and be
sure that the stapler is adjusted for this length.
1. Pull the pusher all the way out. (Fig.7/1)
2. Place three staple strips into the magazine from
the top (7/2)
3. Lift the pusher to release the pusher. Forward it
carefully until it reach the staples (7/3).
5.6 OPERATING THE STAPLER
– Press the stapler against the card board.
– Pull the handle rather hard as described in chapter
4.2.
– Move the tool and repeate until you have nished
the stapling.
– Control the clinch regulary, see chapter 5.4.
Warning: before stapling, ensure that
your hand or any other part of your
body is not underneath the nozzle.
Always place yourself in a rmly ba-
lanced position when using or hand-
ling the tool.
Fig. 7
1
2
3

05.20 9
Josef Kihlberg c.561M22
6 PREVENTIVE AND CORRECTIVE MAINTENANCE
6.1 CLEANING THE STAPLER
This stapler does not require special servicing. It only
needs regular cleaning with a non-aggressive (non-
corrosive) cleaner agent. Do not remove any parts for
cleaning purposes!
Check the proper functioning of all safety devices
daily. Make especially sure that:
– all screws and nuts are securely
tightened.
To remove a staple which has become jammed:
– Unscrew the six screws at the rear body (Fig 8).
– Remove rear body and the defective staple
(Fig 9).
– Assemble in the opposit way.
6.2 REMOVING JAMMED STAPLES
Fig. 9
Fig. 8

10 05.20
Josef Kihlberg c.561M22
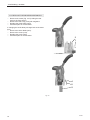
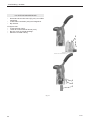
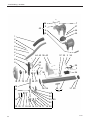
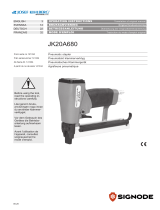
6.3 REPLACE THE DRIVER BLADE/ANVILS
– Remove six screws (Fig. 10/1) holding the rear
body to the front section.
– Remove the rear body (10/2) with magazine.
– Replace the driver blade (10/3).
– Assemble parts in reverse order.
If changing the anvils always change both at the same
time:
– Remove the driver blade (10/3).
– Remove the screw (10/4).
– Replace the anvils (10/5).
– Assemble parts in reverse order.
Fig. 10
3
4
5
1
2

05.20 11
Josef Kihlberg c.561M22
8 TROUBLE SHOOTING
FAULT
No staples when ring the tool.
Bad clinch
Jammed staple in the nozzle.
ELIMINATION
– Check that the right type of staples is being used
and moves easily.
–Always use Josef Kihlberg original staples.
– Check if the feeder spring is not defective. If
necessary replace.
– Check if the staple pusher is not defective. If
necessary replace.
– Clean the staple track.
– Check if the right leg length is used and the sta-
pler is right adjusted, see chapter 5.1 and 5.2
– Remove the defective staple, see chapter 6.2.
Before all trouble shooting tasks on
the stapler it must rst be
disconnected from the air supply.
7 TROUBLE SHOOTING

12 05.20
Josef Kihlberg c.561M22
1 TEKNISKA DATA
INNEHÅLL
Page
1 Tekniska data 12
2 Allmänt 13
2.1 Miljöinformation 13
3 Säkerhetsföreskrifter 14
4 Beskrivning 15
4.1 Sammansättning 15
4.2 Funktion 15
4.3 Installation 15
5 Användning 16
5.1 Justera benlängd 16
5.2 Justera inrängningsdjup 16
5.3 Justera klammerns bockning 17
5.4 Kontroll av klinch 17
5.5 Ladda verktyget 18
5.6 Använda klammerverktyget 18
6 Förebyggande och avhjälpande underhåll 19
6.1 Rengöring av klammerverktyget 19
6.2 Avlägsna klammer som fastnat 19
6.3 Byte av drivare/klor 20
7 Felsökning 21
8 Reservdelssatser 42
9 Reservdelslista 43
Sprängskiss 44
SE JOSEF KIHLBERG AB
Industrigatan 37B
SE-544 50 HJO
Telefone: +46 503 328 00
Fax: +46 503 328 01
Internet: www.kihlberg.com
SVENSKA
Vikt 1,6 kg (4 lbs)
Dimension Längd 455 mm (17,9“)
Bredd 104 mm (4,1“)
Höjd 320 mm (12,6“)
Magasinskapacitet 150 klammer
Klammerlängd 22 mm (7/8“)
Noslängd 0 mm (0,0 in.)
KLAMMER
Klammer JK561-22K (7/8“) Art.No 400158

05.20 13
Josef Kihlberg c.561M22
FÖRBUD!
Symbolen används vid
fara för liv och lem.
VARNING!
Symbolen används vid
risk för materiella skador.
OBSERVERA!
Symbolen används för
allmänna instruktioner
samt för instruktioner
som måste följas för att
undvika störningar.
2 ALLMÄNT
Denna manual är framtagen för att förenkla kännedo-
men om klammerverktyget och dess handhavande
och applikationer. Manualen innehåller viktig informa-
tion angående säkerhet, korrekt och effektiv användn-
ing. Genom att iakttaga denna information hjälper det
till att förhindra olyckor och reducera reparationer och
driftstörningar och förlänga livslängden på lockhäf-
taren.
Manualen skall alltid hållas tillgänglig i arbetsområdet
för lockhäftaren. Den skall läsas och förstås av all per-
sonal som använder verktyget.
Som tillägg till manualen skall bestämmelser för
förebyggande olycksfallsrisker följas för det land där
produkten används. Det skall också iakttagas tekniska
förordningar angående säker och riktig användning.
2.1 MILJÖINFORMATION
Detta klammerverktyg är tillverkat utan några fysiska
eller kemiska substanser vilka kan vara farliga för
hälsan. För avfallshantering av samtliga delar skall
regeringens lagar och förordningar följas.
DEKLARATION OM ÖVERENSSTÄMMELSE
Försäkrar härmed att c.561M22 lockhäftare, är till-
verkade enligt följande harmoniserande standarder:
SS-EN ISO 12100:2010 samt följer rådets direktiv:
2006/42/EG
SE-544 50 HJO, 04.05.2020
Plant Manager:
Thor-Björn Elmers
Behörig att ställa samman den tekniska dokumentation
+46 503 32800:

14 05.20
Josef Kihlberg c.561M22
Användningsområde
Lochhäftaren är avsedd för häftning av transportför-
packningar i well.
Häftaren är konstruerad och tillverkad för en säker
hantering under häftförloppet.
Möjlig felanvänding
Använd endast i de material som rekommenderas för
verktyget.
Underhåll
Följande underhåll måste genomföras regelbundet
beroende på arbetsmiljö och volym:
– regelbunden rengöring av klammerverktyget.
– kontrollera regelbundet konditionen på häftaren och
se till att inga defekta eller utslitna delar förekom-
mer (för mer information angående service
se 6.1–6.2).
Informera dig!
Läs igenom bruks-
anvisningen noga.
Skyddsutrustning!
Bär skyddsutrustning för
ögon och öron när du
använder klammerverk-
tyget.
Varning: Akta ngrarna!
Stoppa inte ngrar eller
andra kroppsdelar under
nosen.
Lämna aldrig ett laddat
verktyg obevakat.
Använd alltid Josef
Kihlberg original
klammer.
Endast original-
reservdelar från
JOSEF KIHLBERG
får användas!
I annat fall upphävs
garanti och övrigt ansvar
från tillverkaren!
3 SÄKERHETSFÖRESKRIFTER
.,+/%(5*
2ULJLQDO
KIHLBERG
Original

05.20 15
Josef Kihlberg c.561M22
4 BESKRIVNING
4.2 FUNKTION
Lockhäftaren c.561M22 är ett manuellt häftverktyg.
1. Tryck verktyget mot kartongen och tryck därefter
ned handtaget (Fig. 1/4).
2. Flytta därefter verktyget och repetera.
Häfta aldrig utan något häftmaterial.
4.1 SAMMANSÄTTNING
1 Justering inträngningsdjup
2 Justering används ej för 22 mm klammer.
3 Frammatare
4 Handtag
Varning! innan du häftar, säkerställ
att ingen del av din kropp är under
nosen.
Fig. 1
4.3 INSTALLATION
Lockhäftaren levereras komplett färdig att användas.
Fig. 2
1
2
3
4

16 05.20
Josef Kihlberg c.561M22
5 ANVÄNDNING
5.1 JUSTERA BENLÄNGD
Säkerställ att verktyget inte pekar mot
dig själv eller någon annan när in-
koppling sker till tryckluftssystemet
Verktyget är endast för 22 mm klammer. Kontrollera
att verktyget är rätt inställt enligt g. 3.
5.2 JUSTERA INTRÄNGNINGSDJUP
Häftklornas inträngningsdjup regleras lätt med hjälp
av inställningsvredet (Fig 4/1) som har 5 positioner.
Tryck in justervredet och vrid det till önskat läge.
– Grund häftning
= Djup häftning
Fig. 3
Fig. 4
1
22mm

05.20 17
Josef Kihlberg c.561M22
5.3 JUSTERA KLAMMERNS BOCKNING
Säkerställ att verktyget inte pekar
mot dig själv eller någon annan innan
häftning sker.
Hur hårt klammern skall klämmas ihop kan justeras.
Vrid justeringsmuttern (Fig 5/1) medurs för en hårdare
bockning och moturs för en mer öppen klammer.
5.4 KONTROLL AV KLINCH
1 Korrekt bockning av klammern.
2 Överbockad klammer.
3 Underbockad klammer.
Justera enlig kapitel 5.3.
Använd alltid Josef Kihlberg original
klammer: JK561-22 mm
Fig.5
Fig.6
To short
Correct
To long staple
Fel
To short
Correct
To long staple
Fel
To short
Correct
To long staple
Fel
3
2
1
1

18 05.20
Josef Kihlberg c.561M22
5.5 LADDA VERKTYGET
5.6 ANVÄNDA KLAMMERVERKTYGET
Vid användning av verktyget bör man
stå välbalanserat och stadigt.
– Tryck verktyget mot kartongen.
– Klamra genom att trycka på hantaget.
– Flytta därefter verktyget och upprepa.
–
– Använd alltid Josef Kihlberg originalklammer för en
säker funktion, JK561 med klammerlängd
22 (7/8“) .
– Den korrekta typ av klammer är märkt på magasi-
nets vänstra sida. Kontrollera att rätt längd på klam-
mern används före du börjar klamra. Se 5.1
1. Fatta frammatarens ngergrepp och dra framma-
taren tillbaka tills spärren låser i magasinspärren.
(Fig.7/1).
2. För in tre klammerstavar i magasinet (7/2).
3. Lyft ngergreppet uppåt så att spärren frigöres
och för frammataren framåt tills den får kontakt
med klammerstaven.(7/3).
Säkerställ att verktyget inte pekar
mot dig själv eller någon annan innan
häftning sker.
Varning! innan du häftar, säkerställ
att ingen del av din kropp är under
nosen.
Fig. 7
1
2
3

05.20 19
Josef Kihlberg c.561M22
6 FÖREBYGGANDE OCH AVHJÄLPANDE UNDERHÅLL
6.1 RENGÖRING AV KLAMMERVERKTYGET
Denna häftare behöver inget speciellt underhåll.
Den behöver regelbunden rengöring med ett neutralt
rengöringsmedel (ej frätande). Demontera inte några
delar vid rengöring.
Kontrollera dagligen verktygets funktion
och säkerhetsutrustningar. Speciellt att:
– Kontrollera samtidigt att alla skruvar och muttrar
är åtdragna.
För att ta bort en kilad och defekt klammer gör föl-
jande:
1. Lossa de sex skruvarna som håller bakre huset till
främre underdel. (Fig. 8)
2. Ta bort magasinet. (Fig. 9).
3. Avlägsna den defekta klammern.
4. Montera i omvänd ordning.
6.2 AVLÄGSNA KLAMMER SOM FASTNAT
Fig. 9
Fig. 8

20 05.20
Josef Kihlberg c.561M22
6.3 BYTE AV DRIVARE/KLOR
– Demontera de sex skruvarna (Fig 10/1) som håller
magasinet.
– Ta bort främre underdel (10/2) med magasinet .
– Byt drivaren.
Vid byte av klor:
– Ta bort drivaren (10/3).
– Lossa de två skruvarna till klorna (10/4).
– Byt klor (10/5), byt båda samtidigt .
– Montera i omvänd ordning.
Fig. 10
3
4
5
1
2
La page charge ...
La page charge ...
La page charge ...
La page charge ...
La page charge ...
La page charge ...
La page charge ...
La page charge ...
La page charge ...
La page charge ...
La page charge ...
La page charge ...
La page charge ...
La page charge ...
La page charge ...
La page charge ...
La page charge ...
La page charge ...
La page charge ...
La page charge ...
La page charge ...
La page charge ...
La page charge ...
La page charge ...
La page charge ...
La page charge ...
-
 1
1
-
 2
2
-
 3
3
-
 4
4
-
 5
5
-
 6
6
-
 7
7
-
 8
8
-
 9
9
-
 10
10
-
 11
11
-
 12
12
-
 13
13
-
 14
14
-
 15
15
-
 16
16
-
 17
17
-
 18
18
-
 19
19
-
 20
20
-
 21
21
-
 22
22
-
 23
23
-
 24
24
-
 25
25
-
 26
26
-
 27
27
-
 28
28
-
 29
29
-
 30
30
-
 31
31
-
 32
32
-
 33
33
-
 34
34
-
 35
35
-
 36
36
-
 37
37
-
 38
38
-
 39
39
-
 40
40
-
 41
41
-
 42
42
-
 43
43
-
 44
44
-
 45
45
-
 46
46


Josef Kihlberg c.561M22 Manuel utilisateur
- Catégorie
- Agrafeuses
- Taper
- Manuel utilisateur
dans d''autres langues
Documents connexes
-
Josef Kihlberg c.561M Manuel utilisateur
-
-
-
 Signode JK20-680FN Manuel utilisateur
-
-
-
-
-
-
 Signode JK20A680 Manuel utilisateur

