Lifetime 80669 Le manuel du propriétaire
- Taper
- Le manuel du propriétaire

(x2)
ETK (7/16" x 1/2")
(x2)
(Included))
CONTACT LIFETIME CUSTOMER SERVICE:
Icon Legend...........................................4
Warnings & Notices..............................5
Cart Assembly........................................6
Cleaning & Care.................................23
Registration.......................................24
Warranty............................................25
Call: 1-800-225-3865
7:00 am–5:00 pm (Monday–Friday) MST
and 9:00 am–1:00 pm Saturday MST
Live Chat: www.lifetime.com
(click on “Ask An Expert” tab)
Video Instructions: www.youtube.com/lifetimeproducts
QUESTIONS?
MODEL# AND PRODUCT ID (you will need both when contacting us)
Model Number: 80669
Product ID:
BEFORE ASSEMBLY:
• Assemble on a level surface
• Recommend 2+ people for setup
TOOLS REQUIRED TABLE OF CONTENTS
Pour le français, voir la page 2. Para el español, ver la página 3.
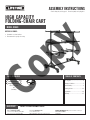
ASSEMBLY INSTRUCTIONS
MODEL #60091
HIGH CAPACITY
FOLDING-CHAIR CART
MODEL 80669
Copy

2
Légende des icônes................................4
Avertissements et avis...........................5
Assemblage du chariot..........................6
Nettoyage et entretien..........................23
Enregistrement.....................................24
Garantie..............................................26
(x2)
ETK (7/16 po x 1/2 po)
(x2)
(Incluses)
CONTACTEZ AUX SERVICES À LA CLIENTÈLE LIFETIME
®
:
Composer le 1-800-225-3865
Du lundi au vendredi 7:00 hr–17:00 hr (HNR)
et samedi 9:00 hr–13:00 hr (HNR)
Live Chat: www.lifetime.com
(click on “Ask An Expert” tab)
Video Instructions: www.youtube.com/lifetimeproducts
QUESTIONS ?
MODEL# AND PRODUCT ID (vous aurez besoin des deux lorsque vous nous
contactez)
Model Number: 80669
Product ID:
AVANT L’ASSEMBLAGE :
• Assembler sur une surface nivelée
• Nous recommendons 2+ adultes pour l’assemblage
OUTILS REQUIS SOMMAIRE
For English, see page 1. Para el español, ver la página 3.
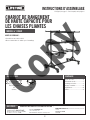
INSTRUCTIONS D’ASSEMBLAGE
MODEL #60091
MODÈLE n° 80669
CHARIOT DE RANGEMENT
DE HAUTE CAPACITÉ POUR
LES CHAISES PLIANTES
Copy

3
Leyenda de íconos.................................4
Advertencias y avisos...........................5
Ensamble del carro...............................6
Limpieza y cuidado.............................23
Registro.............................................24
Garantía.............................................27
(x2)
ETK (7/16 in x 1/2 in)
(x2)
(Incluidas)
PÓNGASE EN CONTACTO CON LOS SERVICIOS DE CLIENTES LIFETIME
®
:
Composer : 1-800-225-3865
7:00 am–5:00 pm (lundi–vendredi) MST
et 9:00 am–1:00 pm (samedi) MST
Live Chat: www.lifetime.com
(click on “Ask An Expert” tab)
Video Instructions: www.youtube.com/lifetimeproducts
¿PREGUNTAS?
MODEL# AND PRODUCT ID (vous aurez besoin des deux lorsque vous nous
contactez)
Model Number: 80669
Product ID:
ANTES DEL ENSAMBLE:
• Ensembler en una superifi cie nivelada
• Recomendamos 2+ adultos para el ensamble
INSTRUMENTAL REQUERIDO ÍNDICE
For English, see page 1. Pour le français, voir la page 2.
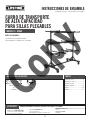
INSTRUCCIONES DE ENSAMBLE
MODEL #60091
CARRO DE TRANSPORTE
DE ALTA CAPACIDAD
PARA SILLAS PLEGABLES
MODELO n° 80669
Copy

CART ASSEMBLY / ASSEMBLAGE DU CHARIOT / ENSAMBLE DEL CARRO
1
4
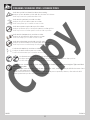
• Indicates the parts to be used for a section.
• Indique les pièces à utiliser pour une section.
• Indica las piezas que se usarán en una sección.
• Indicates special heed should be taken when reading.
• Indique qu’une attention spéciale doit être prise lors de la lecture.
• Indica que uno debe prestar atención al leer.
• Indicates the hardware to be used for a section.
• Indique la quincaillerie à utiliser pour une section.
• Indica el herraje que se usará en una sección.
• Indicates the tools to be used for a section.
• Indique les outils à utiliser pour une section.
• Indica el instrumental que se usará en una sección.
• Indicates no hardware required for a specifi c page.
• Indique qu’aucun matériel n’est requis pour une page précise.
• Indica que no se necesita herraje en una página específi ca.
• Indicates no parts required for a specifi c section.
• Indique qu’aucune pièce n’est requise pour une section précise.
• Indica que no se necesitan partes en una sección específi ca.
• Indicates to use/not to use an electric drill for a specifi c step.
• Indique quand utiliser ou ne pas utiliser une perceuse électrique pour une étape précise.
• Indica usar o no usar un taladro eléctrico en un paso específi co.
ICON LEGEND / LÉGENDE DES ICÔNES / LEYENDA DE ÍCONOS
• These Nuts are centerlock nuts. They are designed to be tight; therefore, they will be harder to tighten. Tighten until fl ush
with the metal or plastic.
• Ces écrous son écrous de blocage central. Ils sont conçus à être serrés; ensuite, ils seront plus diffi ciles à resserrer. Serrer
jusqu’à ce qu’ils soient au ras du métal ou plastique.
• Estas tuercas son tuercas de bloque central. Ellas son diseñadas para ser apretadas; entonces, ellas serán más difícil
ajustar. Apretar hasta que ellas estén al ras del metal o plástico.
1189541 5/21/2018
Copy

CART ASSEMBLY / ASSEMBLAGE DU CHARIOT / ENSAMBLE DEL CARRO
1
5
English:
• Failure to follow these warnings may result in serious injury or property damage and will void warranty.
• To ensure safety, do not attempt to assemble this product without following the instructions carefully.
• Assemble the product on level ground.
• Two capable adults are required for assembly.
• All who participate in the assembly process should wear safety glasses throughout the assembly.
• Proper and complete assembly are essential to reduce the risk of accident or injury.
• Check all hardware for tightness before and during the usage season.
• Most injuries are caused by misuse and/or not following instructions. Use caution when using this product.
Le français :
• Le non-respect de ces avertissements peut entraîner en conséquence des blessures sérieuses ou dommages à la propriété et annulera la
garantie.
• Pour assurer votre sécurité, ne tentez pas d’assembler ce produit sans suivre attentivement les instructions.
• Assemblez ce produit sur une surface nivelée.
• Deux adultes capables sont requis pour assembler ce produit.
• Toutes les personnes qui participent à l’assemblage doivent porter des lunettes de sécurité tout le long de l’assemblage.
• L’assemblage, correct et complet, est essentiel pour réduire le risque des dangers ou des blessures.
• Serrez bien toute la quincaillerie avant et au cours de la période d’usage.
• La plupart des blessures sont causées par l’abus et/ou par le non-respect des instructions. Faites attention lorsque vous utilisez ce produit.
El español:
• El incumplimiento de seguir estas advertencias puede resultar en lesiones graves o daño a la propiedad y anulará la garantía.
• Para asegurar la seguridad, no intente armar este producto sin seguir detenidamente las instrucciones.
• Ensamble el producto sobre una superfi cie nivel.
• Dos adultos competentes son requeridos para ensamblar el producto.
• Todos los que participan en el ensamble del producto deben llevar gafas de seguridad a lo largo del ensamble.
• El armado, propio y completo, es esencial para reducir el riesgo de accidentes y lesiones.
• Apriete todo el herraje antes de y durante la temporada de uso.
• La mayoría de las lesiones son causadas por el uso erróneo y/o el incumplimiento de seguir las instrucciones. Tenga cuidado al usar este
producto.
WARNINGS & NOTICES / ADVERTENCIAS Y AVISOS / AVERTISSEMENTS ET AVIS

CART ASSEMBLY / ASSEMBLAGE DU CHARIOT / ENSAMBLE DEL CARRO
1
6
Metal Parts / Pièces en métal / Piezas de metal
Blister Packs / Blisters / Blísteres
PARTS REQUIRED / PIÈCES REQUISES / PIEZAS REQUERIDAS
HARDWARE REQUIRED / QUINCAILLERIE REQUISE / HERRAJE REQUERIDO
EVV (x68)
EUA (x16)
FNO (x24)
FNP (x24)
FNQ (x1)
FNK (x68)
DBA (x16)
FNJ (x16)
FNH (x16)
FNI (x52)
FSJ
FRI
FSZ
FSY
FRY
FSK
FSL
FNV (x3)
FNZ (x2)
Plastic Parts / Pièces en plastique / Piezas de plástico Small Metal Parts / Petites pièces en métal / Piezas pequeñas de metal
FNL (x24)
FNU (x12)
FNY (x12)
FNW (x4)

CART ASSEMBLY / ASSEMBLAGE DU CHARIOT / ENSAMBLE DEL CARRO
1
7
TOOLS REQUIRED / OUTILS REQUIS / INSTRUMENTAL REQUERIDO
PARTS REQUIRED / PIÈCES REQUISES / PIEZAS REQUERIDAS
1/2" (13 mm) 9/16" (14 mm)
Metal Part / Pièce en métal / Pieza de metal
FNT (x12)
FNS (x2)
FNM (x2)
FNN (x2)
FNR (x1)
FNX (x10)

TOOLS AND HARDWARE REQUIRED / OUTILS ET QUINCAILLERIE REQUIS / INSTRUMENTAL Y HERRAJE REQUERIDOS
u SECTION 1 (CONTINUED) / SECTION 1 (SUITE) / SECCIÓN 1 (CONTINUACIÓN)
8
FNX
FNQ
FNX
FNK
FNK
FNX
FNX
EVV
EVV
EVV
FNI
FNI
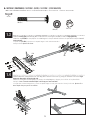
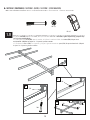
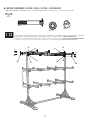
• Attach four Triangular Gussets (FNX) to the Horizontal Base Square Tube (FNQ) using the hardware indicated. Finger tighten only.
• Attacher quatre goussets triangulaires (FNX) à un tube carré horizontal (FNQ) à l’aide de la quincaillerie indiquée. Serrer à la main
seulement.
• Sujetar cuatro pletinas triangulares (FNX) a un tubo cuadrado horizontal (FNQ) usando el herraje indicado. Apretar sólo a mano.
• Note these four top holes in relation to the four side holes.
• Noter les quatre trous supérieurs iau regard des quatre trous latéraux.
• Notar los cuatro agujeros superiores en relación con los cuatro agujeros laterales.
• Attach a Gusset and a Long Brace Plate
(FNY) at each end of the Base Square
Tube as shown using the hardware
indicated. Finger tighten only.
• Attacher un gousset et une plaque de
renfort longue (FNY) à chaque extrémité
du tube carré comme illustré à l’aide de
la quincaillerie indiquée. Serrer á la main
seulement.
• Sujetar una pletina y una placa de
soporte larga (FNY) a cada extremo
del tubo cuadrado como se muestra
usando el herraje indicado. Apretar sólo
a mano.
1.1
1.2
EVV (x8)
FNK (x8)
FNI (x8)
FNY
FNY
EVV
EVV
EVV
EVV
FNK
FNK
FNK
FNK
FNI
FNI
1/2"
(13 mm)
• Side Holes
• Trous latéraux
• Agujeros laterales
• No holes here
• Aucun trou ici
• Ningún agujero aquí

TOOLS AND HARDWARE REQUIRED / OUTILS ET QUINCAILLERIE REQUIS / INSTRUMENTAL Y HERRAJE REQUERIDOS
u SECTION 1 (CONTINUED) / SECTION 1 (SUITE) / SECCIÓN 1 (CONTINUACIÓN)
9
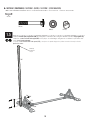
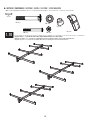
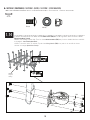
• Attach a Cart Leg (FNS) and two Long Brace Plates to each end using the hardware indicated. Finger tighten only.
• Attacher un pied (FNS) et deux plaques de renfort longues à chaque extrémité à l’aide de la quincaillerie indiquée. Serrer à
la main seulement.
• Sujetar una pata (FNS) y dos placas de soporte largas a cada extremo usando el
herraje indicado. Apretar sólo a mano.
• Attach two more Triangular Gussets and Long Brace Plates to each Cart Leg using the hardware indicated. Finger
tighten only. Repeat this step for the other end.
• Attacher deux goussets triangulaires et plaques de renfort longues a chaque pied à l’aide de la quincaillerie
indiquée. Serrer à la main seulement. Répéter cette étape pour l’autre extrémité.
• Sujetar dos pletinas triangulares y placas de soporte largas a cada pata usando el herraje indicado. Apretar sólo a
mano. Repetir este paso para el otro extremo.
1.3
1.4
EVV (x16)
FNK (x16)
FNH (x16)
FNS
FNS
FNH
FNH
FNH
FNH
FNK
FNK
FNK
FNK
FNK
EVV
EVV
EVV
EVV
FNH
FNH
FNK
FNK
EVV
EVV
EVV
EVV
FNK
1/2"
(13 mm)

TOOLS AND HARDWARE REQUIRED / OUTILS ET QUINCAILLERIE REQUIS / INSTRUMENTAL Y HERRAJE REQUERIDOS
u SECTION 1 (CONTINUED) / SECTION 1 (SUITE) / SECCIÓN 1 (CONTINUACIÓN)
10
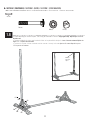
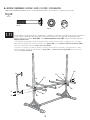
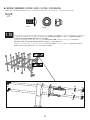
• Attach a Vertical Square Support Tube (FNZ) and Long Brace Plate to the Base using the hardware indicated. Finger tighten only.
• Attacher un tube carré vertical de support (FNZ) et une plaque de renfort longue aux goussets en utilisant la quincaillerie indi-
quée. Serrer à la main seulement.
• Sujetar un tubo cuadrado vertical de soporte (FNZ) y una placa de soporte larga a las pletinas usando el herraje indicado.
Apretar sólo a mano.
• End Cap
• Capuchon
• Tapón
1.5
FNZ
FNI
FNI
EVV
EVV
FNK
FNK
EVV (x2)
FNK (x2)
FNI (x2)
1/2"
(13 mm)

TOOLS AND HARDWARE REQUIRED / OUTILS ET QUINCAILLERIE REQUIS / INSTRUMENTAL Y HERRAJE REQUERIDOS
u SECTION 1 (CONTINUED) / SECTION 1 (SUITE) / SECCIÓN 1 (CONTINUACIÓN)
11
• Finish attaching the Vertical Square Tube using the hardware indicated. Finger tighten only. Repeat steps 1.5–1.6 for
the other end.
• Terminer d’attacher le tube carré vertical à l’aide de la quincaillerie indiquée. Serrer à la main seulement. Répéter les
étapes 1.5 – 1.6 pour l’autre extrémité.
• Terminar de sujetar el tubo cuadrado vertical usando el herraje indicado. Apretar sólo a mano. Repetir los pasos
1.5–1.6 para el otro extremo.
1.6
EVV (x6)
EVV
EVV
FNK (x6)
FNK
FNK
FNI (x6)
FNI
FNI
1/2"
(13 mm)
• End Cap
• Capuchon
• Tapón

TOOLS AND HARDWARE REQUIRED / OUTILS ET QUINCAILLERIE REQUIS / INSTRUMENTAL Y HERRAJE REQUERIDOS
u SECTION 1 (CONTINUED) / SECTION 1 (SUITE) / SECCIÓN 1 (CONTINUACIÓN)
12
1.7
1.8
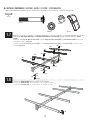
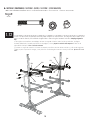
• Attach four Chair Support Arms (FNT) and Short Brace Plates (FNU) to a Cross Bar (FNV) using the hardware indicated. Tighten
securely.
• Attacher quatre bras de support à chaises (FNT) et quatre plaques de renfort courtes (FNU) à un tube transversal (FNV) à l’aide de la
quincaillerie indiquée. Serrer bien.
• Sujetar cuatro brazos de soporte para sillas (FNT) y cuatro placas de soporte cortas (FNU) a uno travesaño (FNV) usando el herraje
indicado. Apretar bien.
• Insert and End Hook (FNL) into the end of a Chair Support.
• Insérer un End Hook (FNL) dans l’extrémité d’un support à chaises.
• Insertar un End Hook (FNL) en el extremo de un soporte de sillas.
FNV
FNL
FNT
FNT
FNT
FNU
FNU
FNU
FNU
FNT
FNL (x1)
FNI (x8)
FNI
FNI
FNI
FNI
FNI
FNI
FNI
FNI
EVV (x8)
EVV (x2)
EVV (x2)
EVV (x2)
EVV (x2)
FNK (x8)
FNK
FNK
FNK
FNK
FNK
FNK
FNK
FNK
1/2"
(13 mm)

TOOLS AND HARDWARE REQUIRED / OUTILS ET QUINCAILLERIE REQUIS / INSTRUMENTAL Y HERRAJE REQUERIDOS
u SECTION 1 (CONTINUED) / SECTION 1 (SUITE) / SECCIÓN 1 (CONTINUACIÓN)
13
1.9
• 1) Slide a Nut (FNP) into the End Hook, and 2) secure the Hook with a Bolt (FNO). Tighten only until snug. 3) Repeat steps
1.8–1.9 for the remaining Hooks.
• 1) Faire glisser un écrou (FNP) dans le crochet, et 2) fixer le crochet à l’aide d’un boulon (FNO). Ne pas serrer
excessivement. 3) Répéter les étapes 1.8 – 1.9 pour les crochets restants.
• 1) Deslizar una tuerca (FNP) en el gancho, y 2) fijar el gancho usando un perno (FNO). No apretar demasiado. 3) Repetir
los pasos 1.8–1.9 para los ganchos restantes.
1
2
3
FNP
FNP
FNO (x8)
FNO
FNP (x8)
FNL
FNL
FNL
FNL
FNL
FNLFNL
FNL (x7)

TOOLS AND HARDWARE REQUIRED / OUTILS ET QUINCAILLERIE REQUIS / INSTRUMENTAL Y HERRAJE REQUERIDOS
u SECTION 1 (CONTINUED) / SECTION 1 (SUITE) / SECCIÓN 1 (CONTINUACIÓN)
14
• Repeat steps 1.7–1.9 for the two other Chair Support Arm Assemblies for a total of three.
• Répéter les étapes 1.7 – 1.9 pour les assemblages des bras de support à chaises carrés pour un total de trois.
• Repetir los pasos 1.7–1.9 para los ensambles de brazos de soporte para sillas para un total de tres.
1.10
FNO (x16)
FNP (x16)
FNL (x16)
FNI (x16)
EVV (x16)
FNK (x16)
1/2"
(13 mm)

TOOLS AND HARDWARE REQUIRED / OUTILS ET QUINCAILLERIE REQUIS / INSTRUMENTAL Y HERRAJE REQUERIDOS
u SECTION 1 (CONTINUED) / SECTION 1 (SUITE) / SECCIÓN 1 (CONTINUACIÓN)
15
• Slide a Chair Support Arm Assembly down between the square tubes, and align with the lower four holes.
Attach it, the lower end of the Handle (FNR), and a Medium-lengthed Brace Plate (FNW) using the hardware indicated.
Only finger tighten for now.
• Faire glisser l’assemblage du bras de support à chaises entre les tubes carrés, et aligner-le avec les quatre
trous inférieurs. Attacher-le, la partie inférieure de la poignée (FNR), et une plaque de renfort de taille moyenne (FNW) à
l’aide de la quincaillerie indiquée. Ne pas serrer excessivement.
• Deslizar el ensamble del brazo de soporte para sillas entre los tubos cuadrados, y alinearlo con los cuatro
agujeros inferiores. Fijarlo, la parte inferior del mango (FNR), y la pletina de media longitud (FNW) usando el herraje
indicado. No apretar demasiado.
1.11
FNR
FNW
EVV (x4)
EVV
EVV
EVV
EVV
FNK (x4)
FNI (x4)
FNI
FNI
FNI
FNI
FNK
FNK
FNK
FNK
1/2"
(13 mm)

TOOLS AND HARDWARE REQUIRED / OUTILS ET QUINCAILLERIE REQUIS / INSTRUMENTAL Y HERRAJE REQUERIDOS
u SECTION 1 (CONTINUED) / SECTION 1 (SUITE) / SECCIÓN 1 (CONTINUACIÓN)
16
• Slide a second Chair Support Arm Assembly down between the vertical tubes, and align the holes. Attach it, the
upper end of the Handle, and a Medim-lengthed Brace Plate using the hardware indicated. Only finger tighten for
now.
• Faire glisser un deuxième assemblage du bras de support à chaises entre les tubes verticales, et aligner
les trous. Attacher-le, la partie supérieure de la poignée, et une plaque de renfort de taille moyenne à l’aide de la
quincaillerie indiquée. Serrer à la main seulement.
• Deslizar un segundo ensamble de brazo de soporte para sillas entre los tubos verticales, y alinear los agujeros.
Fijarlo, la parte superior del mango, y una pletina de media longitud usando el herraje indicado. Apretar sólo con la
mano.
1.12
FNW
EVV (x4)
FNK (x4)
FNI (x4)
FNI
FNI
FNI
FNI
FNK
FNK
FNK
EVV
EVV
EVV
EVV
FNK
1/2"
(13 mm)

TOOLS AND HARDWARE REQUIRED / OUTILS ET QUINCAILLERIE REQUIS / INSTRUMENTAL Y HERRAJE REQUERIDOS
u SECTION 1 (CONTINUED) / SECTION 1 (SUITE) / SECCIÓN 1 (CONTINUACIÓN)
17
• Slide the third Assembly down between the square tubes, and align the holes. Tighten all hardware now.
• Faire glisser le troisième assemblage entre les tubes carrés, et aligner les trous. Serrer toute la quincaillerie maintenant.
• Deslizar el tercer ensamble entre los tubos cuadrados, y alinear los agujeros. Apretar todo el herraje ahora.
1.13
EVV (x4)
FNK (x4)
FNI (x4)
FNW
FNW
FNI
FNI
FNK
FNK
FNK
FNK
EVV
EVV
EVV
EVV
FNI
FNI
1/2"
(13 mm)

TOOLS AND HARDWARE REQUIRED / OUTILS ET QUINCAILLERIE REQUIS / INSTRUMENTAL Y HERRAJE REQUERIDOS
u SECTION 1 (CONTINUED) / SECTION 1 (SUITE) / SECCIÓN 1 (CONTINUACIÓN)
18
• Turn the assembly on its side. Attach the two Swivel Castors (FNN) to the Cart Legs at the same end as the Handle.
Tighten the hardware securely.
• Mettre l’assemblage sur son côté. Fixer les deux roulettes tournantes (FNN) aux pieds du chariot à la même extrémité
de la poignée. Serrer bien la quincaillerie.
• Metar el ensamble sobre su costado. Fijar los dos ricinos giratorios (FNN) a las patas de la carretilla al mismo
extremo del mango. Apretar bien el herraje.
• Handle
• Poignée
• Mango
1.14
EUA (x8)FNJ (x8)
FNJ
DBA
DBA
DBA
DBA
EUA
EUA
EUA
EUA
FNJ
FNJ
FNJ
9/16"
(14 mm)
DBA (x8)

TOOLS AND HARDWARE REQUIRED / OUTILS ET QUINCAILLERIE REQUIS / INSTRUMENTAL Y HERRAJE REQUERIDOS
u SECTION 1 (CONTINUED) / SECTION 1 (SUITE) / SECCIÓN 1 (CONTINUACIÓN)
19
• Turn the assembly on its side. Attach the two remaining Fixed Castors (FNM) to the other Leg. Tighten the hardware
securely. Ensure all other hardware from steps 1.1–1.14 is tight.
• Mettre l’assemblage sur son côté. Fixer les deux roulettes fixées (FNM) restantes à l’autre pied. Serrer bien la
quincaillerie. Veiller à ce que toute autre quincaillerie des étapes 1.1 – 1.14 est bien serrée.
• Metar el ensamble sobre su costado. Fijar los dos ricinos fijos (FNM) restantes a la otra pata. Apretar bien el herraje.
Verificar que todo el herraje de los pasos 1.1–1.14 ha sido bien apretado.
1.15
EUA (x8)FNJ (x8)
DBA (x8)
FNJ
DBA
DBA
DBA
DBA
EUA
EUA
EUA
EUA
FNJ
FNJ
FNJ
9/16"
(14 mm)

TOOLS AND HARDWARE REQUIRED / OUTILS ET QUINCAILLERIE REQUIS / INSTRUMENTAL Y HERRAJE REQUERIDOS
u SECTION 1 (CONTINUED) / SECTION 1 (SUITE) / SECCIÓN 1 (CONTINUACIÓN)
20
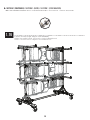
• Turn the assembly upright. Hang the chairs horizontally.
• Mettre l’assemblage vertical. Suspendre les chaises horizontalement.
• Metar el ensamble vertical. Colgar las sillªs horizontalmente.
1.16
La page est en cours de chargement...
La page est en cours de chargement...
La page est en cours de chargement...
La page est en cours de chargement...
La page est en cours de chargement...
La page est en cours de chargement...
La page est en cours de chargement...
La page est en cours de chargement...
-
 1
1
-
 2
2
-
 3
3
-
 4
4
-
 5
5
-
 6
6
-
 7
7
-
 8
8
-
 9
9
-
 10
10
-
 11
11
-
 12
12
-
 13
13
-
 14
14
-
 15
15
-
 16
16
-
 17
17
-
 18
18
-
 19
19
-
 20
20
-
 21
21
-
 22
22
-
 23
23
-
 24
24
-
 25
25
-
 26
26
-
 27
27
-
 28
28


Lifetime 80669 Le manuel du propriétaire
- Taper
- Le manuel du propriétaire
dans d''autres langues
- English: Lifetime 80669 Owner's manual
- español: Lifetime 80669 El manual del propietario
Documents connexes
-
Lifetime 80669 Le manuel du propriétaire
-
-
-
-
-
-
-
-
-