
II. Getting Started
1. Using your smart device, visit the Apple App Store or Google Play to download the
FREE Micro Fi app.
2. While the app is downloading, prepare Micro Fi by opening the battery door and
inserting 3 AA batteries in the battery compartment (fig. 1).
NOTE: Follow the markings on the outside of the battery door to ensure the
batteries are inserted correctly (fig. 2).
3. Slide the ON/OFF switch (2) to the ON position. The green LED (5) will illuminate.
NOTE: If Battery indicator LED (4) is illuminated red, the batteries are low on power
and will need to be changed out.
4. Allow 30 seconds for the Wi-Fi network to boot up.
5. Go to your smart device’s Wi-Fi settings menu and connect to the Micro Fi Wi-Fi network.
NOTE: All Micro Fi microscopes create their own Wi-Fi network. Each is named
“MICRO-FI” followed by 5 random digits to differentiate the networks. The
five digits for your Micro Fi’s network are printed on a sticker inside the
battery door (fig.3).
6. To join the network, enter the default password: 12345678
NOTE: You can change the network’s name and password in the “Settings” section
of the Micro Fi app. To reset name and password back to default, use a
paper clip to press and hold the reset button (3) for 3 seconds.
7. When connection to the network is successful, the green Wi-Fi signal LED (5) will blink.
8. On your smart device, open the Micro-Fi app.
9. If the live stream does not start automatically, touch the “ON” button
on the screen.
III. Using the App
1. ICONS
• ON/OFF: Turns live stream on and off.
• PAUSE: Freezes the live feed for shake-free images.
(NOTE: This feature available using iOS app only.)
• SNAPSHOT: Takes a still image.
• RECORD/STOP: Starts and stops video recording.
• PLAY: Displays all saved videos for playback.
• SETTING: Allows you to change the Wi-Fi network name and password. On iOS devices, you can also adjust
the following image settings: • Brightness • Contrast • Hue • Saturation
IV. Basics
1. The closer the microscope is to the specimen, the higher the magnification will be.
2. To bring a specimen into focus, turn the focus wheel (7) all the way to the right (counter clockwise), then turn it to the
left (clockwise) slowly until the specimen comes into sharp focus.
3. To obtain the highest magnification of 80x, place the microscope on top of the specimen, with clear lens cover (11)
touching it. Continue to turn the focus wheel clockwise until the specimen is in focus.
4. Use Illuminator adjustment wheel (1) to adjust the light if necessary.
5. Use the snapshot button (6) to take a still image. Alternatively, you can press on your app.
6. The snapshot images will be saved to your smart device
a. Camera Roll for iPhone, iPad and iPod Touch b. Gallery for Android devices
7. Videos must be taken using the app and pressing .
8. Videos are saved to the app and can be viewed by pressing .
V. Specifications:
Magnification Ratio
1x to 80x
Digital Camera .3MP, Color CMOS ¼”
Frame Rate 15fps (VGA)
Support Video Code Protocol MPEG4
Shutter trigger On microscope housing or through app
Lens 2-element IR coated lens
Focuser Range Manual focus from 10mm to infinity
Illuminator Upper, 6 bright white adjustable LEDs
White Balance - Auto Exposure - Auto Gain Control - Auto
Operating Temperature
0° C to 50° C (32° F to 122° F)
Operating Systems Supported iOS, Android
Support Protocol 2.4GHz Wi-Fi IEEE802.11b/g/n
Security WPA
Wi-Fi Range 30 feet (without obstructions)
Power Consumption 3.6V/ 440mA
Battery AA Batteries- QNTY:3 (Not included)
Dimensions 3.15” x 1.36” x 4.39” (80.10mm x 34.50mm x 111.6mm)
Weight 121g/42. Oz.
Warranty: Your microscope has a two year limited warranty. Please see Celestron’s website for detailed information on all Celestron microscopes at
www.celestron.com.
FCC Note: This equipment has been tested and found to comply with the limits for a Class B digital device, pursuant to part 15 of the FCC Rules.
These limits are designed to provide reasonable protection against harmful interference in a residential installation. This equipment generates, uses,
and can radiate radio frequency energy and, if not installed and used in accordance with the instructions, may cause harmful interference to radio
communications. However, there is no guarantee that interference will not occur in a particular installation. If this equipment does cause harmful
interference to radio or television reception, which can be determined by turning the equipment off and on, the user is encouraged to try to correct
the interference by one or more of the following measures:
• Reorient or relocate the receiving antenna.
• Increase the separation between the equipment and receiver.
• Connect the equipment into an outlet on a circuit different from that to which the receiver is connected.
• Consult the dealer or an experienced radio/TV technician for help.
This device complies with Part 15 of the FCC Rules. Operation is subject to the following two conditions:
(1) this device may not cause harmful interference, and (2) this device must accept any interference received, including interference that may cause
undesired operation.
RF WARNING
This equipment complies with FCC RF exposure limits set forth for an uncontrolled environment.
This equipment must be installed and operated with a separation distance of at least 20 cm from all persons.
Apple, the Apple logo, iPhone, iPod touch and iPad are trademarks of Apple Inc., registered in the U.S. and other countries. App Store is a service mark
of Apple Inc.
This product is designed and intended for use by those 14 years of age and older.
Product design and specifications are subject to change without prior notification.
FOR COMPLETE SPECIFICATIONS AND PRODUCT INFORMATION, VISIT: WWW.CELESTRON.COM
Celestron, LLC. • Torrance, CA 90503 U.S.A. Tel: 800.421.9649 ©2014 Celestron • All rights reserved. • Printed in Taiwan
FRENCH
II. Mise en route
1. À l’aide de votre appareil intelligent, visitez App Store d’Apple ou Google Play pour télécharger
l’application gratuite Micro Fi
2. Pendant le téléchargement de l’application, préparez Micro Fi en ouvrant le couvercle du
compartiment à piles et insérez 3 piles AA dans le compartiment à piles (fig. 1).
REMARQUE: Suivez les indications à l’extérieur du couvercle du compartiment à piles pour
vous assurer que les piles sont correctement insérées (fig. 2).
3. Faites glisser le commutateur d’alimentation [ON/OFF] (2) à la position « ON ». Le voyant à DEL vert
(5) s’allumera.
REMARQUE: Si le voyant à DEL rouge (4) clignote, cela indique que les piles seront épuisées sous peu.
4. Attendez 30 secondes pour permettre l’initialisation du réseau Wi-Fi.
5. Allez dans menu de paramètres de votre appareil Wi-Fi et connectez-vous au réseau Wi-Fi Micro Fi.
REMARQUE : Tous les microscopes Micro Fi créent leur propre réseau Wi-Fi. Chacun est nom-
mé «MICRO-FI», suivi de 5 chiffres aléatoires servant à différencier les réseaux.
Les cinq chiffres pour le réseau de votre Micro Fi sont imprimés sur une étiquette
à l’intérieur du compartiment à piles (fig. 3).
6. Pour rejoindre le réseau, saisissez le mot de passe par défaut : 12345678
REMARQUE: Vous pouvez modifier le nom et le mot de passe du réseau dans la section «
Paramètres » de l’application Micro Fi. Pour réinitialiser à tout moment le nom et
le mot de passe du réseau, utilisez un trombone pour appuyer sur le bouton de
réinitialisation (3) pendant 3 secondes.
7. Lorsque la connexion au réseau est réussie, le voyant de signal Wi-Fi à DEL vert (5) clignotera.
8. Ouvrez l’application Micro-Fi à partir de votre appareil intelligent.
9. Si le flux de données en direct ne démarre pas automatiquement, appuyez sur le bouton « ON » de
l’écran .
III. Utilisation de l’application
1. ICÔNES
• ON/OFF: Active et désactive le flux de données en direct.
• PAUSE:
Effectue un arrêt sur image du flux de données en direct pour des images sans secousse.
(REMARQUE : cette fonctionnalité est uniquement disponible avec l’application iOS).
• INSTANTANÉ [SNAPSHOT]:Prend une image fixe (photo).
• ENREGISTRER/ARRÊT : Démarre et arrête l’enregistrement vidéo.
• PLAY:LECTURE : Affiche toutes les vidéos enregistrées pour la lecture.
• PARAMÈTRE : Permet de changer le nom et le mot de passe du réseau Wi-Fi. Avec les appareils iOS, vous pouvez
également ajuster les paramètres d’image suivants : • Luminosité • Contraste • Teinte • Saturation
IV. Notions de base
1. Plus le microscope se rapproche de l’échantillon, plus le grossissement sera élevé.
2. Afin d’effectuer la mise au point d’échantillon, tournez complètement la molette (7) vers la droite (sens antihoraire), puis
tournez-la lentement vers la gauche (sens horaire) jusqu’à la mise au point nette de l’échantillon.
3. Pour obtenir le grossissement le plus élevé de 8 0x, placez le microscope au-dessus de l’échantillon, pour que le couvercle
de l’objectif (11) le touche. Continuez à tourner la molette de mise au point dans le sens horaire jusqu’à la mise au point
sur l’échantillon.
4. Utilisez la molette de réglage de l’illuminateur (1) pour régler l’éclairage au besoin.
5. Utilisez le bouton de capture d’instantané (6) pour prendre une image fixe. Une autre façon de le faire consiste à appuyer
sur de votre application.
6. Les images fixes seront sauvegardées dans votre appareil intelligent
a. Camera Roll pour iPhone, iPad et iPod Touch b. Galerie pour les appareils Android
7. Les vidéos doivent être prises à l’aide de l’application .
8. Les vidéos sont sauvegardées dans l’application et peuvent être affichées en appuyant sur .
V. SPÉCIFICATIONS :
Facteur de grossissement 1x à 80x
Appareil photo numérique 0,3Mpx, couleur CMOS ”¼
Fréquence d’image 15 images/s (VGA)
Prise en charge du protocole de code vidéo MPEG4
Déclencheur de l’obturateur Sur le boîtier du microscope ou à l’aide de l’application
Objectif Objectif traité pour IR à 2 éléments
Plage de mise au point Mise au point manuelle de 10 mm à l’infini
Illuminateur En haut, 6 puissantes DEL blanches réglables
Équilibre des blancs — Auto Exposition – Auto Commande de gain — Auto
Température de fonctionnement
0 °C à 50 °C (32 °F à 122 °F)
Systèmes d’exploitation pris en charge iOS, Android
Protocole pris en charge 2,4 GHz Wi-Fi IEEE802.11b/g/n
Sécurité WPA
Portée Wi-Fi 9,1 m (30 pieds) (sans obstacle)
Alimentation 3,6 V/ 440 mA
Pile Piles AA — QTÉ : 3 (non comprise)
Dimensions 3,15 po x 1,36 po x 4.39 po (80,10 mm x 34,50 mm x 111,6 mm)
Poids 121g/42. Oz.
Garantie: Votre microscope bénéficie d’une garantie limitée de deux ans. Veuillez consulter le site web Celestron pour des informations
détaillées sur toute la gamme de microscopes Celestron à www.celestron.com.
Remarque FCC : Cet Èquipement a ÈtÈ testÈ et trouvÈ conforme aux limites pour un dispositif numÈrique de classe B, conformÈment ‡
la Partie 15 des rËglements de la FCC. Ces limites visent ‡ protÈger convenablement les particuliers contre les interfÈrences nuisibles
dans une installation rÈsidentielle. Cet Èquipement gÈnËre et peut Èmettre des frÈquences radio et, s’il n’est pas installÈ et utilisÈ con-
formÈment aux instructions du manuel, peut causer des interfÈrences nuisibles aux communications radio. Toutefois, il n’existe aucune
garantie contre des interfÈrences se produisant dans le cadre d’une installation particuliËre. Si l’Èquipement engendre des interfÈrences
nuisant ‡ la rÈception radio ou tÈlÈvisuelle (ce qui peut Ítre dÈterminÈ en le mettant hors tension, puis en le remettant sous tension),
vous Ítes encouragÈ ‡ tenter d’y remÈdier en ayant
recours ‡ l’une des mesures suivantes:
• RÈorienter ou dÈplacer l’antenne rÈceptrice.
• Augmenter la sÈparation entre l’Èquipement et le rÈcepteur.
• Branchez l’appareil ‡ la prise secteur d’un circuit diffÈrent de celui sur lequel le rÈcepteur est branchÈ.
• Demandez l’assistance de votre revendeur ou celle d’un technicien radio/TV.
son appareil est conforme à la partie 15 des règles de la FCC. Son fonctionnement est soumis aux deux conditions suivantes:
(1) ce dispositif ne doit pas causer d’interférences nuisibles, et (2) cet appareil doit accepter toute interférence reçue, y
compris les interférences qui peuvent provoquer un fonctionnement indésirable.
RF AVERTISSEMENTnt est conforme aux limites d’exposition RF de la FCC établies pour un environnement non contrôlé.
Cet équipement doit être installé et utilisé à une distance de séparation d’au moins 20 cm de toute personne.
Apple, le logo Apple, iPhone, iPodtouch et iPad sont des marques déposées de Apple Inc., déposées aux États-Unis et dans
d’autres pays. App Store est une marque de service d’Apple Inc.
Ce produit est conçu et destiné pour les personnes de 14 ans et plus.
La conception du produit et les spécifications sont sujettes à modification sans notification préalable.
FOR COMPLETE SPECIFICATIONS AND PRODUCT INFORMATION, VISIT: WWW.CELESTRON.COM
Celestron, LLC. • Torrance, CA 90503 U.S.A. Tel: 800.421.9649 ©2014 Celestron | Tous droits réservés.•
Printed in Taiwan
DEUTSCH
II. Erste Schritte
1. Besuchen Sie mit Ihrem mobilen Gerät den Apple App Store oder Google
Play, um die KOSTENLOSE Micro Fi App herunterzuladen.[APPICON]
2. Während die App heruntergeladen wird, öffnen Sie die Batteriefachklappe
des Micro Fi und setzen Sie 3 AA-Batterien in das Batteriefach ein
(Abbildung 1).
HINWEIS: Befolgen Sie die Markierungen auf der Außenseite der Batter-
iefachklappe, um die Batterien richtig herum richtig einzulegen
(Abbildung 2).
3. Schieben Sie den Ein-/Ausschalter (2) in die Stellung ON (Ein). Die
grüne LED (5) leuchtet auf.
HINWEIS: Wenn die rote LED (5) blinkt, sind die Batterien bald erschöpft.
4. Warten Sie 30 Sekunden, damit das WLAN starten kann.
5. Rufen Sie das WLAN-Einstellungsmenü auf Ihrem Gerät auf und stellen
Sie eine Verbindung mit dem Micro Fi-WLAN her.
HINWEIS: Alle Micro Fi-Mikroskope erstellen Sie ihr eigenes WLAN.
Jedes heißt „MICRO-FI“, gefolgt von 5 zufälligen Ziffern,
um die Netzwerk zu unterscheiden. Die fünf Ziffern für Ihr
Micro Fi-Netzwerk befinden sich auf einem Aufkleber auf der
Innenseite der Batteriefachklappe (Abbildung 3).
6. Um eine Verbindung mit dem Netzwerk herzustellen, geben Sie das
Standardpasswort ein: 12345678
HINWEIS: Sie können den Namen und das Passwort des Netzwerks im
Abschnitt „Einstellungen“ der Micro Fi-App ändern. Um den
Namen und das Passwort des Netzwerks zurückzusetzen,
halten Sie mit einer Büroklammer die Reset-Taste (3) für 3
Sekunden gedrückt.
7. Wenn die Verbindung mit dem Netzwerk erfolgreich hergestellt wurde, beginnt die
grüne WLAN Signal-LED (5) zu blinken.
8. Öffnen Sie auf Ihrem mobilen Gerät die Micro-Fi-App.
9. Wenn der Livestream nicht automatisch gestartet, tippen Sie auf dem Bildschirm auf die Taste „ON“ .
fig.1
Micro Fi App
fig.2
fig.3
Micro Fi App
fig.1
fig.2
fig.3
Abbildung 1
Micro Fi App
Abbildung 2
Abbildung 3
8
9
10
11
2
3
4
1
6
5
7
ENGLISH
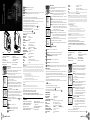
I. COMPONENTS
1. ILLUMINATOR ADJUSTMENT KNOB
2. ON/OFF SWITCH
3. RESET BUTTON
4. BATTERY INDICATOR LED
5. POWER AND WI-FI SIGNAL INDICATOR LED
6. SNAPSHOT BUTTON
7. FOCUS WHEEL
8. MOUNT FOR TRIPOD OR STAND
(1/4-20 STANDARD THREAD)
9. BATTERY DOOR
10. 6 LED RING ILLUMINATOR
11. CLEAR LENS COVER
I. COMPOSANTS
1. MOLETTE DE RÉGLAGE DE L’ILLUMINATEUR
2. COMMUTATEUR D’ALIMENTATION [ON/OFF]
3. TOUCHE DE RÉINITIALISATION [RESET]
4. INDICATEUR DE PILES À DEL
5.
VOYANT D’ALIMENTATION ET DE SIGNAL WI-FI À DEL
6. BOUTON DE CAPTURE D’INSTANTANÉ
07. MOLETTE DE MISE AU POINT
08.
MONTURE POUR TRÉPIED OU SUPPORT (FILETAGE
STANDARD 1/4-20)
09. COUVERCLE DU COMPARTIMENT À PILES
10. 6 LED LAMPE ANNULAIRE
11. LENS COVER EFFACER
I. KOMPONENTEN
1. BELEUCHTUNGSEINSTELLKNOPF
2. EIN-/AUSSCHALTER
3. RESET-TASTE
4. BATTERIE-LEDANZEIGE
5.
BETRIEBS- UND WLANSIGNAL-LEDANZEIGE
6. SCHNAPPSCHUSSTASTE
0
07. FOKUSSIERRAD
08.
GEWINDE FÜR STATIV ODER STÄNDER (1/4-20
STANDARDGEWINDE)
09. BATTERIEFACHKLAPPE
10. 6 LED-RING BELEUCHTUNG
11. KLAR LINSENABDECKUNG
La page est en cours de chargement...
-
 1
1
-
 2
2


dans d''autres langues
- italiano: Celestron Micro Fi Manuale utente
- English: Celestron Micro Fi User manual
- español: Celestron Micro Fi Manual de usuario
- Deutsch: Celestron Micro Fi Benutzerhandbuch
Documents connexes
-
Celestron Cosmos LCD Desktop Microscope Quick Setup
-
-
-
Celestron 44106 Manuel utilisateur
-
-
-
Celestron PentaView Manuel utilisateur
-
-
-
