Health O Meter 2650KL Manuel utilisateur
- Catégorie
- Balances de cuisine
- Taper
- Manuel utilisateur
Ce manuel convient également à

PRO PLUS
TM
ELECTRONIC WHEELCHAIR SCALE
MODEL 2650KL
BALANCE ELECTRONIQUE PRO PLUS
TM
POUR FAUTEUIL ROULANT
MODELE 2650KL
BALANZA ELECTRONICA PRO PLUS
TM
PARA SILLON DE RUEDAS
MODELO 2650KL
OPERATION MANUAL
MODE D'EMPLOI
MANUAL DE OPERACIÓN

1
PRO PLUS
TM
ELECTRONIC WHEELCHAIR SCALE
MODEL 2650KL
Thank you for your purchase of this product.
Please read this manual carefully and keep it handy for ready reference.
Merci d'avoir acheté ce produit.
Veuillez lire attentivement ce manuel et le garder à portée de main pour pouvoir le consulter à
tout moment
Gracias por la adquisición de este producto.
Lea por favor este manual cuidadosamente y manténgalo a su alcance para una pronta
referencia.
ENGLISH............................................................................................ 1
FRANÇAIS......................................................................................... 24
ESPAÑOL .......................................................................................... 47
TABLE OF CONTENTS
CAUTION AND WARNING....................................................................................................2
SPECIFICATIONS.................................................................................................................2
ASSEMBLY INSTRUCTIONS ...............................................................................................3
SET UP .................................................................................................................................6
OPERATION INSTRUCTIONS..............................................................................................7
MAINTENANCE.....................................................................................................................18
TROUBLESHOOTING...........................................................................................................19
CALIBRATION PATH............................................................................................................20
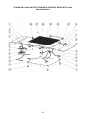
EXPLODED VIEW OF SCALE..............................................................................................20
PARTS LIST..........................................................................................................................22
WARRANTY..........................................................................................................................23

2
CAUTION AND WARNING
To prevent injury and damage to your scale, please follow these instructions very carefully.
• Do not transport the scale while the platform is loaded.
• For accurate weighing the scale must be placed on a flat, stable surface.
• For accurate weighing, verify proper operation according to the procedure described in this
manual before each use.
• Do not use in the presence of flammable materials.
• Operating at other voltages and frequencies than specified could damage the equipment.
• If the “LOW BAT” indicator activates, for accurate weighing, replace the batteries or connect
the scale to an AC power source as soon as possible.
SPECIFICATIONS
GENERAL
Health o meter’s Pro Plus
TM
Electronic Wheelchair Scale Model 2650KL uses highly
sophisticated microprocessor technology. Each precision instrument is designed to provide
accurate, reliable and repeatable weight measurements and features that make the weighing
process simple, fast and convenient.
The scale is set up to use motion-sensing weighing technology, to determine the actual weight
of a moving patient. The scale may be changed to measure live weight; see page 15 for
instructions on changing the scale setting.
The weight can be display in pounds (decimals, fractions of a lb or lb/oz) or in kilograms. The
scale features a platform-independent ramp for easy wheelchair access.
The unit can be operated using its AC adapter or by 6-D cell batteries (not included).
SCALE SPECIFICATIONS
Capacity and Resolution
1000 Lb x 0.2 lb / ¼ lb / 4 oz (450 kg x 0.1 kg)
Power Requirements
Adapter 120VAC - 6VDC - 60Hz or 6 x D size batteries
Environmental
Operating temperatures: 50°F to 95°F (10°C to 35°C)
Storage temperatures: 30°F to 125°F (0°C to 50°C)
Humidity: 85%
Physical Dimensions Platform
Length: 33” (82 cm)
Width: 36” (91 cm)
Height: 3” (7.5 cm)
Platform with Ramp
Length: 43” (109 cm)
Width: 56¼” (143 cm)
Height: 3” (7.5 cm)
Weight: 48.5 lb (22 kg)

3
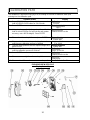
ASSEMBLY INSTRUCTIONS
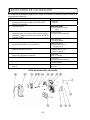
Parts List:
(1) Platform Assembly (plus 2 ramps) (1) Handle
(1) Display Assembly (4) Ramp Holder
(4) Rubber Feet Assemblies (1) Display Support
(1) AC Adapter (4) Screws
(1) LC Cable Connector (1) Power Cord
(2) Wheels
Tools required:
Phillips head screwdriver, Allen wrenches (included).
Remove each piece from the carton and unwrap packing material carefully to prevent scratching
the unit’s parts. It is recommended that assembly is performed by two people.
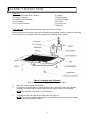
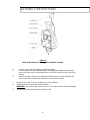
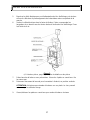
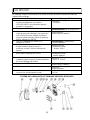
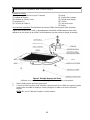
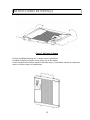
Figure 1. Assembly after Shipment
(refer to the Parts List on page 22 for details on parts)
1. Open the scale to operational position.
2. Connect the load cell cable connector to the load cell port on the rear of the display
assembly and insert and secure the cable into the center channel in the display.
NOTE
: Do not attach the Power Cord at this point.
3. Connect the load cell cable to the display unit see Figure 2.
NOTE
: The load cell cable should now be secured in the channel between the display
assembly and the display support.

4
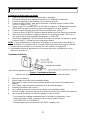
Figure 2
Refer to the Parts List on page 22 for details on parts
4. Insert 4 screws into the display support and tighten.
5. Connect power cord to the power port in the display assembly and insert and
secure the cable into the exposed portion of the 2nd channel from the left in the
display.
6. Insert the power cord into the retaining slot. Align the rear cover tabs with the
slots on the rear of the display assembly. Secure with 4 screws.
7. Gently tip the scale. Screw in 4 plastic feet. Do not tighten.
8. Gently return the scale to the upright position.
WARNING
: Do not drop the scale on its feet. This could result in load cell damage.
9. Screw/unscrew the plastic feet to level the scale.
ASSEMBLY INSTRUCTIONS

5
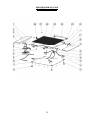
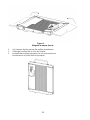
ASSEMBLY INSTRUCTIONS
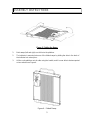
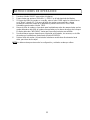
Figure 3. Folding the Ramp
1. Both ramps (left and right) can fold onto the platform.
2. The indicator is mounted onto one of the folded ramps by sliding the slots in the back of
the indicator into raised pins..
3. Lift the scale platform onto its side using the handle, and it is now able to be transported
on two wheels see Figure 4.
Figure 4. Folded Ramp

6
SET UP
Preparing the Scale for Use
1. Remove protective plastic film from keypad and display.
2. Place batteries in the battery holder (see “Replacing Batteries”).
3. Plug the scale’s AC adapter into the power source.
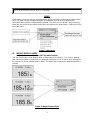
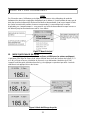
4. Press the ON/OFF button to turn the scale on. The display will show “Health o Meter
Pro Plus” and then ”000
Lb00oz”.
(a)
5. Place a weight [not to exceed 1000 Lb (450 Kg)] on the scale. The display should read
“WEIGHING“ until the weight calculation is complete and the weight is displayed.
6. Press the KG/LB button to select the weight mode (Lb/Kg).
(b)
*
7. Press the REWEIGH button; the scale should perform the weighing process again.
8. Remove the weight from the scale, the scale will return to zero and the display will read
“ZERO” on the left upper side of the screen along with
”000Lb00oz”.
9. Disconnect the scale’s AC adapter from the power source. The scale will shut off. Press
On/Off and the scale will switch to battery power.
NOTE
: If the set up procedure failed, refer to the troubleshooting instructions. If the
problem is not corrected, refer to qualified service personnel.
(a)
To adjust the display backlight and/or contrast, please refer to page 14.
(b)
To change the display mode in pounds to fractions or decimals, please refer to page 9.
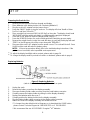
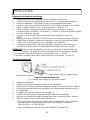
Replacing Batteries
Figure 5. Replacing Batteries
(refer to the Parts List on page 22 for details on parts
1. Unplug the scale.
2. Remove the battery cover from the display assembly.
3. Disconnect battery holder cable connector from the scale-battery connector.
4. Carefully remove the battery holder by sliding it out the display assembly.
5. Replace the batteries with new ones.**
6. Carefully position the battery holder into the display assembly.
7. Plug the battery holder cable connector to the display cable connector.
8. Attach the cover to the display assembly and install the screw.
* To change the scale default units to kilograms, or to deactivate the LB/KG button,
please contact Technical Support at 1 800 638-3722 or +1 708 598-9100.
** We recommend the use of EVEREADY Energizer
®
e2
TM
batteries.

7
OPERATION INSTRUCTIONS
1. Press the ON/OFF button to turn the scale on.
2. Wait until ”000
Lb00oz” and “ZERO” on the left side of the display will appear.
3. If the wheelchair weight is known, enter the TARE value according to instructions in the
“Menu”, para 02. If the wheelchair weight is unknown, place the wheelchair only on the
platform; press REWEIGH. Enter the Automatic TARE by pressing the TARE button.
4. Move the wheelchair and patient onto the platform over the ramp until the front wheelchair
wheels are stopped by the platform guardrail. The display should read “WEIGHING“ until
the weight of the patient is displayed.
5. We recommend reweighing after the patient is sitting still on the wheelchair on the platform
by pressing the REWEIGH button.
6. Remove the wheelchair and patient from the scale by moving straight back off the ramp.
NOTE
: The scale will always default to the settings and units last used.

8
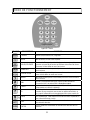
OPERATION INSTRUCTIONS
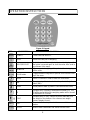
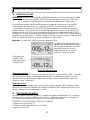
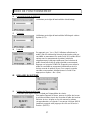
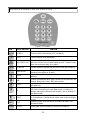
Figure 6. Keypad
ITEM DESCRIPTION FUNCTION
POWER Turns scale ON and OFF.
ZERO Zeros the scale prior to weighing.
HOLD/RELEASE
Holds the value of the weighed object on the display until
the button is pressed again to clear the value. Also used to
scroll down in the menu.
REWEIGH
Allows repeated weighing of the patient without stepping
off the scale.
KG/LB button
Toggles between kilograms or pounds. Also used to scroll
up in the menu.
MENU Press 10 seconds in order to enter the scale menu.
BMI
Prompts entry of data to calculate the patient’s Body Mass
Index (BMI).
PRINT Prints patient’s data (if printer is connected to the scale).
ID
Prompts entry of patient’s identification number (ID). This
ID will be stored with all the weighing made until is cleared
or a different ID is stored.
TARE
Prompts entry of TARE value that will be deducted from
the weight on the platform. Also releases tare weight
(returns display to zero).
EXIT
Reverts back one step when in the menu and data entry
modes.
ENTER Used to enter commands and values into the scale.

9
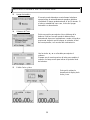
OPERATION INSTRUCTIONS
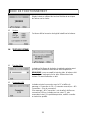
MENU
In the menu screen the user can set preferences and/or instruct the scale how to handle stored
data. The menu can be navigated using the up and down keys (cd) or by entering the
associated menu position number with the keypad. The menu has a “roll-over” way of working:
when the user scrolls to the bottom of the menu and presses the down button, it will return to the
top of the menu.
Figure 7. Main Menu
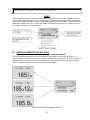
01 WEIGHT DISPLAY MODE
(only applies to pound values, NOT the metric values)
The user can set the screen display value in either fraction of pound (¼, ½ or ¾ lb), in pounds
and ounces (resolution of 4 ounces) or in decimals (resolution of 0.2 lb). When kg is selected as
the units of use, these settings have no effect. The mode that is selected is used through all the
screens.
Figure 8. Weight Display Mode

10
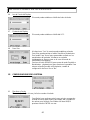
OPERATION INSTRUCTIONS
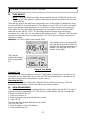
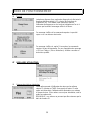
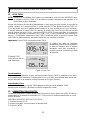
02 TARE WEIGHT
NOTE: Due to the scale’s sensitivity, we recommend using the REWEIGH function prior
to setting the TARE weight, in order to eliminate any operator interference with the item
to be tared out.
There are two ways to manually enter a tare weight (such as the weight of a wheelchair, shoes,
etc): press MENU (1) and select option 02-Tare Weight or press TARE (9). If there is no weight
on the scale platform (value displayed is zero and there is no tare) and the user presses the
TARE button (9), the Tare Weight window appears and prompts the user to enter the TARE
value and to press ENTER. NOTE: The tare weight must be entered using the following
increments: 4oz, 0.2lb, ¼lb. The value entered will display in minus (-). After the TARE has been
entered, the scale goes back to normal operation. This TARE value is stored in memory until
changed or cleared.
Important: The TARE weight cannot exceed 200 lb.
TARE display
indicates the weight
that has been tared
out
The number that is to be changed will
flash and will move from the left to the
right after the appropriate number was
entered or by using the c key (left)
and the d key (right).
Figure 9. Tare Weight
Automatic Tare
The user can set a tare weight by pressing the TARE button (9) while there is a weight on the
scale platform. The display will come to zero and TARE will be displayed to indicate there is a
tare value in the memory (as displayed in Figure 9 above).
Removing the Tare
Additional pressing of the TARE button will delete the tare value from memory, TARE will
disappear from the display and the scale will resume normal operation.
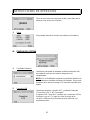
03 DATA MANAGEMENT
The scale manages patient data including patient ID, weight, height, tare and BMI. The value is
stored in memory or transferred to PC. This function is performed by opening a new data file.
OPENING A NEW DATA FILE:
1. Press the ID button (7).
2. Using the keypad, type in the identification number.
3. Press ENTER.
This scale will also calculate Body Mass Index (BMI).
CALCULATING BMI:
1. Place the patient on the scale platform.
2. Press the BMI button (2).

11
OPERATION INSTRUCTIONS
3. The scale will prompt you to enter the patient’s height. Use the keypad to enter the height in
1/4" (1=1/4, 2=1/2, 3=3/4) or 1 cm increments (use inches for weight in lb, cm for kg). Press
ENTER.
4. Display will read the patient’s BMI.
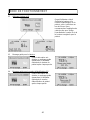
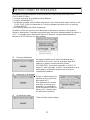
The scale offers you two options to manage your information: to transfer/download the values or
to store them. The first option automatically downloads (transfers) the value to your PC. The
second option stores the value in memory. The maximum capacity of the scale is 270 files of
different data.
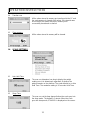
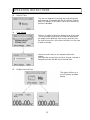
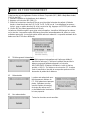
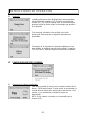
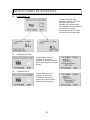
01 Auto Download
Automatic Download is the default option and will transfer the
value to the PC as soon as the patient steps off the scale or
when the user presses the HOLD/RELEASE button if it was
kept in “HOLD”. If no PC is connected, the value is not
transferred and not stored and will be lost after the load is
removed from the scale.
02 Store in memory
The value is stored in memory
for later download to PC.
If the memory is close to full
the user will be warned and
given the option to transfer all
values to the PC or to clear
the memory of all values.
03 Do not store data
All the data will be cleared.

12
OPERATION INSTRUCTIONS
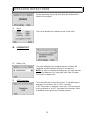
04 Transfer now
All the values stored in memory are transferred to the PC and
the scale memory is cleared of all values. If the transfer was
unsuccessful, the values are kept in memory until
successfully transferred or cleared.
05 Clear memory
All the values stored in memory will be cleared.
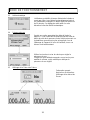
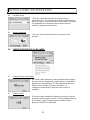
04 SCALE SETTINGS
01 Auto Hold Time
The user can determine how long to display the weight
reading once it is determined, regardless of whether the
patient remains on the platform. The scale defaults to no Auto
Hold Time. The maximum setting is 20 seconds Hold Time.
02 Sleep Time
The user can set the time elapsed before the scale goes into
the sleep mode. The default is 1 minute. When the scale
goes into sleep mode, STANDBY is displayed on the screen.

13
OPERATION INSTRUCTIONS
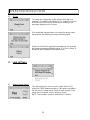
03 Auto Off Time
The user can determine how long the scale will operate
before turning off automatically due to inactivity. Default
time is 10 minutes. If the value is set to zero, the auto off
function is disabled.
04 Tone Volume
There is an option to adjust the beeping tone of the scale.
This tone should sound when the scale has determined
the weight on the platform, when a key is pressed, after
the scale is turned on, at the end of self-test, or in the case
of fault or warning.
Use the c and d keys on the keypad to adjust the
volume.
Whenever the user presses the key to change a volume, a
beep will sound to indicate the set volume level.
05 Display Date and Time
This option will turn on or
turn off the date and time
display.

14
OPERATION INSTRUCTIONS
06 Display Backlight
The user can set the brightness of the backlight.
07 Display Contrast
The user can set the brightness of the LCD.
08 Live Weight
By selecting “Yes” the user can set the Live Weight mode
to deactivate the motion-sensing mode. In the Live Weight
mode the weight displayed will fluctuate with the patient’s
movement; the scale will not lock on quickly to the weight
as is the case in the motion-sensing mode.
Press the REWEIGH button to operate the motion-sensing
mode and to determine the correct weight on the screen.
To revert back to motion-sensing mode, change the Live
Weight setting to “No”.
05 SYSTEM SETTINGS
01 Set Time & Date
The user can set the time and date using the keypad.
To set the time move between hours, minutes and
seconds using the up and down keys cd and enter the
values on the keypad. To jump to the AM/PM line press
the ENTER button once.

15
OPERATION INSTRUCTIONS
Set the date using the up and down keys cd and enter the
values on the keypad.
02 About
This screen displays the software version of the scale.
06 SYSTEM TEST
01 Battery Test
The scale will display the estimated amount of battery life
remaining until the batteries will have to be replaced.
NOTE: In order to complete the battery test, the scale must be
powered by batteries only. Unplug the scale from AC power
source prior to battery test.
02 USB Connection
The scale will test the connection to the PC and will display a
message “Connection is OK” or ”NO Connection”.
If “NO Connection” is displayed, check your USB connections
on the scale and on your PC and retest the connection. Refer
to qualified service personnel if problem persists.

16
OPERATION INSTRUCTIONS
03 UI Test
The scale has a diagnostic routine where it tests the User
Interface (UI) hardware functionality (LCD, keypad). In order to
do this the user has to press all the keys according to the
messages displayed on the screen.
If the requested command was not received or wrong button
was pressed, the following message will be displayed.
If after 10 seconds the requested command was not received,
the following message will be displayed. If “UI Error Failure” is
displayed, refer to qualified service personnel.
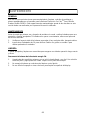
07 USER SETTINGS
01 Retain Entered Values
This option allows the user to use the same values for ID,
height and TARE between weighing. If this option is disabled,
the user has to re-enter these values for each reading. If the
values are not entered, only the weight is stored.
NOTE: These values cannot be retained by ID number.

17
OPERATION INSTRUCTIONS
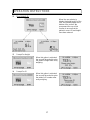
02 Disp Height & ID
When the user selects to
display the height and ID of the
user, it will be displayed at the
bottom of the screen. We
recommend the use of this
function to ensure that the
patient’s correct ID and height
have been entered.
03 Prompt For Height
When this option is activated,
the user will be asked to enter
the patient’s height after every
weighing.
04 Prompt For ID
When this option is activated,
the user will be asked to enter
the patient’s ID number after
every weighing.

18
MAINTENANCE
GENERAL
This section provides instructions for maintenance, cleaning, troubleshooting and operator
replaceable parts for the Pro Plus
TM
Electronic Wheelchair Scale Model 2650KL. Maintenance
operations other than those described in this section should be performed by qualified service
personnel.
MAINTENANCE
Before first use and after periods of non-use, check the scale for proper operation and function.
If the scale does not operate correctly, refer to qualified service personnel.
1. Check overall appearance of the total scale for any obvious damage, wear and tear.
2. Inspect AC adapter for cord cracking or fraying or for broken or bent prongs.
CLEANING
Proper care and cleaning is essential to ensure a long life of accurate and effective operation.
Disconnect the scale from the AC power source.
1. Clean all external surfaces with a clean damp cloth or tissue. Mild soap and water solution
may be used. Dry with a clean soft cloth.
2. Do not immerse the scale into cleaning or other liquid solution.
3. Do not use Isopropyl Alcohol or other solutions to clean the display surface.

19
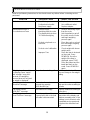
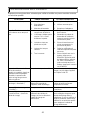
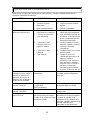
TROUBLESHOOTING
Refer to the following instructions to check and correct any failure before contacting service
personnel.
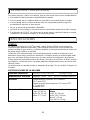
SYMPTOM POSSIBLE CAUSE CORRECTIVE ACTION
Scale does not turn on 1. Dead Battery
2. Faulty electrical outlet
3. Bad power supply
1. Replace batteries
2. Use a different outlet
3. Replace adapter
Questionable weight or
the scale does not zero
1. External object
interfering with the scale
1. Remove interfering object
from the scale
2. The display did not show
”0.0” before weighing
2. Ask the patient to get off
the scale, zero the scale
and begin weighing
process again
3. Scale is not placed on a
level floor
3. Place the scale on a level
floor and begin weighing
process again
4. Scale is out of calibration 4. Check weight with known
weight value
5. Improper Tare 5. Place the item to be tared
on the scale. Press
REWEIGH. Once the
weight of the item is
displayed, press TARE.
Place the patient and the
tared item back on the
scale. Press REWEIGH
again.
Weighing is performed but
the display shows “weigh”
and “reweigh” every few
seconds; the weighing
process takes too long and
no weight is displayed.
The patient is not sitting still Ask the patient to be still or
you can change to live weight
setting
The display shows
“Overload” message
The load on the scale
exceeds the capacity
(1000 lbs/450 kgs)
Remove the excess weight
and use the scale according to
its limits
The display shows
“LOW BAT” message
The batteries are empty Replace batteries according to
instructions
The display shows
“Load Cell Error” message
There is a problem with one
or more load cells or the load
cell cable is disconnected.
Check load cell cable
connection at the display and
platform assembly ports. If the
problem is not corrected, refer
to qualified service personnel
to replace the defective load
cell
La page est en cours de chargement...
La page est en cours de chargement...
La page est en cours de chargement...
La page est en cours de chargement...
La page est en cours de chargement...
La page est en cours de chargement...
La page est en cours de chargement...
La page est en cours de chargement...
La page est en cours de chargement...
La page est en cours de chargement...
La page est en cours de chargement...
La page est en cours de chargement...
La page est en cours de chargement...
La page est en cours de chargement...
La page est en cours de chargement...
La page est en cours de chargement...
La page est en cours de chargement...
La page est en cours de chargement...
La page est en cours de chargement...
La page est en cours de chargement...
La page est en cours de chargement...
La page est en cours de chargement...
La page est en cours de chargement...
La page est en cours de chargement...
La page est en cours de chargement...
La page est en cours de chargement...
La page est en cours de chargement...
La page est en cours de chargement...
La page est en cours de chargement...
La page est en cours de chargement...
La page est en cours de chargement...
La page est en cours de chargement...
La page est en cours de chargement...
La page est en cours de chargement...
La page est en cours de chargement...
La page est en cours de chargement...
La page est en cours de chargement...
La page est en cours de chargement...
La page est en cours de chargement...
La page est en cours de chargement...
La page est en cours de chargement...
La page est en cours de chargement...
La page est en cours de chargement...
La page est en cours de chargement...
La page est en cours de chargement...
La page est en cours de chargement...
La page est en cours de chargement...
La page est en cours de chargement...
La page est en cours de chargement...
La page est en cours de chargement...
La page est en cours de chargement...
-
 1
1
-
 2
2
-
 3
3
-
 4
4
-
 5
5
-
 6
6
-
 7
7
-
 8
8
-
 9
9
-
 10
10
-
 11
11
-
 12
12
-
 13
13
-
 14
14
-
 15
15
-
 16
16
-
 17
17
-
 18
18
-
 19
19
-
 20
20
-
 21
21
-
 22
22
-
 23
23
-
 24
24
-
 25
25
-
 26
26
-
 27
27
-
 28
28
-
 29
29
-
 30
30
-
 31
31
-
 32
32
-
 33
33
-
 34
34
-
 35
35
-
 36
36
-
 37
37
-
 38
38
-
 39
39
-
 40
40
-
 41
41
-
 42
42
-
 43
43
-
 44
44
-
 45
45
-
 46
46
-
 47
47
-
 48
48
-
 49
49
-
 50
50
-
 51
51
-
 52
52
-
 53
53
-
 54
54
-
 55
55
-
 56
56
-
 57
57
-
 58
58
-
 59
59
-
 60
60
-
 61
61
-
 62
62
-
 63
63
-
 64
64
-
 65
65
-
 66
66
-
 67
67
-
 68
68
-
 69
69
-
 70
70
-
 71
71


Health O Meter 2650KL Manuel utilisateur
- Catégorie
- Balances de cuisine
- Taper
- Manuel utilisateur
- Ce manuel convient également à
dans d''autres langues
- English: Health O Meter 2650KL User manual
- español: Health O Meter 2650KL Manual de usuario
Documents connexes
-
Health O Meter Scale 2600KL Manuel utilisateur
-
-
-
-
-
-
-
Health O Meter 160KG Manuel utilisateur
-
-
Health O Meter 498KL Manuel utilisateur
Autres documents
-
Dymo SP5 Manuel utilisateur
-
-
Welch Allyn 5002-XX-X Directions For Use Manual
-
Detecto 6550 Mode d'emploi
-
Seca 654 Manuel utilisateur
-
-
Soehnle 7710 Manuel utilisateur
-
-
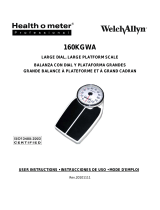 Welch Allyn 160KGWA User Instructions
-
Sunbeam Freightmaster 400 78625-00 Manuel utilisateur
