Remington HT3218A, HT4022A Manuel utilisateur
- Catégorie
- Taille-haies électriques
- Taper
- Manuel utilisateur
Ce manuel convient également à

DUAL-ACTION
ELECTRIC HEDGE TRIMMER
OWNER’S MANUAL
®

118036

118036
Important Safety Information 1
Product Identification 3
Trimmer Operation 4
Extension Cords . . . . . . . . . . . . . . . . . . . . . . . . . . . . . 4
Starting the Hedge Trimmer . . . . . . . . . . . . . . . . . . . . . . . 5
Trimming a Hedge . . . . . . . . . . . . . . . . . . . . . . . . . . . . 6
Trimmer Maintenance 7
Troubleshooting 8
Warranty Information 9

118036
ank you for purchasing this Remington® Dual-action Electric Hedge Trimmer.
We are proud to offer this quality product to assist you in keeping your property neat
and well-groomed.
is owner’s manual provides complete instructions for safely assembling, operating,
and maintaining your hedge trimmer. Read and save these instructions. Refer to this
manual each time before using your hedge trimmer.
For easy reference, record the information from the carton and Remington® name-
plate label located on the tool.
If you have a question or problem,
CALL TOLL FREE 1-800-858-8501
or visit www.desatech.com

118036
SAFETY
WARNINGS
1. Avoid Dangerous Environments
• Do not operate trimmer in rain or
in damp or wet locations.
• Do not operate trimmer while
under the influence of alcohol,
medications, or drugs.
• Do not operate trimmer when you
are tired.
• Do not operate trimmer while
standing on a ladder or in a tree.
• Do not operate trimmer if it is
damaged or not securely and fully
assembled.
2. Keep children away. Keep all bystand-
ers a safe distance from work area.
3. Do not use trimmer for any job except
that for which it is intended.
4. Only well instructed adults should
operate trimmer. Never allow children
to operate trimmer.
5. Dress properly when operating trim-
mer.
• Do not wear loose clothing or jew-
elry that can get caught in the mov-
ing blades or parts of the trimmer.
• Always wear rubber gloves and
substantial foot wear when work-
ing outside.
• Always wear protective hair cover-
ing to contain long hair.
• Always wear a face or dust mask if
operation is dusty.
6. Always wear eye protection that
meets or exceeds the requirements of
ANSI Z87.1.
7. Wear long pants and shoes when
operating this tool.
9. To reduce the risk of electric shock,
the trimmer has a polarized plug (one
blade is wider than the other) and will
require the use of a polarized exten-
sion cord. e trimmer’s plug will fit
into a polarized extension cord only
one way. If the plug does not fit fully
into the extension cord, reverse the
plug. If the plug still does not fit,
obtain a correct polarized extension
cord. A polarized extension cord will
require the use of a polarized wall out-
let. is plug will fit into the polarized
wall outlet only one way. If the plug
does not fit fully into the wall outlet,
reverse the plug. If the plug still does
not fit, contact a qualified electrician
to install the proper wall outlet. Do
not change the trimmer plug, exten-
sion cord receptacle, or extension cord
plug in any way.
10.
Provide Ground Fault Circuit Inter-
rupter (GFCI) protection on the
circuit or outlet to be used for trimmer.
You may use receptacles with built-in
GFCI protection for this safety mea-
sure.
11. Do not operate trimmer near electric
power lines, telephone, or cable lines.
Keep trimmer at least 10 feet away
from any power lines or cables.
8. Make sure your extension cord is in
good condition. When using an ex-
tension cord, be sure to use one heavy
enough to carry the current your
trimmer will draw. An undersized
extension cord will cause a drop in
line voltage resulting in loss of power
and overheating.
e table below shows the correct
size extension cord to use depend-
ing on cord length and nameplate
ampere rating. If in doubt, use the
next larger gauge cord. e smaller
the gauge number, the larger the cord.
To reduce the risk of disconnection
of trimmer from the extension cord
during operation, use the cord hitch
described in this manual.
25 feet
50 feet
100 feet
150 feet
18 AWG
16 AWG
16 AWG
14 AWG
READ ALL INSTRUCTIONS BEFORE
OPERATING TRIMMER.

118036
1. Maintain trimmer with care.
• Keep cutting edge sharp and clean
for best performance and to reduce
the risk of injury.
• Follow instruction for lubricating
•
Inspect trimmer cord periodically,
and if damaged, have it repaired by
a qualified service facility.
• Inspect extension cords periodically
and replace if damaged.
• If trimmer is not working properly,
has been dropped, damaged, left
outdoors, or dropped into water,
have it repaired by a qualified ser-
vice center.
• Keep handles dry, clean, and free
from oil and grease.
2. Check damaged parts.
• If a part is damaged, carefully check
the damaged part before using the
trimmer. Make sure the part will
operate properly and perform its
intended function.
• Check for alignment of moving
parts, binding of moving parts,
breakage of parts, mounting, and
any other condition that may affect
its operation.
• A guard or other part that is dam-
aged should be properly repaired
or replaced by an qualified service
center unless indicated elsewhere in
this manual.
3. Servicing of Double-Insulated
Tools:
• In a double-insulated tool, two
systems of insulation are provided
instead of grounding. No ground-
ing means is provided on a double-
insulated tool, nor should a means
for grounding be added to the tool.
Servicing a double-insulated tool
requires extreme care and knowl-
edge of the system, and should
be done only by qualified service
personnel. Replacement parts for
a double-insulated tool must be
identical to the parts they replace.
4. Store idle trimmer indoors. When not
in use, store trimmer and extension
cord indoors in a dry location. Store
trimmer above the reach of children
or in a locked area out of the reach of
children.
is manual is your guide to safe and proper
operation of the trimmer.
SAVE THESE
INSTRUCTIONS.
1. Stay alert. Watch what you are doing.
Use common sense.
2.
Be aware of extension cord while operat-
ing trimmer. Be careful not to trip over
extension cord. Keep extension cord
away from cutter blades at all times.
3. Avoid unintentional starting. Do not
carry plugged-in trimmer with finger
on switch. Be sure switch is OFF
when plugging in trimmer.
4. Do not overreach. Keep proper foot-
ing and balance at all times when
operating trimmer.
5. Disconnect the trimmer from the
power supply
• when not in use
• before servicing
• when clearing jammed material
from blades
• when moving from one worksite to
another
6. Do not force trimmer. It will do the
job better and with less likelihood of
a risk of injury at the rate for which
it was designed.
7. Do not abuse power cord. Never carry
trimmer by power cord. Never yank
cord to disconnect from receptacle.
Keep power cord from heat, oil, and
sharp edges.
8. Before starting trimmer, make sure
blades are not touching anything.

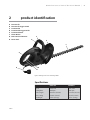
118036
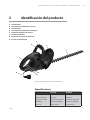
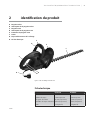
Input
Cutting Rate
Blade Length
Max. Cutting
Net Weight
120V, 3.2A
3500 spm
18 inches (45.7cm)
3/4 inch (19mm)
6.2 lbs. (2.8 Kg)
120V, 4.0A
3500 spm
22 inches (55.9cm)
3/4 inch (19mm)
6.5 lbs. (2.9 Kg)
Figure 2-1: Remington® dual-action electric hedge trimmer

118036
25 feet
50 feet
100 feet
150 feet
18 AWG
16 AWG
16 AWG
14 AWG
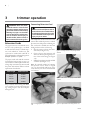
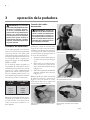
Figure 3-3: Pull extension cord loop tight around molded
cord hitch
Figure 3-4: Optional method of retaining extension cord
Figure 3-2: Inserting extension cord loop through bottom
of handle
Figure 3-1: Plugging trimmer power cord into extension
cord
Safety
Warnings
Use proper extension cord with this trim-
mer. Use only a polarized (i.e., one blade
is wider than the other), UL listed exten-
sion cord marked for outdoor use. e
cord must be marked with suffix W or
W-A following the cord type designation.
Example: SJTW-A or SJTW.
Use proper sized cord with this trimmer.
Cord must be heavy enough to carry cur-
rent needed. An undersized cord will cause
voltage drop at trimmer. e trimmer will
lose power and overheat. Follow cord size
requirements listed below.
Keep cord away from cutting area. Make
sure cord does not catch on branches dur-
ing cutting. Inspect cord often. Replace
damaged cords.
e trimmer has a built-in extension cord
retainer. is cord hitch prevents accidental
disconnection of the power cord during use.
e cord hitch is molded into the lower
hand guard area of the tool housing.
1. Plug the power cord into the exten-
sion cord (see Figure 3-1).
2. Create a loop in the extension cord
and insert the loop through the bot-
tom of the tool housing (see Figure
3-2).
3. Pull the loop tight around the molded
cord hitch (see Figure 3-3).
Note: An optional method of retaining
the extension cord is shown in Figure
3-4. Use this method with larger-gauge
cords that may not fit into the extension
cord retainer.

118036
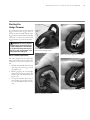
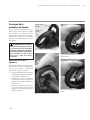
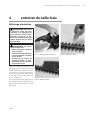
As a safety feature, this trimmer has dual
trigger switches. One trigger switch is
located on the rear handle and the other
trigger switch is located on the front handle
(see Figure 3-5). You must squeeze both
trigger switches to operate the trimmer.
is tool is designed to trim and shape
hedges and shrubs with ease. Follow the
steps below to start and stop the trim-
mer.
1. Hold the front handle with one hand,
squeezing the front trigger switch
(see Figure 3-6).
2. While gripping the rear handle,
squeeze the rear trigger switch. e
trimmer will start immediately (see
Figure 3-7).
3. To stop the trimmer, release one or
both of the trigger switches (see Fig-
ure 3-8). e trimmer will coast to a
stop.
Figure 3-5: Front and rear trigger switches
Figure 3-6: Positioning hand on front handle
Figure 3-7: Squeezing rear trigger switch to start trimmer
Figure 3-8: Releasing trigger switch to stop trimmer
Front Trigger Switch
Rear Trigger
Switch

118036
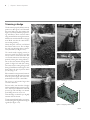
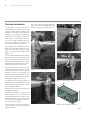
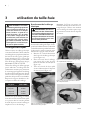
Use the trimmer properly. Always wear eye
protection, rubber gloves, and substantial
foot wear while using the trimmer (see
Figure 3-9). Always maintain proper foot-
ing and balance. Never overreach when
using trimmer. Before starting the trimmer,
hold the unit with both hands on the grip
areas. Make sure that the cutter blade is
not touching anything.
Always keep the extension cord behind
the trimmer when in use. Do not drape
the cord over the hedge where it may be
cut by the blades (see Figure 3-10).
Use smooth steady sweeping motions to
trim new growth (see Figure 3-11). Do
not try to cut too much at one time. is
can cause the trimmer to slow down or get
jammed, reducing the cutting efficiency.
Do not force the trimmer through dense
growth. A slight back and forth sawing
action may ease the cutting of larger, more
dense growth. If the trimmer begins to slow
down, reduce the rate of speed at which
you are trying to cut.
If the trimmer becomes jammed, immedi-
ately turn trimmer off. Disconnect trimmer
from the power supply and remove the
jammed debris from the cutter blades.
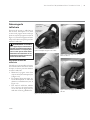
Do not try to cut branches larger than
3/4 inch in diameter.
For best results, trim the sides of hedges
with an upward sweeping motion (see Fig-
ure 3-12). Cut from the bottom and work
your way up. is will keep cut material
from falling into areas not yet cut.
Trim the hedges so that the top is slightly
narrower than the bottom.
To trim extremely level hedges, use a string
stretched along the length of the hedge as
a guide (See Figure 3-13).
Figure 3-9: Proper clothing, stance and grip
Figure 3-10: Protecting extension cord
Figure 3-11: Trimming new growth
Figure 3-12: Trimming sides of hedges
Figure 3-13: Using string to make level cuts

118036
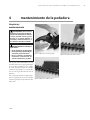
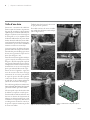
Use a soft cloth dampened with a mild
soap and water mixture to wipe trimmer
housing. Use a stiff brush to clean cutter
blades, then wipe with a cloth. Do not spray
or pour water directly onto trimmer.
Once the trimmer is cleaned, apply a light
coat of oil to the cutter blades to prevent
rust and provide lubrication.
Figure 4-1: Cleaning trimmer housing
Figure 4-2: Cleaning cutter blades
Figure 4-3: Oiling cutter blades

118036
Note: For additional help, visit our
technical ser vice web site at
You may have further questions about
assembling, operating, or maintain-
ing this hedge trimmer. If so, you can
visit our Technical Service web site at
www.desatech.com or contact our
Technical Service Department at 1-800-
858-8501 (English only). You may also
write to:
DESA Specialty Products™
ATTN: Technical Service Specialty
Products
P.O. Box 90004
Bowling Green, KY 42102-9004
When contacting DESA Specialty Prod-
ucts™, have ready
• Your Name
• Your Address
• Your Phone Number
• Model Number of Product
• Date of Purchase (include copy of
receipt for written requests)
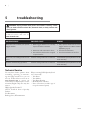
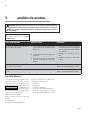
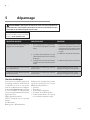
Motor does not run when you squeeze
trigger switches
1. Both trigger switches are not fully
depressed at the same time
2. Extension cord connection is loose
3. Household circuit breaker is tripped
or open line fuse
1. Fully squeeze both front and rear
trigger switches (see Basic Trimmer
Operation, page 5)
2. Check cord connections
3. Check circuit breaker or line fuse
Motor runs, but cutting blades do not
move
Trimmer damaged. Do not use trimmer Contact DESA Specialty Products™ if still
under warranty
Trimmer smokes during operation Trimmer damaged. Do not use trimmer Contact DESA Specialty Products™ if still
under warranty

118036
REMINGTON® DUAL-ACTION ELECTRIC HEDGE TRIMMER LIMITED WARRANTY
Always specify model number when contacting the factory.
We reserve the right to amend these specifications at any time without notice. e only warranty applicable is our standard written warranty.
We make no other warranty, expressed or implied.
DESA Specialty Products™ warrants this Dual-action Electric Hedge Trimmer and any parts thereof, to be free from defects in material
and workmanship for two years (90 days for reconditioned unit) from the date of first purchase from an authorized dealer, provided that
the product has been properly maintained and operated in accordance with all applicable instructions. is warranty is extended only to the
original retail purchaser. e bill of sales or proof of purchase must be presented at the time a claim is made under this warranty.
is warranty does not cover commercial, industrial, or rental usage, nor does it apply to parts that are not in original condition because of
normal wear and tear, or parts that fail or become damaged as a result of misuse, accident, lack of proper maintenance, tampering, or altera-
tion. Travel, handling, transportation, and incidental costs associated with warranty repairs are not reimbursable under this warranty and are
the responsibility of the owner.
To the full extent allowed by the law of the jurisdiction that governs the sale of the product, this express warranty excludes any and all other
expressed warranties and limits the duration of any and all implied warranties, including warranties of merchantability and fitness for a
particular purpose to two years form the date of first purchase, and DESA Specialty Products’™ liability is hereby limited to the purchase
price of the product and DESA Specialty Products™ shall not be liable for any other damages whatsoever including indirect, incidental, or
consequential damages.
Some states do not allow limitation of how long an implied warranty lasts or an exclusion or limitation of incidental or consequential dam-
ages, so the above limitation of damages may not apply to you.
is warranty provides the original purchaser with specific rights. For information regarding those rights, please consult the applicable state
laws.
P.O. Box 90004
Bowling Green, KY 42102-9004
www.desatech.com

118036

PODADORA ELÉCTRICA DE BORDES
DE DOBLE ACCIÓN
MANUAL DEL PROPIETARIO
®

118036

118036
Importante información sobre la seguridad 1
Identificación del producto 3
Operación de la podadora 4
Cordones de extensión . . . . . . . . . . . . . . . . . . . . . . . . . . 4
Arranque de la podadora de bordes . . . . . . . . . . . . . . . . . . . . 5
Recorte de un borde . . . . . . . . . . . . . . . . . . . . . . . . . . . 6
Mantenimiento de la podadora 7
Análisis de averías 8
Información sobre la garantía 9

118036
Muchas gracias por comprar esta Podadora Remington
®
eléctrica de bordes de doble
acción.
Tenemos el orgullo de ofrecerle este producto de calidad para ayudarle a mantener
su establecimiento limpio y bien mantenido.
Este manual del propietario ofrece completas instrucciones para ensamblar, operar y
mantener en forma segura su podadora de bordes. Lea y guarde estas instrucciones.
Consulte este manual cada vez que use su podadora de bordes.
Para una fácil referencia, registre la información del cartón y de la etiqueta sobre la
placa de Remington
®
colocada en la herramienta.
Si tiene alguna pregunta o problema
LLAME A LA LÍNEA GRATIS
1-800-858-8501 (sólo inglés)
o visite www.desatech.com

118036
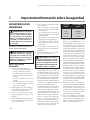
ADVERTENCIAS DE
SEGURIDAD
1. Evite los ambientes peligrosos
• No use la podadora en la lluvia o
en lugares húmedos o mojados.
• No use la podadora bajo la influen-
cia del alcohol, de medicamentos o
de drogas.
• No use la podadora cuando está
cansado.
• No use la podadora si está dañada
o si no está ensamblada en forma
segura y por completo.
2. Mantenga lejos a los niños. Mantenga
a todos los espectadores a una distan-
cia segura del área de trabajo.
3. No use la podadora para ningún
trabajo excepto para el que ha sido
diseñado.
4. Sólo los adultos bien instruidos debe-
rían usar la podadora. Nunca permita
que los niños la usen.
5. Vístase en forma apropiada cuando
use la podadora.
• No use ropa floja o joyas que pue-
dan atorarse en las partes movibles
de la podadora.
• Use siempre guantes de caucho y
zapatos apropiados cuando trabaje
a la intemperie.
• Use siempre una cobertura protectora
del pelo para cubrir el pelo largo.
• Use siempre una máscara facial o
contra el polvo si la usa en un sitio
polvoriento.
6. Use siempre protección ocular que
cumpla o exceda con los requisitos de
ANSI Z87.1.
7. Use pantalones largos y zapatos cuan-
do use esta herramienta.
9. Para reducir el riesgo de sacudida
eléctrica, esta podadora tiene un en-
chufe polarizado (la una clavija es más
ancha que la otra) y se necesitará usar
un cordón de extensión polarizado. El
enchufe de la podadora encajará en el
cordón de extensión polarizado sólo
de una forma. Si el enchufe no encaja
completamente en el cordón de exten-
sión, invierta el enchufe. Si aún así el
enchufe no encaja, consiga un cordón
de extensión polarizado. Un cordón de
extensión polarizado requerirá de un
tomacorriente de pared polarizado. Este
enchufe encajará en el tomacorriente de
pared polarizado sólo de un modo. Si
el enchufe no encaja completamente en
el tomacorriente de pared, invierta el
enchufe. Si aún así no encaja, póngase
en contacto con un electricista califi-
cado para que instale el tomacorriente
de pared apropiado. No haga ninguna
clase de cambios ni en el enchufe de la
podadora, ni en el cordón de extensión
ni en el enchufe del cordón.
10. Proporcione protección mediante un
cortacircuito por falla a tierra (GFCI)
intercalado ya sea en el circuito o en
el tomacorriente que va ha usar para la
podadora. Puede usar tomacorrientes
con protección GFCI incorporada
para este medio de seguridad.
11. No use la podadora cerca de líneas
eléctricas de alimentación, teléfonos
o líneas de cables. Manténgala por lo
menos a 10 pies de distancia de las
líneas o cables de alimentación.
8.
Asegúrese que su cordón de extensión
esté en buenas condiciones. Cuando use
un cordón de extensión, esté seguro de
usar uno del calibre suficiente para que
pueda transportar la corriente absorbi-
da por su podadora eléctrica de bordes.
Un cordón de extensión subdimensio-
nado producirá una caída de voltaje en
la línea con la consiguiente pérdida de
potencia y sobrecalentamiento.
La tabla de abajo muestra el tamaño
correcto del cordón de extensión a
usarse según la longitud del cordón y
los amperios nominales de la placa de
datos. Si hay duda use un cordón del
calibre inmediato superior. Mientras
menor es el número del calibre más
grueso es el cordón. Para reducir el
riesgo de que la podadora se desco-
necte del cordón de extensión durante
la operación, utilice el enganche del
cordón descrito en este manual.
25 pies
50 pies
100 pies
150 pies
18 AWG
16 AWG
16 AWG
14 AWG
LEA TODAS LAS INSTRUCCIONES AN-
TES DE USAR LA PODADORA.

118036
1. Dé mantenimiento a la podadora con
cuidado.
• Mantenga el borde cortante afilado
y limpio para un mejor rendimiento
y para reducir el riesgo de lesiones.
• Siga las instrucciones para lubrica-
ción.
• Inspeccione periódicamente el
cordón de la podadora, y si está
dañado hágalo reparar en un esta-
blecimiento de servicio calificado.
• Inspeccione periódicamente los
cordones de extensión y cámbielos
si están dañados.
• Si la podadora no funciona correc-
tamente, se ha caído, dañado, se
la ha dejado fuera de casa o se ha
caído en agua, hágala reparar en un
centro de servicio calificado.
• Mantenga las asas secas, limpias y
sin aceite o grasa.
2. Revise las piezas dañadas.
• Si una pieza está dañada, revise con
cuidado la pieza dañada antes de
usar la podadora. Asegúrese que la
pieza funcionará apropiadamente y
realizará el trabajo que debe hacer.
• Revise la alineación de las piezas mo-
vibles, la unión de las piezas movibles,
la rotura de las piezas, el ensamble y
cualquier otra condición que pueda
afectar su funcionamiento.
• Una protección o cualquier otra
pieza que esté dañada debe ser re-
parada apropiadamente o cambiada
por un centro de servicio calificado
a no ser que se indique en alguna
parte de este manual.
3. Prestación de servicio a herramientas
con doble aislamiento.
• En una herramienta con doble
aislamiento se ofrecen dos sistemas
de aislamiento en lugar de conexión
a tierra. En una herramienta con
doble aislamiento no se ofrece
medios de conexión a tierra ni se
deben añadir medios de conexión
a tierra a la herramienta. El prestar
servicio a una herramienta con
doble aislamiento requiere un cui-
dado extremo y conocimiento del
sistema y debe ser hecho sólo por
el personal de servicio calificado.
Las piezas de reemplazo para la
herramienta con doble aislamiento
deben ser idénticas a las piezas que
se reemplazan.
4. Si no la está utilizando guarde la
podadora bajo techo. Cuando no la
use, guarde la sopladora/aspiradora y
el cordón de extensión en un sitio seco
y bajo techo. Guarde la podadora por
arriba del alcance de los niños o en un
lugar bajo llave fuera del alcance de
los niños.
Este manual es su guía para una opera-
ción segura y correcta de su podadora.
GUARDE ESTAS
INSTRUCCIONES
1. Esté alerta. Observe lo que está ha-
ciendo. Use el sentido común.
2. Esté al corriente del cordón de ex-
tensión mientras usa la podadora.
Tenga cuidado de no tropezarse sobre
el cordón de extensión. Mantenga
siempre el cordón de extensión lejos
de las cuchillas cortadoras.
3. Evite un arranque no intencionado. No
transporte la podadora conectada con
el dedo en el interruptor. Asegúrese
que el interruptor esté APAGADO
(OFF) cuando conecte la podadora.
4.
No extienda su cuerpo demasiado. Man-
tenga siempre el correcto punto de apoyo
y equilibrio cuando use la podadora.
5. Desconecte la podadora de la fuente
de alimentación
• cuando no la use
• antes de darle servicio
• cuando quite el material atascado
en las cuchillas
• cuando vaya de un sitio de trabajo
a otro
6.
No fuerce la podadora. Hará un mejor
trabajo y con menos posibilidad de riesgo
a la velocidad para la cual fue diseñada.
7. No abuse del cordón de extensión.
Nunca hale o transporte la podadora
usando el cordón de extensión. Nunca
tire del cordón para desconectarlo del
receptáculo. Mantenga el cordón lejos
del calor, aceite y bordes agudos.
8. Antes de arrancar la podadora asegú-
rese que las cuchillas no estén tocando
nada.
La page est en cours de chargement...
La page est en cours de chargement...
La page est en cours de chargement...
La page est en cours de chargement...
La page est en cours de chargement...
La page est en cours de chargement...
La page est en cours de chargement...
La page est en cours de chargement...
La page est en cours de chargement...
La page est en cours de chargement...
La page est en cours de chargement...
La page est en cours de chargement...
La page est en cours de chargement...
La page est en cours de chargement...
La page est en cours de chargement...
La page est en cours de chargement...
La page est en cours de chargement...
La page est en cours de chargement...
La page est en cours de chargement...
La page est en cours de chargement...
-
 1
1
-
 2
2
-
 3
3
-
 4
4
-
 5
5
-
 6
6
-
 7
7
-
 8
8
-
 9
9
-
 10
10
-
 11
11
-
 12
12
-
 13
13
-
 14
14
-
 15
15
-
 16
16
-
 17
17
-
 18
18
-
 19
19
-
 20
20
-
 21
21
-
 22
22
-
 23
23
-
 24
24
-
 25
25
-
 26
26
-
 27
27
-
 28
28
-
 29
29
-
 30
30
-
 31
31
-
 32
32
-
 33
33
-
 34
34
-
 35
35
-
 36
36
-
 37
37
-
 38
38
-
 39
39
-
 40
40


Remington HT3218A, HT4022A Manuel utilisateur
- Catégorie
- Taille-haies électriques
- Taper
- Manuel utilisateur
- Ce manuel convient également à
dans d''autres langues
Documents connexes
-
Remington HT2516A Manuel utilisateur
-
Desa Axcess 117535-01A Manuel utilisateur
-
Remington Axcess 117535-01A Manuel utilisateur
-
-
-
-

